CSS不透明度
opacity属性指定元素的不透明度/透明度。opacity属性的取值范围为0.0 ~ 1.0。 值越低,越透明:
css
img {
  opacity: 0.5;
}
opacity属性通常与:hover选择器一同使用,这样就可以在鼠标悬停时更改不透明度:

css
img {
  opacity: 0.5;
}

img:hover {
  opacity: 1.0;
}
透明盒
使用opacity属性为元素的背景添加透明度,其所有子元素都继承相同的透明度。这可能会使完全透明的元素内文本难以阅读:

css
div {
  opacity: 0.3;
}
使用RGBA的透明度
如果您不希望对子元素应用不透明度,如上面的例子。请使用RGBA颜色值。下面的例子设置背景色而不是文本的不透明度:

css
div {
  background: rgba(76, 175, 80, 0.3) /* 不透明度为 30% 的绿色背景 */
}
CSS导航栏
易用的导航对于任何网站都很重要。通过使用CSS,您可以将无聊的HTML菜单转换为美观的导航栏。
导航栏基本上就是链接列表,因此使用<ul>和<li>元素会很有意义:
list-style-type:none; - 删除项目符号。导航条不需要列表项标记。
设置margin:0; 和 padding: 0; 删除浏览器的默认设置。
css
ul {
  list-style-type: none;
  margin: 0;
  padding: 0;
}
垂直导航栏
如果想要构建垂直导航栏,还可以在列表中设置<a>元素的样式:
display:block; - 将链接显示为块元素可以使整个链接区域都可以被点击(而不仅仅是文本),还可以指定宽度(如果需要,还可以指定内边距、外边距、高度等)。
width: 60px; - 默认情况下,块元素会占用全部可用宽度。
css
ul {
  list-style-type: none;
  margin: 0;
  padding: 0;
  width: 200px;
  background-color: #f1f1f1;
}

li a {
  display: block;
  color: #000;
  padding: 8px 16px;
  text-decoration: none;
}

/* 鼠标悬停时改变链接颜色 */
li a:hover {
  background-color: #555;
  color: white;
}
活动/当前导航链接
向当前链接添加 "active" 类,以使用户知道他/她在哪个页面上:
css
.active {
  background-color: #4CAF50;
  color: white;
}
居中链接以及添加边框
把text-align:center 添加到<li> 或 <a>,使链接居中。
将border属性添加到<ul>, 在导航栏周围添加边框。如果您还希望在导航栏内添加边框,请为所有<li>元素添加border-bottom,最后一个元素除外:
css
ul {
  border: 1px solid #555;
}

li {
  text-align: center;
  border-bottom: 1px solid #555;
}

li:last-child {
  border-bottom: none;
}
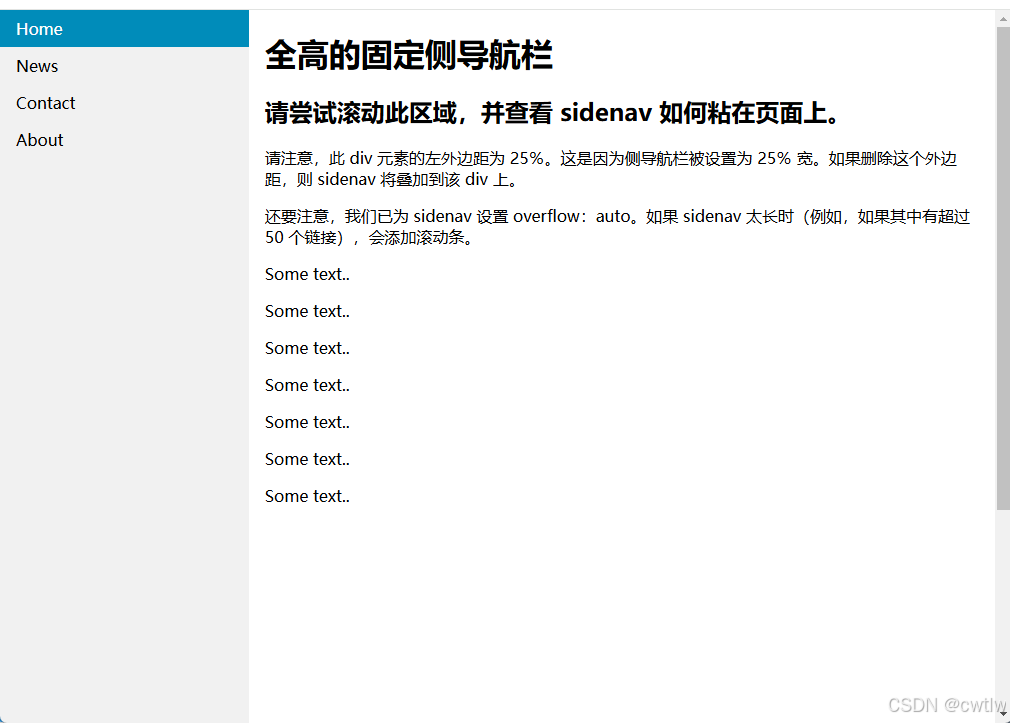
全高固定垂直导航栏
创建全高的"粘性"侧面导航:
css
ul {
  list-style-type: none;
  margin: 0;
  padding: 0;
  width: 25%;
  background-color: #f1f1f1;
  height: 100%; /* 全高 */
  position: fixed; /* 使它产生粘性,即使在滚动时 */
  overflow: auto; /* 如果侧栏的内容太多,则启用滚动条 */
}
css
<!DOCTYPE html>
<html lang="en">
<head>
  <meta charset="UTF-8">
  <meta name="viewport" content="width=device-width, initial-scale=1.0">
  <title>Document</title>
  <style>
    body {
  margin: 0;
}

ul {
  list-style-type: none;
  margin: 0;
  padding: 0;
  width: 25%;
  background-color: #f1f1f1;
  position: fixed;
  height: 100%;
  overflow: auto;
}

li a {
  display: block;
  color: #000;
  padding: 8px 16px;
  text-decoration: none;
}

li a.active {
  background-color:#008CBA;
  color: white;
}

li a:hover:not(.active) {
  background-color: #555;
  color: white;
}
  </style>
</head>
<body>
  <ul>
    <li><a class="active" href="#home">Home</a></li>
    <li><a href="#news">News</a></li>
    <li><a href="#contact">Contact</a></li>
    <li><a href="#about">About</a></li>
  </ul>

  <div style="margin-left:25%;padding:1px 16px;height:1000px;">
    <h1>全高的固定侧导航栏</h1>
    <h2>请尝试滚动此区域,并查看 sidenav 如何粘在页面上。</h2>
    <p>请注意,此 div 元素的左外边距为 25%。这是因为侧导航栏被设置为 25% 宽。如果删除这个外边距,则 sidenav 将叠加到该 div 上。</p>
    <p>还要注意,我们已为 sidenav 设置 overflow:auto。如果 sidenav 太长时(例如,如果其中有超过 50 个链接),会添加滚动条。</p>
    <p>Some text..</p>
    <p>Some text..</p>
    <p>Some text..</p>
    <p>Some text..</p>
    <p>Some text..</p>
    <p>Some text..</p>
    <p>Some text..</p>
  </div>
</body>
</html>
水平导航栏
有两种创建水平导航栏的方法:使用行内或浮动列表项。

行内列表项:
构建水平导航栏的一种方法是,除了之前的标准代码外,还要将<li>元素指定为inline:
display:inline; 默认情况下,<li>元素是块元素。在这里,删除了每个列表项之前和之后的换行符,这样它们才能显示在一行。
css
li {
  display: inline;
}
浮动列表项
创建水平导航栏的另一种方法是浮动<li>元素,并为导航链接规定布局:
- float:left; 使用float使块元素滑动彼此相邻
- display: block; 将链接显示为块元素可以使整个链接区域都可单击(不仅是文本),而且允许我们指定填充(如果需要,还可以指定高度,宽度,边距等)
- padding:8px; 使块元素更加美观。
- background-color: #dddddd;为每个颜色添加灰色背景色
提示:如需全宽的背景色,请将background-color添加到<ul>而不是每个<a>元素:
css
li {
  float: left;
}

a {
  display: block;
  padding: 8px;
  background-color: #dddddd;
}
举例:

css
ul {
  list-style-type: none;
  margin: 0;
  padding: 0;
  overflow: hidden;
  background-color: #333;
}

li {
  float: left;
}

li a {
  display: block;
  color: white;
  text-align: center;
  padding: 14px 16px;
  text-decoration: none;
}

/* 当鼠标悬停时把链接颜色更改为 #111(黑色) */
li a:hover {
  background-color: #111;
}
右对齐链接
通过将列表项向右浮动来右对齐链接(float:right;):

css
<ul>
  <li><a href="#home">Home</a></li>
  <li><a href="#news">News</a></li>
  <li><a href="#contact">Contact</a></li>
  <li style="float:right"><a class="active" href="#about">About</a></li>
</ul>
边框分隔栏
将border-right 属性添加到<li>,以创建链接分隔符:
css
/* 为所有列表项添加灰色右边框,最后一项(last-child)除外 */
li {
  border-right: 1px solid #bbb;
}

li:last-child {
  border-right: none;
}
固定导航栏
css
ul {
  position: fixed;
  top: 0;
  width: 100%;
}
粘性导航栏
为<ul>添加position:sticky; 以创建粘性导航栏。粘性元素会根据滚动位置在相对和固定之间切换。它是相对定位的,直到在视口中遇到给定的偏移位置为止 - 然后将其"粘贴"在适当的位置。
css
ul {
  position: -webkit-sticky; /* Safari */
  position: sticky;
  top: 0;
}
css
<!DOCTYPE html>
<html lang="en">
<head>
<meta charset="UTF-8">
<meta name="viewport" content="width=device-width, initial-scale=1.0">
<style>
body {
font-size: 28px;
}
ul {
list-style-type: none;
margin: 0;
padding: 0;
overflow: hidden;
background-color: #333;
position: -webkit-sticky;
/* Safari */
position: sticky;
top: 0;
}
li {
float: left;
}
li a {
display: block;
color: white;
text-align: center;
padding: 14px 16px;
text-decoration: none;
}
li a:hover {
background-color: #111;
}
.active {
background-color: #4CAF50;
}
</style>
</head>
<body>
<div class="header">
<h1>向下滚动</h1>
<p>请向下滚动以查看粘性效果。</p>
</div>
<ul>
<li><a class="active" href="#home">Home</a></li>
<li><a href="#news">News</a></li>
<li><a href="#contact">Contact</a></li>
</ul>
<h2>粘性导航栏实例</h2>
<p>如果导航栏到了滚动位置,它会<strong>粘</strong>到顶部。</p>
<p><b>注释:</b>Internet Explorer 不支持粘性定位并且 Safari 需要 -webkit- 前缀。</p>
<p>Some text to enable scrolling. Lorem ipsum dolor sit amet, illum definitiones no quo, maluisset concludaturque et
eum, altera fabulas ut quo. Atqui causae gloriatur ius te, id agam omnis evertitur eum. Affert laboramus repudiandae
nec et. Inciderint efficiantur his ad. Eum no molestiae voluptatibus.</p>
</body>
</html>