网络通信原理--套接字
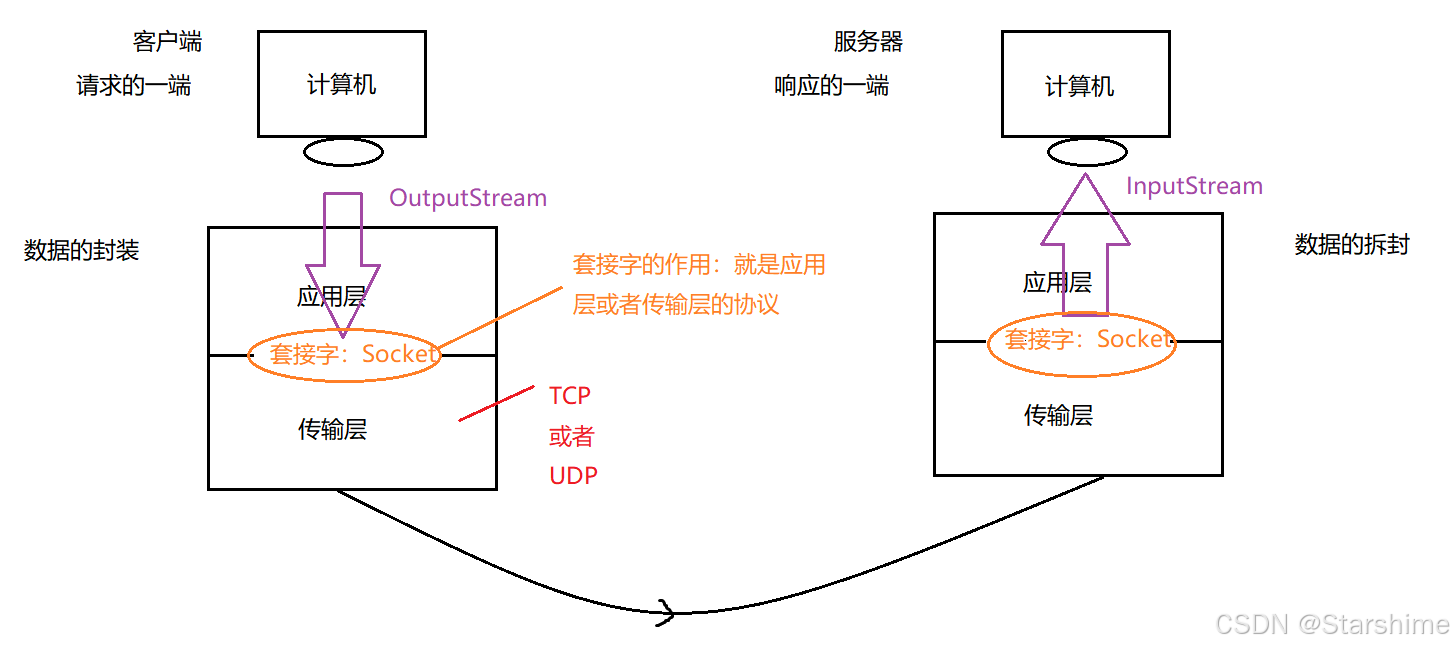
基于TCP的网络编程
功能:模拟网站的登录,客户端录入账号密码,然后服务器端进行验证。
功能分解1:单向通信
功能:客户端发送一句话到服务器:
客户端:
- public class TestClient {//客户端
- //这是一个main方法,是程序的入口:
- public static void main(String\[\] args) throws IOException {
- //1.创建套接字:指定服务器的ip和端口号:
- Socket s = new Socket("192.168.199.217",8888);
- //2.对于程序员来说,向外发送数据 感受 --》利用输出流:
- OutputStream os = s.getOutputStream();
- DataOutputStream dos = new DataOutputStream(os);
- //利用这个OutputStream就可以向外发送数据了,但是没有直接发送String的方法
- //所以我们又在OutputStream外面套了一个处理流:DataOutputStream
- dos.writeUTF("你好");
- //3.关闭流 + 关闭网络资源:
- dos.close();
- os.close();
- s.close();
- }
- }
服务器:
- public class TestServer {//服务器
- //这是一个main方法,是程序的入口:
- public static void main(String\[\] args) throws IOException {
- //1.创建套接字: 指定服务器的端口号
- ServerSocket ss = new ServerSocket(8888);
- //2.等着客户端发来的信息:
- Socket s = ss.accept();//阻塞方法:等待接收客户端的数据,什么时候接收到数据,什么时候程序继续向下执行。
- //accept()返回值为一个Socket,这个Socket其实就是客户端的Socket
- //接到这个Socket以后,客户端和服务器才真正产生了连接,才真正可以通信了
- //3.感受到的操作流:
- InputStream is = s.getInputStream();
- DataInputStream dis = new DataInputStream(is);
- //4.读取客户端发来的数据:
- String str = dis.readUTF();
- System.out.println("客户端发来的数据为:"+str);
- //5.关闭流+关闭网络资源:
- dis.close();
- is.close();
- s.close();
- ss.close();
- }
- }
测试:
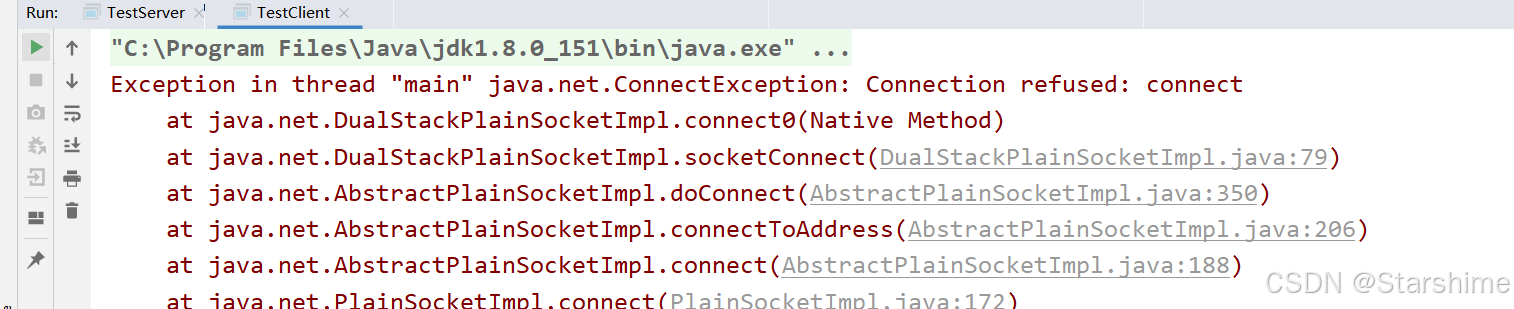
(1)先开启客户端还是先开启服务器:先开服务器,再开启客户端
侧面验证:先开客户端:出错:
功能分解2:双向通信
服务器端:
- package com.star.test02;
- import java.io.*;
- import java.net.ServerSocket;
- import java.net.Socket;
- /**
- * @author : Starshine
- */
- public class TestServer {//服务器
- //这是一个main方法,是程序的入口:
- public static void main(String\[\] args) throws IOException {
- //1.创建套接字: 指定服务器的端口号
- ServerSocket ss = new ServerSocket(8888);
- //2.等着客户端发来的信息:
- Socket s = ss.accept();//阻塞方法:等待接收客户端的数据,什么时候接收到数据,什么时候程序继续向下执行。
- //accept()返回值为一个Socket,这个Socket其实就是客户端的Socket
- //接到这个Socket以后,客户端和服务器才真正产生了连接,才真正可以通信了
- //3.感受到的操作流:
- InputStream is = s.getInputStream();
- DataInputStream dis = new DataInputStream(is);
- //4.读取客户端发来的数据:
- String str = dis.readUTF();
- System.out.println("客户端发来的数据为:"+str);
- //向客户端输出一句话:---》操作流---》输出流
- OutputStream os = s.getOutputStream();
- DataOutputStream dos = new DataOutputStream(os);
- dos.writeUTF("你好,我是服务器端,我接受到你的请求了");
- //5.关闭流+关闭网络资源:
- dos.close();
- os.close();
- dis.close();
- is.close();
- s.close();
- ss.close();
- }
- }
客户端:
- package com.star.test02;
- import java.io.*;
- import java.net.Socket;
- /**
- * @author : Starshine
- */
- public class TestClient {//客户端
- //这是一个main方法,是程序的入口:
- public static void main(String\[\] args) throws IOException {
- //1.创建套接字:指定服务器的ip和端口号:
- Socket s = new Socket("192.168.199.217",8888);
- //2.对于程序员来说,向外发送数据 感受 --》利用输出流:
- OutputStream os = s.getOutputStream();
- DataOutputStream dos = new DataOutputStream(os);
- //利用这个OutputStream就可以向外发送数据了,但是没有直接发送String的方法
- //所以我们又在OutputStream外面套了一个处理流:DataOutputStream
- dos.writeUTF("你好");
- //接收服务器端的回话--》利用输入流:
- InputStream is = s.getInputStream();
- DataInputStream dis = new DataInputStream(is);
- String str = dis.readUTF();
- System.out.println("服务器端对我说:"+str);
- //3.关闭流 + 关闭网络资源:
- dis.close();
- is.close();
- dos.close();
- os.close();
- s.close();
- }
- }
注意:关闭防火墙
功能分解3:对象流传送
封装的User类:
- package com.star.test03;
- import java.io.Serializable;
- /**
- * @author : Starshine
- */
- public class User implements Serializable {
- private static final long serialVersionUID = 9050691344308365540L;
- private String name;
- private String pwd;
- public String getName() {
- return name;
- }
- public void setName(String name) {
- this.name = name;
- }
- public String getPwd() {
- return pwd;
- }
- public void setPwd(String pwd) {
- this.pwd = pwd;
- }
- public User(String name, String pwd) {
- this.name = name;
- this.pwd = pwd;
- }
- }
客户端:
- package com.star.test03;
- import java.io.*;
- import java.net.Socket;
- import java.util.Scanner;
- /**
- * @author : Starshine
- */
- public class TestClient {//客户端
- //这是一个main方法,是程序的入口:
- public static void main(String\[\] args) throws IOException {
- //1.创建套接字:指定服务器的ip和端口号:
- Socket s = new Socket("192.168.199.217",8888);
- //录入用户的账号和密码:
- Scanner sc = new Scanner(System.in);
- System.out.println("请录入您的账号:");
- String name = sc.next();
- System.out.println("请录入您的密码:");
- String pwd = sc.next();
- //将账号和密码封装为一个User的对象:
- User user = new User(name,pwd);
- //2.对于程序员来说,向外发送数据 感受 --》利用输出流:
- OutputStream os = s.getOutputStream();
- ObjectOutputStream oos = new ObjectOutputStream(os);
- oos.writeObject(user);
- //接收服务器端的回话--》利用输入流:
- InputStream is = s.getInputStream();
- DataInputStream dis = new DataInputStream(is);
- boolean b = dis.readBoolean();
- if(b){
- System.out.println("恭喜,登录成功");
- }else{
- System.out.println("对不起,登录失败");
- }
- //3.关闭流 + 关闭网络资源:
- dis.close();
- is.close();
- oos.close();
- os.close();
- s.close();
- }
- }
服务器:
- package com.star.test03;
- import java.io.*;
- import java.net.ServerSocket;
- import java.net.Socket;
- /**
- * @author : Starshine
- */
- public class TestServer {//服务器
- //这是一个main方法,是程序的入口:
- public static void main(String\[\] args) throws IOException, ClassNotFoundException {
- //1.创建套接字: 指定服务器的端口号
- ServerSocket ss = new ServerSocket(8888);
- //2.等着客户端发来的信息:
- Socket s = ss.accept();//阻塞方法:等待接收客户端的数据,什么时候接收到数据,什么时候程序继续向下执行。
- //accept()返回值为一个Socket,这个Socket其实就是客户端的Socket
- //接到这个Socket以后,客户端和服务器才真正产生了连接,才真正可以通信了
- //3.感受到的操作流:
- InputStream is = s.getInputStream();
- ObjectInputStream ois = new ObjectInputStream(is);
- //4.读取客户端发来的数据:
- User user = (User)(ois.readObject());
- //对对象进行验证:
- boolean flag = false;
- if(user.getName().equals("娜娜")&&user.getPwd().equals("123123")){
- flag = true;
- }
- //向客户端输出结果:---》操作流---》输出流
- OutputStream os = s.getOutputStream();
- DataOutputStream dos = new DataOutputStream(os);
- dos.writeBoolean(flag);
- //5.关闭流+关闭网络资源:
- dos.close();
- os.close();
- ois.close();
- is.close();
- s.close();
- ss.close();
- }
- }
功能分解4:加入完整的处理异常方式
服务器端:
- package com.star.test03;
- import java.io.*;
- import java.net.ServerSocket;
- import java.net.Socket;
- /**
- * @author : Starshine
- */
- public class TestServer {//服务器
- //这是一个main方法,是程序的入口:
- public static void main(String\[\] args) {
- //1.创建套接字: 指定服务器的端口号
- ServerSocket ss = null;
- Socket s = null;
- InputStream is = null;
- ObjectInputStream ois = null;
- OutputStream os = null;
- DataOutputStream dos = null;
- try {
- ss = new ServerSocket(8888);
- //2.等着客户端发来的信息:
- s = ss.accept();//阻塞方法:等待接收客户端的数据,什么时候接收到数据,什么时候程序继续向下执行。
- //accept()返回值为一个Socket,这个Socket其实就是客户端的Socket
- //接到这个Socket以后,客户端和服务器才真正产生了连接,才真正可以通信了
- //3.感受到的操作流:
- is = s.getInputStream();
- ois = new ObjectInputStream(is);
- //4.读取客户端发来的数据:
- User user = (User)(ois.readObject());
- //对对象进行验证:
- boolean flag = false;
- if(user.getName().equals("娜娜")&&user.getPwd().equals("123123")){
- flag = true;
- }
- //向客户端输出结果:---》操作流---》输出流
- os = s.getOutputStream();
- dos = new DataOutputStream(os);
- dos.writeBoolean(flag);
- } catch (IOException | ClassNotFoundException e) {
- e.printStackTrace();
- } finally {
- //5.关闭流+关闭网络资源:
- try {
- if(dos!=null){
- dos.close();
- }
- } catch (IOException e) {
- e.printStackTrace();
- }
- try {
- if(os!=null){
- os.close();
- }
- } catch (IOException e) {
- e.printStackTrace();
- }
- try {
- if(ois!=null){
- ois.close();
- }
- } catch (IOException e) {
- e.printStackTrace();
- }
- try {
- if(is!=null){
- is.close();
- }
- } catch (IOException e) {
- e.printStackTrace();
- }
- try {
- if(s!=null){
- s.close();
- }
- } catch (IOException e) {
- e.printStackTrace();
- }
- try {
- if(ss!=null){
- ss.close();
- }
- } catch (IOException e) {
- e.printStackTrace();
- }
- }
- }
- }
客户端:
- package com.star.test03;
- import java.io.*;
- import java.net.Socket;
- import java.util.Scanner;
- /**
- * @author : Starshine
- */
- public class TestClient {//客户端
- //这是一个main方法,是程序的入口:
- public static void main(String\[\] args){
- //1.创建套接字:指定服务器的ip和端口号:
- Socket s = null;
- OutputStream os = null;
- ObjectOutputStream oos = null;
- InputStream is = null;
- DataInputStream dis = null;
- try {
- s = new Socket("192.168.199.217",8888);
- //录入用户的账号和密码:
- Scanner sc = new Scanner(System.in);
- System.out.println("请录入您的账号:");
- String name = sc.next();
- System.out.println("请录入您的密码:");
- String pwd = sc.next();
- //将账号和密码封装为一个User的对象:
- User user = new User(name,pwd);
- //2.对于程序员来说,向外发送数据 感受 --》利用输出流:
- os = s.getOutputStream();
- oos = new ObjectOutputStream(os);
- oos.writeObject(user);
- //接收服务器端的回话--》利用输入流:
- is = s.getInputStream();
- dis = new DataInputStream(is);
- boolean b = dis.readBoolean();
- if(b){
- System.out.println("恭喜,登录成功");
- }else{
- System.out.println("对不起,登录失败");
- }
- } catch (IOException e) {
- e.printStackTrace();
- } finally{
- //3.关闭流 + 关闭网络资源:
- try {
- if(dis!=null){
- dis.close();
- }
- } catch (IOException e) {
- e.printStackTrace();
- }
- try {
- if(is!=null){
- is.close();
- }
- } catch (IOException e) {
- e.printStackTrace();
- }
- try {
- if(oos!=null){
- oos.close();
- }
- } catch (IOException e) {
- e.printStackTrace();
- }
- try {
- if(os!=null){
- os.close();
- }
- } catch (IOException e) {
- e.printStackTrace();
- }
- try {
- if(s!=null){
- s.close();
- }
- } catch (IOException e) {
- e.printStackTrace();
- }
- }
- }
- }
功能分解5:多线程接收用户请求
遗留问题:服务器针对一个请求服务,之后服务器就关闭了(程序自然结束了)
现在需要解决:服务器必须一直在监听 ,一直开着,等待客户端的请求
在当前代码中,客户端不用动了

更改服务器代码:
-
package com.star.test03;
-
import java.io.*;
-
import java.net.Socket;
-
/**
-
* @author : Starshine
-
*/
-
public class ServerThread extends Thread {//线程:专门处理客户端的请求
-
InputStream is = null;
-
ObjectInputStream ois = null;
-
OutputStream os = null;
-
DataOutputStream dos = null;
-
Socket s = null;
-
public ServerThread(Socket s){
-
this.s = s;
-
}
-
@Override
-
public void run() {
-
try{
-
is = s.getInputStream();
-
ois = new ObjectInputStream(is);
-
User user = (User)(ois.readObject());
-
//对对象进行验证:
-
boolean flag = false;
-
if(user.getName().equals("娜娜")&&user.getPwd().equals("123123")){
-
flag = true;
-
}
-
//向客户端输出结果:---》操作流---》输出流
-
os = s.getOutputStream();
-
dos = new DataOutputStream(os);
-
dos.writeBoolean(flag);
-
}catch (IOException | ClassNotFoundException e) {
-
e.printStackTrace();
-
}finally {
-
try {
-
if(dos!=null){
-
dos.close();
-
}
-
} catch (IOException e) {
-
e.printStackTrace();
-
}
-
try {
-
if(os!=null){
-
os.close();
-
}
-
} catch (IOException e) {
-
e.printStackTrace();
-
}
-
try {
-
if(ois!=null){
-
ois.close();
-
}
-
} catch (IOException e) {
-
e.printStackTrace();
-
}
-
try {
-
if(is!=null){
-
is.close();
-
}
-
} catch (IOException e) {
-
e.printStackTrace();
-
}
-
}
-
}
-
}
-
package com.star.test03;
-
import java.io.*;
-
import java.net.ServerSocket;
-
import java.net.Socket;
-
/**
-
* @author : Starshine
-
*/
-
public class TestServer {//服务器
-
//这是一个main方法,是程序的入口:
-
public static void main(String\[\] args) {
-
System.out.println("服务器启动了");
-
//1.创建套接字: 指定服务器的端口号
-
ServerSocket ss = null;
-
Socket s = null;
-
int count = 0;//定义一个计数器,用来计数 客户端的请求
-
try {
-
ss = new ServerSocket(8888);
-
while(true){//加入死循环,服务器一直监听客户端是否发送数据
-
s = ss.accept();//阻塞方法:等待接收客户端的数据,什么时候接收到数据,什么时候程序继续向下执行。
-
//每次过来的客户端的请求 靠 线程处理:
-
new ServerThread(s).start();
-
count++;
-
//输入请求的客户端的信息:
-
System.out.println("当前是第"+count+"个用户访问我们的服务器,对应的用户是:"+s.getInetAddress());
-
}
-
} catch (IOException e) {
-
e.printStackTrace();
-
}
-
}
-
}
基于UDP的网络编程
TCP:
客户端:Socket
程序感受到的 使用流 :输出流
服务器端: ServerSocket --->Socket 程序感受到的 使用流 :输入流
(客户端和服务器端地位不平等。)
UDP:
发送方:DatagramSocket 发送:数据包 DatagramPacket
接收方:DatagramSocket 接收:数据包 DatagramPacket
(发送方和接收方的地址是平等的。)
UDP案例: 完成网站的咨询聊天
功能分解1:单向通信
发送方:
- package com.star.test04;
- import java.io.IOException;
- import java.net.*;
- /**
- * @author : Starshine
- */
- public class TestSend {//发送方:
- //这是一个main方法,是程序的入口:
- public static void main(String\[\] args) throws IOException {
- System.out.println("学生上线。。。");
- //1.准备套接字: 指定发送方的端口号
- DatagramSocket ds = new DatagramSocket(8888);
- //2.准备数据包
- String str = "你好";
- byte\[\] bytes = str.getBytes();
- /*
- 需要四个参数:
- 1.指的是传送数据转为字节数组
- 2.字节数组的长度
- 3.封装接收方的ip
- 4.指定接收方的端口号
- */
- DatagramPacket dp = new DatagramPacket(bytes,bytes.length, InetAddress.getByName("localhost"),9999);
- //发送:
- ds.send(dp);
- //关闭资源
- ds.close();
- }
- }
接收方:
- package com.star.test04;
- import java.io.IOException;
- import java.net.DatagramPacket;
- import java.net.DatagramSocket;
- import java.net.SocketException;
- /**
- * @author : Starshine
- */
- public class TestReceive {//接收方
- //这是一个main方法,是程序的入口:
- public static void main(String\[\] args) throws IOException {
- System.out.println("老师上线了。。");
- //1.创建套接字:指定接收方的端口
- DatagramSocket ds = new DatagramSocket(9999);
- //2.有一个空的数据包,打算用来接收 对方传过来的数据包:
- byte\[\] b = new byte1024;
- DatagramPacket dp = new DatagramPacket(b,b.length);
- //3.接收对方的数据包,然后放入我们的dp数据包中填充
- ds.receive(dp);//接收完以后 dp里面就填充好内容了
- //4.取出数据:
- byte\[\] data = dp.getData();
- String s = new String(data,0,dp.getLength());//dp.getLength()数组包中的有效长度
- System.out.println("学生对我说:"+s);
- //5.关闭资源:
- ds.close();
- }
- }
功能分解2:双向通信
发送方:
- package com.star.test04;
- import java.io.IOException;
- import java.net.*;
- import java.util.Scanner;
- /**
- * @author : Starshine
- */
- public class TestSend {//发送方:
- //这是一个main方法,是程序的入口:
- public static void main(String\[\] args) throws IOException {
- System.out.println("学生上线。。。");
- //1.准备套接字: 指定发送方的端口号
- DatagramSocket ds = new DatagramSocket(8888);
- //2.准备数据包
- Scanner sc = new Scanner(System.in);
- System.out.print("学生:");
- String str = sc.next();
- byte\[\] bytes = str.getBytes();
- /*
- 需要四个参数:
- 1.指的是传送数据转为Z字节数组
- 2.字节数组的长度
- 3.封装接收方的ip
- 4.指定接收方的端口号
- */
- DatagramPacket dp = new DatagramPacket(bytes,bytes.length, InetAddress.getByName("localhost"),9999);
- //发送:
- ds.send(dp);
- //接收老师发送回来的信息:
- byte\[\] b = new byte1024;
- DatagramPacket dp2 = new DatagramPacket(b,b.length);
- ds.receive(dp2);//接收完以后 dp2里面就填充好内容了
- //取出数据:
- byte\[\] data = dp2.getData();
- String s = new String(data,0,dp2.getLength());//dp.getLength()数组包中的有效长度
- System.out.println("老师对我说:"+s);
- //关闭资源
- ds.close();
- }
- }
接收方:
- package com.star.test04;
- import java.io.IOException;
- import java.net.DatagramPacket;
- import java.net.DatagramSocket;
- import java.net.InetAddress;
- import java.net.SocketException;
- import java.util.Scanner;
- /**
- * @author : Starshine
- */
- public class TestReceive {//接收方
- //这是一个main方法,是程序的入口:
- public static void main(String\[\] args) throws IOException {
- System.out.println("老师上线了。。");
- //1.创建套接字:指定接收方的端口
- DatagramSocket ds = new DatagramSocket(9999);
- //2.有一个空的数据包,打算用来接收 对方传过来的数据包:
- byte\[\] b = new byte1024;
- DatagramPacket dp = new DatagramPacket(b,b.length);
- //3.接收对方的数据包,然后放入我们的dp数据包中填充
- ds.receive(dp);//接收完以后 dp里面就填充好内容了
- //4.取出数据:
- byte\[\] data = dp.getData();
- String s = new String(data,0,dp.getLength());//dp.getLength()数组包中的有效长度
- System.out.println("学生对我说:"+s);
- //老师进行回复:
- Scanner sc = new Scanner(System.in);
- System.out.print("老师:");
- String str = sc.next();
- byte\[\] bytes = str.getBytes();
- //封装数据,并且指定学生的ip和端口号
- DatagramPacket dp2 = new DatagramPacket(bytes,bytes.length, InetAddress.getByName("localhost"),8888);
- //发送:
- ds.send(dp2);
- //5.关闭资源:
- ds.close();
- }
- }
功能分解3:加入完整的处理异常方式
发送方:
- package com.star.test04;
- import java.io.IOException;
- import java.net.*;
- import java.util.Scanner;
- /**
- * @author : Starshine
- */
- public class TestSend {//发送方:
- //这是一个main方法,是程序的入口:
- public static void main(String\[\] args) {
- System.out.println("学生上线。。。");
- //1.准备套接字: 指定发送方的端口号
- DatagramSocket ds = null;
- try {
- ds = new DatagramSocket(8888);
- //2.准备数据包
- Scanner sc = new Scanner(System.in);
- System.out.print("学生:");
- String str = sc.next();
- byte\[\] bytes = str.getBytes();
- /*
- 需要四个参数:
- 1.指的是传送数据转为Z字节数组
- 2.字节数组的长度
- 3.封装接收方的ip
- 4.指定接收方的端口号
- */
- DatagramPacket dp = new DatagramPacket(bytes,bytes.length, InetAddress.getByName("localhost"),9999);
- //发送:
- ds.send(dp);
- //接收老师发送回来的信息:
- byte\[\] b = new byte1024;
- DatagramPacket dp2 = new DatagramPacket(b,b.length);
- ds.receive(dp2);//接收完以后 dp2里面就填充好内容了
- //取出数据:
- byte\[\] data = dp2.getData();
- String s = new String(data,0,dp2.getLength());//dp.getLength()数组包中的有效长度
- System.out.println("老师对我说:"+s);
- } catch (SocketException e) {
- e.printStackTrace();
- } catch (UnknownHostException e) {
- e.printStackTrace();
- } catch (IOException e) {
- e.printStackTrace();
- } finally {
- //关闭资源
- ds.close();
- }
- }
- }
接收方:
- package com.star.test04;
- import java.io.IOException;
- import java.net.*;
- import java.util.Scanner;
- /**
- * @author : Starshine
- */
- public class TestReceive {//接收方
- //这是一个main方法,是程序的入口:
- public static void main(String\[\] args){
- System.out.println("老师上线了。。");
- //1.创建套接字:指定接收方的端口
- DatagramSocket ds = null;
- try {
- ds = new DatagramSocket(9999);
- //2.有一个空的数据包,打算用来接收 对方传过来的数据包:
- byte\[\] b = new byte1024;
- DatagramPacket dp = new DatagramPacket(b,b.length);
- //3.接收对方的数据包,然后放入我们的dp数据包中填充
- ds.receive(dp);//接收完以后 dp里面就填充好内容了
- //4.取出数据:
- byte\[\] data = dp.getData();
- String s = new String(data,0,dp.getLength());//dp.getLength()数组包中的有效长度
- System.out.println("学生对我说:"+s);
- //老师进行回复:
- Scanner sc = new Scanner(System.in);
- System.out.print("老师:");
- String str = sc.next();
- byte\[\] bytes = str.getBytes();
- //封装数据,并且指定学生的ip和端口号
- DatagramPacket dp2 = new DatagramPacket(bytes,bytes.length, InetAddress.getByName("localhost"),8888);
- //发送:
- ds.send(dp2);
- } catch (SocketException e) {
- e.printStackTrace();
- } catch (UnknownHostException e) {
- e.printStackTrace();
- } catch (IOException e) {
- e.printStackTrace();
- } finally {
- //5.关闭资源:
- ds.close();
- }
- }
- }
功能分解4:正常通信
发送方:
- package com.star.test04;
- import java.io.IOException;
- import java.net.*;
- import java.util.Scanner;
- /**
- * @author : Starshine
- */
- public class TestSend {//发送方:
- //这是一个main方法,是程序的入口:
- public static void main(String\[\] args) {
- System.out.println("学生上线。。。");
- //1.准备套接字: 指定发送方的端口号
- DatagramSocket ds = null;
- try {
- ds = new DatagramSocket(8888);
- while(true){
- //2.准备数据包
- Scanner sc = new Scanner(System.in);
- System.out.print("学生:");
- String str = sc.next();
- byte\[\] bytes = str.getBytes();
- /*
- 需要四个参数:
- 1.指的是传送数据转为Z字节数组
- 2.字节数组的长度
- 3.封装接收方的ip
- 4.指定接收方的端口号
- */
- DatagramPacket dp = new DatagramPacket(bytes,bytes.length, InetAddress.getByName("localhost"),9999);
- //发送:
- ds.send(dp);
- if(str.equals("byebye")){
- System.out.println("学生下线。。");
- break;
- }
- //接收老师发送回来的信息:
- byte\[\] b = new byte1024;
- DatagramPacket dp2 = new DatagramPacket(b,b.length);
- ds.receive(dp2);//接收完以后 dp2里面就填充好内容了
- //取出数据:
- byte\[\] data = dp2.getData();
- String s = new String(data,0,dp2.getLength());//dp.getLength()数组包中的有效长度
- System.out.println("老师对我说:"+s);
- }
- } catch (SocketException e) {
- e.printStackTrace();
- } catch (UnknownHostException e) {
- e.printStackTrace();
- } catch (IOException e) {
- e.printStackTrace();
- } finally {
- //关闭资源
- ds.close();
- }
- }
- }
接收方:
- package com.star.test04;
- import java.io.IOException;
- import java.net.*;
- import java.util.Scanner;
- /**
- * @author : Starshine
- */
- public class TestReceive {//接收方
- //这是一个main方法,是程序的入口:
- public static void main(String\[\] args){
- System.out.println("老师上线了。。");
- //1.创建套接字:指定接收方的端口
- DatagramSocket ds = null;
- try {
- ds = new DatagramSocket(9999);
- while(true){
- //2.有一个空的数据包,打算用来接收 对方传过来的数据包:
- byte\[\] b = new byte1024;
- DatagramPacket dp = new DatagramPacket(b,b.length);
- //3.接收对方的数据包,然后放入我们的dp数据包中填充
- ds.receive(dp);//接收完以后 dp里面就填充好内容了
- //4.取出数据:
- byte\[\] data = dp.getData();
- String s = new String(data,0,dp.getLength());//dp.getLength()数组包中的有效长度
- System.out.println("学生对我说:"+s);
- if(s.equals("byebye")){
- System.out.println("学生已经下线了,老师也下线。。。");
- break;
- }
- //老师进行回复:
- Scanner sc = new Scanner(System.in);
- System.out.print("老师:");
- String str = sc.next();
- byte\[\] bytes = str.getBytes();
- //封装数据,并且指定学生的ip和端口号
- DatagramPacket dp2 = new DatagramPacket(bytes,bytes.length, InetAddress.getByName("localhost"),8888);
- //发送:
- ds.send(dp2);
- }
- } catch (SocketException e) {
- e.printStackTrace();
- } catch (UnknownHostException e) {
- e.printStackTrace();
- } catch (IOException e) {
- e.printStackTrace();
- } finally {
- //5.关闭资源:
- ds.close();
- }
- }
- }