目录
[五、Java NIO Files](#五、Java NIO Files)
一、基本概述
标准的IO编程接口是面向字节流和字符流的。而NIO是面向通道和缓冲区的,数据总是从通道中读到buffer缓冲区内,或者从buffer写入到通道中。
NIO包含下面几个核心的组件:
- Channels
- Buffers
- Selectors
核心Channels:
- FileChannel (用于文件的数据读写)
- DatagramChannel(用于UDP的数据读写)
- SocketChannel (用于TCP的数据读写)
- ServerSocketChannel (允许我们监听TCP链接请求,每个请求会创建会一个 SocketChannel)
通常来说NIO中的所有IO都是从Channel开始的。Channel和流有点类似。通过Channel,我们即可以从Channel把数据写到Buffer中,也可以把数据冲Buffer写入到Channel
核心Buffer:
- ByteBuffer
- CharBuffer
- DoubleBuffer
- FloatBuffer
- IntBuffer
- LongBuffer
- ShortBuffer
buffer本质上就是一块内存区,可以用来写入数据,并在稍后读取出来。这块内存被NIO Buffer 包裹起来,对外提供一系列的读写方便开发的接口。
选择器(Selectors)
选择器允许单线程操作多个通道。如果你的程序中有大量的链接,同时每个链接的IO带宽不高的话,这个特性将会非常有帮助。比如聊天服务器。
要使用Selector的话,我们必须把Channel注册到Selector上,然后就可以调用Selector的select()方法。这个方法会进入阻塞,直到有一个channel的状态符合条件。当方法返回后,线程可以处理这些事件。
二、Buffer
一个Buffer有三个属性是必须掌握的,分别是:
- capacity容量
- position位置
- limit限制
容量(Capacity)
作为一块内存,buffer有一个固定的大小,叫做capacity容量。也就是最多只能写入容量值得字节,整形等数据。一旦buffer写满了就需要清空已读数据以便下次继续写入新的数据。
位置(Position)
当写入数据到Buffer的时候需要中一个确定的位置开始,默认初始化时这个位置position为0,一旦写入了数据比如一个字节,整形数据,那么position的值就会指向数据之后的一个单元,position最大可以到capacity-1.当从Buffer读取数据时,也需要从一个确定的位置开始。buffer从写入模式变为读取模式时,position会归零,每次读取后,position向后移动。
上限(Limit)
在写模式,limit的含义是我们所能写入的最大数据量。它等同于buffer的容量。一旦切换到读模式,limit则代表我们所能读取的最大数据量,他的值等同于写模式下position的位置。数据读取的上限时buffer中已有的数据,也就是limit的位置(原position所指的位置)。
写数据到Buffer
有两种方法:
- 从Channel中写数据到Buffer
- 手动写数据到Buffer,调用put方法
下面是一个实例,演示从Channel写数据到Buffer:
int bytesRead = inChannel.read(buf);
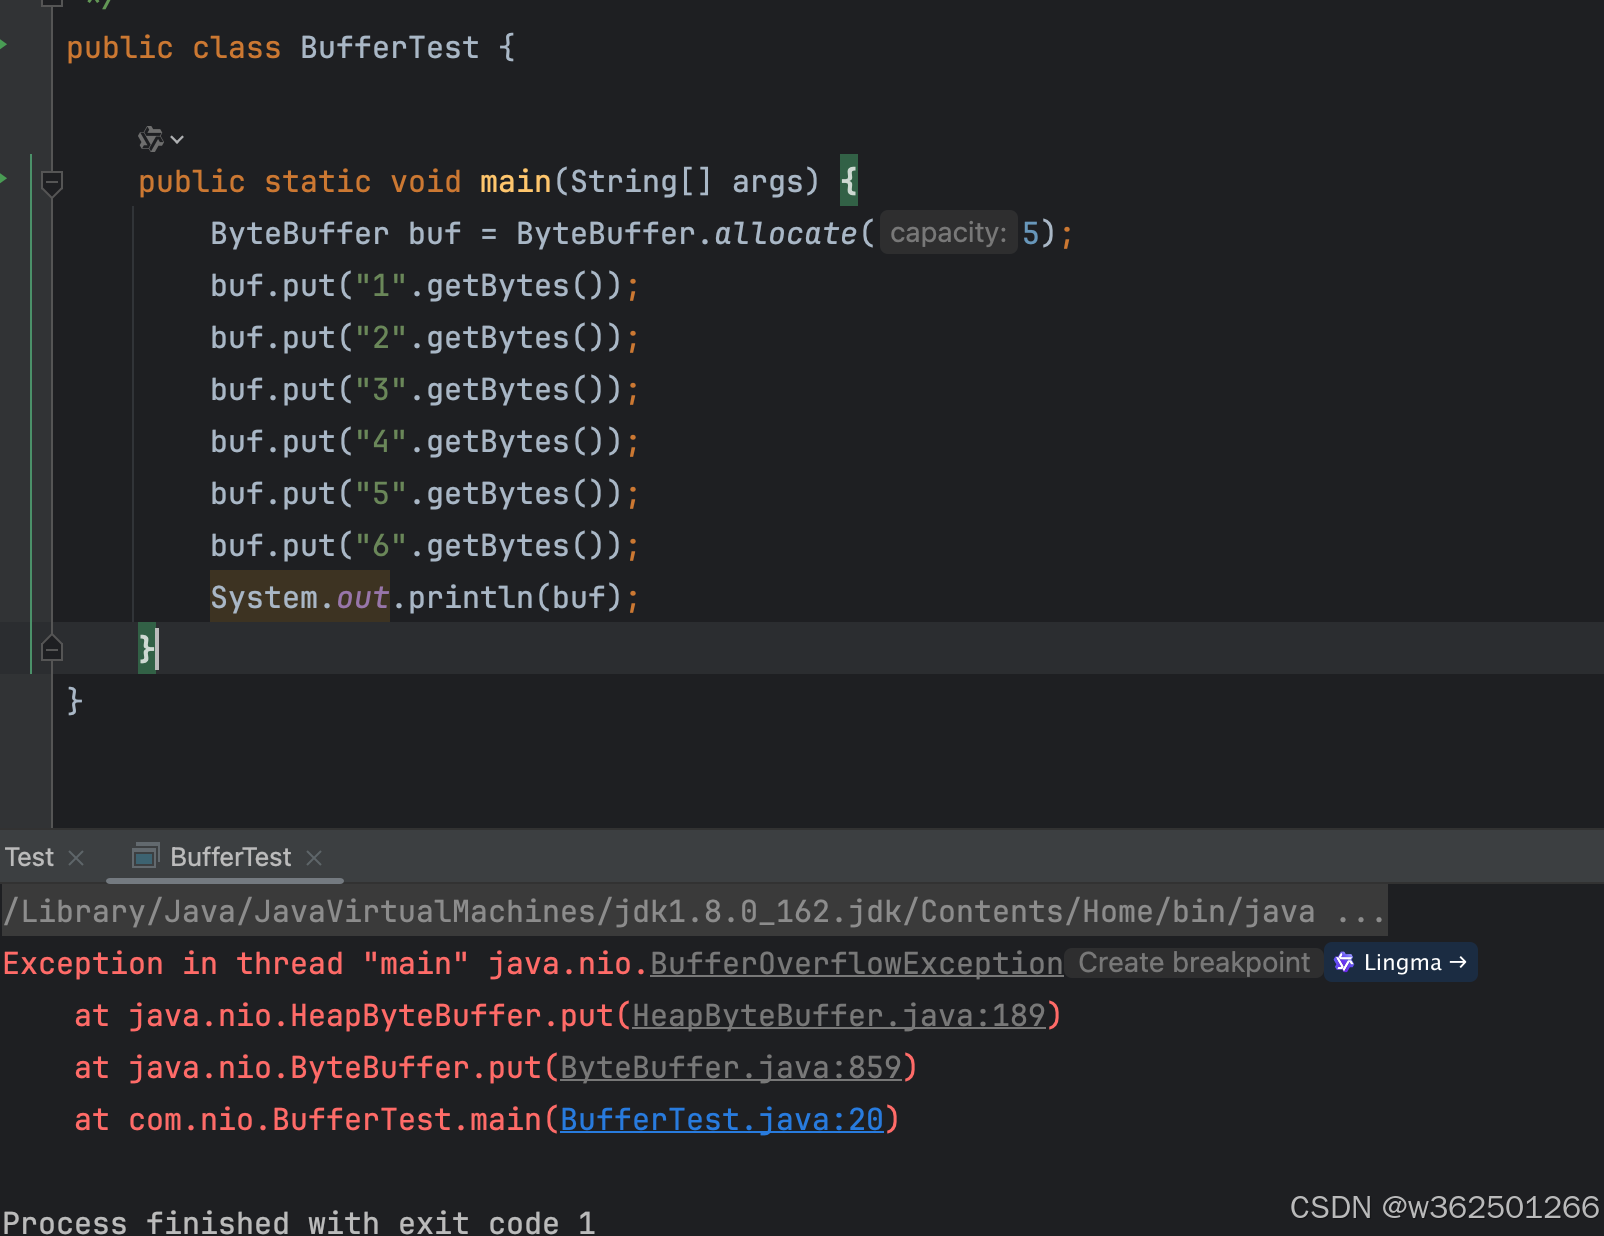
PUT实例:为了获取一个Buffer对象,你必须先分配。每个Buffer实现类都有一个allocate()方法用于分配内存。下面开辟一个5字节大小的buffer,当超出分配的内存时,就会抛出Exception in thread "main" java.nio.BufferOverflowException异常

Buffer读取数据
Buffer读数据也有两种方式。
- 从buffer读数据到channel
- 从buffer直接读取数据,调用get方法
读取数据到channel的例子:
int bytesWritten = inChannel.write(buf);调用get读取数据的例子:
byte aByte = buf.get();
flip方法
flip()方法可以吧Buffer从写模式切换到读模式。调用flip方法会把position归零,并设置limit为之前的position的值。
rewind方法
Buffer.rewind()方法将position置为0,这样我们可以重复读取buffer中的数据。limit保持不变。
clear()、compact()方法
一旦我们从buffer中读取完数据,需要复用buffer为下次写数据做准备。只需要调用clear或compact方法。clear方法会重置position为0,limit为capacity,也就是整个Buffer清空,如果需要保留未读数据,那么可以使用compact。compact和clear的区别就在于对未读数据的处理,是保留这部分数据还是一起清空。
测试实例:
        IntBuffer buf = IntBuffer.allocate(5);
        buf.put(1);
        buf.put(2);
        buf.put(3);
        System.out.println("写入结束,buf值:"+buf);
        buf.flip();
        System.out.println("切换到读模式,buf值:"+buf);
        while (buf.position() < buf.limit()){
            System.out.println("遍历buf所有值:"+buf.get());
        }
        System.out.println("遍历结束,buf值:"+buf);
        while (buf.position() < buf.limit()){
            // 此时读写指针都指向了limit位置,读不到数据了
            System.out.println(buf.get());
        }
        buf.rewind();
        System.out.println("rewind()方法将position置为0,此时buf值: "+buf);
        while (buf.position() < 2){
            System.out.println("我又可以读取了,遍历2条数据:"+buf.get());
        }
        System.out.println("这次buf没读完,buf值:"+buf);
        buf.compact();
        System.out.println("compact保留未读数据,buf值:"+buf);
        buf.put(4);
        buf.put(5);
        System.out.println("buf添加结束,buf值:"+buf);
        buf.flip();
        while (buf.position() < buf.limit()){
            System.out.println("遍历buf值:"+buf.get());
        }
        System.out.println("最终buf情况,buf值:"+buf);
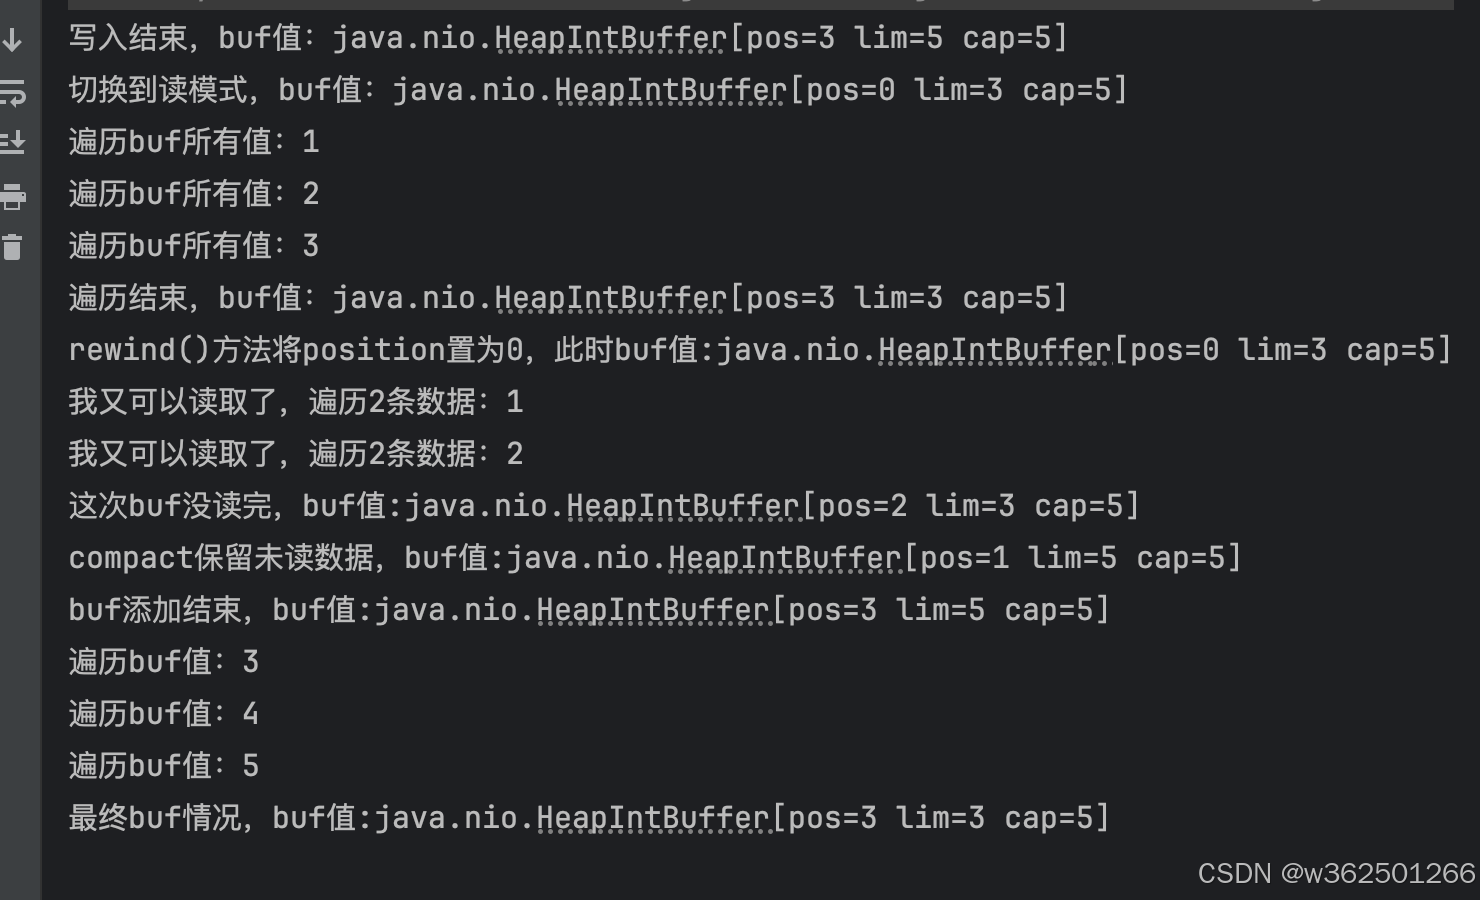
运行结果:

三、channel
Java NIO Channel通道和流非常相似,主要有以下几点区别:
- 通道可以读也可以写,流一般来说是单向的(只能读或者写)。
- 通道可以异步读写。
- 通道总是基于缓冲区Buffer来读写。
正如上面提到的,我们可以从通道中读取数据,写入到buffer;也可以中buffer内读数据,写入到通道中。
channel将buffer中的数据写出来
        // 1.获取文件通道,通过 FileChannel 的静态方法 open() 来获取,获取时需要指定文件路径和文件打开方式
        String fileName = "/Users/wwq/Desktop/test/nio/readme3.text";
        FileChannel channel = FileChannel.open(Paths.get(fileName), StandardOpenOption.WRITE);
        ByteBuffer buf = ByteBuffer.allocate(1024);
        String text = "hello world!";
        for (int i = 0; i < text.length(); i++) {
            buf.put((byte)text.charAt(i));
            // 缓存区已满或者已经遍历到最后一个字符
            if (buf.position() == buf.limit() || i == text.length() - 1) {
                // 将缓冲区由写模式置为读模式
                buf.flip();
                // 将缓冲区的数据写到通道
                channel.write(buf);
                // 清空已经读取完成的 buffer,以便后续使用
                buf.clear();
            }
        }
channel将数据读进buffer
        String fileName = "/Users/wwq/Desktop/test/nio/readme3.text";
        FileChannel channel = FileChannel.open(Paths.get(fileName), StandardOpenOption.READ);
        ByteBuffer buf = ByteBuffer.allocate(1024);
        StringBuilder text = new StringBuilder();
        // 循环读取通道中的数据,并写入到 buf 中
        while (channel.read(buf) != -1) {
            // 缓存区切换到读模式
            buf.flip();
            // 读取 buf 中的数据
            while (buf.position() < buf.limit()) {
                // 将buf中的数据追加到文件中
                text.append((char) buf.get());
            }
            // 清空已经读取完成的 buffer,以便后续使用
            buf.clear();
        }
        System.out.println(text);
四、Selector
每个 Channel向Selector 注册时,都会创建一个 SelectionKey 对象,通过 SelectionKey 对象向Selector 注册,且 SelectionKey 中维护了 Channel 的事件。常见的四种事件如下:
OP_READ:当操作系统读缓冲区有数据可读时就绪。
OP_WRITE:当操作系统写缓冲区有空闲空间时就绪。
OP_CONNECT:当 SocketChannel.connect()请求连接成功后就绪,该操作只给客户端使用。
OP_ACCEPT:当接收到一个客户端连接请求时就绪,该操作只给服务器使用。
服务端实例
  private Selector selector;
    private ServerSocketChannel serverSocketChannel;
    private ByteBuffer readBuffer = ByteBuffer.allocate(1024);//调整缓冲区大小为1024字节
    private ByteBuffer sendBuffer = ByteBuffer.allocate(1024);
    String str;

    public ServerSocket(int port) throws IOException {
        // 打开服务器套接字通道
        this.serverSocketChannel = ServerSocketChannel.open();
        // 服务器配置为非阻塞 即异步IO
        this.serverSocketChannel.configureBlocking(false);
        // 绑定本地端口
        this.serverSocketChannel.bind(new InetSocketAddress(port));
        // 创建选择器
        this.selector = Selector.open();
        // 注册接收连接事件
        //OP_ACCEPT:当接收到一个客户端连接请求时就绪,该操作只给服务器使用
        this.serverSocketChannel.register(selector, SelectionKey.OP_ACCEPT);
    }

    public void handle() throws IOException {
        // 无限判断当前线程状态,如果没有中断,就一直执行while内容。
        while(!Thread.currentThread().isInterrupted()){
            // 获取准备就绪的channel
            if (selector.select() == 0) {
                continue;
            }

            // 获取到对应的 SelectionKey 对象
            Set<SelectionKey> keys = selector.selectedKeys();
            Iterator<SelectionKey> keyIterator = keys.iterator();
            // 遍历所有的 SelectionKey 对象
            while (keyIterator.hasNext()){
                // 根据不同的SelectionKey事件类型进行相应的处理
                SelectionKey key = keyIterator.next();
                if (!key.isValid()){
                    continue;
                }
                if (key.isAcceptable()){
                    accept(key);
                }
                if(key.isReadable()){
                    read(key);
                }
                // 移除当前的key
                keyIterator.remove();
            }
        }
    }

    /**
     * 客服端连接事件处理
     *
     * @param key
     * @throws IOException
     */
    private void accept(SelectionKey key) throws IOException {
        SocketChannel socketChannel = this.serverSocketChannel.accept();
        socketChannel.configureBlocking(false);
        // 注册客户端读取事件到selector
        socketChannel.register(selector, SelectionKey.OP_READ);
        System.out.println("客户端服务连过来了, " + socketChannel.getRemoteAddress());
    }

    /**
     * 读取事件处理
     *
     * @param key
     * @throws IOException
     */
    private void read(SelectionKey key) throws IOException{
        SocketChannel socketChannel = (SocketChannel) key.channel();
        //清除缓冲区,准备接受新数据
        this.readBuffer.clear();
        int numRead;
        try{
            // 从 channel 中读取数据
            numRead = socketChannel.read(this.readBuffer);
        }catch (IOException e){
            System.out.println("接收数据失败");
            key.cancel();
            socketChannel.close();
            return;
        }
        str = new String(readBuffer.array(),0,numRead);
        System.out.println("接收到的数据是: " + str);
    }

    public static void main(String[] args) throws Exception {
        System.out.println("启动服务...");
        new ServerSocket(8000).handle();
    }
客户端实例
 ByteBuffer writeBuffer = ByteBuffer.allocate(1024);
    private SocketChannel channel;
    private Selector selector;

    public SocketClient(String hostname, int port) throws Exception {
        // 打开socket通道
        channel = SocketChannel.open();
        // 配置为非阻塞 即异步IO
        channel.configureBlocking(false);
        // 连接服务器端
        channel.connect(new InetSocketAddress(hostname, port));
        // 创建选择器
        selector = Selector.open();
        // 注册请求连接事件
        //当 SocketChannel.connect()请求连接成功后就绪,该操作只给客户端使用。
        channel.register(selector, SelectionKey.OP_CONNECT);
    }

    public void send() throws Exception {
        Scanner scanner = new Scanner(System.in);
        // 无限判断当前线程状态,如果没有中断,就一直执行while内容。
        while (!Thread.currentThread().isInterrupted()) {
            // 获取可操作的 Channel 中的就绪事件集合
            if (selector.select() == 0) {
                continue;
            }

            // 获取到对应的 SelectionKey 对象
            Set<SelectionKey> keys = selector.selectedKeys();
            System.out.println("selectionKey keys is:" + keys.size());
            Iterator<SelectionKey> iterator = keys.iterator();
            // 遍历所有的 SelectionKey 对象
            while (iterator.hasNext()) {
                SelectionKey key = iterator.next();
                //判断此通道上是否在进行连接操作
                if (key.isConnectable()) {
                    channel.finishConnect();
                    //注册写操作
                    channel.register(selector, SelectionKey.OP_WRITE);
                    System.out.println("连上服务端了...");
                    break;
                } else if (key.isWritable()) {
                    System.out.println("请输入内容,并按回车键:");
                    String message = scanner.nextLine();
                    writeBuffer.clear();
                    writeBuffer.put(message.getBytes());
                    //将缓冲区各标志复位,因为向里面put了数据标志被改变要想从中读取数据发向服务器,就要复位
                    writeBuffer.flip();
                    channel.write(writeBuffer);
                }
                // 移除当前的key
                iterator.remove();
            }
        }
    }
    public static void main(String[] args) throws Exception {
        new SocketClient("localhost", 8000).send();
    }
五、Java NIO Files
Files.createDirectory()
创建了一个Path实例,表示需要创建的目录。接着用try-catch把Files.createDirectory()的调用捕获住。如果创建成功,那么返回值就是新创建的路径。
如果目录已经存在了,那么会抛出java.nio.file.FileAlreadyExistException异常。如果出现其他问题,会抛出一个IOException。比如说,要创建的目录的父目录不存在,那么就会抛出IOException。父目录指的是你要创建的目录所在的位置。也就是新创建的目录的上一级父目录。
代码实例:
Path path = Paths.get("/Users/wwq/Desktop/test/nio");
try {
    Files.createDirectory(path);
} catch (FileAlreadyExistsException e) {
    e.printStackTrace();
} catch (IOException e) {
    e.printStackTrace();
}
Files.copy()
copy操作可以强制覆盖已经存在的目标文件
代码实例:
        Path sourcePath = Paths.get("/Users/wwq/Desktop/test/nio/readme.text");
        Path destinationPath = Paths.get("/Users/wwq/Desktop/test/nio/readme2.text");
        try {
            Files.copy(sourcePath, destinationPath, StandardCopyOption.REPLACE_EXISTING);
        } catch (FileAlreadyExistsException e) {
            e.printStackTrace();
        } catch (IOException e) {
            e.printStackTrace();
        }
Files.move()
Java NIO的Files类也包含了移动的文件的接口。移动文件和重命名是一样的,但是还会改变文件的目录位置。java.io.File类中的renameTo()方法与之功能是一样的。
Path moveSourcePath = Paths.get("/Users/wwq/Desktop/test/nio/readme2.text");
Path moveDestinationPath = Paths.get("/Users/wwq/Desktop/test/nio/readme3.text");
try {
    Files.move(moveSourcePath, moveDestinationPath,
            StandardCopyOption.REPLACE_EXISTING);
} catch (IOException e) {
    //moving file failed.
    e.printStackTrace();
}
Files.walkFileTree()
Files.walkFileTree()方法具有递归遍历目录的功能。walkFileTree接受一个Path和FileVisitor作为参数。Path对象是需要遍历的目录,FileVistor则会在每次遍历中被调用。
FileVisitor这个接口的定义:
public interface FileVisitor {
    public FileVisitResult preVisitDirectory(
        Path dir, BasicFileAttributes attrs) throws IOException;
    public FileVisitResult visitFile(
        Path file, BasicFileAttributes attrs) throws IOException;
    public FileVisitResult visitFileFailed(
        Path file, IOException exc) throws IOException;
    public FileVisitResult postVisitDirectory(
        Path dir, IOException exc) throws IOException {
}
FileVisitor需要调用方自行实现,然后作为参数传入walkFileTree().FileVisitor的每个方法会在遍历过程中被调用多次。如果不需要处理每个方法,那么可以继承他的默认实现类SimpleFileVisitor,它将所有的接口做了空实现。
下面看一个walkFileTree()的示例:
Files.walkFileTree(path, new FileVisitor<Path>() {
  @Override
  public FileVisitResult preVisitDirectory(Path dir, BasicFileAttributes attrs) throws IOException {
    System.out.println("pre visit dir:" + dir);
    return FileVisitResult.CONTINUE;
  }
  @Override
  public FileVisitResult visitFile(Path file, BasicFileAttributes attrs) throws IOException {
    System.out.println("visit file: " + file);
    return FileVisitResult.CONTINUE;
  }
  @Override
  public FileVisitResult visitFileFailed(Path file, IOException exc) throws IOException {
    System.out.println("visit file failed: " + file);
    return FileVisitResult.CONTINUE;
  }
  @Override
  public FileVisitResult postVisitDirectory(Path dir, IOException exc) throws IOException {
    System.out.println("post visit directory: " + dir);
    return FileVisitResult.CONTINUE;
  }
});
FileVisitor的方法会在不同时机被调用:
preVisitDirectory()在访问目录前被调用。postVisitDirectory()在访问后调用。
visitFile()会在整个遍历过程中的每次访问文件都被调用。他不是针对目录的,而是针对文件的。visitFileFailed()调用则是在文件访问失败的时候。例如,当缺少合适的权限或者其他错误。
上述四个方法都返回一个FileVisitResult枚举对象。具体的可选枚举项包括:
- CONTINUE
- TERMINATE
- SKIP_SIBLINGS
- SKIP_SUBTREE
返回这个枚举值可以让调用方决定文件遍历是否需要继续。
CONTINE表示文件遍历和正常情况下一样继续。
TERMINATE表示文件访问需要终止。
SKIP_SIBLINGS表示文件访问继续,但是不需要访问其他同级文件或目录。
SKIP_SUBTREE表示继续访问,但是不需要访问该目录下的子目录。这个枚举值仅在preVisitDirectory()中返回才有效。如果在另外几个方法中返回,那么会被理解为CONTINE。