本章节所有代码托管在miniOS
章节任务介绍
任务简介
上一节,我们实现了用户进程的创建,至此,我们成功将操作系统的使用权给用户进行了开放,用户至此可以创建进程然后实现自己的功能,但用户实现的功能最终还是要在操作系统上运行,因此还需要借助操作系统提供的接口服务,这就是本节我们将要实现的------系统调用
系统调用(System Call)是操作系统提供给应用程序访问硬件资源和操作系统服务的接口。通过系统调用,程序可以向操作系统请求服务,如文件操作、内存管理、进程控制等。系统调用位于用户态和内核态之间,通常被用来执行用户程序无法直接完成的任务。
本节的主要任务有:
构建系统调用的实现框架
实现getpid系统调用
实现printf库函数
前置知识
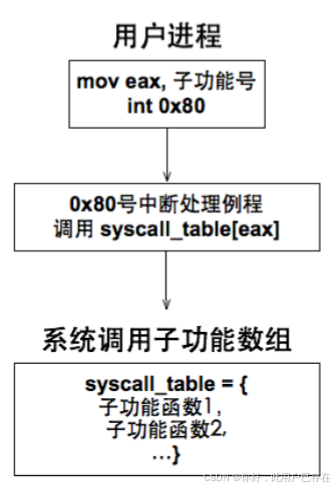
linux系统调用是通过软中断实现 的,并且linux系统调用产生的中断向量号只有一个,即0x80,也就是说,当处理器执行指令`int 0x80`时就触发了系统调用。
为了让用户程序可以通过这一个中断门调用多种系统功能 ,在系统调用之前,Linux在寄存器eax中写入子功能号,例如系统调用open 和 close 都是不同的子功能号,当用户程序通过int 0x80进行系统调用时,对应的中断处理例程会根据eax的值来判断用户进程申请哪种系统调用。
构建系统调用实现框架
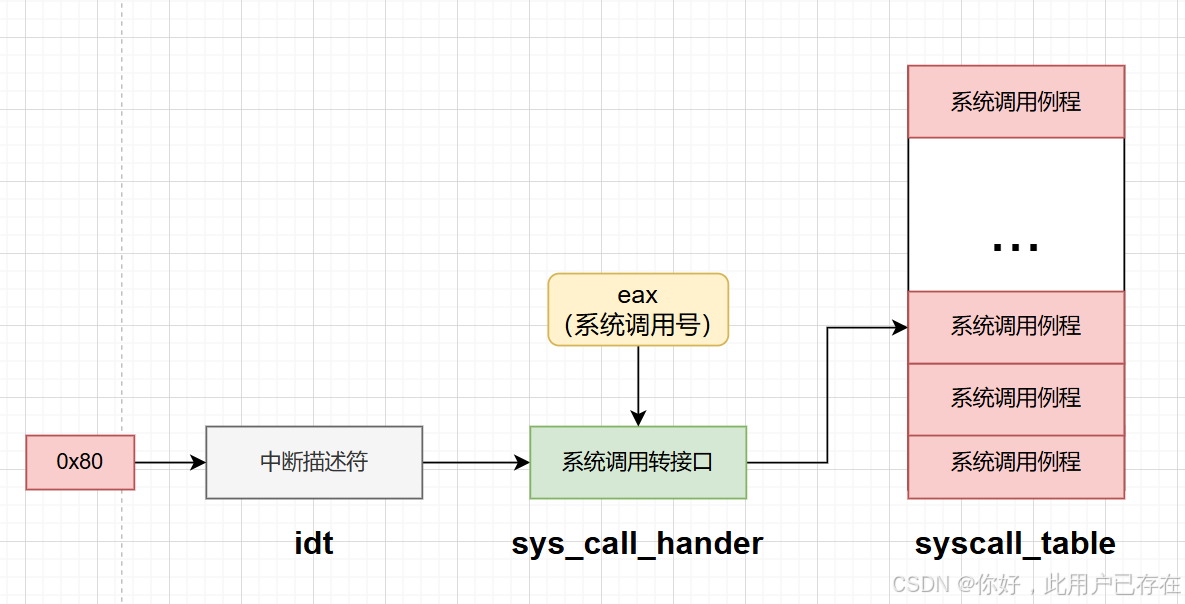
如图,就是本节我们要完成的任务
1.构建系统调用所需的中断描述符
2.构建触发系统调用中断的转接口,该转接口的作用是将`eax`中的系统调用号作为索引,然后按照索引寻找`syscall_table`中对应的系统调用例程
`/kernel/interrupt.c`
cpp
extern uint32_t syscall_handler(void);

static void idt_desc_init(void)
{
   int i;
   for (i = 0; i < IDT_DESC_CNT; i++)
   {
      make_idt_desc(&idt[i], IDT_DESC_ATTR_DPL0, intr_entry_table[i]);
   }

   int lastindex = IDT_DESC_CNT - 1;
   // 单独处理系统调用,系统调用对应的中断门dpl为3,中断处理程序为汇编的syscall_handler
   make_idt_desc(&idt[lastindex], IDT_DESC_ATTR_DPL3, syscall_handler);
   put_str("   idt_desc_init done\n");
}
上述函数是构建中断描述符表的函数,我们之前在开启中断时所写的,因此,我们添加系统调用的中断描述符,只需要添加代码:
cpp
   int lastindex = IDT_DESC_CNT - 1;
   // 单独处理系统调用,系统调用对应的中断门dpl为3,中断处理程序为汇编的syscall_handler
make_idt_desc(&idt[lastindex], IDT_DESC_ATTR_DPL3, syscall_handler);其中,IDT_DESC_CNT表示中断描述符的个数,修改和定义如下
cpp
#define IDT_DESC_CNT 0x81 // 目前总共支持的中断数,最后一个支持的中断号0x80 + 1syscall_handler表示系统调用的中断触发时所调用的函数,也就是我们的转接口,其实现如下
/kernel/kernel.S
cpp
;;;;;;;;;;;;;;;;   0x80号中断   ;;;;;;;;;;;;;;;;
[bits 32]
extern syscall_table
section .text
global syscall_handler
syscall_handler:
;1 保存上下文环境,为了复用之前写好的intr_exit:,所以我们仿照中断处理机制压入的东西,构建系统调用压入的东西
    push 0              ; 压入0, 使栈中格式统一
    push ds
    push es
    push fs
    push gs
    pushad
    push 0x80           ; PUSHAD指令压入32位寄存器,其入栈顺序是:EAX,ECX,EDX,EBX,ESP,EBP,ESI,EDI
                        ; 此位置压入0x80也是为了保持统一的栈格式

;2 为系统调用子功能传入参数,由于这个函数是3个参数的用户程序系统调用入口都会使用
    push edx
    push ecx
    push ebx
;3 调用c中定义的功能处理函数,eax系统调用号
    call [syscall_table+eax*4]
    add esp,12          ;回收三个参数占用的空间,保持中断退出栈格式统一

    mov [esp+8*4],eax   ;将eax的返回值传递给pushad压入的eax,这样中断退出时就可以将返回值弹出
    jmp intr_exit
该函数的处理逻辑如下:
保存中断调用前的寄存器环境,为了使中断退出时调用
intr_exit弹栈顺利执行,需要保持压栈时的栈结构与之前我们处理中断的压栈结构一致,因此首先push 0接下来压入中断号
0x80,准备调用系统调用的中断为系统调用准备参数环境,
edx,ecx,ebx这三个参数将传递系统调用的参数时使用调用系统调用,按照c约定,调用结束后会将返回值压入
eax中为了成功将返回值传递出去,将返回值压入
pushad时压入的eax栈结构中,这样中断退出时就可以将返回值弹出
实现系统调用getpid
有了上述框架之后,我们**以后想扩充系统调用功能,只需要将系统调用例程填充进`syscall_table`中**,并将系统调用号告知给用户,这样用户就可以调用我们实现的系统调用了
接下来我们构建第一个系统调用,然后将其函数地址填充进`syscall_table`
为用户进程和内核线程分配pid
getpid()的作用是返回给用户当前任务的pid ,为了实现此功能,我们首先需要给进程或者线程分配pid
`/thread/thread.h`
cpp
/* 进程或线程的pcb,程序控制块, 此结构体用于存储线程的管理信息*/
struct task_struct
{
   uint32_t *self_kstack; // 用于存储线程的栈顶位置,栈顶放着线程要用到的运行信息
   pid_t pid;             // 定义线程或者进程的pid
   enum task_status status;
   uint8_t priority; // 线程优先级
   char name[16];    // 用于存储自己的线程的名字

   uint8_t ticks;                      // 线程允许上处理器运行还剩下的滴答值,因为priority不能改变,所以要在其之外另行定义一个值来倒计时
   uint32_t elapsed_ticks;             // 此任务自上cpu运行后至今占用了多少cpu嘀嗒数, 也就是此任务执行了多久*/
   struct list_elem general_tag;       // general_tag的作用是用于线程在一般的队列(如就绪队列或者等待队列)中的结点
   struct list_elem all_list_tag;      // all_list_tag的作用是用于线程队列thread_all_list(这个队列用于管理所有线程)中的结点
   uint32_t *pgdir;                    // 进程自己页目录表的虚拟地址
   struct virtual_addr userprog_vaddr; // 每个用户进程自己的虚拟地址池
   uint32_t stack_magic;               // 如果线程的栈无限生长,总会覆盖地pcb的信息,那么需要定义个边界数来检测是否栈已经到了PCB的边界
};
在PCB结构体中添加pid字段
cpp
pid_t pid; // 定义线程或者进程的pid然后在内核线程和用户进程的PCB初始化过程中添加PID的初始化
/thread/thread.c
pid的分配是互斥的,我们首先需要初始化pid锁
cpp
/* 初始化线程环境 */
void thread_init(void)
{
   put_str("thread_init start\n");
   list_init(&thread_ready_list);
   list_init(&thread_all_list);
   lock_init(&pid_lock);
   /* 将当前main函数创建为线程 */
   make_main_thread();
   put_str("thread_init done\n");
}
接下来实现pid分配函数
cpp
/*分配pid*/
static pid_t allocate_pid(void)
{
   static pid_t next_pid = 0;
   lock_acquire(&pid_lock);
   ++next_pid;
   lock_release(&pid_lock);
   return next_pid;
}
接下来就可以进行内核线程和用户进程pid的初始化(注意,`pid`是内核线程和用户进程共同的属性,而用户进程在初始化`PCB`时会复用和内核线程相同属性的初始化代码,因此这里对`init_thread`的修改就相当于修改了内核线程和用户进程初始化`PCB`时对`pid`的分配)
cpp
/* 初始化线程基本信息 , pcb中存储的是线程的管理信息,此函数用于根据传入的pcb的地址,线程的名字等来初始化线程的管理信息*/
void init_thread(struct task_struct *pthread, char *name, int prio)
{
   memset(pthread, 0, sizeof(*pthread)); // 把pcb初始化为0
   pthread->pid = allocate_pid();
   strcpy(pthread->name, name); // 将传入的线程的名字填入线程的pcb中

   if (pthread == main_thread)
   {
      pthread->status = TASK_RUNNING; // 由于把main函数也封装成一个线程,并且它一直是运行的,故将其直接设为TASK_RUNNING */
   }
   else
   {
      pthread->status = TASK_READY;
   }
   pthread->priority = prio;
   /* self_kstack是线程自己在内核态下使用的栈顶地址 */
   pthread->ticks = prio;
   pthread->elapsed_ticks = 0;
   pthread->pgdir = NULL;                                            // 线程没有自己的地址空间,进程的pcb这一项才有用,指向自己的页表虚拟地址
   pthread->self_kstack = (uint32_t *)((uint32_t)pthread + PG_SIZE); // 本操作系统比较简单,线程不会太大,就将线程栈顶定义为pcb地址
                                                                     //+4096的地方,这样就留了一页给线程的信息(包含管理信息与运行信息)空间
   pthread->stack_magic = 0x20241221;                                // /定义的边界数字,随便选的数字来判断线程的栈是否已经生长到覆盖pcb信息了
}
如上所示,只是在PCB的初始化代码中添加了一行代码
cpp
pthread->pid = allocate_pid();初始化系统调用getpid
接下来,我们就可以填充syscall_table中的调用调研例程了,如下所示
/userprog/syscall-init.h
cpp
#ifndef __USERPROG_SYSCALLINIT_H
#define __USERPROG_SYSCALLINIT_H
#include "stdint.h"
void syscall_init(void);
uint32_t sys_getpid(void);
#endif
/userprog/syscall-init.c
cpp
#include "syscall-init.h"
#include "syscall.h"
#include "stdint.h"
#include "print.h"
#include "thread.h"
#define syscall_nr 32
typedef void *syscall;
syscall syscall_table[syscall_nr];

/* 返回当前任务的pid */
uint32_t sys_getpid(void)
{
    return running_thread()->pid;
}

/* 初始化系统调用 */
void syscall_init(void)
{
    put_str("syscall_init start\n");
    syscall_table[SYS_GETPID] = sys_getpid;
    put_str("syscall_init done\n");
}
将系统调用的初始化代码添加进操作系统启动的初始化代码中
/kernel/init.c
cpp
#include "init.h"
#include "print.h"
#include "interrupt.h"
#include "timer.h"
#include "memory.h"
#include "thread.h"
#include "console.h"
#include "keyboard.h"
#include "tss.h"

/*负责初始化所有模块 */
void init_all()
{
   put_str("init_all\n");
   idt_init();      // 初始化中断
   mem_init();      // 初始化内存管理系统
   thread_init();   // 初始化线程相关结构
   timer_init();    // 初始化PIT
   console_init();  // 控制台初始化最好放在开中断之前
   keyboard_init(); // 键盘初始化
   tss_init();      // tss初始化
   syscall_init();  // 初始化系统调用
}
提供给用户使用的系统调用函数getpid
至此,我们已经成功将getpid系统调用例程添加进了`syscall_table`,按照我们之前的分析,当用户执行`init 0x80`触发中断,并将`getpid`的中断号填写进eax中,就可以触发`sys_getpid`函数
我们把上述过程封装起来,以便用户使用,这就是`getpid`库函数
`/lib/user/syscall.h`
cpp
#ifndef __LIB_USER_SYSCALL_H
#define __LIB_USER_SYSCALL_H
#include "stdint.h"
/*定义系统调用号*/
enum SYSCALL_NR
{
    SYS_GETPID
};
uint32_t getpid(void);
#endif
`/lib/user/syscall.c`
cpp
#include "syscall.h"
/* 无参数的系统调用 */
#define _syscall0(NUMBER) ({ \
    int retval;              \
    asm volatile(            \
        "int $0x80"          \
        : "=a"(retval)       \
        : "a"(NUMBER)        \
        : "memory");         \
    retval;                  \
})

/* 一个参数的系统调用 */
#define _syscall1(NUMBER, ARG1) ({ \
    int retval;                    \
    asm volatile(                  \
        "int $0x80"                \
        : "=a"(retval)             \
        : "a"(NUMBER), "b"(ARG1)   \
        : "memory");               \
    retval;                        \
})

/* 两个参数的系统调用 */
#define _syscall2(NUMBER, ARG1, ARG2) ({    \
    int retval;                             \
    asm volatile(                           \
        "int $0x80"                         \
        : "=a"(retval)                      \
        : "a"(NUMBER), "b"(ARG1), "c"(ARG2) \
        : "memory");                        \
    retval;                                 \
})

/* 三个参数的系统调用 */
#define _syscall3(NUMBER, ARG1, ARG2, ARG3) ({         \
    int retval;                                        \
    asm volatile(                                      \
        "int $0x80"                                    \
        : "=a"(retval)                                 \
        : "a"(NUMBER), "b"(ARG1), "c"(ARG2), "d"(ARG3) \
        : "memory");                                   \
    retval;                                            \
})

/*返回当前任务的pid*/
uint32_t getpid()
{
    return _syscall0(SYS_GETPID);
}
如上所示,`getpid`就是我们提供给用户使用的库函数
测试
`/kernel/main.c`
cpp
#include "print.h"
#include "init.h"
#include "thread.h"
#include "interrupt.h"
#include "console.h"
#include "process.h"
#include "syscall-init.h"
#include "syscall.h"
void k_thread_a(void *);
void k_thread_b(void *);
void u_prog_a(void);
void u_prog_b(void);
int prog_a_pid = 0, prog_b_pid = 0;
int main(void)
{
put_str("I am kernel\n");
init_all();
process_execute(u_prog_a, "user_prog_a");
process_execute(u_prog_b, "user_prog_b");
intr_enable();
console_put_str(" main_pid:0x");
console_put_int(sys_getpid());
console_put_char('\n');
thread_start("k_thread_a", 31, k_thread_a, "argA ");
thread_start("k_thread_b", 31, k_thread_b, "argB ");
while (1)
;
return 0;
}
/* 在线程中运行的函数 */
void k_thread_a(void *arg)
{
char *para = arg;
console_put_str(" thread_a_pid:0x");
console_put_int(sys_getpid());
console_put_char('\n');
console_put_str(" prog_a_pid:0x");
console_put_int(prog_a_pid);
console_put_char('\n');
while (1)
;
}
/* 在线程中运行的函数 */
void k_thread_b(void *arg)
{
char *para = arg;
console_put_str(" thread_b_pid:0x");
console_put_int(sys_getpid());
console_put_char('\n');
console_put_str(" prog_b_pid:0x");
console_put_int(prog_b_pid);
console_put_char('\n');
while (1)
;
}
/* 测试用户进程 */
void u_prog_a(void)
{
prog_a_pid = getpid();
while (1)
;
}
/* 测试用户进程 */
void u_prog_b(void)
{
prog_b_pid = getpid();
while (1);
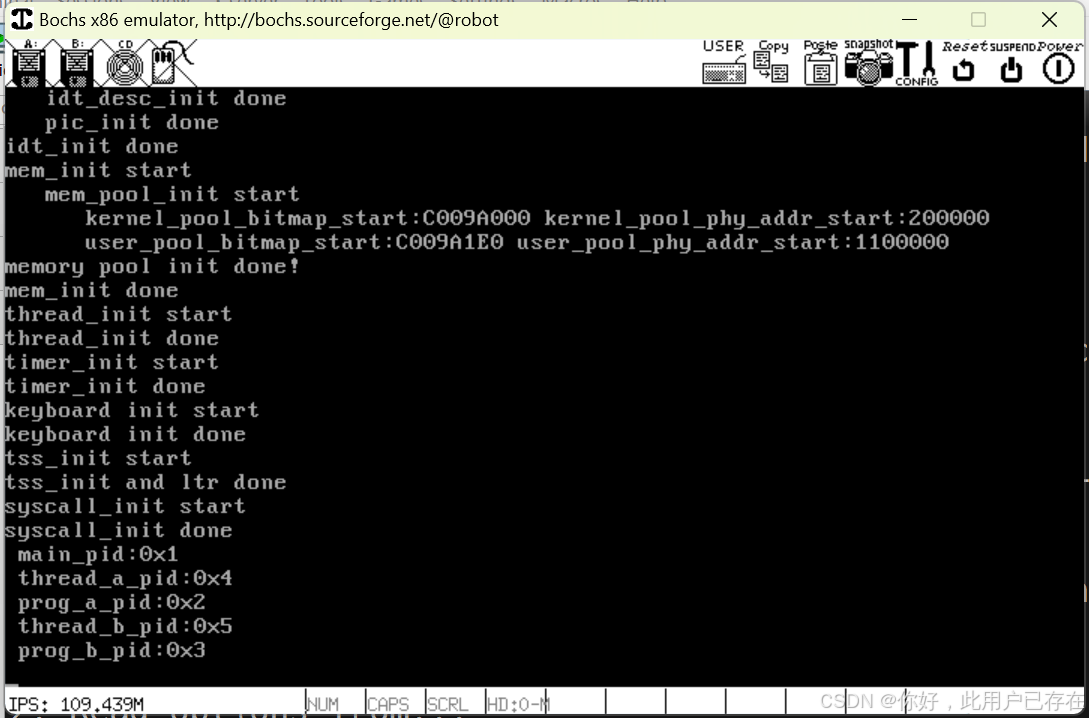
}编译运行
实现库函数printf
我们之前已经构建好了系统调用的实现框架,当我们想要添加系统调用功能时,只需要在`syscal_table`中添加对应的例程,然后再封装一个用户使用的库函数即可
初始化系统调用的屏幕打印函数
`/userprog/syscall-init.h`
cpp
#ifndef __USERPROG_SYSCALLINIT_H
#define __USERPROG_SYSCALLINIT_H
#include "stdint.h"
void syscall_init(void);
uint32_t sys_getpid(void);
uint32_t sys_write(char *str);
#endif
`/userprog/syscall-init.c`
cpp
/*打印字符串*/
uint32_t sys_write(char *str)
{
    console_put_str(str);
    return strlen(str);
}

/* 初始化系统调用 */
void syscall_init(void)
{
    put_str("syscall_init start\n");
    syscall_table[SYS_GETPID] = sys_getpid;
    syscall_table[SYS_WRITE] = sys_write;
    put_str("syscall_init done\n");
}
构建用户调用的库函数
`/lib/user/syscall.h`
cpp
#ifndef __LIB_USER_SYSCALL_H
#define __LIB_USER_SYSCALL_H
#include "stdint.h"
/*定义系统调用号*/
enum SYSCALL_NR
{
    SYS_GETPID,
    SYS_WRITE
};
uint32_t getpid(void);
uint32_t write(char *str);
#endif
`/lib/user/syscall.c`
cpp
/*打印字符串str*/
uint32_t write(char *str)
{
    return _syscall1(SYS_WRITE, str);
}
printf实现
以上我们实现了基本的屏幕打印库函数,用户进程可以使用write函数实现屏幕打印功能,但用户使用该函数不仅需要知道系统调用号,并且不能进行格式化打印,为此,我们继续封装一个格式化打印函数
/lib/user/stdio.h
cpp
#ifndef __LIB_STDIO_H
#define __LIB_STDIO_H
#include "stdint.h"
typedef char *va_list;
// 按照format格式解析字符串,并传出str
uint32_t vsprintf(char *str, const char *format, va_list ap);
// 将解析后的字符串通过系统调用打印到屏幕上
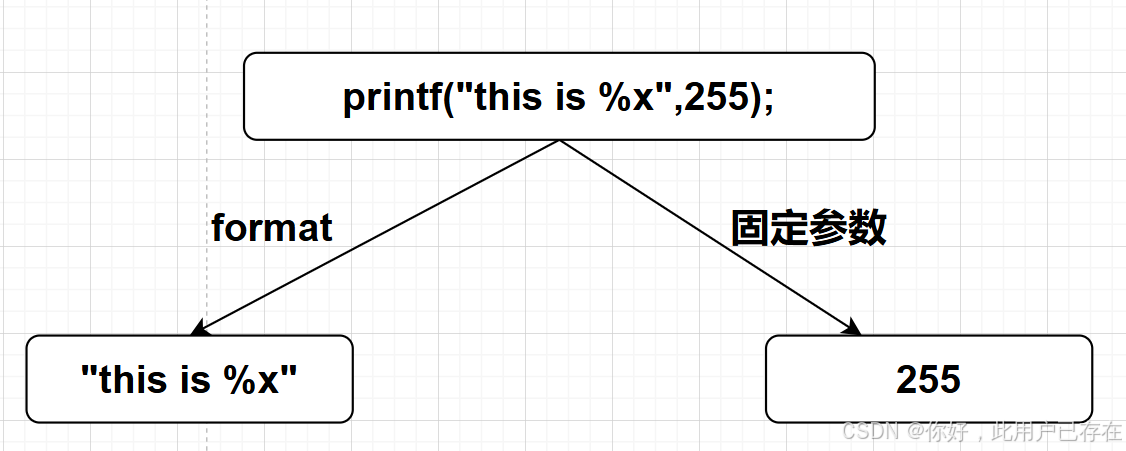
uint32_t printf(const char *str, ...);
#endif`/lib/user/stdio.c`
cpp
#include "stdio.h"
#include "stdint.h"
#include "string.h"
#include "global.h"
#include "syscall.h"
#define va_start(ap, v) ap = (va_list) & v // 把ap指向第一个固定参数v
#define va_arg(ap, t) *((t *)(ap += 4)) // ap指向下一个参数并返回其值
#define va_end(ap) ap = NULL // 清除ap
/* 将整型转换成字符(integer to ascii) */
static void itoa(uint32_t value, char **buf_ptr_addr, uint8_t base)
{
uint32_t m = value % base; // 求模,最先掉下来的是最低位
uint32_t i = value / base; // 取整
if (i)
{ // 如果倍数不为0则递归调用。
itoa(i, buf_ptr_addr, base);
}
if (m < 10)
{ // 如果余数是0~9
*((*buf_ptr_addr)++) = m + '0'; // 将数字0~9转换为字符'0'~'9'
}
else
{ // 否则余数是A~F
*((*buf_ptr_addr)++) = m - 10 + 'A'; // 将数字A~F转换为字符'A'~'F'
}
}
/* 将参数ap按照格式format输出到字符串str,并返回替换后str长度 */
uint32_t vsprintf(char *str, const char *format, va_list ap)
{
char *buf_ptr = str;
const char *index_ptr = format;
char index_char = *index_ptr;
int32_t arg_int;
char *arg_str;
while (index_char)
{
if (index_char != '%')
{
*(buf_ptr++) = index_char;
index_char = *(++index_ptr);
continue;
}
index_char = *(++index_ptr); // 得到%后面的字符
switch (index_char)
{
case 's':
arg_str = va_arg(ap, char *);
strcpy(buf_ptr, arg_str);
buf_ptr += strlen(arg_str);
index_char = *(++index_ptr);
break;
case 'c':
*(buf_ptr++) = va_arg(ap, char);
index_char = *(++index_ptr);
break;
case 'd':
arg_int = va_arg(ap, int);
if (arg_int < 0)
{
arg_int = 0 - arg_int; /* 若是负数, 将其转为正数后,再正数前面输出个负号'-'. */
*buf_ptr++ = '-';
}
itoa(arg_int, &buf_ptr, 10);
index_char = *(++index_ptr);
break;
case 'x':
arg_int = va_arg(ap, int);
itoa(arg_int, &buf_ptr, 16);
index_char = *(++index_ptr); // 跳过格式字符并更新index_char
break;
}
}
return strlen(str);
}
/* 格式化输出字符串format */
uint32_t printf(const char *format, ...)
{
va_list args;
va_start(args, format); // 使args指向format
char buf[1024] = {0}; // 用于存储拼接后的字符串
vsprintf(buf, format, args);
va_end(args);
return write(buf);
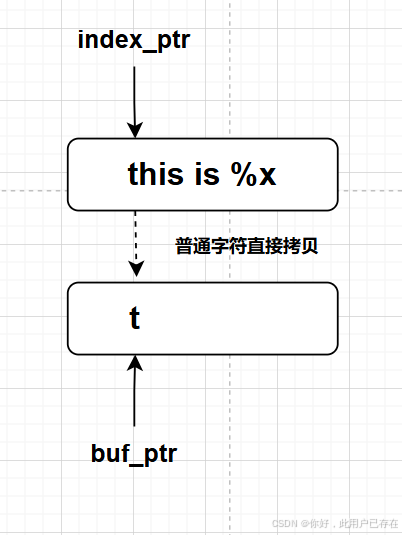
}以下是代码的处理流程,其基本思想为
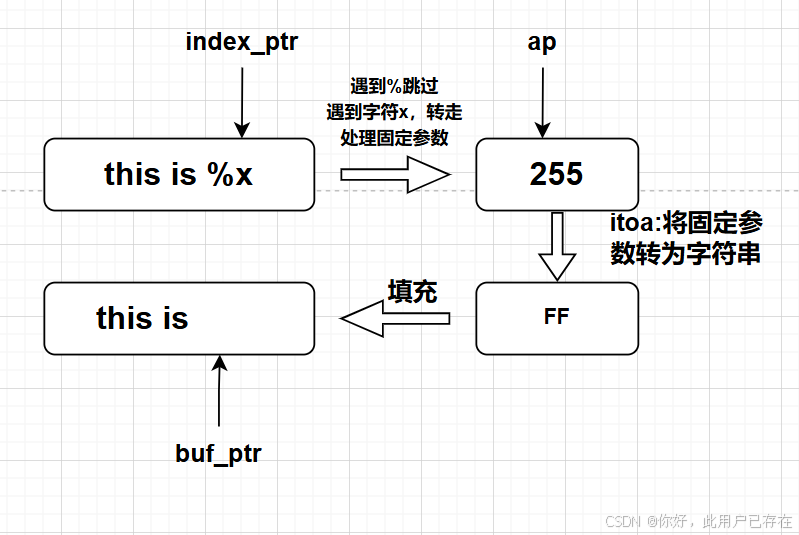
逐个扫描format中的字符,将其拷贝进str中,直到遇到字符%
当遇到字符%,说明有固定参数需要转换,转而按照对应的逻辑进行处理,然后再将其转换为字符串
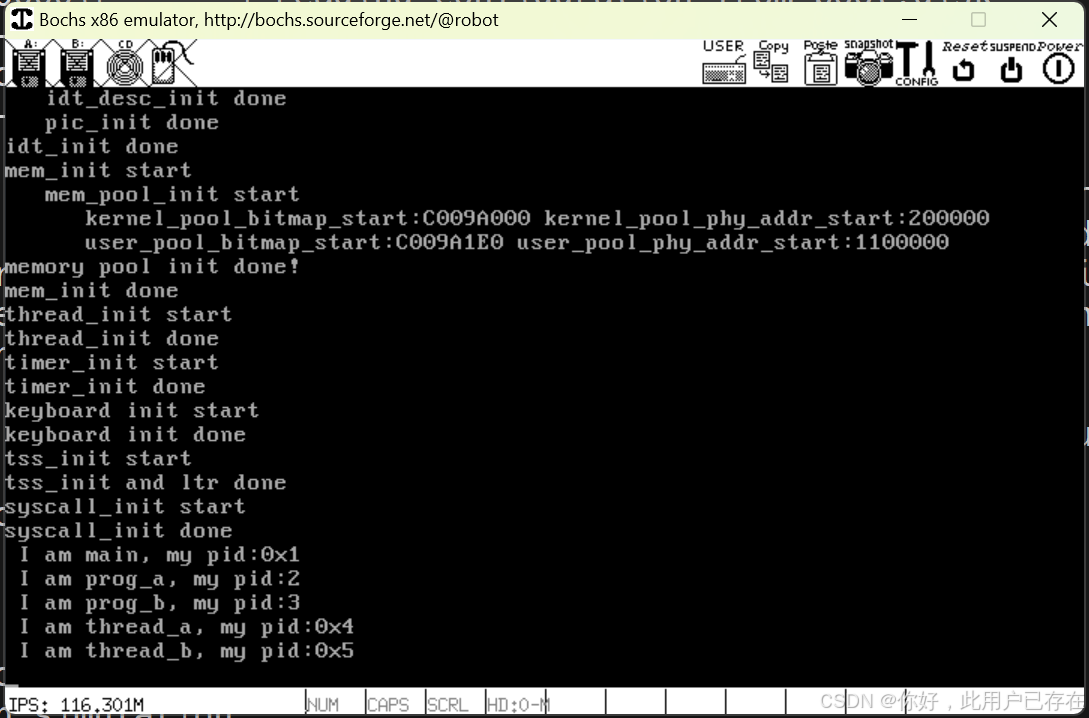
测试
cpp
#include "print.h"
#include "init.h"
#include "thread.h"
#include "interrupt.h"
#include "console.h"
#include "process.h"
#include "syscall-init.h"
#include "syscall.h"
#include "stdio.h"

void k_thread_a(void *);
void k_thread_b(void *);
void u_prog_a(void);
void u_prog_b(void);

int main(void)
{
   put_str("I am kernel\n");
   init_all();

   process_execute(u_prog_a, "user_prog_a");
   process_execute(u_prog_b, "user_prog_b");

   console_put_str(" I am main, my pid:0x");
   console_put_int(sys_getpid());
   console_put_char('\n');
   intr_enable();
   thread_start("k_thread_a", 31, k_thread_a, "I am thread_a ");
   thread_start("k_thread_b", 31, k_thread_b, "I am thread_b ");
   while (1)
      ;
   return 0;
}

/* 在线程中运行的函数 */
void k_thread_a(void *arg)
{
   char *para = arg;
   console_put_str(" I am thread_a, my pid:0x");
   console_put_int(sys_getpid());
   console_put_char('\n');
   while (1)
      ;
}

/* 在线程中运行的函数 */
void k_thread_b(void *arg)
{
   char *para = arg;
   console_put_str(" I am thread_b, my pid:0x");
   console_put_int(sys_getpid());
   console_put_char('\n');
   while (1)
      ;
}

/* 测试用户进程 */
void u_prog_a(void)
{
   char *name = "prog_a";
   printf(" I am %s, my pid:%d%c", name, getpid(), '\n');
   while (1)
      ;
}

/* 测试用户进程 */
void u_prog_b(void)
{
   char *name = "prog_b";
   printf(" I am %s, my pid:%d%c", name, getpid(), '\n');
   while (1)
      ;
}
编译运行