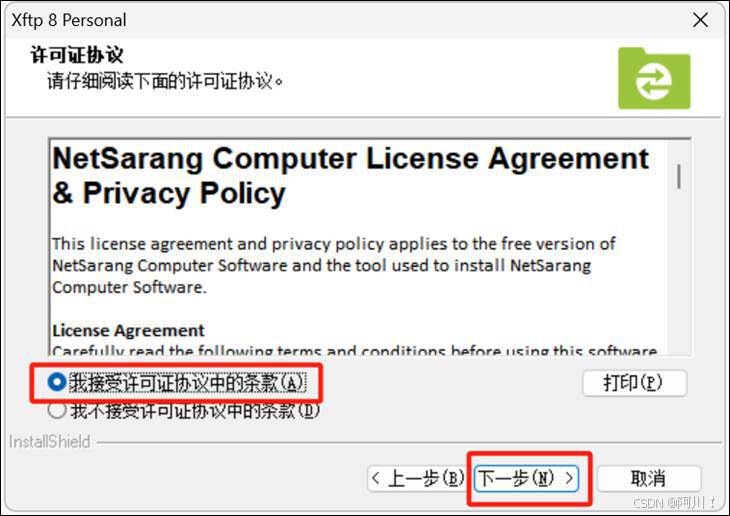
一、Linux入门
1.硬件和操作系统以及用户的关系
一个传感器,获得数据后,需要向服务器发送数据。传感器传数据给上位机。
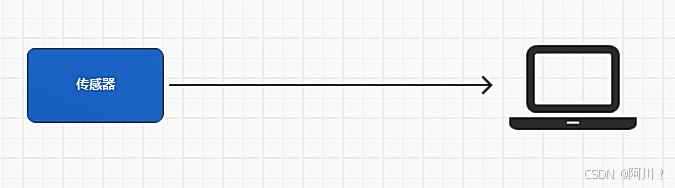
上位机需要一个程序来接收数据,那么这个上位机是什么机器?
我们的笔记本电脑就可以当成上位机。
两个手机之间靠基站来保持联系,传发数据。
我们的传输可以通过网络,也可以不通过网络,都可以。
注意,传感器不止一个,多个地点不同的传感器,那么这个上位机性能会难以承受。这个上位机不是普通的电脑,它被称为服务器。顾名思义,提供服务的机器,那么性能会很高,网络也会很通畅。
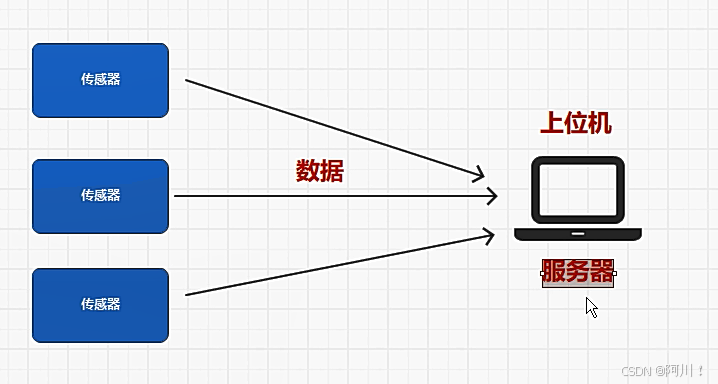
光有电脑这个上位机还不够,还需要操作系统,因此操作系统的安全性必须高,那么windows系统自然不在考虑之列,Linux便脱颖而出。
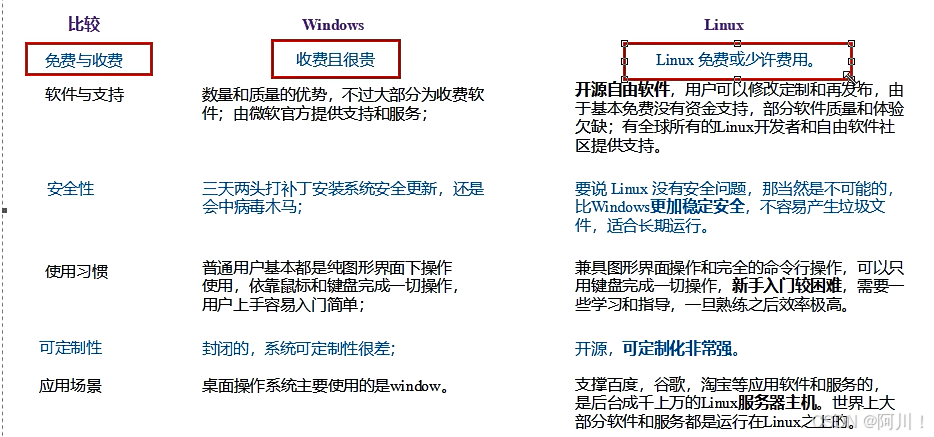
2.windows与Linux的区别:
首先,windows系统更受欢迎,这个每一台新买的电脑都自带的系统,理由自不用说,非常简单方便,操作一看就会。任何东西越简单越受欢迎。
Linux更难,也更安全。
我们要做的就是将自己的程序放到服务器(上位机)上去,但我们需要一些工具辅助管理,帮助我们去操作linux系统。用户通过远程工具控制服务器。
windows unix 都是有费用的,闭源。Linux免费且开源迎合广大国人的心声,继承了unix以网络为核心的设计思想。
我们要用的发行版Ubuntu,是个图形化设计很好的产品。
区别:
二、VMware、Ubuntu、Xshell和Xftp安装
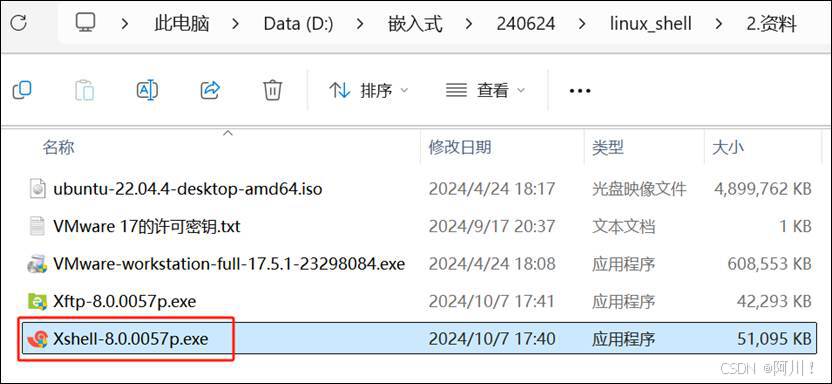
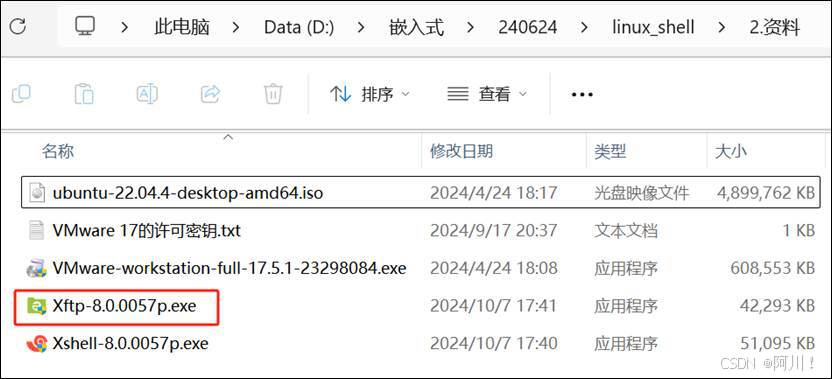
除却官网下载外,这里有集合安装包的网盘链接:
2.1 安装ubuntu,配置电脑
系统的安装得分两个步骤,第一步得配置一台电脑,选配cpu,内存,磁盘,网卡等硬件。第二步才是安装系统。
2.1.1配置电脑
(1)进入VMware
双击VMware图标,看到如下界面。
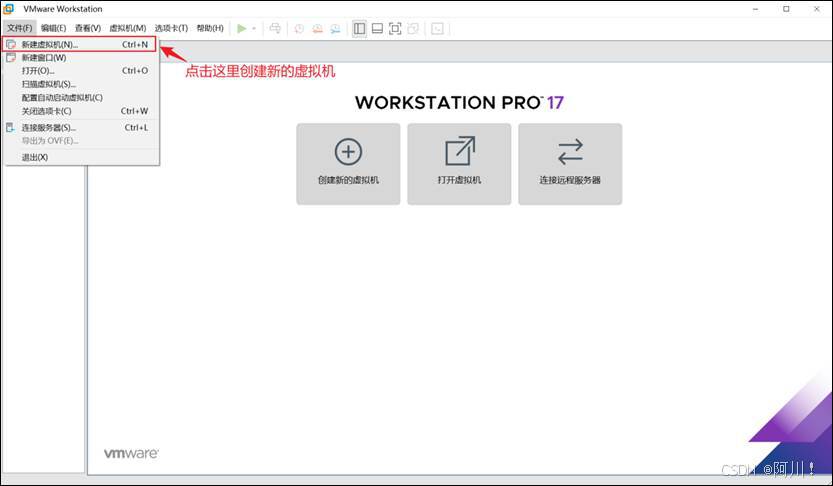
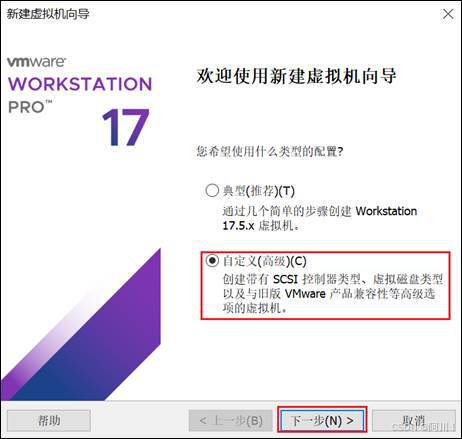
(2)选择配置类型
选择"自定义新的虚拟机"(修改)
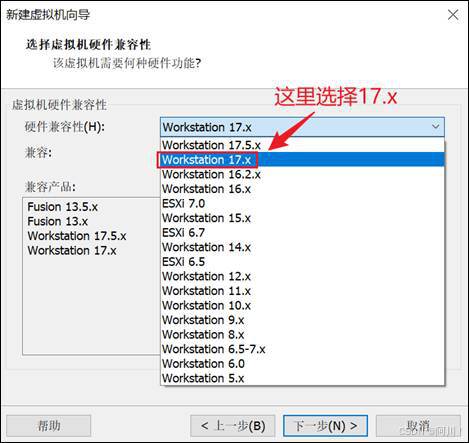
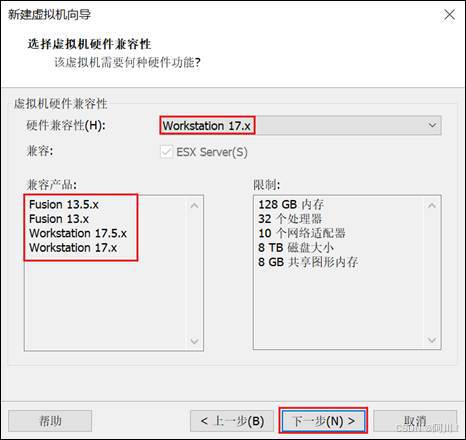
(3)选择硬件兼容性版本
选择"Workstation 17.x"(修改)
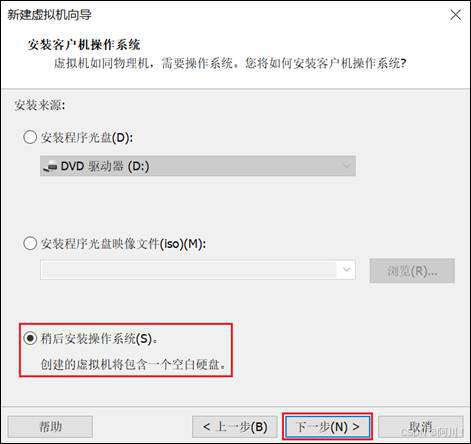
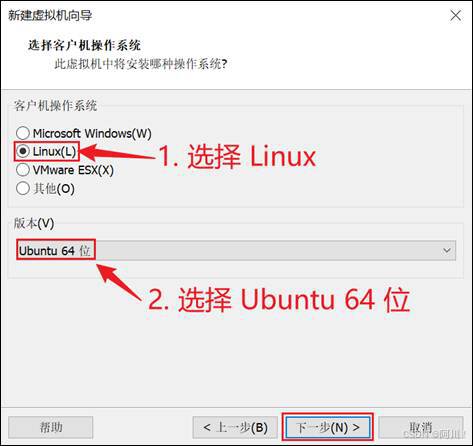
(4)选择当前虚拟机的操作系统
选择"稍后安装操作系统"(修改)
(5)选择虚拟机将来需要安装的系统
因为不同的操作系统需要解决不同的兼容性问题,所以需要选择将来用什么系统,提前做适配。
选中"Linux"和选择"Ubuntu64位"(修改)
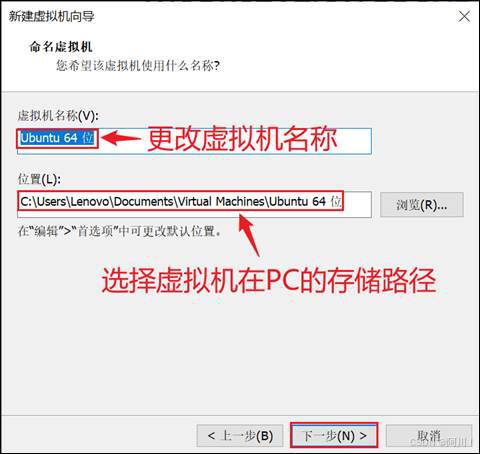
(6)配置电脑
给自己配置电脑取个名字,并存放在物理机的位置在哪。(可以修改)
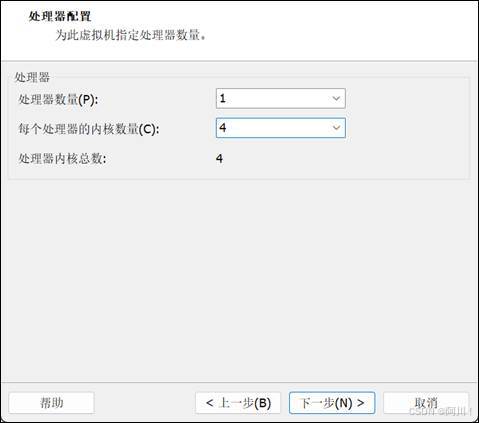
(7)选择CPU的个数
一般选择1个处理器和4个内核;配置高的,可以选择2个处理器和4个内核。(修改)
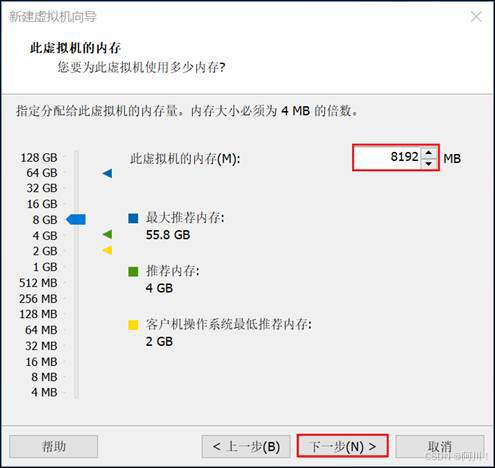
(8)设置虚拟机的内存
**2G够用。**一般内存4-8G,如果电脑配置高可以酌情增加。(修改)
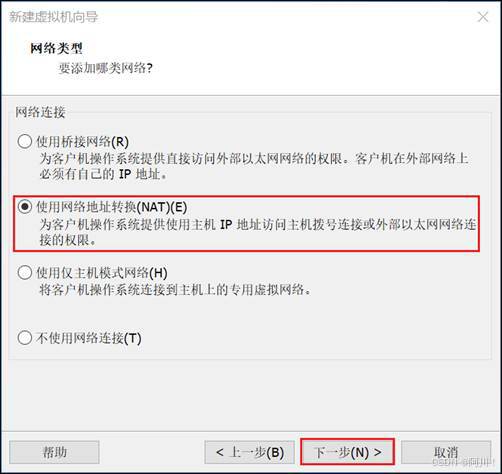
2.1.2选择虚拟机上网方式
(1)选择NAT的方式(默认)
没有VMware之前物理机的网络适配器信息(每个人不同,我只有3个)

安装VMware之后物理机的网络适配器信息(会多两个vmnet1 和 vmnet8)

注:vmnet8是虚拟机使用NAT模式上网的网卡。
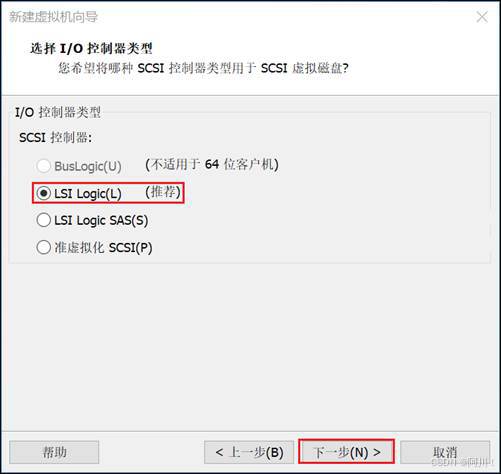
(2)选择对应的文件系统的IO方式
选择"LSI Logic"(默认)
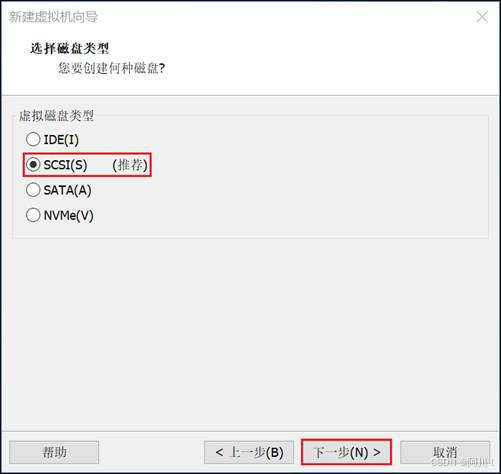
(3)选择磁盘的类型
选择"SCSI(S)"(默认)
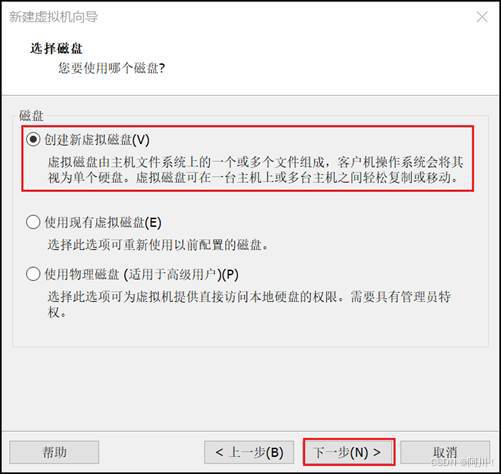
(4)选择磁盘的种类
选择"创建新虚拟磁盘"(默认)
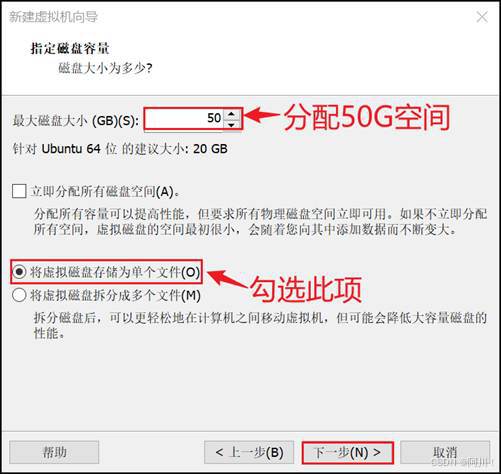
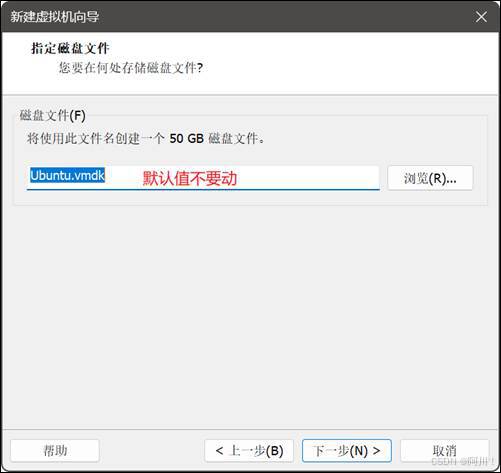
(5)选择虚拟机的磁盘大小和文件个数
指定最大磁盘大小为:50G (修改)
选择虚拟硬盘文件个数为:1 (修改)
(6)虚拟机文件的存放位置
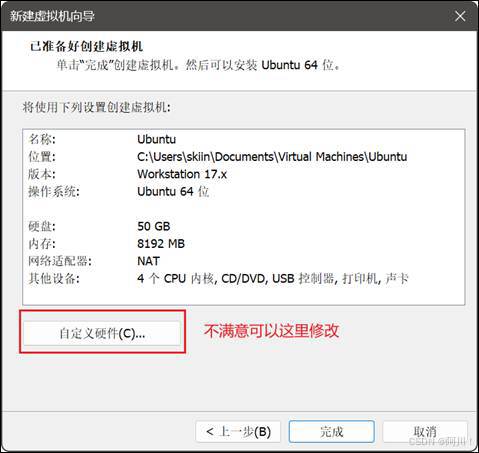
(7)电脑配置完毕
2.1.3安装系统(Ubuntu)

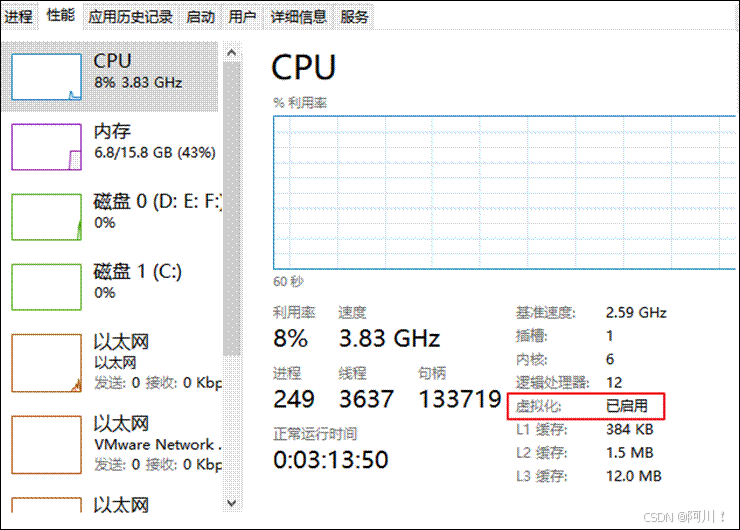
注:在安装系统之前需要检查自己虚拟机的bios的虚拟化是否打开(大部分的电脑都是打开的,大家可以先尝试直接安装,如果出现错误再去调试,没有出错就不用管了)。
以下是查看虚拟机bios是否开启的方式。
window10
- window7里面看不到(得去bios里面看)
- 如果发现bios虚拟化没有开启怎么办,重启电脑,在加载界面时按f1-f10,或者电脑旁边一个小洞,具体怎么进入得去查一下(按照自己电脑的型号去查)
- 修改虚拟化为开启(thinkpad为例)找到security里面的VT并改成enabled
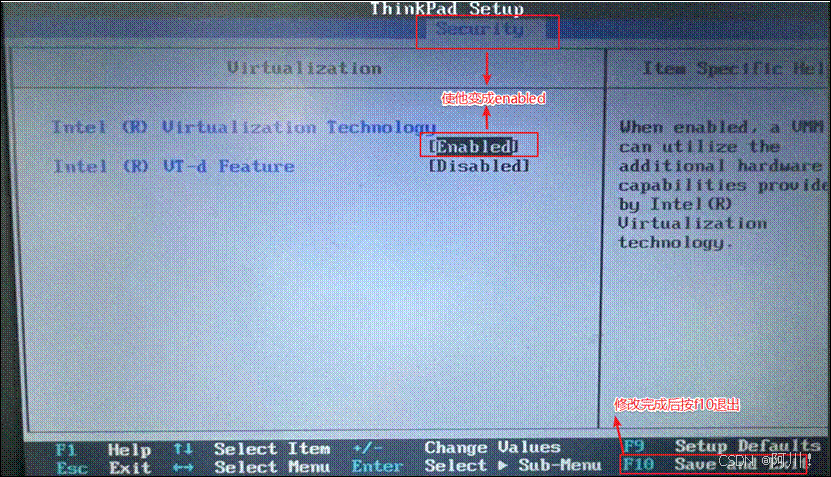
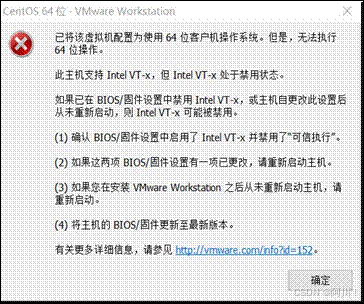
注:如果虚拟化没有开启报的是以下错误。
2.2安装系统
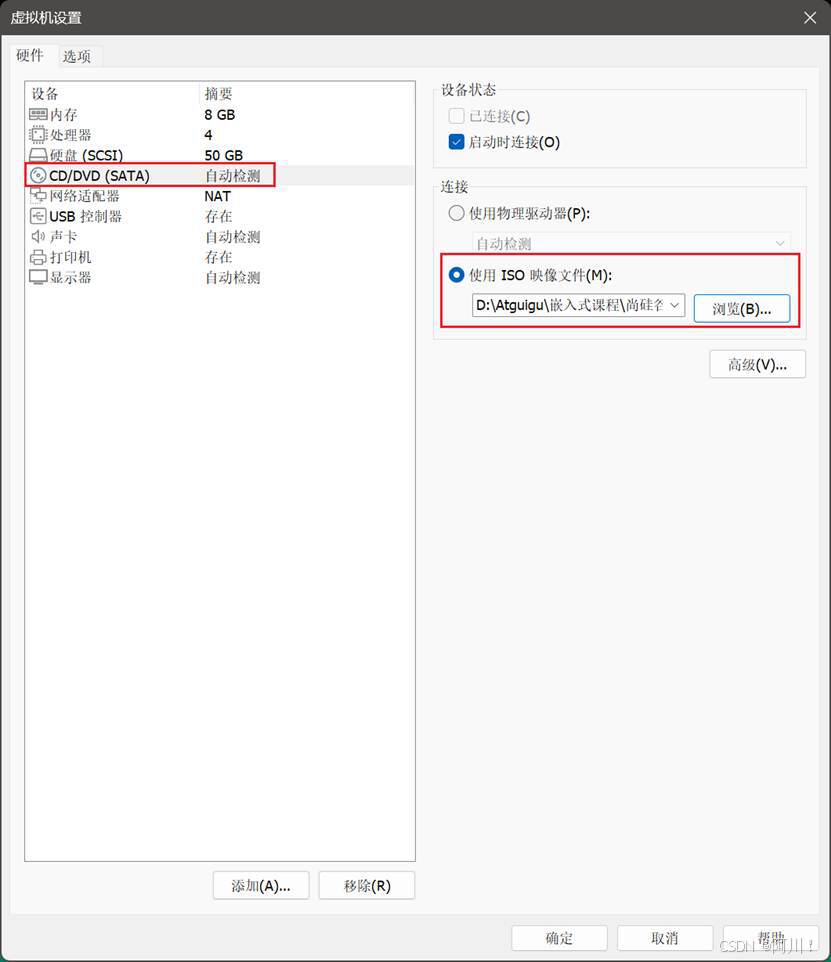
(1)选择cd/dvd的方式安装系统
我们可以直接选择文件包中的**"ubuntu-22.04.4-desktop-amd64.iso"**

(2)系统安装引导界面
你得需要将鼠标点击进入界面中,但是鼠标会消失,你此刻得用键盘的上下键来控制选项,图标变白了表示当前选中的是哪个选项,然后敲回车,表示执行所选选项。
注:如果这个时候你需要鼠标可以使用ctrl+alt****一起按呼出鼠标。

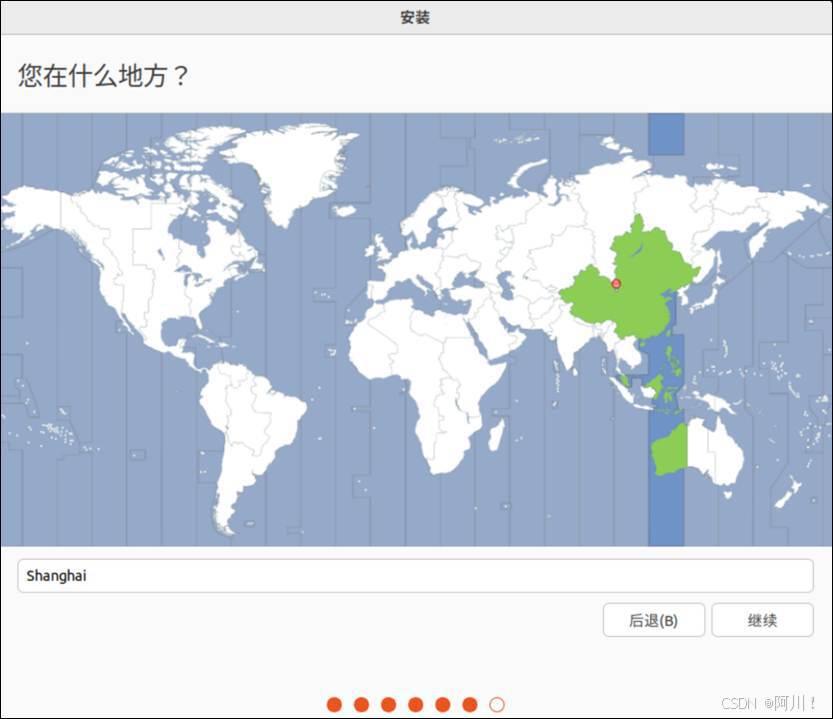
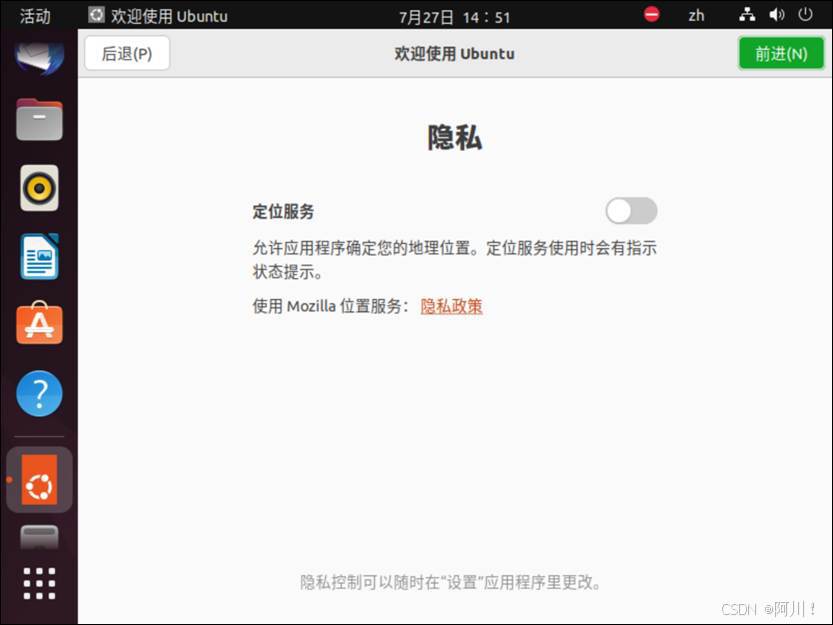
出现如下界面,选择中文安装
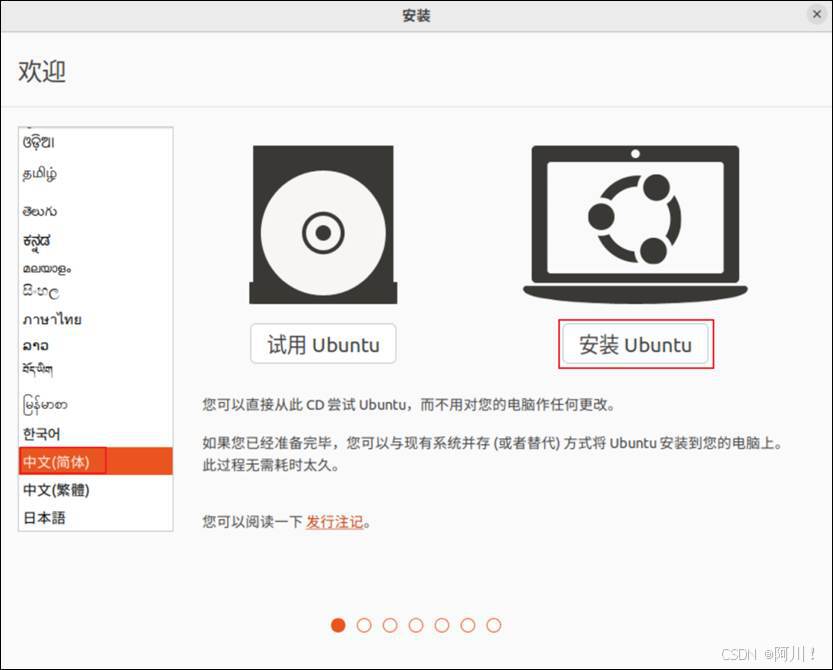
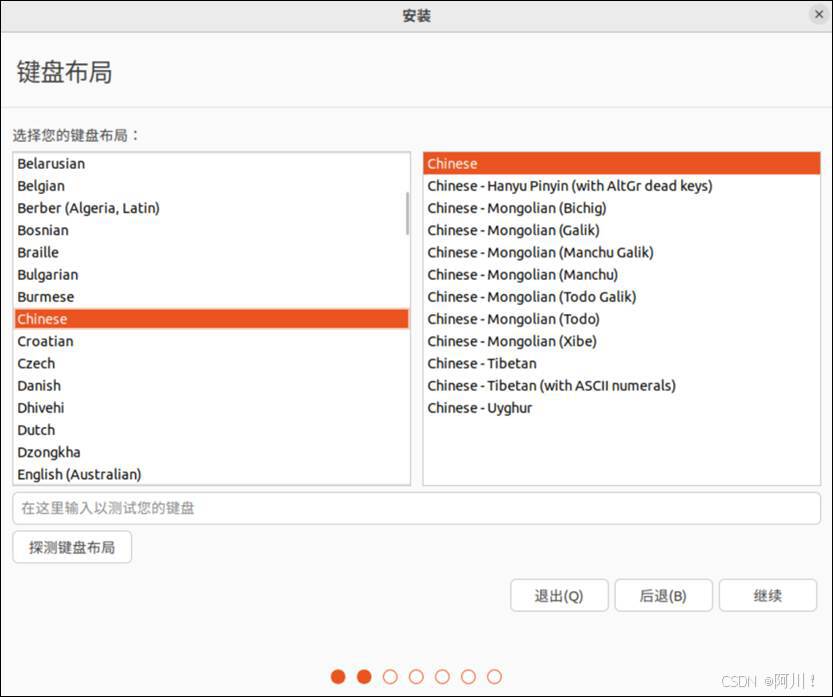
选择中文键盘
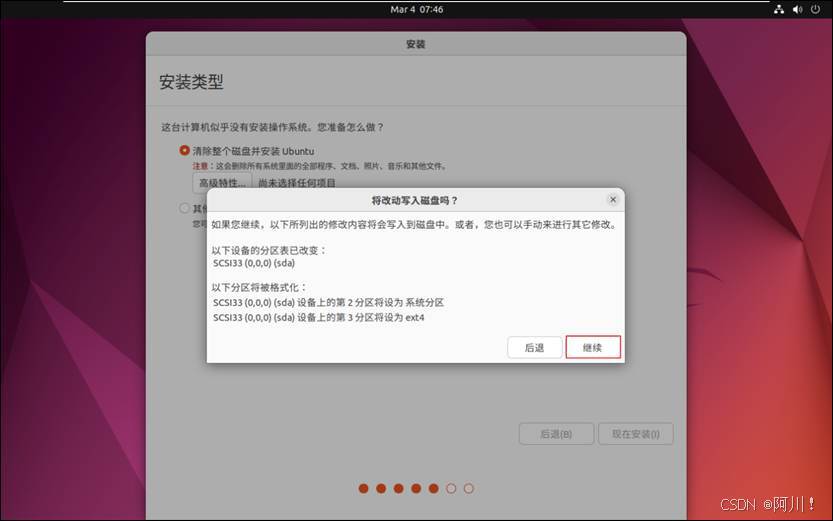
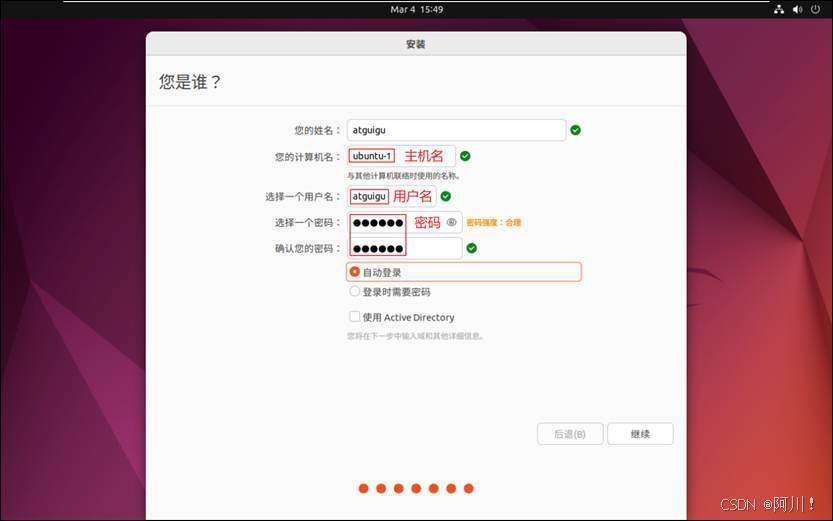
注意:用户名最终都是小写(即使输入大写,最终存储的都是小写的),不要用中文
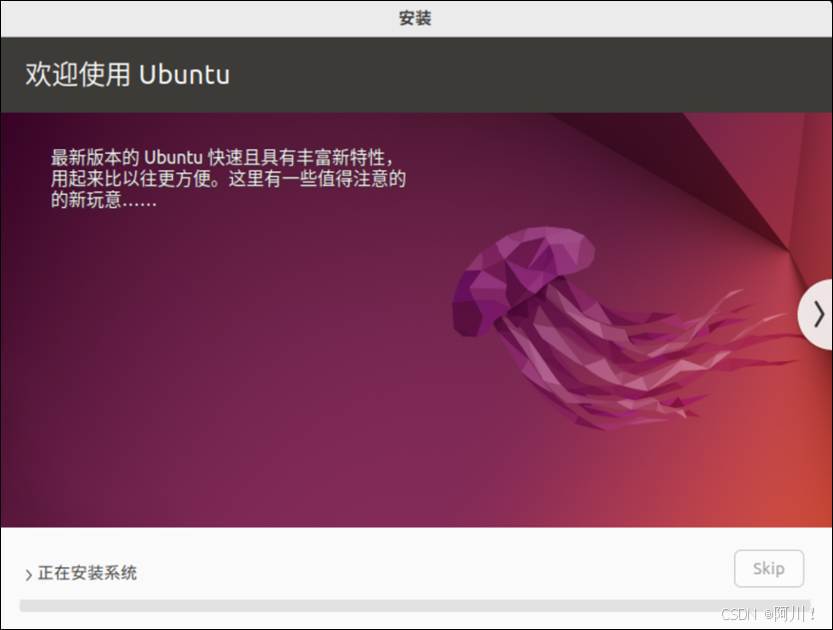
等待安装结束
重启虚拟机

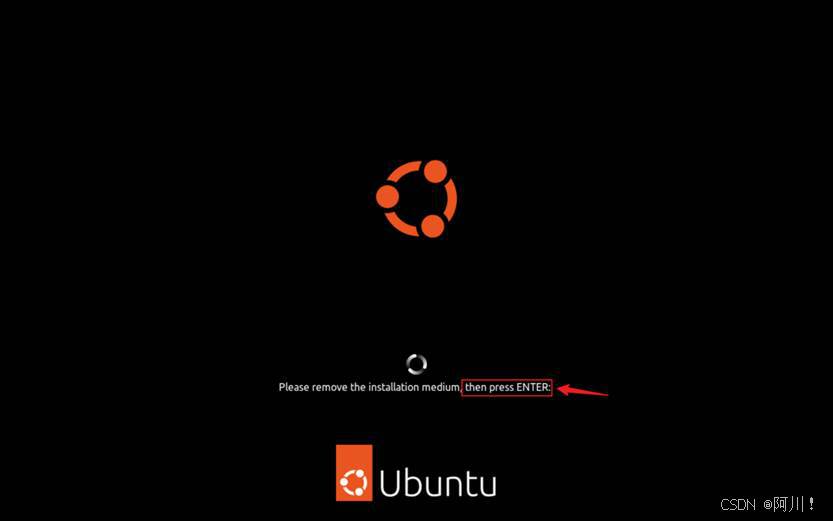
移除安装镜像
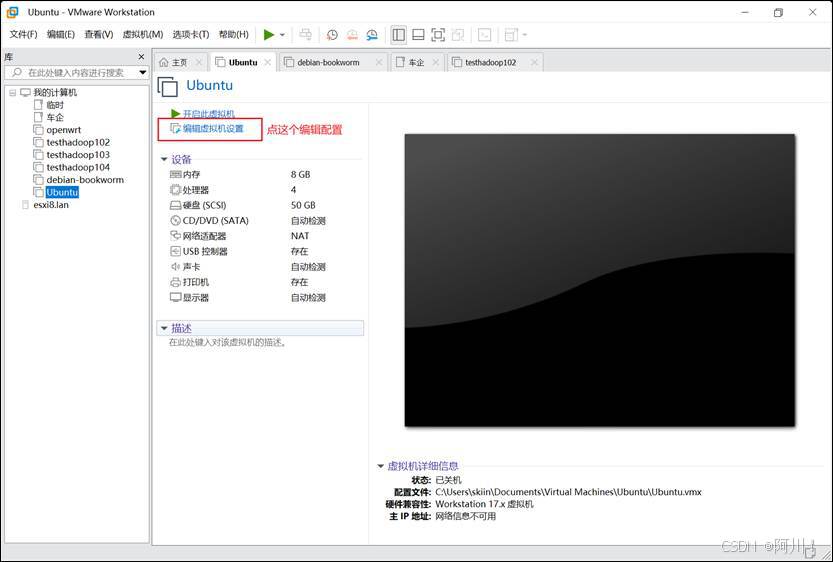
打开虚拟机设置,作出如下修改后确定。
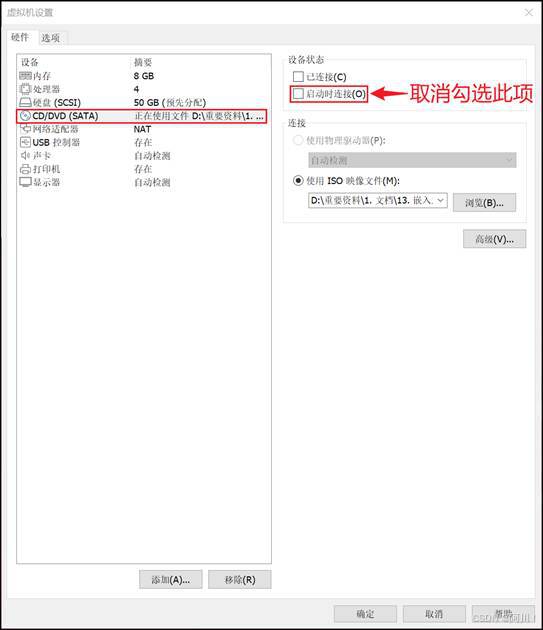
按下回车即可,后续每次启动不再出现以下提示,不必再按回车。
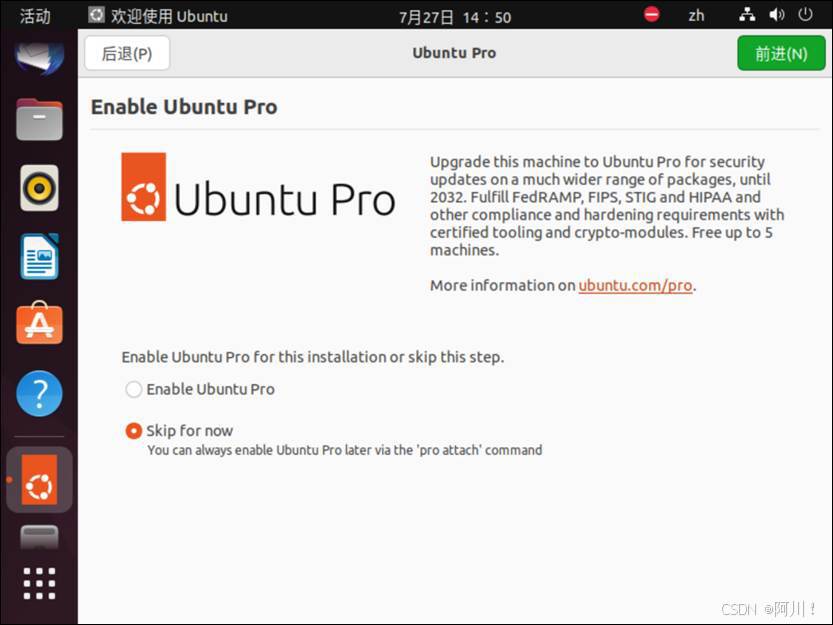
- 虚拟机的使用引导界面
- 安装完成 重启虚拟机,跳过账户页面
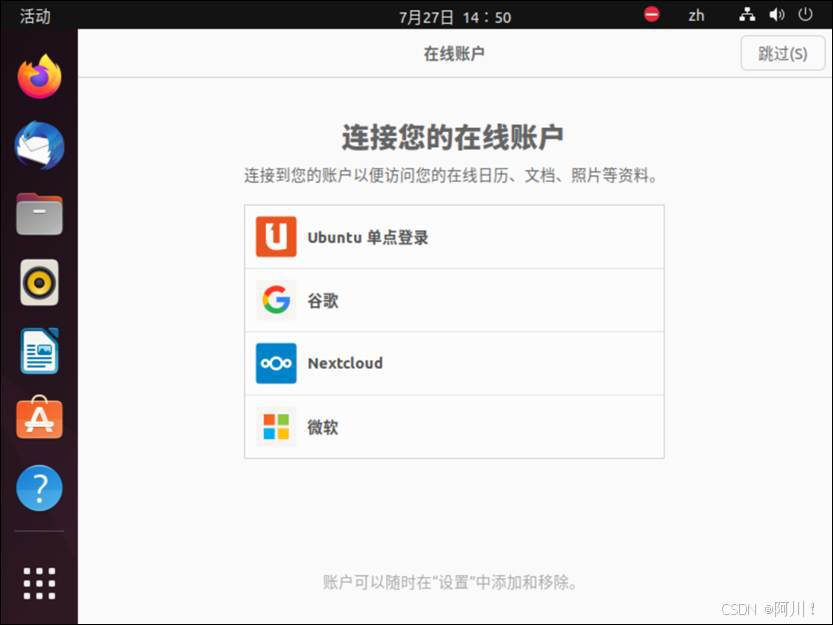
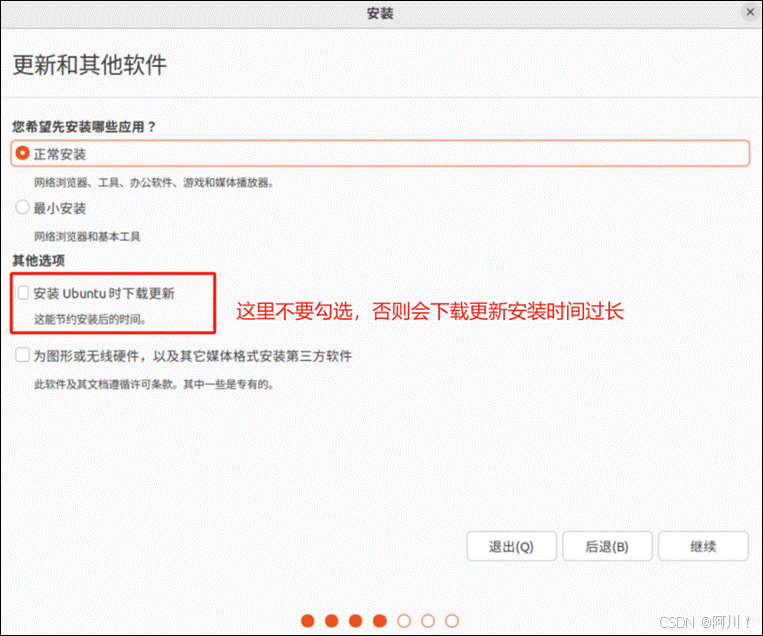
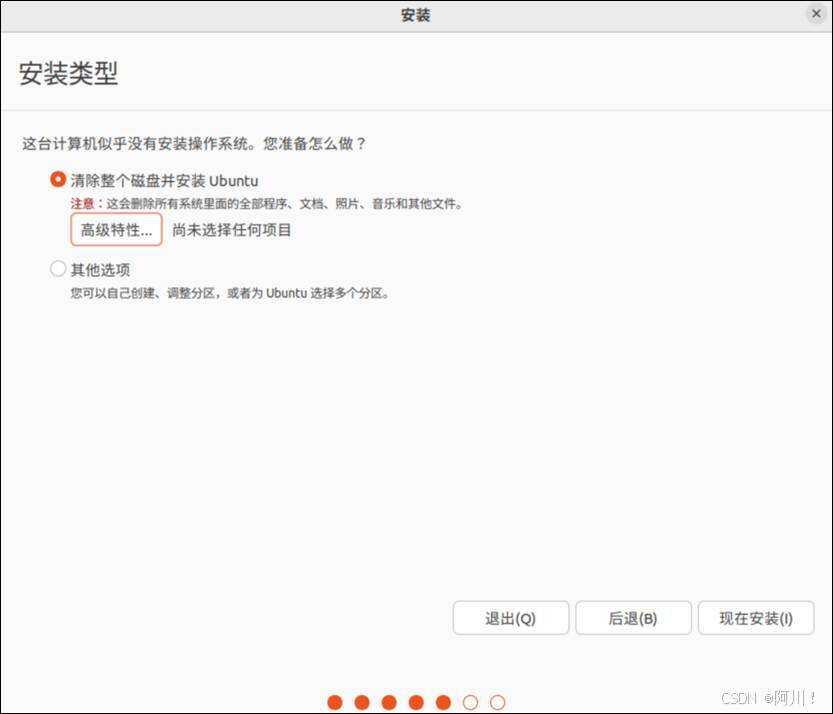
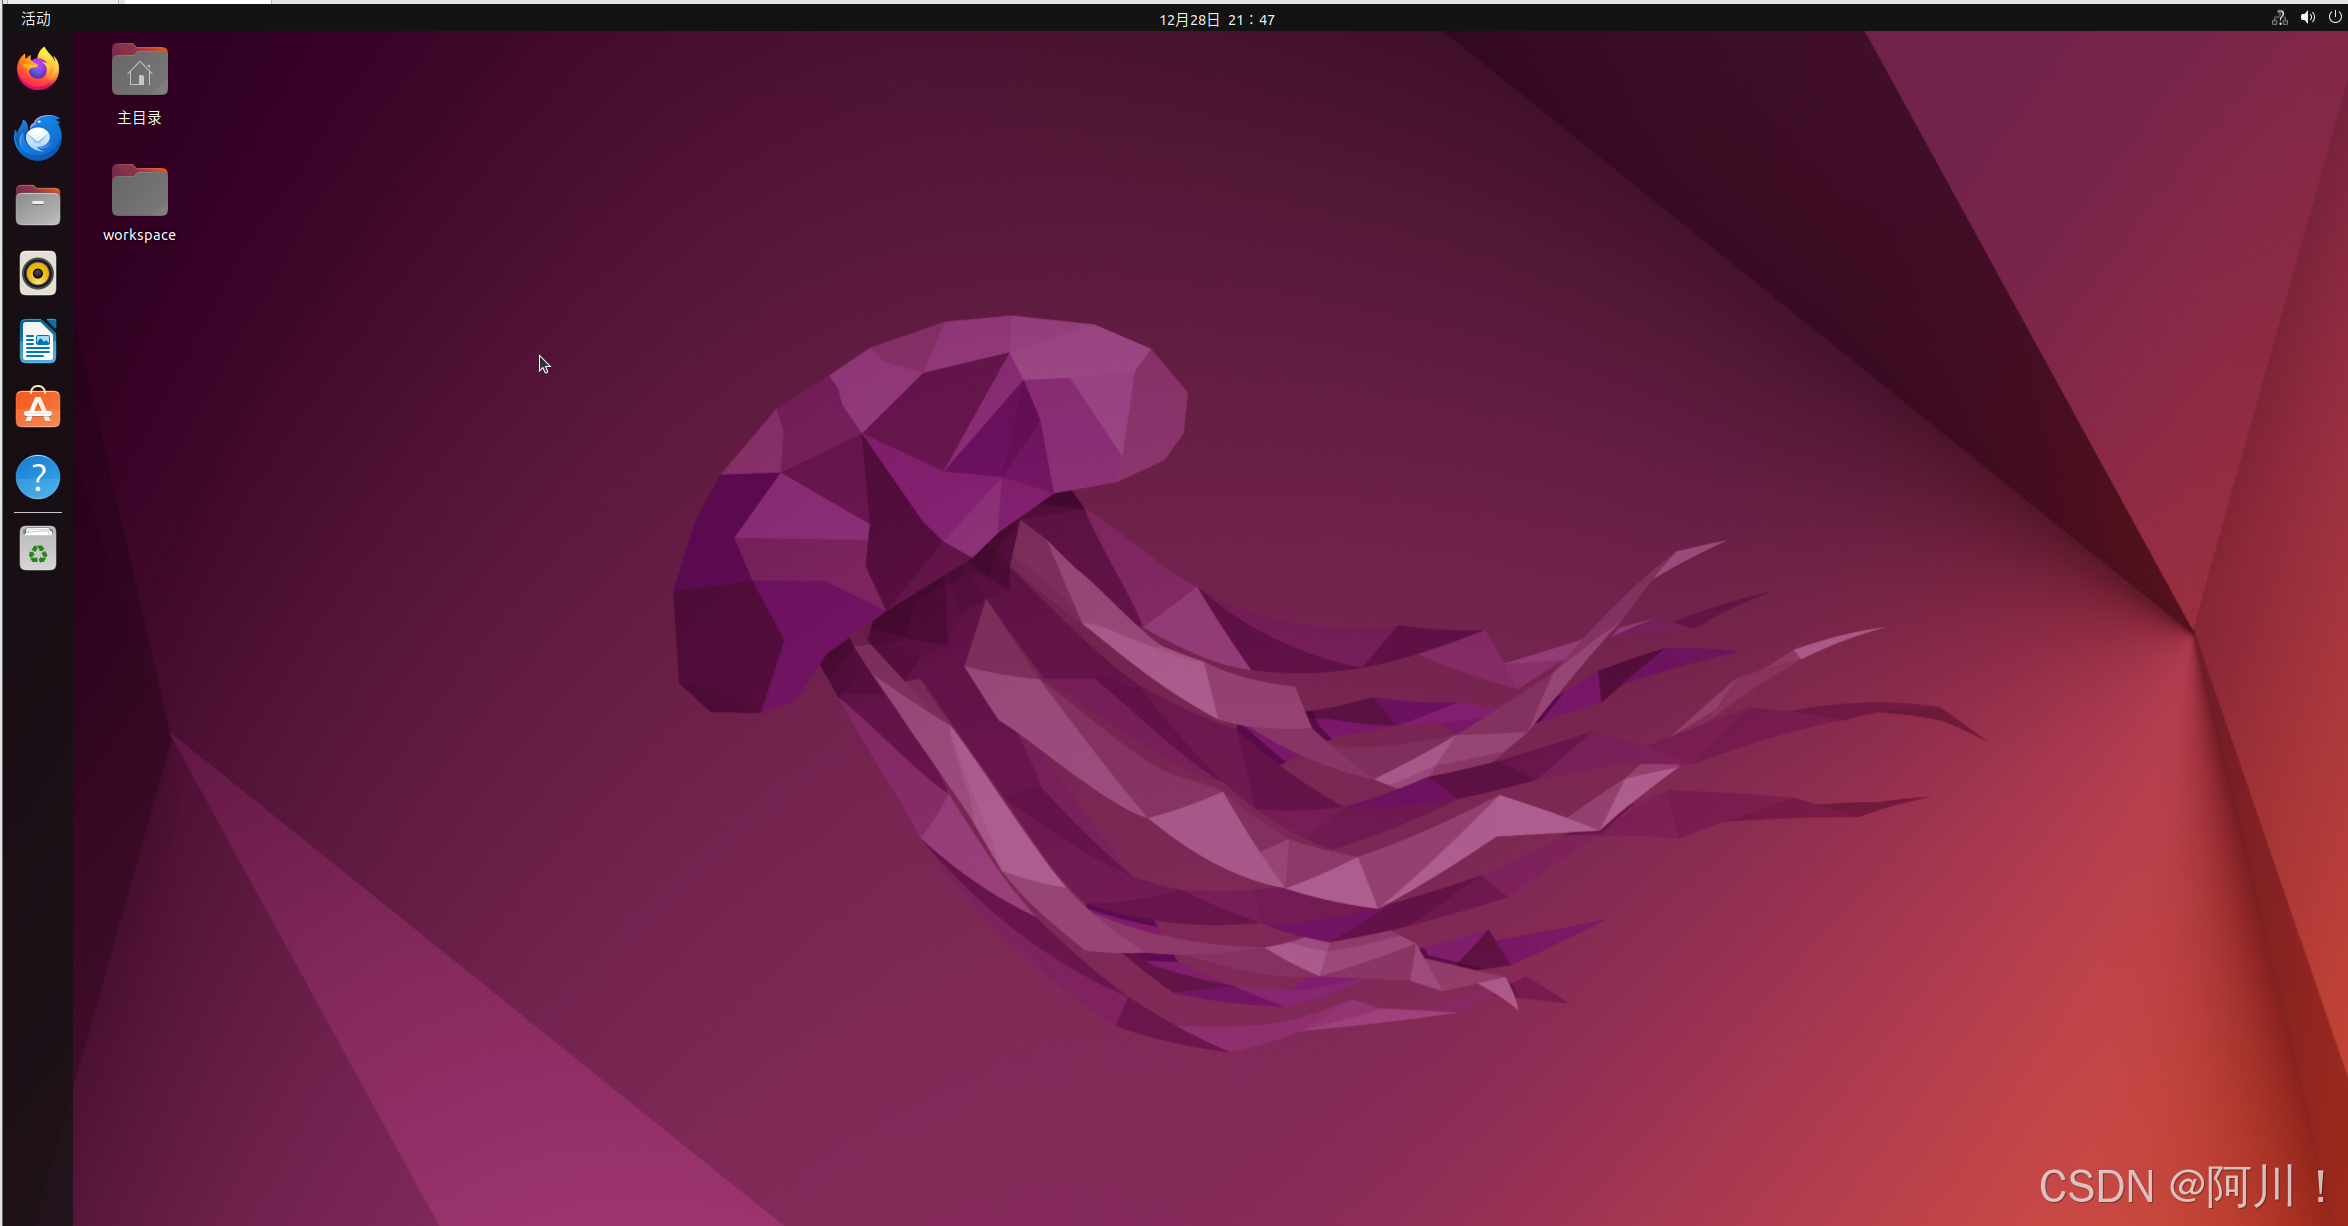
进入引导界面(以下内容就按照图片走,就不做过多解释)

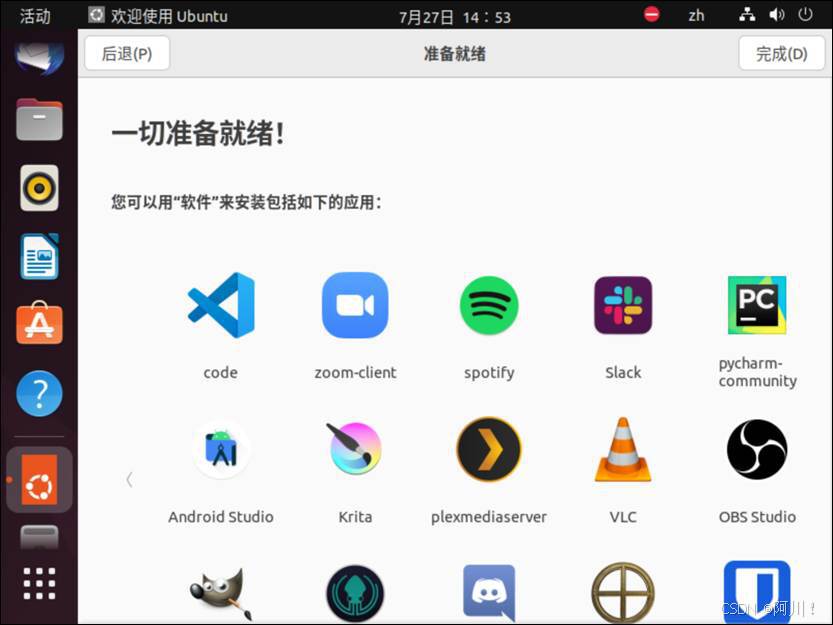
安装完成。
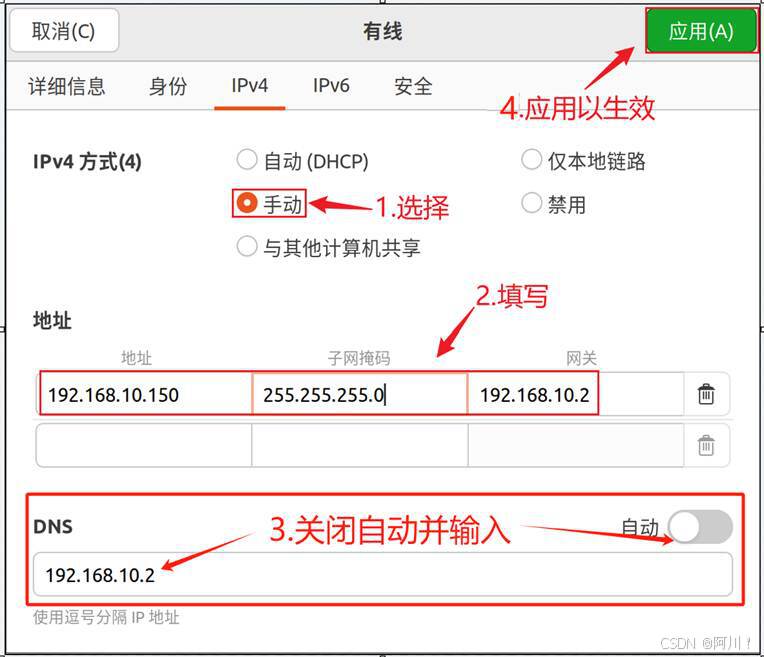
配置网络
在未进行自定义网络配置前,当前虚拟机就已经可以通过宿主系统(Windows)连接外网了。当前配置网络并不是为了让虚拟机能上网。
问题:当前虚拟机上windows上的内网虚拟IP是动态产生的,而在windows上连接虚拟机需要通过这个IP来连接,动态变化的IP极不方便。
解决:通过相关网络配置来固定虚拟机的内网虚拟IP。
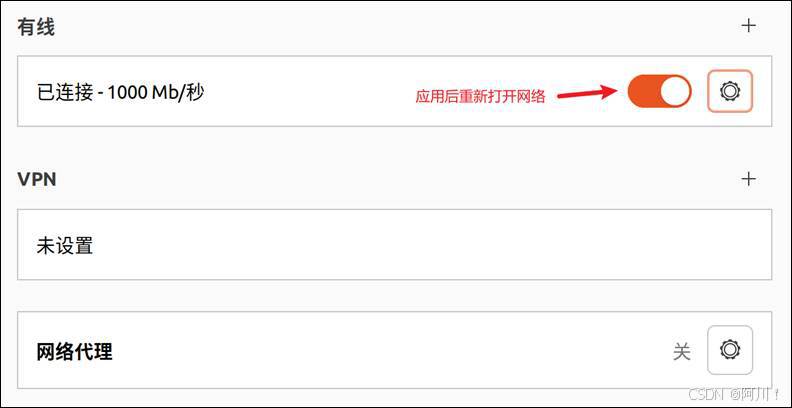
编辑VMware的网络配置
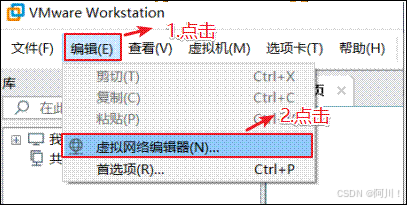
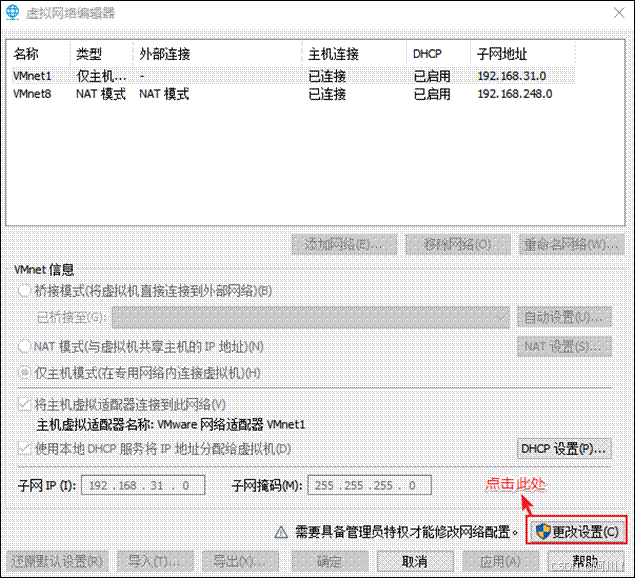
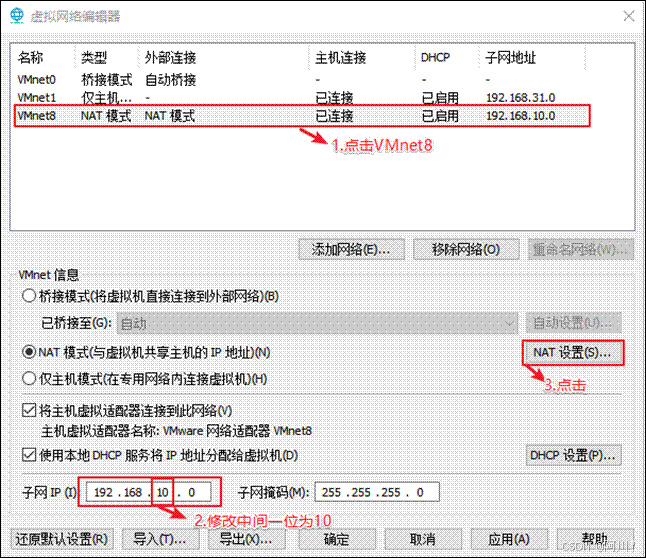
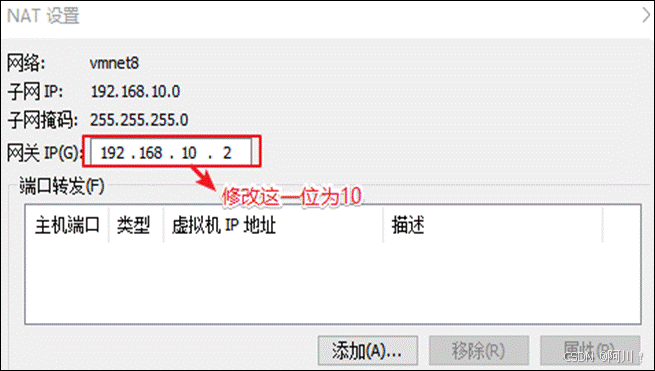
然后全部点击确定,VMware的网络配置就好了。
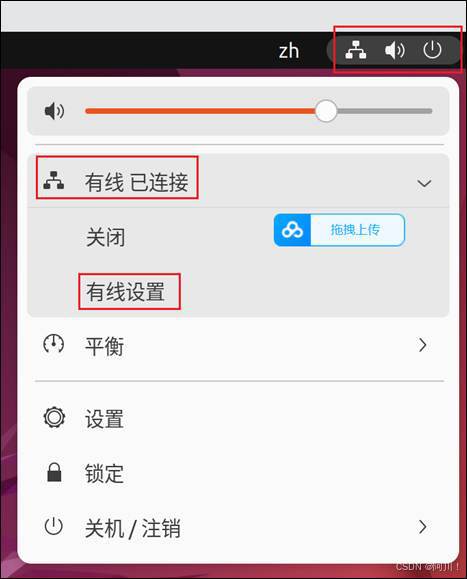
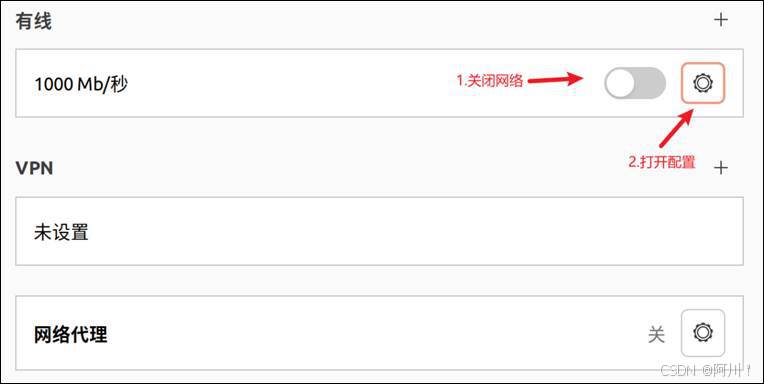
虚拟机网络IP修改地址配置
打开网络配置:
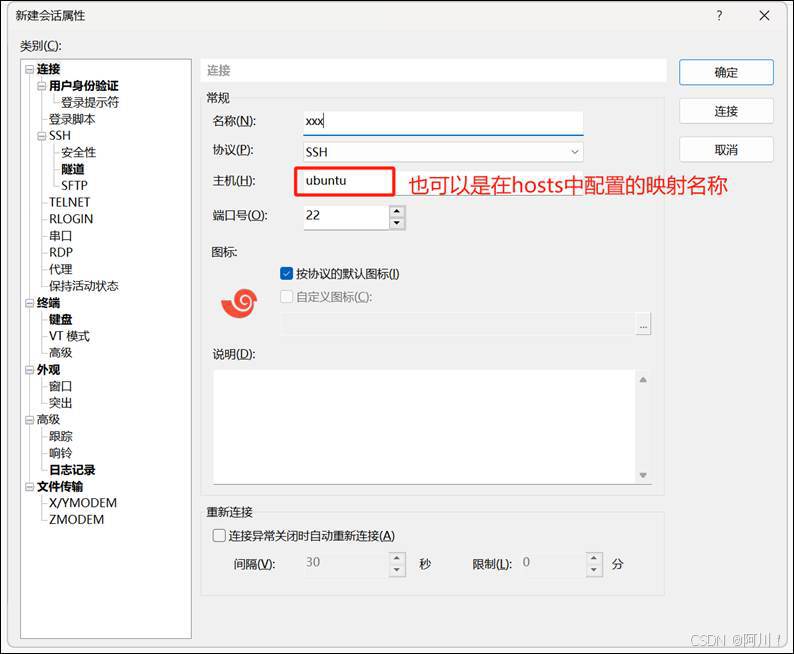
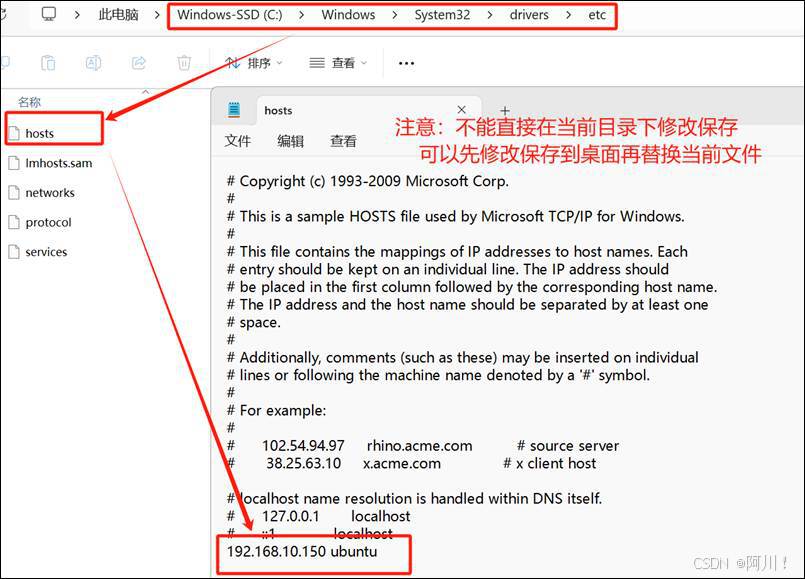
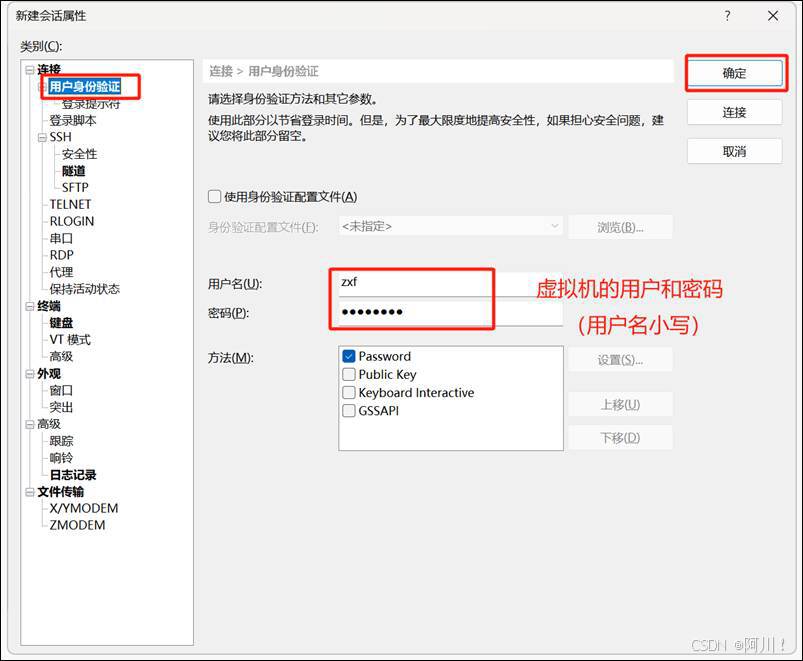
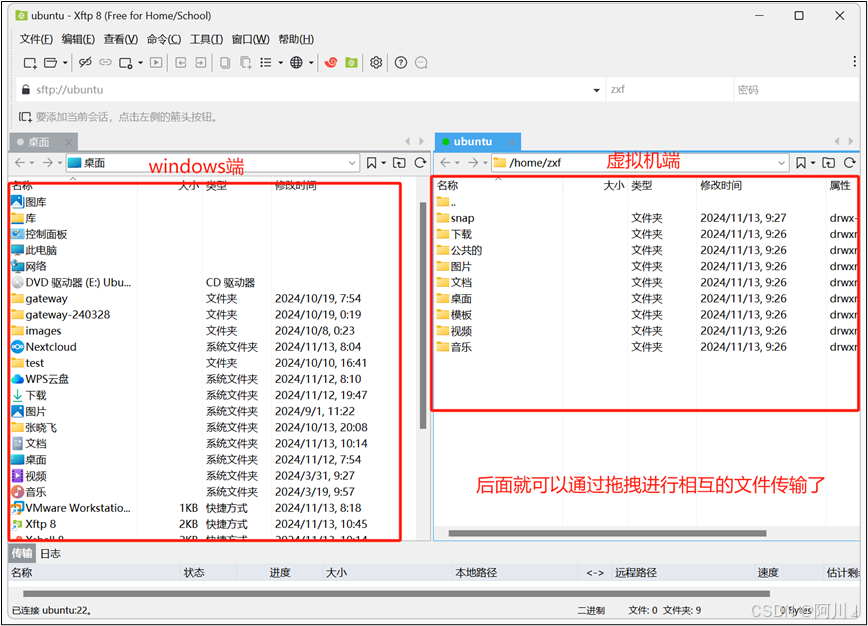
2.3 安装远程终端工具
Xshell:windows系统工具,连接本地或远程的Linux系统虚拟机或服务器,通过命令来操作虚拟机或服务器。
Xftp:windows系统工具,连接本地或远程的Linux系统虚拟机或服务器,进行文件传输操作。
ssh服务端安装(必须)
在Ubuntu中打开终端,执行以下命令:
atguigu@ubuntu:~/桌面$ sudo apt update#更新包管理工具
atguigu@ubuntu:~/桌面$ sudo apt install -y ssh
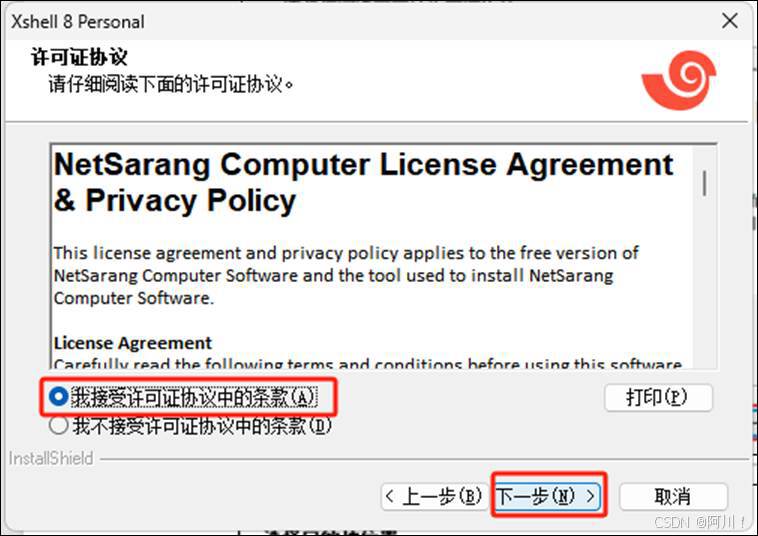
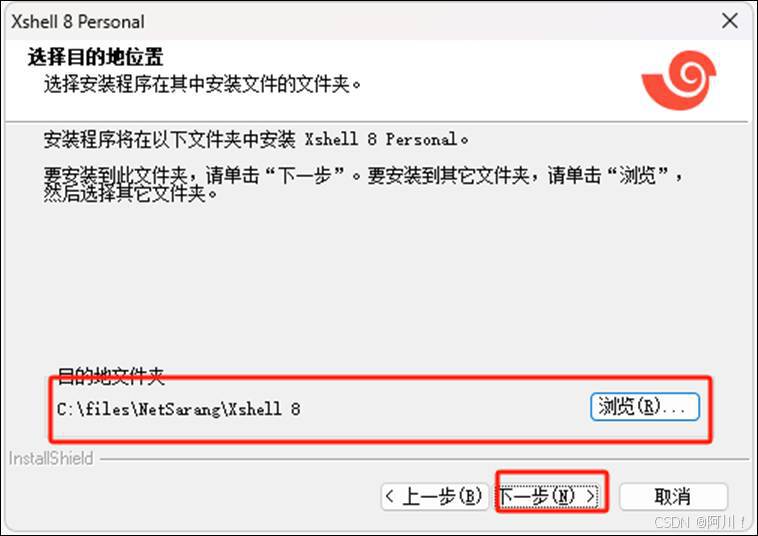
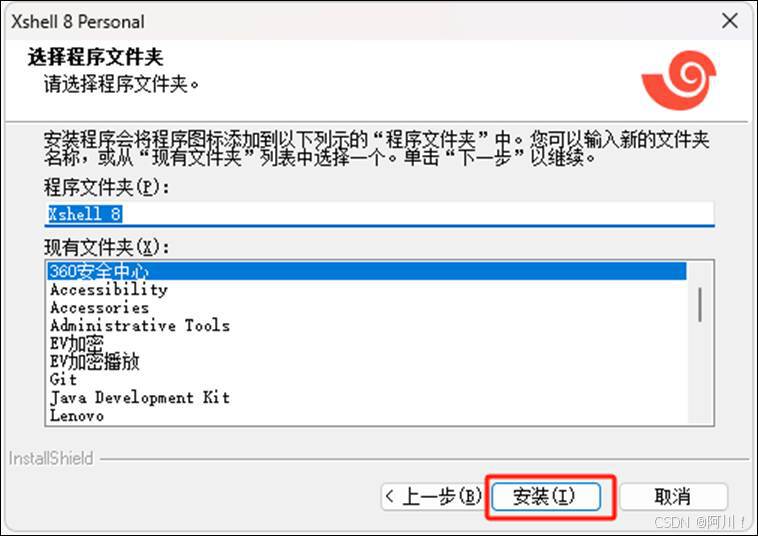
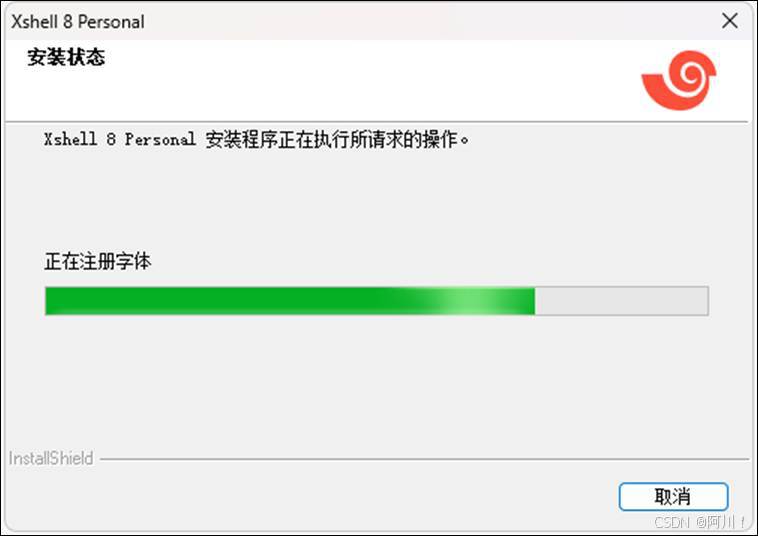
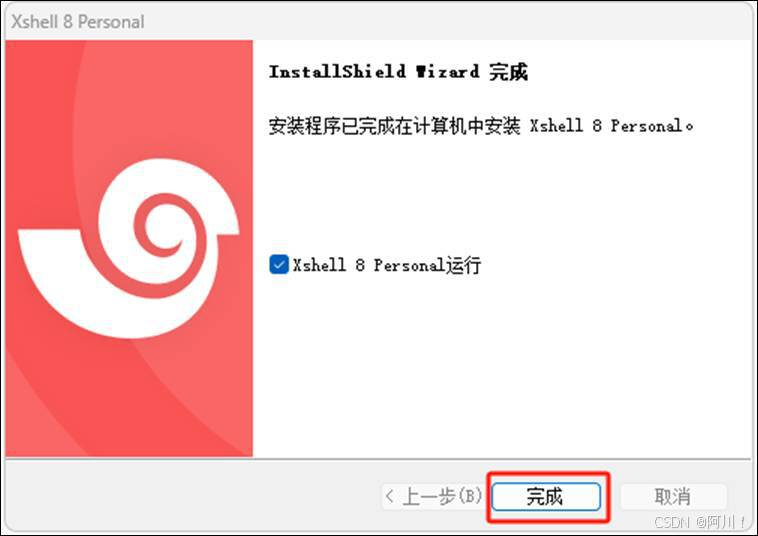
安装Xshell8
-
-
-
-
- 跳过注册
-
-
-
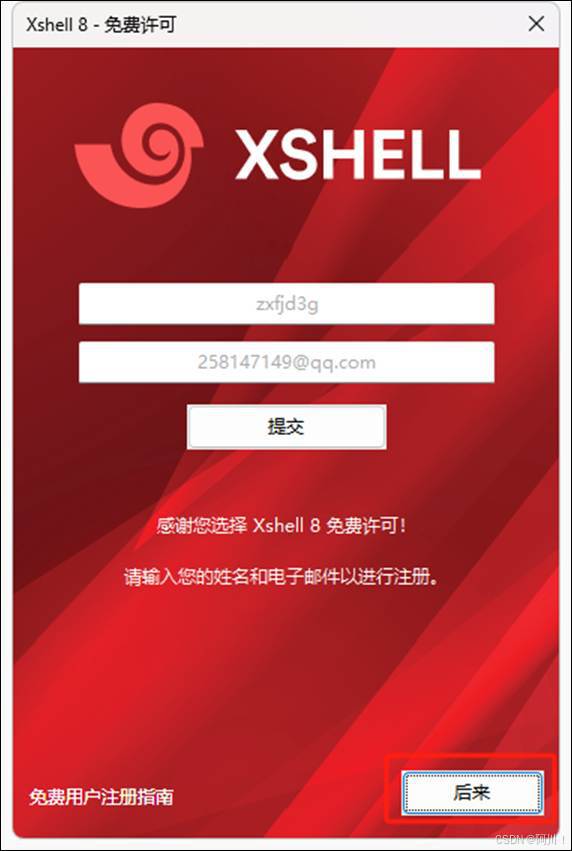
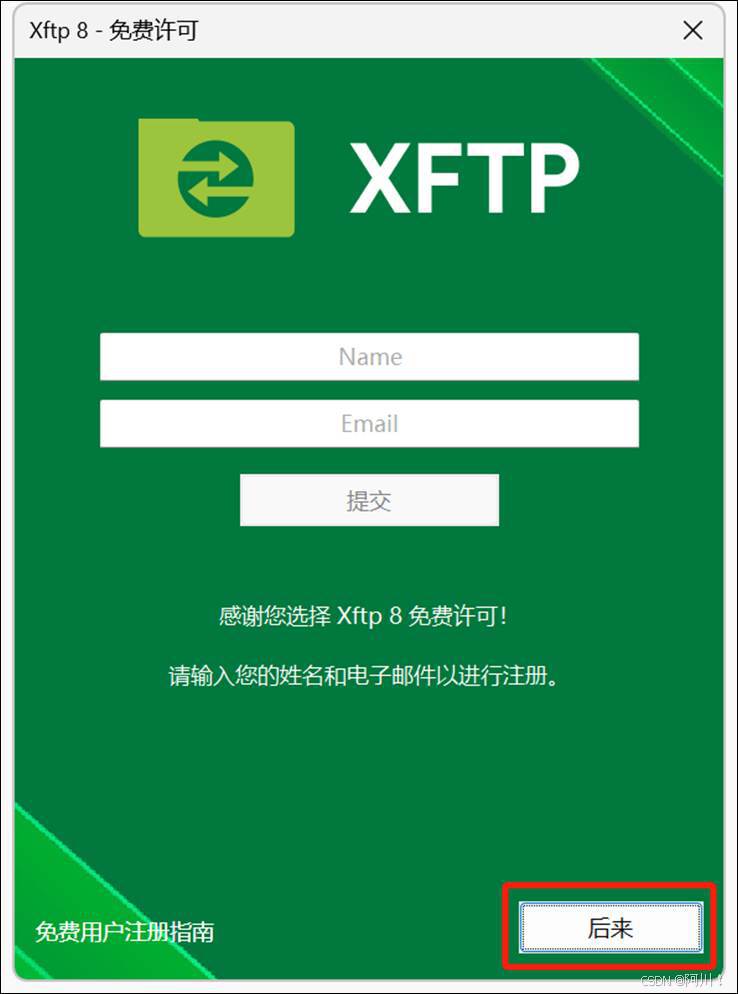
每次启动都会出现上述弹窗,可以根据左下角的"免费用户注册指南"自行注册。
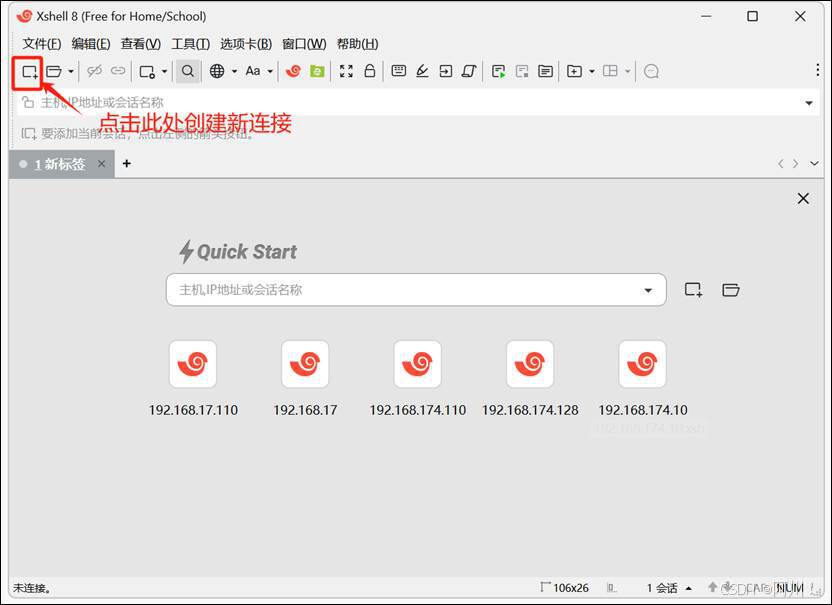
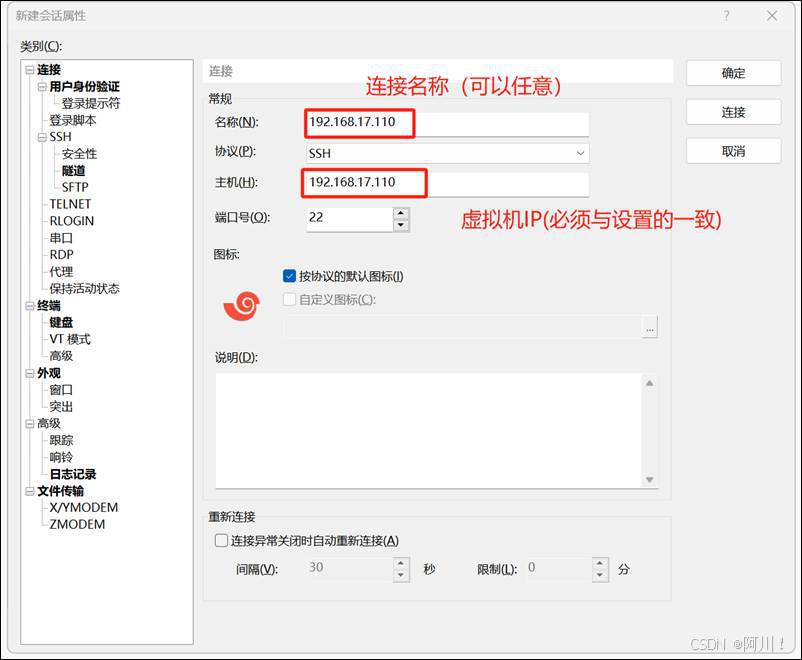
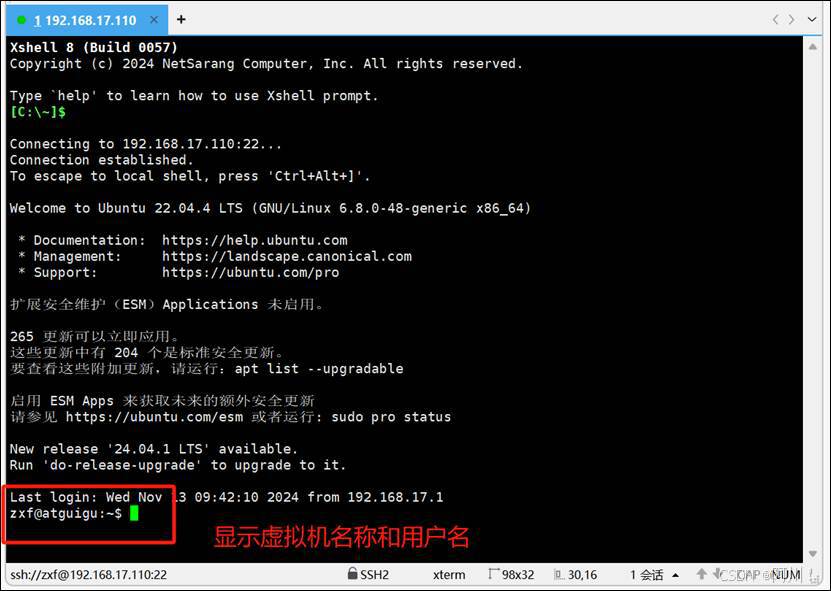
测试连接
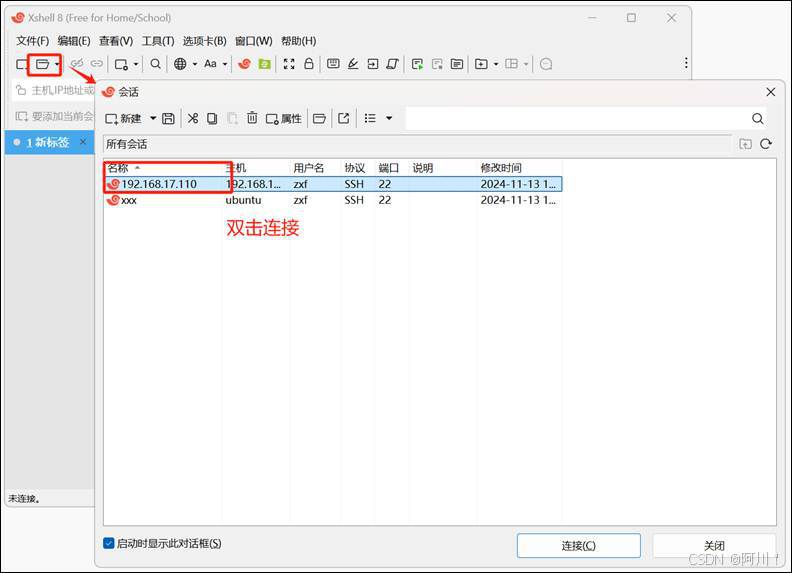
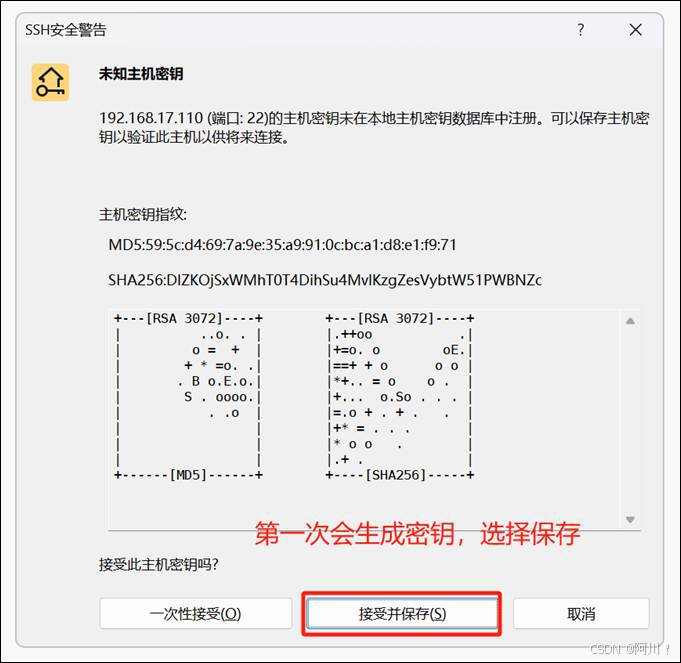
连接成功
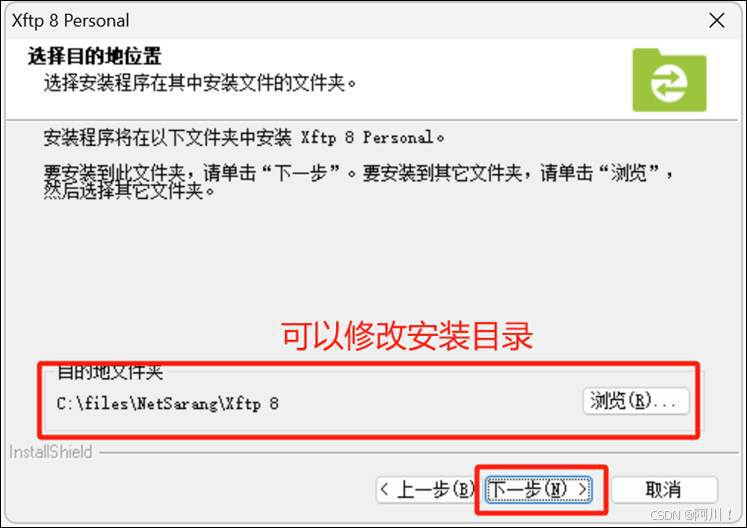
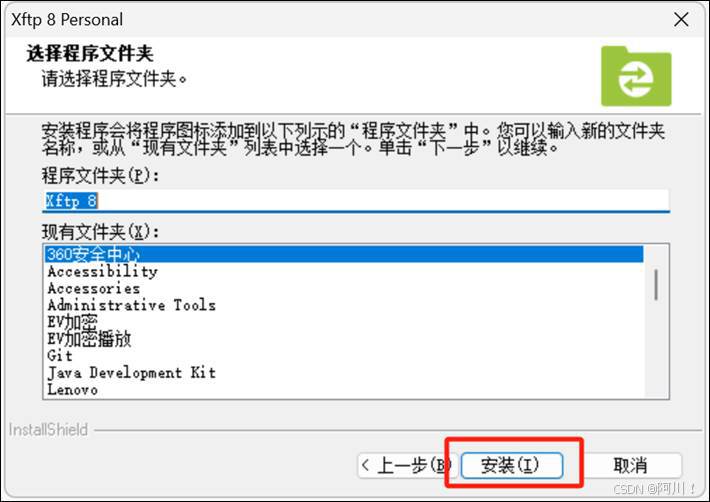
安装Xftp8
按提示操作
出现如下界面表示安装成功
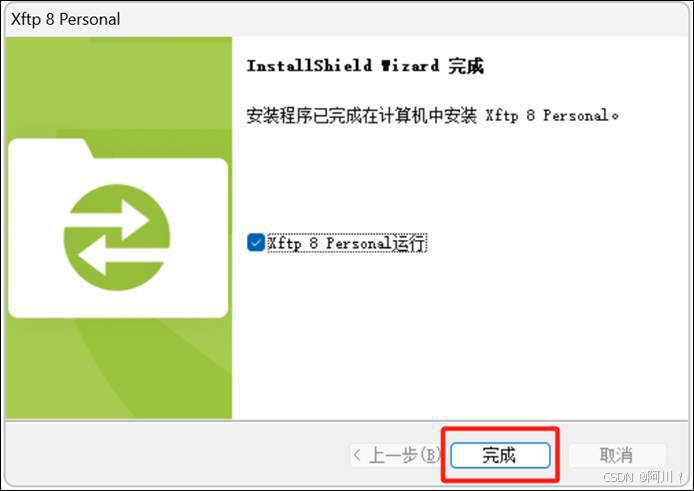
跳过注册
每次启动都会出现上述弹窗,可以根据左下角的"免费用户注册指南"自行注册。
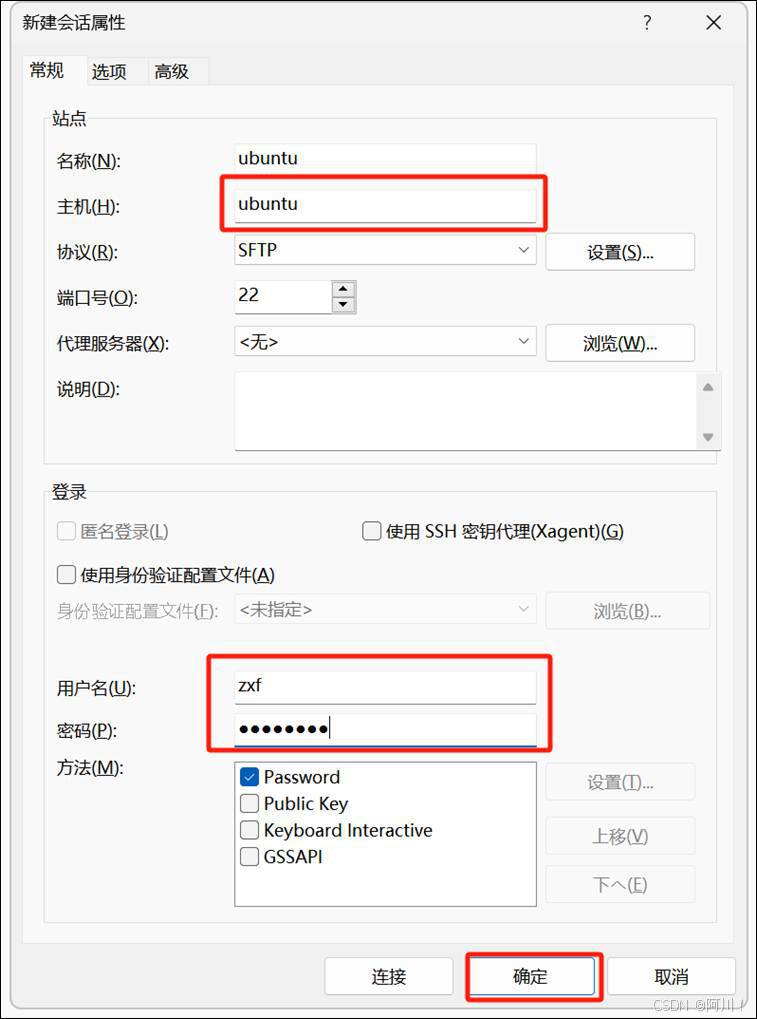
配置Xftp
新建连接

编辑新链接
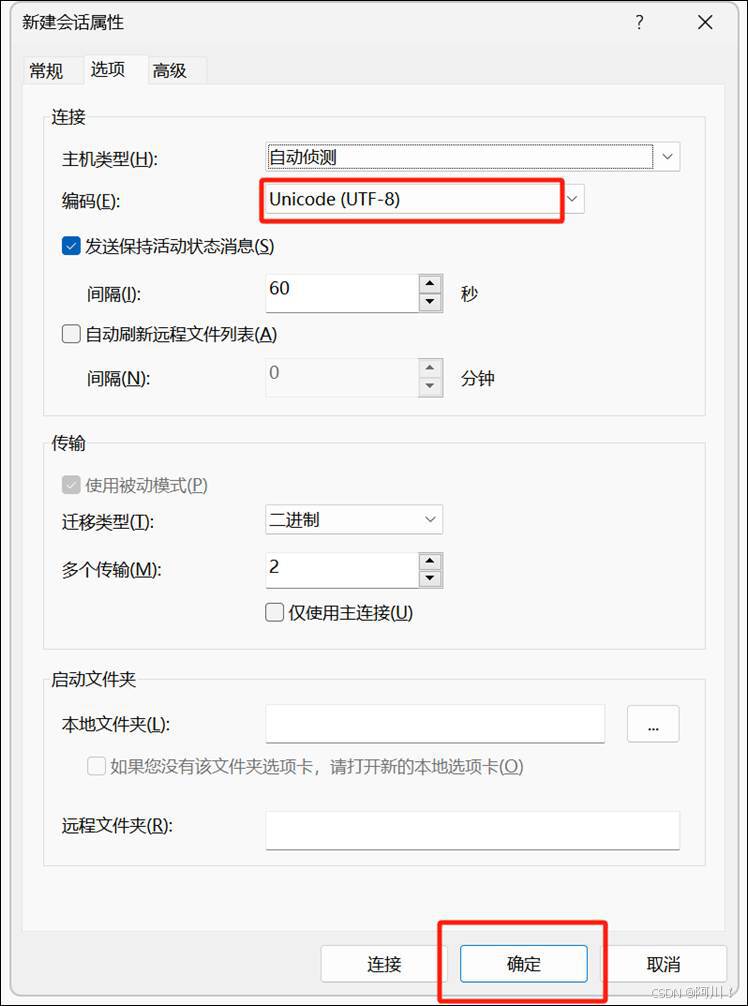
修改编码为UTF-8。
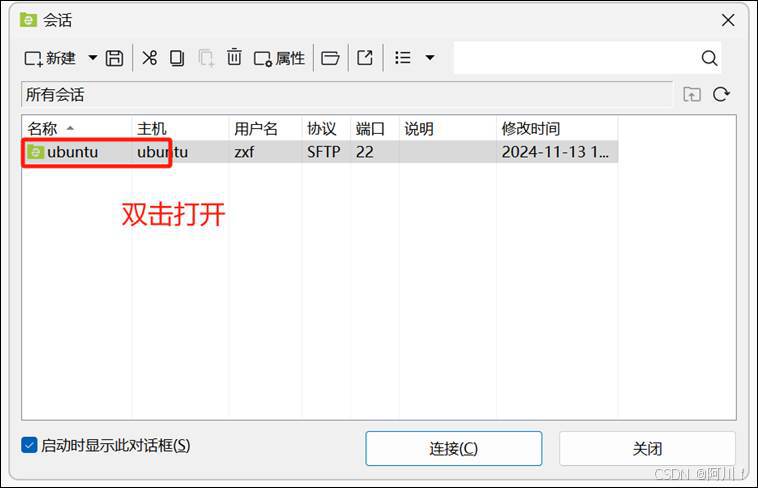
测试新链接

三、linux-ubantu文件结构介绍
linux中一切皆是文件。

如何访问一个文件?
在Windows系统里可以通过路径来访问文件,linux也没有区别。
在浏览器中,我们通过URL地址:协议://IP地址:端口号/文件路径
http://xx.xx.xx.xx:80(web)/xxxx.txt
本地文件的访问需要遵循本地文件协议
windows: d:/xxxx/yyy.txt
linux: /etc
linux的路径: 操作系统的根(路径):/ 用户的家: / home/wenjianjia
四、简单指令
4.1 cd 切换目录/改变路径
cd ~ 去到家目录;
cd . 当前目录
cd .. 上一级目录
"/"是linux的根,cd / 也就是去到根路径
cd /opt :从根路径找到opt,进入到里面去。
绝对路径:无法改变的路径
相对路径:可以改变的路径 (基准路径)
cd -P :跳转到实际物理路径,而非快捷路径
4.2 sudo
sudo:switch user do (切换成管理员执行操作,执行后在切换回来)
4.3 clear
clear:清屏
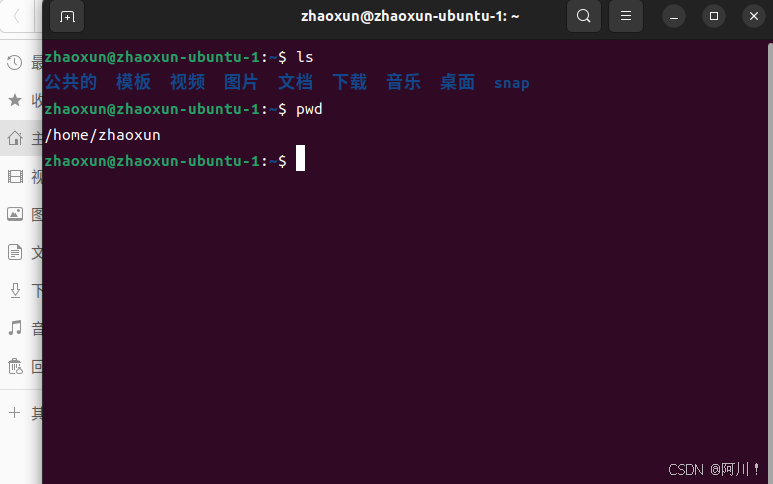
4.4 ls 与 pwd
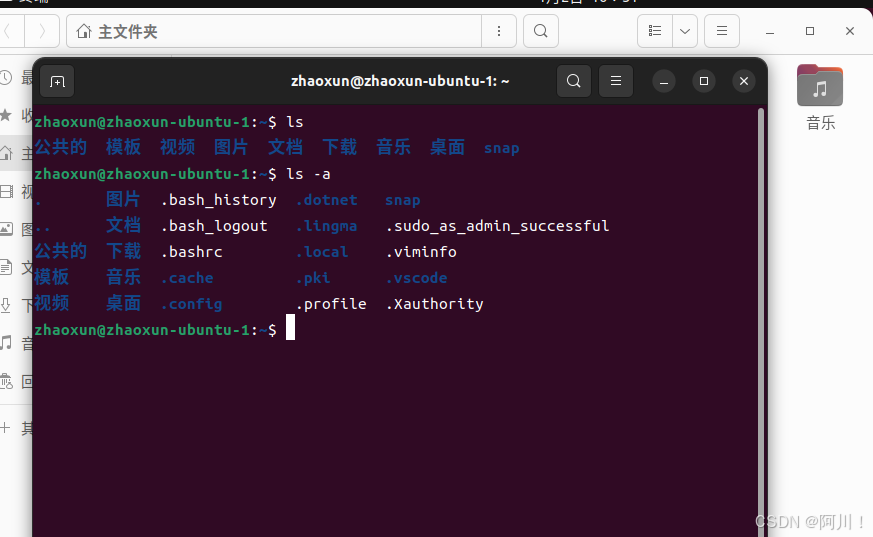
ls:显示目录(当前文件夹下的所有目录)
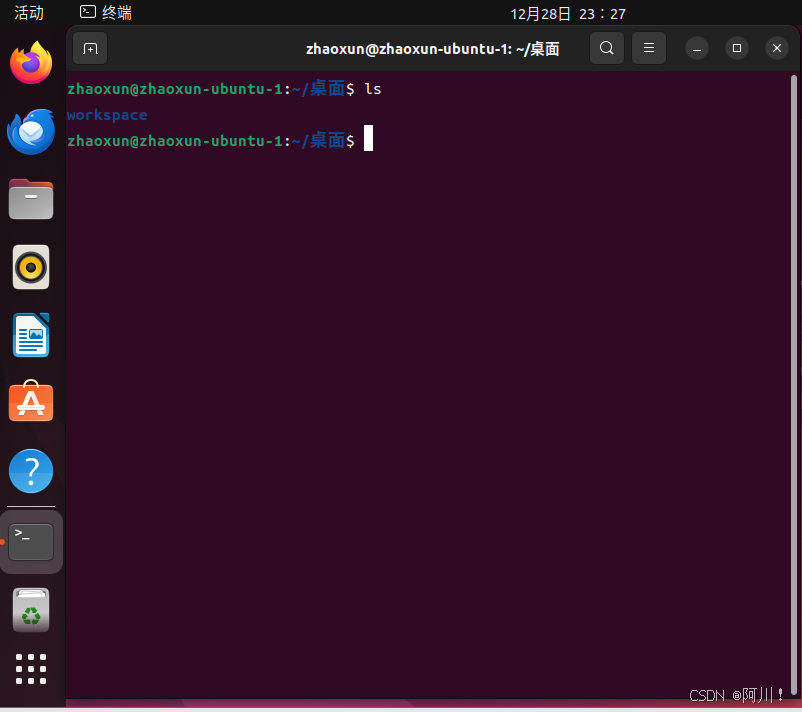

pwd:打印工作目录(print work directory) 显示当前工作目录的绝对路径
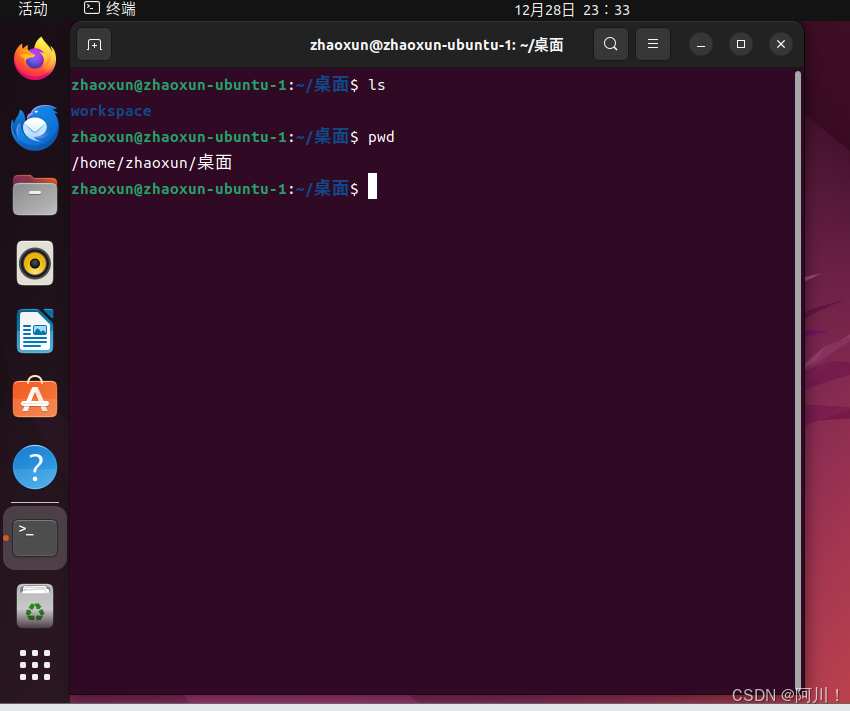
在主目录中打开
ls -a a也就是all,也就是所有的隐藏文件都能看见
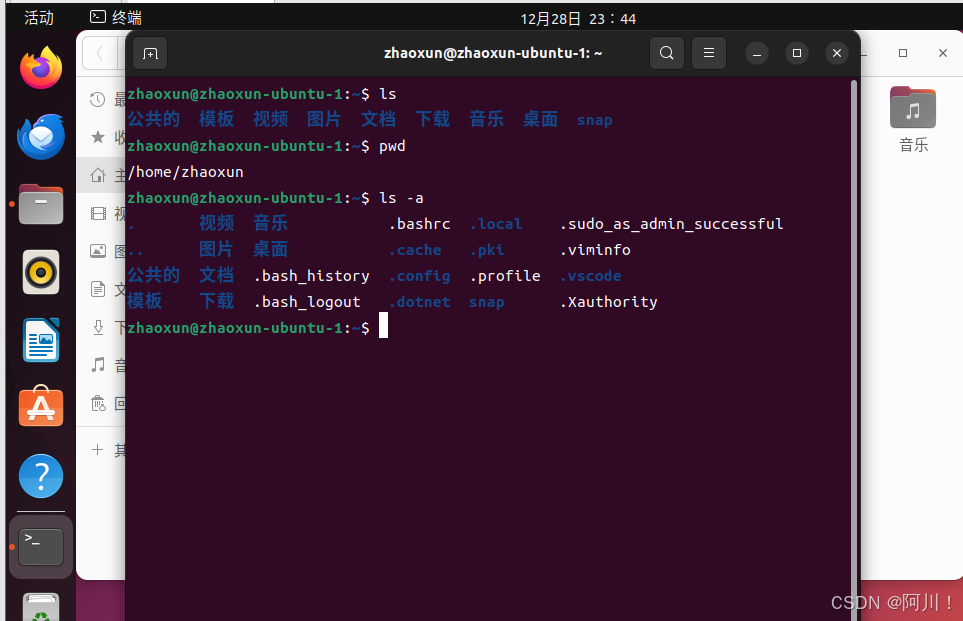
带点的为隐藏文件。但是有两个特殊文件只有.和..
.和..表示文件夹,每一个文件夹都有,表示特殊用途。
一个点就表示当前目录,两个点表示上一级
通过颜色可以区分文件和文件夹,蓝色是文件夹,白色是文件。
ls . 代表列举当前路径下目录内容
ls .. 列举上一级目录内容
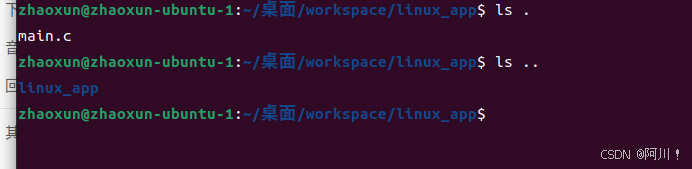
cd ..:改变到上级目录
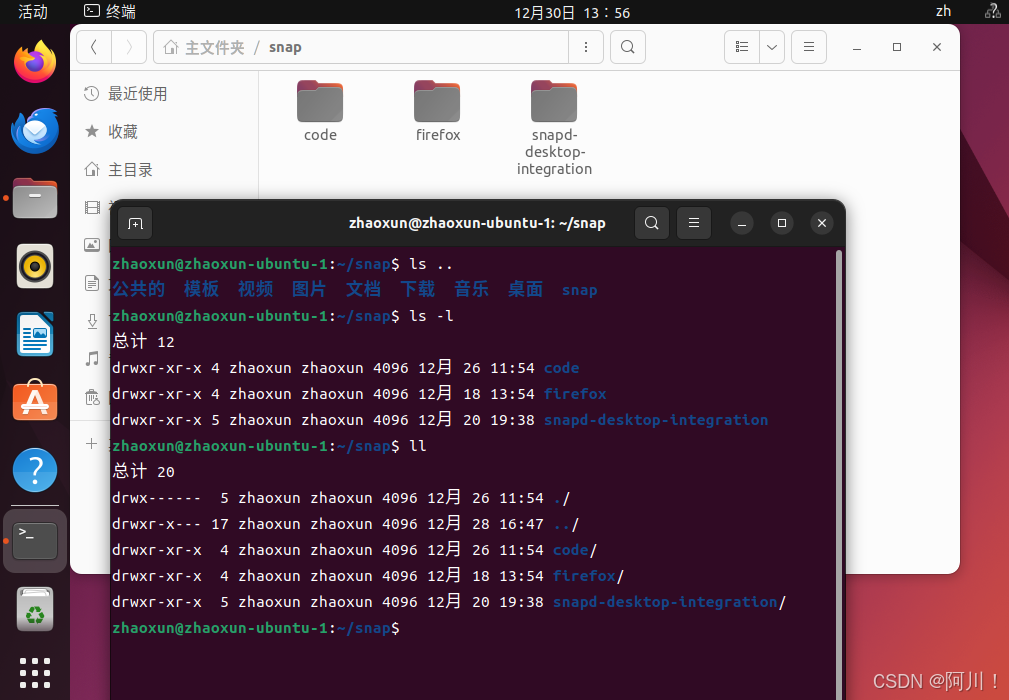
-l 纵向呈现

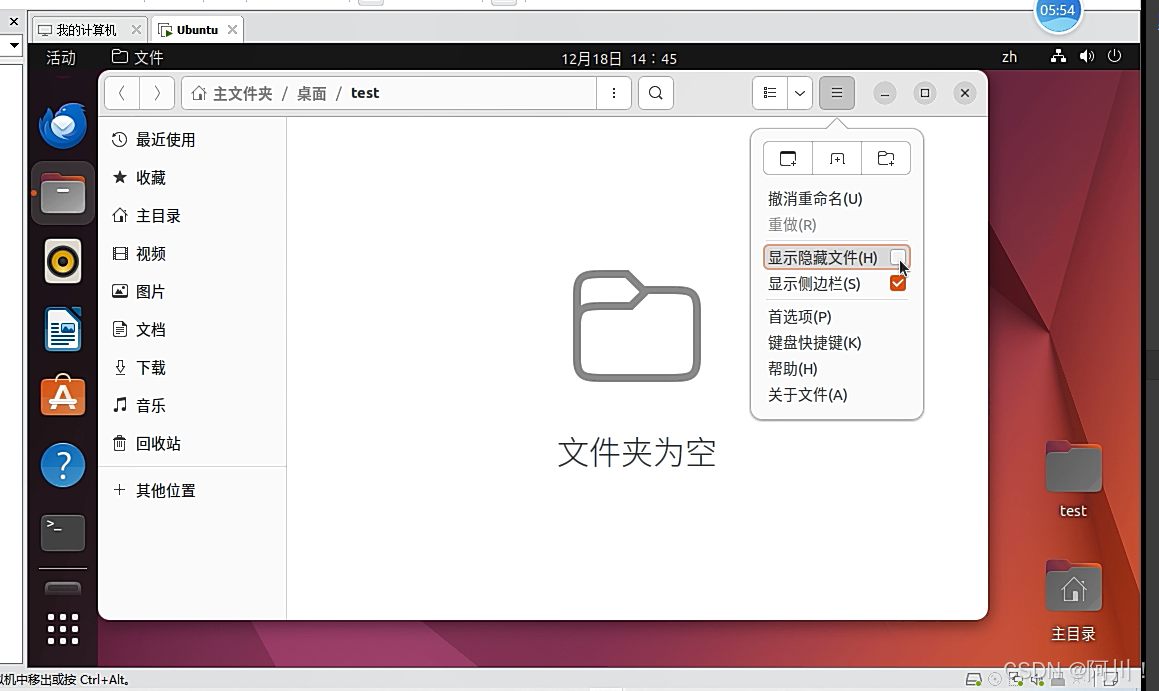
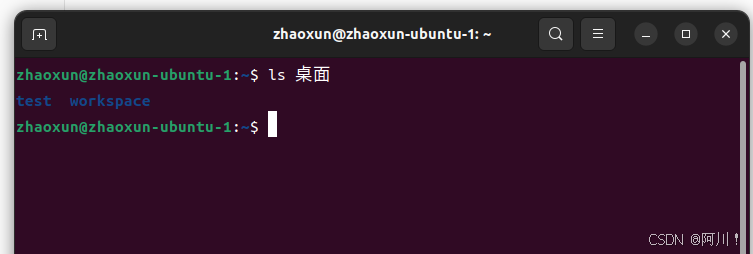
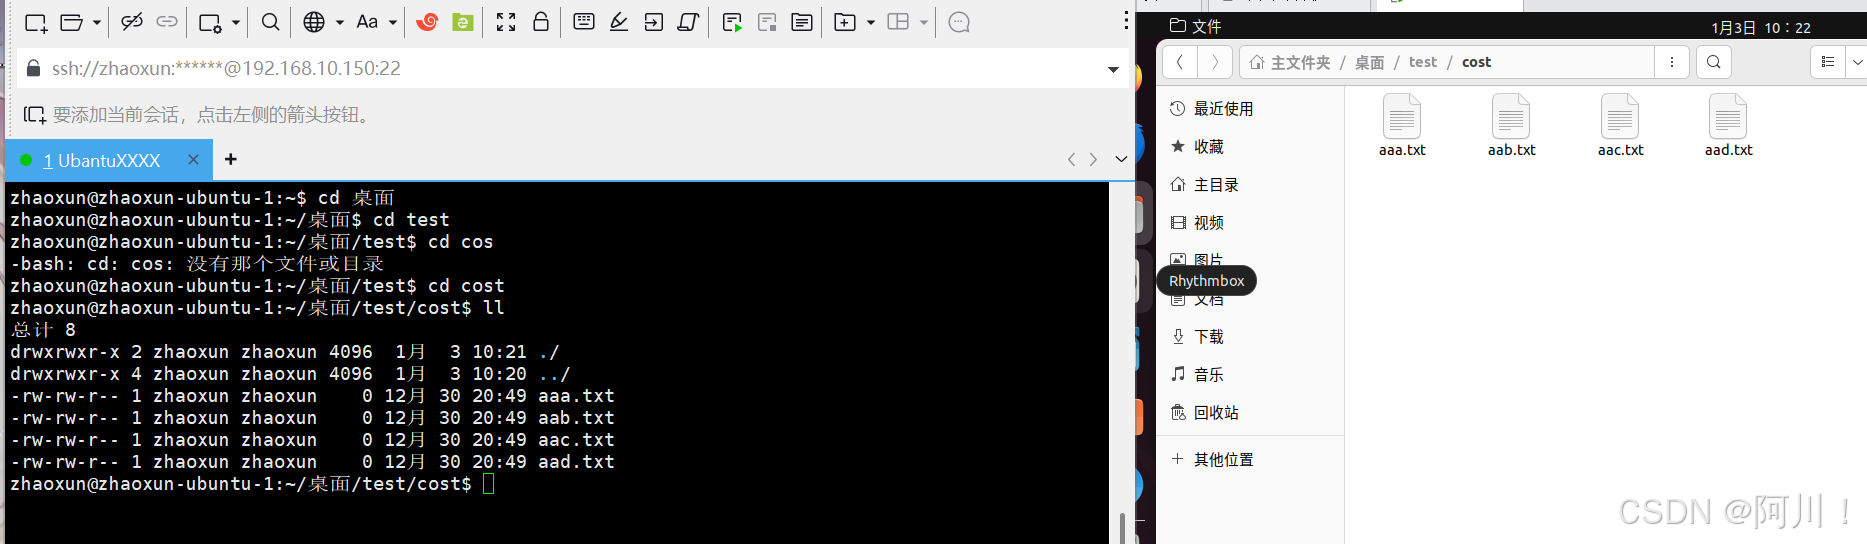
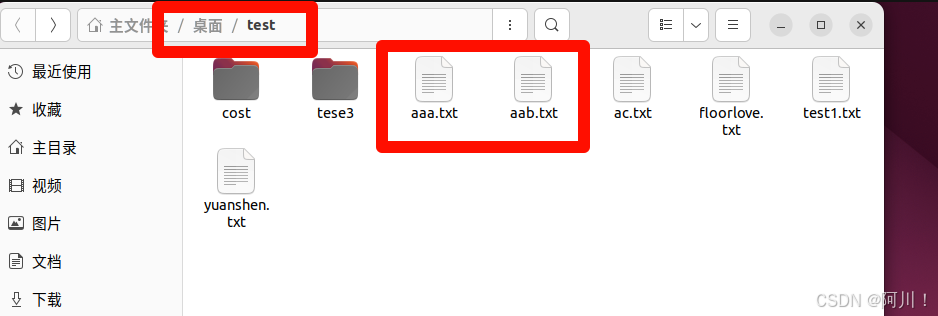
在虚拟机桌面新建文件夹test ,在test文件夹里创建test1,然后在test1里在创建文件夹test11
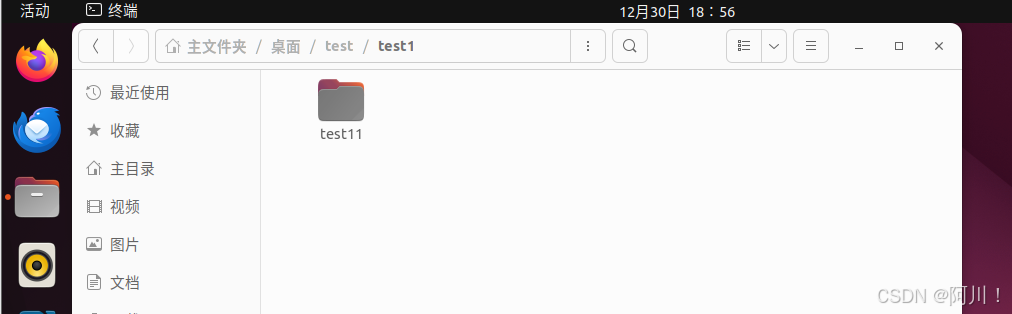
使用ls 桌面 指令,结果只展示了test
如果想看test里面有什么,就在桌面前面加-R,以递归的方式呈现出来。
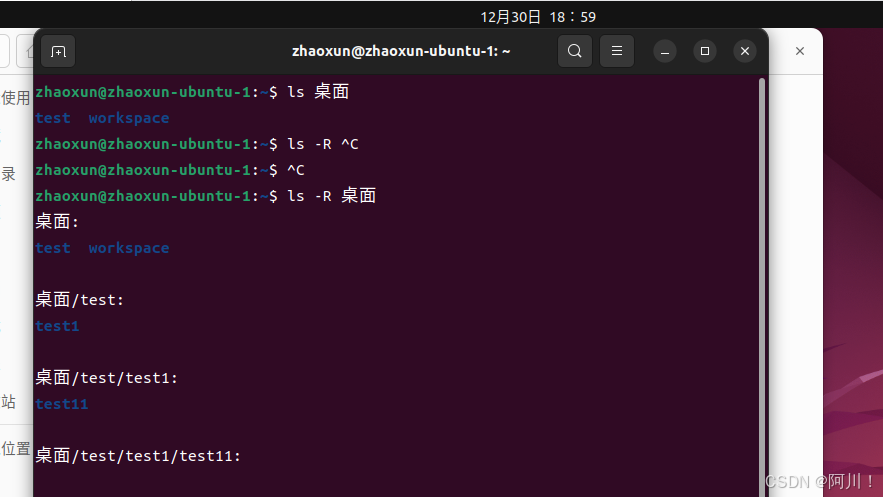
很明显,这种显现方式性能不高。
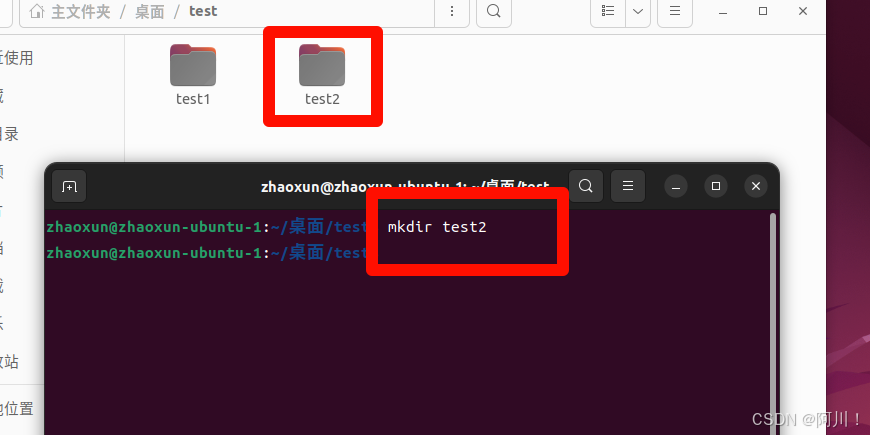
4.5 mkdir
4.5.1mkdir:生成文件夹
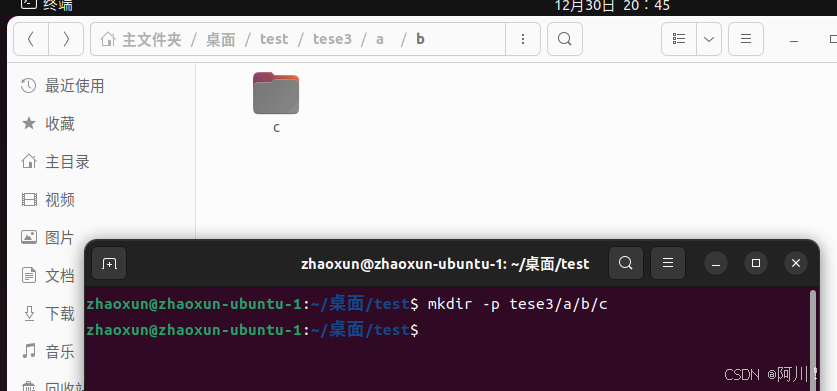
4.5.2 mkdir -p 创建多级目录
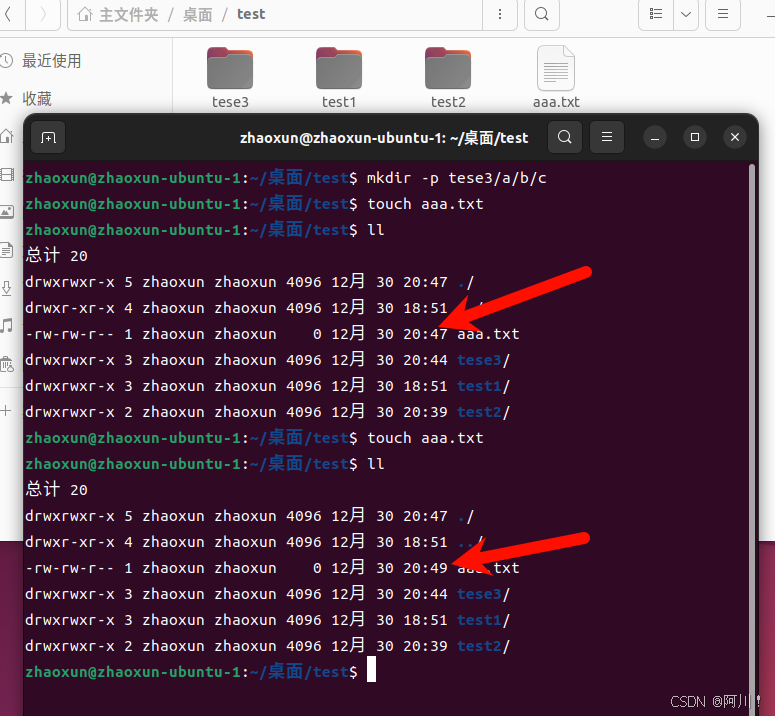
4.6 touch 创建空白文件
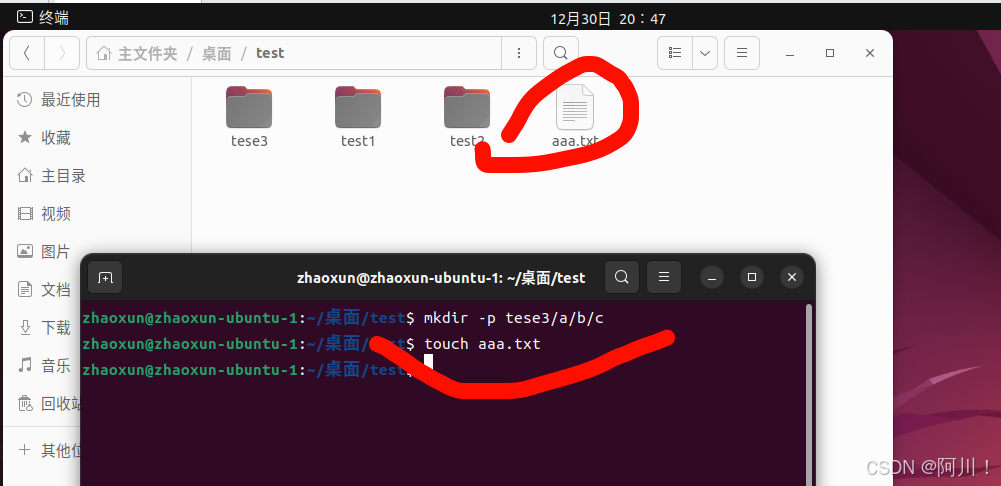
两次创建相同文件,时间不同。
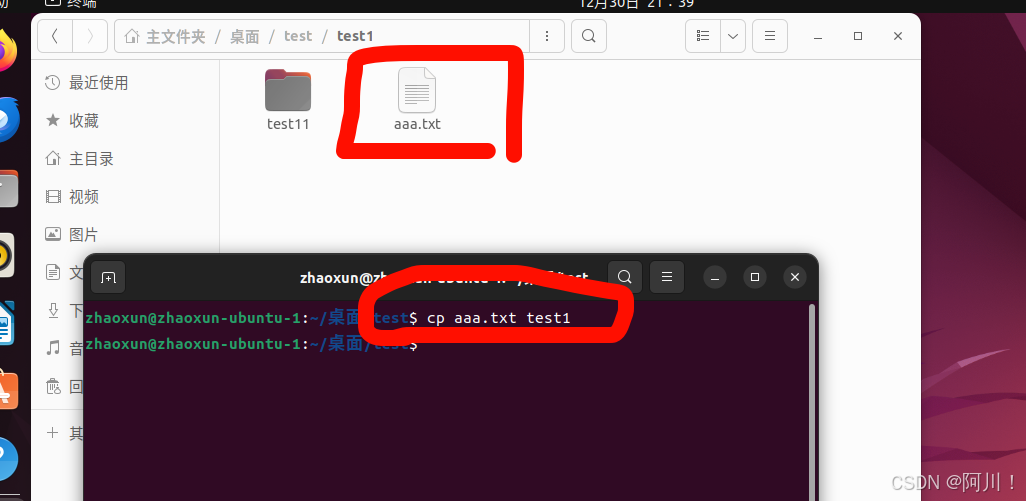
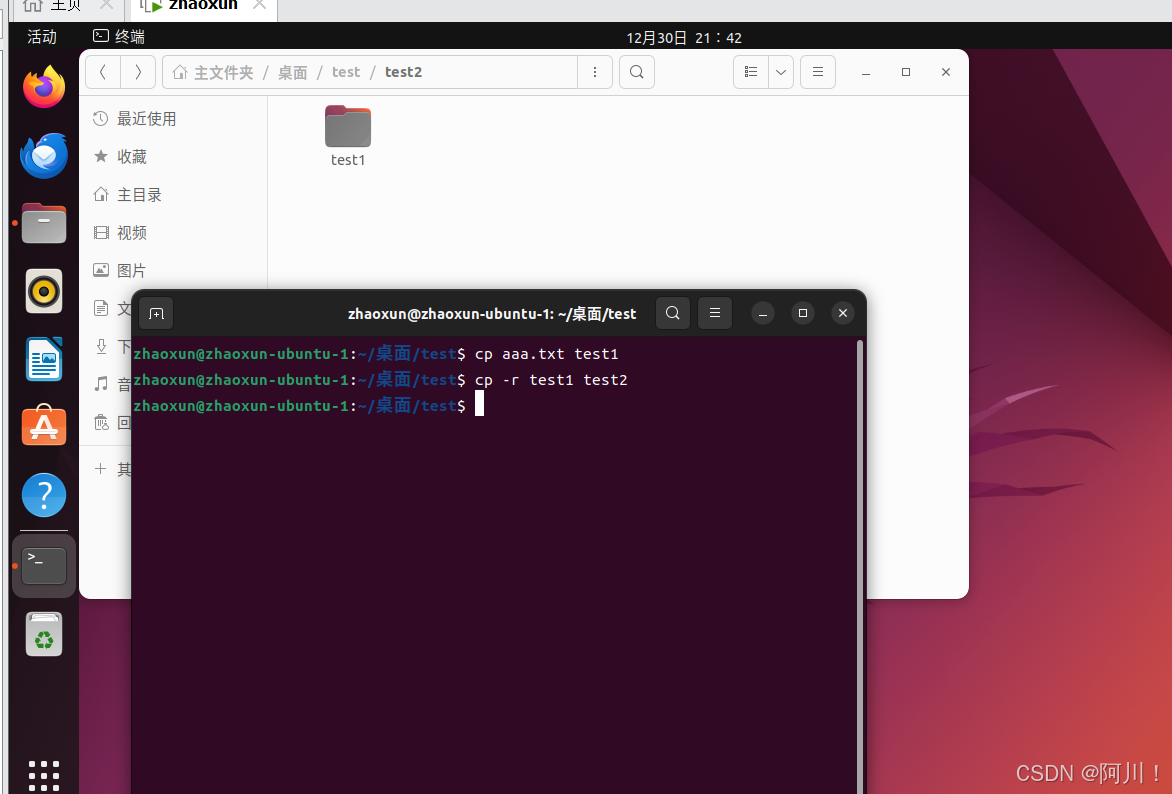
4.7 cp指令拷贝
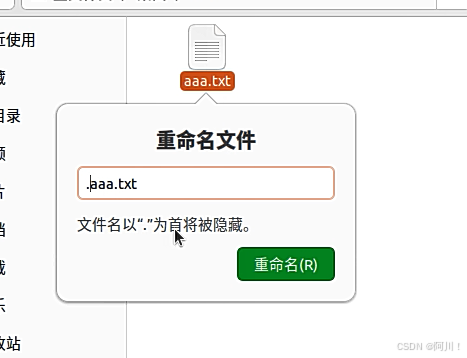
演示:将文件aaa.txt拷贝到test1文件夹下
cp aaa.txt test1
递归复制整个文件夹 cp -r test/b/./
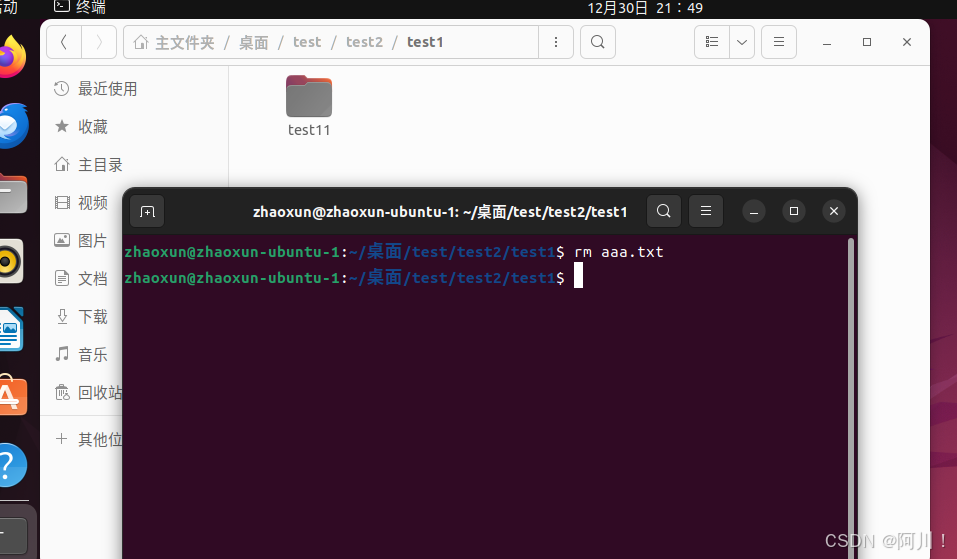
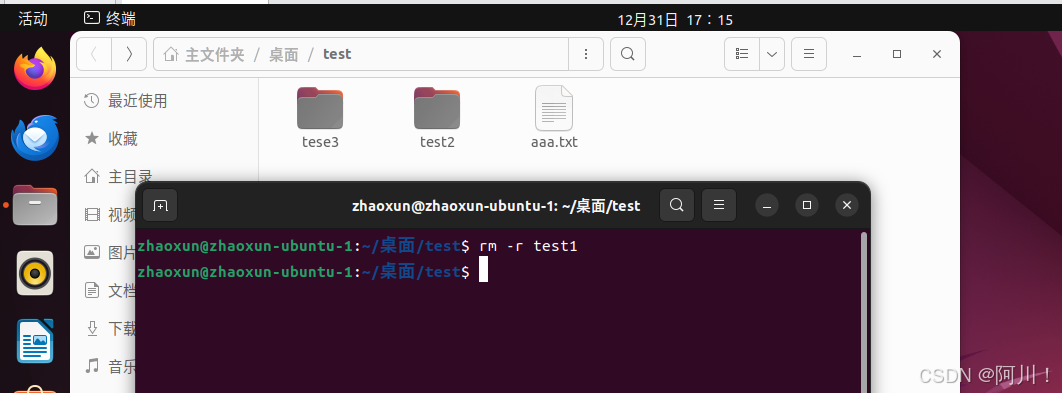
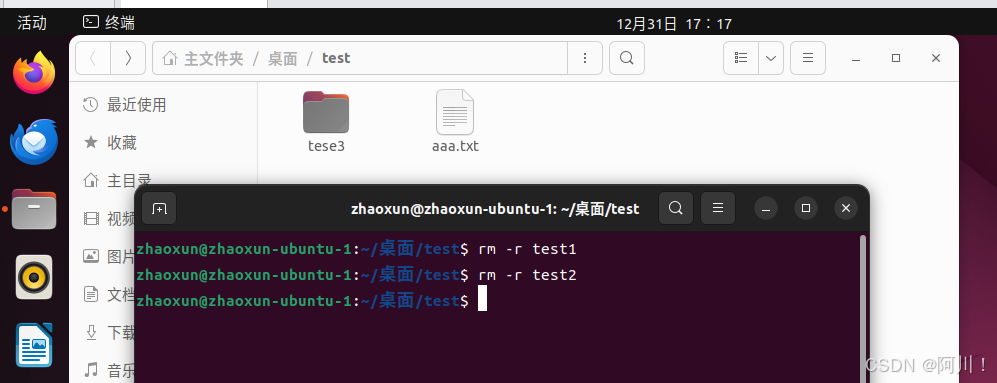
4.8 rm 删除文件或目录
rm删除的东西不会放回收站。
4.8.1 rm+文件,直接删除内容
4.8.2 rm -r 文件夹 递归删除目录及其中所有内容
4.8.3 rm -rf 文件夹
rm -rf test 强制删除,无法恢复,公司跑路销毁资料用!
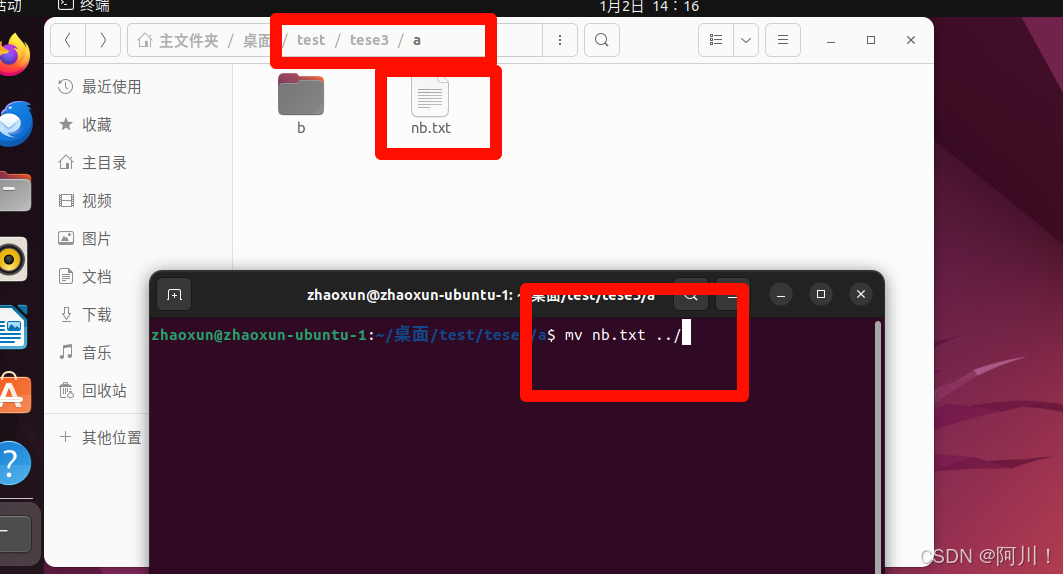
4.9 mv 剪切或重命名
基本语法:mv 旧路径 新路径
把nb.txt移动到上一级目录

如果移动的目录里有这个文件(同名),我们可以进行改名: mv 旧名 新名
也可以移动并改名。
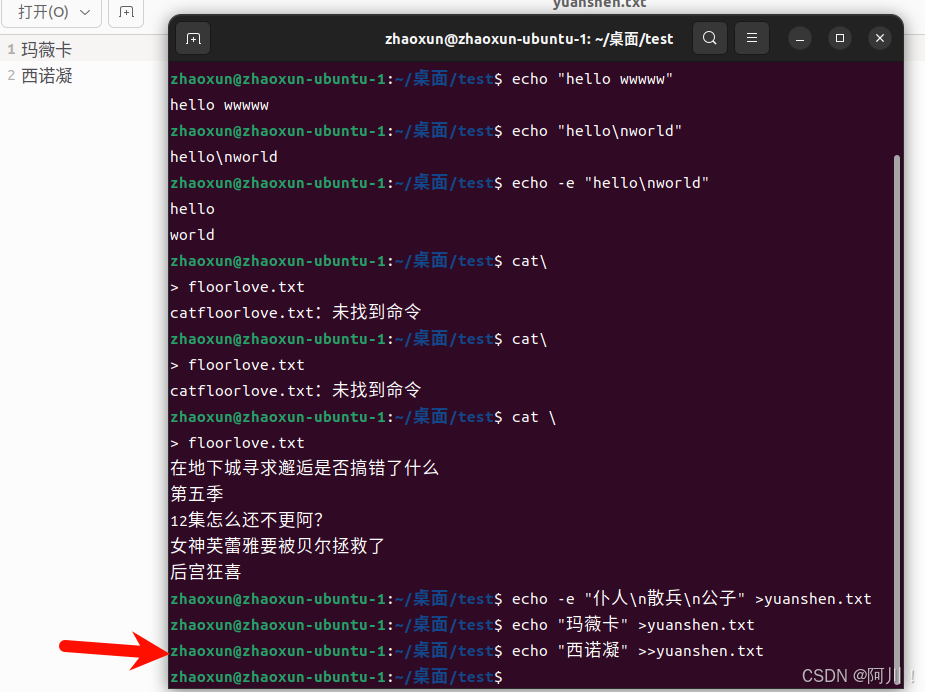
 4.10 cat 查看文件内容
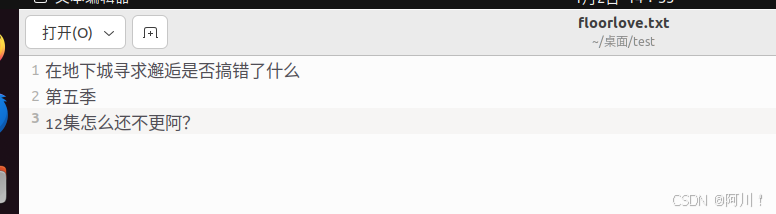
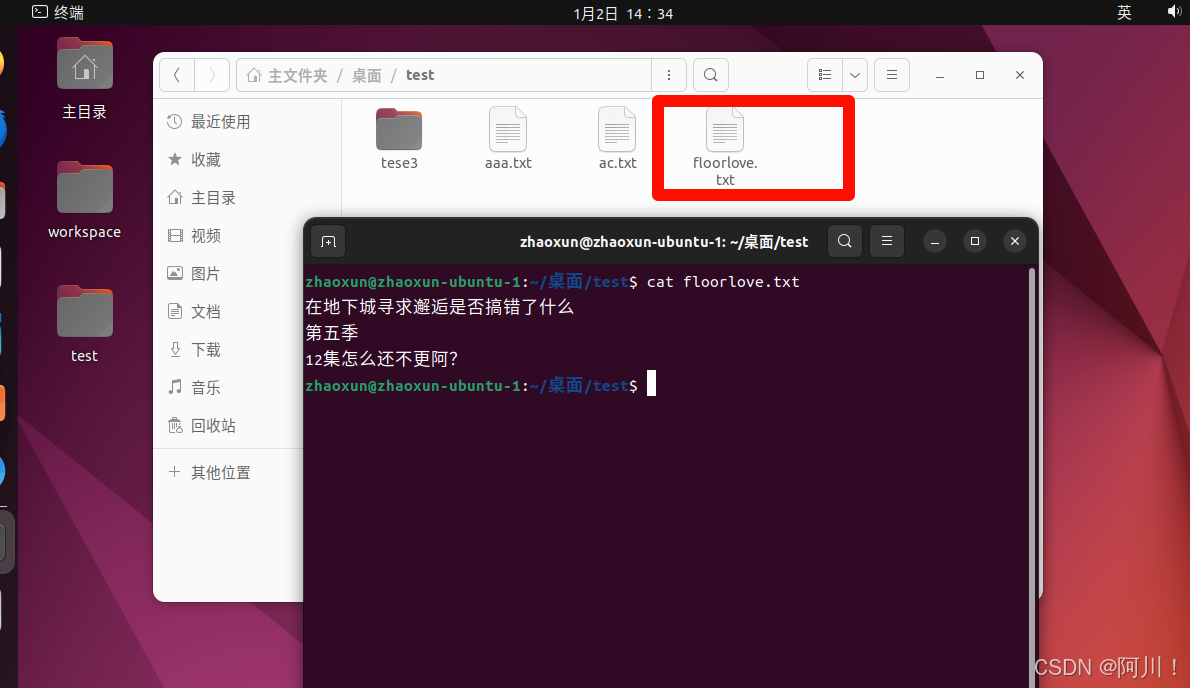
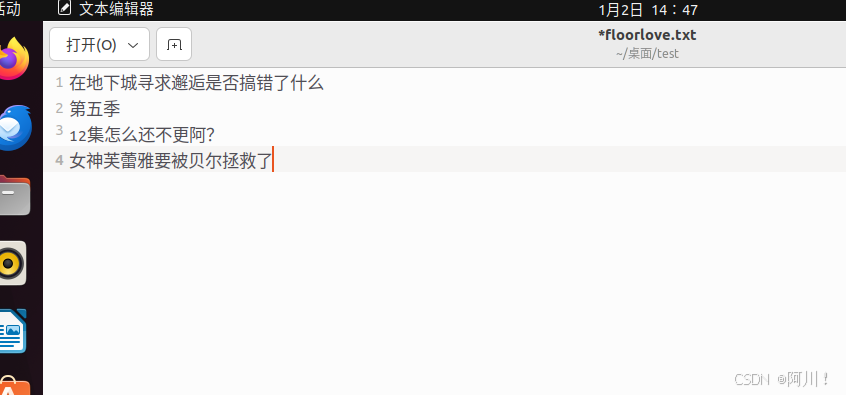
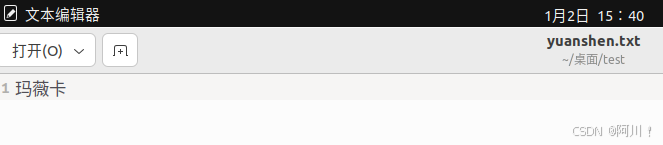
(1)先创建一个带内容的文件floorlove.txt,用cat floorlove.txt显示其中内容:
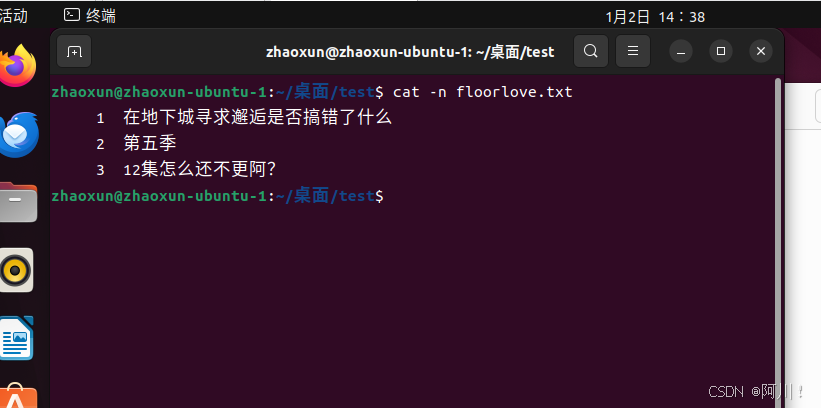
(2)cat -n 文件:显示行号(包括空行)和内容
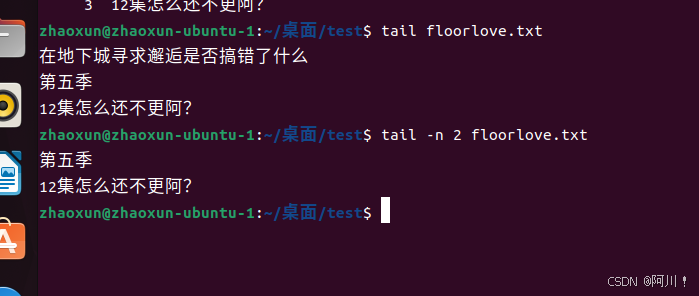
4.11 tail 输出文件尾部的内容
(1) tail 文件 默认呈现末尾10行内容
(2)tail -n 数字,取相应数字的行内容
(3)tail -F 文件,最后显示光标,没有结束,表示还有接收状态。具备监控文件的性质。

监控性:在文件中加入新的内容

终端会跟着显示:
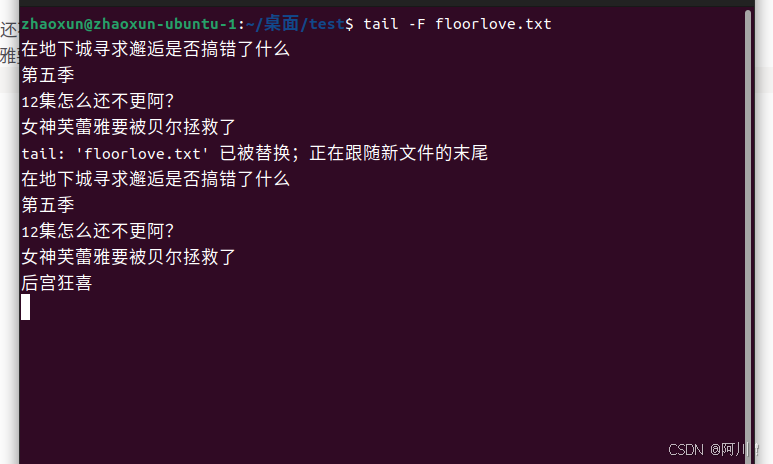
想退出就按CTRL+c
4.12 echo输出内容
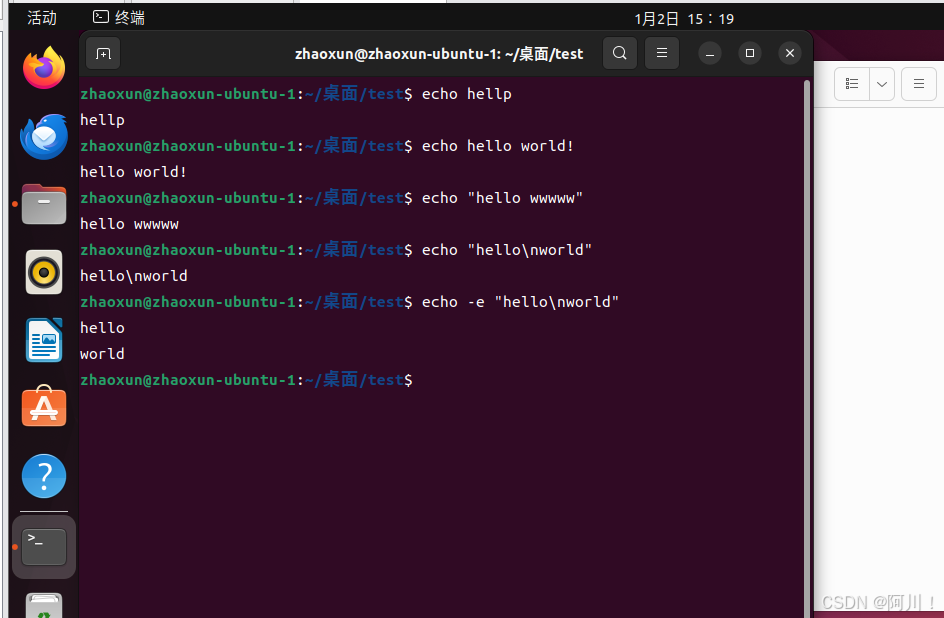
echo :输出内容到控制台(回声、再现) 相当于C语言中printf
整体内容要用引号,避免误会。转义字符要加-e才能识别。
补充:指令加\,意思为这一行没有结束。
4.13 >和>>输出重定向
将控制台内容结果传到指定文件
ls -l > aaa.txt 将指定内容导出到文件里,还会覆盖掉文件原本内容
ls -l >> 文件 追加,不会覆盖
如果文件不存在,会创建。
将打印的内容导出到新创建的文件里

重新打印,覆盖掉原本内容

测试追加,不覆盖原本内容
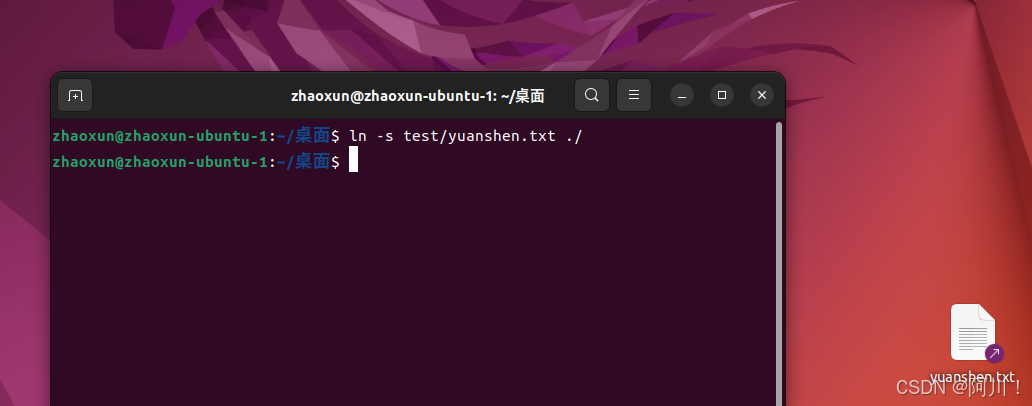
4.14 ln 软链接
类似于windows 里的快捷方式。
基本语法: ln -s原文件或目录软链接名
在当前页面创建文件的快捷方式。
如果-s不写,就会形成独立的文件,内容参考了源文件,但独立。
4.15 history 查看之前的指令
历史记录功能。
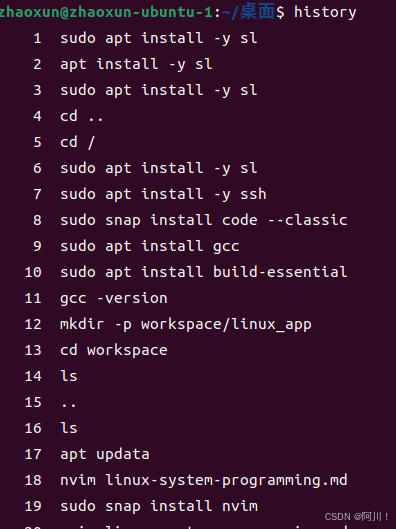
history -c 清除历史命令
4.16 chomd
4.16.1change mode 改变权限
权限说明:


我们用三个字母,表示三个权限。U G O
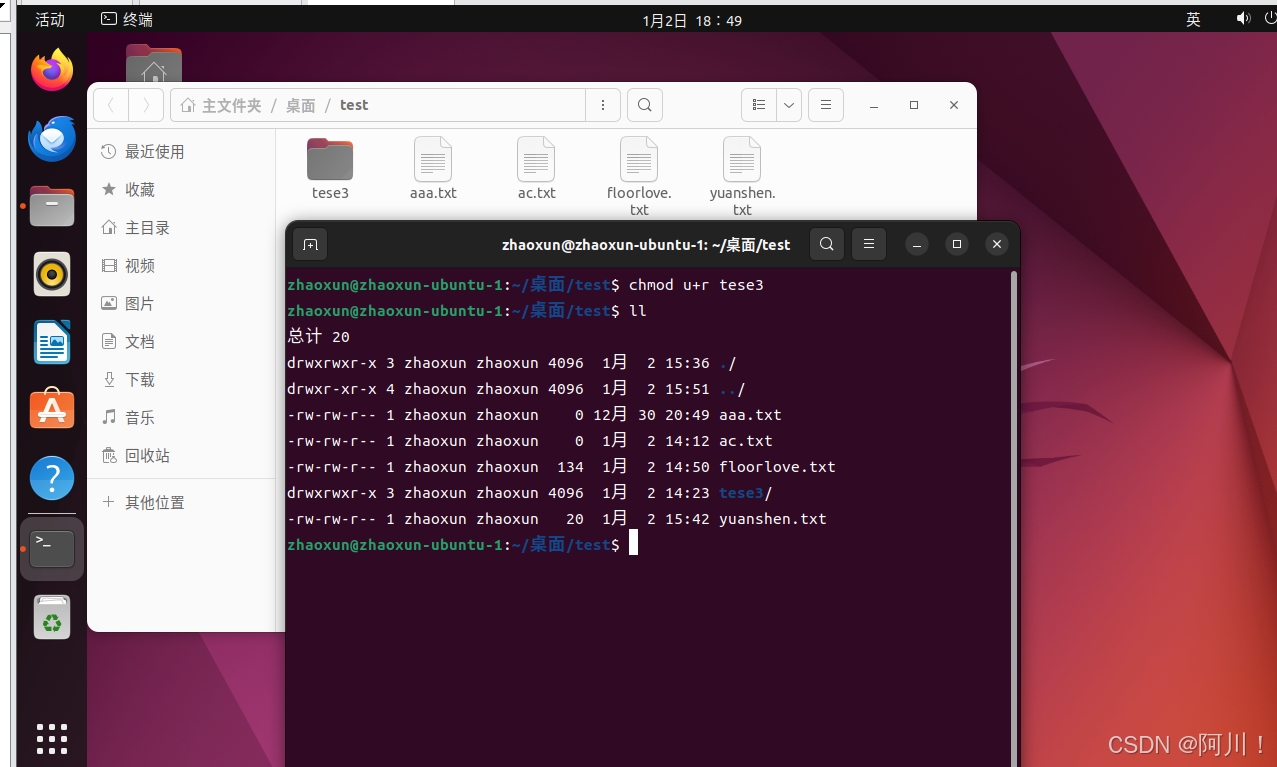
chmod u-r tese3,取消tese3的读权限。
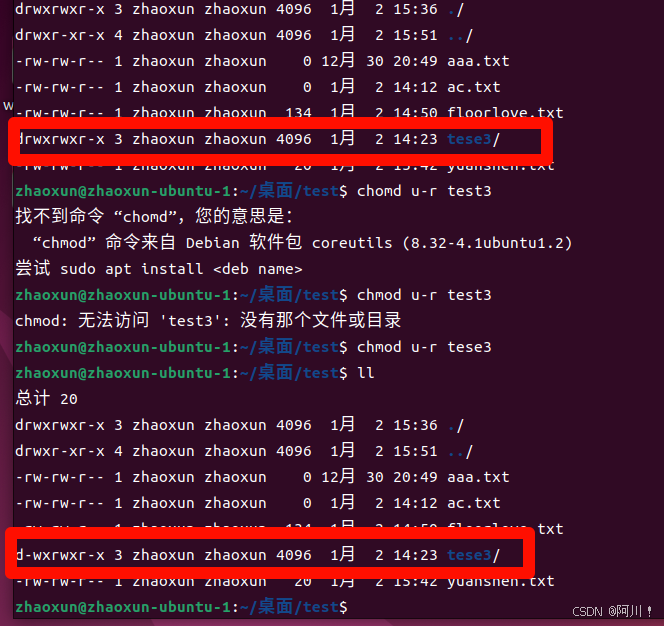
此时tese3的当前用户的读权限没有了。
但如果chmod u+r tese3,能够增加权限。
u:所有者 g:所有组 o:其他人 a:所有人(u、g、o)所有人。
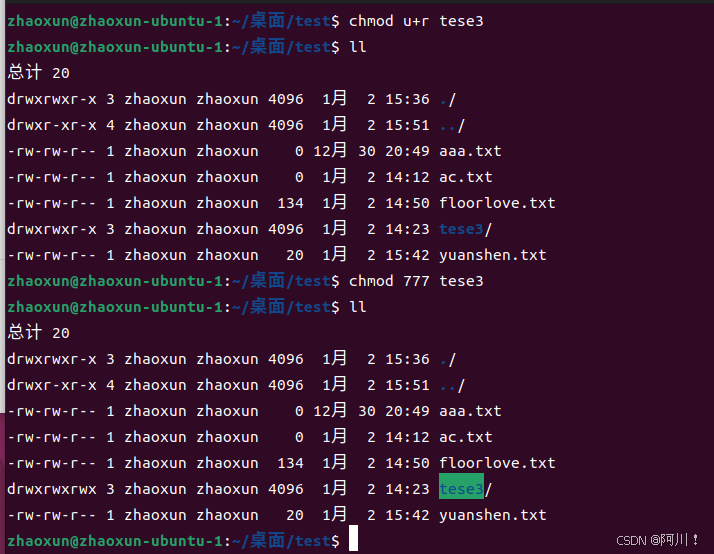
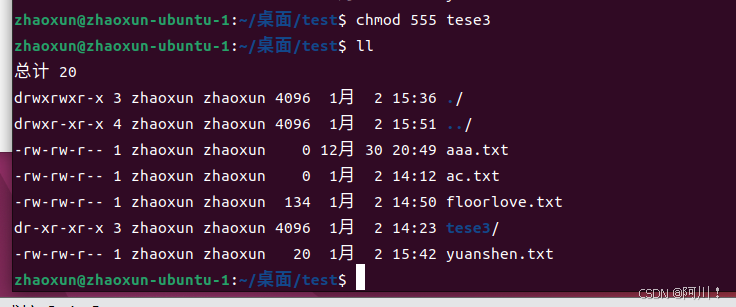
还有chmod 777 ,chomd 555
9个位都是1,就是777. 555对应101 101 101,写的权限都没有
4.16.2 权限的改变方法
chmod 777
chmod 111 111 111
chmod rwx rwx rwx
chmod u g o
chmod u-r g-w o-x 删除权限
chmod -wx r-x rw- 删除权限后
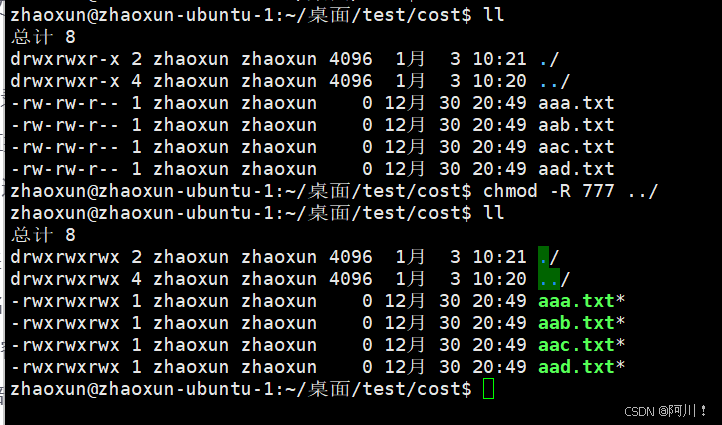
4.16.3 chmod -R 777 test
这个指令可以修改文件夹里面所有文件的所有者、所属组、其他用户都具有可读可写可执行权限。也就是递归指令写法。下面是在Xshell中的命令输出:
4.17 vim
可以在控制台中输入sudo apt install vim,安装vim编辑器。
vim test.txt:创建一个名为test的文件
插入模式下进行编写
退出插入后保存并退出。 ESC退出,:wq保存并退出。
在没有桌面的情况下,编译很方便。
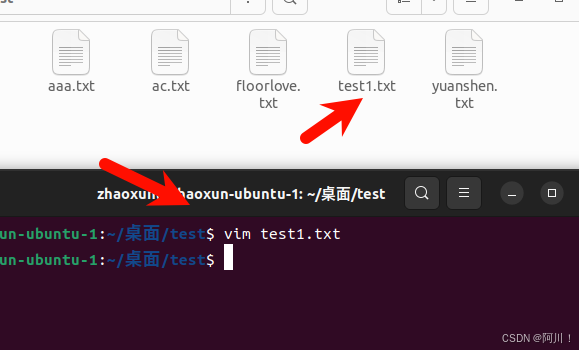
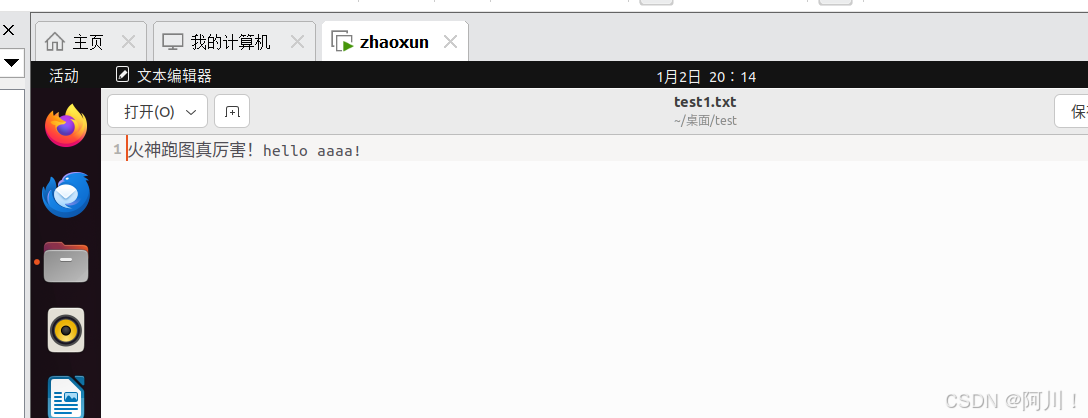
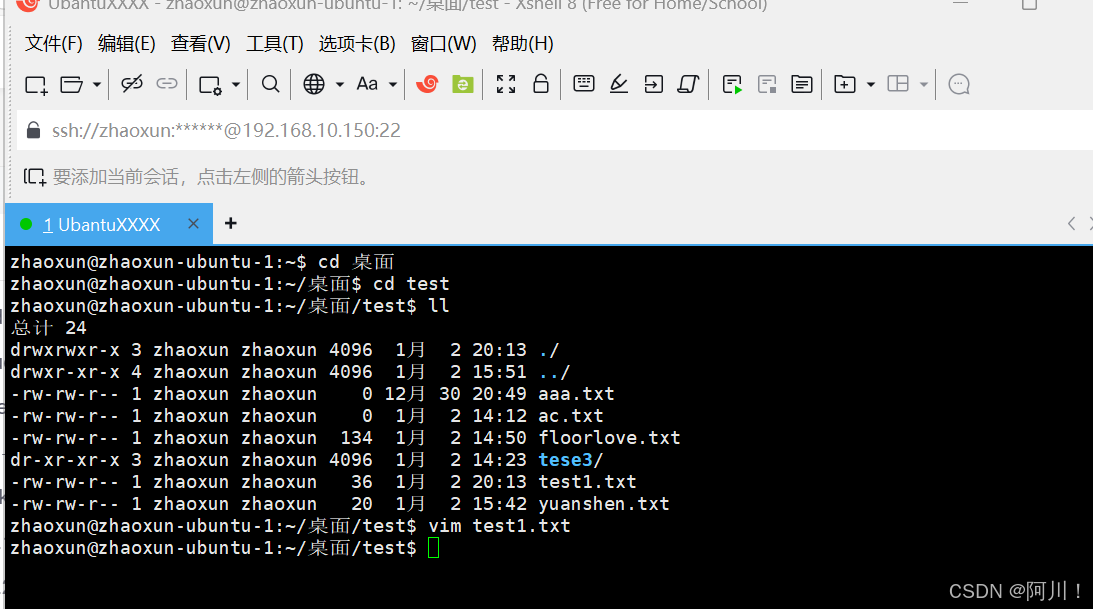
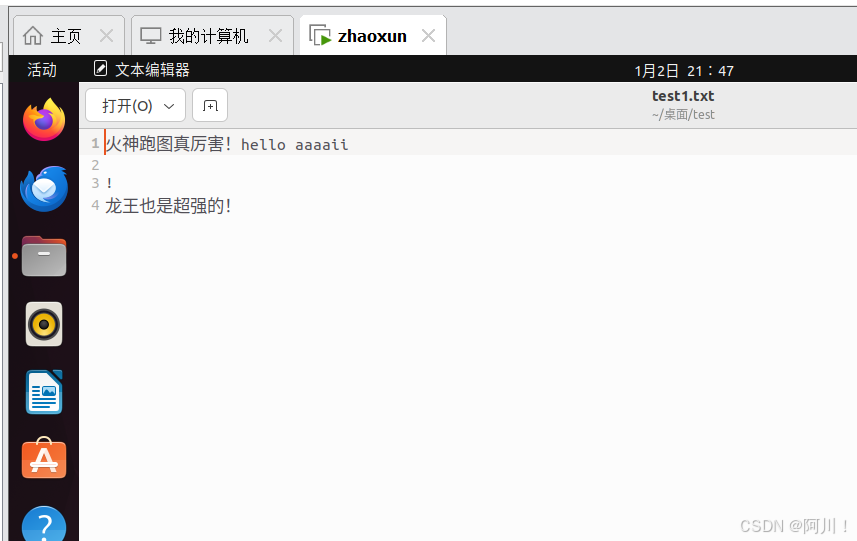
(1)创建test1.txt
(2)展开编辑
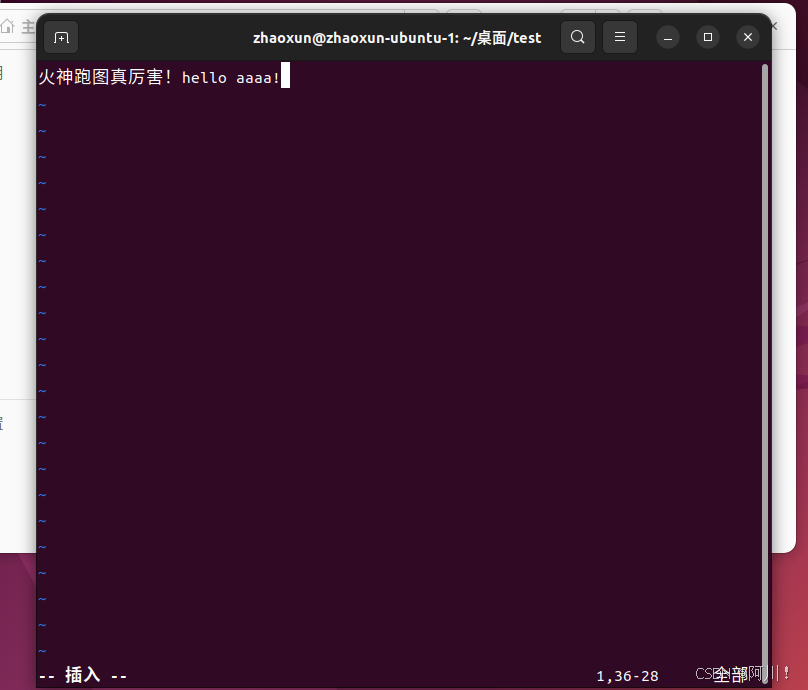
(3)退出编辑,保存并退出
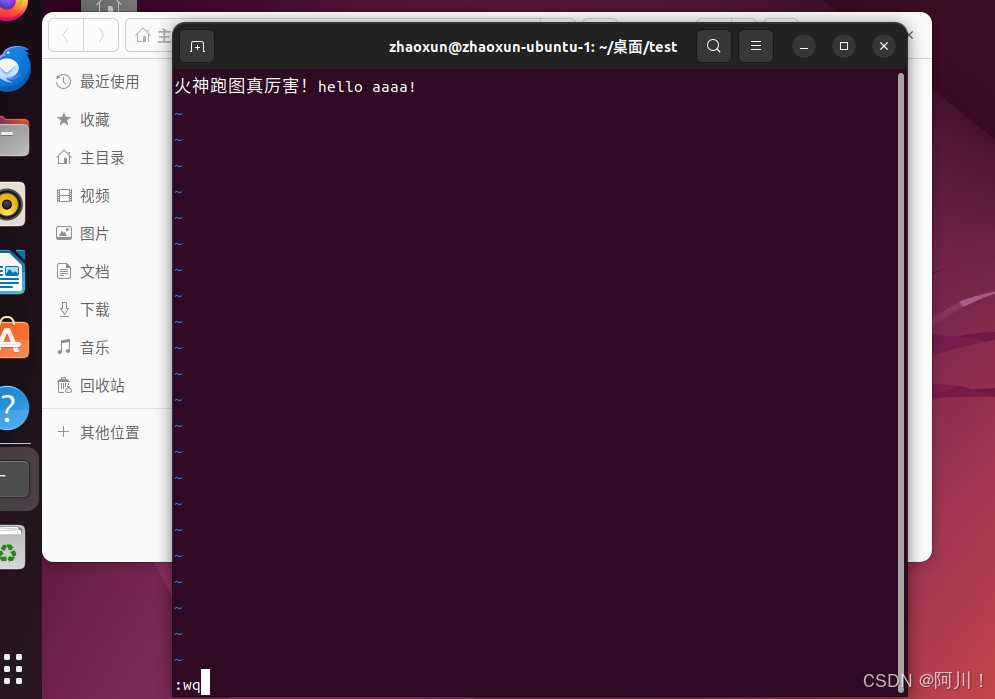
打开文件,内容已经保存
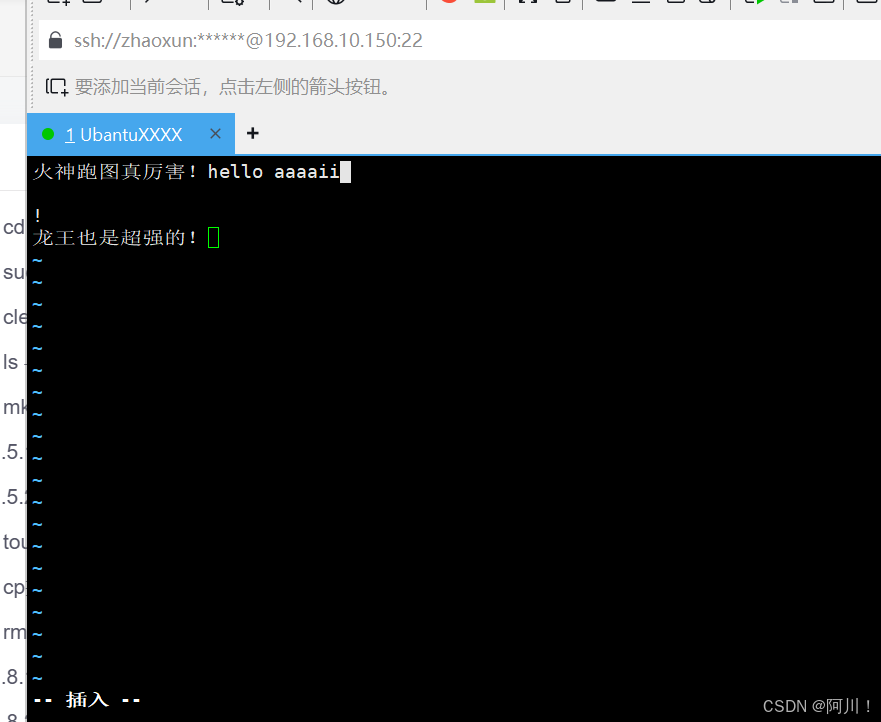
即使用Xshell远程操作Linux主机也是同样的:点i可以进入编辑模式,esc退出编辑,:wq保存并退出。
4.18 chown 改变所有者
change owner
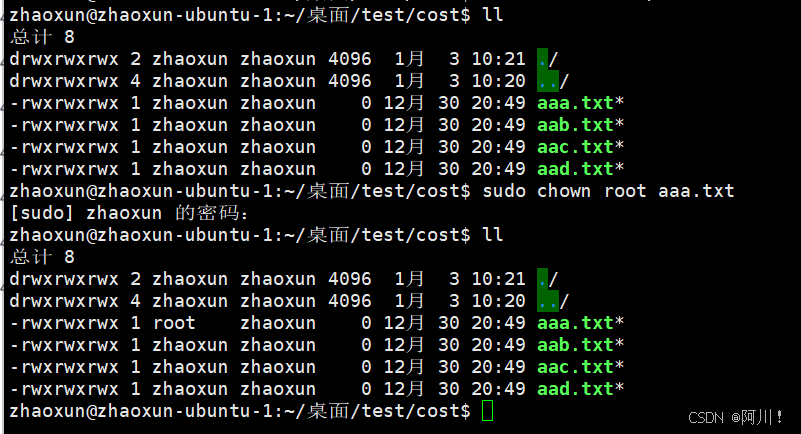
(1)修改文件所有者
sudo chown root aaa.txt
(2)递归改变文件所有者
II -R test/
4.19 chgrp改变所属组
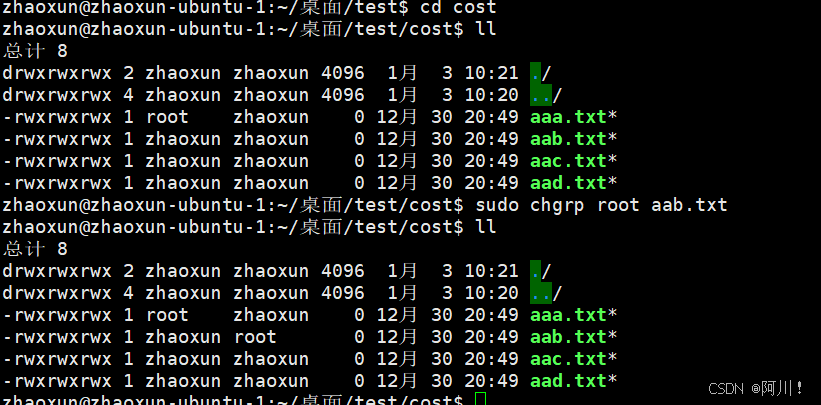
sudo chgrp root 文件
4.20 find
基本语法:find 搜索范围加选项
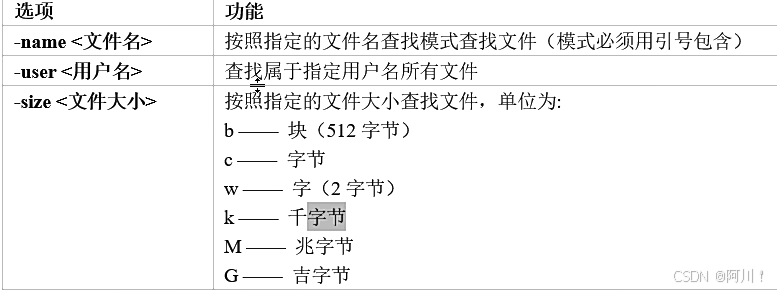
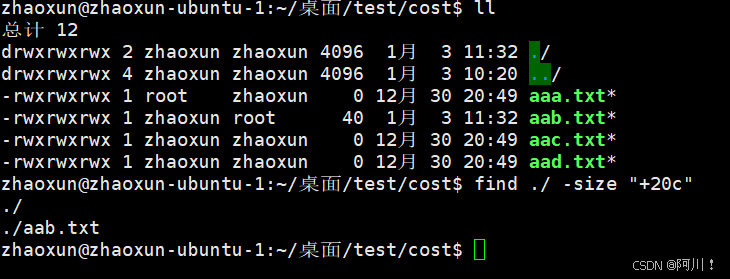
find ./ -name "*.txt" 寻找当前文件夹下的以txt为后缀的文件名

find ./ -user root 搜寻以root为用户名的文件

find ./ -size "+20c" 搜寻文件大小超过20字节的文件
4.21 grep 与管道符"I"的过滤查找
grep 选项 查找内容 源文件
-n 显示匹配行及行号
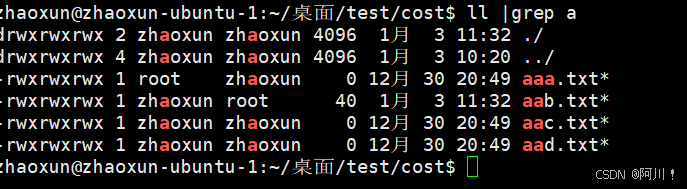
ll | grep a : 查找内容a,并标红

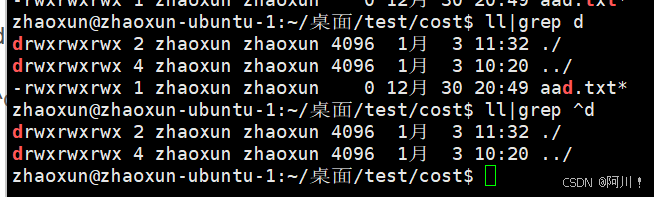
ll|grep d:只要有d,就能寻查到。
ll|grep ^d:以d为开头的能查找到。
4.22 tar打包
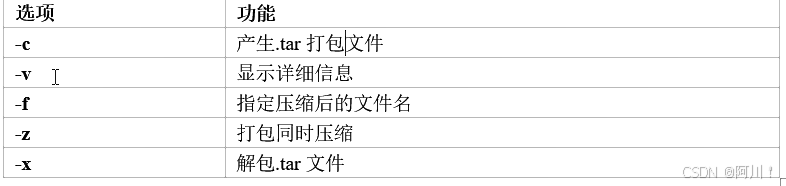
tar -cvf test.tar aaa.txt aac.txt

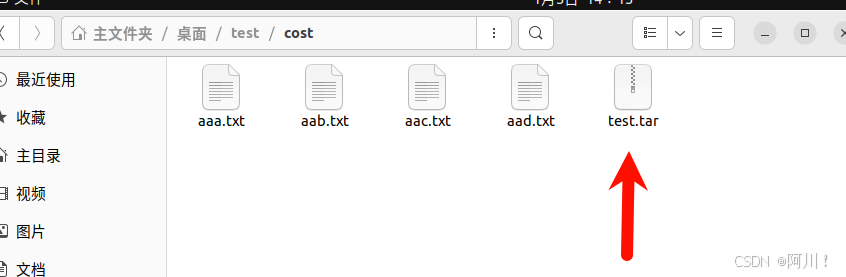
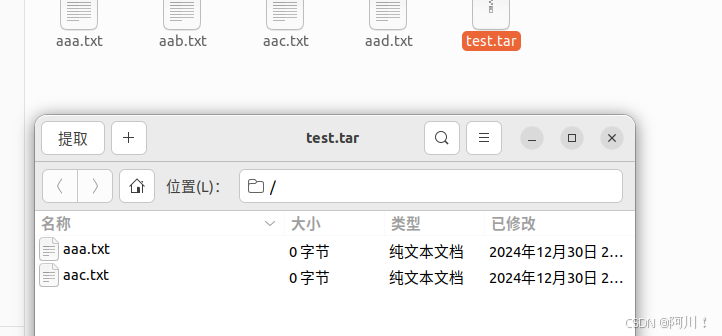
以上操作只是把两个文件打了一个包,并没有压缩。
在指令中再加上一个tar -zcvf test.tar.gz aaa.txt aab.txt

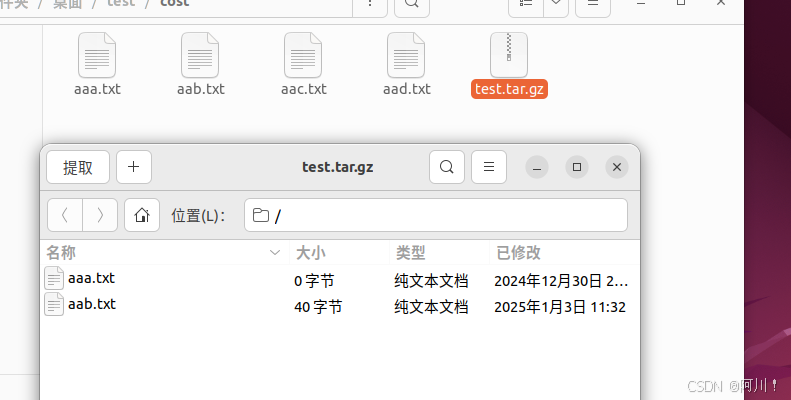
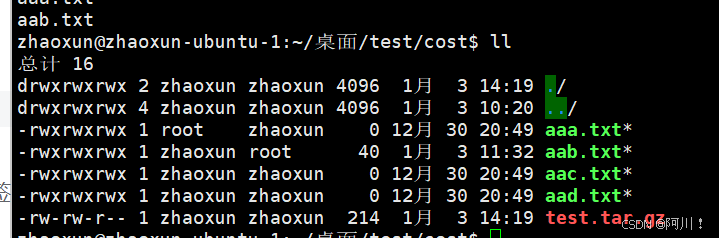
可以看到,字节并没有变小。这与压缩算法有关。
-x 解压缩

-C的作用是将文件解压缩到其他位置。
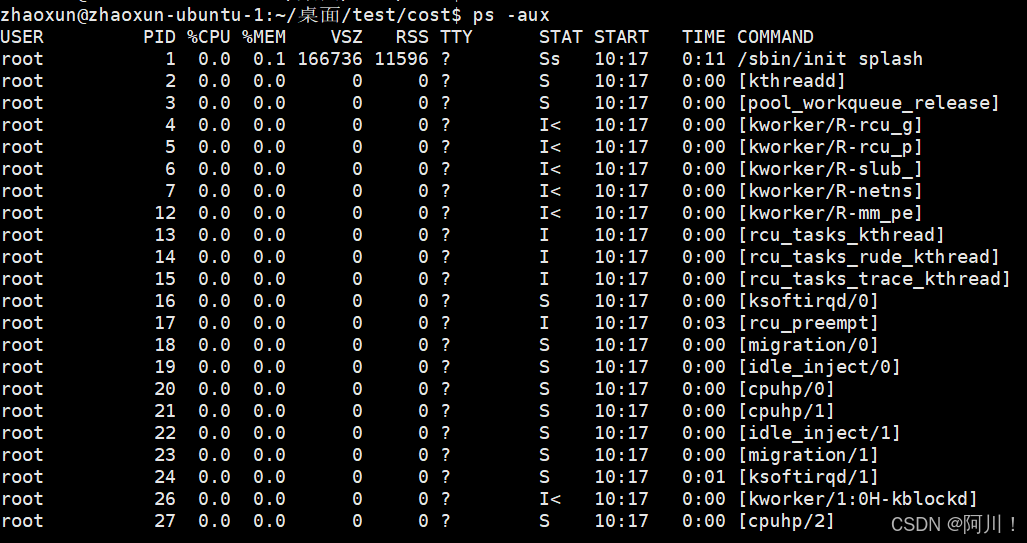
4.23 ps 查看当前系统进程状态
ps (process status) 进程状态
(1)基本语法
ps -aux:查看系统中所有进程
ps -ef:可以查看子父进程之间的关系
软件(父进程)中可以打开另外一个软件(子进程)
如果关掉父进程,子进程无法使用。
4.24 kill 终止进程
kill 选项 进程号 (功能描述:通过进程号杀死进程)
killall 进程名称 (功能描述:通过进程名称杀死进程,也支持通配符,这在系统因负载过大而变得很慢时很有用)

4.25 free查看服务器总体内存
基本语法 free -m

4.26 top 查看系统健康状态
top 选项

案例:top -d 1 指定top命令每隔一秒更新
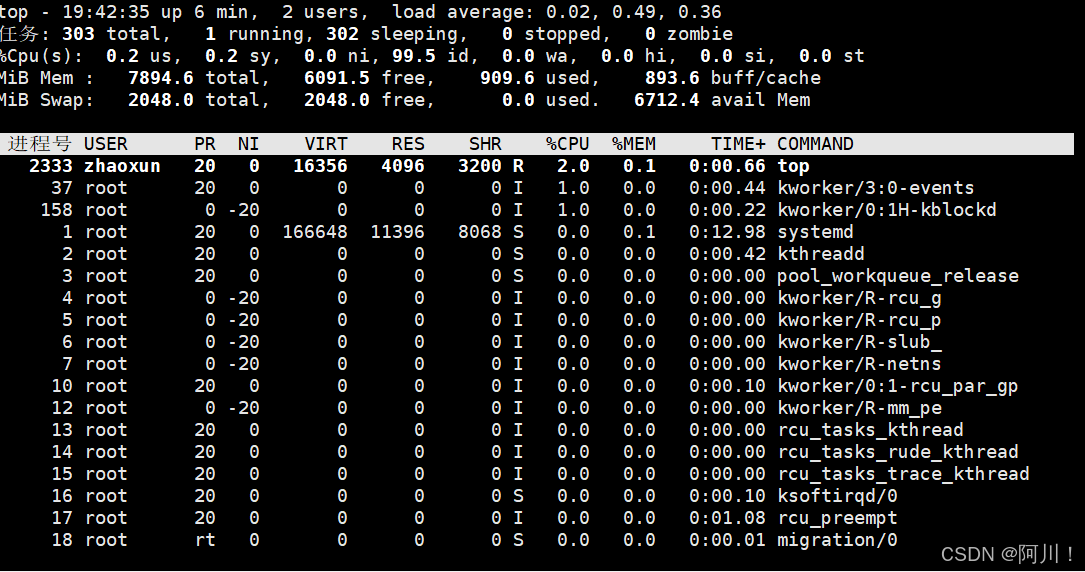
-p 对指定的进程进行监控
按q结束这个命令状态
4.27 basename/dirname
4.27.1 basename
文件名
只判断路径最后的文件名,不判断此路径的真实性。
4.27.2 dirname
路径名
不取最后的文件名,取路径,对路径做出判断,真实性不做判断。
