一、应用 HttpClient 模块
- @angular/common/http 中的 HttpClient 类基于浏览器提供的 XMLHttpRequest 接口。
- 要想使用 HtpClient 模块,就要先导入 Anqular 的 HttpClientModule。大多数 Web 应用程序都会在根模块 AppModule 中导入它。
-
编辑
src/app/app.module.ts,导入 HttpClientModule 模块,导入顺序要在BrowserModule之后javascriptimport { BrowserModule } from '@angular/platform-browser'; import { NgModule } from '@angular/core'; //导入 httpClient import { HttpClientModule } from '@angular/common/http'; import { AppComponent } from './app.component'; @NgModule({ declarations: [AppComponent], imports: [ BrowserModule, HttpClientModule //导入 httpClient,注意要放在 BrowserModule 之后 ], providers: [], bootstrap: [AppComponent] }) export class AppModule {} -
通过构造函数将实例注册到类中
javascriptimport { Injectable } from '@angular/core'; import { HttpClient } from '@angular/common/http'; @Injectable() export class DemoService { constructor(private http: HttpClient) {} }
二、模拟后端接口(创建RESTful API 服务)
1. 使用 json-server 创建 RESTful API 服务
- json-server 是一个 Node.js 模块,底层运行在 Express 服务器上,用户可以指定一个JSON 文件作为 RESTful API 服务的数据源。 使用json-server 在本地搭建一个JSON 服务器对外提供 RESTful API 服务。前端开发工程师在无后端的情况下,可以用它作为后端 RESTfulAPI 服务器。
-
全局安装 json-server
node 版本超过 14 直接安装即可
powershellnpm install -g json-server我的node版本为 12.11.0,所以选择固定 json-server 版本
powershellnpm install -g json-server@0.17.4 -
在任意位置创建 data 目录,并创建 db.json 文件,内容如下
javascript{ "data": [ { "username": "张三", "age": 15 } ] } -
在 data 目录下打开命令行窗口, 输入如下指令启动 json-server
powershelljson-server db.json控制台将会有如下信息

-
在浏览器中输入
http://localhost:3000/data

2. 使用 Angular 内存数据库模拟服务器
- Angular 内存数据库基于in-memory-web-api库,该库用于 Angular 演示和测试时调用内存中的网络 API,可模仿RESTful API 服务上的 CRUD 增、、改、查操作。它拦截了 Angular的 HTTP 请求和HttpClient 请求,这些请求原本会发送到远程服务器,然后将它们重定向到定义的内存数据库中。
- in-memory-web-api 库集成在 Angular 中,该库会替换 HttpClient 模块中的 HttpBackend服务,新的服务会模拟 RESTful 风格的后端的行为。
- in-memory-web-api 库仅拦截了 Angular 中的 HTTP 请求,它实际上没有运行 Web服务器。因此我们不能通过浏览器或者其他 Angular 环境外的工具访问它的 RESTful API 资源。
- in-memory-web-api 库所虚拟的 API位于内存中,这也就意味着当刷新浏览器后,所有的数据都会消失。
- 使用 Angular 内存数据库的优势显而易见: 无须单独构建和启动测试服务器
-
在angualr 项目中安装 in-memory-web-api 库
我的node版本为 12.11.0,所以选择固定 angular-in-memory-web-api 版本
javascriptnpm i angular-in-memory-web-api@0.10.0 --save -
在
src/app目录下新建 In-mem-hero-service.ts 文件,内容如下javascriptimport { InMemoryDbService } from 'angular-in-memory-web-api'; export class InMemHeroService implements InMemoryDbService { // 创建模拟数据 createDb() { // 变量名 heroes 将被视作 URL 的一部分 let heroes = [ { id: 1, name: '张三' }, { id: 2, name: '李四' }, { id: 3, name: '王五' }, { id: 4, name: '赵六' }, { id: 5, name: '孙琦' } ]; return { heroes }; } } -
在
src/app/app.module.ts文件中导入 InMemHeroService 类-
HttpClientInMemoryWebApiModule 的 forRoot 方法的可以提供第二个参数
typescriptHttpclientInMemoryWebApiModule.forRoot(InMemHeroService, { delay: 0} ) // 无延迟 HttpclientInMemoryWebApiModule.forRoot(InMemHeroService, { delay: 500 }) //延迟500ms -
默认情况下,HttpClientlnMemoryWebApiModule 模块会拦截所有的 HttpClient 请求在实际工作中,我们可能需要同时使用 HttpClient 模块和 HttpClientinMemoryWebApiModule模块,意思是同时访问外部和内存的RESTful API资源。这时,我们可以通过配置选项passThruUnknownUrl 来实现,具体代码如下。
typescriptHttpClientInMemoryWebApiModule.forRoot(InMemHeroService,{passThruUnknownUrl: true})
javascriptimport { BrowserModule } from '@angular/platform-browser'; import { NgModule } from '@angular/core'; //导入 httpClient import { HttpClientModule } from '@angular/common/http'; // 导入 HttpClientInMemoryWebApiModule 注册数据存储服务 import { HttpClientInMemoryWebApiModule } from 'angular-in-memory-web-api'; import { AppRoutingModule } from './app-routing.module'; import { AppComponent } from './app.component'; // 导入自己创建的 InMemHeroService 类 import { InMemHeroService } from './in-mem-hero-service'; @NgModule({ declarations: [AppComponent], imports: [ BrowserModule, AppRoutingModule, HttpClientModule, //导入 HttpClientModule BrowserModule 之后 HttpClientInMemoryWebApiModule.forRoot(InMemHeroService) //该模块必须在 HttpClientModule 之后 ], providers: [], bootstrap: [AppComponent] }) export class AppModule {} -
-
修改
src/app/app.components.ts文件javascriptimport { Component, OnInit } from '@angular/core'; import { HttpClient } from '@angular/common/http'; @Component({ selector: 'app-root', template: ``, styles: [] }) export class AppComponent implements OnInit { constructor(private http: HttpClient) {} ngOnInit(): void { // 获取所有的数据 this.http.get('api/heroes').subscribe((data) => { console.log(data); }); // 获取id为1的数据 this.http.get('api/heroes/1').subscribe((data) => { console.log(data); // {id:1, name: "张三"} }); // 获取name以李开头的数据 this.http.get('api/heroes?name=^李').subscribe((data) => { console.log(data); // [{id:2, name: "李四"}] }); } }
三、从服务器获取数据
-
HttpClient 模块允许我们在调用 HTTP 请求时使用泛型,通过泛型告诉 Angular 我们期望从HTTP 请求获得的响应类型。响应的类型可以是 any 变量类型(如 string )、类或接口等。如下面的代码执行 HttpClient 模块的 GET 请求,将预期的响应类型指定为 Hero 对象的数组。
javascriptexport class Hero { constructor(public id = 1, public name = '') {} } this.http.get<hero[]>(this.hreoesUrl) -
指定响应类型是给 TypeScript 看的声明,并不能保证服务器会实际使用此类型的对象进行响应。服务器 API 返回的实际响应类型是由服务器来保证的。换句话说,用户可以对Hero 类中的属性随意定义。因此,服务器实际返回的对象与类的定义并没有直接关系。
-
新建一个项目 demo-http
javascriptng new demo-http -t -s --minimal -
安装 Angular 内存数据库
javascriptnpm i angular-in-memory-web-api@0.10.0 -S -
新建一个 hero 接口(位置:src/app/hero.ts)
javascriptng g interface hero -
修改 hero 接口文件 (位置:src/app/hero.ts)
javascriptexport interface Hero { id: number; name: string; } -
新建 inMemHero 服务(位置:src/app/in-mem-hero.service.ts)
javascriptng g s inMemHero -
修改 inMemHero 服务文件(位置:src/app/in-mem-hero.service.ts)
javascriptimport { Injectable } from '@angular/core'; import { InMemoryDbService, RequestInfo } from 'angular-in-memory-web-api'; import { Observable } from 'rxjs'; @Injectable() export class InMemHeroService implements InMemoryDbService { createDb(reqInfo?: RequestInfo): {} | Observable<{}> | Promise<{}> { // 变量名 heroes 将被视作 URL 的一部分 let heroes = [ { id: 1, name: '张三' }, { id: 2, name: '李四' }, { id: 3, name: '王五' }, { id: 4, name: '赵六' }, { id: 5, name: '孙琦' } ]; return { heroes }; } } -
编辑
src/app/app.module.ts文件javascriptimport { BrowserModule } from '@angular/platform-browser'; import { NgModule } from '@angular/core'; //导入 httpClient import { HttpClientModule } from '@angular/common/http'; // 导入 HttpClientInMemoryWebApiModule 注册数据存储服务 import { HttpClientInMemoryWebApiModule } from 'angular-in-memory-web-api'; import { AppComponent } from './app.component'; // 导入自己创建的 InMemHeroService 类 import { InMemHeroService } from './in-mem-hero.service'; @NgModule({ declarations: [AppComponent], imports: [ BrowserModule, HttpClientModule, //导入 HttpClientModule BrowserModule 之后 HttpClientInMemoryWebApiModule.forRoot(InMemHeroService) //该模块必须在 HttpClientModule 之后 ], providers: [], bootstrap: [AppComponent] }) export class AppModule {} -
编辑
src/app/app.component.ts组件javascriptimport { HttpClient } from '@angular/common/http'; import { Component, OnInit } from '@angular/core'; import { Observable } from 'rxjs'; import { Hero } from './hero'; @Component({ selector: 'app-root', template: ` <div style="text-align: center;"> <p *ngFor="let hero of heroes">{{ hero.id }}-{{ hero.name }}</p> </div> `, styles: [] }) export class AppComponent implements OnInit { private heroesUrl = 'api/heroes'; heroes: Hero[]; constructor(private http: HttpClient) {} ngOnInit(): void { this.getHeroes().subscribe((data) => { console.log(data); this.heroes = data; }); } getHeroes(): Observable<Hero[]> { return this.http.get<Hero[]>(this.heroesUrl); } }
四、HttpClient 模块的请求头配置
1. 添加请求头
HttpClient 方法的最后一个参数可以指定一个可选的配置对象,通过它可以对请求头进行配置。常见的配置有需要 Content-Type 标识来显式声明 HTTP 请求正文的 MIME 类型、权限认证中的Authorization 令牌以及 HTTP 请求中的参数传递等。
javascript
import { HttpClient } from '@angular/common/http';
import { HttpHeaders } from '@angular/common/http';

export class DemoService {
  constructor(private http: HttpClient) {}

  getData() {
    const httpOptions = {
      headers: new HttpHeaders({
        'Content-Type': 'application/json'
      })
    };
    return this.http.get('api/heroes', httpOptions);
  }
}2. 获取完整的响应信息
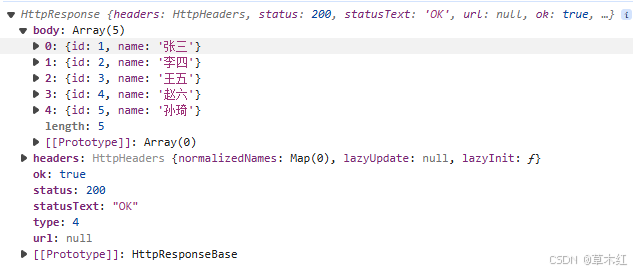
有时访问服务器,需要读取它返回的一个特殊的响应头或响应状态码,因此可能需要完整的响应信息,而不是只有响应体。在 HttpClient 模块的 get0)方法中,observe 选项可用来告诉 HttpClient 模块,希望服务器返回完整的响应信息,代码如下。
javascript
import { HttpClient } from '@angular/common/http';

export class DemoService {
  constructor(private http: HttpClient) {}

  getData() {
    return this.http.get('api/heroes', { observe: 'response' });
  }
}
3. 配置请求参数
设置单个参数
javascript
import { HttpClient, HttpParams } from '@angular/common/http';

export class DemoService {
  constructor(private http: HttpClient) {}

  searchHero(key: string) {
    const options = { params: new HttpParams().set('name', key) };
    return this.http.get('api/heroes', options);
  }
}
设置多个参数
javascript
new HttpParams().append('id', '1').append('name', '张三')使用 fromString 变量通过 URL 查询字符串构建请求参数
javascript
new HttpParams({ fromString: 'id=1&name=张三'});4. 请求非 JSON 数据
不是所有的 API 都会返回 JSON 数据。有时候它们会从服务器读取文本文件,并把文本文件的内容记录下来,然后把这些内容使用 Observable 的形式返回给调用者。我们可以通过在HttpClient 模块提供的 get() 方法中配置 responseType 选项来指定获取响应内容的类型。
javascript
this.http.get (filename, {responseType: 'text'})
.pipe(
	tap( data =>
		console.log(filename, data)
	)
);
五、HttpClient 模块与RxJS配合
1. 错误处理
-
处理单个接口的错误:调用 HttpClient() 方法,返回可观察对象,可以在可观测对象的订阅方法中添加错误处理的逻辑代码:这种方式仅针对某个组件的接口,无法处理某一类错误
javascript// getHeroes(): Observable<Hero[]> { // const httpOptions = { // headers: new HttpHeaders({ // 'Content-Type': 'application/json' // }) // }; // return this.http.get<Hero[]>(this.heroesUrl); // } this.getHeroes().subscribe( (data) => { console.log(data); this.heroes = data; }, (error) => { console.log(error); } ); -
在接口处理错误:由 HttpClient 方法返回的可观察对象通过管道传给错误处理器
javascriptimport { HttpClient, HttpErrorResponse, HttpParams } from '@angular/common/http'; import { Observable, throwError } from 'rxjs'; import { catchError, retry } from 'rxjs/operators'; import { Hero } from './hero'; export class DemoService { private heroesUrl = 'api/heroes'; constructor(private http: HttpClient) {} getHeroes(): Observable<Hero[]> { return this.http.get<Hero[]>(this.heroesUrl).pipe( catchError(this.handleError) // 错误处理 ); } private handleError(error: HttpErrorResponse) { if (error.error instanceof ErrorEvent) { // 代码运行错误或网络错误 console.error('代码运行错误或网络错误:', error.error.message); } else { // 服务器发生错误,返回一个不成功的响应代码 console.error(`错误码是:${error.status}, 错误信息:${error.error}`); } return throwError('系统发生错误,请稍后重试'); } }
2. 重试
RxJS 提供了几个 retry 操作符,它们可以对失败的可观察对象自动重新订阅几次,其中最简单的是 retry0)操作符。对调用 HttpClient 方法返回的结果进行重新订阅会导致重新发起 HTTP 请求。
javascript
import { HttpClient, HttpErrorResponse, HttpParams } from '@angular/common/http';
import { Observable, throwError } from 'rxjs';
import { catchError, retry } from 'rxjs/operators';
import { Hero } from './hero';

export class DemoService {
  private heroesUrl = 'api/heroes';

  constructor(private http: HttpClient) {}

  getHeroes(): Observable<Hero[]> {
    return this.http.get<Hero[]>(this.heroesUrl).pipe(
      retry(3), // 重试失败的请求,最多可重试3次
      catchError(this.handleError) // 错误处理
    );
  }

  private handleError(error: HttpErrorResponse) {
    if (error.error instanceof ErrorEvent) {
      // 代码运行错误或网络错误
      console.error('代码运行错误或网络错误:', error.error.message);
    } else {
      // 服务器发生错误,返回一个不成功的响应代码
      console.error(`错误码是:${error.status}, 错误信息:${error.error}`);
    }

    return throwError('系统发生错误,请稍后重试');
  }
}
六、把数据发送到服务器
1. 发送 POST 请求
handleError 可以看 第五章的错误处理
javascript
import { HttpClient, HttpHeaders } from '@angular/common/http';
import { Observable } from 'rxjs';
import { Hero } from './hero';

export class DemoService {
  private heroesUrl = 'api/heroes';

  constructor(private http: HttpClient) {}

  addHero(hero: Hero): Observable<Hero> {
    const httpOptions = {
      headers: new HttpHeaders({
        'Content-Type': 'application/json'
      })
    };
    return this.http.post<Hero>(this.heroesUrl, hero, httpOptions);
  }
}2. 发送 DELETE 请求
javascript
import { HttpClient } from '@angular/common/http';
import { Observable } from 'rxjs';
import { Hero } from './hero';

export class DemoService {
  private heroesUrl = 'api/heroes';

  constructor(private http: HttpClient) {}

  deleteHero(hero: Hero | number): Observable<Hero> {
    const id = typeof hero === 'number' ? hero : hero.id;
    const url = this.heroesUrl + '/' + id;
    return this.http.delete<Hero>(url);
  }
}3. 发送 PUT 请求
javascript
import { HttpClient } from '@angular/common/http';
import { Observable } from 'rxjs';
import { Hero } from './hero';

export class DemoService {
  private heroesUrl = 'api/heroes';

  constructor(private http: HttpClient) {}

  updateHero(hero: Hero): Observable<Hero> {
    return this.http.put<Hero>(this.heroesUrl, hero);
  }
}4. 用例
-
新建一个项目
powershellng new demo-http -s -t --minimal -
安装 Angular 内存数据库模拟服务器
powershellnpm i angular-in-memory-web-api@0.10.0 --save -
使用命令新建一个 hero 接口文件(位置src/app/hero.ts)
powershellng g interface hero -
修改 hero 接口文件 (位置src/app/hero.ts)
javascriptexport interface Hero { id: number; name: string; } -
使用命令新建服务文件,用作请求的数据 (位置src/app/in-mem-hero.service.ts)
javascriptng g s inMemHero -
修改服务文件 (位置src/app/in-mem-hero.service.ts)
javascriptimport { Injectable } from '@angular/core'; import { InMemoryDbService, RequestInfo } from 'angular-in-memory-web-api'; import { Observable } from 'rxjs'; @Injectable() export class InMemHeroService implements InMemoryDbService { createDb(reqInfo?: RequestInfo): {} | Observable<{}> | Promise<{}> { // 变量名 heroes 将被视作 URL 的一部分 let heroes = [ { id: 1, name: '张三' }, { id: 2, name: '李四' }, { id: 3, name: '王五' }, { id: 4, name: '赵六' }, { id: 5, name: '孙琦' } ]; return { heroes }; } } -
编辑
src/app/app.modulee.ts模块文件javascriptimport { BrowserModule } from '@angular/platform-browser'; import { NgModule } from '@angular/core'; import { AppComponent } from './app.component'; import { ReactiveFormsModule } from '@angular/forms'; import { HttpClientModule } from '@angular/common/http'; import { InMemHeroService } from './in-mem-hero.service'; import { HttpClientInMemoryWebApiModule } from 'angular-in-memory-web-api'; @NgModule({ declarations: [AppComponent], imports: [ BrowserModule, ReactiveFormsModule, HttpClientModule, // 须在 BrowserModule 后面 HttpClientInMemoryWebApiModule.forRoot(InMemHeroService) // 须在 HttpClientModule 后面 ], providers: [], bootstrap: [AppComponent] }) export class AppModule {} -
使用命令新建服务,用于发送 http 请求(位置:src/app/hero.service.ts)
javascriptng g s hero -
修改
src/app/hero.service.ts文件javascriptimport { HttpClient, HttpHeaders } from '@angular/common/http'; import { Injectable } from '@angular/core'; import { Observable, of } from 'rxjs'; import { tap, catchError } from 'rxjs/operators'; import { Hero } from './hero'; @Injectable({ providedIn: 'root' }) export class HeroService { // 内存数据库的 REST API 地址 private herosUrl = 'api/heroes'; // 请求头 httpOptions = { headers: new HttpHeaders({ 'Content-Type': 'application/json' }) }; constructor(private http: HttpClient) {} // 用作处理请求产生的错误 private handleError<T>(operation = 'operation', result?: T) { return (error: any): Observable<T> => { console.log(`${operation} 失败:${error.message}`); return of(result as T); // 返回可观察对象 }; } getHeroes(): Observable<Hero[]> { return this.http.get<Hero[]>(this.herosUrl).pipe( tap((_) => console.log('获取所有数据')), catchError(this.handleError<any>('getHeroes')) ); } addHero(hero: Hero): Observable<Hero> { return this.http.post<Hero>(this.herosUrl, hero, this.httpOptions).pipe( tap((newHero: Hero) => console.log(`添加的 hero 的id=${newHero.id}`)), catchError(this.handleError<Hero>('addHero')) ); } deleteHero(hero: Hero | number): Observable<Hero> { const id = typeof hero === 'number' ? hero : hero.id; const url = `${this.herosUrl}/${id}`; return this.http.delete<Hero>(url, this.httpOptions).pipe( tap((_) => console.log(`删除的 hero 的id=${id}`)), catchError(this.handleError<any>('deleteHero', hero)) ); } updateHero(hero: Hero): Observable<Hero> { hero.name = hero.name + (hero.id + 1); return this.http .put<Hero>(this.herosUrl, hero, this.httpOptions) .pipe(tap((_) => console.log(`更新 hero id=${hero.id}`), catchError(this.handleError('updateHero', hero)))); } } -
编辑
src/app/app.component.ts文件javascriptimport { Component, OnInit } from '@angular/core'; import { Hero } from './hero'; import { FormBuilder, FormGroup, Validators } from '@angular/forms'; import { HeroService } from './hero.service'; @Component({ selector: 'app-root', template: `<div> <table> <tr> <th>ID</th> <th>姓名</th> <th>操作</th> </tr> <tr *ngFor="let hero of heroes"> <td>{{ hero.id }}</td> <td>{{ hero.name }}</td> <td> <button (click)="deleteHero(hero.id)">删除</button> <button (click)="updateHero(hero)">更新</button> </td> </tr> </table> <br /> <form [formGroup]="formGroup" (ngSubmit)="onSubmit()"> <div class="block"> <label>Id:</label> <input type="text" formControlName="id" /> </div> <div class="block"> <label>姓名:</label> <input type="text" formControlName="name" /> </div> <input type="submit" value="添加" [disabled]="!formGroup.valid" /> <br /><br /> 表单是否有效:{{ formGroup.valid }}<br /> 表单完整数据:{{ formGroup.valid | json }}<br /> </form> </div>`, styles: ['form { border: 1px solid red; } ', '.block label { display: inline-block; width: 50px; text-align: right; }'] }) export class AppComponent implements OnInit { heroes: Hero[]; formGroup: FormGroup; constructor(private heroService: HeroService, private fb: FormBuilder) {} ngOnInit(): void { this.getHeroes(); // 初始化表单 this.formGroup = this.fb.group({ id: this.fb.control('', Validators.required), name: this.fb.control('', Validators.required) }); } getHeroes() { this.heroService.getHeroes().subscribe((data) => (this.heroes = data)); } updateHero(hero: Hero) { this.heroService.updateHero(hero).subscribe((data) => { console.log('修改数据:', data); this.getHeroes(); }); } deleteHero(id: number) { this.heroService.deleteHero(id).subscribe((data) => { console.log('删除数据', data); this.getHeroes(); }); } onSubmit() { const hero = this.formGroup.value; hero.id = Number(hero.id); this.heroService.addHero(hero).subscribe((hero) => { if (hero) { this.getHeroes(); } else { alert('发送错误'); } this.formGroup.reset(); }); } } -
页面如下

七、Angular 拦截器
Angular 中的拦截器(Httplnterceptor 接口)提供了一种拦截 HTTP 请求和 HTTP 响应的方法,可以用来监视与转换 HTTP 请求和 HTTP 响应。 拦截器使用一种常规的、标准的方法对每一次 HTTP 的请求和响应任务执行如认证、添加请求参数和记录日志等很多种隐式任务。 如果没有拦截器,那么开发者将不得不对 HttpClient 模块的每次调用显式地执行这些任务。
1. 创建拦截器
-
要创建拦截器,就要创建一个实现了 Httplnterceptor 接口的类,并实现该接口中的 intercept()方法。用户可以使用如下的 Anqular CLI命令创建拦截器。
powershellng generate interceptor <name>
-
新建一个拦截器 my,将生成
src/app/my.interceptor.ts文件javascriptng g interceptor my -
src/app/my.interceptor.ts文件内容如下javascriptimport { Injectable } from '@angular/core'; import { HttpRequest, HttpHandler, HttpEvent, HttpInterceptor } from '@angular/common/http'; import { Observable } from 'rxjs'; @Injectable() export class MyInterceptor implements HttpInterceptor { constructor() {} /*** * request: 请求对象实例 * next: 拦截器链表中的下一个拦截器 */ intercept(request: HttpRequest<unknown>, next: HttpHandler): Observable<HttpEvent<unknown>> { // 输入请求信息,只有这一行是添加的,别的都是生成的 console.log(JSON.stringify(request)); // 继续向下走 return next.handle(request); } }
2. 配置拦截器提供商
-
在Angular 中配置提供商后,应用程序就可以使用提供商来配置注入器了。注入器负责提供依赖注入服务,进而 Web 应用程序就能使用依赖注入服务了。因此,在创建了拦截器后,我们还需要进一步配置拦截器提供商。
-
由于拦截器是 HttpClient 服务的(可选)依赖,因此必须在提供 HttpClient 服务的同一个(或其各级父注入器)注入器中提供这些拦截器。我们在根模块 AppModule 中导入了HttoClientModule 模块,导致 Web 应用程序在其根注入器中提供了 HtpClient 服务,所以也要在根模块 AppModule 中提供这些拦截器。配置拦截器提供商的注册语句格式如下。
javascript@NgModule({ providers: [{ provide: HTTP_INTERCEPTORS, useClass: MyInterceptor, multi: true }], }) -
在上述代码中,我们在@NgModule() 装饰器的元数据的 providers 选项里配置拦截器提供商。其中 provide 选项值HTTP_INTERCEPTORS 常量来自 @angular/common/http 包; useClass选项值是我们创建的拦截器;multi 选项值为 true,表示当前注入的是一个数组的值,而不是单一的值,multi 选项值默认为 true。如果在 Web 应用程序中仅配置一个拦截器提供商,那么程序代码也可以直接写成如下形式。
javascript@NgModule({ providers: [MyInterceptor], })
3. 用例
配置日志和错误信息的拦截器
-
新建一个项目
powershellng new demo-http4 -s -t --minimal --routing=false --style=css -
新建一个日志拦截器文件(位置:src/app/log.interceptor.ts)
powershellng g interceptor log -
修改日志拦截器文件(位置:src/app/log.interceptor.ts)
javascriptimport { Injectable } from '@angular/core'; import { HttpRequest, HttpHandler, HttpEvent, HttpInterceptor, HttpResponse } from '@angular/common/http'; import { Observable } from 'rxjs'; import { tap, finalize } from 'rxjs/operators'; @Injectable() export class LogInterceptor implements HttpInterceptor { constructor() {} intercept(request: HttpRequest<unknown>, next: HttpHandler): Observable<HttpEvent<unknown>> { const started = Date.now(); let ok: string; return next.handle(request).pipe( tap( // 正常是返回 HttpResponse 类型对象 (event) => { console.log('进入Log 拦截器'); ok = event instanceof HttpResponse ? 'succeeded' : ''; }, // 错误时返回 HttpErrorResponse 类型对象 (error) => (ok = 'failed') ), // 当 HTTP 请求调用完成或者有错误发生时执行下面的逻辑 finalize(() => { const elapsed = Date.now() - started; const msg = `${request.method} "${request.urlWithParams}" ${ok} in ${elapsed} ms.`; console.log('Log拦截器' + msg); //输入请求信息 }) ); } } -
新建一个错误拦截器文件(位置:src/app/error.interceptor.ts)
powershellng g interceptor error -
修改错误拦截器文件(位置:src/app/error.interceptor.ts)
javascript
import { Injectable } from '@angular/core';
import { HttpRequest, HttpHandler, HttpEvent, HttpInterceptor } from '@angular/common/http';
import { Observable, throwError } from 'rxjs';
import { catchError, tap } from 'rxjs/operators';

@Injectable()
export class ErrorInterceptor implements HttpInterceptor {
  constructor() {}

  intercept(request: HttpRequest<unknown>, next: HttpHandler): Observable<HttpEvent<unknown>> {
    return next.handle(request).pipe(
      tap(
        (data) => console.log('进入 error 拦截器,没有发生错误', data),
        catchError((err) => {
          if (err.status === 401) {
            console.log('进入 error 拦截器,发生了 401 错误');
          }
          const error = err.error.message || err.statusText;
          return throwError(error);
        })
      )
    );
  }
}-
编辑
src/app/app.module.ts文件javascriptimport { BrowserModule } from '@angular/platform-browser'; import { NgModule } from '@angular/core'; import { HTTP_INTERCEPTORS } from '@angular/common/http'; import { HttpClientModule } from '@angular/common/http'; import { AppComponent } from './app.component'; import { LogInterceptor } from './log.interceptor'; import { ErrorInterceptor } from './error.interceptor'; @NgModule({ declarations: [AppComponent], imports: [BrowserModule, HttpClientModule], providers: [ // angular 会按照顺序依次进行拦截 { provide: HTTP_INTERCEPTORS, useClass: ErrorInterceptor, multi: true }, { provide: HTTP_INTERCEPTORS, useClass: LogInterceptor, multi: true } ], bootstrap: [AppComponent] }) export class AppModule {} -
新建 user 接口文件(位置:src/app/user.ts)
powershellng g interface user -
修改 user 接口文件(位置:src/app/user.ts)
javascriptexport interface User { login: string; url: string; } -
新建一个 github 服务类文件(位置:src/app/github.service.ts)
javascriptng g s github -
修改 github 服务类文件(位置:src/app/github.service.ts)
javascriptimport { Injectable } from '@angular/core'; import { HttpClient } from '@angular/common/http'; import { Observable } from 'rxjs'; import { User } from './user'; @Injectable({ providedIn: 'root' }) export class GithubService { // github 的接口 private usersUrl = 'https://api.github.com/users?since=1'; constructor(private http: HttpClient) {} getUsers(): Observable<User[]> { return this.http.get<User[]>(this.usersUrl); } } -
修改
src/app/app.component.ts文件javascriptimport { Component, OnInit } from '@angular/core'; import { Observable } from 'rxjs'; import { GithubService } from './github.service'; import { User } from './user'; @Component({ selector: 'app-root', template: ` <div> <h3>从github 上获取 users</h3> <div *ngFor="let user of users$ | async"> <strong>User Name: </strong>{{ user.login }} <strong>GitHub URL: </strong>{{ user.url }} </div> </div>`, styles: [] }) export class AppComponent implements OnInit { users$: Observable<Array<User>>; constructor(private githubService: GithubService) {} ngOnInit(): void { this.users$ = this.githubService.getUsers(); } } -
页面展示,控制台将输出拦截的信息,两个拦截器分别进入了两次,请求时一次,响应时一次
