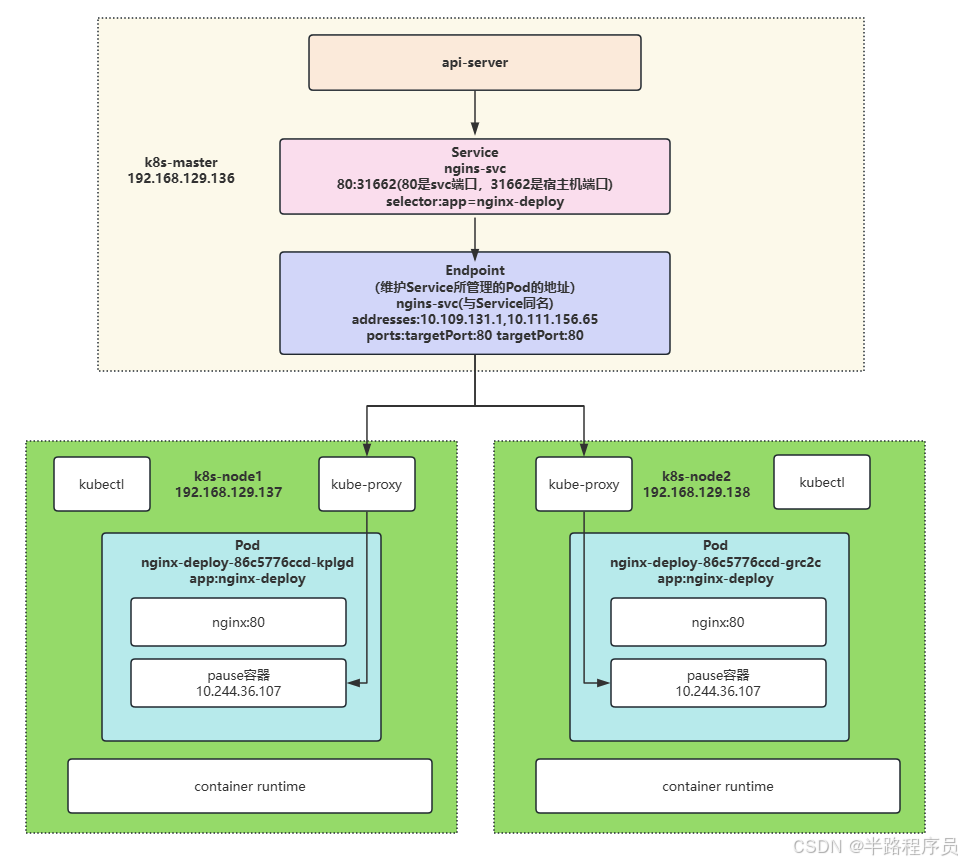
一、Service-pod-endpoint关系
# 查看endpoints
[root@k8s-master deployments]# kubectl get endpoints
NAME         ENDPOINTS                          AGE
kubernetes   192.168.129.136:6443               90m
nginx-svc    10.109.131.1:80,10.111.156.65:80   22m
# 查看svc
[root@k8s-master deployments]# kubectl get svc
NAME         TYPE        CLUSTER-IP      EXTERNAL-IP   PORT(S)        AGE
kubernetes   ClusterIP   10.96.0.1       <none>        443/TCP        90m
nginx-svc    NodePort    10.98.220.155   <none>        80:31662/TCP   22m

[root@k8s-master deployments]# kubectl get po -l app=nginx-deploy -o wide
NAME                            READY   STATUS    RESTARTS   AGE   IP              NODE        NOMINATED NODE   READINESS GATES
nginx-deploy-86c5776ccd-grc2c   1/1     Running   0          46m   10.109.131.1    k8s-node2   <none>           <none>
nginx-deploy-86c5776ccd-kplgd   1/1     Running   0          47m   10.111.156.65   k8s-node1   <none>           <none>
[root@k8s-master deployments]# kubectl get ep
NAME         ENDPOINTS                          AGE
kubernetes   192.168.129.136:6443               94m
nginx-svc    10.109.131.1:80,10.111.156.65:80   25m


可以看到endpoints中的名字和svc的名字是一样的,并且在endpoints中有两个IP地址分别为:
10.109.131.1:80
10.111.156.65:80,
同时,在po中看到,
nginx-deploy-86c5776ccd-grc2c对应10.109.131.1
nginx-deploy-86c5776ccd-kplgd对应10.111.156.65
Service,Pod,Endpoint之间的关系
二、Service定义
(1)配置文件
apiVersion: v1
kind: Service
metadata:
  name: nginx-svc
  labels:
    app: nginx-svc
spec:
  ports:
  - name: http # service 端口配置的名称
    protocol: TCP # 端口绑定的协议,支持 TCP、UDP、SCTP,默认为 TCP
    port: 80 # service 自己的端口
    targetPort: 9527 # 目标 pod 的端口
  - name: https
    port: 443
    protocol: TCP
    targetPort: 443
  selector: # 选中当前 service 匹配哪些 pod,对哪些 pod 的东西流量进行代理
    app: nginx
(2)常用命令
# 创建 service
kubectl create -f nginx-svc.yaml

# 查看 service 信息,通过 service 的 cluster ip 进行访问
kubectl get svc

# 查看 pod 信息,通过 pod 的 ip 进行访问
kubectl get po -owide

# 创建其他 pod 通过 service name 进行访问(推荐)
kubectl exec -it busybox -- sh
curl http://nginx-svc

# 默认在当前 namespace 中访问,如果需要跨 namespace 访问 pod,则在 service name 后面加上 .<namespace> 即可
curl http://nginx-svc.default
(3)访问测试
# 创建一个busybox,并进入容器,如果之前已经创建了,则直接进入:kubectl exec -it dns-test -- sh
[root@k8s-master www]# kubectl run -it --image busybox dns-test --restart=Never --rm /bin/sh
If you don't see a command prompt, try pressing enter.
/ # wget http://nginx-svc  // 使用wget访问服务名
Connecting to nginx-svc (10.98.220.155:80)
saving to 'index.html'
index.html           100% |****************************************************************************************************************************************************************************************************************|   615  0:00:00 ETA
'index.html' saved
/ # cat index.html
<!DOCTYPE html>
<html>
<head>
<title>Welcome to nginx!</title>
<style>
html { color-scheme: light dark; }
body { width: 35em; margin: 0 auto;
font-family: Tahoma, Verdana, Arial, sans-serif; }
</style>
</head>
<body>
<h1>Welcome to nginx!</h1>
<p>If you see this page, the nginx web server is successfully installed and
working. Further configuration is required.</p>

<p>For online documentation and support please refer to
<a href="http://nginx.org/">nginx.org</a>.<br/>
Commercial support is available at
<a href="http://nginx.com/">nginx.com</a>.</p>

<p><em>Thank you for using nginx.</em></p>
</body>
</html>
/ # wget http://nginx-svc.default // 使用命名空间进行访问
Connecting to nginx-svc.default (10.98.220.155:80)
saving to 'index.html'
index.html           100% |****************************************************************************************************************************************************************************************************************|   615  0:00:00 ETA
'index.html' saved
/ # cat index.html
<!DOCTYPE html>
<html>
<head>
<title>Welcome to nginx!</title>
<style>
html { color-scheme: light dark; }
body { width: 35em; margin: 0 auto;
font-family: Tahoma, Verdana, Arial, sans-serif; }
</style>
</head>
<body>
<h1>Welcome to nginx!</h1>
<p>If you see this page, the nginx web server is successfully installed and
working. Further configuration is required.</p>

<p>For online documentation and support please refer to
<a href="http://nginx.org/">nginx.org</a>.<br/>
Commercial support is available at
<a href="http://nginx.com/">nginx.com</a>.</p>

<p><em>Thank you for using nginx.</em></p>
</body>
</html>
(4)代理 k8s 外部服务tong
[root@k8s-master services]# vim nginx-svc-external.yaml
apiVersion: v1
kind: Service
metadata:
name: nginx-svc-external
labels:
app: nginx
spec:
# selector: # 注释掉选择器,就不会自动创建endpoint
# app: nginx-deploy
ports:
- port: 80
targetPort: 80
name: web
type: ClusterIP
[root@k8s-master services]# kubectl create -f nginx-svc-external.yaml
service/nginx-svc-external created
# 可以看到svc被创建
[root@k8s-master services]# kubectl get svc
NAME TYPE CLUSTER-IP EXTERNAL-IP PORT(S) AGE
kubernetes ClusterIP 10.96.0.1 <none> 443/TCP 3d1h
nginx-svc NodePort 10.98.220.155 <none> 80:31662/TCP 3d
nginx-svc-external ClusterIP 10.110.50.51 <none> 80/TCP 2s
# 但是endpoint没有被创建,因为没有指定selector
[root@k8s-master services]# kubectl get ep
NAME ENDPOINTS AGE
kubernetes 192.168.129.136:6443 3d1h
nginx-svc 10.109.131.5:80,10.111.156.70:80 3d
# 后面数据可能有变化,因为中间电脑重启过一次,重新搭建了一次环境
# 创建ep
[root@k8s-master services]# vim nginx-ep-external.yaml
apiVersion: v1
kind: Endpoints
metadata:
labels:
app: nginx # 与 service 一致
name: nginx-svc-external # 与 service 一致
namespace: default # 与 service 一致
subsets:
- addresses:
- ip: 120.78.159.117 # 目标 ip 地址
ports: # 与 service 一致
- name: web
port: 80
protocol: TCP
[root@k8s-master services]# kubectl create -f nginx-ep-external.yaml
endpoints/nginx-svc-external created
[root@k8s-master services]# kubectl get ep
NAME ENDPOINTS AGE
kubernetes 192.168.129.136:6443 20m
nginx-svc-external 120.78.159.117:80 12s
# 查看代理信息
[root@k8s-master services]# kubectl describe ep nginx-svc-external
Name: nginx-svc-external
Namespace: default
Labels: app=nginx
Annotations: <none>
Subsets:
Addresses: 120.78.159.117
NotReadyAddresses: <none>
Ports:
Name Port Protocol
---- ---- --------
web 80 TCP
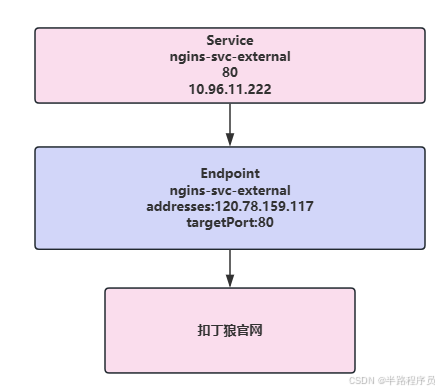
Events: <none>通过service访问外部地址
# 进入到测试容器,我这里是因为之前电脑重启了,所以又重新建了一个
[root@k8s-master services]#  kubectl run -it --image busybox dns-test --restart=Never --rm /bin/sh
If you don't see a command prompt, try pressing enter.
/ # ls
bin    dev    etc    home   lib    lib64  proc   root   sys    tmp    usr    var
/ # wget http://nginx-svc-external  # 访问自己创建的service
Connecting to nginx-svc-external (10.96.11.222:80)
Connecting to www.wolfcode.cn (120.78.159.117:80) # 通过service访问到了外部地址
Connecting to www.wolfcode.cn (120.78.159.117:443)
wget: note: TLS certificate validation not implemented
saving to 'index.html'
index.html           100% |******************************************************************************************************************************************| 72518  0:00:00 ETA
'index.html' saved
/ # ls
bin         dev         etc         home        index.html  lib         lib64       proc        root        sys         tmp         usr         var
/ #
原理图如下:
(5)反向代理外部域名
[root@k8s-master services]# vim nginx-svc-externalname.yaml
apiVersion: v1
kind: Service
metadata:
  labels:
    app: wolfcode-external-domain
  name: wolfcode-external-domain
spec:
  type: ExternalName
  externalName: www.wolfcode.cn


[root@k8s-master services]# kubectl create -f nginx-svc-externalname.yaml
service/wolfcode-external-domain created
[root@k8s-master services]# kubectl get svc
NAME                       TYPE           CLUSTER-IP     EXTERNAL-IP       PORT(S)   AGE
kubernetes                 ClusterIP      10.96.0.1      <none>            443/TCP   68m
nginx-svc-external         ClusterIP      10.96.11.222   <none>            80/TCP    49m
wolfcode-external-domain   ExternalName   <none>         www.wolfcode.cn   <none>    10s

# 通过域名的方式,访问外部服务
[root@k8s-master services]# kubectl run -it --image busybox dns-test --restart=Never --rm /bin/sh
If you don't see a command prompt, try pressing enter.
/ # wget wolfcode-external-domain  # 这里指定名字,上面的配置文件中externalName: www.wolfcode.cn,指定的是域名,而不是IP地址
Connecting to wolfcode-external-domain (120.78.159.117:80)
Connecting to www.wolfcode.cn (120.78.159.117:80)
Connecting to www.wolfcode.cn (120.78.159.117:443)
wget: note: TLS certificate validation not implemented
saving to 'index.html'
index.html           100% |******************************************************************************************************************************************| 72518  0:00:00 ETA
'index.html' saved


# 查看目前配置的type
[root@k8s-master services]# grep type nginx-svc.yaml
  type: NodePort
[root@k8s-master services]# grep type nginx-svc-external.yaml
  type: ClusterIP
[root@k8s-master services]# grep type nginx-svc-externalname.yaml
  type: ExternalName

# 类型解释
ClusterIP:只能在集群内部使用,不配置类型的话默认就是 ClusterIP
ExternalName:返回定义的 CNAME 别名,可以配置为域名
NodePort:会在所有安装了 kube-proxy 的节点都绑定一个端口,此端口可以代理至对应的 Pod,集群外部可以使用任意节点 ip + NodePort 的端口号访问到集群中对应 Pod 中的服务。

当类型设置为 NodePort 后,可以在 ports 配置中增加 nodePort 配置指定端口,需要在下方的端口范围内,如果不指定会随机指定端口

端口范围:30000~32767

端口范围配置在 /usr/lib/systemd/system/kube-apiserver.service 文件中

LoadBalancer:使用云服务商(阿里云、腾讯云等)提供的负载均衡器服务