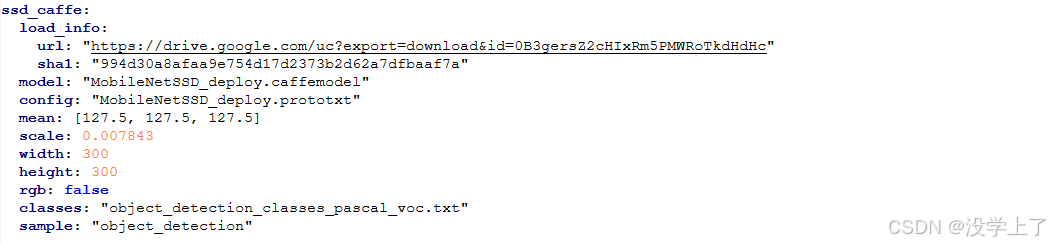
"C:\opencv\opencv\sources\samples\dnn\models.yml"下载opencv的深度模型框架,例如 caffe,copyMobileNetSSD_deploy.prototxt和MobileNetSSD_deploy.caffemodel所在的位置,其中prototxt需要后面生成,这两个文件用于std::string model_text_file和std::string modelFile的读取。
#include <opencv2/opencv.hpp>
#include <opencv2/dnn.hpp>
#include <iostream>
using namespace cv;
using namespace cv::dnn;
using namespace std;
String objNames\[\] = { "background",
"aeroplane", "bicycle", "bird", "boat",
"bottle", "bus", "car", "cat", "chair",
"cow", "diningtable", "dog", "horse",
"motorbike", "person", "pottedplant",
"sheep", "sofa", "train", "tvmonitor" };
int main(int argc, char** argv) {
Mat frame = imread("C:/newword/image/39.jpg");
if (frame.empty()) {
printf("could not load image...\n");
return 0;
}
namedWindow("input image", WINDOW_AUTOSIZE);
imshow("input image", frame);
std::string model_text_file = "C:/Users/ss/Desktop/newword/dnn/MobileNetSSD_deploy.prototxt";
std::string modelFile = "C:/Users/ss/Desktop/newword/dnn/MobileNetSSD_deploy.caffemodel";//指定Caffe模型的配置文件(.prototxt)和权重文件(.caffemodel)路径,并使用readNetFromCaffe函数加载模型
Net net = readNetFromCaffe(model_text_file, modelFile);//从models找到对应的框架参数
Mat blobImage = blobFromImage(frame, 0.007843,
Size(300, 300),
Scalar(127.5, 127.5, 127.5), false, false);
printf("blobImage width : %d, height: %d\n", blobImage.cols, blobImage.rows);// 使用blobFromImage函数对输入图像进行预处理,包括缩放、均值减法等操作,将图像转换为适合模型输入的Blob格式。并输出Blob图像的宽和高。
net.setInput(blobImage, "data");
Mat detection = net.forward("detection_out");
//
这两行代码在基于OpenCV的深度学习物体检测流程中起着关键作用,用于将预处理后的图像数据输入模型并获取检测结果。
1. net.setInput(blobImage, "data");
• 功能:此函数将预处理后的图像数据(blobImage)设置为深度神经网络(net)的输入。这里的"data"是指模型输入层的名称 。在Caffe模型中,输入层通常命名为"data",不同框架或模型的输入层名称可能不同,需按实际情况调整。
• 原理:blobImage是经过blobFromImage函数预处理得到的,格式符合模型输入要求。setInput函数将blobImage数据与模型的输入层关联,为后续前向传播做准备。
2. Mat detection = net.forward("detection_out");
• 功能:执行深度神经网络的前向传播,并获取指定输出层("detection_out")的输出结果。detection是一个Mat对象,存储检测结果数据。
• 原理:forward函数根据模型的结构和权重,将输入数据(即之前设置的blobImage)从输入层依次经过各个中间层的计算,最终得到输出层的数据。"detection_out"是模型输出检测结果的层名称,不同模型该名称可能不同。输出结果通常包含检测到的物体类别、置信度以及物体在图像中的位置等信息。
通过这两行代码,实现了从输入图像数据到获取检测结果的关键步骤,后续可对detection中的数据进行解析和后处理,如绘制检测框、标记物体类别等操作。
// post-process
Mat detectionMat(detection.size2, detection.size3, CV_32F, detection.ptr<float>());//对于Mat类型的detection矩阵,其维度顺序一般为batch_size, channels, height, width,对应索引0到3。
float confidence_threshold = 0.5;//设置置信度阈值只有高过这个阈值才被认定为有效的检测
for (int i = 0; i < detectionMat.rows; i++) {
float* curr_row = detectionMat.ptr<float>(i);//获取detectionMat矩阵的第i行数据指针,并将值赋予给curr_row,用来访问每个元素的值
int image_id = (int)(*curr_row++);//通过(int)将其强制转换为整数类型,赋值给image_id。curr_row++使指针curr_row移动到下一个元素位置,准备读取下一个信息,int image_id = (int)(*curr_row++) 的执行顺序是先取 curr_row 所指向的内存地址中的值,将其转换为 int 类型后赋值给 image_id,然后再将 curr_row 指针向后移动一位,指向下一个元素的内存地址
size_t objIndex = (size_t)(*curr_row++);//用于获取物体类别索引:在目标检测等任务中,模型输出的检测结果可能包含多个信息,其中之一就是物体的类别索引。这行代码就是从curr_row指针所指向的当前位置获取一个值,将其转换为size_t类型后赋值给objIndex,这个objIndex可用于在类别名称数组等数据结构中查找对应的类别名称。比如有一个数组objNames存储了各种物体类别名称,objIndex就可以作为索引去获取相应的类别名称,如objNamesobjIndex可以得到检测到的物体的类别字符串。
float score = *curr_row++;
if (score > confidence_threshold) { //tl_x 和 tl_y 分别是检测框左上角的x坐标和y坐标,br_x 和 br_y 分别是检测框右下角的x坐标和y坐标。这些坐标值最初是归一化到 0, 1 范围的,通过乘以原始图像的宽度 frame.cols 和高度 frame.rows,将其转换为实际图像中的坐标。
float tl_x = (*curr_row++) * frame.cols;
float tl_y = (*curr_row++) * frame.rows;
float br_x = (*curr_row++) * frame.cols;
float br_y = (*curr_row++) * frame.rows;
Rect object_box((int)tl_x, (int)tl_y, (int)(br_x - tl_x), (int)(br_y - tl_y));//Rect object_box((int)tl_x, (int)tl_y, (int)(br_x - tl_x), (int)(br_y - tl_y)); 创建一个 Rect 对象来表示检测框,包含左上角坐标和宽高信息。
rectangle(frame, object_box, Scalar(0, 0, 255), 2, 8, 0);//rectangle(frame, object_box, Scalar(0, 0, 255), 2, 8, 0); 使用 rectangle 函数在原始图像 frame 上绘制红色(Scalar(0, 0, 255))的矩形框,线宽为2像素。
putText(frame, format(" confidence %.2f, %s", score, objNamesobjIndex.c_str()), Point(tl_x - 10, tl_y - 5), FONT_HERSHEY_SIMPLEX, 0.7, Scalar(255, 0, 0), 2, 8)
;
putText(frame, format(" confidence %.2f, %s", score, objNamesobjIndex.c_str()), Point(tl_x - 10, tl_y - 5), FONT_HERSHEY_SIMPLEX, 0.7, Scalar(255, 0, 0), 2, 8);
}
}/ / putText(frame, format(" confidence %.2f, %s", score, objNamesobjIndex.c_str()), Point(tl_x - 10, tl_y - 5), FONT_HERSHEY_SIMPLEX, 0.7, Scalar(255, 0, 0), 2, 8); 使用 putText 函数在检测框附近标注检测结果的置信度和物体类别名称。format 函数用于格式化字符串,将置信度保留两位小数,并结合物体类别名称一起显示。
putText是OpenCV库中的一个函数,用于在图像上绘制文本。以下是其相关信息:
函数原型
void putText(Mat& img, const String& text, Point org, int fontFace, double fontScale, Scalar color, int thickness = 1, int lineType = LINE_8, bool bottomLeftOrigin = false);
参数解释
• img:要绘制文本的图像,是Mat类型的引用。
• text:要绘制的文本内容,是const String&类型。
• org:文本左下角的坐标,是Point类型,表示文本在图像中的起始位置。
• fontFace:字体类型,如FONT_HERSHEY_SIMPLEX等。
• fontScale:字体缩放因子,用于控制文本大小。
• color:文本颜色,是Scalar类型,如Scalar(0, 0, 255)表示红色。
• thickness:文本线条的粗细程度,默认值为1。
• lineType:线条类型,默认是LINE_8。
• bottomLeftOrigin:若为true,则图像的左下角为原点,文本方向会相应改变,默认是false。
imshow("ssd-demo", frame);
waitKey(0);
return 0;
}