目录
[可视化相机pose colmap形式的相机内参外参](#可视化相机pose colmap形式的相机内参外参)
内参外参转换
python
def visualize_cameras(cameras, images):
    fig = plt.figure()
    ax = fig.add_subplot(111, projection='3d')

    for image_id, image_data in images.items():
        qvec = image_data['qvec']
        tvec = image_data['tvec']

        # Convert quaternion to rotation matrix
        rotation = R.from_quat(qvec).as_matrix()

        # Plot camera position
        ax.scatter(tvec[0], tvec[1], tvec[2], c='r', marker='o')

        # Plot camera orientation
        camera_direction = rotation @ np.array([0, 0, 1])
        ax.quiver(tvec[0], tvec[1], tvec[2], camera_direction[0], camera_direction[1], camera_direction[2], length=0.5, normalize=True)

    ax.set_xlabel('X')
    ax.set_ylabel('Y')
    ax.set_zlabel('Z')
    plt.show()
这段代码用于在3D坐标系中可视化相机的位置和朝向。以下是逐行解释:
-
提取参数:
qvec = image_data['qvec'] # 相机的旋转四元数 (w, x, y, z 或 x, y, z, w,需确认顺序) tvec = image_data['tvec'] # 相机的平移向量 (x, y, z 坐标) -
四元数转旋转矩阵:
pythonrotation = R.from_quat(qvec).as_matrix() # 将四元数转换为3x3旋转矩阵-
假设
R来自scipy.spatial.transform.Rotation。 -
需确认
qvec的顺序是否为库预期的格式(通常R.from_quat接受(x, y, z, w))。
-
-
绘制相机位置:
pythonax.scatter(tvec[0], tvec[1], tvec[2], c='r', marker='o') # 在3D图中用红点标记相机位置 -
计算并绘制相机朝向:
pythoncamera_direction = rotation @ np.array([0, 0, 1]) # 旋转矩阵乘以Z轴单位向量,得到相机在世界坐标系中的朝向 ax.quiver(tvec[0], tvec[1], tvec[2], camera_direction[0], camera_direction[1], camera_direction[2], length=0.5, normalize=True)-
原理:相机坐标系中默认朝向为Z轴正方向(通常指向拍摄方向),通过旋转矩阵将其转换到世界坐标系。
-
箭头参数:
-
起点为相机位置
(tvec[0], tvec[1], tvec[2])。 -
方向向量为
camera_direction。 -
length=0.5控制箭头显示长度(实际长度可能因归一化调整)。 -
normalize=True确保箭头方向正确,长度统一。
-
-
注意事项:
-
四元数顺序 :确认
qvec是否与R.from_quat兼容(SciPy需(x, y, z, w))。 -
坐标系定义 :假设相机朝向为Z轴正方向,若实际定义相反(如OpenGL使用-Z),需调整为
[0, 0, -1]。 -
3D绘图设置 :确保
ax是3D轴(例如通过fig.add_subplot(111, projection='3d')创建)。
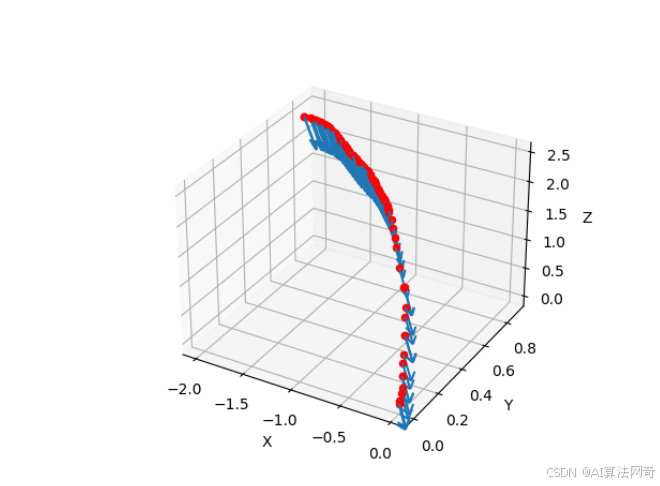
效果:在3D图中,红色圆点表示相机位置,箭头指示其拍摄方向。
可视化相机pose colmap形式的相机内参外参
python
import numpy as np
import matplotlib.pyplot as plt
from mpl_toolkits.mplot3d import Axes3D
from scipy.spatial.transform import Rotation as R
def read_cameras(file_path):
    cameras = {}
    with open(file_path, 'r') as file:
        for line in file:
            if line[0] == '#':
                continue
            parts = line.strip().split()
            camera_id = int(parts[0])
            model = parts[1]
            width = int(parts[2])
            height = int(parts[3])
            params = np.array([float(p) for p in parts[4:]])
            cameras[camera_id] = {
                'model': model,
                'width': width,
                'height': height,
                'params': params
            }
    return cameras

def read_images(file_path):
    images = {}
    with open(file_path, 'r') as file:
        for line in file:
            if line[0] == '#':
                continue
            parts = line.strip().split()
            if len(parts) == 15:
                continue
            image_id = int(parts[0])
            qvec = np.array([float(p) for p in parts[1:5]])
            tvec = np.array([float(p) for p in parts[5:8]])
            camera_id = int(parts[8])
            file_name = parts[9]
            images[image_id] = {
                'qvec': qvec,
                'tvec': tvec,
                'camera_id': camera_id,
                'file_name': file_name
            }
    return images

def visualize_cameras(cameras, images):
    fig = plt.figure()
    ax = fig.add_subplot(111, projection='3d')

    for image_id, image_data in images.items():
        qvec = image_data['qvec']
        tvec = image_data['tvec']

        # Convert quaternion to rotation matrix
        rotation = R.from_quat(qvec).as_matrix()

        # Plot camera position
        ax.scatter(tvec[0], tvec[1], tvec[2], c='r', marker='o')

        # Plot camera orientation
        camera_direction = rotation @ np.array([0, 0, 1])
        ax.quiver(tvec[0], tvec[1], tvec[2], camera_direction[0], camera_direction[1], camera_direction[2], length=0.5, normalize=True)

    ax.set_xlabel('X')
    ax.set_ylabel('Y')
    ax.set_zlabel('Z')
    plt.show()

# 示例使用
cameras = read_cameras('./cameras.txt')
images = read_images('./images.txt')
visualize_cameras(cameras, images)