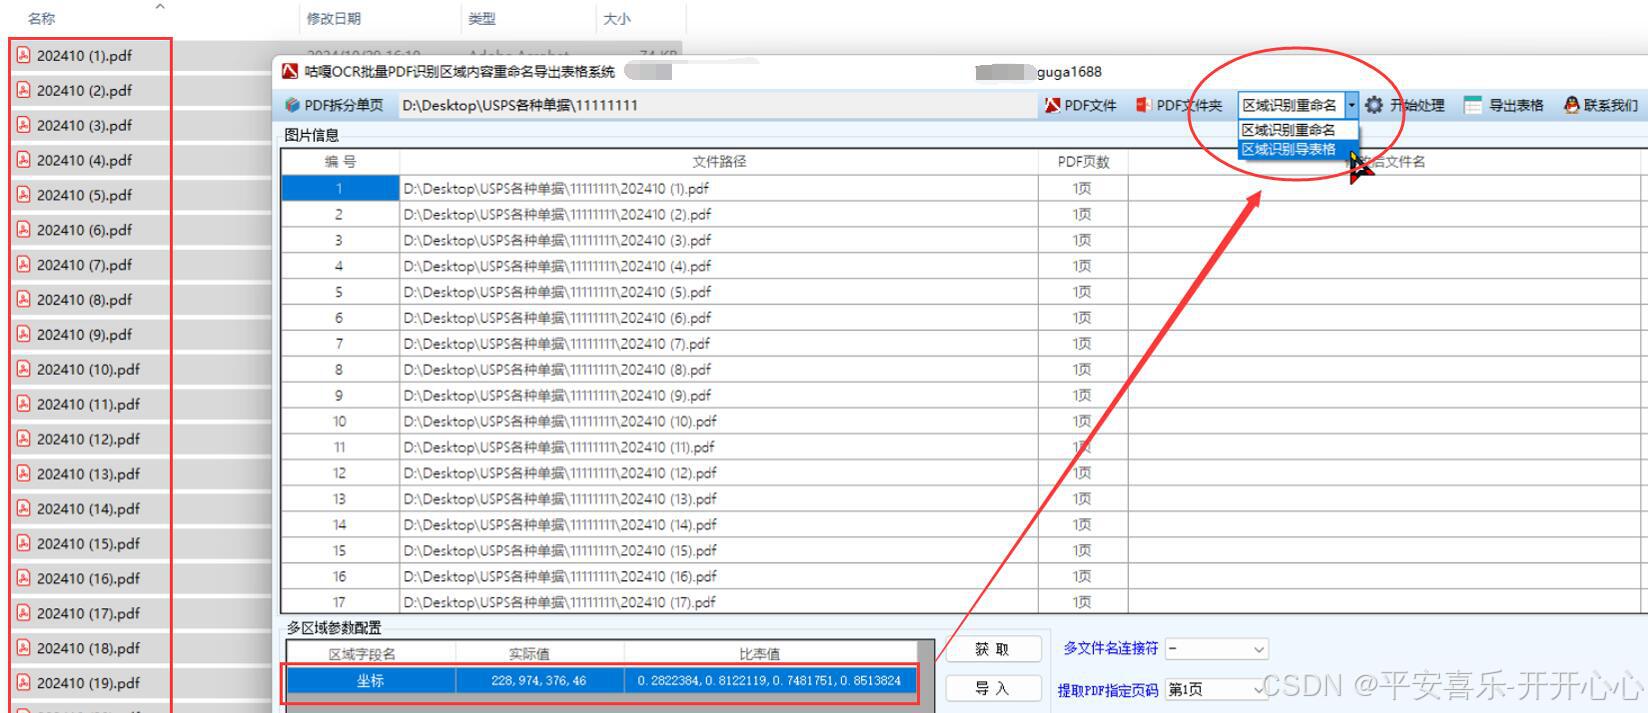
在很多实际业务场景中,需要对大量扫描件 PDF 中的特定区域内容进行识别并整理到 Excel 表格里,以下是一些常见的应用场景:物流运单扫描件 PDF 中包含发货人信息、收货人信息、货物信息等。批量识别这些区域内容到 Excel 表格,有助于物流企业对订单信息进行管理和跟踪。

详细代码步骤
1. 准备工作
- 创建 WPF 项目:打开 Visual Studio,创建一个新的 WPF 应用程序项目。
- 注册腾讯云账号并开通 OCR 服务 :访问腾讯云官网(腾讯云 产业智变·云启未来 - 腾讯),注册账号并开通 OCR 服务,获取 API 密钥(SecretId 和 SecretKey)。
- 安装必要的 NuGet 包 :在 Visual Studio 中,右键点击项目,选择 "管理 NuGet 包",搜索并安装
Newtonsoft.Json用于处理 JSON 数据,以及RestEase用于进行 HTTP 请求。
2. 设计 WPF 界面
在 MainWindow.xaml 文件中设计一个简单的界面,包含选择 PDF 文件夹按钮、开始识别按钮和显示识别结果的文本框,代码如下:
xml
<Window x:Class="PdfOcrToExcel.MainWindow"
        xmlns="http://schemas.microsoft.com/winfx/2006/xaml/presentation"
        xmlns:x="http://schemas.microsoft.com/winfx/2006/xaml"
        Title="批量识别扫描件 PDF 内容到 Excel" Height="350" Width="525">
    <Grid>
        <Button Content="选择 PDF 文件夹" HorizontalAlignment="Left" Margin="10,10,0,0" VerticalAlignment="Top" Width="150" Click="SelectPdfFolder_Click"/>
        <TextBox x:Name="txtPdfFolderPath" HorizontalAlignment="Left" Height="23" Margin="170,10,0,0" TextWrapping="Wrap" VerticalAlignment="Top" Width="300" IsReadOnly="True"/>
        <Button Content="开始识别" HorizontalAlignment="Left" Margin="10,50,0,0" VerticalAlignment="Top" Width="150" Click="StartRecognition_Click"/>
        <TextBox x:Name="txtResult" HorizontalAlignment="Left" Height="200" Margin="10,90,0,0" TextWrapping="Wrap" VerticalAlignment="Top" Width="500" IsReadOnly="True"/>
    </Grid>
</Window>
3. 实现逻辑代码
在 MainWindow.xaml.cs 文件中实现选择文件夹、识别 PDF 区域内容并保存到 Excel 的逻辑,代码如下:
csharp
using System;
using System.Collections.Generic;
using System.IO;
using System.Linq;
using System.Windows;
using Newtonsoft.Json;
using RestEase;
using Spire.Pdf;
using Spire.Pdf.Graphics;
using Spire.Xls;

// 定义腾讯 OCR API 接口
[SerializationMethods(Query = QuerySerializationMethod.Serialized)]
public interface ITencentOcrApi
{
    [Post("https://ocr.tencentcloudapi.com/")]
    Task<HttpResponseMessage> DetectGeneralText([Body(BodySerializationMethod.UrlEncoded)] Dictionary<string, string> parameters);
}

namespace PdfOcrToExcel
{
    public partial class MainWindow : Window
    {
        private string pdfFolderPath;
        private const string SecretId = "your_secret_id";
        private const string SecretKey = "your_secret_key";

        public MainWindow()
        {
            InitializeComponent();
        }

        private void SelectPdfFolder_Click(object sender, RoutedEventArgs e)
        {
            var dialog = new System.Windows.Forms.FolderBrowserDialog();
            System.Windows.Forms.DialogResult result = dialog.ShowDialog();
            if (result == System.Windows.Forms.DialogResult.OK)
            {
                pdfFolderPath = dialog.SelectedPath;
                txtPdfFolderPath.Text = pdfFolderPath;
            }
        }

        private async void StartRecognition_Click(object sender, RoutedEventArgs e)
        {
            if (string.IsNullOrEmpty(pdfFolderPath))
            {
                MessageBox.Show("请先选择 PDF 文件夹!");
                return;
            }

            // 创建 Excel 工作簿
            Workbook workbook = new Workbook();
            Worksheet worksheet = workbook.Worksheets[0];
            int rowIndex = 1;

            // 遍历 PDF 文件夹中的所有 PDF 文件
            string[] pdfFiles = Directory.GetFiles(pdfFolderPath, "*.pdf");
            foreach (string pdfFile in pdfFiles)
            {
                try
                {
                    // 加载 PDF 文件
                    PdfDocument pdf = new PdfDocument();
                    pdf.LoadFromFile(pdfFile);

                    // 假设需要识别的区域(这里简单示例一个区域,可根据实际情况修改)
                    PdfRectangle rect = new PdfRectangle(100, 100, 200, 50);

                    // 将 PDF 页面转换为图片
                    System.Drawing.Bitmap image = pdf.Pages[0].ToImage(0, rect);
                    byte[] imageBytes = ImageToByteArray(image);

                    // 调用腾讯 OCR 进行识别
                    string ocrResult = await PerformOcr(imageBytes);

                    // 将识别结果写入 Excel 单元格
                    worksheet.Range[rowIndex, 1].Text = Path.GetFileName(pdfFile);
                    worksheet.Range[rowIndex, 2].Text = ocrResult;

                    rowIndex++;

                    pdf.Close();
                }
                catch (Exception ex)
                {
                    MessageBox.Show($"处理文件 {pdfFile} 时出错:{ex.Message}");
                }
            }

            // 保存 Excel 文件
            workbook.SaveToFile("ExtractedData.xlsx", ExcelVersion.Version2013);
            MessageBox.Show("信息提取完成,已保存为 ExtractedData.xlsx");
        }

        private byte[] ImageToByteArray(System.Drawing.Bitmap image)
        {
            using (MemoryStream ms = new MemoryStream())
            {
                image.Save(ms, System.Drawing.Imaging.ImageFormat.Jpeg);
                return ms.ToArray();
            }
        }

        private async Task<string> PerformOcr(byte[] imageBytes)
        {
            var api = RestClient.For<ITencentOcrApi>("https://ocr.tencentcloudapi.com/");

            // 生成签名等参数(此处简化,实际需根据腾讯云文档生成正确签名)
            var parameters = new Dictionary<string, string>
            {
                { "Action", "DetectGeneralText" },
                { "Version", "2018-11-19" },
                { "Region", "ap-guangzhou" },
                { "SecretId", SecretId },
                { "Timestamp", DateTimeOffset.UtcNow.ToUnixTimeSeconds().ToString() },
                { "Nonce", new Random().Next(100000).ToString() },
                { "ImageBase64", Convert.ToBase64String(imageBytes) }
            };

            // 调用 API
            var response = await api.DetectGeneralText(parameters);
            string responseContent = await response.Content.ReadAsStringAsync();

            // 解析 JSON 结果
            var result = JsonConvert.DeserializeObject<dynamic>(responseContent);
            string text = "";
            if (result.Response.TextDetections != null)
            {
                foreach (var detection in result.Response.TextDetections)
                {
                    text += detection.DetectedText;
                }
            }

            return text;
        }
    }
}
4. 代码解释
- 选择 PDF 文件夹:点击 "选择 PDF 文件夹" 按钮,弹出文件夹选择对话框,用户选择包含扫描件 PDF 的文件夹,选择结果会显示在文本框中。
- 开始识别 :点击 "开始识别" 按钮,程序会遍历所选文件夹中的所有 PDF 文件。对于每个 PDF 文件,将指定区域转换为图片,调用腾讯 OCR API 进行文字识别,将识别结果和文件名写入 Excel 表格。最后保存 Excel 文件为
ExtractedData.xlsx。 - 腾讯 OCR 调用 :使用
RestEase库进行 HTTP 请求,将图片转换为 Base64 编码后作为参数传递给腾讯 OCR API。解析 API 返回的 JSON 结果,提取识别出