一、订单结算台
(一)获取收货地址列表渲染
computed: {
  longAddress () {
    const region = this.selectAddress.region
    return region.province + region.city + region.region + this.selectAddress.detail
  }
},

<!-- 有address_id就代表存在 -->
<div class="info" v-if="selectAddress?.address_id">
  <div class="info-content">
    <span class="name">{{ selectAddress.name }}</span>
    <span class="mobile">{{ selectAddress.phone }}</span>
  </div>
  <div class="info-address">
    {{ longAddress }}
  </div>
</div>
(二)通用接口封装和购物车结算
通用接口封装
import request from '@/utils/request'

// 订单结算确认
// mode: cart    => obj { cartIds }
// mode: buyNow  => obj { goodsId  goodsNum  goodsSkuId }
export const checkOrder = (mode, obj) => {
  return request.get('/checkout/order', {
    params: {
      mode, // cart buyNow
      delivery: 10, // 10 快递配送 20 门店自提
      couponId: 0, // 优惠券ID 传0 不使用优惠券
      isUsePoints: 0, // 积分 传0 不使用积分
      ...obj // 将传递过来的参数对象 动态展开
    }
  })
}
购物车结算
<div @click="goPay">结算({{ selCount }})</div>

goPay () {
  // 判断有没有选中商品
  if (this.selCount > 0) {
    // 有选中的 商品 才进行结算跳转
    this.$router.push({
      path: '/pay',
      query: {
        mode: 'cart',
        cartIds: this.selCartList.map(item => item.id).join(',') // 'cartId,cartId,cartId'(用逗号引起来的字符串)
      }
    })
  }
}
data () {
  return {
    order: {},
    personal: {}
  }
},

computed: {
  // 建议将这两个值提供为计算属性
  mode () {
    return this.$route.query.mode
  },
  cartIds () {
    return this.$route.query.cartIds
  }
}

async created () {
  this.getOrderList()
},

async getOrderList () {
  if (this.mode === 'cart') {
    const { data: { order, personal } } = await checkOrder(this.mode, { cartIds: this.cartIds })
    // order指的是当前订单的信息,买的商品、价格等
    this.order = order
    // personal是余额
    this.personal = personal
  }
}
(三)立即购买结算和mixin混入处理
<div class="btn" v-if="mode === 'buyNow'" @click="goBuyNow">立刻购买</div>

goBuyNow () {
  if (this.loginConfirm()) {
    return
  }
  this.$router.push({
    path: '/pay',
    query: {
      mode: 'buyNow',
      goodsId: this.goodsId,
      goodsSkuId: this.detail.skuList[0].goods_sku_id,
      goodsNum: this.addCount
    }
  })
}
computed: {
  ...
  goodsId () {
    return this.$route.query.goodsId
  },
  goodsSkuId () {
    return this.$route.query.goodsSkuId
  },
  goodsNum () {
    return this.$route.query.goodsNum
  }
}
async getOrderList () {
  ...
  // 立刻购买结算
  if (this.mode === 'buyNow') {
    const { data: { order, personal } } = await checkOrder(this.mode, {
      goodsId: this.goodsId,
      goodsSkuId: this.goodsSkuId,
      goodsNum: this.goodsNum
    })
    this.order = order
    this.personal = personal
  }
}
二、提交订单并支付
<div class="tipsbtn" @click="submitOrder">提交订单</div>

// 提交订单
async submitOrder () {
  if (this.mode === 'cart') {
    await submitOrder(this.mode, {
      cartIds: this.cartIds,
      remark: this.remark
    })
  }
  if (this.mode === 'buyNow') {
    await submitOrder(this.mode, {
      goodsId: this.goodsId,
      goodsSkuId: this.goodsSkuId,
      goodsNum: this.goodsNum,
      remark: this.remark
    })
  }
  this.$toast.success('支付成功')
  this.$router.replace('/myorder')
},
三、订单管理和个人中心
import { reactive, ref, watch } from 'vue'
import { orderStatus } from '@/api/constants'
import { delteOrder, findOrderList } from '@/api/order'
import OrderItem from './components/order-item'
import OrderCancel from './components/order-cancel'
import Confirm from '@/components/library/Confirm'
import Message from '@/components/library/Message'
export default {
  name: 'MemberOrderPage',
  components: {
    OrderItem,
    OrderCancel
  },
  setup () {
    const activeName = ref('all')
    const tabClick = (tab) => {
      // 此时:tab.index 就是订单的状态
      requestParams.orderState = tab.index
      requestParams.page = 1
    }
    // 筛选条件
    const requestParams = reactive({
      page: 1,
      pageSize: 5,
      orderState: 0
    })
    // 发请求获取数据
    const orderList = ref([])
    const loading = ref(false)
    const total = ref(0)
    // 使用侦听器,监听 requestParams 的改变
+   const findOrderListFn = () => {
+     loading.value = true
+     findOrderList(requestParams).then(data => {
+       orderList.value = data.result.items
+       total.value = data.result.counts
+       loading.value = false
+     })
+   }
    watch(requestParams, () => {
+      findOrderListFn()
    }, { immediate: true })

    // 分页事件
    const changePager = (np) => {
      requestParams.page = np
    }

+    // 删除订单
+    const onDeleteOrder = (item) => {
+      Confirm({ text: '您确认删除该条订单吗?' }).then(() => {
+        delteOrder([item.id]).then(() => {
+          Message({ text: '删除订单成功', type: 'success' })
+          findOrderListFn()
+        })
+      }).catch(e => {})
+    }

    return {
      activeName,
      orderStatus,
      tabClick,
      requestParams,
      orderList,
      loading,
      total,
      changePager,
+      onDeleteOrder,
      ...useCancelOrder()
    }
  }
}
四、打包优化

1.打包优化的重要性:优化打包可减小文件体积,提升加载速度,改善用户体验,对应用性能至关重要。
2.优化方法:利用工具如Webpack,通过Tree Shaking去除未引用代码,压缩代码减小文件大小,还可压缩图片降低资源占用;合理分包,分离基础库和业务代码,使基础库能被缓存,减少重复加载;配置CDN,借助CDN节点分发静态资源,减轻服务器压力,加快资源加载。
五、vue3
(一)vue3
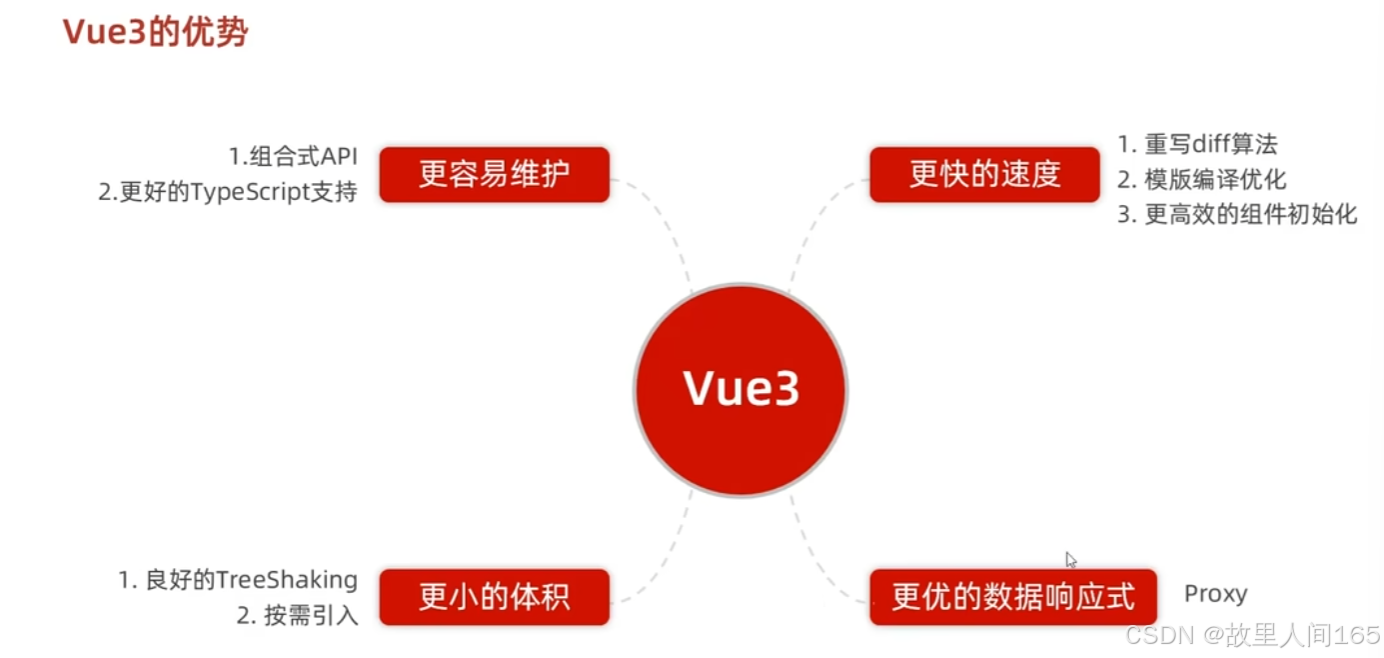
1.性能优化:Vue3 采用Proxy替代Object.defineProperty实现响应式,能更高效追踪数据变化,提升渲染性能,在大型应用中优势显著。
2.代码组织与复用:引入组合式API,逻辑代码可按功能而非生命周期组织,提升代码可读性、维护性和复用性,便于开发复杂项目。
(二)使用creat-vue创建项目
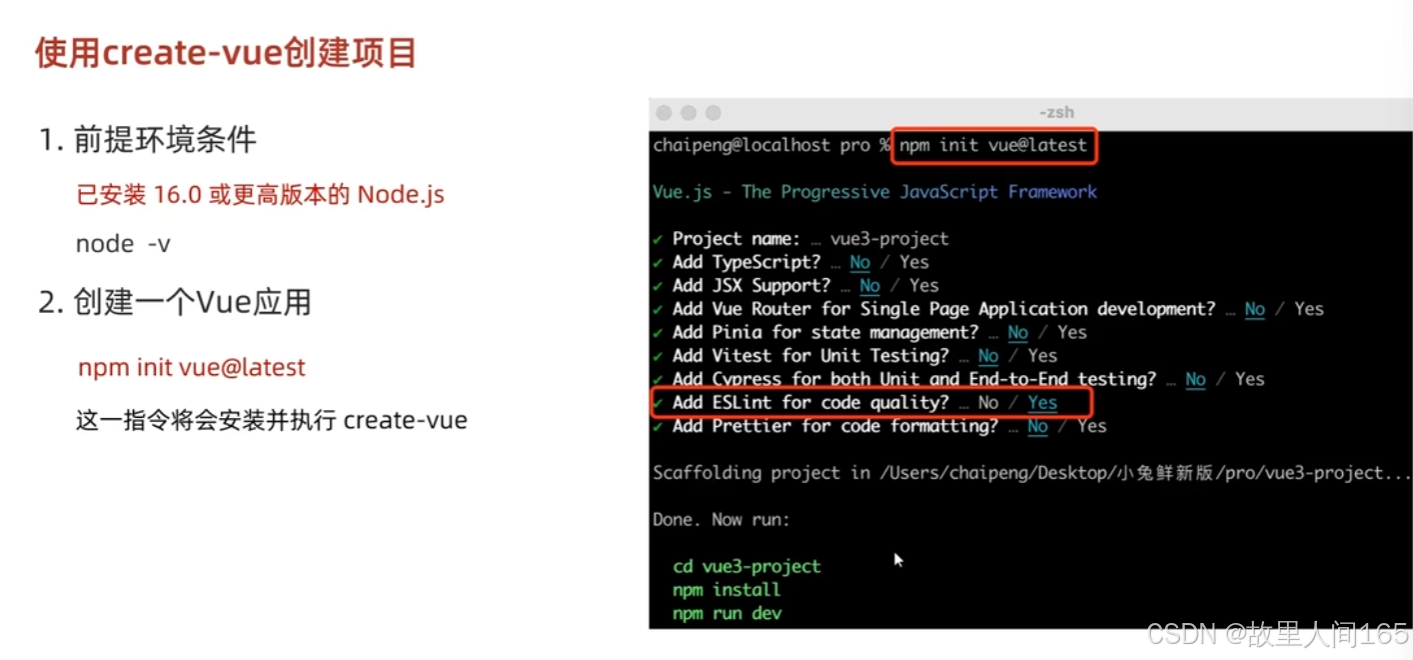
1.create-vue工具:它是Vue官方提供的脚手架工具,能快速搭建Vue3项目基础结构,简化项目初始化流程。
2.创建步骤:确保安装了Node.js和npm(或yarn);打开终端,运行 npm init vue@latest 或 yarn create vue 命令;根据提示输入项目名称、选择是否添加TypeScript、ESLint等功能;完成选择后,进入项目目录,安装依赖,如 npm install 或 yarn install ,然后启动项目, npm run dev 或 yarn dev 。
(三)项目目录和关键文件
1.src 目录存放项目核心源代码, components 文件夹放置可复用组件,便于代码模块化与复用; assets 文件夹用于管理样式、图片等静态资源; router 文件夹配置路由信息,决定页面如何跳转与展示; store 文件夹(若使用Vuex)管理应用状态,实现数据共享与状态管理。 public 目录中的文件会直接复制到打包后的根目录,如 index.html 是项目入口页面,可配置基本页面结构、引入外部资源。
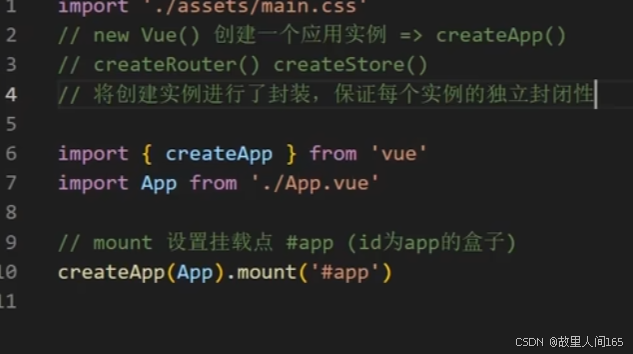
2.关键文件: main.js 是项目入口文件,创建Vue应用实例、挂载根组件、配置全局属性和插件; .vue 单文件组件,每个组件包含模板( template )、脚本( script )和样式( style ),分别定义组件的结构、逻辑和样式,让代码组织更清晰,便于维护和开发。
六、组合式API
(一)setup选项
- setup 是Vue3新增的组件选项,在组件创建阶段, setup 比 created 生命周期钩子更早执行。它的主要作用是为组件提供组合式API的入口,在函数内部可使用响应式数据、计算属性、方法等逻辑代码,让代码逻辑按功能组织,而非像Vue2按生命周期划分,提升代码的可维护性与复用性。
2.使用响应式数据:在 setup 中,通过 ref 和 reactive 创建响应式数据。 ref 用于创建基本类型的响应式数据, reactive 用于创建对象或数组的响应式数据。
<template>
  <div>
    <p>{{ count }}</p>
    <p>{{ user.name }}</p>
    <button @click="increment">增加计数</button>
  </div>
</template>

<script setup>
import { ref, reactive } from 'vue';
// 使用ref创建基本类型响应式数据
const count = ref(0);
// 使用reactive创建对象的响应式数据
const user = reactive({
  name: '张三'
});
const increment = () => {
  count.value++;
};
</script>
使用计算属性和方法:在 setup 中,使用 computed 创建计算属性,普通函数定义方法。
<template>
  <div>
    <p>{{ doubleCount }}</p>
    <button @click="resetCount">重置计数</button>
  </div>
</template>

<script setup>
import { ref, computed } from 'vue';
const count = ref(0);
// 使用computed创建计算属性
const doubleCount = computed(() => count.value * 2);
const resetCount = () => {
  count.value = 0;
};
</script>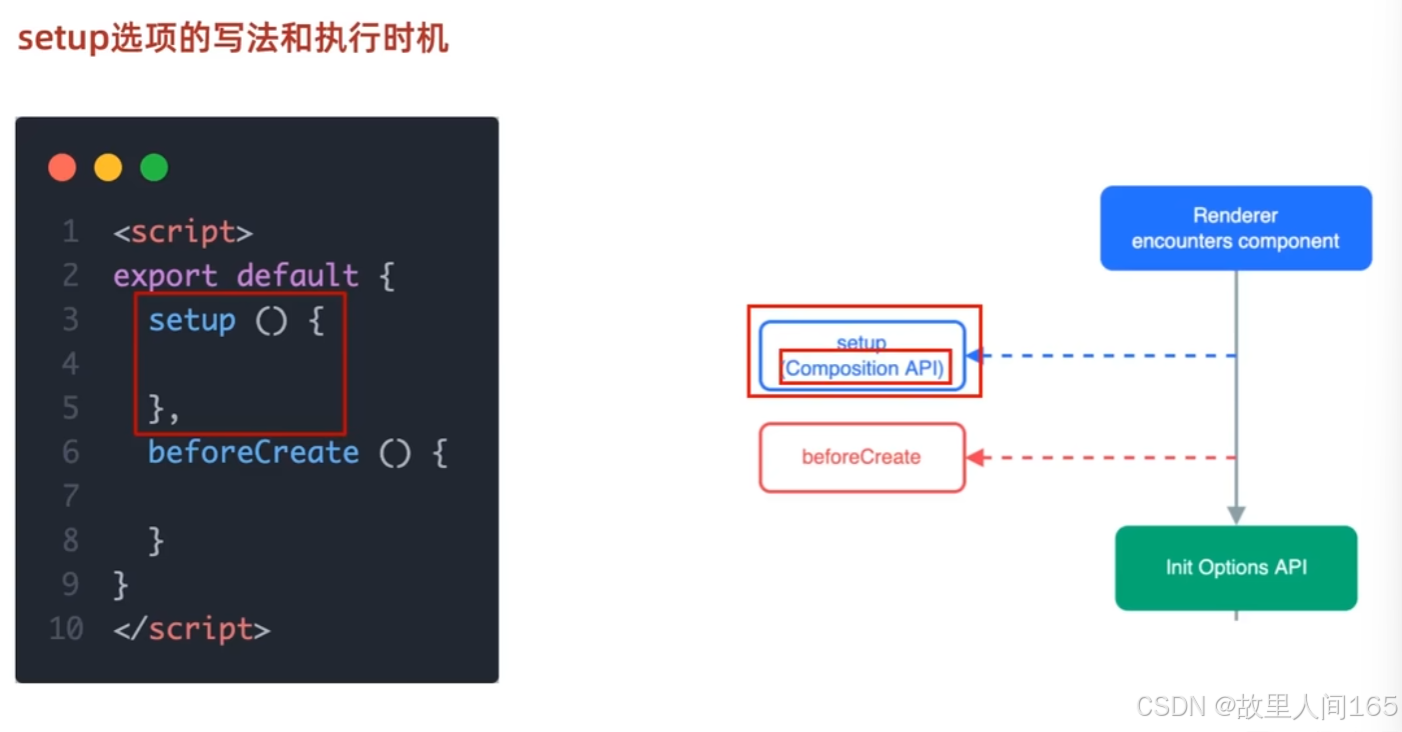
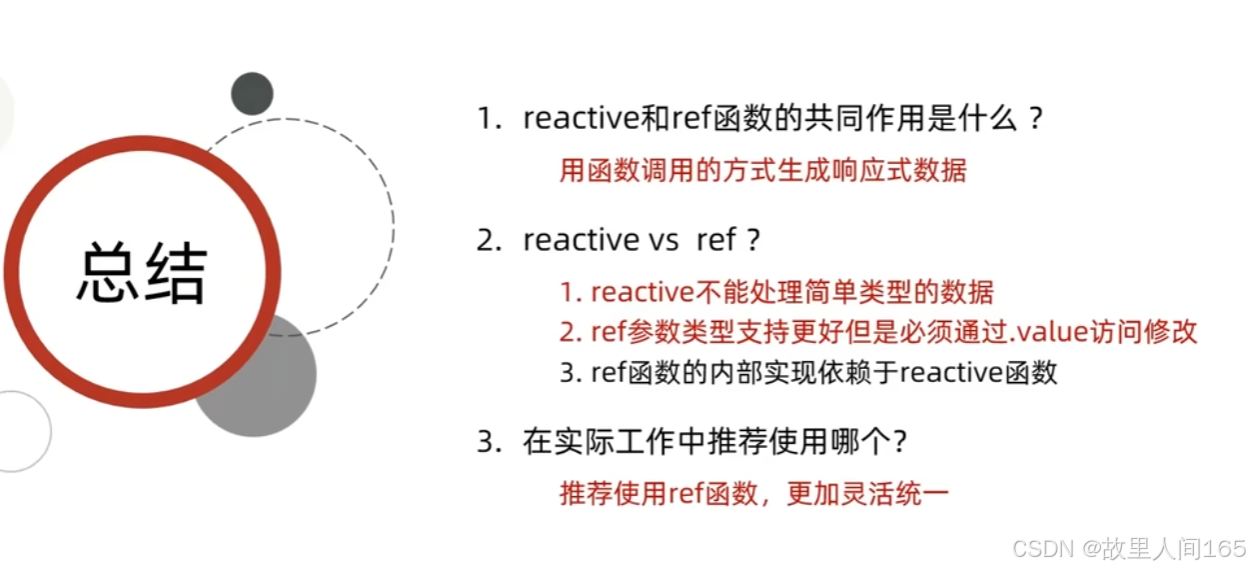
(二)reactive和ref函数
reactive函数
用于创建响应式对象或数组。它基于ES6的Proxy实现,能深度监听对象内部属性的变化。当对象属性改变时,Vue会自动更新相关的DOM。
<template>
  <div>
    <p>{{ user.name }}</p>
    <p>{{ user.age }}</p>
    <button @click="updateUser">更新用户信息</button>
  </div>
</template>

<script setup>
import { reactive } from 'vue';
const user = reactive({
  name: 'Alice',
  age: 25
});
const updateUser = () => {
  user.name = 'Bob';
  user.age = 26;
};
</script>
ref函数
用于创建一个包含响应式数据的引用。对于基本数据类型(如字符串、数字、布尔值),使用ref来使其成为响应式。在模板中使用时,无需.value;但在JavaScript代码中访问或修改时,需要通过.value来操作。
<template>
  <div>
    <p>{{ count }}</p>
    <button @click="increment">增加计数</button>
  </div>
</template>

<script setup>
import { ref } from 'vue';
const count = ref(0);
const increment = () => {
  count.value++;
};
</script>
ref与reactive的转换
ref创建的对象,内部数据会自动解包,使用方式类似reactive创建的对象。若想在ref内部使用reactive创建的对象,直接将reactive对象赋值给ref即可。
(三)computed

1.基本概念: computed 用于创建计算属性,计算属性的值依赖于其他响应式数据,并且只有在依赖数据发生变化时才会重新计算,具有缓存特性。它能简化模板中的复杂逻辑,提升代码的可读性和性能。
<template>
  <div>
    <p>原始数字: {{ num }}</p>
    <p>翻倍后的数字: {{ doubledNum }}</p>
    <button @click="increment">增加原始数字</button>
  </div>
</template>

<script setup>
import { ref, computed } from 'vue';
// 定义响应式数据
const num = ref(1);
// 定义只读计算属性
const doubledNum = computed(() => num.value * 2);
// 定义修改响应式数据的方法
const increment = () => {
  num.value++;
};
</script>
2.计算属性的使用 - 可写计算属性:可写计算属性需要同时提供 getter 和 setter 函数。
<template>
  <div>
    <p>输入的名字: {{ fullName }}</p>
    <input v-model="fullName" />
  </div>
</template>

<script setup>
import { ref, computed } from 'vue';
const firstName = ref('张');
const lastName = ref('三');
// 定义可写计算属性
const fullName = computed({
  get: () => firstName.value + lastName.value,
  set: (newValue) => {
    const names = newValue.split(' ');
    firstName.value = names[0];
    lastName.value = names[1] || '';
  }
});
</script>
(四)watch
1.基本概念: watch 用于监听响应式数据的变化,当被监听的数据发生改变时,会执行相应的回调函数。它可以在数据变化时执行异步操作、副作用操作等。
监听单个响应式数据
<template>
  <div>
    <input v-model.number="count" />
    <p>监听到的count值: {{ watchedCount }}</p>
  </div>
</template>

<script setup>
import { ref, watch } from 'vue';
const count = ref(0);
const watchedCount = ref(0);

watch(count, (newValue) => {
  watchedCount.value = newValue;
  console.log(`count值变为: ${newValue}`);
});
</script>
2.监听多个响应式数据
<template>
  <div>
    <input v-model="firstName" placeholder="请输入名字" />
    <input v-model="lastName" placeholder="请输入姓氏" />
    <p>姓名变化: {{ fullName }}</p>
  </div>
</template>

<script setup>
import { ref, watch } from 'vue';
const firstName = ref('');
const lastName = ref('');
const fullName = ref('');

watch([firstName, lastName], (newValues) => {
  const [newFirstName, newLastName] = newValues;
  fullName.value = newFirstName + newLastName;
  console.log(`姓名变为: ${fullName.value}`);
});
</script>
3.深度监听对象:当监听对象时,默认不会深度监听对象内部属性的变化,需开启深度监听。
<template>
  <div>
    <input v-model="user.name" placeholder="请输入用户名" />
    <input v-model.number="user.age" placeholder="请输入年龄" />
    <p>用户信息变化: {{ JSON.stringify(watchedUser) }}</p>
  </div>
</template>

<script setup>
import { ref, watch } from 'vue';
const user = ref({ name: '', age: 0 });
const watchedUser = ref({ name: '', age: 0 });

watch(user, (newValue) => {
  watchedUser.value = { ...newValue };
  console.log(`用户信息变为: ${JSON.stringify(newValue)}`);
}, { deep: true });
</script>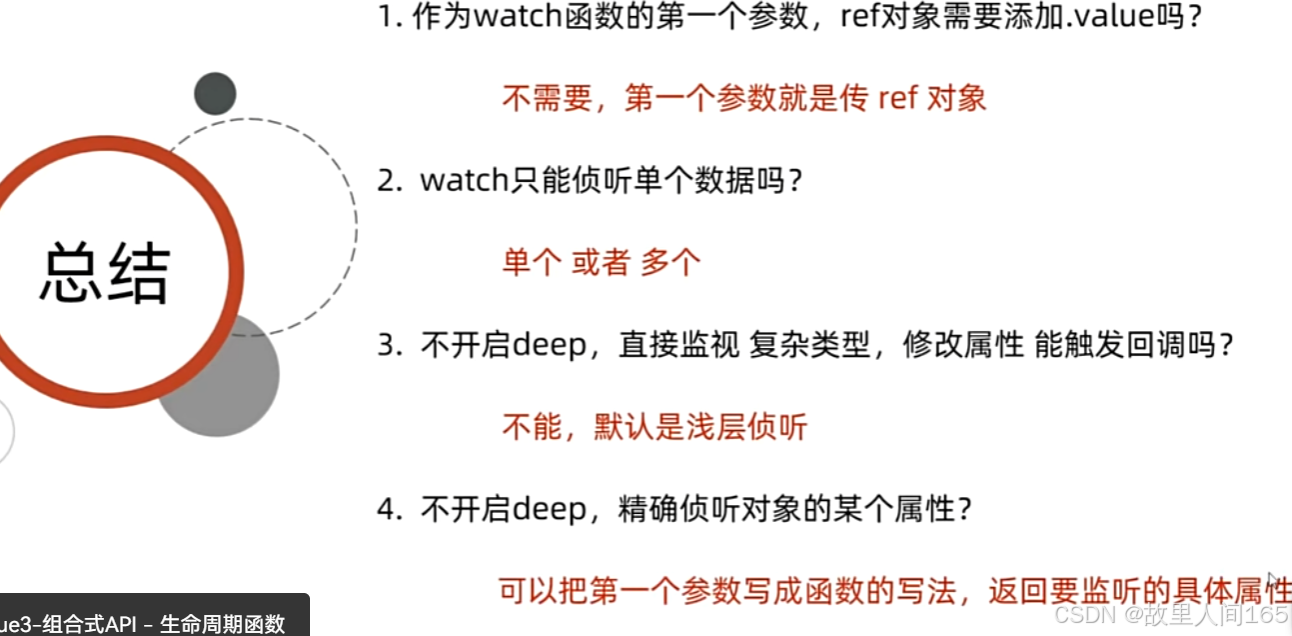
(五)生命周期函数
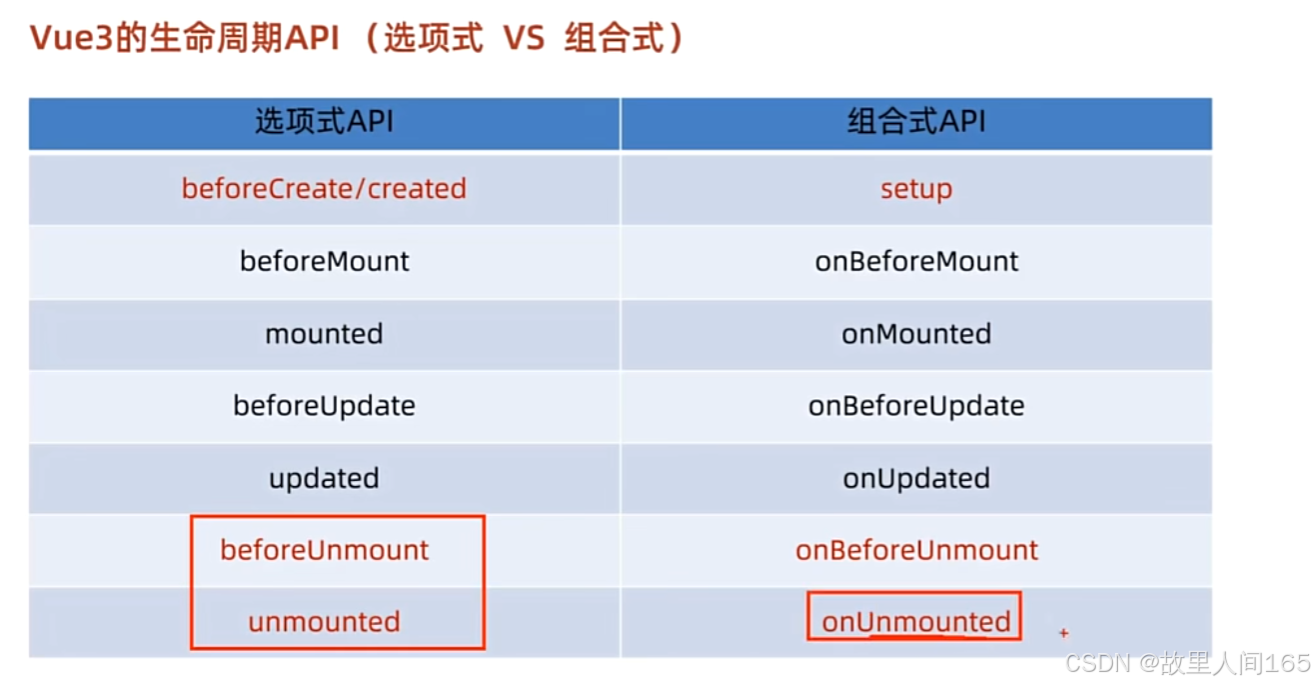
在Vue3的组合式API里,生命周期函数被重命名并引入到 vue 库中使用。相比Vue2,它们在 setup 函数内部使用,使代码逻辑组织更紧凑。
常用生命周期函数示例代码
<template>
  <div>
    <p>组件已加载并显示在页面上,count: {{ count }}</p>
  </div>
</template>

<script setup>
import { ref, onMounted, onUpdated, onUnmounted } from 'vue';
// 定义响应式数据
const count = ref(0);

// 组件挂载后执行
onMounted(() => {
  console.log('组件挂载完成');
  // 模拟一些初始化操作,比如发起网络请求
  // 这里简单将count设为1
  count.value = 1;
});

// 组件更新后执行
onUpdated(() => {
  console.log('组件更新完成');
});

// 组件卸载前执行
onUnmounted(() => {
  console.log('组件即将卸载');
});
</script>
onMounted 在组件挂载到DOM后调用,常用于初始化操作; onUpdated 在组件更新后调用,可用于数据更新后的一些额外操作; onUnmounted 在组件从DOM中移除前调用,常用于清理定时器、解绑事件监听器等操作 。
(六)父传子和子传父
父传子
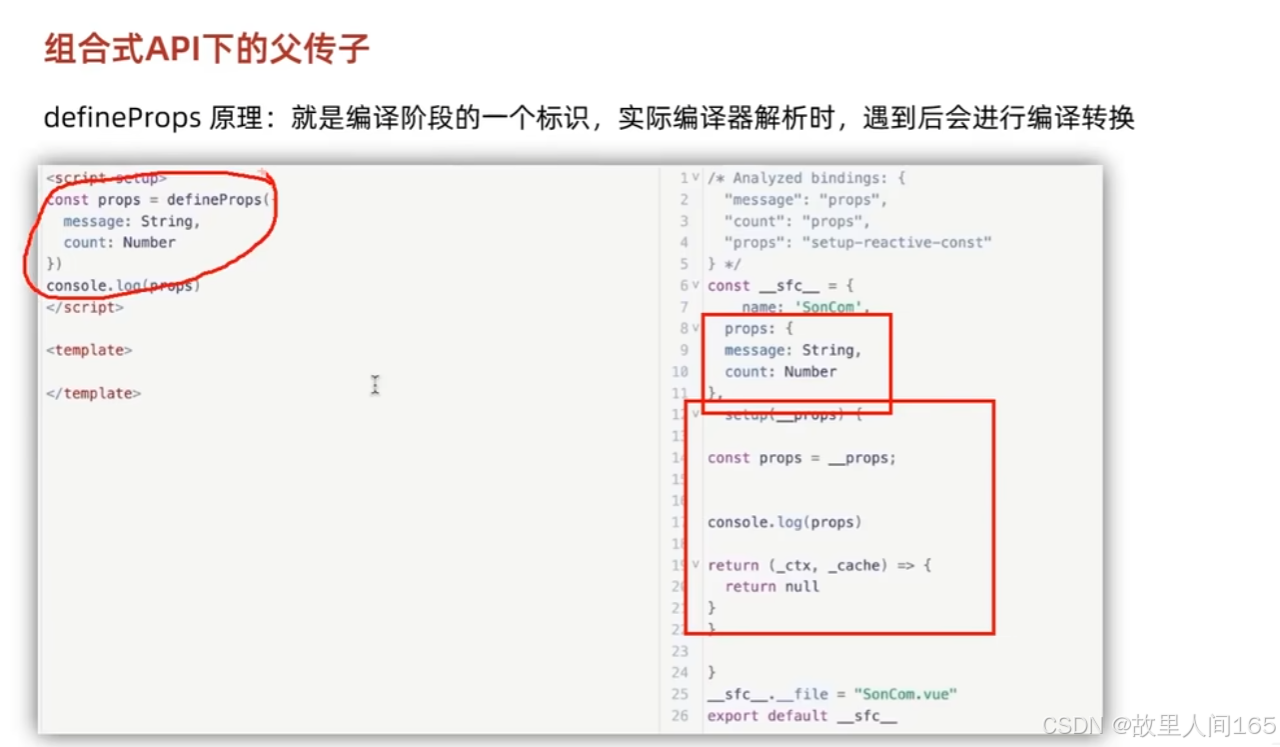
- 概念:父组件向子组件传递数据,实现数据共享与组件复用。
2.代码示例:在父组件中,定义数据并传递给子组件。
<!-- 父组件 Parent.vue -->
<template>
  <div>
    <child-component :message="parentMessage"></child-component>
  </div>
</template>

<script setup>
import ChildComponent from './ChildComponent.vue';
import { ref } from 'vue';
const parentMessage = ref('来自父组件的数据');
</script>

<!-- 子组件 ChildComponent.vue -->
<template>
  <div>
    <p>{{ message }}</p>
  </div>
</template>

<script setup>
const props = defineProps({
  message: String
});
</script>
子传父
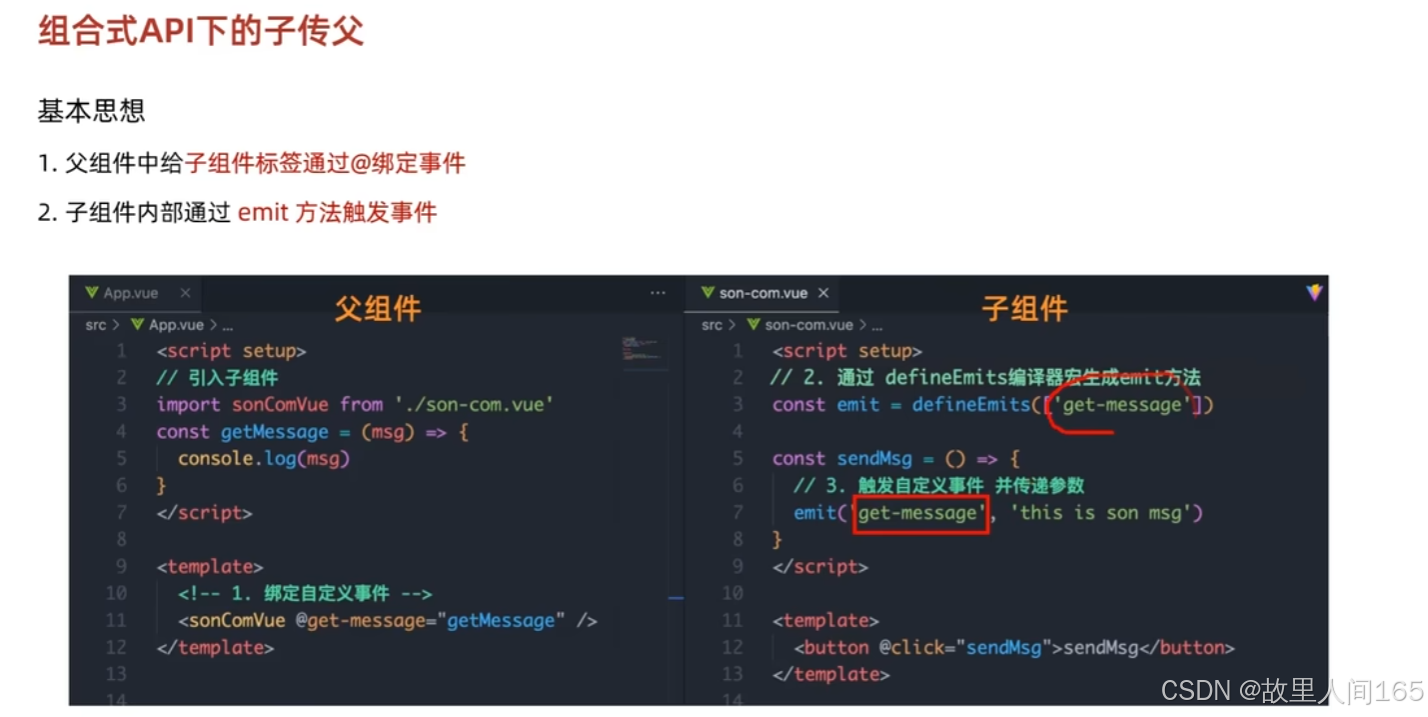
1.概念:子组件将数据或事件传递给父组件,让父组件根据子组件的变化做出响应。
2.代码示例:子组件通过 defineEmits 定义事件,父组件监听并处理。
<!-- 子组件 ChildComponent.vue -->
<template>
  <div>
    <button @click="sendDataToParent">点击传递数据</button>
  </div>
</template>

<script setup>
const emit = defineEmits(['childEvent']);
const sendDataToParent = () => {
  emit('childEvent', '来自子组件的数据');
};
</script>

<!-- 父组件 Parent.vue -->
<template>
  <div>
    <child-component @childEvent="handleChildEvent"></child-component>
  </div>
</template>

<script setup>
import ChildComponent from './ChildComponent.vue';
const handleChildEvent = (data) => {
  console.log(data);
};
</script>
(七)provide和inject
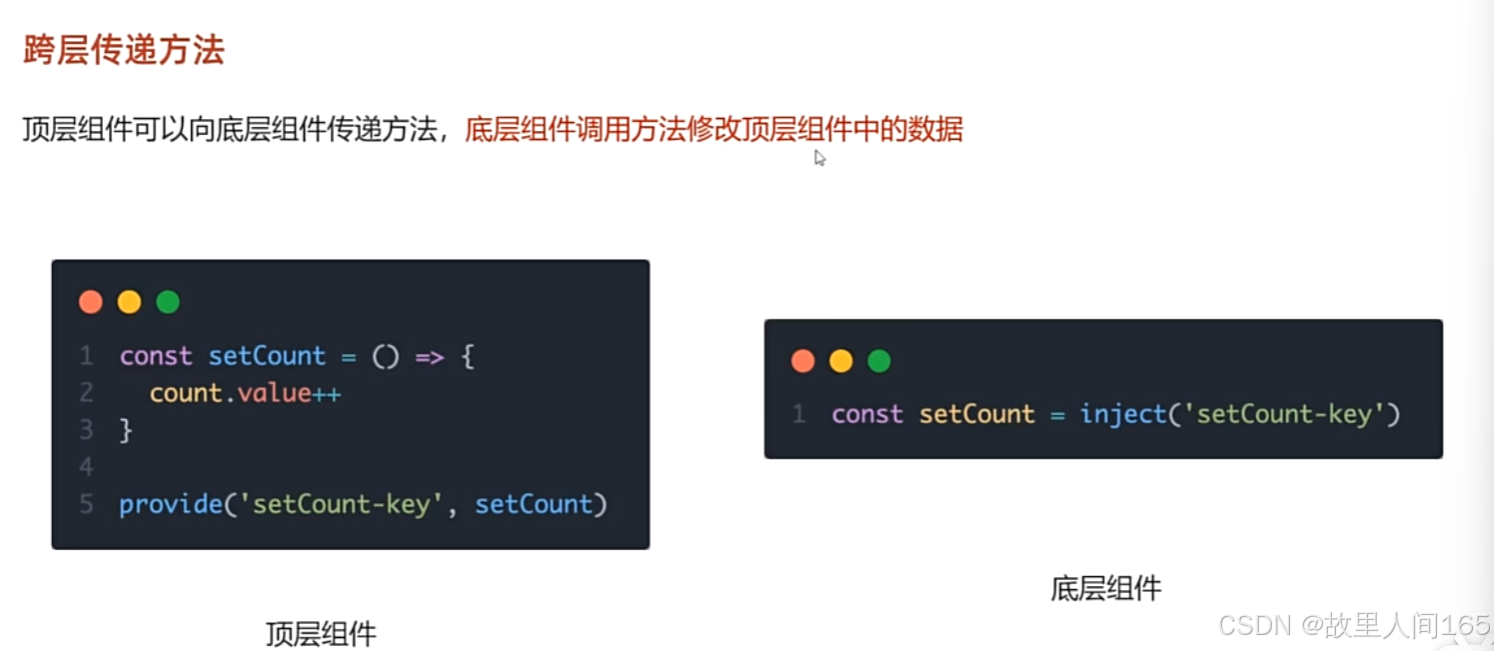
1.provide 和 inject 的作用:这对API用于实现跨组件层级的数据传递,解决组件间多层嵌套传值繁琐的问题。 provide 在父组件中提供数据, inject 在子组件中注入使用,无论组件层级多深,都能获取到对应数据。
2.基本使用示例
<!-- 父组件App.vue -->
<template>
  <div>
    <child-component></child-component>
  </div>
</template>

<script setup>
import { provide } from 'vue';
import ChildComponent from './ChildComponent.vue';
// 提供数据
provide('message', '来自祖先组件的数据');
</script>

<!-- 子组件ChildComponent.vue,可能在深层嵌套 -->
<template>
  <div>
    <p>{{ injectedMessage }}</p>
  </div>
</template>

<script setup>
import { inject } from 'vue';
// 注入数据
const injectedMessage = inject('message');
</script>
传递响应式数据:传递响应式数据时,子组件能实时响应数据变化。
<!-- 父组件App.vue -->
<template>
  <div>
    <button @click="updateMessage">更新数据</button>
    <child-component></child-component>
  </div>
</template>

<script setup>
import { provide, ref } from 'vue';
import ChildComponent from './ChildComponent.vue';
const message = ref('初始数据');
provide('message', message);
const updateMessage = () => {
  message.value = '更新后的数据';
};
</script>

<!-- 子组件ChildComponent.vue -->
<template>
  <div>
    <p>{{ injectedMessage }}</p>
  </div>
</template>

<script setup>
import { inject } from 'vue';
const injectedMessage = inject('message');
</script>
七、模板引用和defineExpose宏函数
(一)模板引用
1.概念:在模板中使用 ref 指令给元素或组件添加引用,方便在JavaScript中直接访问和操作DOM元素或子组件实例。
2.代码示例:访问DOM元素
<template>
<div>
<input type="text" ref="inputRef" />
<button @click="focusInput">聚焦输入框</button>
</div>
</template>
<script setup>
import { ref } from 'vue';
const inputRef = ref(null);
const focusInput = () => {
if (inputRef.value) {
inputRef.value.focus();
}
};
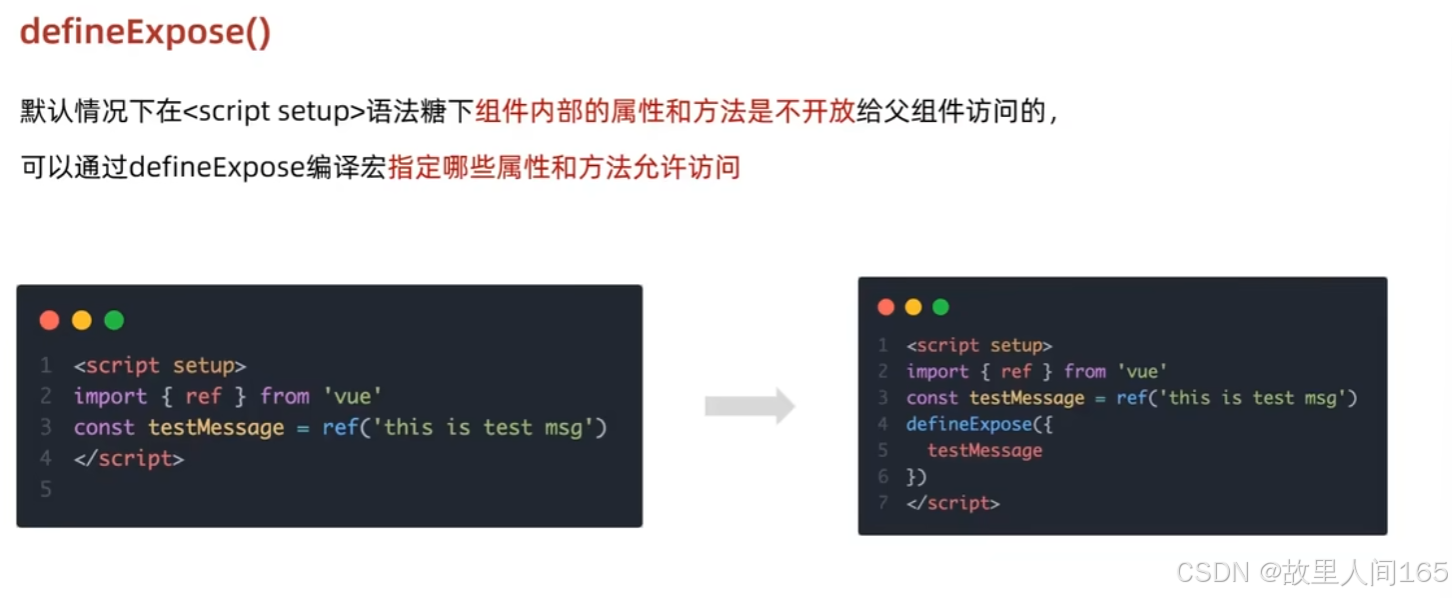
</script>(二)defineExpose 宏函数
1.概念:在组合式API中,默认组件内部的属性和方法是私有的,外部无法访问。 defineExpose 用于显式地暴露组件内部的属性和方法,让父组件可以访问子组件的特定内容。
-
代码示例:子组件暴露数据和方法
子组件数据: {{ childData }}

八、新特性
(一)defineOptions

defineOptions 的作用:在Vue3.3之前,若使用 script setup 语法糖,像 name 、 inheritAttrs 等一些组件选项难以直接声明。 defineOptions 就是为了解决这个问题,它允许在 script setup 中定义这些组件选项,让代码结构更清晰、紧凑。
<template>
  <div>这是一个组件</div>
</template>

<script setup>
import { defineOptions } from 'vue';

defineOptions({
  name: 'MyComponent',
  inheritAttrs: false
});
</script>
(二)defineModel
- defineModel 的作用: defineModel 是Vue3.3新增的宏函数,用于简化自定义组件中 v-model 的双向绑定实现。它可以让开发者更方便地在子组件中控制 v-model 绑定的值和触发更新事件。
2.基本使用示例
<!-- 子组件CustomInput.vue -->
<template>
  <input :value="modelValue" @input="handleInput">
</template>

<script setup>
import { defineModel } from 'vue';
const { modelValue, update: updateModelValue } = defineModel({
  type: String,
  default: ''
});

const handleInput = (e) => {
  updateModelValue(e.target.value);
};
</script>

<!-- 父组件App.vue -->
<template>
  <div>
    <custom-input v-model="parentValue"></custom-input>
    <p>父组件的值: {{ parentValue }}</p>
  </div>
</template>

<script setup>
import CustomInput from './CustomInput.vue';
import { ref } from 'vue';
const parentValue = ref('');
</script>