目录
Redis 常见的数据结构有五种:String、Hash、List、Set、Zset。实际上这些数据结构都是基于以下几种数据结构实现的:
- SDS: Redis 中字符串的底层实现。
- Intset: 用于存储整数值集合的紧凑数据结构,当集合元素全为整数且数量较少时使用以节省内存。
- Dict:Redis 中实现哈希表的基础结构。
- Ziplist: 一种为节省内存设计的线性数据结构。
- Quicklist: 结合了双向链表和压缩列表优点的数据结构,将多个压缩列表连接成双向链表。
- Skiplist:一种有序的数据结构,通过在链表基础上增加多层索引,能在对数时间复杂度内完成插入、删除和查找操作。
SDS
SDS结构
SDS是Redis实现的动态字符串,C语言的原生字符串用 ' \0 ' 作为字符串结束的标志,是二进制不安全的。同时如果要获得字符串长度需要遍历字符串。所以redis自主实现了SDS结构,定义如下:
struct __attribute__ ((__packed__)) sdshdr8 {
    uint8_t len;             /* used */
    uint8_t alloc;           /* excluding the header and null terminator */
    unsigned char flags;     /* 3 lsb of type, 5 unused bits */
    char buf[];
};(attribute ((packed))是指定该结构体不进行字节对齐,以最小化结构体占用的内存空间)
- len: 已使用的字节数。
- alloc: 已分配的字符串。
- flags: 第三位用于标识 SDS 的类型,高五位未使用。
- buf: 指向实际分配的内存。
通过 len 字段,SDS实现了二进制安全的字符串,结束标识并不使用 ' \0 ' 而是通过长度标识,同时也实现了 O(1) 时间获取长度。
SDS的扩容与缩短
alloc标识了实际分配的内存,实际上SDS是可以动态扩容的。当 SDS 需要进行扩展时,它不仅会分配当前所需的空间,还会额外分配一些未使用的空间。
例如,如果对一个 SDS 进行追加操作,且追加后所需的长度小于 1MB,那么 Redis 会分配与当前 SDS 长度相等的未使用空间。如果追加后所需长度大于 1MB,那么 Redis 会额外分配 1MB 的未使用空间。
当对 SDS 进行缩短操作时,Redis 并不会立即释放多出来的空间,而是将这部分空间作为未使用空间保留在 SDS 中,等待后续可能的操作再次使用。这样可以避免频繁的内存分配和释放操作,提高了内存的使用效率。
SDS的类型
我们注意到 len 与 alloc 都为8位无符号整数,最大值为 255。那么超过这个长度的字符串岂不是无法存储?实际上 Redis 实现了五种SDS结构,通过 flags 标识 SDS 类型:
/* Note: sdshdr5 is never used, we just access the flags byte directly.
 * However is here to document the layout of type 5 SDS strings. */
struct __attribute__ ((__packed__)) sdshdr5 {
    unsigned char flags; /* 3 lsb of type, and 5 msb of string length */
    char buf[];
};
struct __attribute__ ((__packed__)) sdshdr8 {
    uint8_t len; /* used */
    uint8_t alloc; /* excluding the header and null terminator */
    unsigned char flags; /* 3 lsb of type, 5 unused bits */
    char buf[];
};
struct __attribute__ ((__packed__)) sdshdr16 {
    uint16_t len; /* used */
    uint16_t alloc; /* excluding the header and null terminator */
    unsigned char flags; /* 3 lsb of type, 5 unused bits */
    char buf[];
};
struct __attribute__ ((__packed__)) sdshdr32 {
    uint32_t len; /* used */
    uint32_t alloc; /* excluding the header and null terminator */
    unsigned char flags; /* 3 lsb of type, 5 unused bits */
    char buf[];
};
struct __attribute__ ((__packed__)) sdshdr64 {
    uint64_t len; /* used */
    uint64_t alloc; /* excluding the header and null terminator */
    unsigned char flags; /* 3 lsb of type, 5 unused bits */
    char buf[];
};
sdshdr5 实际上被弃用了,我们不需要关心。Redis 会通过字符串长度决定使用的SDS类型。
一个包含字符串 "knight" 的 SDS 结构如下:

总结一下,SDS优点如下:
- 获取字符串长度的时间复杂度为O(1)
- 支持动态扩容
- 减少内存分配次数
- 二进制安全
IntSet
IntSet结构
IntSet是set集合的一种实现方式,基于整数数组实现,并且具有长度可变,有序等特征,定义如下:
typedef struct intset
{
    uint32_t encoding;    //编码方式 16位 32位 64位
    uint32_t length;      //元素个数
    int8_t contents[];    //整数数组
} intset;- encoding:表示整数集合中元素的编码方式。
- length:集合中元素的个数。
- contents:实际存储元素位置。
在IntSet中,元素可以以 16 位、32 位或 64 位的整数形式存储,encoding 字段决定了当前集合中元素采用的具体编码长度。例如,当 encoding 表示为 INTSET_ENC_INT16 时,意味着 contents 数组中的每个元素都是 16 位整数,以此类推。
/* Note that these encodings are ordered, so:
 * INTSET_ENC_INT16 < INTSET_ENC_INT32 < INTSET_ENC_INT64. */
#define INTSET_ENC_INT16 (sizeof(int16_t))
#define INTSET_ENC_INT32 (sizeof(int32_t))
#define INTSET_ENC_INT64 (sizeof(int64_t))
IntSet的升级
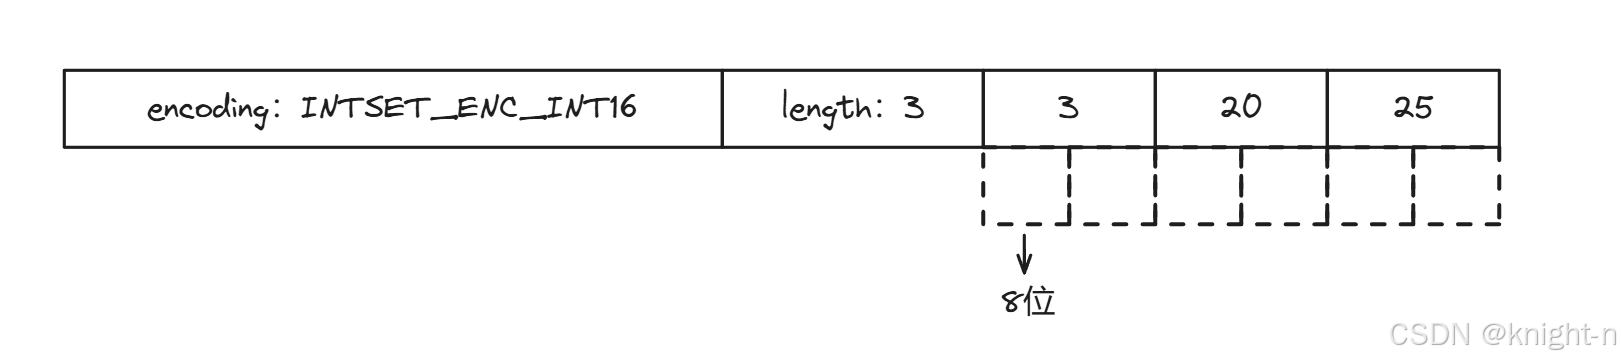
为了方便查找,IntSet中的元素以升序存储在 contents 数组中,现在,假设有一个 Intset,元素为 3,20,25。采用的编码为 INTSET_ENC_INT16 。结构如下:
现在向其中添加一份数字:50000,很明显,这个数字超出了 int16 的范围,那么 IntSet 会自动升级 IntSet的编码方式,源码如下:
/* Insert an integer in the intset */
intset *intsetAdd(intset *is, int64_t value, uint8_t *success) {
    uint8_t valenc = _intsetValueEncoding(value);
    uint32_t pos;
    if (success) *success = 1;

    /* Upgrade encoding if necessary. If we need to upgrade, we know that
     * this value should be either appended (if > 0) or prepended (if < 0),
     * because it lies outside the range of existing values. */
    if (valenc > intrev32ifbe(is->encoding)) {
        /* This always succeeds, so we don't need to curry *success. */
        return intsetUpgradeAndAdd(is,value);
    } else {
        /* Abort if the value is already present in the set.
         * This call will populate "pos" with the right position to insert
         * the value when it cannot be found. */
        if (intsetSearch(is,value,&pos)) {
            if (success) *success = 0;
            return is;
        }

        is = intsetResize(is,intrev32ifbe(is->length)+1);
        if (pos < intrev32ifbe(is->length)) intsetMoveTail(is,pos,pos+1);
    }

    _intsetSet(is,pos,value);
    is->length = intrev32ifbe(intrev32ifbe(is->length)+1);
    return is;
}
在判断需要升级后,会调用下面的函数:
/* Upgrades the intset to a larger encoding and inserts the given integer. */
static intset *intsetUpgradeAndAdd(intset *is, int64_t value) {
    uint8_t curenc = intrev32ifbe(is->encoding);
    uint8_t newenc = _intsetValueEncoding(value);
    int length = intrev32ifbe(is->length);
    int prepend = value < 0 ? 1 : 0;

    /* First set new encoding and resize */
    is->encoding = intrev32ifbe(newenc);
    is = intsetResize(is,intrev32ifbe(is->length)+1);

    /* Upgrade back-to-front so we don't overwrite values.
     * Note that the "prepend" variable is used to make sure we have an empty
     * space at either the beginning or the end of the intset. */
    while(length--)
        _intsetSet(is,length+prepend,_intsetGetEncoded(is,length,curenc));

    /* Set the value at the beginning or the end. */
    if (prepend)
        _intsetSet(is,0,value);
    else
        _intsetSet(is,intrev32ifbe(is->length),value);
    is->length = intrev32ifbe(intrev32ifbe(is->length)+1);
    return is;
}
该函数用于升级编码方式,以当前案例来说,逻辑如下:
- 升级编码为 INTSET_ENC_INT32 ,每个整数占4字节,并按照编码方式与元素个数进行扩容
- 倒序将数组中元素拷贝到扩容后正确位置
- 将待添加元素放入数组末尾
IntSet的查找
上面我们说过 IntSet 的数据存储是有序的,实际上这是为了更高效的进行查找,IntSet的查找采用的是二分查找:
/* Search for the position of "value". Return 1 when the value was found and
 * sets "pos" to the position of the value within the intset. Return 0 when
 * the value is not present in the intset and sets "pos" to the position
 * where "value" can be inserted. */
static uint8_t intsetSearch(intset *is, int64_t value, uint32_t *pos) {
    int min = 0, max = intrev32ifbe(is->length)-1, mid = -1;
    int64_t cur = -1;

    /* The value can never be found when the set is empty */
    if (intrev32ifbe(is->length) == 0) {
        if (pos) *pos = 0;
        return 0;
    } else {
        /* Check for the case where we know we cannot find the value,
         * but do know the insert position. */
        if (value > _intsetGet(is,max)) {
            if (pos) *pos = intrev32ifbe(is->length);
            return 0;
        } else if (value < _intsetGet(is,0)) {
            if (pos) *pos = 0;
            return 0;
        }
    }

    while(max >= min) {
        mid = ((unsigned int)min + (unsigned int)max) >> 1;
        cur = _intsetGet(is,mid);
        if (value > cur) {
            min = mid+1;
        } else if (value < cur) {
            max = mid-1;
        } else {
            break;
        }
    }

    if (value == cur) {
        if (pos) *pos = mid;
        return 1;
    } else {
        if (pos) *pos = min;
        return 0;
    }
}
关于二分查找我们就不过多赘述,不熟悉的读者可以自行学习。
Dict
Dict的结构
Dict是redis实现的键值字典,它是 Redis 实现哈希键(Hash)以及 Redis 数据库的基础。Dict的有三部分组成:哈希表、哈希结点、字典。
哈希表与哈希结点
哈希表的定义如下:
/* This is our hash table structure. Every dictionary has two of this as we
 * implement incremental rehashing, for the old to the new table. */
typedef struct dictht {
    dictEntry **table;
    unsigned long size;
    unsigned long sizemask;
    unsigned long used;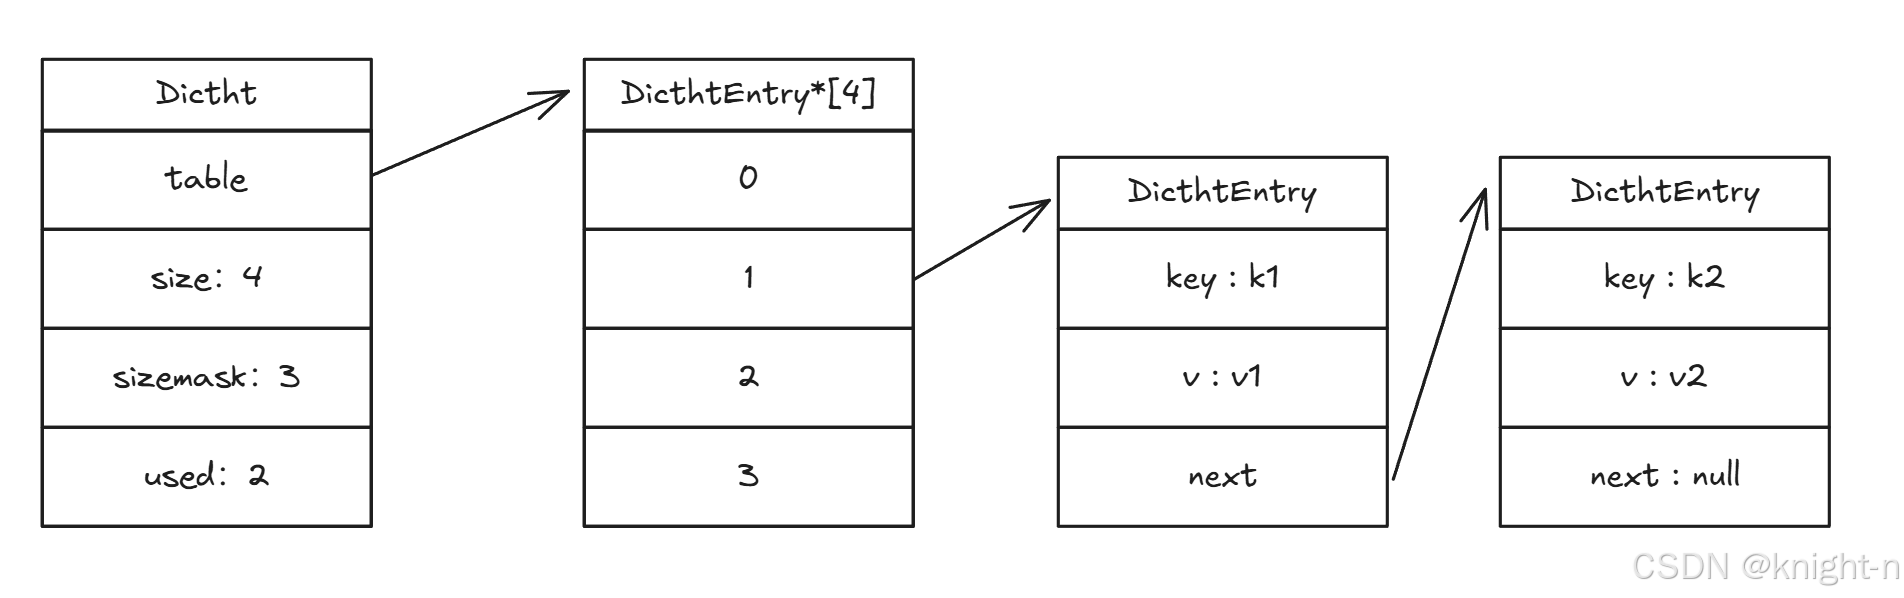
} dictht;- table: 指向entry数组,数组中保存的是指向entry的指针。
- size: 哈希表的大小。
- sizemask: 哈希表的大小的掩码,相当于size-1。
- used: entry结点的数量。
哈希结点的定义如下:
typedef struct dictEntry {
    void *key;
    union {
        void *val;
        uint64_t u64;
        int64_t s64;
        double d;
    } v;
    struct dictEntry *next;
} dictEntry;- key:键。
- v:值。
- next:下一个节点的地址。
Redis 采用的是拉链法解决哈希冲突,实际结构如下
当插入一个键值对时,首先会根据哈希函数计算出 key 的 哈希值 h,在通过 h&sizemask 计算出存储的位置,在对应的链表用头插法插入。
字典
字典也就是Dict的定义如下:
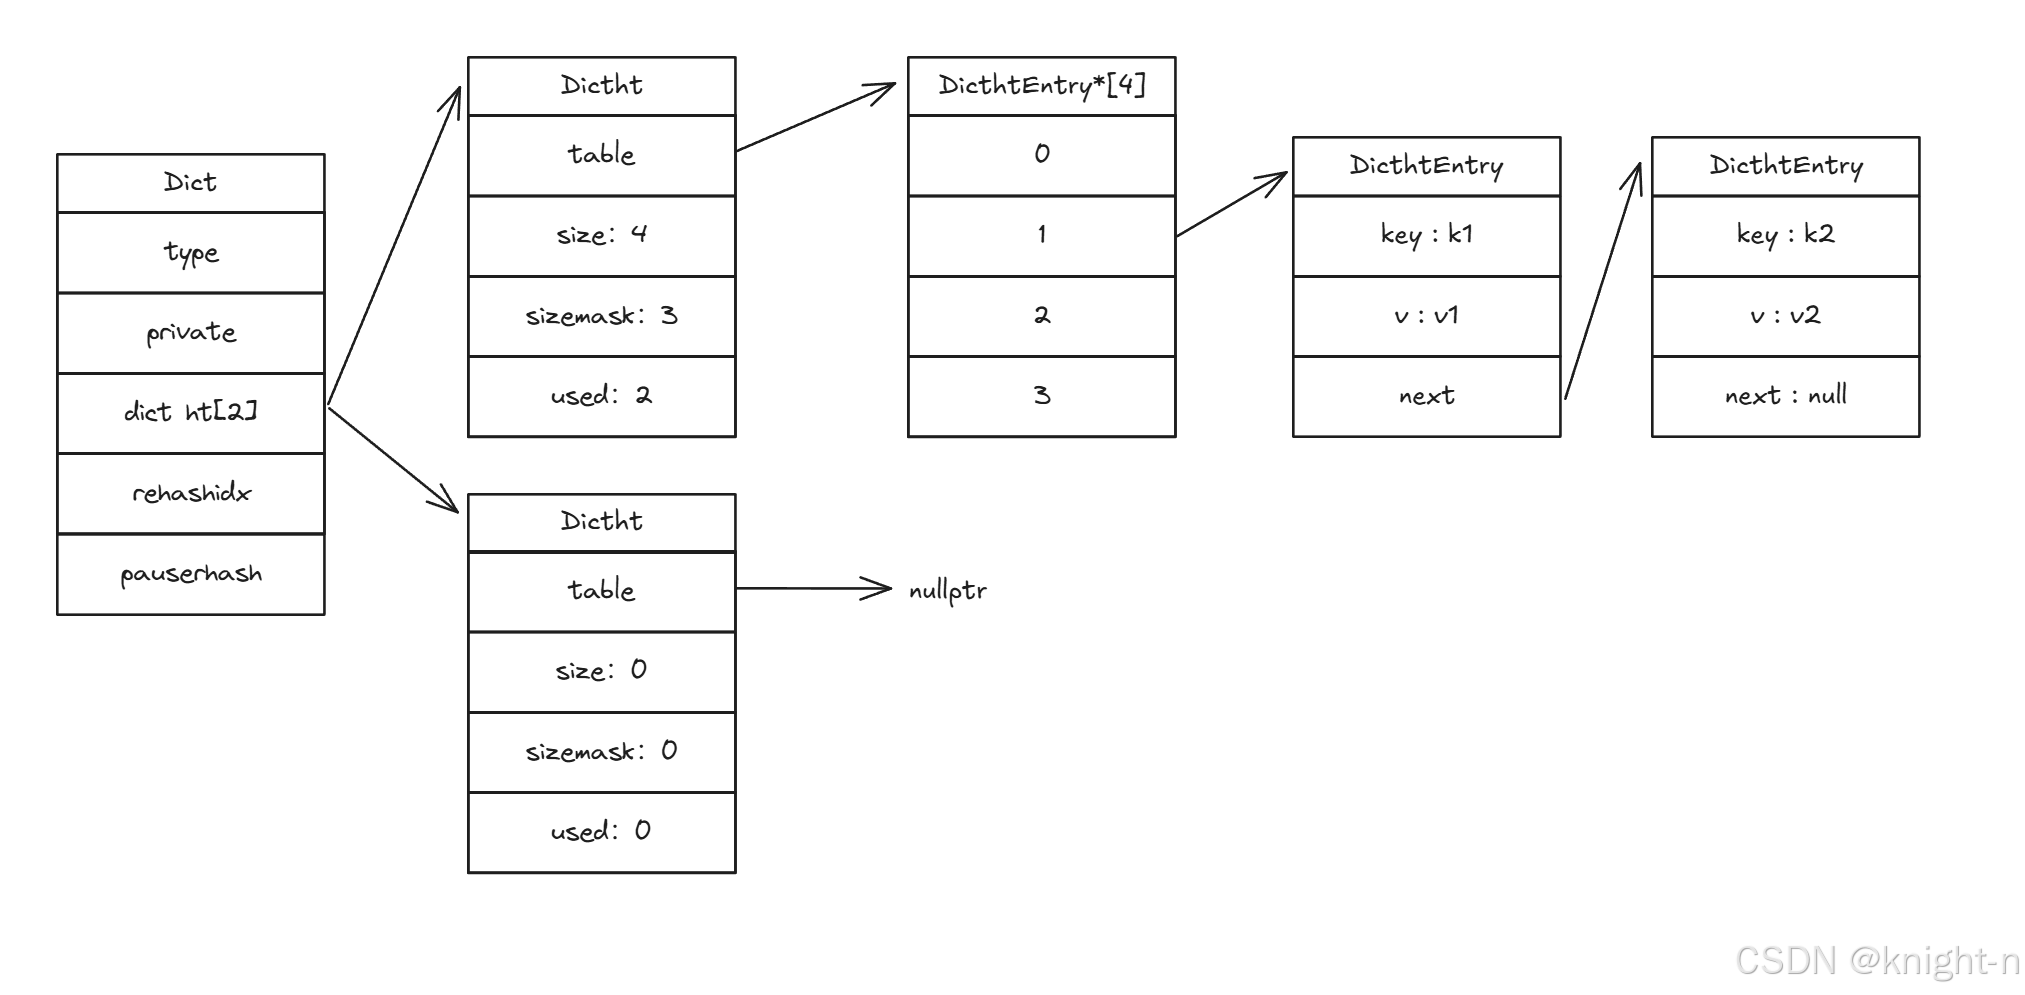
typedef struct dict {
    dictType *type;
    void *privdata;
    dictht ht[2];
    long rehashidx; /* rehashing not in progress if rehashidx == -1 */
    int16_t pauserehash; /* If >0 rehashing is paused (<0 indicates coding error) */
} dict;- type: dict的不同类型,不同类型有不同的哈希函数。
- private:私有数据,在做特殊哈希的时候用到。
- ht:存储两个哈希表。
- rehashidx:标识 rehash 的进度。
- pauserehash:标识rehash是否暂停。
为什么要有两个哈希表?实际上一个哈希表存储实际数据,另一个哈希表为空。只有在 rehash 的时候才会用到。所以一个 dict 的结构如下
Dict的渐进式rehash
对于哈希表来说,表内的元素越多哈希冲突的概况就越大,增删查改的时间复杂度也就越大。为了降低冲突,在表内元素过多的时候我们需要进行扩容。
Dict 在每次新增节点的时候都会检查负载因子,负载因子的计算公式为 loadfactor = used/size ,即哈希表的元素个数除于哈希表大小。以下两种情况会触发扩容:
- 负载因子大于等于1,并且没有执行 bgsave 或 bgrewriteaof 等后台进程;
- 负载大于5;
Dict 在每次删除元素的时候也会检查负载因子,当负载因子小于 0.1 时会触发缩容。
不管是扩容还是收缩,都会创建新的哈希表,导致哈希表的 size 和 sizemask 变化,而 key 的查询与 sizemask 有关。因此必须对哈希表中的每一个 key 重新计算索引,插入新的哈希表,这个过程称为 rehash。过程如下:
- 计算新 hash 表的 realeSize, 值取决于当前要做的是扩容还是收缩
- 如果是扩容,则新 size 为第一个大于等于 dict.ht 0.used+1 的 2^n
- 如果是收缩,则新 size 为第一个大于等于 dict.ht 0.used 的 2^n(不得小于 4)
- 按照新的 realeSize 申请内存空间,创建 dictht, 并赋值给 dict.h \[\]
- 设置 dict.rehashidx=0, 标示开始 rehash
- 将 dict.ht 0 中的每一个 dictEntry 都 rehash 到 dict.ht 1
- 将 dict.ht 1 赋值给 dict.ht 0, 给 dict.ht 1 初始化为空哈希表,释放原来的 dict.ht 0 的内存
实际上的 redis 采用的是渐进式rehash,因为上面的方法在哈希表存在大量数据时会导致主线程阻塞,redis的渐进式rehash过程如下:
- 计算新 hash 表的 size, 值取决于当前要做的是扩容还是收缩
- 如果是扩容,则新 size 为第一个大于等于 dict.ht 0.used+1 的 2^n
- 如果是收缩,则新 size 为第一个大于等于 dict.ht 0.used 的 2^n(不得小于 4)
- 按照新的 size 申请内存空间,创建 dictht, 并赋值给 dict.ht 1
- 设置 dict.rehashidx=0, 标示开始 rehash
- 将 dict.ht 0 中的每一个 dictEntry 都 rehash 到 dict.ht 1
- 每次执行新增、查询、修改、删除操作时,都检查一下 dict.rehashidx 是否大于 - 1, 如果是则将 dict.ht 0.table rehashidx 的 entry链表 rehash 到 dict.ht 1, 并且将 rehashidx++。直至 dict.ht 0 的所有数据都 rehash 到 dict.ht 1
- 将 dict.ht 1 赋值给 dict.ht 0, 给 dict.ht 1 初始化为空哈希表,释放原来的 dict.ht 0 的内存
- 将 dict.rehashidx=-1, rehash 结束
在 rehash 的过程中,所有的新增数据都直接插入到 ht1 中,删除查找操作则会在两个哈希表中搜索。
ZipList
ZipList的结构
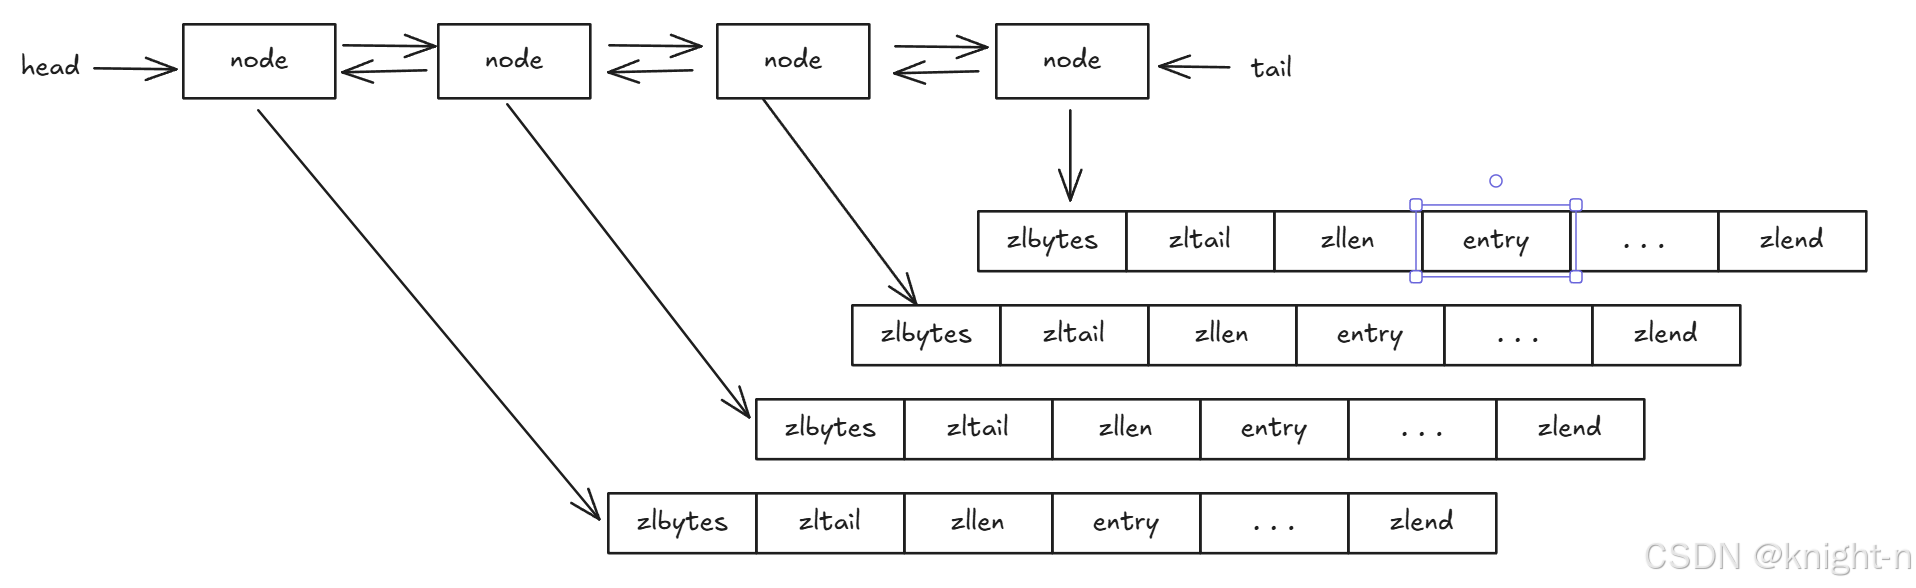
ZipList 是一种特殊的双端链表,有一系列连续的内存块组成。可以在任意一端进行压入/弹出操作,并且该操作时间复杂度为O(1)。ZipList 的结构如下:

|---------|----------|-----|--------------------|
| 属性 | 类型 | 长度 | 用途 |
| zlbytes | uint32_t | 4字节 | 记录压缩列表占用的字节数 |
| zltail | uint32_t | 4字节 | 记录压缩列表尾节点据起始地址的偏移量 |
| zllen | uint16_t | 2字节 | 记录压缩链表包含的节点数量 |
| entry | 列表节点 | 不定 | 压缩链表的结点 |
| zlend | uint8_t | 1字节 | 特殊值 0xFF 标识压缩链表结尾 |
zlbytes、zltail 与 zllen 均为定长字段,所以累加可以得到头节点的偏移量,zltail 记录了尾节点的偏移量,所以我们可以在 O(1) 时间内找到头尾节点。
ZipList 中的 Entry 并不像普通链表那样记录前后节点的指针,因为记录两个指针要占用 16 个字节,浪费内存。而是采用了下面的结构:

- previous_entry_length: 前一节点的长度,占 1 个或 5 个字节。如果前一节点的长度小于 254 字节,则采用 1 个字节来保存这个长度值如果前一节点的长度大于 254 字节,则采用 5 个字节来保存这个长度值,第一个字节为 0xfe, 后四个字节才是真实长度数据
- encoding: 编码属性,记录 content 的数据类型 (字符串还是整数女) 以及长度,占用 1 个、2 个或 5 个字节
- contents: 负责保存节点的数据,可以是字符串或整数
那么对于当前节点是如何找到前后节点的?找到前一个结点:
- 将当前指针减去previous_entry_length结点,即指向前一个结点。
找到后一个结点:
- 将当前指针加上当前节点的长度,即指向后一个节点。
ZipListEntry 中的 encoding 编码分为字符串和整数两种:
如果 encoding 是以 "00"、"01" 或者 "10" 开头,则证明 content 是字符串
|----------------------------------|------|---------------|
| 编码 | 编码长度 | 字符串长度 |
| 00xxxxxx | 1字节 | <=63字节 |
| 01xxxxxxxxxxxxxx | 2字节 | <=16383字节 |
| 10xxxxxxxxxxxxxxxxxxxxxxxxxxxxxx | 5字节 | <=4294967295 |
如果 encoding 是以 "11" 开始,则证明 content 是整数,且 encoding 固定只占用 1 个字节
|----------|------|---------------|
| 编码 | 编码长度 | 整数类型 |
| 11000000 | 1字节 | int16_t (2字节) |
| 11010000 | 1字节 | int32_t (4字节) |
| 11100000 | 1字节 | int64_t (6字节) |
| 11110000 | 1字节 | 24位有符号整数(3字节) |
| 11111110 | 1字节 | 8位有符号整数(1字节) |
| 1111xxxx | 1字节 | 直接在xxxx位置保存数据 |
ZipList的连锁更新问题
ZipList 的每个 Entry 都包含 previous_entry_length 来记录上一个节点的大小,长度是 1 个或 5 个字节:
- 如果前一节点的长度小于 254 字节,则采用 1 个字节来保存这个度值
- 如果前一节点的长度大于等于 254 字节,则采用 5 个字节来保存这这个长度值,第一个字节为 0xfe, 后四个字节才是真实长度数据
现在,假设我们有 N 个连续的、长度为 250~253 字节之间的 entry, 因此 entry 的 previous_entry_length 属性用 1 个字节

现在我们向链表首部插入一个长度大于 254 字节的数据会发生什么,我们需要更新第二个元素的 previous_entry_length 从 一字节变为五字节,那么第二元素的长度也大于了 254 ,第三个元素也会更新,就会产生连锁更新问题。
QuickList
QuickList结构
ZipList 虽然节省内存,但申请内存必须是连续空间,如果内存占用车交多,申请内存效率很低。为了缓解这个问题,我们必须限制 ZipList 的长度和 entry 大小。
但是我们要存储大量数据,超出了 ZipList 最佳的上限该怎么办?我们可以创建多个 ZipList 来分片存储数据。
数据拆分后比较分散,不方便管理和查找,这多个 ZiplList 如何建立联系?Redis 在 3.2 版本引入了新的数据结构 QuickList, 它是一个双端链表,只不过链表中的每个节点都是一个 ZipList。结构如下
/* Node, quicklist, and Iterator are the only data structures used currently. */

/* quicklistNode is a 32 byte struct describing a ziplist for a quicklist.
 * We use bit fields keep the quicklistNode at 32 bytes.
 * count: 16 bits, max 65536 (max zl bytes is 65k, so max count actually < 32k).
 * encoding: 2 bits, RAW=1, LZF=2.
 * container: 2 bits, NONE=1, ZIPLIST=2.
 * recompress: 1 bit, bool, true if node is temporary decompressed for usage.
 * attempted_compress: 1 bit, boolean, used for verifying during testing.
 * extra: 10 bits, free for future use; pads out the remainder of 32 bits */
typedef struct quicklistNode {
    struct quicklistNode *prev;
    struct quicklistNode *next;
    unsigned char *zl;
    unsigned int sz;             /* ziplist size in bytes */
    unsigned int count : 16;     /* count of items in ziplist */
    unsigned int encoding : 2;   /* RAW==1 or LZF==2 */
    unsigned int container : 2;  /* NONE==1 or ZIPLIST==2 */
    unsigned int recompress : 1; /* was this node previous compressed? */
    unsigned int attempted_compress : 1; /* node can't compress; too small */
    unsigned int extra : 10; /* more bits to steal for future usage */
} quicklistNode;

/* quicklist is a 40 byte struct (on 64-bit systems) describing a quicklist.
 * 'count' is the number of total entries.
 * 'len' is the number of quicklist nodes.
 * 'compress' is: 0 if compression disabled, otherwise it's the number
 *                of quicklistNodes to leave uncompressed at ends of quicklist.
 * 'fill' is the user-requested (or default) fill factor.
 * 'bookmakrs are an optional feature that is used by realloc this struct,
 *      so that they don't consume memory when not used. */
typedef struct quicklist {
    quicklistNode *head;
    quicklistNode *tail;
    unsigned long count;        /* total count of all entries in all ziplists */
    unsigned long len;          /* number of quicklistNodes */
    int fill : QL_FILL_BITS;              /* fill factor for individual nodes */
    unsigned int compress : QL_COMP_BITS; /* depth of end nodes not to compress;0=off */
    unsigned int bookmark_count: QL_BM_BITS;
    quicklistBookmark bookmarks[];
} quicklist;
为了避免 QuickList 中的每个 ZipList 中 entry 过多,Redis 提供了一个配置项:list-max-ziplist-size 来限制。
- 如果值为正,则代表 ZipList 的允许的 entry 个数的最大值
- 如果值为负,则代表 ZipList 的最大内存大小,分 5 种情况:
- -1: 每个 ZipList 的内存占用不能超过 4kb
- -2: 每个 ZipList 的内存占用不能超过 8kb
- -3: 每个 ZipList 的内存占用不能超过 16kb
- -4: 每个 ZipList 的内存占用不能超过 32kb
- -5: 每个 ZipList 的内存占用不能超过 64kb
默认值为 - 2。
除了控制 ZipList 的大小,QuickList 还可以对节点的 ZipList 做压缩。通过配置项 list-compress-depth 来控制。因为链表一般都是从首尾访问较多,所以首尾是不压缩的。这个参数是控制首尾不压缩的节点个数:
- 0: 特殊值,代表不压缩
- 1: 标示 QuickList 的首尾各有 1 个节点不压缩,中间节点压缩
- 2: 标示 QuickList 的首尾各有 2 个节点不压缩,中间节点压缩
- 以此类推
默认值: 0。
Skiplist
SkipList结构
Skiplis实际上是一个跳表结构,跳表的本质实际上就是一个按升序排序的链表,通过在每个节点中维护多个指向其他节点的指针,从而实现快速的查找、插入和删除操作。
跳跃表是基于有序链表扩展而来的。在普通的有序链表中,查找一个元素需要从头节点开始逐个比较,时间复杂度为 。而跳跃表通过在原始链表的基础上增加多层索引,使得查找时可以跳过一些不必要的节点,从而提高查找效率。
例如,对于一个有序链表 1 -> 3 -> 5 -> 7 -> 9。

我们可以为其建立一层索引,只选取部分节点作为索引节点,比如选取 1 -> 5 -> 9 作为第一层索引。在查找元素时,先在索引层进行查找,快速定位到一个大致的范围,然后再在原始链表中进行精确查找。通过增加更多的索引层,可以进一步提高查找效率。

- 索引层查找 :先在索引层
1 -> 5 -> 9进行查找。从索引层第一个节点 1 开始,因为 7 大于 1,继续向后查找;遇到节点 5,7 大于 5,再继续向后查找;遇到节点 9,7 小于 9,此时通过索引层查找,确定 7 在 5 和 9 之间的范围。 - 原始链表精确查找:在确定范围后,到原始链表中进行精确查找。从索引节点 5 对应的原始链表后续节点开始查找,即从节点 7 所在的原始链表部分开始查找,进而找到元素 7。
对于具体的实现这里就不展开了,感兴趣的读者可以自行学习。