目录
[1 -> 创建Swiper组件](#1 -> 创建Swiper组件)
[2 -> 添加属性](#2 -> 添加属性)
[3 -> 设置样式](#3 -> 设置样式)
[4 -> 绑定事件](#4 -> 绑定事件)
[5 -> 场景示例](#5 -> 场景示例)

1 -> 创建Swiper组件
在pages/index目录下的hml文件中创建一个Swiper组件。
html
<!-- test.hml-->
<div class="container">
  <swiper>
    <div class="item" style="background-color: #bf45ea;">
      <text>item1</text>
    </div>
    <div class="item" style="background-color: #088684;">
      <text>item2</text>
    </div>
    <div class="item" style="background-color: #7786ee;">
      <text>item3</text>
    </div>
  </swiper>
</div>
css
/* test.css */
.container{
  width: 100%;
  height: 100%;
  flex-direction: column;
  background-color: #F1F3F5;
  align-items: center;
  justify-content: center;
  width: 100%;
}
swiper{
  height: 30%;
}
.item{
  width: 100%;
  height: 500px;
}
text{
  width: 100%;
  height: 100%;
  text-align: center;
  font-size: 50px;
  color: white;
}
说明
Swiper组件支持除<list>之外的子组件。
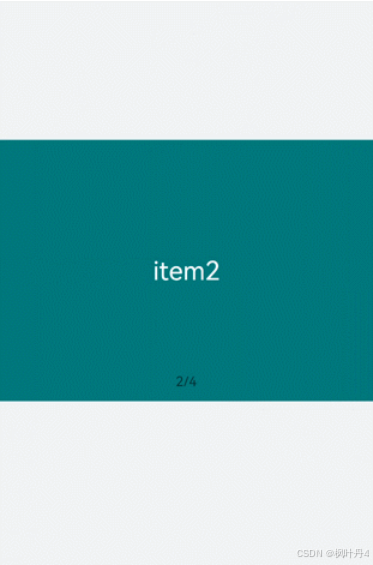
2 -> 添加属性
Swiper组件当不开启循环播放(loop="false")时添加自动播放属性(autoplay),设置自动播放时播放时间间隔(interval),页面会自动切换并停留在最后一个子组件页面。添加digital属性启用数字导航点,设置切换时为渐隐滑动效果(scrolleffect="fade")。
html
<!-- test.hml-->
<div class="container">
  <swiper index="1"  autoplay="true" interval="2000" indicator="true" digital="true" duration="500"
  scrolleffect="fade" loop="false">
    <div class="item" style="background-color: #bf45ea;">
      <text>item1</text>
    </div>
    <div class="item" style="background-color: #088684;">
      <text>item2</text>
    </div>
    <div class="item" style="background-color: #7786ee;">
      <text>item3</text>
    </div>
    <div class="item" style="background-color: #c88cee;">
      <text>item4</text>
    </div>
  </swiper>
</div>
css
/* test.css */
.container{
  width: 100%;
  height: 100%;
  flex-direction: column;
  background-color: #F1F3F5;
  align-items: center;
  justify-content: center;
}
swiper{
  height: 30%;
}
.item{
  width: 100%;
  height: 500px;
}
text{
  width: 100%;
  height: 100%;
  text-align: center;
  font-size: 50px;
  color: white;
}
说明
-
设置indicator(是否启用导航点指示器)属性为true时digital(是否启用数字导航点)属性才会生效。
-
Swiper子组件的个数大于等于2时设置的loop属性才会生效。
-
scrolleffect属性仅在loop属性值为false时生效。
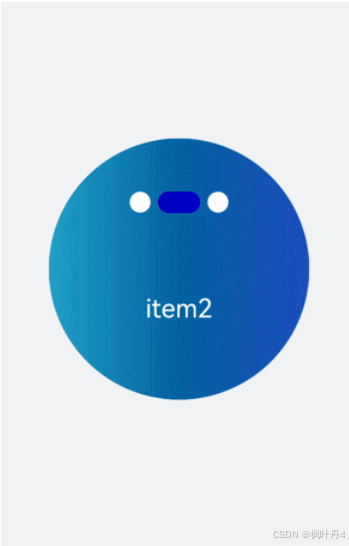
3 -> 设置样式
设置Swiper组件的宽高,导航点指示器的直径大小(indicator-size)、颜色(indicator-color)、相对位置(ndicator-top)及选中时的颜色(indicator-selected-color)。
html
<!-- test.hml-->
<div class="container">
  <swiper index="1" autoplay="true" interval="2000"  duration="500" >
    <div class="item" style="background: linear-gradient(to right,#806dd9,#5d44ea,#2eb9d5)">
      <text>item1</text>
    </div>
    <div class="item" style="background: linear-gradient( to right,#2eb9d5,#0e7db4,#2673d9)">
      <text>item2</text>
    </div>
    <div class="item" style="background: linear-gradient( to right,#2673d9,#0c89af,#806dd9)">
      <text>item3</text>
    </div>
  </swiper>
</div>
css
/* test.css */
.container{
  width: 100%;
  height: 100%;
  flex-direction: column;
  background-color: #F1F3F5;
  align-items: center;
  justify-content: center;
}
swiper{
  width:  500px;
  height: 500px;
  border-radius: 250px;
  indicator-color: white;
  indicator-selected-color: blue;
  indicator-size: 40px;
  indicator-top: 100px;
  overflow: hidden ;
}
.item{
  width: 100%;
  height: 500px;
}
text{
  width: 100%;
  text-align: center;
  margin-top: 150px;
  font-size: 50px;
  color: white;
}
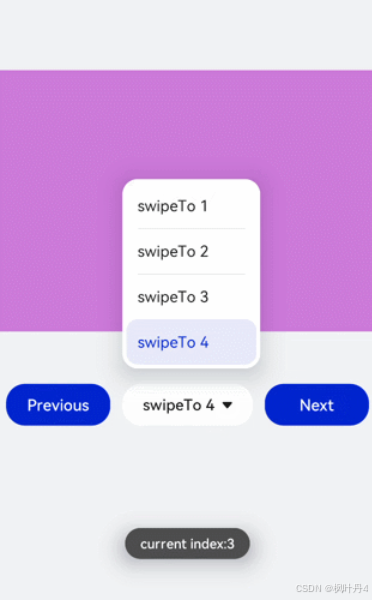
4 -> 绑定事件
创建两个text组件添加点击事件,当点击后就调用showPrevious(显示上一个子组件)或showNext(显示下一个子组件)方法。添加select组件下拉选择时触发change事件后调用swiperTo方法跳转到指定轮播页面。Swiper组件绑定change(当前显示的组件索引变化时触发)和finish(切换动画结束时触发)事件。
html
<!-- test.hml-->
<div class="container">
  <swiper interval="2000" onchange="change" loop="false" onanimationfinish="finish" id="swiper">
    <div class="item" style="background-color: #bf45ea">
      <text>item1</text>
    </div>
    <div class="item" style="background-color: #088684;">
      <text>item2</text>
    </div>
    <div class="item" style="background-color: #7786ee;">
      <text>item3</text>
    </div>
    <div class="item" style="background-color: #c88cee;">
      <text>item4</text>
    </div>
  </swiper>
  <div class="content">
      <button class="pnbtn" onclick="previous">Previous</button>
      <select onchange="selectChange">
          <option value="0">swipeTo 1</option>
          <option value="1">swipeTo 2</option>
          <option value="2">swipeTo 3</option>
          <option value="3">swipeTo 4</option>
      </select>
    <button class="pnbtn" onclick="next">Next</button>
  </div>
</div>
css
/* test.css */
.container{
  width: 100%;
  height: 100%;
  flex-direction: column;
  background-color: #F1F3F5;
  align-items: center;
  justify-content: center;
}
swiper{
  height: 30%;
}
.item{
  width: 100%;
  height: 500px;
}
text{
  width: 100%;
  height: 100%;
  text-align: center;
  font-size: 50px;
  color: white;
}
select{
  background-color: white;
  width: 250px;
  height: 80px;
}
.content{
  margin-top: 100px;
  justify-content: space-around;
}
.pnbtn{
  width: 200px;
  height: 80px;
  font-size: 30px;
}
javascript
import prompt from '@system.prompt';
export default{
  change(e){
    prompt.showToast({duration:2000,message:"current index:"+e.index});
  },
  finish(){
    prompt.showToast({duration:2000,message:"切换动作结束"});
  },
  selectChange(e){
    this.$element('swiper').swipeTo({index: Number(e.newValue)});
  },
  previous(){
    this.$element('swiper').showPrevious();
  },
  next(){
    this.$element('swiper').showNext();
  }
}
5 -> 场景示例
本场景中使用Swiper创建一个轮播图,在轮播图底部制作一个缩略图,点击缩略图后调用swipeTo方法切换到对应的轮播图。
html
<!-- test.hml-->
<div class="container">
  <swiper duration="500" indicator="false" id="swiper" onchange="change">
    <div class="item" for="item in list">
      <image src="{{item.src}}"></image>
    </div>
  </swiper>
  <div class="content">
    <div class="content_item {{index == $idx?'actived':''}}" for="item in list" onclick="imageTo({{$idx}})">
      <image src="{{item.src}}"></image>
    </div>
  </div>
</div>
css
/* test.css */
.container{
  flex-direction: column;
  background-color: #F1F3F5;
  align-items: center;
  justify-content: center;
  width: 100%;
}
swiper{
  width: 100%;
  height: 500px;
}
.item{
  width: 100%;
  height: 500px;
}
.content{
  margin-top: -120px;
  width: 70%;
  display: flex;
  justify-content: space-around;
  height: 100px;
}
.content_item{
  padding: 5px;
  transform: scale(0.5);
}
.actived{
  transform: scale(1);
  border: 1px solid #b20937ea;
}
javascript
// index.js
import prompt from '@system.prompt';
export default {
  data:{
    index: 0,
    list:[
      {src: 'common/images/1.png'},
      {src: 'common/images/2.png'},
      {src: 'common/images/3.png'},
      {src: 'common/images/4.png'},]
    },
  imageTo(index){
    this.index = index;
    this.$element('swiper').swipeTo({index: index});
  },
  change(e){
    this.index = e.index;
  }
}
感谢各位大佬支持!!!
互三啦!!!