uniapp对接打印机和电子秤
连接电子秤和打印机,最难的不是连接蓝牙和电子成,而是打印机。因为打印机涉及到向打印机写数据操作,然后这个写的数据需要做一个编码转换。难就难在编码转换。如果是
java那就是一句代码的事情,而js就没有那么简单了。其实js也是一句代码的事情,打印机接收的的编码为GBK,但是hbuilderx编码为UTF-8。编码转换我们可以使用encoding.js或者GBK.js,但是这些引入方式为var encode = require("./encoding.js");。Vue3已经废弃require这种引入方式,所以没有办法引入 。使用new TextDecoder('gbk').decode(codes)可以解决,但是只能在浏览器里面解决,手机不支持这个命令。所有将编码转换成GBK,并且转换后返回10进制的数组打印。打印机编码可以设置为UTF-8,但是不靠谱,不通用,这样也面临着数据转成10进制后似乎也有问题。我找到一个文件进过更改后可以解决这个问题,下面对接打印机详细讲解。
一、连接蓝牙
参考:https://uniapp.dcloud.net.cn/api/system/bluetooth.html#openbluetoothadapter
- 初始化蓝牙模块
- 开始搜寻附近的蓝牙外围设备
- 监听寻找到新设备的事件(这里可以设备信息)
- 连接低功耗蓝牙设备。
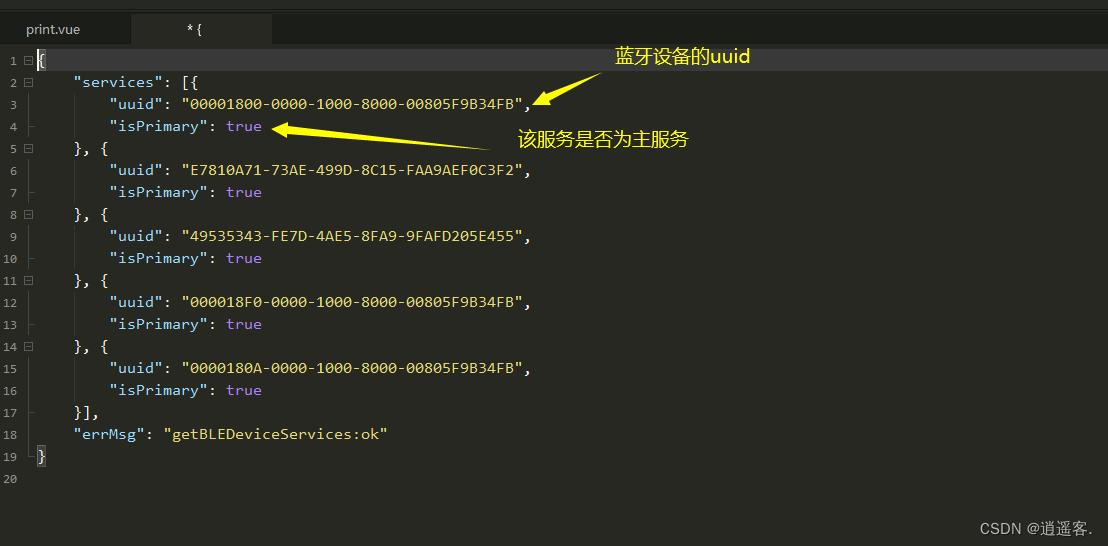
- 获取蓝牙设备所有服务(service)。
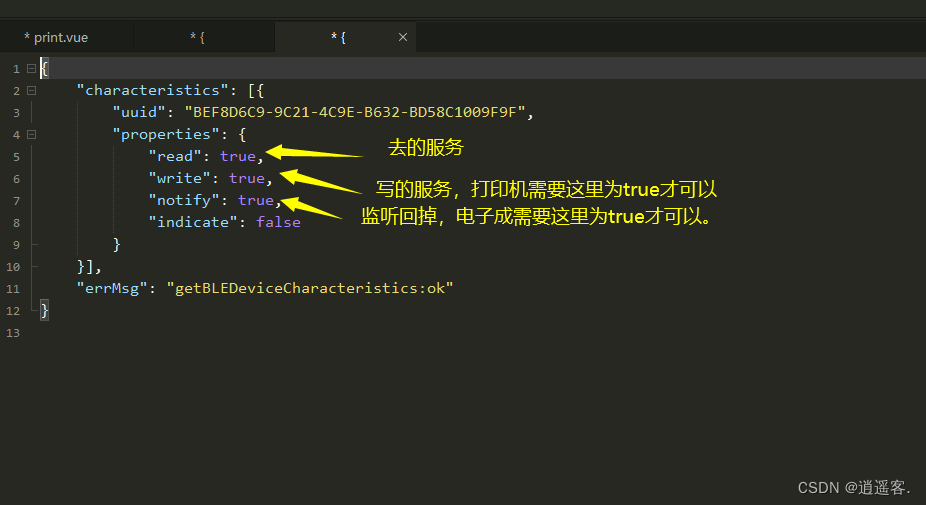
- 根据设备获取蓝牙特征值(一个设备特征值很多,这个设备 支持读,写,异步监听等就看这个特征值了。)
1.1、初始化蓝牙
js
// 初始化蓝牙
uni.openBluetoothAdapter({
    success: (res) => {
        that.connectLog.push("蓝牙初始化完成")
    },
    fail: (res) => {}
});
1.2、开始搜寻附近的蓝牙外围设备
这异步需要初始化蓝牙完成在操作
js
uni.startBluetoothDevicesDiscovery({
    // services: ['0000FFE0'],
    success: res => {
    },
    fail: res => {
        that.connectLog.push("查找设备失败")
    }
});
1.3、发现外围设备
这一步才是真正的搜索附近的蓝牙设备
js
uni.onBluetoothDeviceFound(res => {
    console.log(res)
});
这里会频繁的调用,因为搜索到一个设备调用一次。

注意:deviceId,name要保存下来,后面需要使用。
1.4、连接蓝牙设备
js
uni.createBLEConnection({ //创建蓝牙连接,连接低功耗蓝牙设备
    deviceId: item.deviceId, //传入刚刚获取的uuid
    success(res) {

    },
    fail(res) {
        that.connectLog.push("创建连接失败")
    }
})
这里的
deviceId既是uni.onBluetoothDeviceFound中过去到的deviceId
1.5、获取蓝牙设备所有服务
蓝牙已经连接成功了,获取这个蓝牙设备有哪些服务,获取蓝牙特征值需要使用蓝牙服务的uuid。因为每个蓝牙有很多服务,每个服务的特征值不同,需要根据蓝牙特征值来寻找是否可以写,可以读,可以监听。
js
uni.getBLEDeviceServices({ //获取蓝牙设备所有服务
    deviceId: deviceId,
    success(res) { //为什么要用延时,因为不用延时就拿不到所有的服务,在上一步,连接低功耗蓝牙
        //设备的时候,需要一个600-1000毫秒的时间后,再去获取设备所有服务,不给延时就会一直返回错误码10004
        console.log("蓝牙可用服务:", res)
    },
    fail(res) {
        console.log("搜索蓝牙服务失败:", res)
        that.connectLog.push("搜索蓝牙服务失败")
    }
})
这里的
deviceId既是uni.onBluetoothDeviceFound中过去到的deviceId
1.6、获取蓝牙特征值
js
uni.getBLEDeviceCharacteristics({ //获取蓝牙设备某个服务中所有特征值
    deviceId: that.deviceId,
    serviceId: item.uuid, //这个serviceId可以在上一步获取中拿到,也可以在
    success(res) {
        console.log("获取特征值:", res)
    },
    fail(res) {
    }
})
这里的
deviceId既是uni.onBluetoothDeviceFound中获取到的deviceId
serviceId获取蓝牙服务时获取到的服务uuid
一台蓝牙设备有多个服务,一个服务可以获取多个蓝牙特征值,需要循环所有的蓝牙服务,去获取蓝牙特征值,找到符合自己需求的特征值即可,除非蓝牙设备不支持。
1.7、连接蓝牙完整步骤
js
// 第一步 在页面显示的时候判断是否已经初始化完成蓝牙适配器若成功,则开始查找设备
openBluetoothAdapter() {
	let that = this
	// 初始化蓝牙
	uni.openBluetoothAdapter({
		success: (res) => {
			// 初始化完毕开始搜索
			that.StartBluetoothDeviceDiscovery()
		},
		fail: (res) => {}
	});
},
/**
 * 第二步 在页面显示的时候判断是都已经初始化完成蓝牙适配器若成功,则开始查找设备
 */
StartBluetoothDeviceDiscovery() {
	let that = this
	uni.startBluetoothDevicesDiscovery({
		// services: ['0000FFE0'],
		success: res => {
			that.OnBluetoothDeviceFound();
		},
		fail: res => {
			that.connectLog.push("查找设备失败")
		}
	});
},
/**
 * 第三步  发现外围设备
 */
OnBluetoothDeviceFound() {
	let that = this
	uni.onBluetoothDeviceFound(res => {
		res.devices.forEach(device => { //这一步就是去筛选找到的蓝牙中,有没有你匹配的名称
			if (device.name === "MPT-II") {
				// 连接蓝牙
				that.CreateBLEConnection(device)
				// 找到需要连接的蓝牙了,可以关闭蓝牙搜索了。
				that.StopBluetoothDevicesDiscovery()
			}
		})
	});
},

//
/**
 * 第四步 停止搜索蓝牙设备
 */
StopBluetoothDevicesDiscovery() {
	let that = this
	uni.stopBluetoothDevicesDiscovery({
		success: res => {
			console.log("第四步 找到匹配的蓝牙后就关掉蓝牙搜寻:", JSON.stringify(res))
		},
		fail: res => {
			console.log('第四步 停止搜索蓝牙设备失败,错误码:' + res.errCode);
		}
	});
},
// 第五步 创建蓝牙连接,连接低功耗蓝牙设备
CreateBLEConnection(item) {
	let that = this
	uni.createBLEConnection({ //创建蓝牙连接,连接低功耗蓝牙设备
		deviceId: item.deviceId, //传入刚刚获取的uuid
		success(res) {
			that.GetBLEDeviceServices(item.deviceId) //获取蓝牙设备所有服务(service)。
		},
		fail(res) {
			that.connectLog.push("创建连接失败")
		}
	})
},

//第六步 获取蓝牙设备所有服务(service)。
GetBLEDeviceServices(deviceId) {
	let that = this
	setTimeout(() => {
		uni.getBLEDeviceServices({ //获取蓝牙设备所有服务
			deviceId: deviceId,
			success(res) { //为什么要用延时,因为不用延时就拿不到所有的服务,在上一步,连接低功耗蓝牙
				//设备的时候,需要一个600-1000毫秒的时间后,再去获取设备所有服务,不给延时就会一直返回错误码10004
				console.log("蓝牙可用服务:", res)
				that.GetBLEDeviceCharacteristics(deviceId, res) //获取蓝牙设备某个服务中所有特征值
			},
			fail(res) {
				console.log("搜索蓝牙服务失败:", res)
				that.connectLog.push("搜索蓝牙服务失败")
			}
		})
	}, 1000)
},
// 第七步 获取蓝牙特征值
GetBLEDeviceCharacteristics(deviceId, item) {
	let that = this
	// 获取当前连接这个蓝牙的可用服务
	setTimeout(() => {
		item.services.forEach((services) => {
			console.log("服务:", services)
			uni.getBLEDeviceCharacteristics({ //获取蓝牙设备某个服务中所有特征值
				deviceId: deviceId,
				serviceId: services.uuid, //这个serviceId可以在上一步获取中拿到,也可以在
				success(res) {
					console.log("特征值", res)
					// 循环筛选蓝牙特征值,筛选到符合打印机的特征值为止
					res.characteristics.forEach((ch) => {
						// 判断是否支持打印
						if (ch.properties.write) {
							// 连接蓝牙最终就是使用者三个值。
							console.log("蓝牙设备deviceId:", deviceId)
							console.log("使用蓝牙服务uuid:", services.uuid)
							console.log("特征值uuid:", ch.uuid)
							// 这里不能结束最外层循环,就让他全部循环完成把,反正也不多。
							return
						}
					})
				},
				fail(res) {
					that.connectLog.push("获取特征值失败")
					console.log("获取蓝牙设备某个服务中所有特征值失败:", JSON.stringify(res))
				}
			})
		})
	}, 2000)
},
二、对接电子秤
2.1、使用
js
uni.notifyBLECharacteristicValueChange({
state: true, // 启用 notify 功能
deviceId: that.deviceId, // 蓝牙设备 deviceId
serviceId: that.serviceId, // 蓝牙服务uuid
characteristicId: that.characteristicId, // 蓝牙特征值uuid
success(res) {
console.log('订阅电子秤成功', res.errMsg)
// 电子秤回调事件
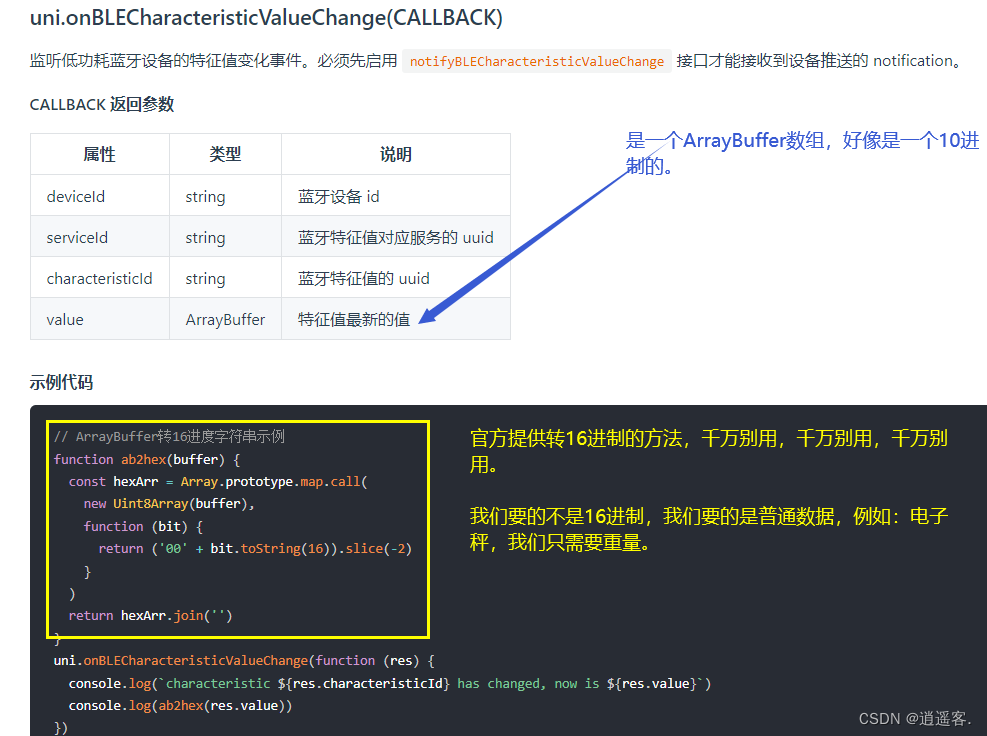
uni.onBLECharacteristicValueChange(function(res) {
const buffer = new Uint8Array(res.value);
var dataString = "";
for (var i = 0; i < buffer.length; i++) {
dataString += String.fromCharCode(buffer[i]);
}
that.weight = dataString
})
}
})需要的三个参数,连接蓝牙,的时候就说过怎么获取了。
这里千万需要注意: uni.onBLECharacteristicValueChange返回的是重量,这里要看电子秤厂商给我们返回啥。我的电子秤是和厂商说好的,值返回重量,所以这里直接把ArrayBuffer转成普通文本,我就能得到了重量。
2.2、完整案列
注意:连接电子秤部分,我直接将电子秤的蓝牙名称写死了,这样方便操作,今后电子秤蓝牙名称不同的,需要更改。
js
<template>
	<!-- 打印 -->
	<view class="balance-box">
		<!-- 操作区 -->
		<view class="operation-box">
			<button @click="openBluetoothAdapter">连接蓝牙</button>
			<input class="balance-input" :value="weight" placeholder="这里是电子秤返回数据" />
		</view>
		<!-- 显示连接蓝牙日志 -->
		<view class="connect-log">
			<view v-for="(log,index) in connectLog" :key="index">{{log}}</view>
		</view>
	</view>
</template>

<script>
	export default {
		data() {
			return {
				connectLog: [], // 日志
				weight: null, // 获取到的重量
				deviceId: null, // 蓝牙设备的 deviceId
				// 这里的 serviceId 需要在 getBLEDeviceServices 接口中获取
				serviceId: null, // 蓝牙服务uuid
				// 这里的 characteristicId 需要在 getBLEDeviceCharacteristics 接口中获取
				characteristicId: null, // 蓝牙特征值uuid
			}
		},
		methods: {
			openBluetoothAdapter() {
				let that = this
				// 初始化蓝牙
				uni.openBluetoothAdapter({
					success: (res) => {
						// 初始化完毕开始搜索
						that.StartBluetoothDeviceDiscovery()
					},
					fail: (res) => {}
				});
			},
			/**
			 * 第二步 在页面显示的时候判断是都已经初始化完成蓝牙适配器若成功,则开始查找设备
			 */
			StartBluetoothDeviceDiscovery() {
				let that = this
				uni.startBluetoothDevicesDiscovery({
					// services: ['0000FFE0'],
					success: res => {
						that.OnBluetoothDeviceFound();
					},
					fail: res => {
						// that.connectLog.push("查找设备失败")
					}
				});
			},
			/**
			 * 第三步  发现外围设备
			 */
			OnBluetoothDeviceFound() {
				let that = this
				uni.onBluetoothDeviceFound(res => {
					res.devices.forEach(device => { //这一步就是去筛选找到的蓝牙中,有没有你匹配的名称
						if (device.name === "ANDZ") {
							// 连接蓝牙
							that.CreateBLEConnection(device)
							// 找到需要连接的蓝牙了,可以关闭蓝牙搜索了。
							that.StopBluetoothDevicesDiscovery()
						}
					})
				});
			},

			//
			/**
			 * 第四步 停止搜索蓝牙设备
			 */
			StopBluetoothDevicesDiscovery() {
				let that = this
				uni.stopBluetoothDevicesDiscovery({
					success: res => {
						console.log("第四步 找到匹配的蓝牙后就关掉蓝牙搜寻:", JSON.stringify(res))
					},
					fail: res => {
						console.log('第四步 停止搜索蓝牙设备失败,错误码:' + res.errCode);
					}
				});
			},
			// 第五步 创建蓝牙连接,连接低功耗蓝牙设备
			CreateBLEConnection(item) {
				let that = this
				uni.createBLEConnection({ //创建蓝牙连接,连接低功耗蓝牙设备
					deviceId: item.deviceId, //传入刚刚获取的uuid
					success(res) {
						that.GetBLEDeviceServices(item.deviceId) //获取蓝牙设备所有服务(service)。
					},
					fail(res) {}
				})
			},

			//第六步 获取蓝牙设备所有服务(service)。
			GetBLEDeviceServices(deviceId) {
				let that = this
				setTimeout(() => {
					uni.getBLEDeviceServices({ //获取蓝牙设备所有服务
						deviceId: deviceId,
						success(res) { //为什么要用延时,因为不用延时就拿不到所有的服务,在上一步,连接低功耗蓝牙
							//设备的时候,需要一个600-1000毫秒的时间后,再去获取设备所有服务,不给延时就会一直返回错误码10004
							console.log("蓝牙可用服务:", res)
							that.GetBLEDeviceCharacteristics(deviceId, res) //获取蓝牙设备某个服务中所有特征值
						},
						fail(res) {
							console.log("搜索蓝牙服务失败:", res)
						}
					})
				}, 1000)
			},
			// 第七步 获取蓝牙特征值
			GetBLEDeviceCharacteristics(deviceId, item) {
				let that = this
				// 获取当前连接这个蓝牙的可用服务
				setTimeout(() => {
					item.services.forEach((services) => {
						console.log("服务:", services)
						uni.getBLEDeviceCharacteristics({ //获取蓝牙设备某个服务中所有特征值
							deviceId: deviceId,
							serviceId: services.uuid, //这个serviceId可以在上一步获取中拿到,也可以在
							success(res) {
								console.log("特征值", res)
								// 循环筛选蓝牙特征值,筛选到符合打印机的特征值为止
								res.characteristics.forEach((ch) => {
									// 判断是否支持打印
									if (ch.properties.notify) {
										// 连接蓝牙最终就是使用者三个值。
										// console.log("蓝牙设备deviceId:", deviceId)
										// console.log("使用蓝牙服务uuid:", services.uuid)
										// console.log("特征值uuid:", ch.uuid)
										that.deviceId = deviceId
										that.serviceId = services.uuid
										that.characteristicId = ch.uuid
										// 这里不能结束最外层循环,就让他全部循环完成把,反正也不多。
										setTimeout(() => {
											that.onNotifyBLECharacteristicValueChange()
										}, 1500)
										return
									}
								})
							},
							fail(res) {
								console.log("获取蓝牙设备某个服务中所有特征值失败:", JSON.stringify(res))
							}
						})
					})
				}, 2000)
			},

			// 监听电子秤
			onNotifyBLECharacteristicValueChange() {
				let that = this
				uni.notifyBLECharacteristicValueChange({
					state: true, // 启用 notify 功能
					deviceId: that.deviceId, // 蓝牙设备 deviceId
					serviceId: that.serviceId, // 蓝牙服务uuid
					characteristicId: that.characteristicId, // 蓝牙特征值uuid
					success(res) {
						console.log('订阅电子秤成功', res.errMsg)
						// 电子秤回调事件
						uni.onBLECharacteristicValueChange(function(res) {
							const buffer = new Uint8Array(res.value);
							var dataString = "";
							for (var i = 0; i < buffer.length; i++) {
								dataString += String.fromCharCode(buffer[i]);
							}
							that.weight = dataString
						})
					}
				})
			},
		}
	}
</script>

<style lang="scss">
	.balance-box {
		display: flex;

		.operation-box {
			width: 70%;
			overflow: auto;

			.balance-input {
				height: 80rpx;
				border-radius: 10rpx;
				border: 2rpx solid saddlebrown;
			}
		}

		.connect-log {
			display: flex;
			flex-direction: column;
			position: sticky;
			top: 0;
			width: 30%;
			color: #fff;
			height: 100vh;
			overflow: auto;
			background-color: rgba(0, 0, 0, 0.2);

			view {
				margin: 10rpx 0;
			}
		}
	}
</style>
三、对接打印机
3.1、对接打印机
js
// 第八步 发送二进制数据
WriteBLECharacteristicValue() {
    // return
    let that = this
    // 打印的内容
    uni.writeBLECharacteristicValue({
        // 蓝牙设备 deviceId
        deviceId: that.deviceId,
        // 蓝牙服务uuid
        serviceId: that.serviceId,
        // 蓝牙特征值uuid
        characteristicId: that.characteristicId,
        // 打印的数据,ArrayBuffer 类型,数据为 10进制或者16进制。编码方式:GBK
        value: [178, 226, 202, 212, 163, 161, 163, 161, 163, 161, 13, 10],
        success(res) {
            console.log("打印成功")
        },
        fail(res) {
            console.log("打印失败", res)
        }
    })
},对接打印机,难点在value的值,这个是ArrayBuffer类型的,这个里面可以放10进制和16进制,我是使用10进制的。例如:27,100,2表示走纸2行27,100,3表示走纸三行。为什么是27,100,n这个要看打印机的指令说明文档,里面有10进制和16进制的。不同厂商的打印机指令有差异。
并且value的数据最多只能有20个,多了需要拆分开,批量发送。
3.2、编码转换
编码转换就是在前言所说的这个困惑,由于我使用的是Vue3,所以不支持var encode = require("./encoding.js");方式引入。编码转换的js有 encoding.js和 GBK.js,但是这两种都是require引入的方式,所以Vue3无法使用,uniapp的手机端 不支持 new TextDecoder('gbk').decode(codes),百思不得其解的时刻,偶然间发现 GBK.js的另外一个版本有改动的希望,所以我使用 GBK.js的另外一个版本改动了一下,成功解决这个困惑。
3.2.1、GBK文件改动
文件来源:https://github.com/EtherDream/str2gbk
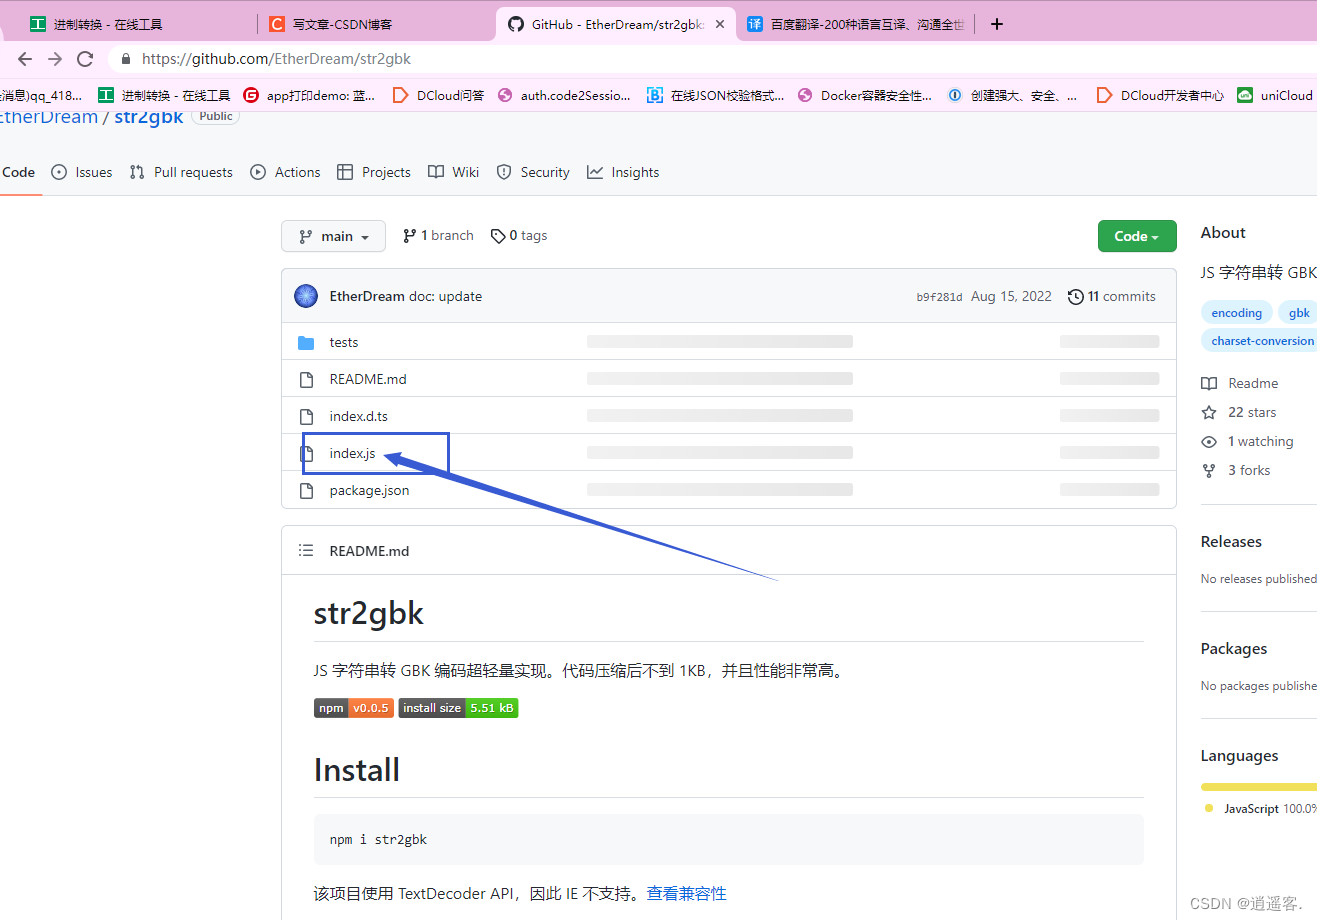
这个文件在Vue3中可以使用,但是有一个地方使用了 new TextDecoder('gbk').decode(codes),因为手机端不支持这个,但是浏览器支持。看看GBK.js源代码。
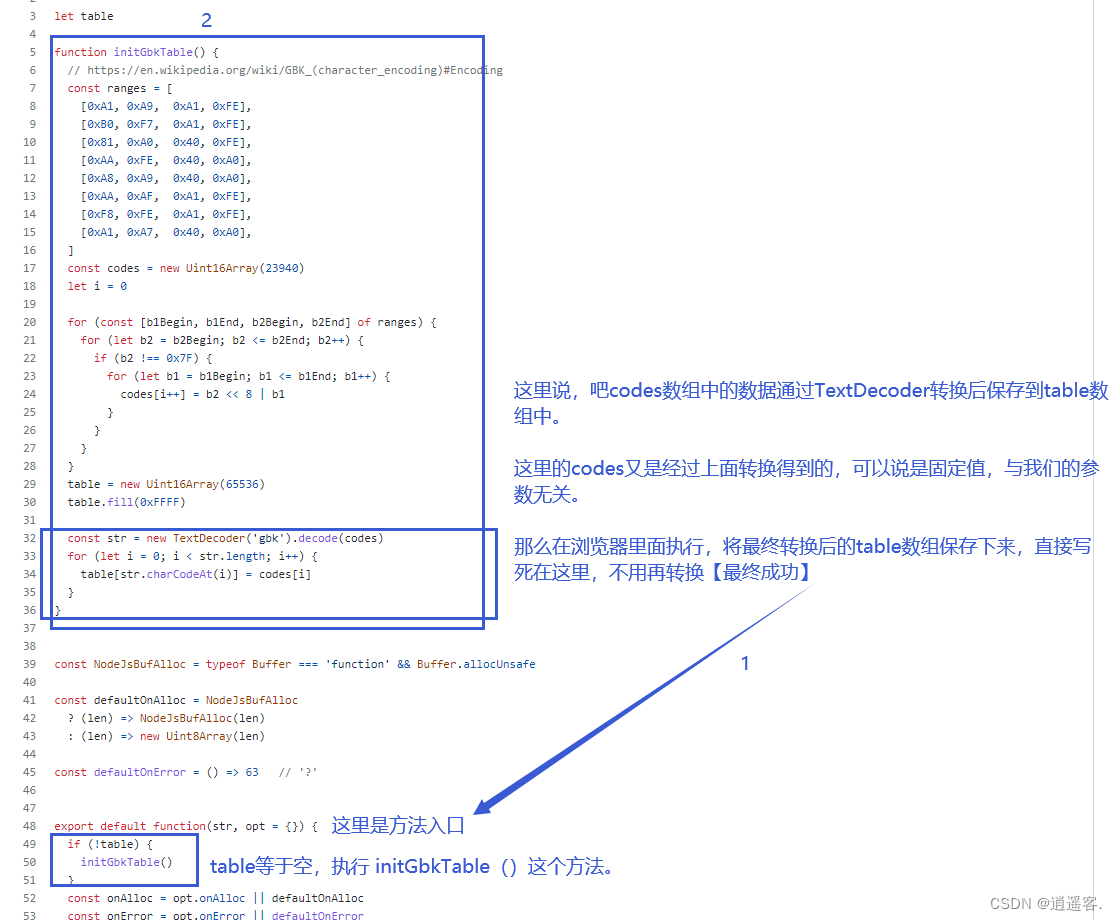
最终看到这里,因为这个js文件里面的 table数组的数据的来源是,根据codes参数通过 new TextDecoder('gbk').decode(codes)转换得到的,而 codes参数又是通过一段算法计算得到,都与我们的参数无关,可以说是一段死的数据。那么我们就可以在浏览器里面执行,将最终转换后的 table集合数据获取到,直接卸载文件里面,这样就可以解决 UTF-8编码转为GBK编码的问题,并且转换后 是10进制的 Uint8Array 数组,刚好符合打印条件。转换后的gbk.js这个文件已经放在当前目录的 doc文件夹下面。
3.2.2、使用GBK.js
- 引入文件
js
import gbk from "./gbk.js"- 使用
js
let data = gbk("这是打印的内容,不得有误。")
console.log(data)- 返回数据案例
js
213,226,202,199,180,242,211,161,181,196,196,218,200,221,163,172,178,187,181,195,211,208,206,243,161,163是个数组,只是打印出来的时候是这样子而已。这个数据可以直接打印了,只是不能超过20个,多的话需要拆分发送,3.3拆分打印数据有现成方法。
3.3、拆分打印数据
因为 value最多只能发送20个,所以需要拆分批量发送。
js
/**
 * 拆分打印数据并打印,将uint8Array打印的数据拆分成,最多 20
 * @param {Object} deviceId 蓝牙设备deviceId
 * @param {Object} serviceId 服务uuid
 * @param {Object} characteristicId 蓝牙特征值uuid
 * @param {Object} uint8Array 打印数据
 */
senBlData(deviceId, serviceId, characteristicId, uint8Array) {
	var that = this;
	console.log('************deviceId = [' + deviceId + ']  serviceId = [' + serviceId +
		'] characteristics=[' + characteristicId + "]")
	var uint8Buf = Array.from(uint8Array);

	function split_array(datas, size) {
		var result = {};
		var j = 0
		for (var i = 0; i < datas.length; i += size) {
			result[j] = datas.slice(i, i + size)
			j++
		}
		console.log(result)
		return result
	}
	var sendloop = split_array(uint8Buf, 20);

	function realWriteData(sendloop, i) {
		var data = sendloop[i]
		if (typeof(data) == "undefined") {
			return
		}
		console.log("第【" + i + "】次写数据" + data)
		var buffer = new ArrayBuffer(data.length)
		var dataView = new DataView(buffer)
		for (var j = 0; j < data.length; j++) {
			dataView.setUint8(j, data[j]);
		}
		// 调动打印机打印
		uni.writeBLECharacteristicValue({
			deviceId,
			serviceId,
			characteristicId,
			value: buffer,
			success(res) {
				realWriteData(sendloop, i + 1);
			},
			fail(e) {
				console.log("点错误:", e)
				realWriteData(sendloop, i + 1);
			}
		})
	}
	var i = 0;
	realWriteData(sendloop, i);
},
3.4、打印指令讲解
打印指令就像是命令,发送什么样的命令干什么样的事情。打印机的指令有十进制和十六进制两种,如果使用十六进制的,会遇到 x011,0x0a,0x1c,0x10等,而这里的 x0在C语言里面表示指令的意思,没有其他作用,但是发送的时候得这样写,真正的指令是后面的 11,0a,1c,10。
不同打印机的指令不同,估计大多都一样把,我目前使用的打印机是 "便捷式打印机MoilePrinter"这种。
特备强调:打印机如果设置了,没有恢复,那么后面打印的所有内容都是按照设置后的打印,除非发送设置默认命令或者关机重启。例如:将行间距设置为150,那么后面打印的所有内容都是150行间距,如果发送了恢复行间距了,后面打印的行间距为默认行间距。
3.4.1、打印机指令使用说明
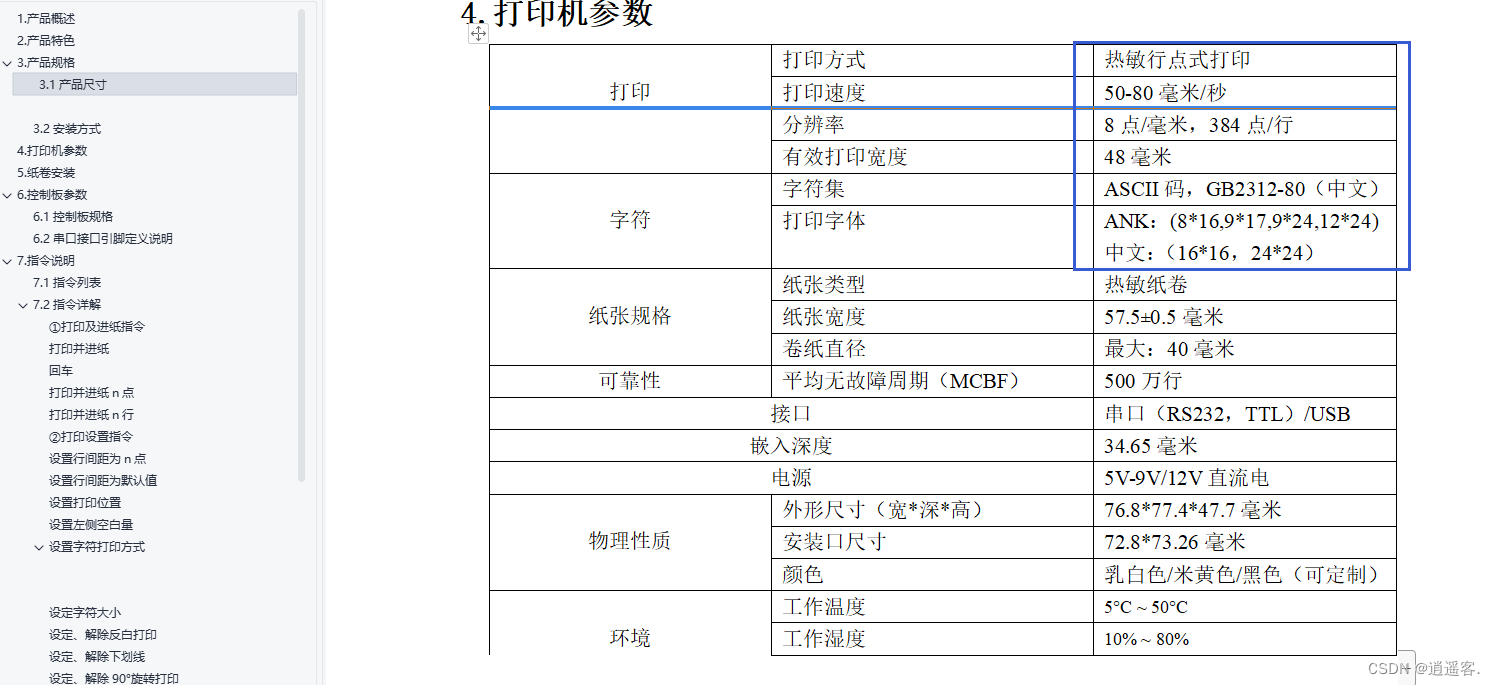
首先拿着打印机指令说明,需要看看打印机参数。比如:编码方式,多少点每行。这些都是需要使用的到,必须了解。
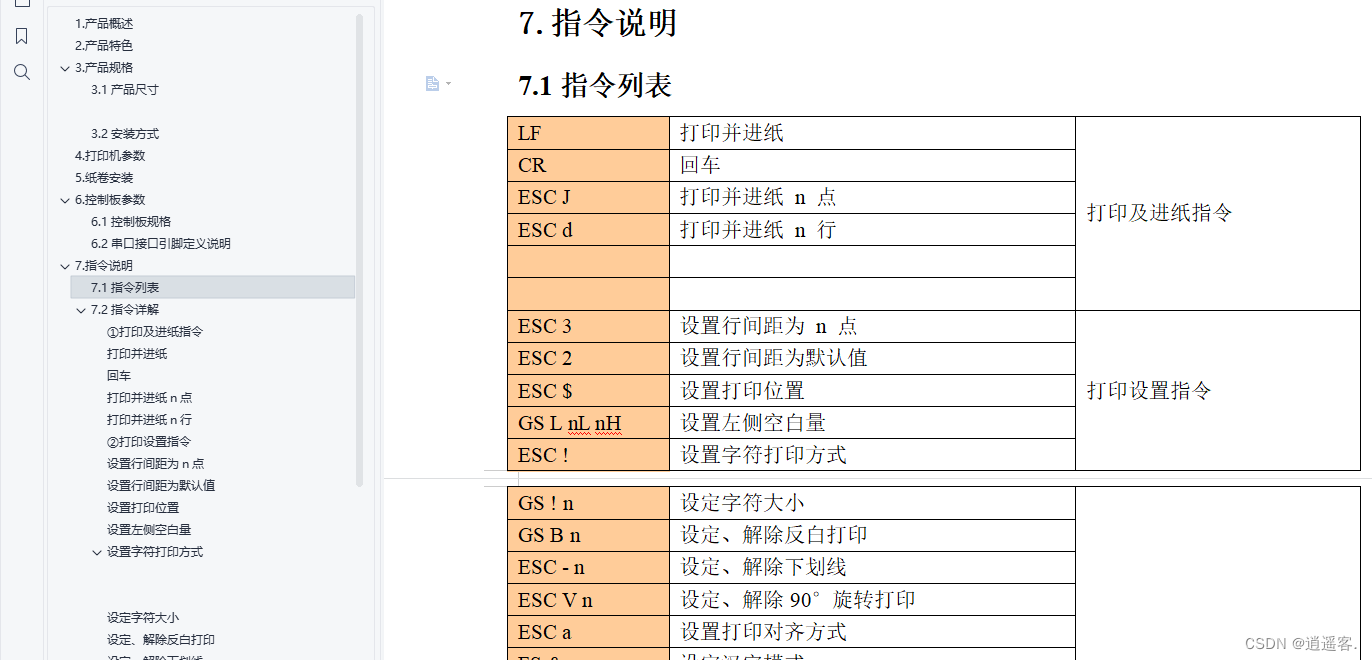
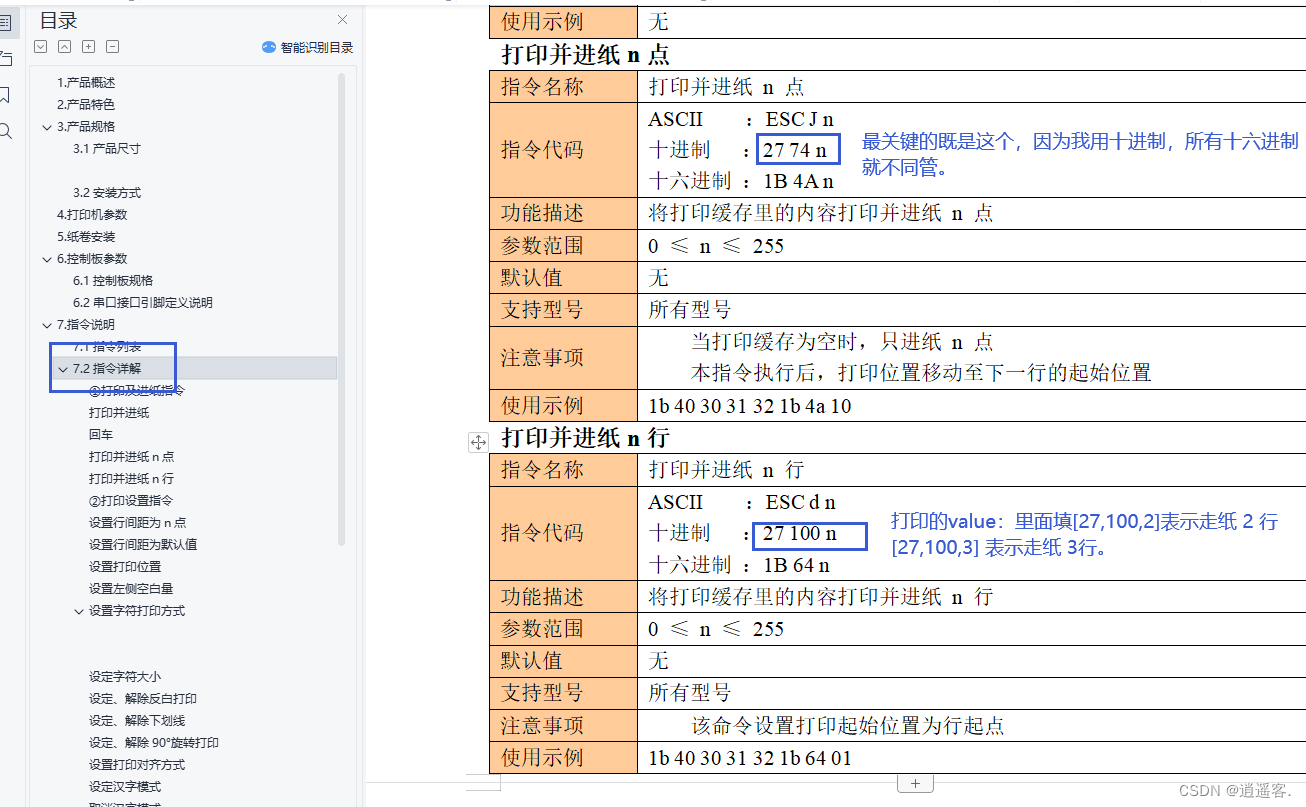
说明书里面的指令列表可以不同看,最关键的是指令详解。
案列
- 走纸60 行
js
// 打印的内容
uni.writeBLECharacteristicValue({
    // 蓝牙设备 deviceId
    deviceId: that.deviceId,
    // 蓝牙服务uuid
    serviceId: that.serviceId,
    // 蓝牙特征值uuid
    characteristicId: that.characteristicId,
    // 打印的数据,ArrayBuffer 类型,数据为 10进制或者16进制。编码方式:GBK
    value: [27,100,60],
    success(res) {
        console.log("打印成功")
    },
    fail(res) {
        console.log("打印失败", res)
    }
})
- 打印
这是测试打印机并走纸 2 行
js
printData() {
    // 打印的数据
    let command = []
    // 打印的数据,这里的 \r\n表示换行,必须要进过转码
    let data = gbk("这是测试打印机")
    data.forEach((d) => {
        command.push(d)
    })
    // 打印指令
    let instruct = [27, 100, 2]
    // 将打印指令增加到 打印的数据中,因为是打印为在走纸两行,所以说 27,100,2 要增加在打印数据的后面,【 27,100,2  这三个数字就相当于中文对人说 ,走纸两			行。而这里是对机器说走纸两行,机器的走纸两行的语言就是  27,100,2】
    instruct.forEach((d) => {
        command.push(d)
    })

    // 这里打印的数据可能超过20个字符了,所有拆分批量打印。
    this.senBlData(this.deviceId, this.serviceId, this.characteristicId, command)
},
"这是测试打印机"这几个中文通过 gbk()转码后得到的Uint8Array 数组是 213, 226, 202, 199, 178, 226, 202, 212, 180, 242, 211, 161, 187, 250,打印并走纸两行 的十进制是 27,100,2。是先打印然后在走纸,所以走纸的命令要增加在后面,所以最终打印数据为:
js
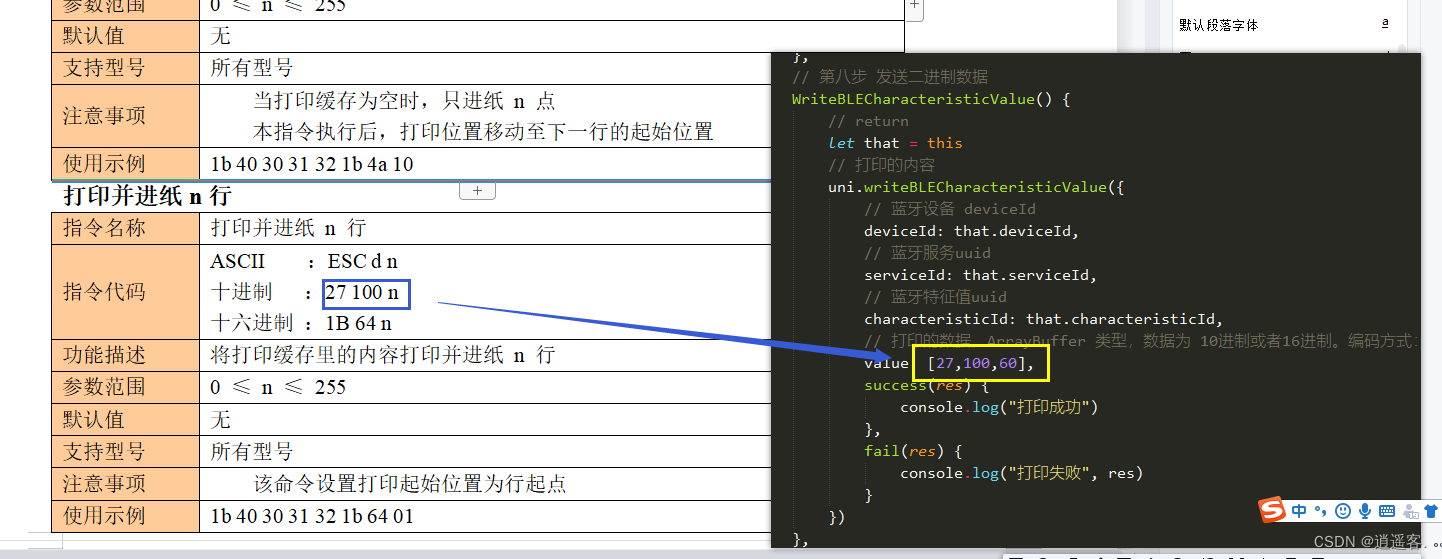
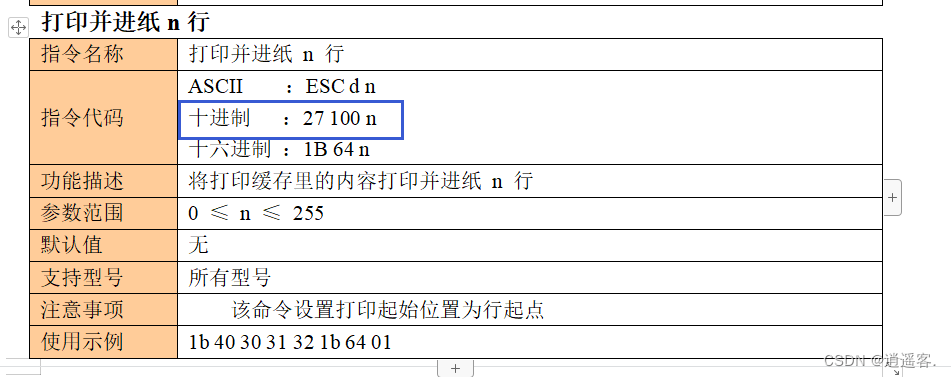
213, 226, 202, 199, 178, 226, 202, 212, 180, 242, 211, 161, 187, 250, 27, 100, 23.4.1、打印并进纸n行
js
27 100 n0 ≤ n ≤ 255
3.4.2、设置行间距
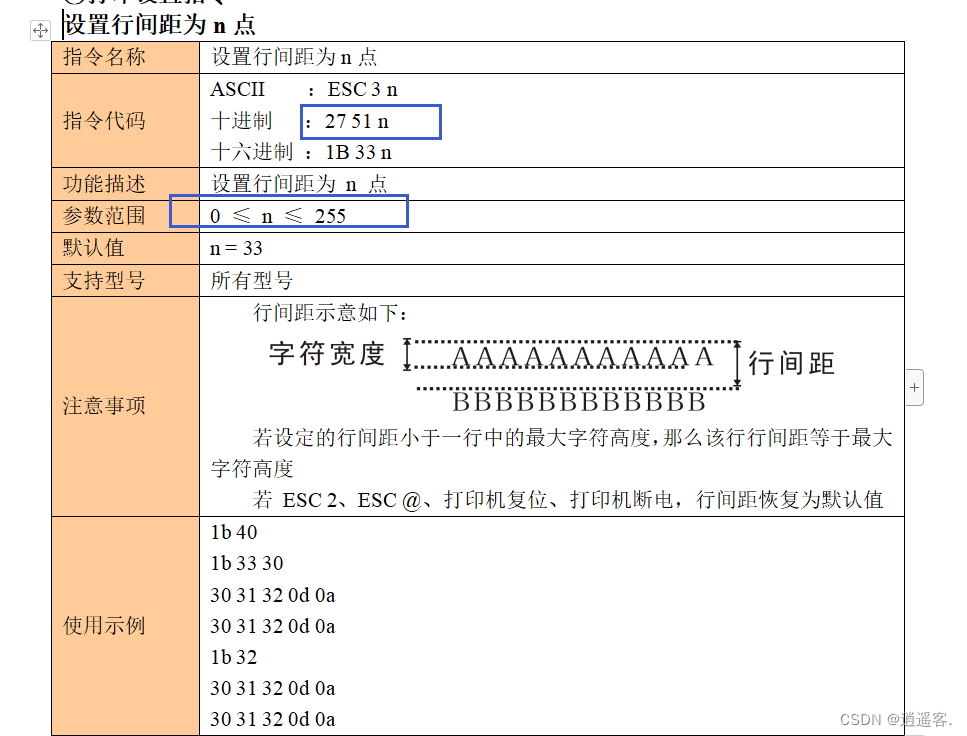
- 实例值
js
27, 51, 2553.4.3、设置行间距为默认
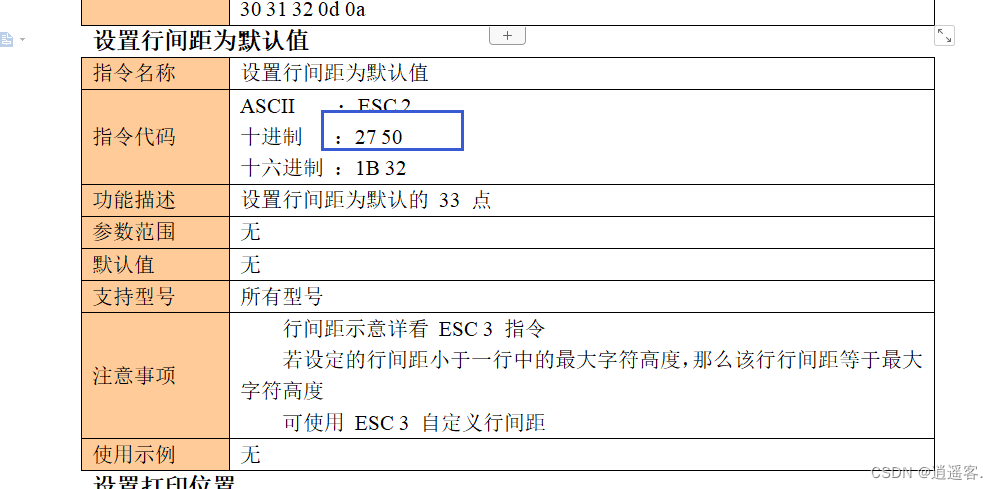
- 参数
js
27, 50这个必须是这样,没有其他任何参数,因为是设置为默认。
3.4.4、字体大小
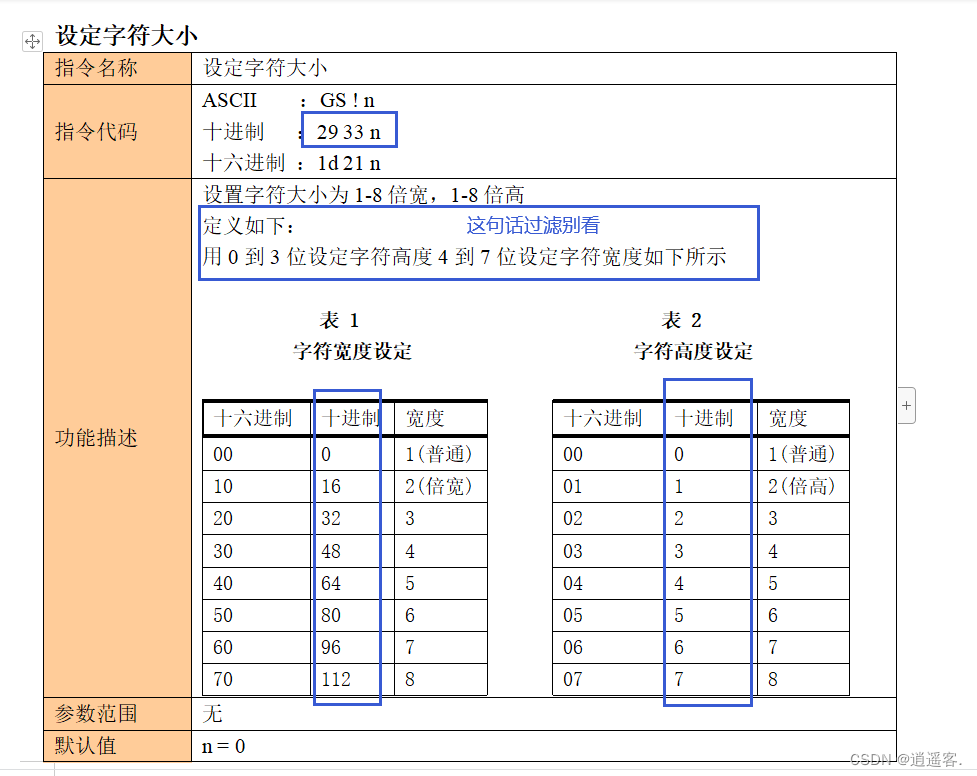
- 设置字2倍宽
js
29, 33, 16- 设置字体2倍高度
js
29, 33, 1- 设置字体2倍宽和2倍高
直接在打印数组里面增加就行。
js
29, 33, 1, 29, 33, 16- 恢复字体宽高
直接使用 29, 33, 0 字体的宽高都恢复默认了。
js
29, 33, 03.4.5、字体对齐方式
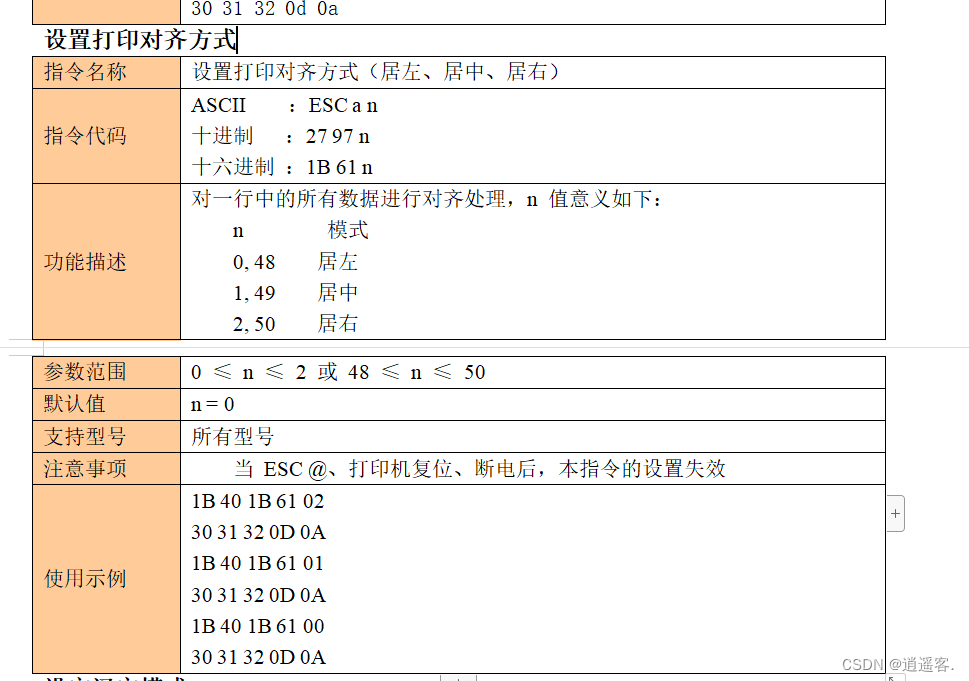
- 字体居左
js
27,97,0 或者 27,97,48-
字体居中
27,97,1 或者 27,97,49
-
字体居右
js
27,97,2 或者 27,97,503.4.6、打印一维码
设置一维条码可读字符(HRI)打印位置
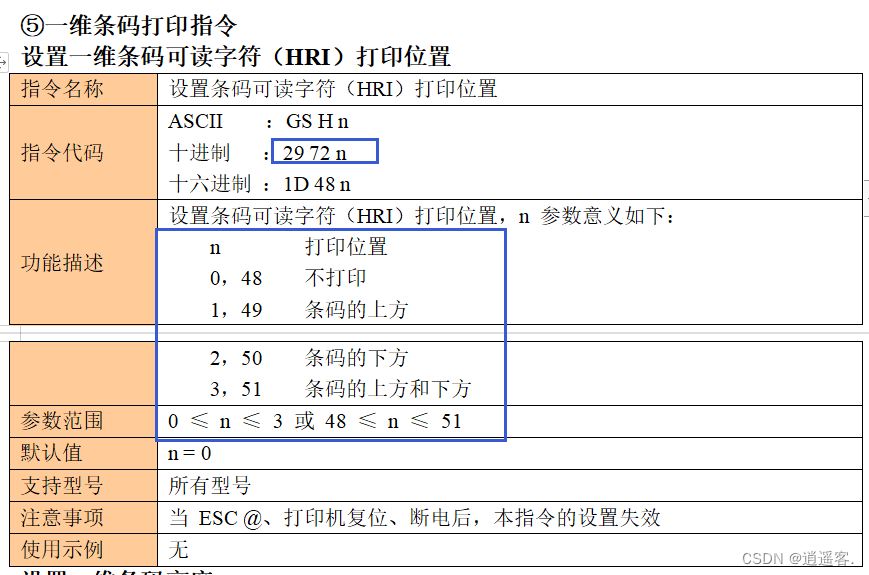
- 实例
js
29,72,0
29,72,1
29,72,2
29,72,3
或者
29,72,48
29,72,49
29,72,50
29,72,51
设置一维条码高度

- 实例值
js
29,104,100设置一维条码宽度
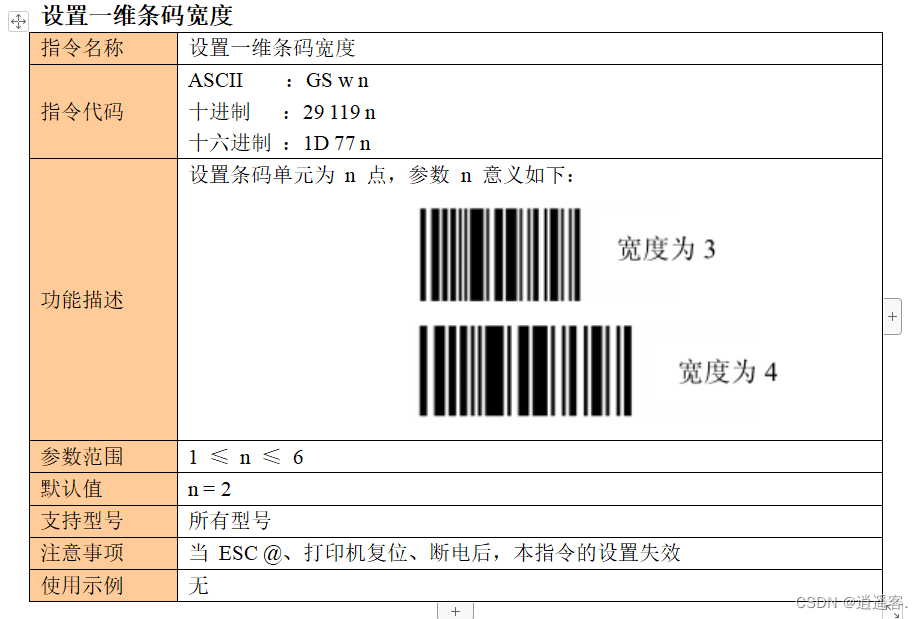
- 实例值
js
29,119,3打印一维条码
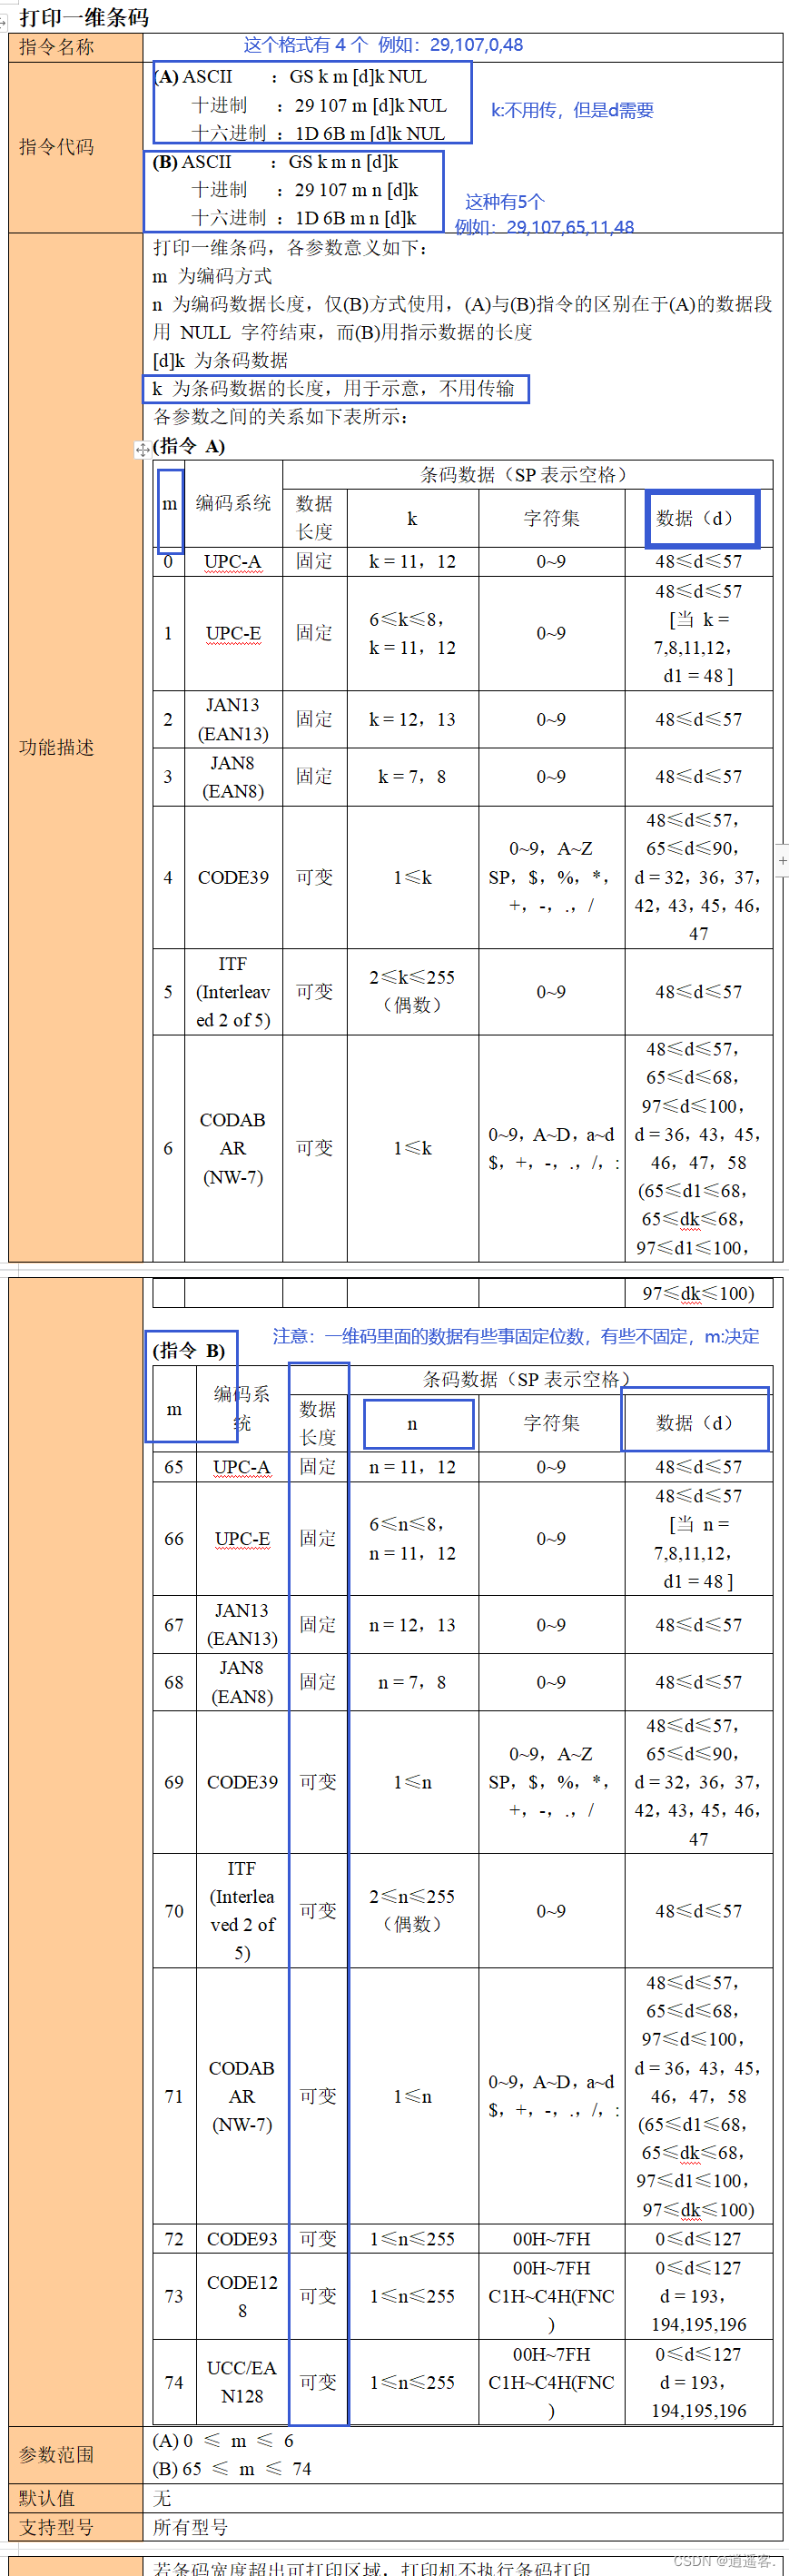
这里分为 A 和 B两种情况,并且参数都有了,自己仔细观察。
- 实例值
js
29,107,0,48

29,107,65,11,48
java
// 打印一维码
let instruct = [29, 72, 2, 29, 104, 100, 29, 119, 6, 29, 107, 0, 48]
// let instruct = [29, 72, 3, 29, 104, 255, 29, 119, 1, 29, 107, 65, 11, 50]
let data = gbk("12345678901")
3.4.7、二维码打印
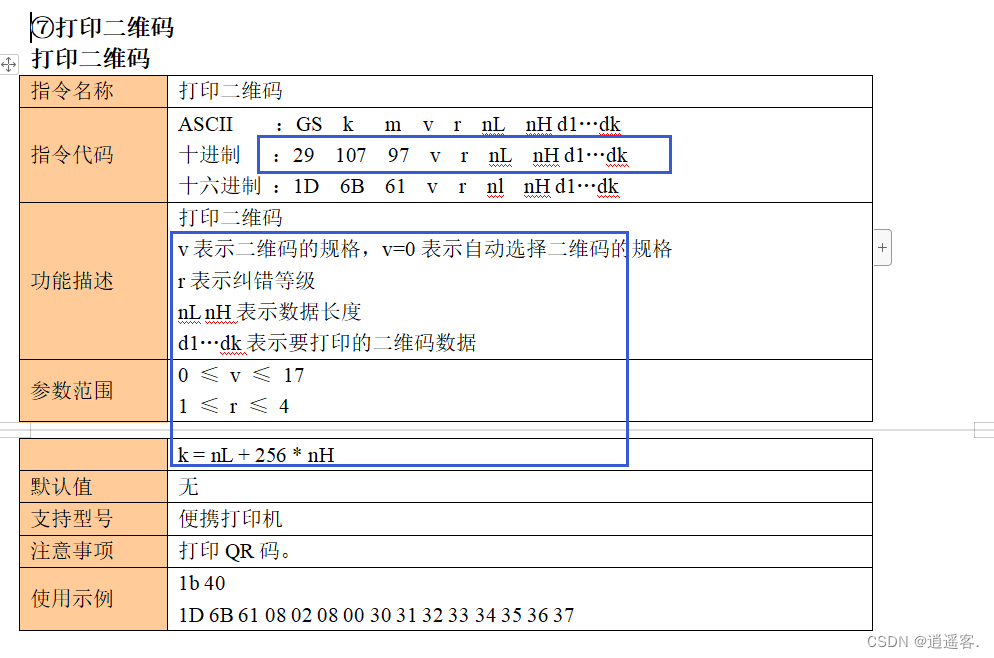
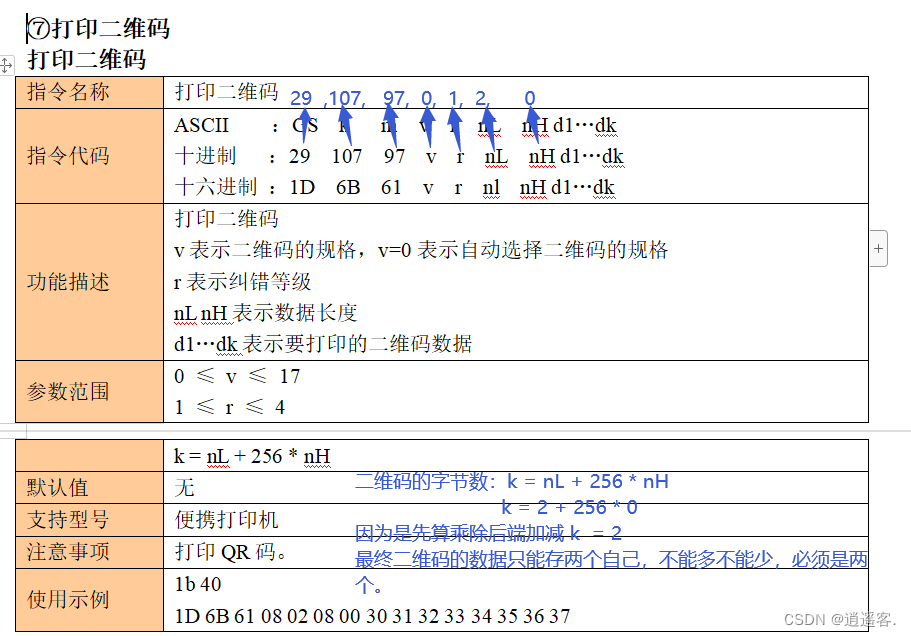
特别注意:这里的k计算出来是多个,那么二维码打印的内容必须就是多少个字节,如果k计算出来是2个字节,打印的内容才有1个或者3个字节都是错的。
- 实例值
js
29,107,97,0,1,2,0
js
// 打印二维码
let instruct = [29,107,97,0,1,2,0]
// 里面必须 2 个字节,一个汉字 2个字节
let data = gbk("12")
注意:这里如果是中文,那么将中文通过 gkb()方法转换后,得到GKB编码的10进制,那么扫描出来的编码也是GBK,二维码里面最好不要保存中文。或者不要进行GBK转码,直接获取10进制数组。

3.4.8、完整案例
vue
<template>
	<!-- 打印 -->
	<view class="print-box">
		<!-- 操作区 -->
		<view class="operation-box">
			<button @click="onPrint">打印</button>
		</view>
		<!-- 显示连接蓝牙日志 -->
		<view class="connect-log">
			<view v-for="(log,index) in connectLog" :key="index">{{log}}</view>
		</view>
	</view>
</template>

<script>
	import gbk from "./gbk.js"
	export default {
		data() {
			return {
				connectLog: [], // 日志
				deviceId: null, // 蓝牙设备的 deviceId
				// 这里的 serviceId 需要在 getBLEDeviceServices 接口中获取
				serviceId: null, // 蓝牙服务uuid
				// 这里的 characteristicId 需要在 getBLEDeviceCharacteristics 接口中获取
				characteristicId: null, // 蓝牙特征值uuid
			}
		},
		methods: {

			// 打印
			onPrint() {
				// 判断是否连接蓝牙,已连接直接打印,未连接就去连接。
				if (this.deviceId) {
					this.printData()
				} else {
					this.openBluetoothAdapter()
				}
			},

			// 第一步 在页面显示的时候判断是否已经初始化完成蓝牙适配器若成功,则开始查找设备
			openBluetoothAdapter() {
				let that = this
				// 初始化蓝牙
				uni.openBluetoothAdapter({
					success: (res) => {
						that.connectLog.push("初始化蓝牙成功")
						// 初始化完毕开始搜索
						that.StartBluetoothDeviceDiscovery()
					},
					fail: (res) => {
						that.connectLog.push("初始化蓝牙失败")
					}
				});
			},
			/**
			 * 第二步 在页面显示的时候判断是都已经初始化完成蓝牙适配器若成功,则开始查找设备
			 */
			StartBluetoothDeviceDiscovery() {
				let that = this
				uni.startBluetoothDevicesDiscovery({
					// services: ['0000FFE0'],
					success: res => {
						that.connectLog.push("查找设备")
						that.OnBluetoothDeviceFound();
					},
					fail: res => {
						that.connectLog.push("查找设备失败")
					}
				});
			},
			/**
			 * 第三步  发现外围设备
			 */
			OnBluetoothDeviceFound() {
				let that = this
				uni.onBluetoothDeviceFound(res => {
					res.devices.forEach(device => { //这一步就是去筛选找到的蓝牙中,有没有你匹配的名称
						that.connectLog.push(`查找到设备${device.name}`)
						if (device.name === "MPT-II") {
							// 连接蓝牙
							that.CreateBLEConnection(device)
							// 找到需要连接的蓝牙了,可以关闭蓝牙搜索了。
							that.StopBluetoothDevicesDiscovery()
						}
					})
				});
			},

			//
			/**
			 * 第四步 停止搜索蓝牙设备
			 */
			StopBluetoothDevicesDiscovery() {
				let that = this
				uni.stopBluetoothDevicesDiscovery({
					success: res => {
						that.connectLog.push("关闭蓝牙搜索")
						console.log("第四步 找到匹配的蓝牙后就关掉蓝牙搜寻:", JSON.stringify(res))
					},
					fail: res => {
						that.connectLog.push("关闭蓝牙搜索失败")
						console.log('第四步 停止搜索蓝牙设备失败,错误码:' + res.errCode);
					}
				});
			},
			// 第五步 创建蓝牙连接,连接低功耗蓝牙设备
			CreateBLEConnection(item) {
				let that = this
				that.connectLog.push("创建蓝牙连接" + item.name)
				uni.createBLEConnection({ //创建蓝牙连接,连接低功耗蓝牙设备
					deviceId: item.deviceId, //传入刚刚获取的uuid
					success(res) {
						that.connectLog.push("蓝牙连接成功")
						that.GetBLEDeviceServices(item.deviceId) //获取蓝牙设备所有服务(service)。
					},
					fail(res) {
						that.connectLog.push("蓝牙连接失败")
					}
				})
			},

			//第六步 获取蓝牙设备所有服务(service)。
			GetBLEDeviceServices(deviceId) {
				let that = this
				that.connectLog.push("开始搜索蓝牙服务")
				setTimeout(() => {
					uni.getBLEDeviceServices({ //获取蓝牙设备所有服务
						deviceId: deviceId,
						success(res) { //为什么要用延时,因为不用延时就拿不到所有的服务,在上一步,连接低功耗蓝牙
							//设备的时候,需要一个600-1000毫秒的时间后,再去获取设备所有服务,不给延时就会一直返回错误码10004
							console.log("蓝牙可用服务:", res)
							that.connectLog.push("搜索到蓝牙服务")
							that.GetBLEDeviceCharacteristics(deviceId, res) //获取蓝牙设备某个服务中所有特征值
						},
						fail(res) {
							that.connectLog.push("搜索蓝牙服务失败")
							console.log("搜索蓝牙服务失败:", res)
						}
					})
				}, 1000)
			},
			// 第七步 获取蓝牙特征值
			GetBLEDeviceCharacteristics(deviceId, item) {
				let that = this
				that.connectLog.push("开始获取蓝牙特征值")
				// 获取当前连接这个蓝牙的可用服务
				setTimeout(() => {
					item.services.forEach((services) => {
						console.log("服务:", services)
						uni.getBLEDeviceCharacteristics({ //获取蓝牙设备某个服务中所有特征值
							deviceId: deviceId,
							serviceId: services.uuid, //这个serviceId可以在上一步获取中拿到,也可以在
							success(res) {
								that.connectLog.push("蓝牙特征值获取成功")
								console.log("特征值", res)
								// 循环筛选蓝牙特征值,筛选到符合打印机的特征值为止
								res.characteristics.forEach((ch) => {
									// 判断是否支持打印机
									if (ch.properties.write) {
										// 连接蓝牙最终就是使用者三个值。
										// console.log("蓝牙设备deviceId:", deviceId)
										// console.log("使用蓝牙服务uuid:", services.uuid)
										// console.log("特征值uuid:", ch.uuid)
										that.deviceId = deviceId
										that.serviceId = services.uuid
										that.characteristicId = ch.uuid
										// 这里不能结束最外层循环,就让他全部循环完成把,反正也不多。
										that.connectLog.push("找打符合条件特征值")
										return
									}
								})
							},
							fail(res) {
								that.connectLog.push("蓝牙特征值获取失败")
								console.log("获取蓝牙设备某个服务中所有特征值失败:", JSON.stringify(res))
							}
						})
					})
				}, 2000)
			},
			// 第八步 发送二进制数据
			WriteBLECharacteristicValue() {
				// return
				let that = this
				// 打印的内容
				uni.writeBLECharacteristicValue({
					// 蓝牙设备 deviceId
					deviceId: that.deviceId,
					// 蓝牙服务uuid
					serviceId: that.serviceId,
					// 蓝牙特征值uuid
					characteristicId: that.characteristicId,
					// 打印的数据,ArrayBuffer 类型,数据为 10进制或者16进制。编码方式:GBK
					value: [27, 100, 60],
					success(res) {
						console.log("打印成功")
					},
					fail(res) {
						console.log("打印失败", res)
					}
				})
			},
			printData() {
				// 打印的数据
				let command = []
				// 打印的数据,这里的 \r\n表示换行,必须要进过转码
				// let data = gbk(
				// 	"这是打印的内容,我要写很多很多文字,然后打印出来看看看,什么行间距啊,什么间距啥的有没有设置好。如果没有设置好,自己看看到底是怪哪里,是我的编写问题,就更改。是厂商的问题,就寻找厂商。")
				// 设置行间距
				// let instruct = [27, 51, 255]

				// 设置行间距为默认
				// let instruct = [27, 50]


				// 设置开始打印的位置
				// let instruct = [29, 33, 1, 29, 33, 16]
				// 字体恢复默认
				// let instruct = [29, 33, 0]
				// let data = gbk("这是打印的内容,反正是很多的那种,不止一行数据,自己看着办,结束。")

				// 居中字体
				// let instruct = [27, 97, 49]
				// 字体居中
				// let instruct = [27, 97, 1]
				// 字体居左
				// let instruct = [27, 97, 0]
				// let data = gbk("字体居左")
				// 字体居右
				// let instruct = [27, 97, 1]
				// let data = gbk("字体居右")

				// // 打印一维码
				// let instruct = [29, 72, 2, 29, 104, 100, 29, 119, 6, 29, 107, 0, 48]
				// // let instruct = [29, 72, 3, 29, 104, 255, 29, 119, 1, 29, 107, 65, 11, 50]
				// let data = gbk("12345678901")

				// 打印二维码
				let instruct = [29,107,97,0,1,2,0]
				// 里面必须 2 个字节,一个汉字 2个字节
				let data = gbk("12")

				// 将打印指令增加到 打印的数据中
				instruct.forEach((d) => {
					command.push(d)
				})
				data.forEach((d) => {
					command.push(d)
				})
				command.push(27)
				command.push(100)
				command.push(2)
				// 这里打印的数据可能超过20个字符了,所有拆分批量打印。
				this.senBlData(this.deviceId, this.serviceId, this.characteristicId, command)
			},

			/**
			 * 拆分打印数据并打印,将uint8Array打印的数据拆分成,最多 20
			 * @param {Object} deviceId 蓝牙设备deviceId
			 * @param {Object} serviceId 服务uuid
			 * @param {Object} characteristicId 蓝牙特征值uuid
			 * @param {Object} uint8Array 打印数据
			 */
			senBlData(deviceId, serviceId, characteristicId, uint8Array) {
				var that = this;
				console.log('************deviceId = [' + deviceId + ']  serviceId = [' + serviceId +
					'] characteristics=[' + characteristicId + "]")
				var uint8Buf = Array.from(uint8Array);

				function split_array(datas, size) {
					var result = {};
					var j = 0
					for (var i = 0; i < datas.length; i += size) {
						result[j] = datas.slice(i, i + size)
						j++
					}
					console.log(result)
					return result
				}
				var sendloop = split_array(uint8Buf, 20);

				function realWriteData(sendloop, i) {
					var data = sendloop[i]
					if (typeof(data) == "undefined") {
						return
					}
					console.log("第【" + i + "】次写数据" + data)
					var buffer = new ArrayBuffer(data.length)
					var dataView = new DataView(buffer)
					for (var j = 0; j < data.length; j++) {
						dataView.setUint8(j, data[j]);
					}
					// 调动打印机打印
					uni.writeBLECharacteristicValue({
						deviceId,
						serviceId,
						characteristicId,
						value: buffer, // 打印的数据,ArrayBuffer 类型,数据为 10进制或者16进制。编码方式:GBK
						success(res) {
							realWriteData(sendloop, i + 1);
						},
						fail(e) {
							console.log("点错误:", e)
							realWriteData(sendloop, i + 1);
						}
					})
				}
				var i = 0;
				realWriteData(sendloop, i);
			},
		}
	}
</script>

<style lang="scss">
	.print-box {
		display: flex;

		.operation-box {
			width: 70%;
			overflow: auto;

			.device-box {
				background-color: #8d98cc;
				margin: 20rpx;
			}

			.services-css {
				margin: 20rpx;
				background-color: #8d98cc;

				.char-css {
					margin: 20rpx;
					background-color: #ffffdc;
				}
			}
		}

		.connect-log {
			display: flex;
			flex-direction: column;
			position: sticky;
			top: 0;
			width: 30%;
			color: #fff;
			height: 100vh;
			overflow: auto;
			background-color: rgba(0, 0, 0, 0.2);
		}
	}
</style>