=====欢迎来到编程星辰海的博客讲解======

看完可以给一个免费的三连吗,谢谢大佬!

目录
[1. Hooks 是什么?](#1. Hooks 是什么?)
[2. useState 的作用](#2. useState 的作用)
[3. 基本语法解析](#3. 基本语法解析)
[4. 工作原理](#4. 工作原理)
[5. 参数详解](#5. 参数详解)
a) 初始值设置方式 初始值设置方式)
b) 更新函数特性 更新函数特性)
[6. 注意事项](#6. 注意事项)
[7. 类组件对比](#7. 类组件对比)
[8. 常见问题解答](#8. 常见问题解答)
一、知识讲解
1. Hooks 是什么?
React Hooks 是 React 16.8 引入的革命性特性,它允许开发者在函数组件中使用状态(state)和其他 React 特性。Hooks 的诞生解决了以下问题:
- 类组件中生命周期函数带来的逻辑分散
- 高阶组件带来的嵌套地狱(Wrapper Hell)
- 函数组件无法使用状态的局限
- 状态逻辑难以复用的问题
2. useState 的作用
useState 是最基础且重要的 Hook,它让函数组件具备管理局部状态的能力。其核心功能包括:
- 声明组件内部状态
- 提供状态更新方法
- 触发组件重新渲染
- 保持状态在多次渲染间的持久性
3. 基本语法解析
JAVASCRIPT
const [state, setState] = useState(initialState);
initialState:状态的初始值,可以是任何数据类型state:当前状态值setState:用于更新状态的函数
4. 工作原理
- 初始化阶段:组件首次渲染时,useState 会读取初始值并保存
- 更新阶段 :调用 setState 后:
- 将新值加入更新队列
- 触发组件重新渲染
- 在下次渲染时返回更新后的状态
- 渲染机制:每次渲染都有独立的状态快照(闭包特性)
5. 参数详解
a) 初始值设置方式
JAVASCRIPT
// 直接值初始化
const [count, setCount] = useState(0);

// 函数式初始化(惰性初始化)
const [count, setCount] = useState(() => {
  const initialValue = calculateExpensiveValue();
  return initialValue;
});
b) 更新函数特性
-
支持直接赋值更新: JAVASCRIPT
setCount(5); -
支持函数式更新(推荐用于依赖前值的场景): JAVASCRIPT
setCount(prevCount => prevCount + 1);
6. 注意事项
- 异步更新:状态更新是异步的,不能立即获取到新值
- 合并更新:React 会自动合并多个 setState 调用
- 性能优化:使用函数式更新避免闭包陷阱
- 不可变原则:始终返回新值而不是修改原值
7. 类组件对比
| 特性 | 类组件 | 函数组件 + useState |
|---|---|---|
| 状态初始化 | constructor | useState 参数 |
| 状态更新方式 | this.setState() | setState 函数 |
| 状态访问 | this.state | 直接使用状态变量 |
| 生命周期依赖 | 需要 | 无需 |
| 代码组织 | 分散在各个生命周期方法中 | 逻辑集中 |
8. 常见问题解答
Q:useState 和类组件的 state 有何不同?
A:useState 不会自动合并对象类型的状态,需要手动合并
Q:为什么 setCount(count + 1) 在异步操作中不可靠?
A:由于闭包特性,异步回调中的 count 可能不是最新值,应该使用函数式更新
Q:可以在条件语句中使用 useState 吗?
A:不行,所有 Hooks 都必须保证每次渲染的调用顺序一致
Q:如何存储复杂对象?
JAVASCRIPT
const [user, setUser] = useState({
  name: 'John',
  age: 25,
  address: {
    city: 'New York',
    zip: '10001'
  }
});

// 正确更新方式
setUser(prev => ({
  ...prev,
  age: 26,
  address: {
    ...prev.address,
    zip: '10002'
  }
}));
二、核心代码示例
JSX
import React, { useState } from 'react';

function Counter() {
  // 声明状态变量 count 及其更新函数 setCount
  // 初始值设为 0
  const [count, setCount] = useState(0);

  // 定义增加计数器的方法
  const increment = () => {
    // 使用函数式更新确保基于最新状态值
    setCount(prevCount => prevCount + 1);
  };

  // 定义减少计数器的方法
  const decrement = () => {
    setCount(prevCount => prevCount - 1);
  };

  // 定义重置计数器的方法
  const reset = () => {
    setCount(0);
  };

  return (
    <div style={styles.container}>
      <h2>当前计数: {count}</h2>
      <div style={styles.buttonGroup}>
        {/* 绑定点击事件 */}
        <button style={styles.button} onClick={increment}>+</button>
        <button style={styles.button} onClick={decrement}>-</button>
        <button style={styles.button} onClick={reset}>重置</button>
      </div>

      {/* 条件渲染提示信息 */}
      {count >= 10 && <p style={styles.tip}>计数已经超过10啦!</p>}
    </div>
  );
}

// 样式对象
const styles = {
  container: {
    textAlign: 'center',
    padding: '2rem',
    backgroundColor: '#f0f0f0',
    borderRadius: '8px',
    maxWidth: '400px',
    margin: '2rem auto'
  },
  buttonGroup: {
    display: 'flex',
    justifyContent: 'center',
    gap: '1rem',
    marginTop: '1rem'
  },
  button: {
    padding: '0.5rem 1rem',
    fontSize: '1.2rem',
    cursor: 'pointer',
    backgroundColor: '#2196f3',
    color: 'white',
    border: 'none',
    borderRadius: '4px',
    transition: 'background-color 0.3s'
  },
  tip: {
    color: '#d32f2f',
    marginTop: '1rem',
    fontWeight: 'bold'
  }
};

export default Counter;
三、实现效果

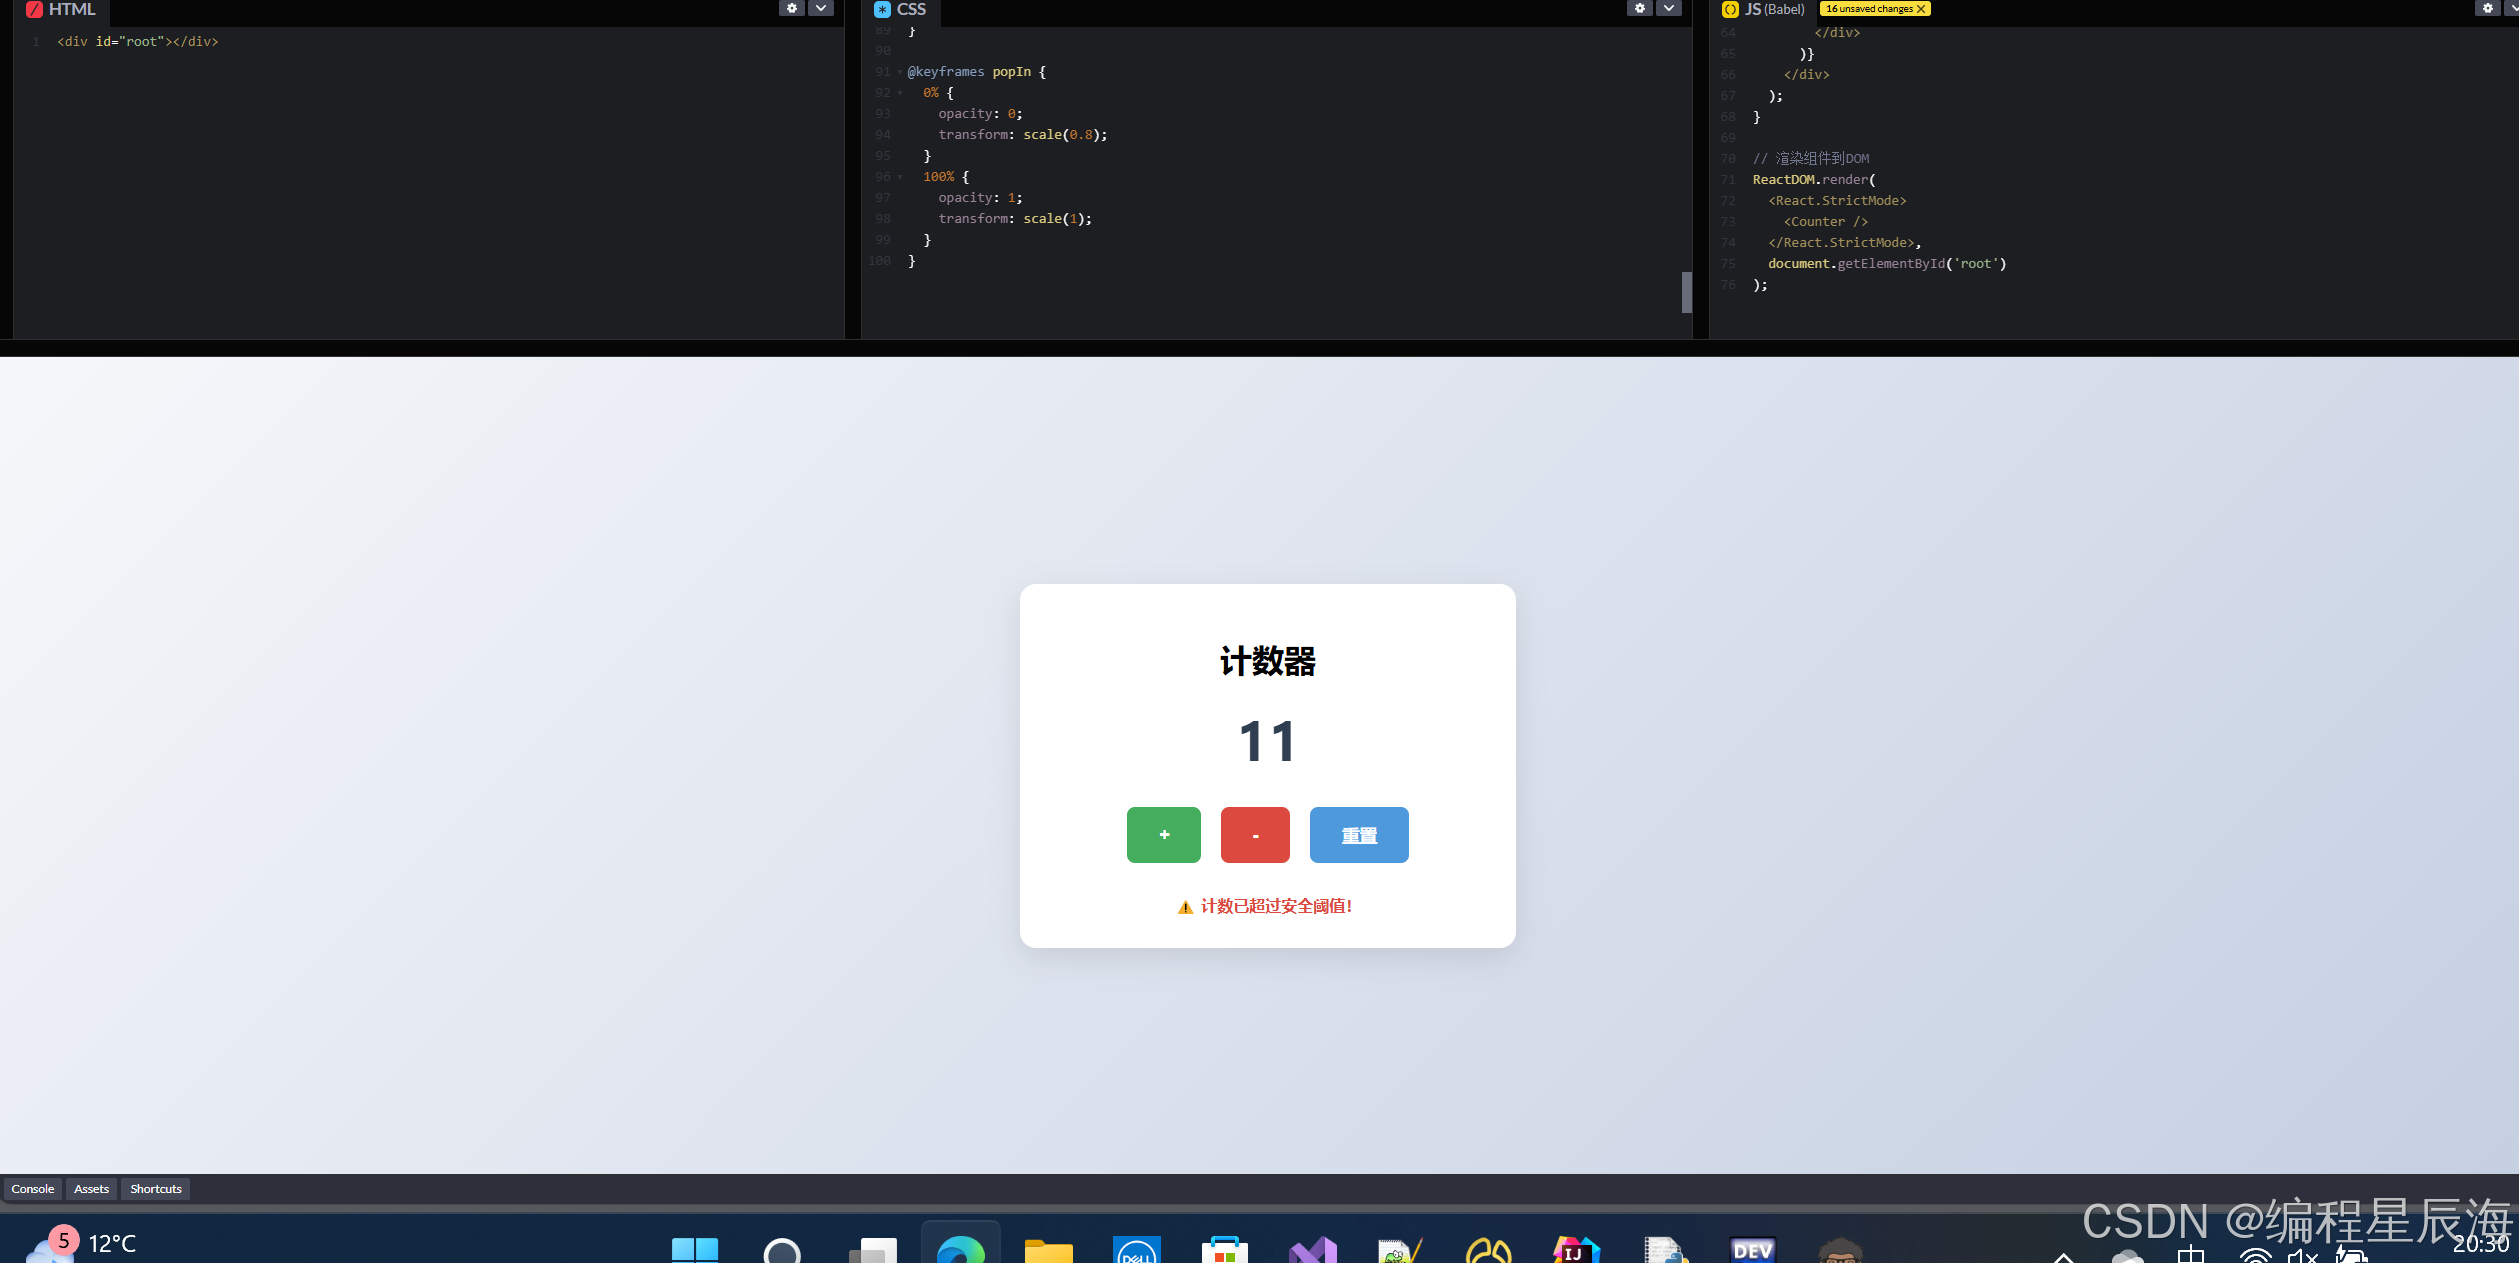
计数器组件包含:
- 显示当前数值的标题
- "+"、"-" 和 "重置" 三个操作按钮
- 当数值 >=10 时显示提示信息
- 按钮悬停时的颜色变化效果
- 整洁的卡片式布局
四、学习要点总结
-
基础概念
- useState 是用于给函数组件添加状态管理的 Hook
- 遵循
const [state, setState] = useState(initialValue)语法
-
使用规则
- 只在组件的顶层调用 Hooks
- 不要在循环、条件或嵌套函数中调用 Hooks
- 遵循不可变原则(immutability)
-
最佳实践
- 对于复杂对象,使用扩展运算符进行合并更新
- 异步操作时使用函数式更新确保获取最新状态
- 拆分多个 useState 管理不同状态
-
性能优化
- 对于昂贵的初始化,使用函数式初始化
- 当更新依赖前值时,必须使用函数式更新
- 使用 React.memo 防止不必要的重新渲染
-
常见错误
- 直接修改状态对象
JAVASCRIPT
// 错误示例
const [user, setUser] = useState({name: 'John'});
user.name = 'Mike'; // 直接修改原对象
setUser(user);      // 不会触发更新

// 正确做法
setUser({...user, name: 'Mike'});
- 在渲染函数中执行副作用操作
- 忽视异步更新的特性
五、扩展阅读推荐
官方文档
优质文章
推荐学习路径
- 掌握 useState → useEffect → useContext 基础三件套
- 学习自定义 Hook 实现逻辑复用
- 了解 useReducer 管理复杂状态
- 学习性能优化相关 Hooks(useMemo/useCallback)
- 探索第三方 Hooks 库(如 ahooks)
进阶资源
六、实践步骤
可以以下步骤进行实践:
- 从简单计数器开始
- 实现表单输入控制
- 创建动态列表组件
- 开发带有复杂状态的购物车
- 尝试将业务逻辑抽象为自定义 Hooks
一、表单输入控制
JSX
import React, { useState } from 'react';

function UserForm() {
  // 使用单个对象管理所有表单字段
  const [formData, setFormData] = useState({
    username: '',
    email: '',
    password: '',
    newsletter: false
  });

  // 统一处理输入变化
  const handleInputChange = (e) => {
    const { name, value, type, checked } = e.target;
    setFormData(prev => ({
      ...prev,
      [name]: type === 'checkbox' ? checked : value
    }));
  };

  // 处理表单提交
  const handleSubmit = (e) => {
    e.preventDefault();
    console.log('表单提交数据:', formData);
    alert(JSON.stringify(formData, null, 2));
  };

  return (
    <form style={formStyles} onSubmit={handleSubmit}>
      <div style={inputGroup}>
        <label>用户名:</label>
        <input
          type="text"
          name="username"
          value={formData.username}
          onChange={handleInputChange}
        />
      </div>

      <div style={inputGroup}>
        <label>邮箱:</label>
        <input
          type="email"
          name="email"
          value={formData.email}
          onChange={handleInputChange}
        />
      </div>

      <div style={inputGroup}>
        <label>密码:</label>
        <input
          type="password"
          name="password"
          value={formData.password}
          onChange={handleInputChange}
        />
      </div>

      <div style={checkboxGroup}>
        <label>
          <input
            type="checkbox"
            name="newsletter"
            checked={formData.newsletter}
            onChange={handleInputChange}
          />
          订阅新闻邮件
        </label>
      </div>

      <button type="submit" style={submitButton}>提交</button>
    </form>
  );
}

// 样式配置
const formStyles = {
  maxWidth: '400px',
  margin: '2rem auto',
  padding: '2rem',
  backgroundColor: '#f8f9fa',
  borderRadius: '8px'
};

const inputGroup = {
  marginBottom: '1rem'
};

const checkboxGroup = {
  margin: '1rem 0'
};

const submitButton = {
  backgroundColor: '#28a745',
  color: 'white',
  padding: '0.5rem 1rem',
  border: 'none',
  borderRadius: '4px',
  cursor: 'pointer'
};

export default UserForm;
学习要点:
- 使用对象统一管理表单状态
- 处理多种输入类型(文本/复选框)
- 动态属性名更新技巧(name: value)
- 表单提交时访问最新状态
二、动态列表组件
JSX
import React, { useState } from 'react';

function TodoList() {
  const [todos, setTodos] = useState([
    { id: 1, text: '学习React Hooks', completed: false },
    { id: 2, text: '练习useState', completed: true }
  ]);
  const [newTodo, setNewTodo] = useState('');

  // 添加新待办事项
  const addTodo = () => {
    if (newTodo.trim()) {
      setTodos([...todos, {
        id: Date.now(),
        text: newTodo,
        completed: false
      }]);
      setNewTodo('');
    }
  };

  // 切换完成状态
  const toggleTodo = (id) => {
    setTodos(todos.map(todo =>
      todo.id === id ? { ...todo, completed: !todo.completed } : todo
    ));
  };

  // 删除待办事项
  const deleteTodo = (id) => {
    setTodos(todos.filter(todo => todo.id !== id));
  };

  return (
    <div style={container}>
      <h2>待办事项列表 ({todos.length})</h2>

      <div style={inputGroup}>
        <input
          type="text"
          value={newTodo}
          onChange={(e) => setNewTodo(e.target.value)}
          placeholder="输入新事项"
          style={inputStyle}
        />
        <button onClick={addTodo} style={addButton}>添加</button>
      </div>

      <ul style={listStyle}>
        {todos.map(todo => (
          <li key={todo.id} style={itemStyle(todo.completed)}>
            <input
              type="checkbox"
              checked={todo.completed}
              onChange={() => toggleTodo(todo.id)}
            />
            <span style={{ flex: 1 }}>{todo.text}</span>
            <button
              onClick={() => deleteTodo(todo.id)}
              style={deleteButton}
            >删除</button>
          </li>
        ))}
      </ul>
    </div>
  );
}

// 样式配置
const container = {
  maxWidth: '600px',
  margin: '2rem auto',
  padding: '1rem'
};

const inputGroup = {
  display: 'flex',
  gap: '0.5rem',
  marginBottom: '1rem'
};

const inputStyle = {
  flex: 1,
  padding: '0.5rem'
};

const addButton = {
  backgroundColor: '#17a2b8',
  color: 'white',
  border: 'none',
  padding: '0.5rem 1rem',
  borderRadius: '4px',
  cursor: 'pointer'
};

const listStyle = {
  listStyle: 'none',
  padding: 0
};

const itemStyle = (completed) => ({
  display: 'flex',
  alignItems: 'center',
  padding: '0.5rem',
  margin: '0.5rem 0',
  backgroundColor: completed ? '#d4edda' : '#fff',
  border: '1px solid #ddd',
  borderRadius: '4px',
  opacity: completed ? 0.7 : 1
});

const deleteButton = {
  backgroundColor: '#dc3545',
  color: 'white',
  border: 'none',
  padding: '0.25rem 0.5rem',
  borderRadius: '4px',
  cursor: 'pointer'
};

export default TodoList;
学习要点:
- 使用数组管理动态列表
- 列表项的增删改操作
- 正确使用key属性
- 复杂状态对象的更新方法
- 条件样式渲染技巧
三、购物车组件(复杂状态)
JSX
import React, { useState } from 'react';

const initialProducts = [
  { id: 1, name: '商品A', price: 100, quantity: 1 },
  { id: 2, name: '商品B', price: 200, quantity: 2 }
];

function ShoppingCart() {
  const [cart, setCart] = useState(initialProducts);
  const [newProduct, setNewProduct] = useState('');

  // 计算总价
  const total = cart.reduce((sum, item) => sum + (item.price * item.quantity), 0);

  // 添加新商品
  const addProduct = () => {
    if (newProduct.trim()) {
      setCart([...cart, {
        id: Date.now(),
        name: newProduct,
        price: Math.floor(Math.random() * 500) + 100,
        quantity: 1
      }]);
      setNewProduct('');
    }
  };

  // 更新商品数量
  const updateQuantity = (id, delta) => {
    setCart(cart.map(item => {
      if (item.id === id) {
        const newQuantity = Math.max(1, item.quantity + delta);
        return { ...item, quantity: newQuantity };
      }
      return item;
    }));
  };

  // 移除商品
  const removeProduct = (id) => {
    setCart(cart.filter(item => item.id !== id));
  };

  return (
    <div style={container}>
      <h2>购物车 (总价: ¥{total})</h2>

      <div style={inputGroup}>
        <input
          type="text"
          value={newProduct}
          onChange={(e) => setNewProduct(e.target.value)}
          placeholder="输入商品名称"
          style={inputStyle}
        />
        <button onClick={addProduct} style={addButton}>添加商品</button>
      </div>

      <ul style={listStyle}>
        {cart.map(item => (
          <li key={item.id} style={itemStyle}>
            <div style={itemInfo}>
              <span style={itemName}>{item.name}</span>
              <span>单价: ¥{item.price}</span>
            </div>

            <div style={quantityControls}>
              <button
                onClick={() => updateQuantity(item.id, -1)}
                style={controlButton}
              >-</button>
              <span style={quantityDisplay}>{item.quantity}</span>
              <button
                onClick={() => updateQuantity(item.id, 1)}
                style={controlButton}
              >+</button>
            </div>

            <div style={itemSubtotal}>
              小计: ¥{item.price * item.quantity}
              <button
                onClick={() => removeProduct(item.id)}
                style={removeButton}
              >删除</button>
            </div>
          </li>
        ))}
      </ul>
    </div>
  );
}

// 样式配置
const container = {
  maxWidth: '800px',
  margin: '2rem auto',
  padding: '1rem'
};

const inputGroup = {
  display: 'flex',
  gap: '0.5rem',
  marginBottom: '1rem'
};

const inputStyle = {
  flex: 1,
  padding: '0.5rem'
};

const addButton = {
  backgroundColor: '#007bff',
  color: 'white',
  border: 'none',
  padding: '0.5rem 1rem',
  borderRadius: '4px',
  cursor: 'pointer'
};

const listStyle = {
  listStyle: 'none',
  padding: 0
};

const itemStyle = {
  display: 'flex',
  justifyContent: 'space-between',
  alignItems: 'center',
  padding: '1rem',
  margin: '0.5rem 0',
  backgroundColor: '#fff',
  border: '1px solid #ddd',
  borderRadius: '4px'
};

const itemInfo = {
  flex: 2,
  display: 'flex',
  flexDirection: 'column',
  gap: '0.5rem'
};

const itemName = {
  fontWeight: 'bold'
};

const quantityControls = {
  display: 'flex',
  alignItems: 'center',
  gap: '0.5rem'
};

const controlButton = {
  padding: '0.25rem 0.5rem',
  minWidth: '32px',
  backgroundColor: '#6c757d',
  color: 'white',
  border: 'none',
  borderRadius: '4px',
  cursor: 'pointer'
};

const quantityDisplay = {
  minWidth: '30px',
  textAlign: 'center'
};

const itemSubtotal = {
  flex: 1,
  display: 'flex',
  flexDirection: 'column',
  alignItems: 'flex-end',
  gap: '0.5rem'
};

const removeButton = {
  backgroundColor: '#dc3545',
  color: 'white',
  border: 'none',
  padding: '0.25rem 0.5rem',
  borderRadius: '4px',
  cursor: 'pointer'
};

export default ShoppingCart;
学习要点:
- 多层嵌套状态的管理
- 复杂状态更新模式
- 派生状态(总价)的计算
- 不可变数据更新模式
- 复杂组件的样式组织
四、自定义Hook:useCart
JSX
// useCart.js
import { useState } from 'react';

function useCart(initialItems = []) {
  const [cart, setCart] = useState(initialItems);

  const total = cart.reduce((sum, item) => sum + (item.price * item.quantity), 0);

  const addItem = (newItem) => {
    setCart([...cart, {
      ...newItem,
      id: Date.now(),
      quantity: 1
    }]);
  };

  const updateQuantity = (itemId, delta) => {
    setCart(currentCart =>
      currentCart.map(item =>
        item.id === itemId
          ? { ...item, quantity: Math.max(1, item.quantity + delta) }
          : item
      )
    );
  };

  const removeItem = (itemId) => {
    setCart(currentCart => currentCart.filter(item => item.id !== itemId));
  };

  return {
    cart,
    total,
    addItem,
    updateQuantity,
    removeItem
  };
}

export default useCart;

// 使用示例
function CartComponent() {
  const { cart, total, addItem, updateQuantity, removeItem } = useCart();
  // ...组件实现与前面购物车示例类似
}
学习要点:
- 自定义Hook的命名规范(必须用use开头)
- 状态逻辑的封装
- Hook之间的通信
- 返回可操作的方法集
- 实现业务逻辑复用
推荐练习项目:
- 个人博客系统
- 任务管理系统(类似Trello)
- 电子商务平台
- 实时数据监控仪表盘
学完后建议弄清以下问题:
- 状态更新的原理是什么?
- 如何避免不必要的重新渲染?
- 复杂状态如何组织更合理?
- 如何调试状态变化?
- 如何测试Hook相关逻辑?