一、了解源码
在
SGL-STL30版本中,看一下map和set的部分源码
cpp
// set
#ifndef __SGI_STL_INTERNAL_TREE_H
#include <stl_tree.h>
#endif
#include <stl_set.h>
#include <stl_multiset.h>
// map
#ifndef __SGI_STL_INTERNAL_TREE_H
#include <stl_tree.h>
#endif
#include <stl_map.h>
#include <stl_multimap.h>
// stl_set.h
template <class Key, class Compare = less<Key>, class Alloc = alloc>
class set {
public:
// typedefs:
	typedef Key key_type;
	typedef Key value_type;
private:
	typedef rb_tree<key_type, value_type,
		identity<value_type>, key_compare, Alloc> rep_type;
	rep_type t; // red-black tree representing set
};
// stl_map.h
template <class Key, class T, class Compare = less<Key>, class Alloc = alloc>
class map {
public:
// typedefs:
	typedef Key key_type;
	typedef T mapped_type;
	typedef pair<const Key, T> value_type;
private:
	typedef rb_tree<key_type, value_type,
	select1st<value_type>, key_compare, Alloc> rep_type;
	rep_type t; // red-black tree representing map
};
// stl_tree.h
struct __rb_tree_node_base
{
	typedef __rb_tree_color_type color_type;
	typedef __rb_tree_node_base* base_ptr;
	color_type color;
	base_ptr parent;
	base_ptr left;
	base_ptr right;
};
// stl_tree.h
template <class Key, class Value, class KeyOfValue, class Compare, class Alloc = alloc>
class rb_tree {
protected:
	typedef void* void_pointer;
	typedef __rb_tree_node_base* base_ptr;
	typedef __rb_tree_node<Value> rb_tree_node;
	typedef rb_tree_node* link_type;
	typedef Key key_type;
	typedef Value value_type;
public:
	// insert⽤的是第⼆个模板参数左形参
	pair<iterator,bool> insert_unique(const value_type& x);
	// erase和find⽤第⼀个模板参数做形参
	size_type erase(const key_type& x);
	iterator find(const key_type& x);
protected:
	size_type node_count; // keeps track of size of tree
	link_type header;
};
template <class Value>
struct __rb_tree_node : public __rb_tree_node_base
{
	typedef __rb_tree_node<Value>* link_type;
	Value value_field;
};部分源码如上,我们通过源码可以看到源码中rb_tree使用了泛型思维实现;其中rb_tree是实现key搜索场景还是实现key/value的搜索场景不是写死的,而是通过了第二个模版参数来决定的。
上面意思呢?
set在实例化时第二个模版参数给的是key,而map实例化时第二个模版参数给的是pair<const K, T>,这样我们一颗红黑树就可以实现两种效果,既可以实现key搜索场景的set也可以实现key/value搜索场景map。- 这里源码当中,模版参数用
T来代替了value,而其中value_type并不是我们之前key/value场景中的value;源码当中value_type反而是红黑树节点中存储的数据类型。(这样set存储的数据就是K,而map中存储的数据就是pair<K , V>)。- 这里第二个模版参数
Value已经控制了红黑树节点中存储的数据类型,那为什么还需要第一个模版参数呢?,就比如set模版参数传的是K,K;这里主要原因还是因为map和set中find和erase函数的参数都是Key,所以需要第一个模版参数传给find和erase。- 对于
set而言两个参数都是key,而对于map而言,map的insert是pair对象,但是find和erase的是Key对象。
二、 封装实现map和set
我们复用之前实现的红黑树来实现set和map;我们需要进行一系列的修改,让我们实现的红黑树可以完成复用,让我们实现出来set和map。
要复用整个框架,我们首先要进行一些修改;这里对比源码当中实现方法进行一系列修改和完善:
- 模版参数:红黑树的模版参数要用三个
<class K , class T , class KeyOfT>,能够进行insert操作。- 迭代器:
RBTree要实现出迭代器,能够进行遍历。map中的[]: 对于map,我们要实现[]运算符重载;那个实现其完整的[]操作。
1. 复用红黑树框架,实现insert
首先来看如何去封装,实现map和set的框架。
模版参数:
对于三个模版参数K , T , KeyOfT,各有什么用呢?
key和T就不多解释了,在了解源码时已经知道了它们的作用。
KeyOfT的作用是什么?
首先我们知道,红黑树我们修改成
K , T结构之后,我们在insert的时候函数参数是T,我们并不知道T是K还是pair<K , V>;那我们如何去进行大小比较呢?
这里我们要看一下pair<K , V>的比较方法是什么
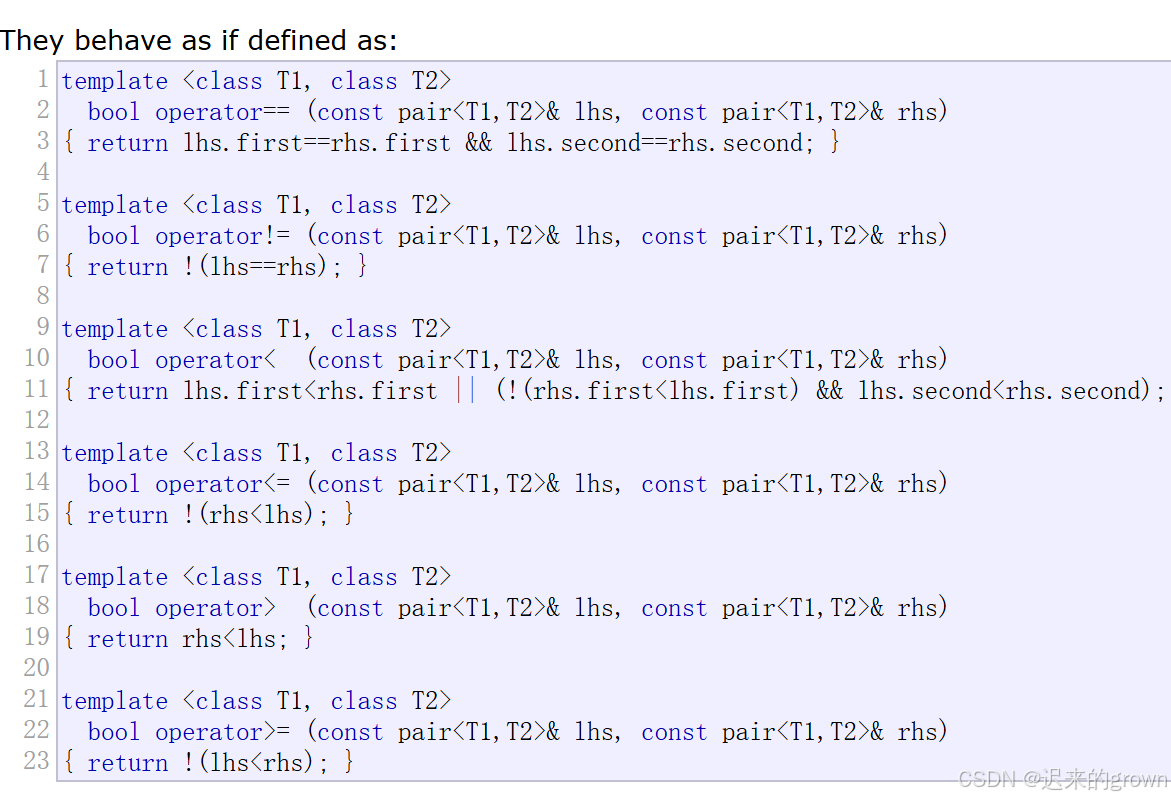
可以看到库里面pair的比较方法是先比较first,first大就大,first小就小;如果相等那就比较second。
我们不想要这样的比较方法,我们就想要单纯的比较K也就是first。(这里我们想要的比较方法,关键我们需要拿到K)
现在,KeyOfT的作用就体现出来了:
KeyOfT是一个仿函数,它重载了operator()方法,它的作用就是返回T中的K;如果
T是K那就直接返回,如果T是pair<K , V>就返回其中的K。
那我们在RBTree怎么知道T要返回的是什么呢?(显然是无法知道的,但是上层复用的肯定知道;所以我们就在set和map中写好SetKeyOfT和MapKeyOfT,将其放在第三个模版参数的位置;这样我们在下层RBTree中就能够拿到T中的K了。
支持insert实现
现在就对于上述来修改我们之前实现好的RBTree代码。
RBTree.h:
cpp
enum Color
{
	RED,
	BLACK,
};
//RBTree节点
template<class T>
struct RBTreeNode
{
	RBTreeNode* _left;
	RBTreeNode* _right;
	RBTreeNode* _parent;
	T _data;
	Color _col;
	RBTreeNode(const T& data)
		:_data(data)
		, _left(nullptr)
		, _right(nullptr)
		, _parent(nullptr)
		,_col(RED)
	{}
};
template<class K, class T,class KOT>
class RBTree
{
	typedef RBTreeNode<T> Node;
public:
	bool insert(const T& data)
	{
		if (_root == nullptr)//空树插入
		{
			_root = new Node(data);
			_root->_col = BLACK;
			return true;
		}
		//非空树插入
		Node* tail = _root;
		Node* parent = nullptr;
		KOT kot;
		while (tail)
		{
			if (kot(data) > kot(tail->_data))
			{
				parent = tail;
				tail = tail->_right;
			}
			else if (kot(data) < kot(tail->_data))
			{
				parent = tail;
				tail = tail->_left;
			}
			else
			{
				return false;
			}
		}
		Node* cur = new Node(data);
		cur->_col = RED;//新插入节点一定是红色
		cur->_parent = parent;
		if (kot(cur->_data) > kot(parent->_data))
		{
			parent->_right = cur;
		}
		else if (kot(cur->_data) < kot(parent->_data))
		{
			parent->_left = cur;
		}
		//这里当父节点存在且为红色时就一直循环
		//直到父节点不存在或者父节点的颜色为黑色
		while (parent && parent->_col == RED)
		{
			Node* grandfather = parent->_parent;
			if (parent == grandfather->_left)
			{
				//
				Node* uncle = grandfather->_right;
				if (uncle && uncle->_col == RED) //变色
				{
					uncle->_col = parent->_col = BLACK;
					grandfather->_col = RED;
					cur = grandfather;
					parent = cur->_parent;
				}
				else
				{
					if (cur == parent->_left)//右单旋+变色
					{
						RevoleR(grandfather);
						parent->_col = BLACK;
						grandfather->_col = RED;
						break;
					}
					else//左右双旋+变色
					{
						RevoleL(parent);
						RevoleR(grandfather);
						cur->_col = BLACK;
						grandfather->_col = RED;
						break;
					}
				}
			}
			else
			{
				Node* uncle = grandfather->_left;
				if (uncle && uncle->_col == RED)//变色
				{
					uncle->_col = parent->_col = BLACK;
					grandfather->_col = RED;
					cur = grandfather;
					parent = cur->_parent;
				}
				else
				{
					if (cur == parent->_right)//左单旋+变色
					{
						RevoleL(grandfather);
						parent->_col = BLACK;
						grandfather->_col = RED;
						break;
					}
					else //右左双旋+变色
					{
						RevoleR(parent);
						RevoleL(grandfather);
						cur->_col = BLACK;
						grandfather->_col = RED;
						break;
					}
				}
			}
		}
		_root->_col = BLACK;
		return true;
	}
private:
	void RevoleR(Node* parent) //右单旋
	{
		Node* subl = parent->_left;
		Node* sublr = parent->_left->_right;

		parent->_left = sublr;
		if (sublr)
			sublr->_parent = parent;
		Node* ppNode = parent->_parent;
		parent->_parent = subl;
		subl->_parent = ppNode;
		if (ppNode == nullptr)
		{
			_root = subl;
		}
		else
		{
			if (parent == ppNode->_left)
			{
				ppNode->_left = subl;
			}
			else if (parent->_right)
			{
				ppNode->_right = subl;
			}
		}
	}
	void RevoleL(Node* parent)//左单旋
	{
		Node* subr = parent->_right;
		Node* subrl = parent->_right->_left;

		parent->_right = subrl;
		if (subrl)
			subrl->_parent = parent;

		Node* ppNode = parent->_parent;
		parent->_parent = subr;
		subr->_left = parent;
		subr->_parent = ppNode;
		if (ppNode == nullptr)
		{
			_root = subr;
		}
		else
		{
			if (parent == ppNode->_left)
			{
				ppNode->_left = subr;
			}
			else if (parent == ppNode->_right)
			{
				ppNode->_right = subr;
			}
		}
	}
	Node* _root = nullptr;
};myset.h:
cpp
namespace HL
{
	template<class K>
	class set
	{
		struct SetKeyOfT
		{
			const K& operator()(const K& key)
			{
				return key;
			}
		};
	public:
		set() {}
		bool insert(const K& k)
		{
			return _rb.insert(k);
		}
	private:
		RBTree<K,const K, SetKeyOfT> _rb;
	};
}mymap.h:
cpp
namespace HL
{
	template<class K,class V>
	class map
	{
		struct MapKeyOfT
		{
			const K& operator()(const pair<const K,V>& kv)
			{
				return kv.first;
			}
		};
	public:
		map() {}
		bool insert(const pair<const K, V>& kv)
		{
			return _rb.insert(kv);
		}
	private:
		RBTree<K, pair<const K, V>, MapKeyOfT> _rb;
	};
}
2. 实现iterator,完成set和map的迭代器遍历
对于RBTree的迭代器,它和list的迭代器是非常相似的,都是对于节点的指针进行封装来实现的;通过实现运算符重载来让迭代器能够像指针那样一样的访问行为。
运算符重载
这里先简单来实现operator==、operator!=、operator*、operator->等这些简单一些的运算符重载
cpp
template<class T,class Ref, class Ptr>
struct RBTreeIterator
{
	typedef RBTreeNode<T> Node;
	typedef RBTreeIterator<T, Ref, Ptr> Self;
	Node* _node;
	RBTreeIterator(Node* node,Node* root)
		:_node(node)
	{}
	Ref operator* ()
	{
		return _node->_data;
	}
	Ptr operator->()
	{
		return &_node->_data;
	}
	bool operator==(const Self& it)
	{
		return _node == it._node;
	}
	bool operator!=(const Self& it)
	{
		return _node != it._node;
	}
};operator++重载实现
这里operator++和operator--是重点也是难点;我们知道map和set的迭代器走的都是中序遍历因为中序遍历是有序的。
而中序遍历(左子树->根节点->右子树),那我们begin()返回的就是中序遍历的第一个节点位置的迭代器。
**迭代器++**的核心逻辑就是,遍历完当前位置,应该遍历哪一个位置?
所以我们就只需要考虑下一个节点位置在哪即可。
中序遍历的顺序:
左子树->根节点->右子树我们优先考虑该节点的右子树,(因为遍历到当前节点时,就说明
左子树和当前节点已经遍历完了);
- **如果当前节点的右子树不为空:**那就找到其
右子树中的最左节点,该节点就是当前节点中序遍历的下一个节点。- 如果当前节点的右子树为空: 如果当前节点的右子树为空,就代表当前节点所在子树已经访问完了;
要访问下一个节点在当前节点的祖先当中,我们就需要沿着当前节点到根节点的路径中寻找下一个节点。- 那如何去找呢?其实很简单,我们根据
左子树->根节点->右子树这个顺序可以发现:如果当前节点等于其父亲节点的左子树 ,就说明父节点的左子树访问完了,要接着访问父节点;如果当前节点等于其父节点的右子树 ,就说明父节点的右子树已经访问完了,也说明以父节点为根节点的子树也访问完了,就要继续向上在祖先中寻找下一个节点。
这里当前节点的右子树不为空 很好理解,当前节点的右子树为空可能不太好理解,现在就来推理一个树来辅助理解一下。
现在有这样一个红黑树:
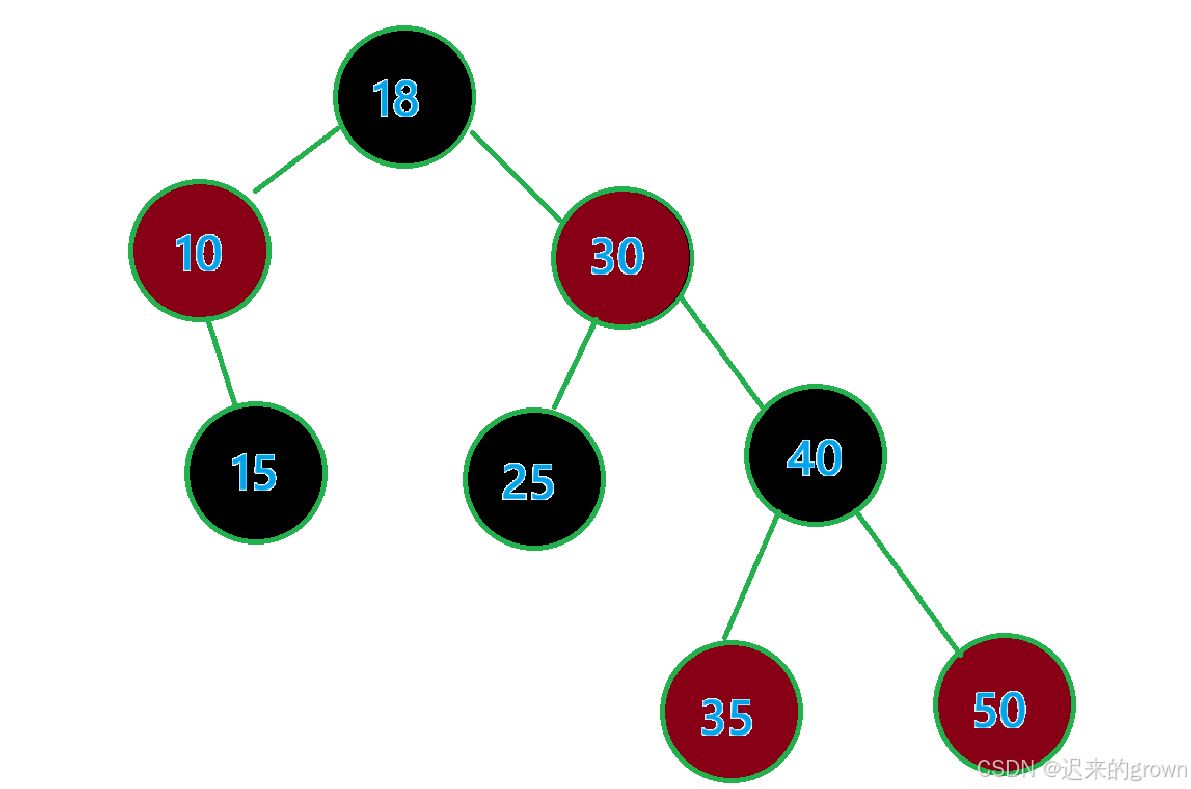
现在就从begin()位置(中序第一个)开始遍历:
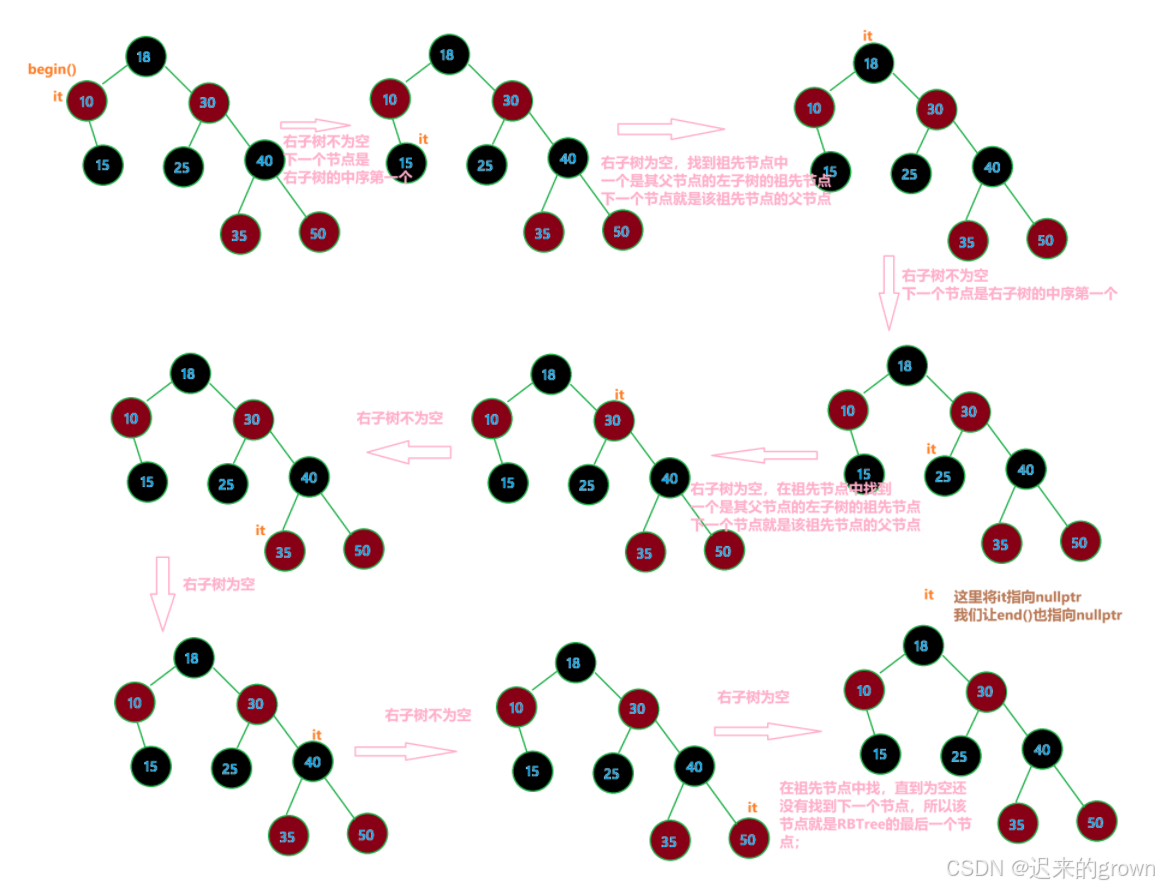
所以迭代器++的过程如上图所示,现在就来实现operator++()代码:
cpp
	Self& operator++()
	{
		if (_node->_right)
		{
			Node* cur = _node->_right;
			while (cur && cur->_left)
			{
				cur = cur->_left;
			}
			_node = cur;
		}
		else
		{
			Node* parent = _node->_parent;
			Node* cur = _node;
			while (parent && cur == parent->_right)
			{
				cur = parent;
				parent = cur->_parent;
			}
			_node = parent;
		}
		return *this;
}operator--重载实现
对于operator--的实现,大致思路和operator++是一样的;只是我们要对特殊情况进行处理
- 在上述
operator++过程中,我们end()返回的是nullptr的迭代器,所以我们在实现operator--时就要对这一特殊情况进行处理:如果当前位置是nullptr,我们就要让当前迭代器执行最后一个位置。- 那最后一个位置在哪?首先,
begin()是中序遍历(左子树->根节点->右子树)的第一个(也是该树的最左节点),那中序遍历最后一个节点就是该树的最右节点 ,所以我们按照(右子树->根节点->左子树)的顺序去找该树的最右节点,也就是中序遍历的最后一个节点。- 那这里问题就又出来了,我们当前迭代器位置是
nullptr,我们该如何找到该树的最右节点呢? (这里源码当中是使用了一个哨兵位来充当end()的位置,我们并没有去实现这个哨兵位);那如何找到该树的最右节点呢?- 其实很简单,我们这里让迭代器多了一个成员
_root表示当前树的根节点,这样我们在对end()位置--的时候,就可以通过根节点找到该树的最右节点。- 其他的思路都和
operator++一样,这里就不进行分析了。
直接来看operator--的代码实现:
cpp
	Self& operator--()
	{
		if (_node == nullptr)
		{
			Node* cur = _root;
			while (cur && cur->_right)
			{
				cur = cur->_right;
			}
			_node = cur;
		}
		else
		{
			if (_node->_left)
			{
				Node* cur = _node->_left;
				while (cur->_left)
				{
					cur = cur->_right;
				}
				_node = cur;
			}
			else
			{
				Node* parent = _node->_parent;
				Node* cur = _node;
				while (parent && cur == parent->_left)
				{
					cur = parent;
					parent = cur->_parent;
				}
				_node = parent;
			}
		}
		return *this;
	}
这里迭代器相比于上面写的多了一个成员变量
root,所以最终实现的简易迭代器代码如下:
cpp
template<class T, class Ref, class Ptr>
struct RBTreeIterator
{
	typedef RBTreeNode<T> Node;
	typedef RBTreeIterator<T, Ref, Ptr> Self;
	Node* _node;
	Node* _root;
	RBTreeIterator(Node* node, Node* root)
		:_node(node)
		, _root(root)
	{}
	Ref operator* ()
	{
		return _node->_data;
	}
	Ptr operator->()
	{
		return &_node->_data;
	}
	bool operator==(const Self& it)
	{
		return _node == it._node;
	}
	bool operator!=(const Self& it)
	{
		return _node != it._node;
	}
	Self& operator++()
	{
		if (_node->_right)
		{
			Node* cur = _node->_right;
			while (cur && cur->_left)
			{
				cur = cur->_left;
			}
			_node = cur;
		}
		else
		{
			Node* parent = _node->_parent;
			Node* cur = _node;
			while (parent && cur == parent->_right)
			{
				cur = parent;
				parent = cur->_parent;
			}
			_node = parent;
		}
		return *this;
	}
	Self& operator--()
	{
		if (_node == nullptr)
		{
			Node* cur = _root;
			while (cur && cur->_right)
			{
				cur = cur->_right;
			}
			_node = cur;
		}
		else
		{
			if (_node->_left)
			{
				Node* cur = _node->_left;
				while (cur->_left)
				{
					cur = cur->_right;
				}
				_node = cur;
			}
			else
			{
				Node* parent = _node->_parent;
				Node* cur = _node;
				while (parent && cur == parent->_left)
				{
					cur = parent;
					parent = cur->_parent;
				}
				_node = parent;
			}
		}
		return *this;
	}
};RBTree、set和map的迭代器实现
RBTree
这里begin()返回的是中序遍历的第一个位置,也就是红黑树的最左节点;而end()返回的则是nullptr位置
cpp
	typedef RBTreeIterator<T, T&, T*> Iterator;
	typedef RBTreeIterator<T, const T&, const T*> ConstIterator;
	Iterator begin()
	{
		Node* cur = _root;
		while (cur && cur->_left)
		{
			cur = cur->_left;
		}
		return Iterator(cur,_root);
	}
	Iterator end()
	{
		return Iterator(nullptr,_root);
	}
	ConstIterator begin() const
	{
		Node* cur = _root;
		while (cur && cur->_left)
		{
			cur = cur->_left;
		}
		return Iterator(cur, _root);
	}
	ConstIterator end() const
	{
		return Iterator(nullptr, _root);
}set和map
这里
set和map迭代器实现起来就简单很多了,直接对RBTree的迭代器进行复用即可,而begin()和end()就直接进行调用即可。
set
cpp
		typedef typename RBTree<K,const K, SetKeyOfT>::Iterator iterator;
		typedef typename RBTree<K,const K, SetKeyOfT>::ConstIterator const_iterator;
		iterator begin()
		{
			return _rb.begin();
		}
		iterator end()
		{
			return _rb.end();
		}
		const_iterator begin() const
		{
			return _rb.begin();
		}
		const_iterator end() const
		{
			return _rb.end();
		}
这里
typedef typename RBTree<K, K, SetKeyOfT>::Iterator iterator;中typename是告诉编译器这是个类型,让编译器在类模版实例化之后去取其中的类型名(因为编译器是按需实例化的 ,不加可能会报错)C++语法是运行这样的。
map
cpp
		typedef typename RBTree<K,pair<const K,V>,MapKeyOfT>::Iterator iterator;
		typedef typename RBTree<K,pair<const K,V>,MapKeyOfT>::ConstIterator const_iterator;
		iterator begin()
		{
			return _rb.begin();
		}
		iterator end()
		{
			return _rb.end();
		}
		const_iterator begin() const
		{
			return _rb.begin();
		}
		const_iterator end() const
		{
			return _rb.end();
}测试set和map
这里来测试一下实现的set和map的迭代器
cpp
void test_map()
{
	HL::map<int, int> mp;
	mp.insert({ 1,1 });
	mp.insert({ 2,2 });
	mp.insert({ 3,3 });
	mp.insert({ 4,4 });
	mp.insert({ 5,5 });
	auto it = mp.begin();
	while (it != mp.end())
	{
		cout << it->first << ": " << it->second<< endl;
		++it;
	}
	cout << endl;
	it = mp.end();
	while (it != mp.begin())
	{
		--it;
		cout << it->first << ": " << it->second << endl;
	}
	cout << endl;
}
void test_set()
{
	HL::set<int> st;
	st.insert(1);
	st.insert(2);
	st.insert(3);
	st.insert(4);
	st.insert(5);
	st.insert(6);
	st.insert(7);
	st.insert(8);
	auto it = st.begin();
	while (it != st.end())
	{
		cout << *it << " ";
		++it;
	}
	cout << endl;
	it = st.end();
	while (it != st.begin())
	{
		--it;
		cout << *it << " ";
	}
	cout << endl;
}
int main()
{
	test_set();
	test_map();
	return 0;
}
运行结果:
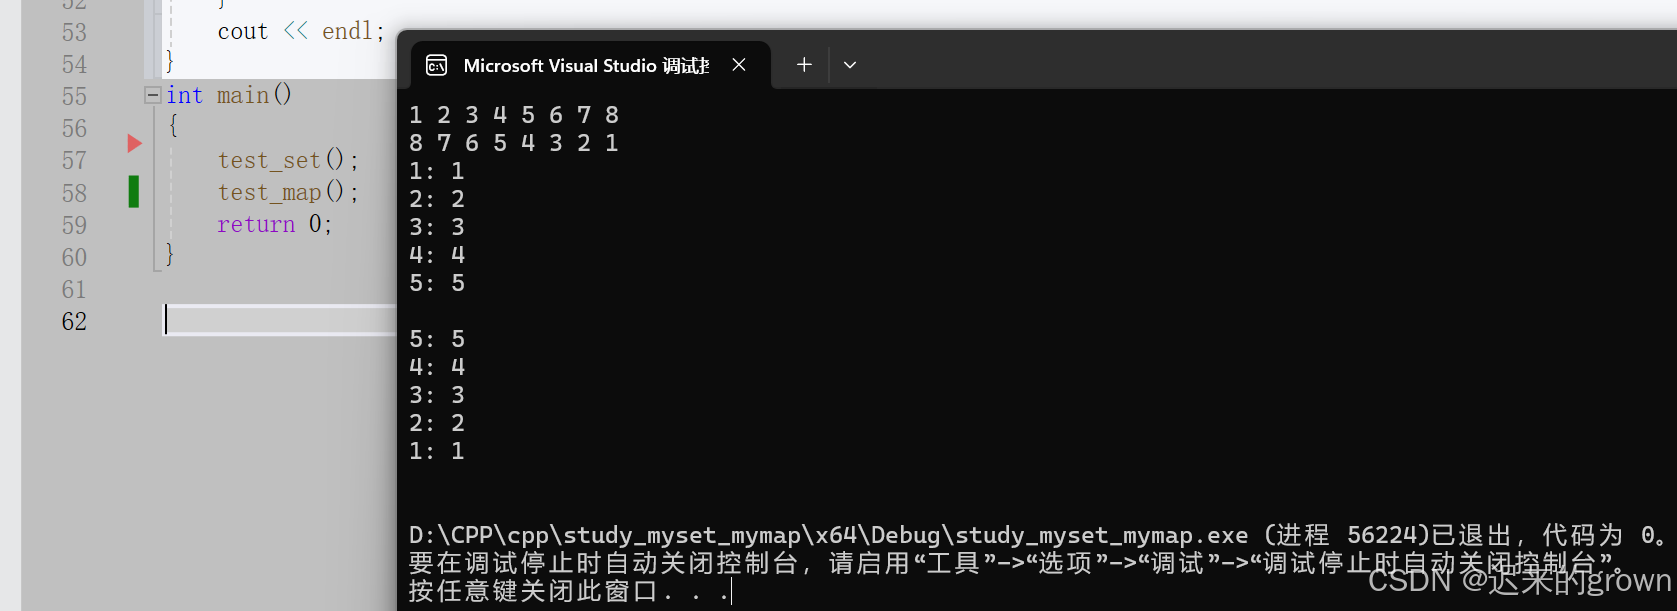
可以看到我们已经完成set和map的迭代器遍历。
三、map的operator[]的实现
对于
map的operator[],我们知道它有两种功能:一是
key存在,通过key查找value,返回value的引用;二是如果
key不存在进插入key,其对应的value是缺省值,然后返回value的引用;
所以这里不管key是否存在,我们都要返回对应的value的引用;
我们在实现时就肯定需要调用insert函数,先来看一下库里面map的insert函数
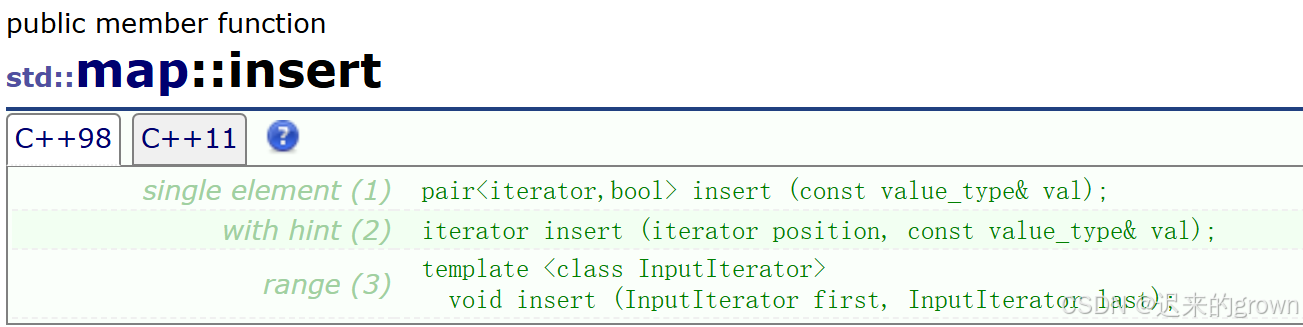
可以看到,相比于我们现在实现的insert,库里面返回的是pair<iterator , bool>类型,这样我们就能拿到插入位置的迭代器。
所以我们在实现的时候也需要这样去设计;(再结合一下insert的逻辑,如果插入值存在,我们就可以返回当前位置迭代器和false,这样就达到了我们想要的效果)
修改后的RBTreeinsert:
cpp
	pair<Iterator, bool> insert(const T& data)
	{
		if (_root == nullptr)//空树插入
		{
			_root = new Node(data);
			_root->_col = BLACK;
			//return true;
			return make_pair(Iterator(_root,_root), true);
		}
		//非空树插入
		Node* tail = _root;
		Node* parent = nullptr;
		KOT kot;
		while (tail)
		{
			if (kot(data) > kot(tail->_data))
			{
				parent = tail;
				tail = tail->_right;
			}
			else if (kot(data) < kot(tail->_data))
			{
				parent = tail;
				tail = tail->_left;
			}
			else
			{
				//return false;
				return make_pair(Iterator(tail, _root), false);
			}
		}
		Node* cur = new Node(data);
		Node* newnode = cur;
		cur->_col = RED;//新插入节点一定是红色
		cur->_parent = parent;
		if (kot(cur->_data) > kot(parent->_data))
		{
			parent->_right = cur;
		}
		else if (kot(cur->_data) < kot(parent->_data))
		{
			parent->_left = cur;
		}
		//这里当父节点存在且为红色时就一直循环
		//直到父节点不存在或者父节点的颜色为黑色
		while (parent && parent->_col == RED)
		{
			Node* grandfather = parent->_parent;
			if (parent == grandfather->_left)
			{
				//
				Node* uncle = grandfather->_right;
				if (uncle && uncle->_col == RED) //变色
				{
					uncle->_col = parent->_col = BLACK;
					grandfather->_col = RED;
					cur = grandfather;
					parent = cur->_parent;
				}
				else
				{
					if (cur == parent->_left)//右单旋+变色
					{
						RevoleR(grandfather);
						parent->_col = BLACK;
						grandfather->_col = RED;
						break;
					}
					else//左右双旋+变色
					{
						RevoleL(parent);
						RevoleR(grandfather);
						cur->_col = BLACK;
						grandfather->_col = RED;
						break;
					}
				}
			}
			else
			{
				Node* uncle = grandfather->_left;
				if (uncle && uncle->_col == RED)//变色
				{
					uncle->_col = parent->_col = BLACK;
					grandfather->_col = RED;
					cur = grandfather;
					parent = cur->_parent;
				}
				else
				{
					if (cur == parent->_right)//左单旋+变色
					{
						RevoleL(grandfather);
						parent->_col = BLACK;
						grandfather->_col = RED;
						break;
					}
					else //右左双旋+变色
					{
						RevoleR(parent);
						RevoleL(grandfather);
						cur->_col = BLACK;
						grandfather->_col = RED;
						break;
					}
				}
			}
		}
		_root->_col = BLACK;
		//return true;
		return make_pair(Iterator(newnode, _root), true);
}map中实现的operator[]:
cpp
		pair<iterator, bool> insert(const pair<const K, V>& kv)
		{
			return _rb.insert(kv);
		}
		V& operator[](const K& key)
		{
			pair<iterator, bool> ret = insert({ key, V() });
			return ret.first->second;
		}
到这里我们实现的
map就可以使用[]去访问了。
测试
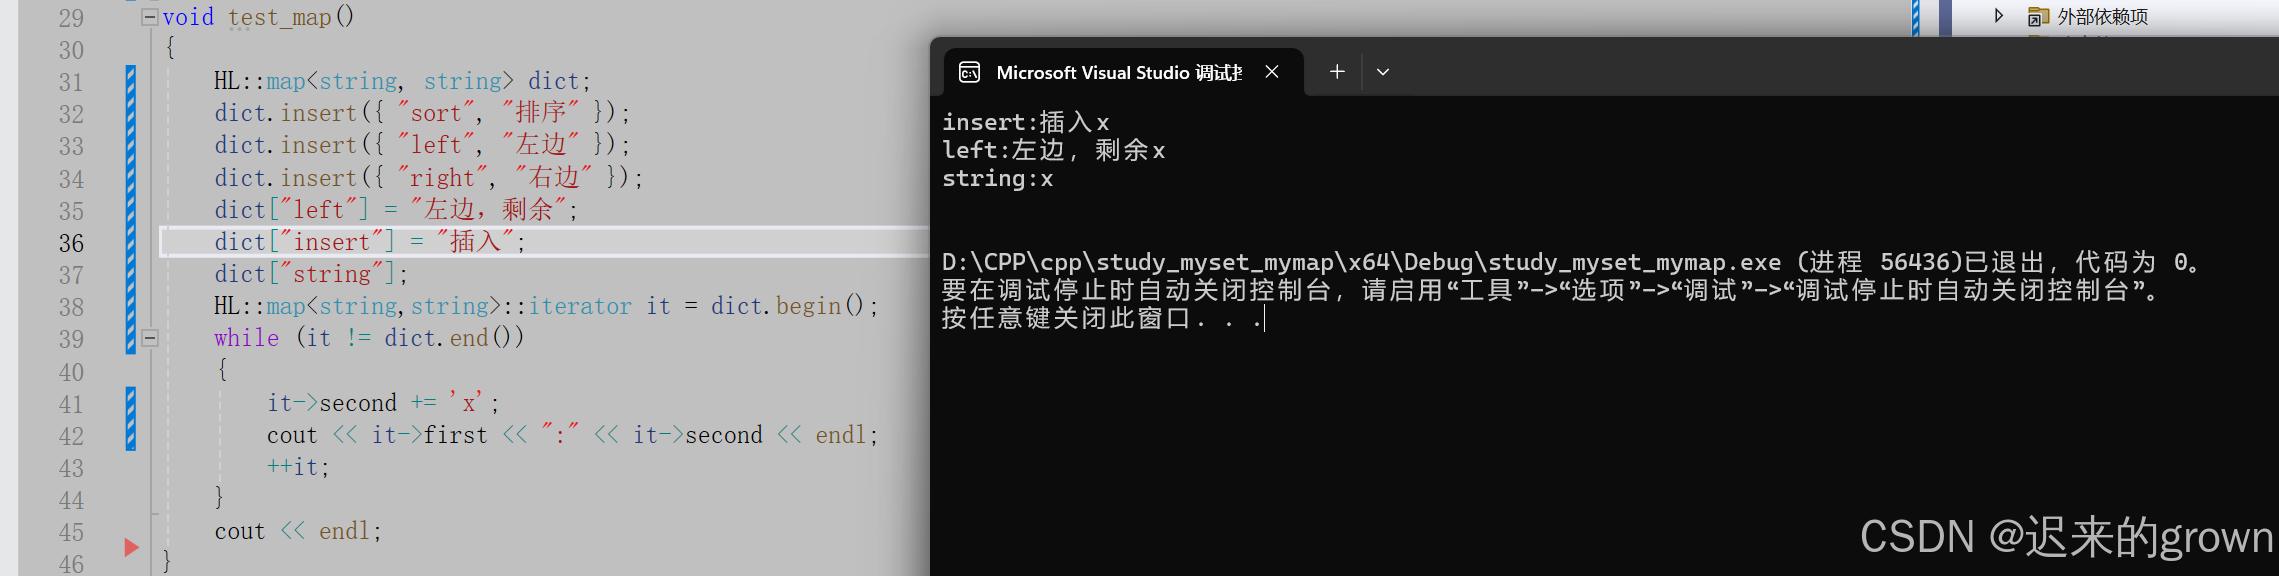
这里来测试一下我们实现的是否到达了我们预期的效果:
cpp
void test_map()
{
	HL::map<string, string> mp;
	mp.insert({ "sort", "排序" });
	mp.insert({ "left", "左边" });
	mp.insert({ "right", "右边" });
	mp["left"] = "左边,剩余";
	mp["insert"] = "插入";
	mp["string"];
	HL::map<string,string>::iterator it = mp.begin();
	while (it != mp.end())
	{
		it->second += 'x';
		cout << it->first << ":" << it->second << endl;
		++it;
	}
	cout << endl;
}
这里简单使用
map中[],是可以到达我们的预期效果的。
四、map和set的构造函数与析构函数
对于构造函数和析构函数,相对来说就非常简单了。
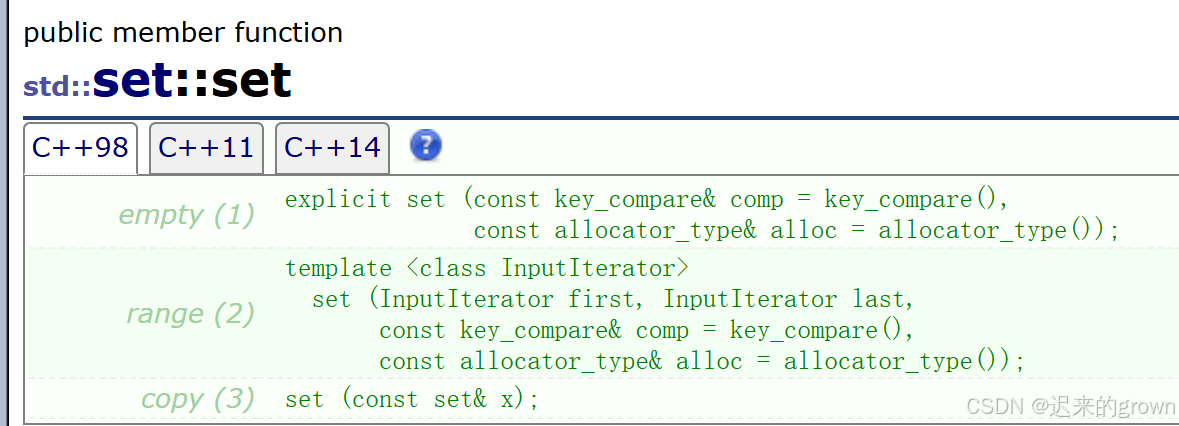
对于构造函数,我们直接进行复用insert即可。
cpp
		set() {}
		template<class InputIterator>
		set(InputIterator first, InputIterator last)
		{
			while (first != last)
			{
				_rb.insert(*first);
				first++;
			}
		}
		set(const set& x)
		{
			for (const auto& e : x)
			{
				_rb.insert(e);
			}
		}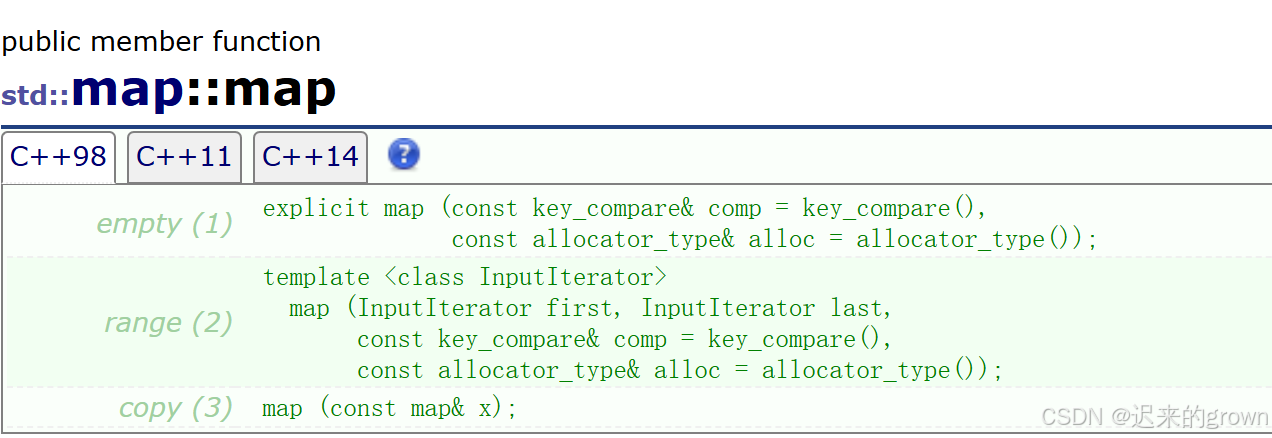
map和set一样直接调用RBTree中的insert即可。
cpp
		map() {}
		template<class InputIterator>
		map(InputIterator first, InputIterator last)
		{
			while (first != last)
			{
				_rb.insert(*first);
				first++;
			}
		}
		map(const set& x)
		{
			for (const auto& e : x)
			{
				_rb.insert(e);
			}
		}
对于析构函数,我们就要实现
RBTree的析构函数,然后在map和set中进行调用;这里就使用递归来释放每一个节点。
RBTree.h
cpp
	~RBTree()
	{
		Destroy(_root);
	}
	void Destroy(Node* root)
	{
		if (root == nullptr)
			return;
		Destrot(root->_left);
		Destrot(root->_right);
		delete root;
	}
而
map和set就直接delete即可,编译器会自动调用RBTree的析构函数。
五、总结
这里并没有去实现erase删除功能,只是简单模拟了map和set的实现。
这里简单总结几个点:
- 首先就是一个红黑树框架来封装实现
map和set- 其次就是模拟迭代器的实现,整个思路(重点:
operator++和operator--)- 然后就是
map中operator[]的特殊功能。- 最后就是构造函数、析构函数等这些简单的复用。
这里并没有实现像size、find、empty、count等函数,这些就比较简单。
到这里本篇内容就结束了,希望对你有所帮助。
制作不易,感谢大佬的支持。
我的博客即将同步至腾讯云开发者社区,邀请大家一同入驻:https://cloud.tencent.com/developer/support-plan?invite_code=2oul0hvapjsws