使用 Python 开发 MCP Server 及 Inspector 工具详解
前言
模型上下文协议 (Model Context Protocol, MCP) 是一种新兴的协议,旨在让大型语言模型 (LLM) 更容易地与外部工具和服务集成。本文将介绍如何使用 Python 开发一个 MCP Server,并详细讲解如何使用 MCP Inspector 工具进行测试和调试。
什么是 MCP?
MCP 允许 LLM 通过定义明确的接口(资源、工具和提示)与外部世界进行交互。这使得 LLM 能够访问实时信息、执行复杂计算,以及与各种应用程序和服务集成。
MCP Server 架构
MCP Server 负责处理来自 LLM 的请求,执行相应的操作,并将结果返回给 LLM。一个 MCP Server 可以提供以下三种类型的能力:
- 资源 (Resources): 类似于文件,LLM 可以读取资源的内容,例如 API 响应或文件内容。
- 工具 (Tools): 类似于函数,LLM 可以调用工具来执行特定任务,例如获取天气预报或发送电子邮件。
- 提示 (Prompts): 预定义的模板,帮助用户完成特定任务。
使用 Python 开发 MCP Server
以下是一个使用 Python 开发简单天气服务器的示例,该示例基于官方教程:
1. 环境准备
- Python 3.10 或更高版本
- 安装
uv和httpx:
bash
# MacOS/Linux
curl -LsSf https://astral.sh/uv/install.sh | sh

# Windows
powershell -ExecutionPolicy ByPass -c "irm https://astral.sh/uv/install.ps1 | iex"- 创建项目并设置虚拟环境:
bash
# MacOS/Linux
uv init weather
cd weather
uv venv
source .venv/bin/activate

# Windows
uv init weather
cd weather
uv venv
.venv\Scripts\activate- 安装依赖:
bash
uv add "mcp[cli]" httpx- 创建服务器文件
weather.py。
2. 代码实现 (weather.py)
python
from typing import Any
import httpx
from mcp.server.fastmcp import FastMCP

# 初始化 FastMCP 服务器
mcp = FastMCP("weather")

# 常量
NWS_API_BASE = "https://api.weather.gov"
USER_AGENT = "weather-app/1.0"

async def make_nws_request(url: str) -> dict[str, Any] | None:
    """向 NWS API 发起请求,并进行错误处理。"""
    headers = {
        "User-Agent": USER_AGENT,
        "Accept": "application/geo+json"
    }
    async with httpx.AsyncClient() as client:
        try:
            response = await client.get(url, headers=headers, timeout=30.0)
            response.raise_for_status()
            return response.json()
        except Exception:
            return None

def format_alert(feature: dict) -> str:
    """将警报信息格式化为可读字符串。"""
    props = feature["properties"]
    return f"""
Event: {props.get('event', 'Unknown')}
Area: {props.get('areaDesc', 'Unknown')}
Severity: {props.get('severity', 'Unknown')}
Description: {props.get('description', 'No description available')}
Instructions: {props.get('instruction', 'No specific instructions provided')}
"""

@mcp.tool()
async def get_alerts(state: str) -> str:
    """获取美国州的天气警报。

    Args:
        state: 美国州的代码 (例如 CA, NY)
    """
    url = f"{NWS_API_BASE}/alerts/active/area/{state}"
    data = await make_nws_request(url)

    if not data or "features" not in data:
        return "Unable to fetch alerts or no alerts found."

    if not data["features"]:
        return "No active alerts for this state."

    alerts = [format_alert(feature) for feature in data["features"]]
    return "\n---\n".join(alerts)

@mcp.tool()
async def get_forecast(latitude: float, longitude: float) -> str:
    """获取地点的天气预报。

    Args:
        latitude: 地点的纬度
        longitude: 地点的经度
    """
    points_url = f"{NWS_API_BASE}/points/{latitude},{longitude}"
    points_data = await make_nws_request(points_url)

    if not points_data:
        return "Unable to fetch forecast data for this location."

    forecast_url = points_data["properties"]["forecast"]
    forecast_data = await make_nws_request(forecast_url)

    if not forecast_data:
        return "Unable to fetch detailed forecast."

    periods = forecast_data["properties"]["periods"]
    forecasts = []
    for period in periods[:5]:
        forecast = f"""
{period['name']}:
Temperature: {period['temperature']}°{period['temperatureUnit']}
Wind: {period['windSpeed']} {period['windDirection']}
Forecast: {period['detailedForecast']}
"""
        forecasts.append(forecast)

    return "\n---\n".join(forecasts)

if __name__ == "__main__":
    # 初始化并运行服务器
    mcp.run(transport='stdio')
3. 运行服务器
bash
uv run weather.pyMCP Inspector 工具详解
MCP Inspector 是一个交互式开发工具,用于测试和调试 MCP 服务器。
1. 安装和基本用法
Inspector 直接通过 npx 运行,无需安装:
bash
npx @modelcontextprotocol/inspector <command>
npx @modelcontextprotocol/inspector <command> <arg1> <arg2>
2. 检查来自 NPM 或 PyPi 的服务器
bash
# NPM 包
npx -y @modelcontextprotocol/inspector npx <package-name> <args>
# For example
npx -y @modelcontextprotocol/inspector npx server-postgres postgres://127.0.0.1/testdb

# PyPi 包
npx @modelcontextprotocol/inspector uvx <package-name> <args>
# For example
npx @modelcontextprotocol/inspector uvx mcp-server-git --repository ~/code/mcp/servers.git
3. 检查本地开发的服务器
bash
# TypeScript
npx @modelcontextprotocol/inspector node path/to/server/index.js args...

# Python
npx @modelcontextprotocol/inspector \
  uv \
  --directory path/to/server \
  run \
  package-name \
  args...
4. Inspector 界面功能概览
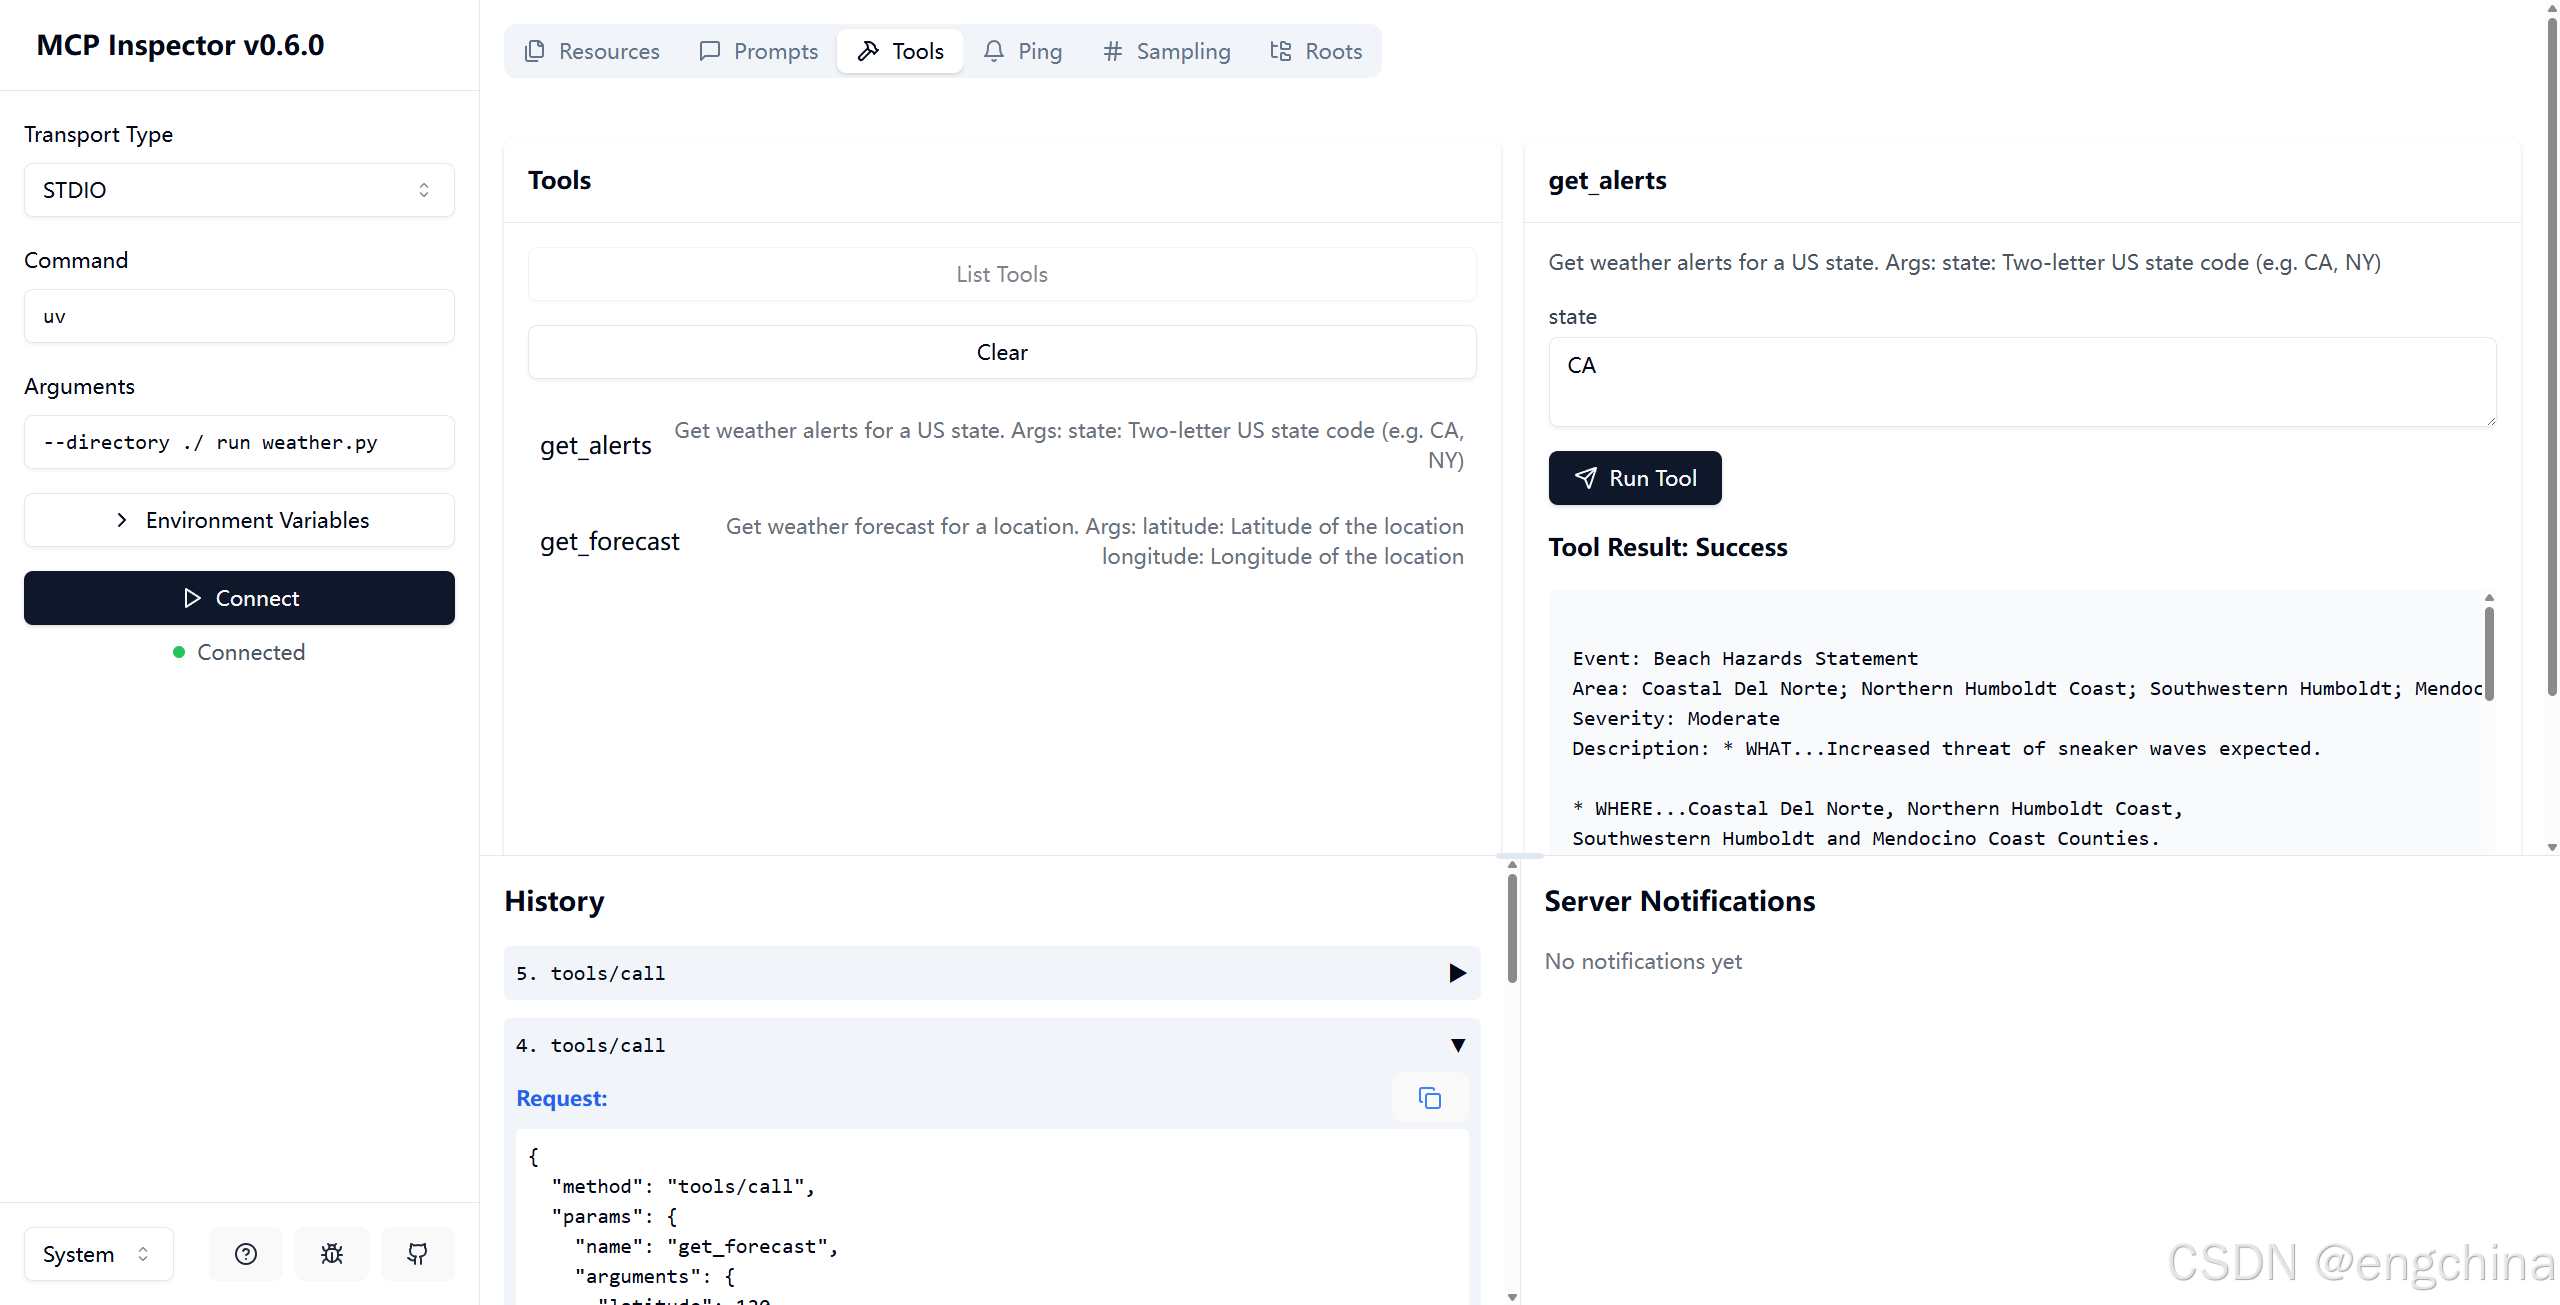
- 服务器连接面板 (Server connection pane): 选择连接服务器的传输方式,并可自定义命令行参数和环境变量(对于本地服务器)。
- 资源标签 (Resources tab): 列出所有可用的资源,显示资源元数据(MIME 类型、描述),允许资源内容检查,支持订阅测试。
- 提示标签 (Prompts tab): 显示可用的提示模板,显示提示参数和描述,启用带有自定义参数的提示测试,预览生成的消息。
- 工具标签 (Tools tab): 列出可用的工具,显示工具模式和描述,启用带有自定义输入的工具测试,显示工具执行结果。
- 通知面板 (Notifications pane): 呈现服务器记录的所有日志,显示服务器收到的通知。
5. 最佳实践
- 开发流程:
- 启动 Inspector 并连接服务器。
- 验证基本连接和能力协商。
- 迭代测试:修改服务器代码,重建服务器,重新连接 Inspector,测试受影响的功能,监控消息,测试边缘情况(无效输入、缺失参数、并发操作)。
- 错误处理验证: 确保服务器能够正确处理错误输入和并发操作,并返回相应的错误响应。
总结
本文介绍了使用 Python 开发 MCP Server 的基本步骤,以及如何使用 MCP Inspector 工具进行测试和调试。通过使用 MCP,开发者可以更轻松地将 LLM 与外部工具和服务集成,从而扩展 LLM 的能力。希望本文能帮助您快速入门 MCP 开发。
参考资料