Light > Mode(或者 Render Mode):
Auto(自动)
Important(重要)
Not Important(不重要)
渲染优先级设置
当你使用 Forward 渲染路径 时:
🌟 Important 会强制这个光源作为 逐像素光源(Per-Pixel Light),即:
-
即使已经超过了
Quality Settings中的 Pixel Light Count 限制 -
它依然会参与 ForwardAdd Pass 进行逐像素光照计算
什么是 Pixel Light Count?
路径:
Edit > Project Settings > Quality > Pixel Light Count
这个参数定义了:
在 Forward 渲染路径下,最多多少个光源可以作为逐像素光源
-
超过这个数量,剩下的光源会降级为逐顶点光照(效率高但不真实)
-
Unity 会根据光源和摄像机的距离来排序选中最重要的光源
每个光源类型:与逐像素 / 逐顶点没直接关系
对的 ✅
-
Unity 支持的光源类型有:Directional、Point、Spot、Area(仅烘焙)
-
但它们是不是以逐像素方式参与渲染,不是由光源类型决定,而是由:
✅ Render Mode(Auto / Important / Not Important)
✅ Pixel Light Count(质量设置)
✅ 当前渲染路径(Forward / Deferred)
这三者共同决定:
👉 这个光源是否以逐像素(Per-Pixel)方式处理,还是被降级为逐顶点(Per-Vertex)。
一个光源的
Render Mode(Important / Auto / Not Important)决定它是否以"逐像素"方式影响某个物体吗?
**✅ 是的,但不是它"自己决定",而是 Unity 在渲染该物体时,综合多个条件判断是否"以逐像素方式处理这个光源"对这个物体生效。
-
Unity 内置 Forward 渲染中,只允许一个 Directional Light 被当作主光源(Main Light)
-
它参与
ForwardBasepass,拥有:-
逐像素计算
-
阴影贴图(_ShadowMapTexture)
-
环境球谐光(SH)融合
-
你 Shader 里
_WorldSpaceLightPos0就是它。
-
如果光源设置为
Important或在范围内排进 Pixel Light Count -
Unity 会用
ForwardAddpass 为每个光源 单独再渲染一次
所以一个物体有多个逐像素光源时,实际会被多次 DrawCall 绘制
光源为auto时,个数在pixellightcount以内的光源 都是 逐像素光源。(Forward Add)
关键理解:光源不是物体的属性,而是场景中独立存在的"全局影响者"
👉 光源(Light)是场景级别的对象,不是物体的组件属性。
-
它不"附属"在某个 MeshRenderer 或材质上
-
它存在于场景中,并通过光照算法影响所有在它影响范围内的物体
"一个物体有多个逐像素光源" 实际意思是:
这个物体在渲染时,被多个光源同时照亮,而且这些光源都是以逐像素精度来参与光照计算的。
它的本质是:
-
一个物体 渲染时,Unity 会判断哪些光源影响到它
-
然后根据光源的设置(Important / Pixel Count 排名等)
-
决定:
-
哪些光源对它是逐像素光照(需要额外渲染一次 ForwardAdd)
-
哪些降级为逐顶点光照或不计算
-
光源影响范围是怎么判断的?
Unity 使用的方式是:
-
光源的 影响范围(Point Light 半径、Spot 光锥) 与物体 AABB(包围盒)是否相交
-
再根据渲染路径(Forward/Deferred)决定它是否被纳入当前物体的光照列表中
Deferred 渲染路径下:
-
所有光源都被视为逐像素光源(Deferred 统一光照)
-
Render Mode 不影响是否逐像素,而是用于排序 / 优先级 / 阴影开关控制

渲染路径(Render Path) 是 渲染管线(Render Pipeline)中的一个具体"光照执行策略",是管线内部的子选项,不是独立的系统。
举个例子说明区别:
🎮 Built-in 渲染管线下(默认老版 Unity 项目):
你可以选择的 Render Path(渲染路径) 有:
| 渲染路径 | 意思 |
|---|---|
| Forward | 逐物体光照,光源 pass 多,适合透明物体 |
| Deferred | 延迟光照,先 G-buffer 后统一光照,适合多光源场景 |
| Legacy Vertex Lit | 全部逐顶点光照,效率高但画质差 |
这些路径++可以在 Camera 设置中自由切换++,是管线的内部分支策略。
而如果你是用 URP / HDRP(基于 SRP 的渲染管线):
-
没有
Render Path这个概念暴露给用户了 -
URP 默认采用 Forward+ 渲染策略,但不再由 Camera 控制,而是由 URP 的 PipelineAsset 决定
-
渲染逻辑由 SRP C# 脚本驱动,你要改必须改管线代码或配置项
Frame Debugger 就是一个"分解显卡渲染调用"的实时调试工具,能让你看到 Unity 每一帧是怎么一步步画出画面的。
BasePass(也叫 ForwardBase)
- 在 Forward 渲染路径 中,每个++物体++ ++都++会先经历一次主 Pass,叫 BasePass(或 ForwardBase)
默认会把主光源的阴影也一并计算进去
Directional Light
-
是唯一会作为"主光源"进入 BasePass 的光源类型
-
Directional Light 开启了 Cast Shadows(投射阴影)
-
并且 URP / Built-in 管线开启了 Shadow Support
还是要先学hlsl
unity直接引用太乱了

ForwardAdd 是用于处理「除主光源之外的每一个逐像素光源
Blend One One = 前一帧的结果 + 当前颜色(累加光照)
CGPROGRAM ... ENDCG 启动 Unity 的 CG/HLSL 编写区域
#pragma multi_compile_fwdadd 根据这个指令编译多个版本的 Shade,会自动包含这些关键词:_POINT, _SPOT, _ADDITIONAL_LIGHT_SHADOWS, _LIGHT_COOKIES
#pragma vertex vert 告诉 Unity:顶点着色器函数名是 vert
#include "Lighting.cginc"
这里面包含了:
Lambert, BlinnPhong, Unity_GlossyEnvironment 等核心光照函数
多种标准光照模型的定义
Unity 的内置变量结构(比如光源颜色、衰减等)
#include "AutoLight.cginc"
所有的 HLSL / CG 代码必须写在 CGPROGRAM ... ENDCG 或 HLSLPROGRAM ... ENDHLSL 块内部
因为 Unity ShaderLab 文件本质上是分层语言结构,分为:
| 区域 | 用途 | 支持语法 |
|---|---|---|
| ShaderLab 部分 | 定义 Shader 框架、Pass、标签、材质属性、混合方式等 | 只能用 ShaderLab 指令(如 Tags、Pass、Blend、LOD 等) |
CGPROGRAM / HLSLPROGRAM |
编写具体的 GPU 渲染逻辑 | 才能写 CG / HLSL 语言(变量、函数、结构体等) |
CGPROGRAM vs HLSLPROGRAM
| 写法 | 区别 |
|---|---|
CGPROGRAM ... ENDCG |
历史上为 CG 语言设计,但可写 HLSL(Unity 会转) |
HLSLPROGRAM ... ENDHLSL |
标准 HLSL,推荐在 URP/HDRP 或自定义 SRP 中使用 |
HLSL/CG 是运行在 GPU 上的代码,而 Unity 的渲染系统负责在 CPU 层把游戏物体、光源、动画等数据统一收集、转换成 GPU 能理解的变量,然后通过 Material 把这些数据传给 Shader 去计算。
所以 HLSL/CG 不是"独立的逻辑孤岛",而是 Unity 渲染管线的执行端
Unity 不自己"做渲染",它只是:
-
把场景中各种数据(光源位置、物体矩阵、摄像机视角、阴影图等)
-
转换成 GPU 能读懂的变量(uniform)
-
然后交给 Shader 的 HLSL 代码去"算每一个像素该怎么显示"
举个真实的例子:
你写了这样的 Shader:
float4 _MainLightColor;
float4x4 unity_ObjectToWorld;
float3 _WorldSpaceLightPos0;
这些变量你并没有赋值。那它怎么会有数据?
✅ 这是 Unity 在每一帧渲染前,自动把这些从游戏引擎(CPU 层)中的 光源信息 / 物体变换矩阵 / 摄像机数据,通过 Material + GPU uniform 机制传入进来的!


"How can a Shader affect every pixel on screen, when it's just bound to a material on one GameObject?"


A mesh is stored as a series of arrays that store all the information about the vertices and normals.
a UV array that specifies how a texture is wrapped onto a model

"a point on a polygon"
其实就是在说:3D 模型表面某一个平面区域上的某个位置,而这个区域被称为 polygon。

viewDir 提供了模型当前被观察的方向信息,
它可以让你编写 Shader 来根据摄像机视角动态改变表面外观。
一个例子就是边缘光(rim lighting)效果。
worldPos 给出了当前处理的顶点在世界空间中的坐标,
它让你可以根据世界位置来决定 Shader 的行为。
比如说:只在某个世界位置范围内显示材质,而其他地方不显示。
worldRefl 是一个包含反射信息的向量,它能帮助你把图像反射到模型表面上。
这在你想做出镜面高光或金属反光材质时非常有用。
你可以在 Input 结构体中加入任意多个你想使用的输入属性,以实现你想要的 Shader 效果。
记住:只需要包含你真正要用的属性就够了,
因为没有必要占用额外的内存去存储你用不到的数据。
Shader 是计算代价很高的东西。

网格是一系列 包含了顶点和法线的所有信息 的数组
数组包括:一个顶点数组(Vertex Array),其中记录了每个角的三维坐标;一个法线数组(Normal Array),对应每个顶点的法线向量;
一个 UV 数组,用于指定纹理如何包裹到模型表面上;以及一个包含每个三角形多边形的数组。
UV 属于每一个顶点,并且在法线朝向观察者的一面,它们始终按照逆时针顺序排列。
如果整个图像要被拉伸覆盖到一个多边形上,那么 UV 值会从 0 到 1。
但如果只需要图像的一半,那么某些坐标就会是 0.5。
每个顶点的坐标都被列在顶点数组中。对于每个顶点,其对应的法线也记录在法线数组中。
三角形数组按照每三个顶点一组进行排列,每组三元组表示一个组成网格表面的三角形。
What is a mesh?
-
A mesh is the entire 3D object surface made from many small flat faces.
-
These flat faces are usually triangles , or more generally, polygons.
👉 Think of a mesh like this:
Mesh = 顶点 + 三角形面片(polygon)组成的结构
-
A polygon is a flat surface in 3D space, made from multiple vertices.
-
In modern 3D graphics, almost all polygons are triangles (three-sided polygons).
-
所以"polygon"就是"网格中组成面的基本单元"。
一个网格可以拥有多个 UV 集。
比如说,当一个模型表面上要叠加多张图像时,就可能会使用多个 UV。
在 Unity 中,最多允许使用两套 UV。
UV 可以通过程序生成,但通常是在模型被赋予纹理时,在 3D 建模软件中指定的。
Shader 代码中,Input 结构体就是你声明所需网格数据的地方,这些数据会在 Shader 函数中用到。
Surface Shader 函数需要一个 Input 结构体,即使你暂时不打算使用它。因此我们现在的这个结构体只是一个占位符。
不过,一旦你通过输入结构体获取到了网格数据,你就可以创建各种酷炫的视觉效果了。
你可以通过 uv 或 uv2 加上纹理名的方式获取 UV 值。
这些数据可以用来把纹理图映射到你的网格上。

different Types of array,
Vertex array holding each corners 3D coordinates
Normal array with each of the vertices Normal
UV array that specifies how a texture is wrapped onto a model


same ,for Normal and

but the concerned values of each array is different and separate


An example of this would be to show (and not to show) a material on the surface of an object based on

a cube-mapped image (such as a skybox) to achieve things like environment reflections)

Not exactly the same --- but they are linked by naming convention
-
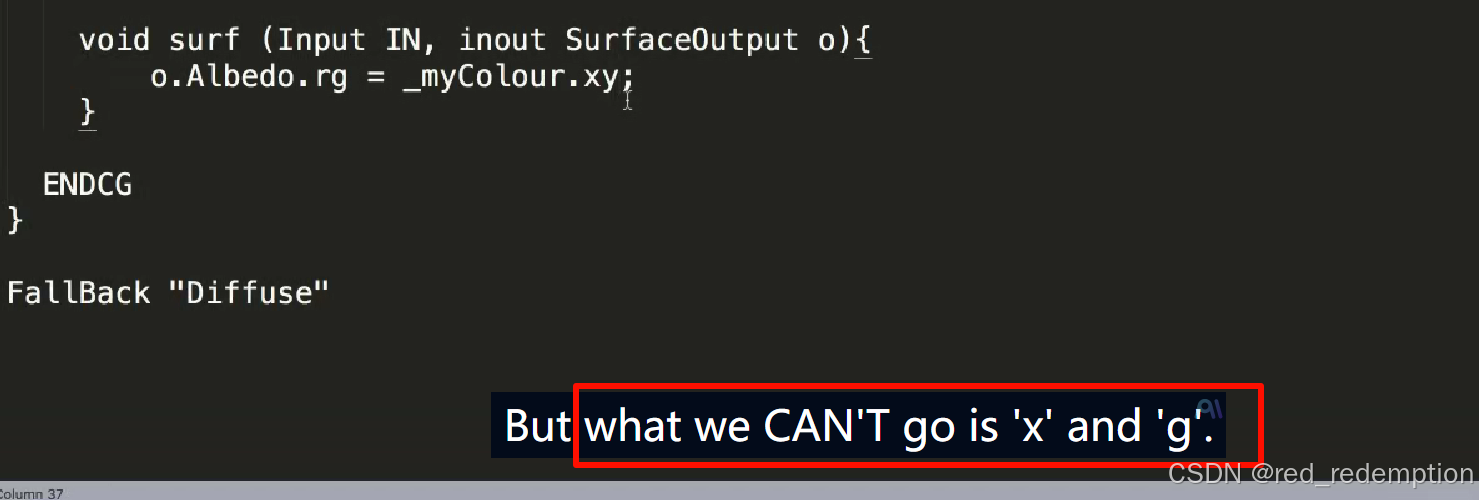
_myTex= texture variable -
uv_myTex= UV coordinates corresponding to_myTex

_myTex
-
This is a sampler2D --- a reference to a GPU texture resource
-
It's declared in the shader:
IN.uv_myTex
-
This is a float2 UV coordinate passed from the
Inputstruct -
It tells the shader where on the texture to sample
that's how the colors from the texture become the colors of the albedo setting on your model.
o.Albedo = ...
-
ois the output of the Surface Shader (SurfaceOutputstruct) -
.Albedois the base color of the material (diffuse) -
So this sets the visible color of the surface from the texture lookup
In Unity (or any GPU pipeline), a "shader" is not just the file --- it's more specifically:
👉 A program that runs on the GPU , and is compiled from the code in the
.shaderfile.
So:
-
The
.shaderfile you write = a script that defines how Unity generates GPU programs -
But the actual shader = the compiled code (vertex shader + fragment shader) that runs per object / per pixel
now see how that world reflection value takes note of the position of where the skybox would be

notice the cube is a mikiway,and it exist in the reflection
how the viewer or camera angle has no effect on the brightness calculation for Lambert,

This is the job of a normal map. Instead of having one normal on a flat surface, a normal map produces

They don't actually modify the geometry of the mesh.
Lambert lighting treats it as flat and lights it evenly across the surface.


= "bump"
does not mean "this is a bump map" directly in code --- but it tells Unity to treat the default texture as a bump/normal map when no texture is assigned in the editor.


In shaders, normal maps store this vector in tangent space using RGB:
-
R → X(left-right tilt) -
G → Y(up-down tilt) -
B → Z(how much it points "outward")
If you change it:
-
You distort the vector
-
The shader might calculate invalid lighting (e.g. very dark or overbright)
-
In extreme cases, lighting will break (look wrong or "inside-out")
"So don't touch the Z!"
It keeps the normal "pointing outward" from the surface --- which is essential for proper lighting.
| Component | What it controls | Safe to change? | Visual result |
|---|---|---|---|
| X | Side-to-side tilt | ✅ Yes | Lighting shifts left/right |
| Y | Up/down tilt | ✅ Yes | Lighting shifts up/down |
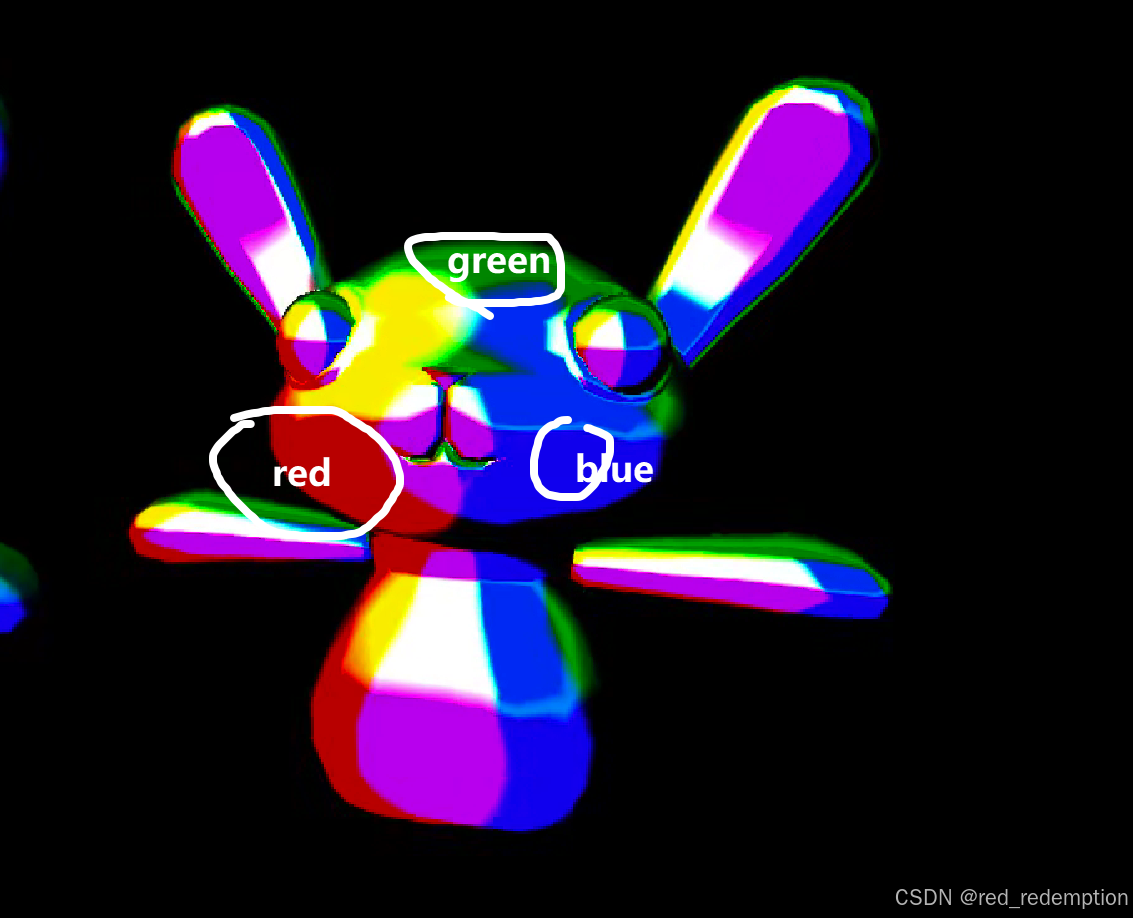
if you compare the normal with the world reflection vectors, is that the normals are blended across the surface giving a smooth appearance, whereas the others have much harder divisions.
o.Emission = texCUBE(_myCube, WorldReflectionVector(IN, o.Normal)).rgb;
Use a cubemap texture (_myCube) to simulate reflections on the surface,
by looking up the world reflection vector based on the surface normal,
and apply that reflected color as the surface's emissive glow (not affected by lighting).
texCUBE(_myCube, ...)
-
This samples a cubemap texture (a 3D environment texture that surrounds the world).
-
The lookup direction is a vector in 3D space , like
(0.3, 0.7, -0.2)
_myCube
-
This is the cubemap texture, declared as:
samplerCUBE _myCube;
WorldReflectionVector(IN, o.Normal)
-
This is a built-in Unity function that computes the world-space reflection direction:
-
It uses the view direction (from the camera) and
-
The surface normal (
o.Normal)
-

.rgb
- You extract the color (no alpha) from the cubemap sample
o.Emission = ...
-
You're saying: "make this pixel emit the reflected color"
-
It's a glow-like effect, not affected by lights or shadows
-
The surface looks like it's reflecting the world/environment, even though it's not ray-traced
-
Common for glass , metal , chrome , water, or stylized sci-fi materials
, o.Emission = texCUBE(...) is not truly matching the surface normal to the environment , but is a visual simulation of reflection using the cubemap.
It's a fake reflection, and it looks convincing --- but it's not physically traced.
The reflection direction is calculated using: WorldReflectionVector(IN, o.Normal)
"If the surface reflects light toward the camera, what color would it reflect from the cubemap?"
But it doesn't account for:
-
The actual surrounding geometry (because cubemaps are static)
-
Real light bounces
-
Depth or occlusion
-
Multiple rays per pixel

Unity is set to use forward rendering. Unless you're working with a lot of lights,

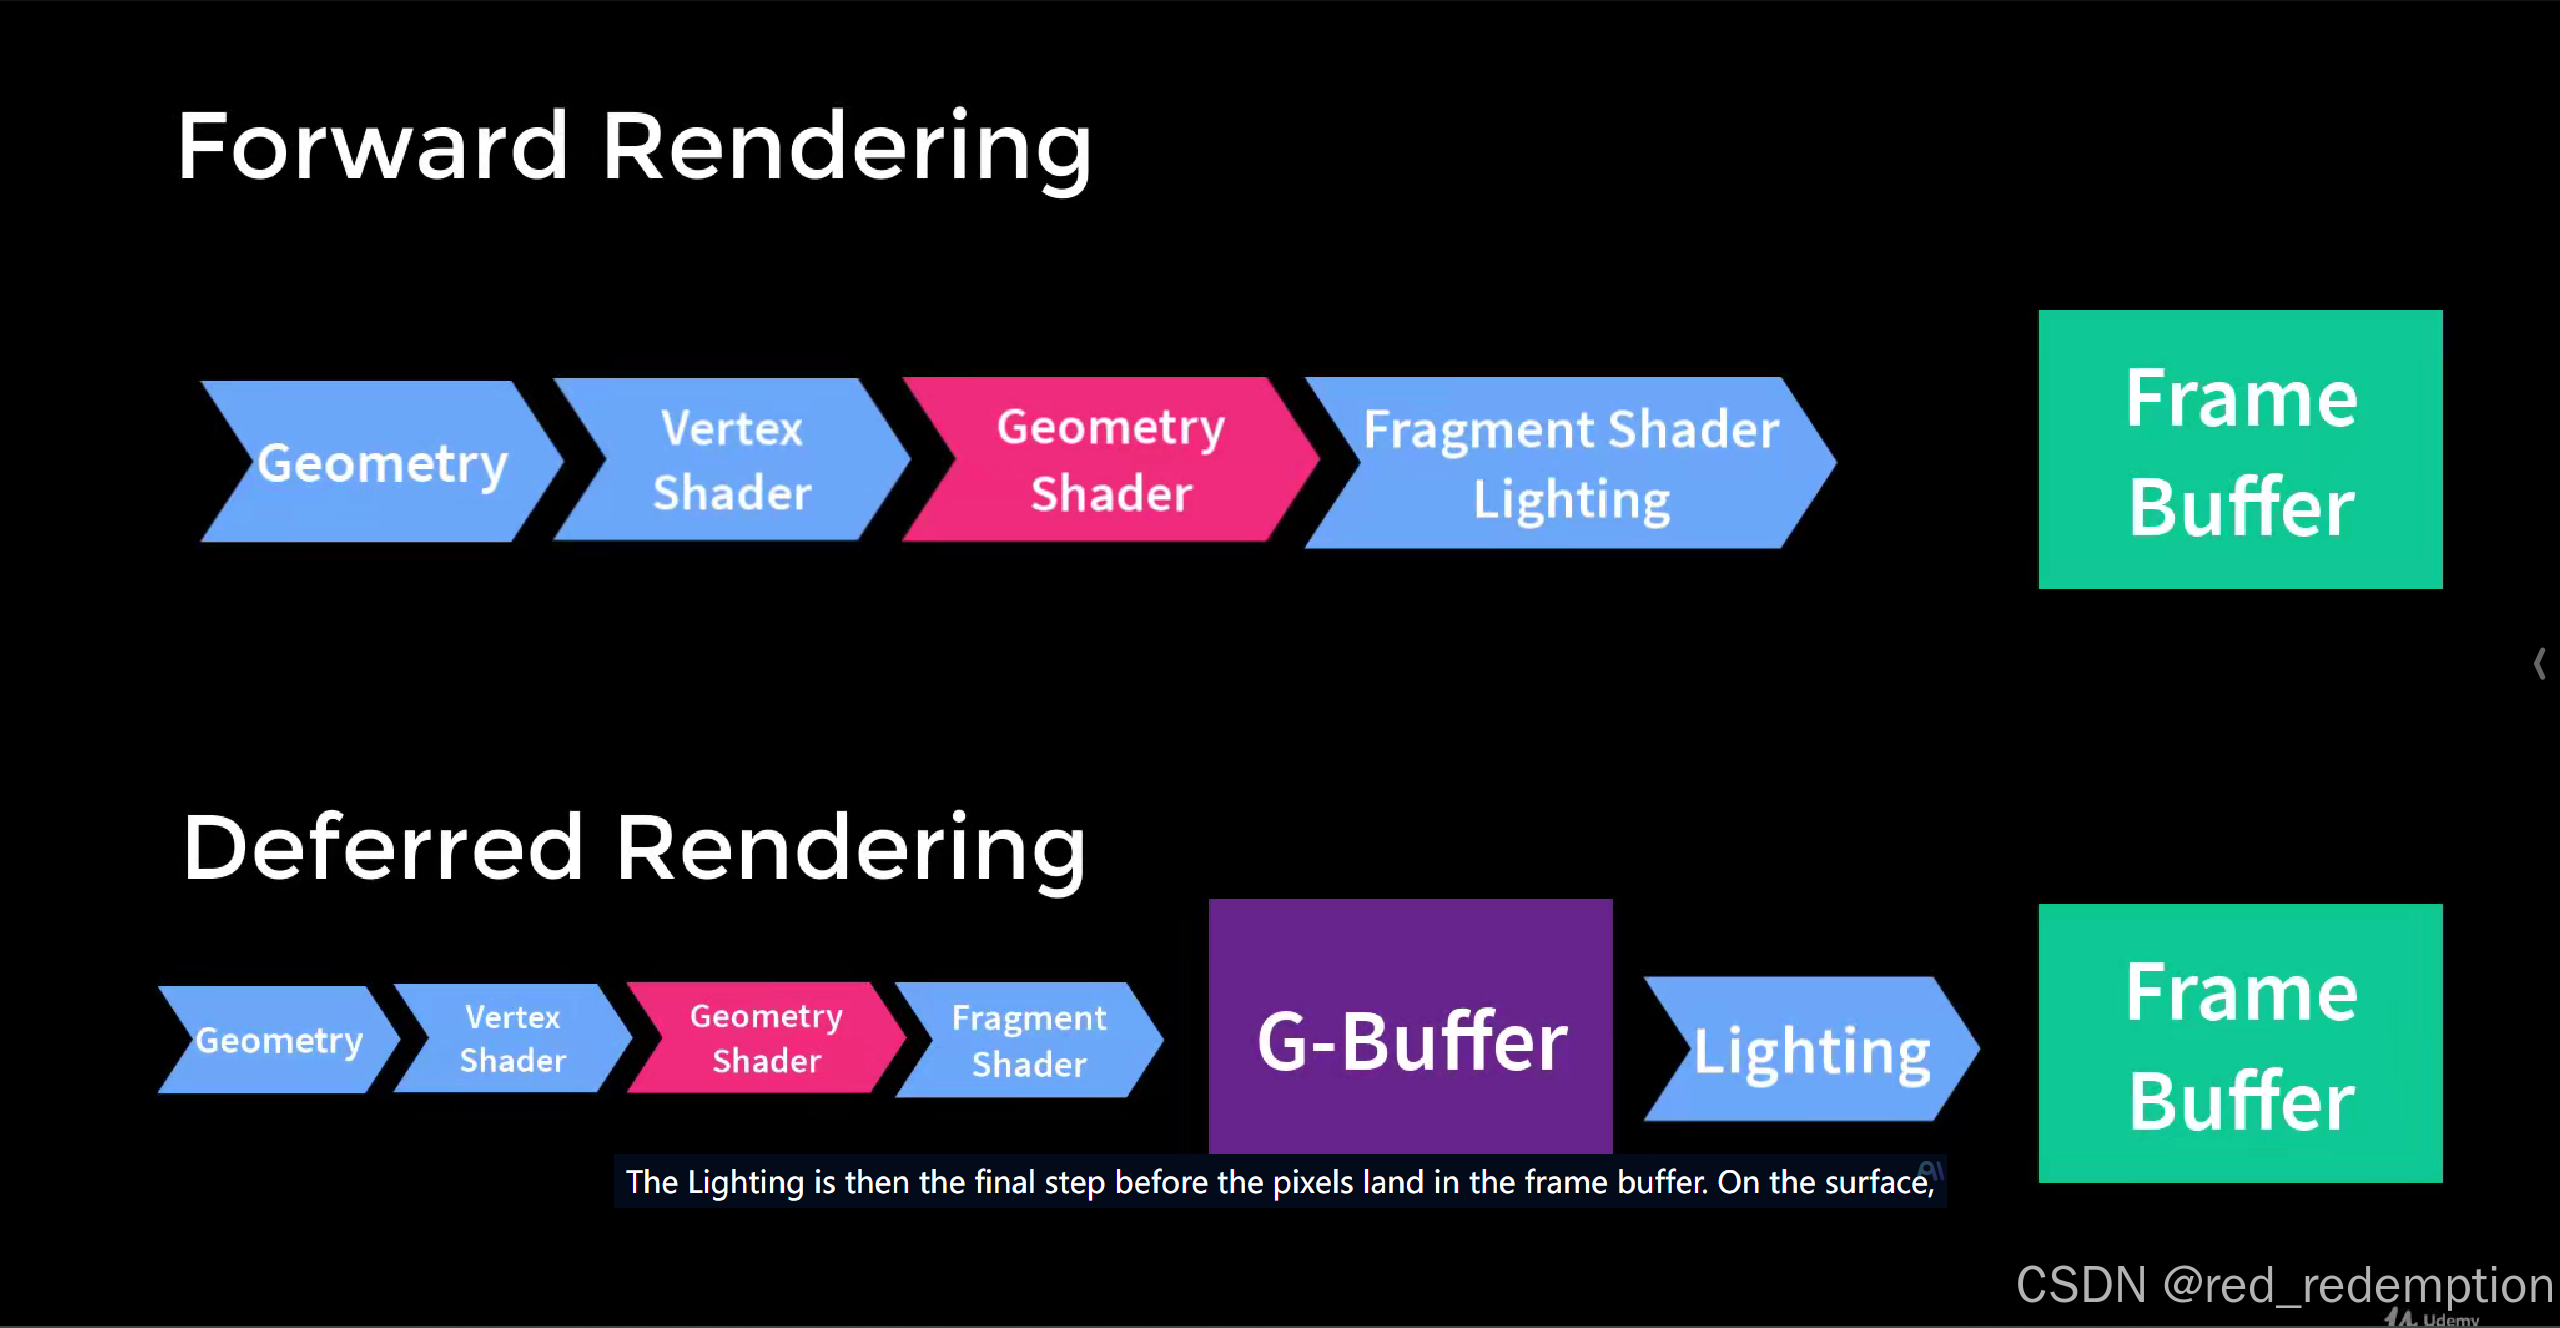

default is forward rendering in Unity

but what if you wanted to process a surface based on where you were looking at it from? The whole lighting


