当我刚开始接触编程的时候,第一个接触的语言是C#,开发网站使用的是.net,因为是在职校学习的所以在技术学习范围就变的很狭隘,连接数据库要写一长串代码直连,并且每个语句都要写出来 加上拼接自己的参数去实现查询。后来接触了第一个orm框架Hibernate 再到上班接触学习了TypeORM、Sequelize。
今天我们讲解一下如何sequelize的基本使用,解放你写原生语句的烦恼
一、连接mysql
首先在mysql上创建一个测试用的库 sequelize 推荐使用的数据库管理工具(navicat)
注意:电脑上要已安装了mysql服务才有用!
shell
cnpm install --save sequelize mysql2 moment编写测试连接的代码:
javascript
// 引入库
const { Sequelize } = require("sequelize");
// 连接数据库
const sequelize = new Sequelize({
  // 选择使用的数据库 'mysql' | 'postgres' | 'sqlite' | 'mariadb' | 'mssql' | 'db2' | 'snowflake' | 'oracle'
  dialect: "mysql",
  // 连接本机mysql
  host: "localhost",
  port: 3306,
  // 输入mysql的账号密码 并指定数据库
  username: "root",
  password: "root",
  database: "sequelize",
});
// 测试连接
async function authenticate() {
  try {
    await sequelize.authenticate();
    console.log("数据库连接成功");
  } catch (error) {
    console.error("无法连接数据库", error);
    return process.exit(1);
  }
}
authenticate();
二、编写表模型代码
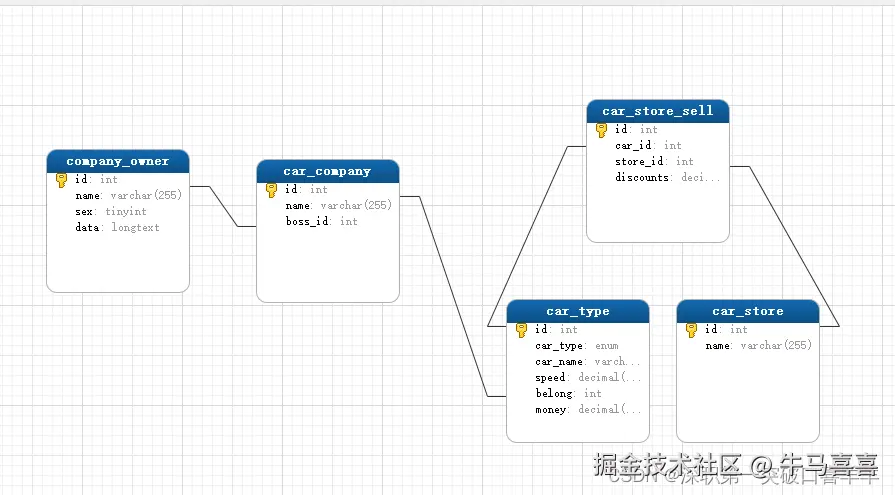
编写代码之前我们先要想我们的数据表 这是最重要的部分
我们创建一个model.js的文件 根据创建的模型想法 写入代码
javascript
const { Sequelize, DataTypes, NOW } = require("sequelize");
const moment = require("moment");
const { STRING, INTEGER, DECIMAL, DATE, BOOLEAN, ENUM, TEXT } = DataTypes;
/**
 * @description:创建数据库表用
 * @param {Sequelize} sequelize // IDE检测不到 这个参数是啥 我们用的又是js 所以使用这个方式就能让IDE知道这个参数的类型 VsCode插件:koroFileHeader
 */
module.exports = (sequelize) => {
  // 学生啊 班级啊 教师啊 那些表都用烂了 男人的浪漫还是要车子 我们就以车子为例

  //  属性介绍
  //   type(字段类型)
  //   primaryKey(主键)
  //   autoIncrement(自动增长)
  //   allowNull(是否允许为Null)
  //   defaultValue(默认值)
  //   get(获取时的操作)
  //   set(设置时的操作)
  //   values(枚举允许使用的值)
  //   comment(注释)

  const common_config = {
    // Model 对应的表名将与model名相同
    freezeTableName: true,
    // 时间戳开启 并且开启sequelize为我们预设的关于时间的字段
    timestamps: true,
    deletedAt: true,
    createdAt: true,
    updatedAt: true,
    // 偏执表 开启后 删除记录都是软删除 防止误删
    paranoid: true,
  };

  // 格式化创建时间
  const createdAt = {
    type: DATE,
    defaultValue: NOW,
    get() {
      return moment(this.getDataValue("createdAt")).format("YYYY-MM-DD HH:mm");
    },
  };

  // 车企老板
  const CompanyOwner = sequelize.define(
    "company_onwer",
    {
      id: { type: INTEGER, primaryKey: true, autoIncrement: true },
      name: { type: STRING, allowNull: false, comment: "老板名称" },
      sex: { type: BOOLEAN, allowNull: false, comment: "性别", defaultValue: 1 },
      // 一些特殊的用法 比如塞一个json数据到里面 我想获取和设置的时候不需要额外处理
      data: {
        type: TEXT("long"),
        allowNull: false,
        get() {
          // 如果使用raw 去获取的话会失效
          return JSON.parse(this.getDataValue("data"));
        },
        set(value) {
          this.setDataValue("data", JSON.stringify(value));
        },
      },
      createdAt,
    },
    common_config
  );

  // 车企
  const CarCompany = sequelize.define(
    "car_company",
    {
      id: { type: INTEGER, primaryKey: true, autoIncrement: true },
      name: { type: STRING, allowNull: false, comment: "厂家名称" },
      boss_id: { type: INTEGER, allowNull: false, comment: "boss的id" },
      createdAt,
    },
    common_config
  );

  // 车子
  const CarType = sequelize.define(
    "car_type",
    {
      id: { type: INTEGER, primaryKey: true, autoIncrement: true },
      car_type: { type: ENUM, allowNull: false, values: ["轿车", "suv"], comment: "车子类型" },
      car_name: { type: STRING, allowNull: false, comment: "车辆名称" },
      speed: { type: DECIMAL, allowNull: false, comment: "0-100加速" },
      belong: { type: INTEGER, allowNull: false, comment: "所属厂家" },
      money: { type: DECIMAL, allowNull: false, comment: "指导价" },
      createdAt,
    },
    common_config
  );

  // 4S店
  const CarStore = sequelize.define(
    "car_store",
    {
      id: { type: INTEGER, primaryKey: true, autoIncrement: true },
      name: { type: STRING, allowNull: false, comment: "4s名称" },
      createdAt,
    },
    common_config
  );

  // 4S与车子的连接表
  const CarStoreSell = sequelize.define(
    "car_store_sell",
    {
      id: { type: INTEGER, primaryKey: true, autoIncrement: true },
      car_id: { type: INTEGER, allowNull: false, comment: "车辆id" },
      store_id: { type: INTEGER, allowNull: false, comment: "4S店的id" },
      discounts: { type: DECIMAL, allowNull: false, comment: "优惠价格" },
      createdAt,
    },
    common_config
  );

  // 定义关联情况

  // 关联讲解

  // 一对一 就是你的车架号和你的车 是绑定的 不会有相同的车架号
  // 一对多 就是一个车企 可以有很多子品牌 比如 吉利下有 领克 极氪等 但他们都是属于吉利下的
  // 多对多 就是你买车的时候 可以去A4S店 也可以去B4S店买 但是A、B店不止卖这一款车 而且优惠力度也不一样

  // 配置项还可以使用 constraints:false 虚拟绑定不创建外键 防止删除表的时候一直很恶心
  // 一对一 一个公司 一个老板 这里只是为了把三种关联关系都绑上 一个老板可以有很多个公司
  CompanyOwner.hasOne(CarCompany, { foreignKey: "boss_id", sourceKey: "id", constraints: false });
  CarCompany.belongsTo(CompanyOwner, { as: "bossInfo", foreignKey: "boss_id", targetKey: "id", constraints: false });

  // 一对多 一个公司可以生产很多车型
  CarCompany.hasMany(CarType, { foreignKey: "belong", constraints: false });
  CarType.belongsTo(CarCompany, { foreignKey: "belong", constraints: false });

  // 多对多 一个4S可以卖多种类的车 一个种类的车也可以被多个4S店卖
  CarStore.belongsToMany(CarType, { through: CarStoreSell, sourceKey: "id", foreignKey: "store_id", constraints: false });
  CarType.belongsToMany(CarStore, { through: CarStoreSell, sourceKey: "id", foreignKey: "car_id", constraints: false });

  // 初始化表 创建完记得注释掉 使用alter属性还会重复创建外键 所以 只有初始化的时候用就好了
  // sequelize.sync();

  return {
    CarCompany,
    CarStore,
    CarType,
    CompanyOwner,
    CarStoreSell,
  };
};
三、增删改查
1.代码修改
我们先对原来的代码进行修改 后续代码统一写入transaction里
javascript
// 引入库
const { Sequelize, Op, fn, col, literal } = require("sequelize");
// 连接数据库
const sequelize = new Sequelize({
  // 选择使用的数据库 'mysql' | 'postgres' | 'sqlite' | 'mariadb' | 'mssql' | 'db2' | 'snowflake' | 'oracle'
  dialect: "mysql",
  // 连接本机mysql
  host: "localhost",
  port: 3306,
  // 输入mysql的账号密码 并指定数据库
  username: "root",
  password: "root",
  database: "sequelize",
  logging: false,
});
// 测试连接
async function authenticate() {
  try {
    await sequelize.authenticate();
    console.log("数据库连接成功");
    let { CarCompany, CarStore, CarType, CompanyOwner, CarStoreSell } = require("./models")(sequelize);
    // 运行前清空所有表数据
    await sequelize.truncate({ force: true });
    try {
      // 使用事务 后续再讲 原子性 要全部语句运行成功 有一个错误就回滚
      await sequelize.transaction(async (transaction) => {
        // 在此写入代码
      });
    } catch (err) {
      console.log("数据操作的时候出现了错误:");
      console.log(err);
    }
  } catch (error) {
    console.error("无法连接数据库", error);
    return process.exit(1);
  }
}
authenticate();
2.增的基础使用
javascript
        // 增删改查 增的基础使用
        const createMethods = async () => {
          // 推荐使用findOrCreate 测试途中会重复运行代码 防止重复创建
          // xxx.create(结构)
          // xxx.findOrCreate 返回结构为[model,created] model代表返回查询或者刚创建的模型 created代表是否是刚刚创建的

          // 1.一个叫张三的老板
          let boss = await CompanyOwner.create(
            {
              name: "张三",
              data: {
                story: "测试数据",
              },
            },
            {
              transaction,
            }
          );

          // 2.创建了一个车企
          let bwm = await CarCompany.create(
            {
              name: "别摸我",
              boss_id: boss.id,
            },
            {
              transaction,
            }
          );

          // 3.生产了两个车型
          let M3 = await CarType.create(
            {
              car_type: "轿车",
              car_name: "M3 雷霆版",
              money: 900000,
              speed: 4,
              belong: bwm.id,
            },
            {
              transaction,
            }
          );

          let GLB200 = await CarType.create(
            {
              car_type: "suv",
              car_name: "GLB200 7座",
              money: 300000,
              speed: 10,
              belong: bwm.id,
            },
            {
              transaction,
            }
          );

          // 4.开了两家4S店 A店只卖M3 B店卖M3和GLB200
          let storeA = await CarStore.create(
            { name: "中升海滨店" },
            {
              transaction,
            }
          );

          let storeB = await CarStore.create(
            { name: "中升讯美店" },
            {
              transaction,
            }
          );

          // 这个生成的添加关联方法有点难找
          // 如果一直提示错误的话 Model.associations 打印出来 看里面的关联 并且将首字母大写
          // 如 我获取到的数据 { car_types: car_types } 所以就是addCar_types
          await storeA.addCar_types(M3, { through: { discounts: 10000 } });
          await storeB.addCar_types(M3, { through: { discounts: 8000 } });
          await storeB.addCar_types(GLB200, { through: { discounts: 30000 } });
          // 基础的数据生成完毕了
        };
3.查的基础使用
javascript
  // 增删改查 查的基础使用
        const readMethods = async () => {
          // 为什么查询都要加上事务呢? 因为我们是在同一次事务内操作的 还没提交到数据库中
          // 不加上事务的id 无法查找到还未提交
          let [current_page, page_size] = [1, 10];
          // 查找有几家车企和数据 通常用于分页
          let companys = await CarCompany.findAndCountAll({
            limit: page_size,
            offset: (current_page - 1) * page_size,
            transaction,
          });
          // 返回的结果是 {count:数量,rows:数据}
          console.log(companys.count);

          // 查找叫别摸我的车企 并且获取它的老板信息
          let bwm = await CarCompany.findOne({
            where: { name: "别摸我" },
            include: {
              // 使用模型获取
              //   model: CompanyOwner,
              // 使用别名获取
              association: "bossInfo",
              // 不写获取所有的字段 写了就仅获取所填的字段
              attributes: ["name", "data"],

              // 第二种写法 可以排除属性 也可以包含属性
              //   attributes: {
              //     include: ["name", "data"],
              //     exclude: ["id"],
              //   },
            },
            transaction,
          });
          // 能直接获取到老板的名字
          //   console.log(bwm.company_onwer.name);
          console.log(bwm.bossInfo.name);
          // 我们之前做了处理 所以拿到的直接是对象 而不是字符串
          // { story: '测试数据' }
          console.log(bwm.bossInfo.data);

          // 查询该车企业有几款车
          let cars = await CarCompany.findOne({
            where: {
              // 使用id查询 其实不需要别的条件的话 直接使用findByPk即可
              id: bwm.id,
              // car_type:["suv","轿车"] car_type:"suv" 对车类型进行筛查
              // 对价格进行筛查
              //   money: {
              //     [Op.lte]: 500000,
              //     [Op.gte]: 500000,
              //     [Op.between]: [0, 1000000],
              //   },
              // 更多操作见 https://www.sequelize.cn/core-concepts/model-querying-basics#%E9%AB%98%E7%BA%A7%E6%9F%A5%E8%AF%A2%E4%B8%8D%E4%BB%85%E9%99%90%E4%BA%8E%E5%88%97
            },
            include: {
              model: CarType,
            },
            transaction,
          });
          //   [ 'M3 雷霆版', 'GLB200 7座' ]
          cars.car_types.length && console.log(cars.car_types.map((x) => x.car_name));

          // 查找这几款车有几家4S店在卖 指导价 以及优惠过的价格
          // 尽量不要在循环里写语句 一次查找出来 再用代码逻辑去操作
          let stores = await CarType.findAll({
            where: {
              id: cars.car_types.map((x) => x.id),
            },
            include: {
              model: CarStore,
              // 不希望连接的字段出现
              attributes: [],
              through: {
                model: CarStoreSell,
                attributes: [],
              },
            },
            attributes: [
              "car_name",
              "money",
              [col("car_stores.name"), "store_name"],
              // [col("`car_stores->car_store_sell`.discounts"), "discounts"]
              // 计算优惠后的价格
              [literal("`car_type`.`money` - `car_stores->car_store_sell`.`discounts`"), "sell_money"],
            ],
            // 不需要获取模型原型 只要数据
            raw: true,
            transaction,
          });

          // 获取到的数组其中一项
          //   [
          //     {
          //       car_name: "GLB200 7座",
          //       money: "300000",
          //       store_name: "中升讯美店",
          //       sell_money: "270000",
          //     },
          //   ];

          console.log(stores);

          // 基本的关联查找功能讲解完毕
        };
4.改的基础使用
javascript
   // 增删改查 改的基础使用
        const updateMethods = async () => {
          // 修改一些老板的数据
          let boss = await CompanyOwner.findOne({ where: { name: "张三" }, transaction });
          // 赋值方式1
          //   boss.setDataValue("data", { story: "修改数据" });
          // 赋值方式2
          boss.data = { story: "修改数据" };
          boss.sex = 0;
          boss.name = "李四";
          await boss.save({ transaction });

          boss = await CompanyOwner.findOne({ include: CarCompany, transaction });
          // {name:"李四",sex:false,data:{ story: '修改数据' }}
          console.log(boss);

          // 车企指导价下降的批量操作
          // 自减写法1 自增increment
          //   await CarType.decrement("money", {
          //     by: 10000,
          //     where: {
          //       belong: boss.car_company.id,
          //     },
          //     transaction,
          //   });
          // 自减写法2
          await CarType.update(
            {
              money: literal(`money - 20000`),
            },
            {
              where: {
                belong: boss.car_company.id,
              },
              transaction,
            }
          );

          // 更新的基础操作就做完了
        };
5.删的基础使用
javascript
        // 增删改查 删除的基础使用
        const deleteMethods = async () => {
          // 4s下架所有车辆
          await CarStoreSell.destroy({ transaction, where: {} });

          // 车企下架单独某款车
          let car = await CarType.findOne({ where: { car_name: "GLB200 7座" }, transaction });
          await car.destroy({ transaction });

          // 车企倒闭了 所有车辆下架 老板销户了
          await CarType.destroy({ transaction, where: {} });
          await CarCompany.destroy({ transaction, where: {} });
          await CompanyOwner.destroy({ where: { name: "李四" }, transaction });

          // 这就是简单的删除应用 操作数据类的代码 最好要用事务去操作 但是事务也有缺陷 可以去看看脏读 幻读 等
        };
6.完整代码
javascript
// 引入库
const { Sequelize, Op, fn, col, literal } = require("sequelize");
// 连接数据库
const sequelize = new Sequelize({
  // 选择使用的数据库 'mysql' | 'postgres' | 'sqlite' | 'mariadb' | 'mssql' | 'db2' | 'snowflake' | 'oracle'
  dialect: "mysql",
  // 连接本机mysql
  host: "localhost",
  port: 3306,
  // 输入mysql的账号密码 并指定数据库
  username: "root",
  password: "root",
  database: "sequelize",
  logging: false,
});
// 测试连接
async function authenticate() {
  try {
    await sequelize.authenticate();
    console.log("数据库连接成功");
    let { CarCompany, CarStore, CarType, CompanyOwner, CarStoreSell } = require("./models")(sequelize);
    // 运行前清空所有表数据
    await sequelize.truncate({ force: true });
    try {
      // 使用事务 后续再讲 原子性 要全部语句运行成功 有一个错误就回滚
      await sequelize.transaction(async (transaction) => {
        // 增删改查 增的基础使用
        const createMethods = async () => {
          // 推荐使用findOrCreate 测试途中会重复运行代码 防止重复创建
          // xxx.create(结构)
          // xxx.findOrCreate 返回结构为[model,created] model代表返回查询或者刚创建的模型 created代表是否是刚刚创建的

          // 1.一个叫张三的老板
          let boss = await CompanyOwner.create(
            {
              name: "张三",
              data: {
                story: "测试数据",
              },
            },
            {
              transaction,
            }
          );

          // 2.创建了一个车企
          let bwm = await CarCompany.create(
            {
              name: "别摸我",
              boss_id: boss.id,
            },
            {
              transaction,
            }
          );

          // 3.生产了两个车型
          let M3 = await CarType.create(
            {
              car_type: "轿车",
              car_name: "M3 雷霆版",
              money: 900000,
              speed: 4,
              belong: bwm.id,
            },
            {
              transaction,
            }
          );

          let GLB200 = await CarType.create(
            {
              car_type: "suv",
              car_name: "GLB200 7座",
              money: 300000,
              speed: 10,
              belong: bwm.id,
            },
            {
              transaction,
            }
          );

          // 4.开了两家4S店 A店只卖M3 B店卖M3和GLB200
          let storeA = await CarStore.create(
            { name: "中升海滨店" },
            {
              transaction,
            }
          );

          let storeB = await CarStore.create(
            { name: "中升讯美店" },
            {
              transaction,
            }
          );

          // 这个生成的添加关联方法有点难找
          // 如果一直提示错误的话 Model.associations 打印出来 看里面的关联 并且将首字母大写
          // 如 我获取到的数据 { car_types: car_types } 所以就是addCar_types
          await storeA.addCar_types(M3, { through: { discounts: 10000 } });
          await storeB.addCar_types(M3, { through: { discounts: 8000 } });
          await storeB.addCar_types(GLB200, { through: { discounts: 30000 } });
          // 基础的数据生成完毕了
        };

        // 增删改查 查的基础使用
        const readMethods = async () => {
          // 为什么查询都要加上事务呢? 因为我们是在同一次事务内操作的 还没提交到数据库中
          // 不加上事务的id 无法查找到还未提交
          let [current_page, page_size] = [1, 10];
          // 查找有几家车企和数据 通常用于分页
          let companys = await CarCompany.findAndCountAll({
            limit: page_size,
            offset: (current_page - 1) * page_size,
            transaction,
          });
          // 返回的结果是 {count:数量,rows:数据}
          console.log(companys.count);

          // 查找叫别摸我的车企 并且获取它的老板信息
          let bwm = await CarCompany.findOne({
            where: { name: "别摸我" },
            include: {
              // 使用模型获取
              //   model: CompanyOwner,
              // 使用别名获取
              association: "bossInfo",
              // 不写获取所有的字段 写了就仅获取所填的字段
              attributes: ["name", "data"],

              // 第二种写法 可以排除属性 也可以包含属性
              //   attributes: {
              //     include: ["name", "data"],
              //     exclude: ["id"],
              //   },
            },
            transaction,
          });
          // 能直接获取到老板的名字
          //   console.log(bwm.company_onwer.name);
          console.log(bwm.bossInfo.name);
          // 我们之前做了处理 所以拿到的直接是对象 而不是字符串
          // { story: '测试数据' }
          console.log(bwm.bossInfo.data);

          // 查询该车企业有几款车
          let cars = await CarCompany.findOne({
            where: {
              // 使用id查询 其实不需要别的条件的话 直接使用findByPk即可
              id: bwm.id,
              // car_type:["suv","轿车"] car_type:"suv" 对车类型进行筛查
              // 对价格进行筛查
              //   money: {
              //     [Op.lte]: 500000,
              //     [Op.gte]: 500000,
              //     [Op.between]: [0, 1000000],
              //   },
              // 更多操作见 https://www.sequelize.cn/core-concepts/model-querying-basics#%E9%AB%98%E7%BA%A7%E6%9F%A5%E8%AF%A2%E4%B8%8D%E4%BB%85%E9%99%90%E4%BA%8E%E5%88%97
            },
            include: {
              model: CarType,
            },
            transaction,
          });
          //   [ 'M3 雷霆版', 'GLB200 7座' ]
          cars.car_types.length && console.log(cars.car_types.map((x) => x.car_name));

          // 查找这几款车有几家4S店在卖 指导价 以及优惠过的价格
          // 尽量不要在循环里写语句 一次查找出来 再用代码逻辑去操作
          let stores = await CarType.findAll({
            where: {
              id: cars.car_types.map((x) => x.id),
            },
            include: {
              model: CarStore,
              // 不希望连接的字段出现
              attributes: [],
              through: {
                model: CarStoreSell,
                attributes: [],
              },
            },
            attributes: [
              "car_name",
              "money",
              [col("car_stores.name"), "store_name"],
              // [col("`car_stores->car_store_sell`.discounts"), "discounts"]
              // 计算优惠后的价格
              [literal("`car_type`.`money` - `car_stores->car_store_sell`.`discounts`"), "sell_money"],
            ],
            // 不需要获取模型原型 只要数据
            raw: true,
            transaction,
          });

          // 获取到的数组其中一项
          //   [
          //     {
          //       car_name: "GLB200 7座",
          //       money: "300000",
          //       store_name: "中升讯美店",
          //       sell_money: "270000",
          //     },
          //   ];

          console.log(stores);

          // 基本的关联查找功能讲解完毕
        };

        // 增删改查 改的基础使用
        const updateMethods = async () => {
          // 修改一些老板的数据
          let boss = await CompanyOwner.findOne({ where: { name: "张三" }, transaction });
          // 赋值方式1
          //   boss.setDataValue("data", { story: "修改数据" });
          // 赋值方式2
          boss.data = { story: "修改数据" };
          boss.sex = 0;
          boss.name = "李四";
          await boss.save({ transaction });

          boss = await CompanyOwner.findOne({ include: CarCompany, transaction });
          // {name:"李四",sex:false,data:{ story: '修改数据' }}
          console.log(boss);

          // 车企指导价下降的批量操作
          // 自减写法1 自增increment
          //   await CarType.decrement("money", {
          //     by: 10000,
          //     where: {
          //       belong: boss.car_company.id,
          //     },
          //     transaction,
          //   });
          // 自减写法2
          await CarType.update(
            {
              money: literal(`money - 20000`),
            },
            {
              where: {
                belong: boss.car_company.id,
              },
              transaction,
            }
          );

          // 更新的基础操作就做完了
        };

        // 增删改查 删除的基础使用
        const deleteMethods = async () => {
          // 4s下架所有车辆
          await CarStoreSell.destroy({ transaction, where: {} });

          // 车企下架单独某款车
          let car = await CarType.findOne({ where: { car_name: "GLB200 7座" }, transaction });
          await car.destroy({ transaction });

          // 车企倒闭了 所有车辆下架 老板销户了
          await CarType.destroy({ transaction, where: {} });
          await CarCompany.destroy({ transaction, where: {} });
          await CompanyOwner.destroy({ where: { name: "李四" }, transaction });

          // 这就是简单的删除应用 操作数据类的代码 最好要用事务去操作 但是事务也有缺陷 可以去看看脏读 幻读 等
        };

        await createMethods();
        await readMethods();
        await updateMethods();
        await deleteMethods();
      });
    } catch (err) {
      console.log("数据操作的时候出现了错误:");
      console.log(err);
    }
  } catch (error) {
    console.error("无法连接数据库", error);
    return process.exit(1);
  }
}
authenticate();