文章目录
一、远程连接
1、通过putty连接
bash
sudo apt update
sudo apt install openssh-server
2、查看putty运行状态
bash
sudo systemctl status ssh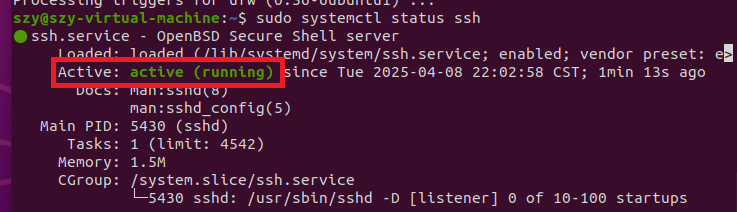
3、通过Puuty远程登录Ubuntu
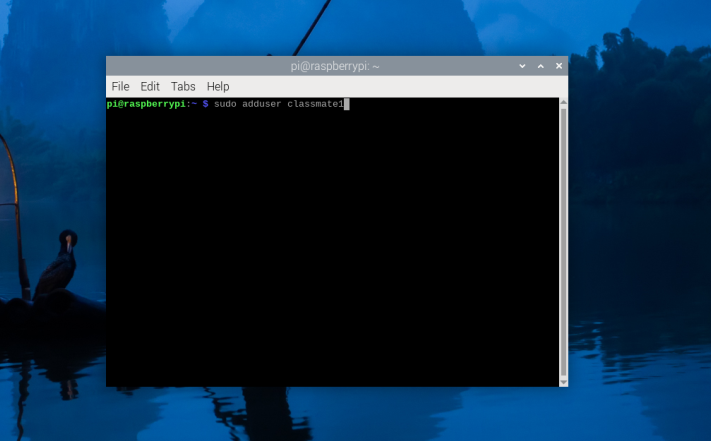
4、添加新用户
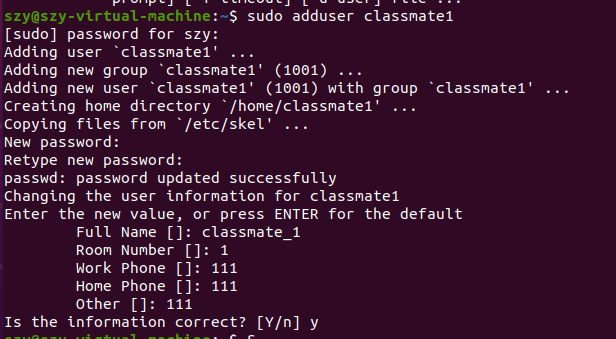
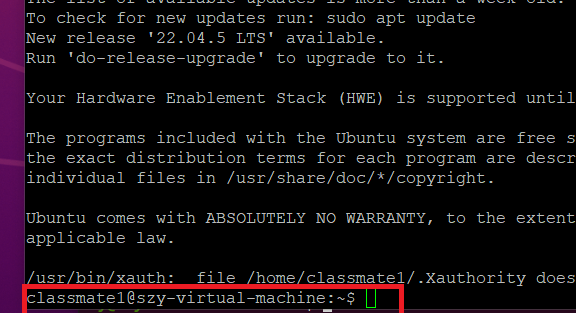
查看是否添加成功
bash
cat /etc/passwd | grep -E 'classmate1|classmate2'
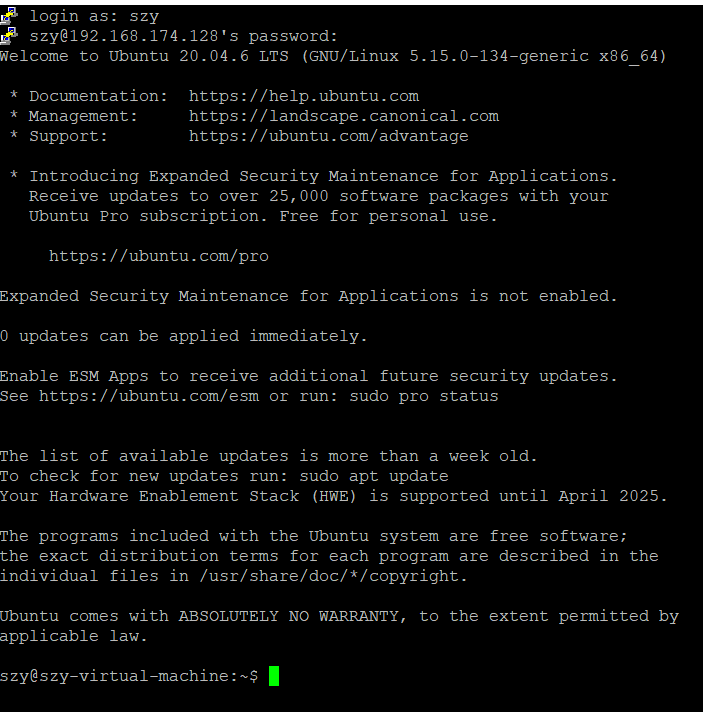
5、用新用户登录远程Ubuntu
- X 窗口协议与 VNC-viewer 协议的差异
X 窗口协议:
用于在本地显示远程图形界面,依赖于 X11 转发。
适合运行单个图形程序,性能较高。
VNC 协议:
提供完整的远程桌面访问,支持多用户同时连接。
适合需要完整桌面环境的场景,但性能可能较低。
6、使用VNC远程登录树莓派
二、虚拟机上talk聊天
bash
#include <stdio.h>
#include <stdlib.h>
#include <string.h>
#include <unistd.h>
#include <sys/socket.h>
#include <sys/un.h>
#include <signal.h>
#include <pwd.h>

#define SOCKET_PATH "/tmp/talk_socket_"
#define MAX_CLIENTS 5
struct message {
    char sender[32];
    char text[256];
};
int server_fd;
char current_user[32] = {0};

void cleanup() {
    char path[128];
    snprintf(path, sizeof(path), "%s%s", SOCKET_PATH, current_user);
    unlink(path); // 删除套接字文件
    close(server_fd);
}

void handle_signal(int sig) {
    printf("\nCleaning up before exit...\n");
    cleanup();
    exit(0);
}

void run_server(const char *username) {
    struct sockaddr_un addr;
    int client_fd;
    struct message msg;

    // 设置套接字路径
    char path[128];
    snprintf(path, sizeof(path), "%s%s", SOCKET_PATH, username);

    // 创建套接字
    if ((server_fd = socket(AF_UNIX, SOCK_STREAM, 0)) == -1) {
        perror("socket error");
        exit(EXIT_FAILURE);
    }

    // 绑定套接字
    memset(&addr, 0, sizeof(addr));
    addr.sun_family = AF_UNIX;
    strncpy(addr.sun_path, path, sizeof(addr.sun_path)-1);

    unlink(path); // 确保路径可用
    if (bind(server_fd, (struct sockaddr*)&addr, sizeof(addr)) == -1) {
        perror("bind error");
        exit(EXIT_FAILURE);
    }

    // 监听
    if (listen(server_fd, MAX_CLIENTS) == -1) {
        perror("listen error");
        exit(EXIT_FAILURE);
    }

    printf("Waiting for incoming messages as [%s]...\n", username);

    while (1) {
        // 接受连接
        if ((client_fd = accept(server_fd, NULL, NULL)) == -1) {
            perror("accept error");
            continue;
        }

        // 接收消息
        if (read(client_fd, &msg, sizeof(msg)) > 0) {
            printf("\n[Message from %s]: %s\n", msg.sender, msg.text);
            printf("Reply to %s> ", msg.sender);
            fflush(stdout);
        }

        close(client_fd);
    }
}

void send_message(const char *target_user, const char *username) {
    struct sockaddr_un addr;
    int fd;
    struct message msg;
    void send_message(const char *target_user, const char *username) {
    struct sockaddr_un addr;
    int fd;
    struct message msg;

    // 设置目标套接字路径
    char path[128];
    snprintf(path, sizeof(path), "%s%s", SOCKET_PATH, target_user);

    // 创建套接字
    if ((fd = socket(AF_UNIX, SOCK_STREAM, 0)) == -1) {
        perror("socket error");
        exit(EXIT_FAILURE);
    }

    // 连接目标
    memset(&addr, 0, sizeof(addr));
    addr.sun_family = AF_UNIX;
    strncpy(addr.sun_path, path, sizeof(addr.sun_path)-1);

    if (connect(fd, (struct sockaddr*)&addr, sizeof(addr)) == -1) {
        perror("connect error");
        printf("User %s is not available or not running talk\n", target_user);
        exit(EXIT_FAILURE);
    }

    // 发送消息
    strncpy(msg.sender, username, sizeof(msg.sender)-1);
    printf("Enter message (Ctrl+D to end): ");
    fgets(msg.text, sizeof(msg.text), stdin);

    if (write(fd, &msg, sizeof(msg)) == -1) {
        perror("write error");
    }

    close(fd);
}

int main(int argc, char *argv[]) {
    if (argc < 2) {
        fprintf(stderr, "Usage: %s <username> [target_user]\n", argv[0]);
        fprintf(stderr, "Server mode: %s yourname\n", argv[0]);
        fprintf(stderr, "Client mode: %s yourname target_user\n", argv[0]);
        exit(EXIT_FAILURE);
    }

    // 获取当前用户名
    strncpy(current_user, argv[1], sizeof(current_user)-1);
    signal(SIGINT, handle_signal);
    signal(SIGTERM, handle_signal);

    if (argc == 2) {
        // 服务端模式
        run_server(argv[1]);
    } else {
        // 客户端模式
        send_message(argv[2], argv[1]);
    }

    return 0;
}
三、Opencv
1、简单安装版(适合新手安装)
1、打开Terminal输入以下命令
bash
sudo apt update
sudo apt install python3-opencv libopencv-dev
2、验证安装是否成功
bash
# 检查Python环境
python3 -c "import cv2; print(cv2.__version__)"

# 检查C++开发环境
pkg-config --modversion opencv4
如图所示,安装的是4.2.0。这个方法安装的Opencv版本较老,可以选择去官网下载较新的版本安装,只不过我这里尝试了很久没有安装成功,并且每次最后都会导致虚拟机卡死
2、打开VScode
1、创建一个新的python文件
案例测试
bash
import cv2

# Load an image from file
image = cv2.imread('example.jpg')

# Check if the image was successfully loaded
if image is None:
    print("Error: Could not load the image. Please check the file path.")
else:
    # Apply a grayscale effect
    gray_image = cv2.cvtColor(image, cv2.COLOR_BGR2GRAY)

    # Apply a Gaussian blur effect
    blurred_image = cv2.GaussianBlur(image, (15, 15), 0)

    # Display the original image
    cv2.imshow('Original Image', image)

    # Display the grayscale image
    cv2.imshow('Grayscale Image', gray_image)

    # Display the blurred image
    cv2.imshow('Blurred Image', blurred_image)

    # Wait for a key press and close the windows
    cv2.waitKey(0)
    cv2.destroyAllWindows()
以下是一个示例代码,添加了一些简单的图像特效(如将图像转换为灰度图像和应用高斯模糊):
python
import cv2

# Load an image from file
image = cv2.imread('example.jpg')

# Check if the image was successfully loaded
if image is None:
    print("Error: Could not load the image. Please check the file path.")
else:
    # Apply a grayscale effect
    gray_image = cv2.cvtColor(image, cv2.COLOR_BGR2GRAY)

    # Apply a Gaussian blur effect
    blurred_image = cv2.GaussianBlur(image, (15, 15), 0)

    # Display the original image
    cv2.imshow('Original Image', image)

    # Display the grayscale image
    cv2.imshow('Grayscale Image', gray_image)

    # Display the blurred image
    cv2.imshow('Blurred Image', blurred_image)

    # Wait for a key press and close the windows
    cv2.waitKey(0)
    cv2.destroyAllWindows()
特效说明:
- 灰度图像 :使用
cv2.cvtColor将彩色图像转换为灰度图像。 - 高斯模糊 :使用
cv2.GaussianBlur对图像进行模糊处理,参数(15, 15)控制模糊的程度。
如下图所示

同样这个也可以通过C++实现,但是我尝试了很久,被各种配置困了很久还么解决,就用的Python