一、JdbcTemplate
JdbcTemplate是Spring提供的一个JDBC模板类,是对JDBC的封装,简化JDBC代码。 当然,你也可以不用,可以让Spring集成其它的ORM框架,例如:MyBatis、Hibernate等。 接下来我们简单来学习一下,使用JdbcTemplate完成增删改查。
1.环境准备
数据库表:t_user
IDEA中新建模块:spring6-007-jdbc
引入相关依赖:
<?xml version="1.0" encoding="UTF-8"?>
<project xmlns="http://maven.apache.org/POM/4.0.0"
         xmlns:xsi="http://www.w3.org/2001/XMLSchema-instance"
         xsi:schemaLocation="http://maven.apache.org/POM/4.0.0 http://maven.apache.org/xsd/maven-4.0.0.xsd">
    <modelVersion>4.0.0</modelVersion>

    <groupId>com.powernode</groupId>
    <artifactId>spring6-007-jdbc</artifactId>
    <version>1.0-SNAPSHOT</version>
    <packaging>jar</packaging>

    <repositories>
        <repository>
            <id>repository.spring.milestone</id>
            <name>Spring Milestone Repository</name>
            <url>https://repo.spring.io/milestone</url>
        </repository>
    </repositories>

    <dependencies>
        <dependency>
            <groupId>org.springframework</groupId>
            <artifactId>spring-context</artifactId>
            <version>6.0.0-M2</version>
        </dependency>
        <dependency>
            <groupId>junit</groupId>
            <artifactId>junit</artifactId>
            <version>4.13.2</version>
            <scope>test</scope>
        </dependency>
        <!--新增的依赖:mysql驱动-->
        <dependency>
            <groupId>mysql</groupId>
            <artifactId>mysql-connector-java</artifactId>
            <version>8.0.30</version>
        </dependency>
        <!--新增的依赖:spring jdbc,这个依赖中有JdbcTemplate-->
        <dependency>
            <groupId>org.springframework</groupId>
            <artifactId>spring-jdbc</artifactId>
            <version>6.0.0-M2</version>
        </dependency>
    </dependencies>

    <properties>
        <maven.compiler.source>17</maven.compiler.source>
        <maven.compiler.target>17</maven.compiler.target>
    </properties>

</project>
准备实体类:表t_user对应的实体类User。
package com.spring6.bean;

/**
 * t_user
 * @className User
 * @since 1.0
 **/
public class User {
    private Integer id;
    private String realName;
    private Integer age;

    public User() {
    }

    public User(Integer id, String realName, Integer age) {
        this.id = id;
        this.realName = realName;
        this.age = age;
    }

    @Override
    public String toString() {
        return "User{" +
                "id=" + id +
                ", realName='" + realName + '\'' +
                ", age=" + age +
                '}';
    }

    public Integer getId() {
        return id;
    }

    public void setId(Integer id) {
        this.id = id;
    }

    public String getRealName() {
        return realName;
    }

    public void setRealName(String realName) {
        this.realName = realName;
    }

    public Integer getAge() {
        return age;
    }

    public void setAge(Integer age) {
        this.age = age;
    }
}
编写Spring配置文件:
JdbcTemplate是Spring提供好的类,这类的完整类名是:org.springframework.jdbc.core.JdbcTemplate
我们怎么使用这个类呢?new对象就可以了。怎么new对象,Spring最在行了。直接将这个类配置到Spring配置文件中,纳入Bean管理即可。
<?xml version="1.0" encoding="UTF-8"?>
<beans xmlns="http://www.springframework.org/schema/beans"
       xmlns:xsi="http://www.w3.org/2001/XMLSchema-instance"
       xsi:schemaLocation="http://www.springframework.org/schema/beans http://www.springframework.org/schema/beans/spring-beans.xsd">
    <bean id="jdbcTemplate" class="org.springframework.jdbc.core.JdbcTemplate"></bean>
</beans>
可以看到JdbcTemplate中有一个DataSource属性,这个属性是数据源,我们都知道连接数据库需要Connection对象,而生成Connection对象是数据源负责的。
所以我们需要给JdbcTemplate设置数据源属性。 所有的数据源都是要实现javax.sql.DataSource接口的。这个数据源可以自己写一个,也可以用写好的,比如:阿里巴巴的德鲁伊连接池,c3p0,dbcp等。我们这里自己先手写一个数据源。
package com.spring6.bean;

import javax.sql.DataSource;
import java.io.PrintWriter;
import java.sql.Connection;
import java.sql.DriverManager;
import java.sql.SQLException;
import java.sql.SQLFeatureNotSupportedException;
import java.util.logging.Logger;

/**
 * 自己的数据源。数据源存在的目的是为了提供Connection对象。
 * 只要实现了DataSource接口的都是数据源。
 * 德鲁伊连接池,C3p0连接池,dbcp连接池,都实现了DataSource接口。
 * @className MyDataSource
 * @since 1.0
 **/
public class MyDataSource implements DataSource {

    private String driver;
    private String url;
    private String username;
    private String password;

    public void setDriver(String driver) {
        this.driver = driver;
    }

    public void setUrl(String url) {
        this.url = url;
    }

    public void setUsername(String username) {
        this.username = username;
    }

    public void setPassword(String password) {
        this.password = password;
    }

    @Override
    public Connection getConnection() throws SQLException {
        try {
            // 注册驱动
            Class.forName(driver);
            // 获取数据库连接对象
            Connection connection = DriverManager.getConnection(url, username, password);
            return connection;
        } catch (Exception e) {
            e.printStackTrace();
        }
        return null;
    }

    @Override
    public Connection getConnection(String username, String password) throws SQLException {
        return null;
    }

    @Override
    public PrintWriter getLogWriter() throws SQLException {
        return null;
    }

    @Override
    public void setLogWriter(PrintWriter out) throws SQLException {

    }

    @Override
    public void setLoginTimeout(int seconds) throws SQLException {

    }

    @Override
    public int getLoginTimeout() throws SQLException {
        return 0;
    }

    @Override
    public Logger getParentLogger() throws SQLFeatureNotSupportedException {
        return null;
    }

    @Override
    public <T> T unwrap(Class<T> iface) throws SQLException {
        return null;
    }

    @Override
    public boolean isWrapperFor(Class<?> iface) throws SQLException {
        return false;
    }
}
写完数据源,我们需要把这个数据源传递给JdbcTemplate。因为JdbcTemplate中有一个DataSource属性:
<?xml version="1.0" encoding="UTF-8"?>
<beans xmlns="http://www.springframework.org/schema/beans"
       xmlns:xsi="http://www.w3.org/2001/XMLSchema-instance"
       xsi:schemaLocation="http://www.springframework.org/schema/beans http://www.springframework.org/schema/beans/spring-beans.xsd">


    <!--配置自己写的数据源-->
    <!--当然,也可以集成其他人或者其他组织开发的数据源,例如:c3p0 dbcp druid-->
    <bean id="ds" class="com.spring6.bean.MyDataSource">
        <property name="driver" value="com.mysql.cj.jdbc.Driver"/>
        <property name="url" value="jdbc:mysql://localhost:3306/jdbc"/>
        <property name="username" value="root"/>
        <property name="password" value="abc123"/>
    </bean>


    <!--配置JdbcTemplate-->
    <bean id="jdbcTemplate" class="org.springframework.jdbc.core.JdbcTemplate">
        <property name="dataSource" ref="ds"/>
    </bean>

</beans>
到这里环境就准备好了。
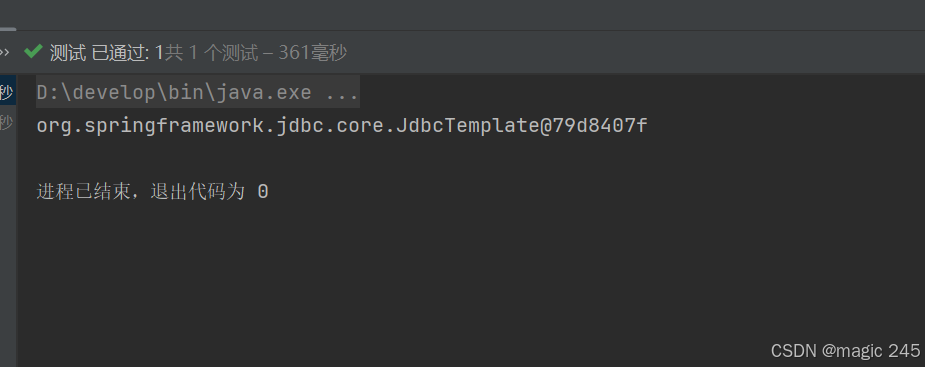
Test
    @Test
    public void testJdbc(){
        ApplicationContext applicationContext = new ClassPathXmlApplicationContext("spring.xml");
        JdbcTemplate jdbcTemplate = applicationContext.getBean("jdbcTemplate", JdbcTemplate.class);
        System.out.println(jdbcTemplate);
    }
2.新增
编写测试程序:
@Test
public void testInsert(){
ApplicationContext applicationContext = new ClassPathXmlApplicationContext("spring.xml");
JdbcTemplate jdbcTemplate = applicationContext.getBean("jdbcTemplate", JdbcTemplate.class);
// insert语句
String sql = "insert into t_user(real_name, age) values(?,?)";
// 注意:在JdbcTemplate当中,只要是insert delete update语句的,都是调用update方法。
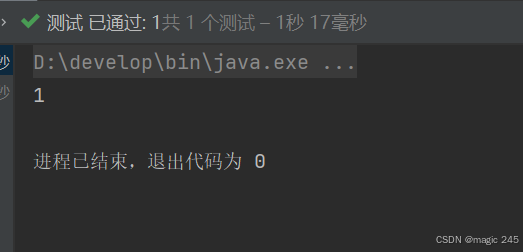
int count = jdbcTemplate.update(sql, "王五", 20);
System.out.println(count);
}
update方法有两个参数:
-
第一个参数:要执行的SQL语句。(SQL语句中可能会有占位符 ? )
-
第二个参数:可变长参数,参数的个数可以是0个,也可以是多个。一般是SQL语句中有几个问号,则对应几个参数。
3 修改
@Test
public void testUpdate(){
// 根据id来修改某一条记录。
ApplicationContext applicationContext = new ClassPathXmlApplicationContext("spring.xml");
JdbcTemplate jdbcTemplate = applicationContext.getBean("jdbcTemplate", JdbcTemplate.class);
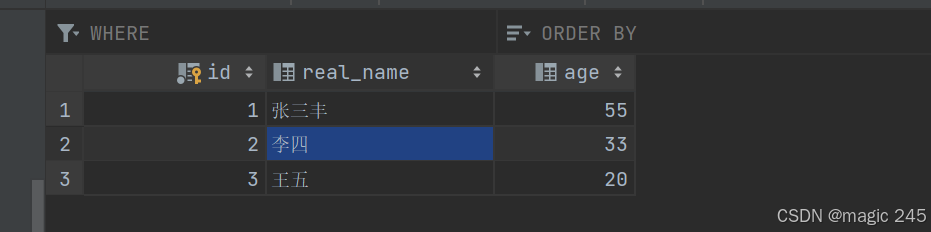
String sql = "update t_user set real_name = ? , age = ? where id = ?";
int count = jdbcTemplate.update(sql, "张三丰", 55, 1);
System.out.println(count);
}
4 删除
@Test
public void testDelete(){
ApplicationContext applicationContext = new ClassPathXmlApplicationContext("spring.xml");
JdbcTemplate jdbcTemplate = applicationContext.getBean("jdbcTemplate", JdbcTemplate.class);
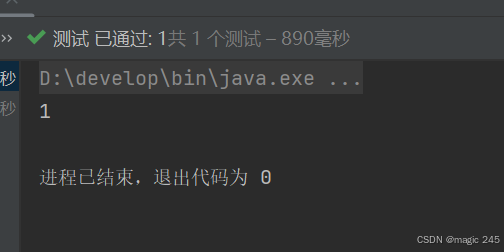
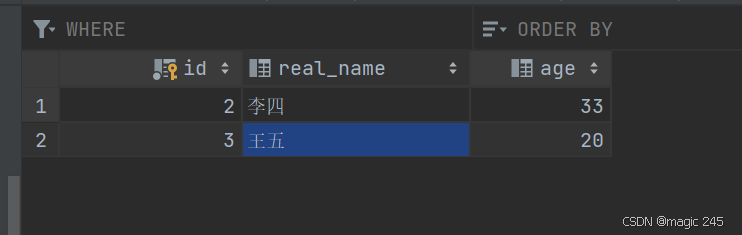
String sql = "delete from t_user where id = ?";
int count = jdbcTemplate.update(sql, 1);
System.out.println(count);
}
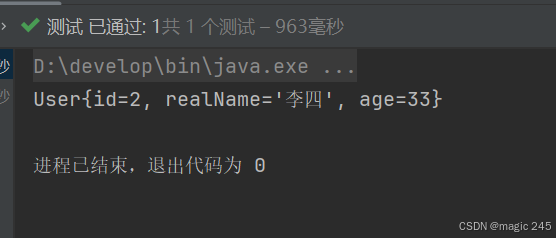
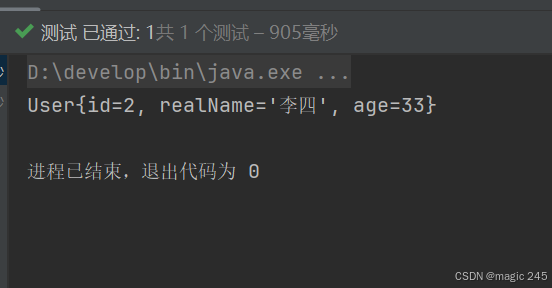
5 查询一个对象
  @Test
    public void testQueryOne(){
        ApplicationContext applicationContext = new ClassPathXmlApplicationContext("spring.xml");
        JdbcTemplate jdbcTemplate = applicationContext.getBean("jdbcTemplate", JdbcTemplate.class);
        String sql = "select id, real_name,age from t_user where id = ?";
        User user = jdbcTemplate.queryForObject(sql, new BeanPropertyRowMapper<>(User.class), 2);
        System.out.println(user);
    }
queryForObject方法三个参数:
-
第一个参数:sql语句
-
第二个参数:Bean属性值和数据库记录行的映射对象。在构造方法中指定映射的对象类型。
-
第三个参数:可变长参数,给sql语句的占位符问号传值。
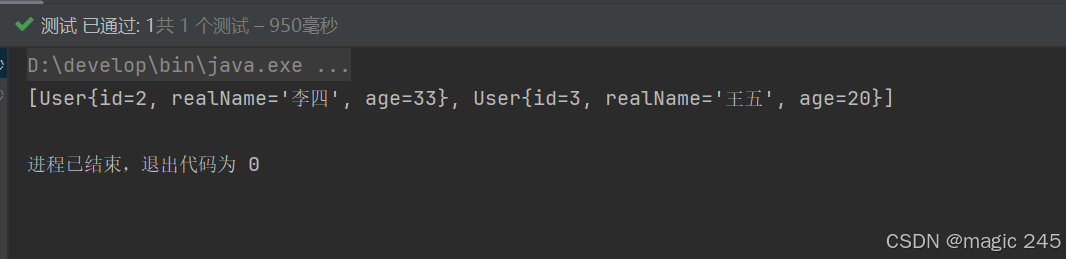
6 查询多个对象
  @Test
    public void testQueryAll(){
        ApplicationContext applicationContext = new ClassPathXmlApplicationContext("spring.xml");
        JdbcTemplate jdbcTemplate = applicationContext.getBean("jdbcTemplate", JdbcTemplate.class);
        String sql = "select id,real_name,age from t_user";
        List<User> users = jdbcTemplate.query(sql, new BeanPropertyRowMapper<>(User.class));
        System.out.println(users);
    }
7 查询一个值
    @Test
    public void testQueryOneValue(){
        ApplicationContext applicationContext = new ClassPathXmlApplicationContext("spring.xml");
        JdbcTemplate jdbcTemplate = applicationContext.getBean("jdbcTemplate", JdbcTemplate.class);
        String sql = "select count(1) from t_user"; // 返回总记录条数是一个整数数字。
        Long total = jdbcTemplate.queryForObject(sql, long.class);
        System.out.println("总记录条数:" + total);
    }
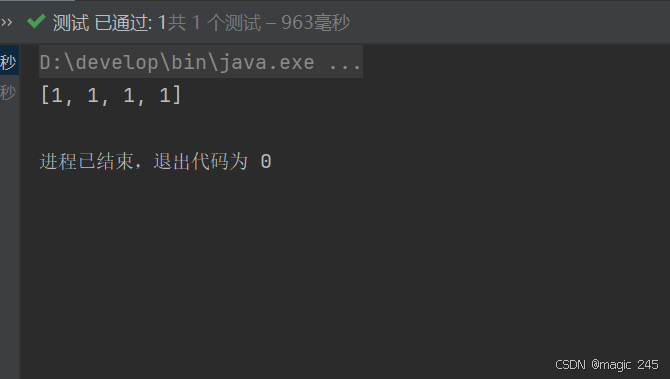
8 批量添加
@Test
public void testBatchInsert(){
ApplicationContext applicationContext = new ClassPathXmlApplicationContext("spring.xml");
JdbcTemplate jdbcTemplate = applicationContext.getBean("jdbcTemplate", JdbcTemplate.class);
String sql = "insert into t_user(real_name, age) values(?,?)";
// 准备数据
Object[] objs1 = {"小花1", 30};
Object[] objs2 = {"小花2", 31};
Object[] objs3 = {"小花3", 32};
Object[] objs4 = {"小花4", 33};
// 添加到List集合
List<Object[]> list = new ArrayList<>();
list.add(objs1);
list.add(objs2);
list.add(objs3);
list.add(objs4);
// 执行SQL语句
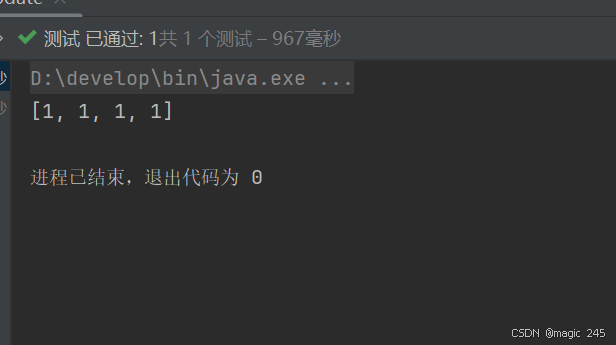
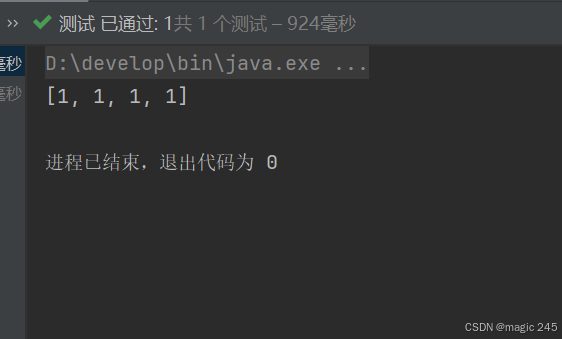
int[] count = jdbcTemplate.batchUpdate(sql, list);
System.out.println(Arrays.toString(count));
}
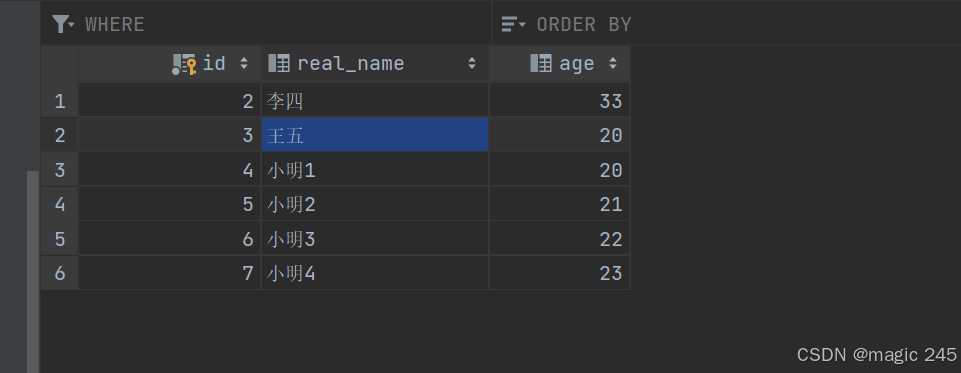
    @Test
    public void testBatchUpdate(){
        ApplicationContext applicationContext = new ClassPathXmlApplicationContext("spring.xml");
        JdbcTemplate jdbcTemplate = applicationContext.getBean("jdbcTemplate", JdbcTemplate.class);
        String sql = "update t_user set real_name = ? , age = ? where id = ?";
        // 准备数据
        Object[] objs1 = {"小明1", 20, 12};
        Object[] objs2 = {"小明2", 21, 13};
        Object[] objs3 = {"小明3", 22, 14};
        Object[] objs4 = {"小明4", 23, 15};
        // 添加到List集合
        List<Object[]> list = new ArrayList<>();
        list.add(objs1);
        list.add(objs2);
        list.add(objs3);
        list.add(objs4);
        // 执行SQL语句
        int[] count = jdbcTemplate.batchUpdate(sql, list);
        System.out.println(Arrays.toString(count));
    }
9 批量修改
    @Test
    public void testBatchUpdate(){
        ApplicationContext applicationContext = new ClassPathXmlApplicationContext("spring.xml");
        JdbcTemplate jdbcTemplate = applicationContext.getBean("jdbcTemplate", JdbcTemplate.class);
        String sql = "update t_user set real_name = ? , age = ? where id = ?";
        // 准备数据
        Object[] objs1 = {"小明1", 20, 12};
        Object[] objs2 = {"小明2", 21, 13};
        Object[] objs3 = {"小明3", 22, 14};
        Object[] objs4 = {"小明4", 23, 15};
        // 添加到List集合
        List<Object[]> list = new ArrayList<>();
        list.add(objs1);
        list.add(objs2);
        list.add(objs3);
        list.add(objs4);
        // 执行SQL语句
        int[] count = jdbcTemplate.batchUpdate(sql, list);
        System.out.println(Arrays.toString(count));
    }
    @Test
    public void testBatchUpdate(){
        ApplicationContext applicationContext = new ClassPathXmlApplicationContext("spring.xml");
        JdbcTemplate jdbcTemplate = applicationContext.getBean("jdbcTemplate", JdbcTemplate.class);
        String sql = "update t_user set real_name = ? , age = ? where id = ?";
        // 准备数据
        Object[] objs1 = {"小明1", 20, 4};
        Object[] objs2 = {"小明2", 21, 5};
        Object[] objs3 = {"小明3", 22, 6};
        Object[] objs4 = {"小明4", 23, 7};
        // 添加到List集合
        List<Object[]> list = new ArrayList<>();
        list.add(objs1);
        list.add(objs2);
        list.add(objs3);
        list.add(objs4);
        // 执行SQL语句
        int[] count = jdbcTemplate.batchUpdate(sql, list);
        System.out.println(Arrays.toString(count));
    }
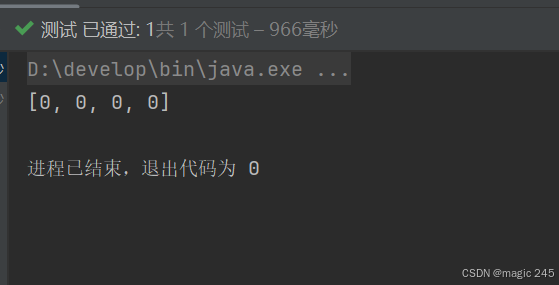
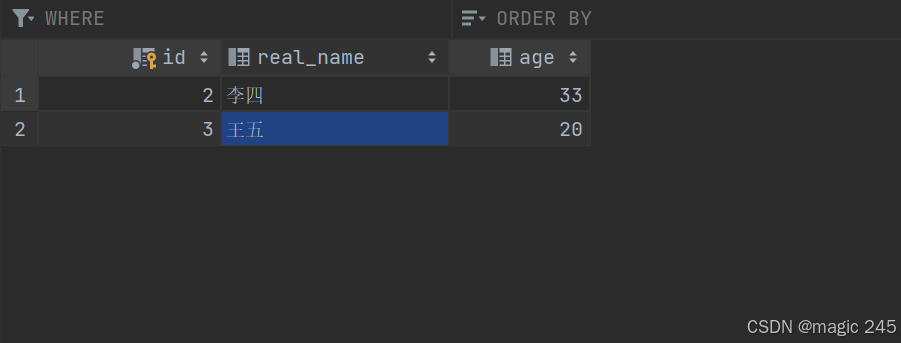
10 批量删除
   @Test
    public void testBatchDelete(){
        ApplicationContext applicationContext = new ClassPathXmlApplicationContext("spring.xml");
        JdbcTemplate jdbcTemplate = applicationContext.getBean("jdbcTemplate", JdbcTemplate.class);
        String sql = "delete from t_user where id = ?";
        // 准备数据
        Object[] objs1 = {4};
        Object[] objs2 = {5};
        Object[] objs3 = {6};
        Object[] objs4 = {7};
        // 添加到List集合
        List<Object[]> list = new ArrayList<>();
        list.add(objs1);
        list.add(objs2);
        list.add(objs3);
        list.add(objs4);
        // 执行SQL语句
        int[] count = jdbcTemplate.batchUpdate(sql, list);
        System.out.println(Arrays.toString(count));
    }
11.使用回调函数
使用回调函数,可以参与的更加细节:
    @Test
    public void testCallback(){
        // 如果你想写JDBC代码,可以使用callback回调函数。
        ApplicationContext applicationContext = new ClassPathXmlApplicationContext("spring.xml");
        JdbcTemplate jdbcTemplate = applicationContext.getBean("jdbcTemplate", JdbcTemplate.class);
        // 准备SQL语句
        String sql = "select id, real_name, age from t_user where id = ?";
        // 注册回调函数,当execute方法执行的时候,回调函数中的doInPreparedStatement()会被调用。
        User user = jdbcTemplate.execute(sql, new PreparedStatementCallback<User>() {
            @Override
            public User doInPreparedStatement(PreparedStatement ps) throws SQLException, DataAccessException {
                User user = null;
                ps.setInt(1, 2);
                ResultSet rs = ps.executeQuery();
                if (rs.next()) {
                    int id = rs.getInt("id");
                    String realName = rs.getString("real_name");
                    int age = rs.getInt("age");
                    user = new User(id, realName, age);
                }
                return user;
            }
        });

        System.out.println(user);

    }
12.使用德鲁伊连接池
之前数据源是用我们自己写的。也可以使用别人写好的。例如比较牛的德鲁伊连接池。 第一步:引入德鲁伊连接池的依赖。(毕竟是别人写的)
<dependency>
  <groupId>com.alibaba</groupId>
  <artifactId>druid</artifactId>
  <version>1.1.8</version>
</dependency>
第二步:将德鲁伊中的数据源配置到spring配置文件中。和配置我们自己写的一样。
<?xml version="1.0" encoding="UTF-8"?>
<beans xmlns="http://www.springframework.org/schema/beans"
       xmlns:xsi="http://www.w3.org/2001/XMLSchema-instance"
       xsi:schemaLocation="http://www.springframework.org/schema/beans http://www.springframework.org/schema/beans/spring-beans.xsd">


    <!--引入德鲁伊连接池-->
    <bean id="ds" class="com.alibaba.druid.pool.DruidDataSource">
        <property name="driverClassName" value="com.mysql.cj.jdbc.Driver"/>
        <property name="url" value="jdbc:mysql://localhost:3306/jdbc"/>
        <property name="username" value="root"/>
        <property name="password" value="abc123"/>
    </bean>

    <!--配置JdbcTemplate-->
    <bean id="jdbcTemplate" class="org.springframework.jdbc.core.JdbcTemplate">
        <property name="dataSource" ref="ds"/>
    </bean>

</beans>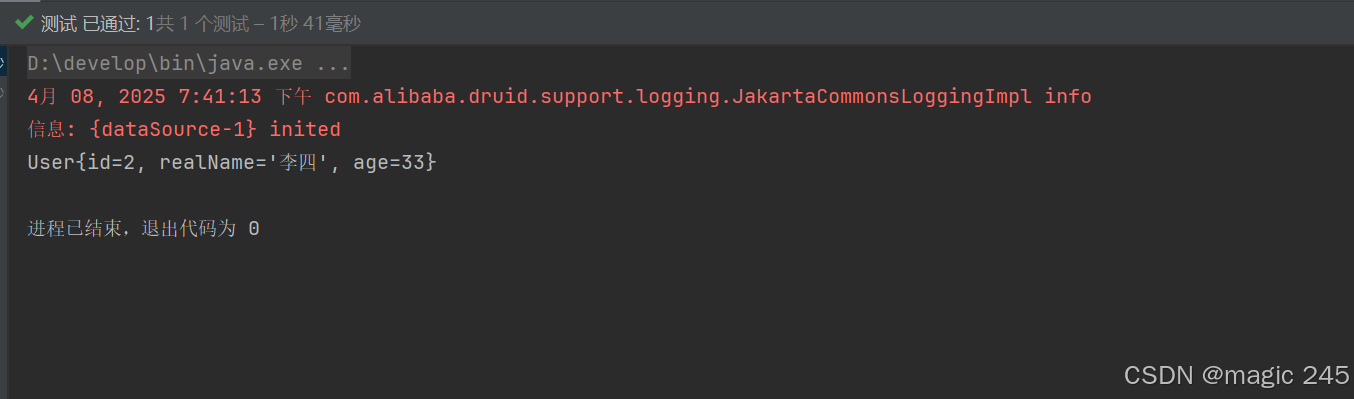
二、GoF之代理模式
1.对代理模式的理解
生活场景1:牛村的牛二看上了隔壁村小花,牛二不好意思直接找小花,于是牛二找来了媒婆王妈妈。这里面就有一个非常典型的代理模式。
牛二不能和小花直接对接,只能找一个中间人。其中王妈妈是代理类,牛二是目标类。王妈妈代替牛二和小花先见个面。(现实生活中的婚介所)【在程序中,对象A和对象B无法直接交互时。】
生活场景2 :你刚到北京,要租房子,可以自己找,也可以找链家帮你找。其中链家是代理类,你是目标类。你们两个都有共同的行为:找房子。不过链家除了满足你找房子,另外会收取一些费用的。(现实生活中的房产中介)【在程序中,功能需要增强时。】
西游记场景 :八戒和高小姐的故事。八戒要强抢民女高翠兰。悟空得知此事之后怎么做的?悟空幻化成高小姐的模样。代替高小姐与八戒会面。其中八戒是客户端程序。悟空是代理类。高小姐是目标类。那天夜里,在八戒眼里,眼前的就是高小姐,对于八戒来说,他是不知道眼前的高小姐是悟空幻化的,在他内心里这就是高小姐。所以悟空代替高小姐和八戒亲了嘴儿。这是非常典型的代理模式实现的保护机制。代理模式中有一个非常重要的特点:对于客户端程序来说,使用代理对象时就像在使用目标对象一样。【在程序中,目标需要被保护时】
业务场景:系统中有A、B、C三个模块,使用这些模块的前提是需要用户登录,也就是说在A模块中要编写判断登录的代码,B模块中也要编写,C模块中还要编写,这些判断登录的代码反复出现,显然代码没有得到复用,可以为A、B、C三个模块提供一个代理,在代理当中写一次登录判断即可。代理的逻辑是:请求来了之后,判断用户是否登录了,如果已经登录了,则执行对应的目标,如果没有登录则跳转到登录页面。【在程序中,目标不但受到保护,并且代码也得到了复用。】
代理模式是GoF23种设计模式之一。属于结构型设计模式。
**代理模式的作用是:**为其他对象提供一种代理以控制对这个对象的访问。在某些情况下,一个客户不想或者不能直接引用一个对象,此时可以通过一个称之为"代理"的第三者来实现间接引用。
代理对象可以在客户端和目标对象之间起到中介的作用,并且可以通过代理对象去掉客户不应该看到的内容和服务或者添加客户需要的额外服务。 通过引入一个新的对象来实现对真实对象的操作或者将新的对象作为真实对象的一个替身,这种实现机制即为代理模式,通过引入代理对象来间接访问一个对象,这就是代理模式的模式动机。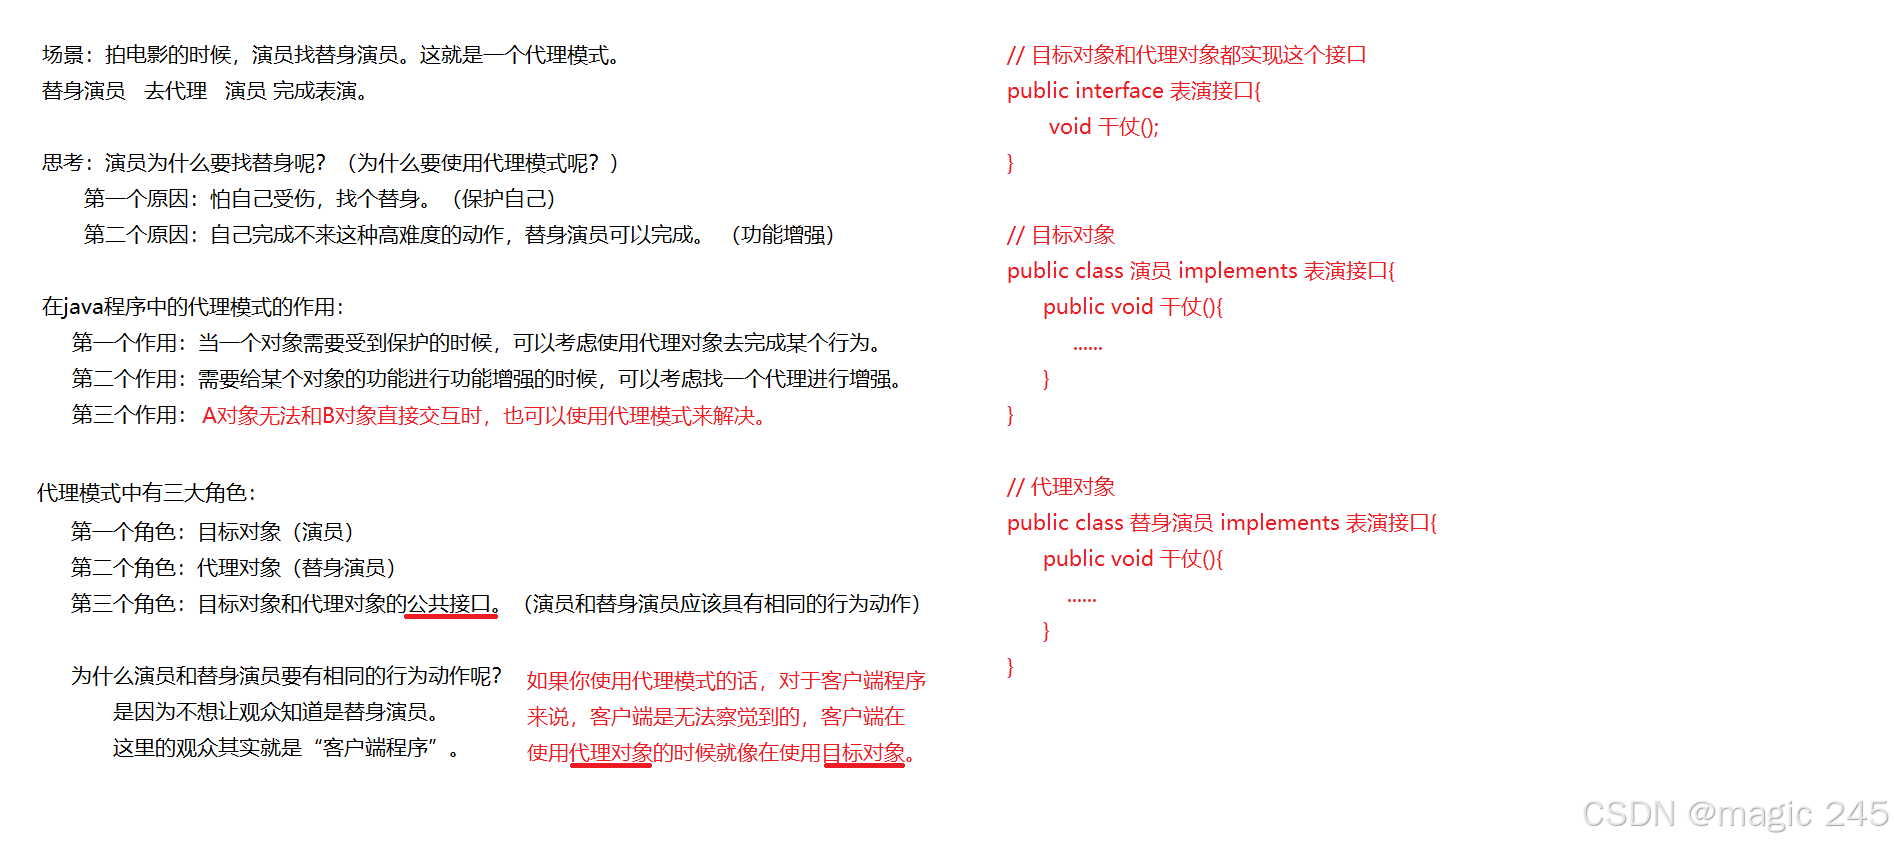
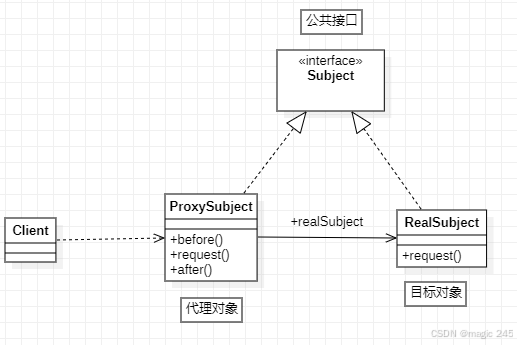
代理模式中的角色:
-
代理类(代理主题)
-
目标类(真实主题)
-
代理类和目标类的公共接口(抽象主题):客户端在使用代理类时就像在使用目标类,不被客户端所察觉,所以代理类和目标类要有共同的行为,也就是实现共同的接口。
代理模式的类图:
代理模式在代码实现上,包括两种形式:
-
静态代理
-
动态代理
2.静态代理
现在有这样一个接口和实现类:
public interface OrderService { // 代理对象和目标对象的公共接口。

    /**
     * 生成订单
     */
    void generate();

    /**
     * 修改订单信息
     */
    void modify();

    /**
     * 查看订单详情
     */
    void detail();

}

public class OrderServiceImpl implements OrderService{ // 目标对象

    @Override
    public void generate() { // 目标方法
        // 模拟生成订单的耗时
        try {
            Thread.sleep(1234);
        } catch (InterruptedException e) {
            e.printStackTrace();
        }
        System.out.println("订单已生成.");
    }

    @Override
    public void modify() { // 目标方法
        // 模拟修改订单的耗时
        try {
            Thread.sleep(456);
        } catch (InterruptedException e) {
            e.printStackTrace();
        }
        System.out.println("订单已修改.");
    }

    @Override
    public void detail() { // 目标方法
        // 模拟查询订单的耗时
        try {
            Thread.sleep(111);
        } catch (InterruptedException e) {
            e.printStackTrace();
        }
        System.out.println("请看订单详情.");
    }
}
Test
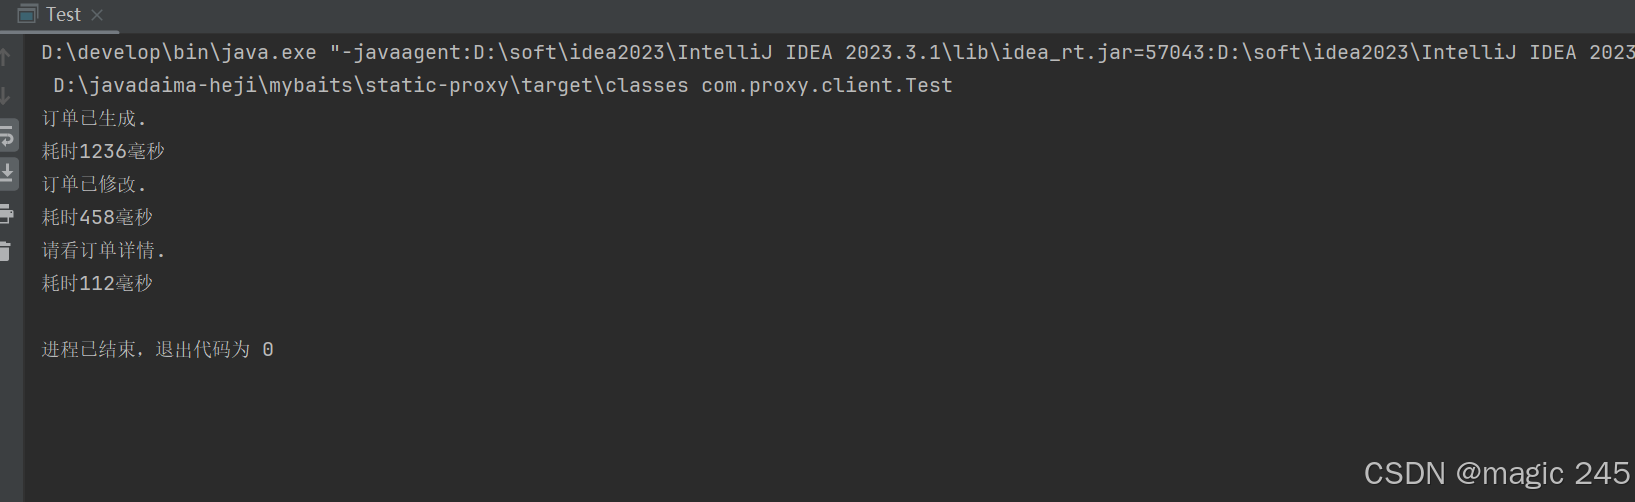
public class Test {
    public static void main(String[] args) {
        OrderService orderService = new OrderServiceImpl();
        orderService.generate();
        orderService.detail();
        orderService.modify();

    }
}
其中Thread.sleep()方法的调用是为了模拟操作耗时。
项目已上线,并且运行正常,只是客户反馈系统有一些地方运行较慢,要求项目组对系统进行优化。于是项目负责人就下达了这个需求。首先需要搞清楚是哪些业务方法耗时较长,于是让我们统计每个业务方法所耗费的时长。如果是你,你该怎么做呢?
第一种方案:直接修改Java源代码,在每个业务方法中添加统计逻辑,如下:
public class OrderServiceImpl implements OrderService {
    @Override
    public void generate() {
        long begin = System.currentTimeMillis();
        try {
            Thread.sleep(1234);
        } catch (InterruptedException e) {
            e.printStackTrace();
        }
        System.out.println("订单已生成");
        long end = System.currentTimeMillis();
        System.out.println("耗费时长"+(end - begin)+"毫秒");
    }

    @Override
    public void detail() {
        long begin = System.currentTimeMillis();
        try {
            Thread.sleep(2541);
        } catch (InterruptedException e) {
            e.printStackTrace();
        }
        System.out.println("订单信息如下:******");
        long end = System.currentTimeMillis();
        System.out.println("耗费时长"+(end - begin)+"毫秒");
    }

    @Override
    public void modify() {
        long begin = System.currentTimeMillis();
        try {
            Thread.sleep(1010);
        } catch (InterruptedException e) {
            e.printStackTrace();
        }
        System.out.println("订单已修改");
        long end = System.currentTimeMillis();
        System.out.println("耗费时长"+(end - begin)+"毫秒");
    }
}
需求可以满足,但显然是违背了OCP开闭原则。这种方案不可取。
第二种方案:编写一个子类继承OrderServiceImpl,在子类中重写每个方法,代码如下
public class OrderServiceImplSub extends OrderServiceImpl{

    @Override
    public void generate() {
        long begin = System.currentTimeMillis();
        super.generate();
        long end = System.currentTimeMillis();
        System.out.println("耗时"+(end - begin)+"毫秒");
    }

    @Override
    public void modify() {
        long begin = System.currentTimeMillis();
        super.modify();
        long end = System.currentTimeMillis();
        System.out.println("耗时"+(end - begin)+"毫秒");
    }

    @Override
    public void detail() {
        long begin = System.currentTimeMillis();
        super.detail();
        long end = System.currentTimeMillis();
        System.out.println("耗时"+(end - begin)+"毫秒");
    }
}
Test
public class Test {
    public static void main(String[] args) {

        OrderService orderService = new OrderServiceImplSub();
        orderService.generate();
        orderService.detail();
        orderService.modify();


    }
}
这种方式可以解决,但是存在两个问题:
-
第一个问题:假设系统中有100个这样的业务类,需要提供100个子类,并且之前写好的创建Service对象的代码,都要修改为创建子类对象。
-
第二个问题:由于采用了继承的方式,导致代码之间的耦合度较高。
这种方案也不可取。
第三种方案:使用代理模式(这里采用静态代理) 
可以为OrderService接口提供一个代理类。
package com.proxy.service;

/**
 * @className OrderServiceProxy
 * @since 1.0
 **/
// 代理对象(代理对象和目标对象要具有相同的行为,就要实现同一个或同一些接口。)
// 客户端在使用代理对象的时候就像在使用目标对象一样。
public class OrderServiceProxy implements OrderService{

    // 将目标对象作为代理对象的一个属性。这种关系叫做关联关系。比继承关系的耦合度低。
    // 代理对象中含有目标对象的引用。关联关系。has a
    // 注意:这里要写一个公共接口类型。因为公共接口耦合度低。
    private OrderService target; // 这就是目标对象。目标对象一定是实现了OrderService接口的。

    // 创建代理对象的时候,传一个目标对象给代理对象。
    public OrderServiceProxy(OrderService target) {
        this.target = target;
    }

    @Override
    public void generate() { // 代理方法
        // 增强
        long begin = System.currentTimeMillis();
        // 调用目标对象的目标方法
        target.generate();
        long end = System.currentTimeMillis();
        System.out.println("耗时"+(end - begin)+"毫秒");
    }

    @Override
    public void modify() { // 代理方法
        // 增强
        long begin = System.currentTimeMillis();
        // 调用目标对象的目标方法
        target.modify();
        long end = System.currentTimeMillis();
        System.out.println("耗时"+(end - begin)+"毫秒");
    }

    @Override
    public void detail() { // 代理方法
        // 增强
        long begin = System.currentTimeMillis();
        // 调用目标对象的目标方法
        target.detail();
        long end = System.currentTimeMillis();
        System.out.println("耗时"+(end - begin)+"毫秒");
    }
}
这种方式的优点:符合OCP开闭原则,同时采用的是关联关系,所以程序的耦合度较低。所以这种方案是被推荐的。 编写客户端程序:
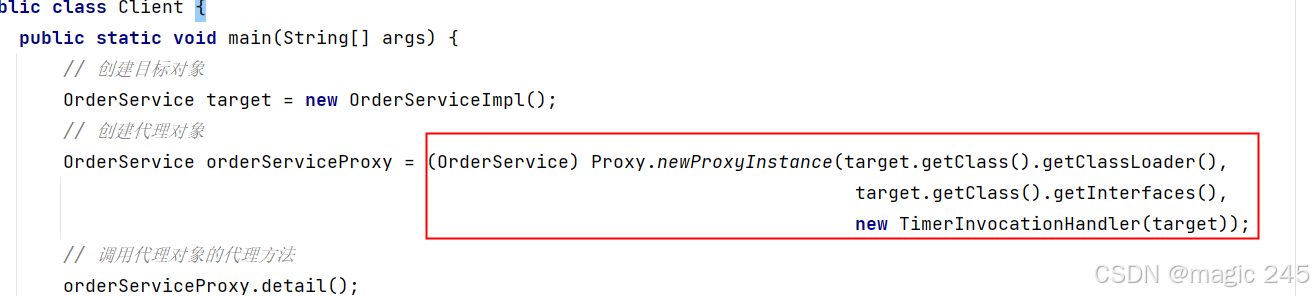
public class Test {
    public static void main(String[] args) {


        // 创建目标对象
        OrderService target = new OrderServiceImpl();
        // 创建代理对象
        OrderService proxy = new OrderServiceProxy(target);
        // 调用代理对象的代理方法
        proxy.generate();
        proxy.modify();
        proxy.detail();
    }
}
以上就是代理模式中的静态代理,其中OrderService接口是代理类和目标类的共同接口。OrderServiceImpl是目标类。OrderServiceProxy是代理类。
大家思考一下:如果系统中业务接口很多,一个接口对应一个代理类,显然也是不合理的,会导致类爆炸。怎么解决这个问题?动态代理可以解决。因为在动态代理中可以在内存中动态的为我们生成代理类的字节码。代理类不需要我们写了。类爆炸解决了,而且代码只需要写一次,代码也会得到复用。
3.动态代理
在程序运行阶段,在内存中动态生成代理类,被称为动态代理,目的是为了减少代理类的数量。解决代码复用的问题。 在内存当中动态生成类的技术常见的包括:
-
JDK动态代理技术:只能代理接口。
-
CGLIB动态代理技术:CGLIB(Code Generation Library)是一个开源项目。是一个强大的,高性能,高质量的Code生成类库,它可以在运行期扩展Java类与实现Java接口。它既可以代理接口,又可以代理类,底层是通过继承的方式实现的。性能比JDK动态代理要好。(底层有一个小而快的字节码处理框架ASM。)
-
Javassist动态代理技术:Javassist是一个开源的分析、编辑和创建Java字节码的类库。是由东京工业大学的数学和计算机科学系的 Shigeru Chiba (千叶 滋)所创建的。它已加入了开放源代码JBoss 应用服务器项目,通过使用Javassist对字节码操作为JBoss实现动态"AOP"框架。
⑴.JDK动态代理
我们还是使用静态代理中的例子:一个接口和一个实现类。
/**
 * 订单业务接口

 * @className OrderService
 * @since 1.0
 **/
public interface OrderService { // 代理对象和目标对象的公共接口。

    String getName();

    /**
     * 生成订单
     */
    void generate();

    /**
     * 修改订单信息
     */
    void modify();

    /**
     * 查看订单详情
     */
    void detail();

}

/**
 * @className OrderServiceImpl
 * @since 1.0
 **/
public class OrderServiceImpl implements OrderService{ // 目标对象

    @Override
    public String getName() {
        System.out.println("getName()方法执行了");
        return "张三";
    }

    @Override
    public void generate() { // 目标方法
        // 模拟生成订单的耗时
        try {
            Thread.sleep(1234);
        } catch (InterruptedException e) {
            e.printStackTrace();
        }
        System.out.println("订单已生成.");
    }

    @Override
    public void modify() { // 目标方法
        // 模拟修改订单的耗时
        try {
            Thread.sleep(456);
        } catch (InterruptedException e) {
            e.printStackTrace();
        }
        System.out.println("订单已修改.");
    }

    @Override
    public void detail() { // 目标方法
        // 模拟查询订单的耗时
        try {
            Thread.sleep(111);
        } catch (InterruptedException e) {
            e.printStackTrace();
        }
        System.out.println("请看订单详情.");
    }
}
我们在静态代理的时候,除了以上一个接口和一个实现类之外,是不是要写一个代理类UserServiceProxy呀!在动态代理中UserServiceProxy代理类是可以动态生成的。这个类不需要写。我们直接写客户端程序即可:
public class Client {
    public static void main(String[] args) {
        // 第一步:创建目标对象
        OrderService target = new OrderServiceImpl();
        // 第二步:创建代理对象
        OrderService orderServiceProxy = Proxy.newProxyInstance(target.getClass().getClassLoader(), target.getClass().getInterfaces(), 调用处理器对象);
        // 第三步:调用代理对象的代理方法
        orderServiceProxy.detail();
        orderServiceProxy.modify();
        orderServiceProxy.generate();
    }
}
以上第二步创建代理对象是需要大家理解的: OrderService orderServiceProxy = Proxy.newProxyInstance(target.getClass().getClassLoader(), target.getClass().getInterfaces(), 调用处理器对象); 这行代码做了两件事:
-
第一件事:在内存中生成了代理类的字节码
-
第二件事:创建代理对象
Proxy类全名:java.lang.reflect.Proxy。这是JDK提供的一个类(所以称为JDK动态代理)。主要是通过这个类在内存中生成代理类的字节码。 其中newProxyInstance()方法有三个参数:
-
第一个参数:类加载器。在内存中生成了字节码,要想执行这个字节码,也是需要先把这个字节码加载到内存当中的。所以要指定使用哪个类加载器加载。
-
第二个参数:接口类型。代理类和目标类实现相同的接口,所以要通过这个参数告诉JDK动态代理生成的类要实现哪些接口。
-
第三个参数:调用处理器。这是一个JDK动态代理规定的接口,接口全名:java.lang.reflect.InvocationHandler。显然这是一个回调接口,也就是说调用这个接口中方法的程序已经写好了,就差这个接口的实现类了。
所以接下来我们要写一下java.lang.reflect.InvocationHandler接口的实现类,并且实现接口中的方法,代码如下:
public class TimerInvocationHandler implements InvocationHandler {
    @Override
    public Object invoke(Object proxy, Method method, Object[] args) throws Throwable {
        return null;
    }
}
InvocationHandler接口中有一个方法invoke,这个invoke方法上有三个参数:
-
第一个参数:Object proxy。代理对象。设计这个参数只是为了后期的方便,如果想在invoke方法中使用代理对象的话,尽管通过这个参数来使用。
-
第二个参数:Method method。目标方法。
-
第三个参数:Object\[\] args。目标方法调用时要传的参数。
我们将来肯定是要调用"目标方法"的,但要调用目标方法的话,需要"目标对象"的存在,"目标对象"从哪儿来呢?我们可以给TimerInvocationHandler提供一个构造方法,可以通过这个构造方法传过来"目标对象",代码如下:
public class TimerInvocationHandler implements InvocationHandler {
    // 目标对象
    private Object target;

    // 通过构造方法来传目标对象
    public TimerInvocationHandler(Object target) {
        this.target = target;
    }

    @Override
    public Object invoke(Object proxy, Method method, Object[] args) throws Throwable {
        return null;
    }
}
有了目标对象我们就可以在invoke()方法中调用目标方法了。代码如下:
package com.proxy.service;

import java.lang.reflect.InvocationHandler;
import java.lang.reflect.Method;

/**
 * 专门负责计时的一个调用处理器对象。
 * 在这个调用处理器当中编写计时相关的增强代码。
 * 这个调用处理器只需要写一个就行了。
 * @className TimerInvocationHandler
 * @since 1.0
 **/
public class TimerInvocationHandler implements InvocationHandler {

    // 目标对象
    private Object target;

    public TimerInvocationHandler(Object target) {
        // 赋值给成员变量。
        this.target = target;
    }

    /*
        1. 为什么强行要求你必须实现InvocationHandler接口?
            因为一个类实现接口就必须实现接口中的方法。
            以下这个方法必须是invoke(),因为JDK在底层调用invoke()方法的程序已经提前写好了。
            注意:invoke方法不是我们程序员负责调用的,是JDK负责调用的。
        2. invoke方法什么时候被调用呢?
            当代理对象调用代理方法的时候,注册在InvocationHandler调用处理器当中的invoke()方法被调用。

        3. invoke方法的三个参数:
            invoke方法是JDK负责调用的,所以JDK调用这个方法的时候会自动给我们传过来这三个参数。
            我们可以在invoke方法的大括号中直接使用。
            第一个参数:Object proxy 代理对象的引用。这个参数使用较少。
            第二个参数:Method method 目标对象上的目标方法。(要执行的目标方法就是它。)
            第三个参数:Object[] args 目标方法上的实参。

            invoke方法执行过程中,使用method来调用目标对象的目标方法。
         */
    @Override
    public Object invoke(Object proxy, Method method, Object[] args) throws Throwable {

        // 这个接口的目的就是为了让你有地方写增强代码。
        //System.out.println("增强1");
        long begin = System.currentTimeMillis();

        // 调用目标对象上的目标方法
        // 方法四要素:哪个对象,哪个方法,传什么参数,返回什么值。
        Object retValue = method.invoke(target, args);

        //System.out.println("增强2");
        long end = System.currentTimeMillis();
        System.out.println("耗时"+(end - begin)+"毫秒");

        // 注意这个invoke方法的返回值,如果代理对象调用代理方法之后,需要返回结果的话,invoke方法必须将目标对象的目标方法执行结果继续返回。
        return retValue;
    }
}
到此为止,调用处理器就完成了。接下来,应该继续完善Client程序:
package com.proxy.client;
import com.proxy.service.OrderService;
import com.proxy.service.OrderServiceImpl;
import com.proxy.service.TimerInvocationHandler;
import com.proxy.util.ProxyUtil;
import java.lang.reflect.Proxy;
/**
* @className Client
* @since 1.0
**/
public class Client {
//客户端程序
public static void main(String[] args) {
// 创建目标对象
OrderService target = new OrderServiceImpl();
// 创建代理对象
/*
1. newProxyInstance 翻译为:新建代理对象
也就是说,通过调用这个方法可以创建代理对象。
本质上,这个Proxy.newProxyInstance()方法的执行,做了两件事:
第一件事:在内存中动态的生成了一个代理类的字节码class。
第二件事:new对象了。通过内存中生成的代理类这个代码,实例化了代理对象。
2. 关于newProxyInstance()方法的三个重要的参数,每一个什么含义,有什么用?
第一个参数:ClassLoader loader
类加载器。这个类加载器有什么用呢?
在内存当中生成的字节码也是class文件,要执行也得先加载到内存当中。加载类就需要类加载器。所以这里需要指定类加载器。
并且JDK要求,目标类的类加载器必须和代理类的类加载器使用同一个。
第二个参数:Class<?>[] interfaces
代理类和目标类要实现同一个接口或同一些接口。
在内存中生成代理类的时候,这个代理类是需要你告诉它实现哪些接口的。
第三个参数:InvocationHandler h
InvocationHandler 被翻译为:调用处理器。是一个接口。
在调用处理器接口中编写的就是:增强代码。
因为具体要增强什么代码,JDK动态代理技术它是猜不到的。没有那么神。
既然是接口,就要写接口的实现类。
可能会有疑问?
自己还要动手写调用处理器接口的实现类,这不会类爆炸吗?不会。
因为这种调用处理器写一次就好。
注意:代理对象和目标对象实现的接口一样,所以可以向下转型。
*/
OrderService proxyObj = (OrderService) Proxy.newProxyInstance(target.getClass().getClassLoader(),
target.getClass().getInterfaces(),
new TimerInvocationHandler(target));
// 调用代理对象的代理方法
// 注意:调用代理对象的代理方法的时候,如果你要做增强的话,目标对象的目标方法得保证执行。
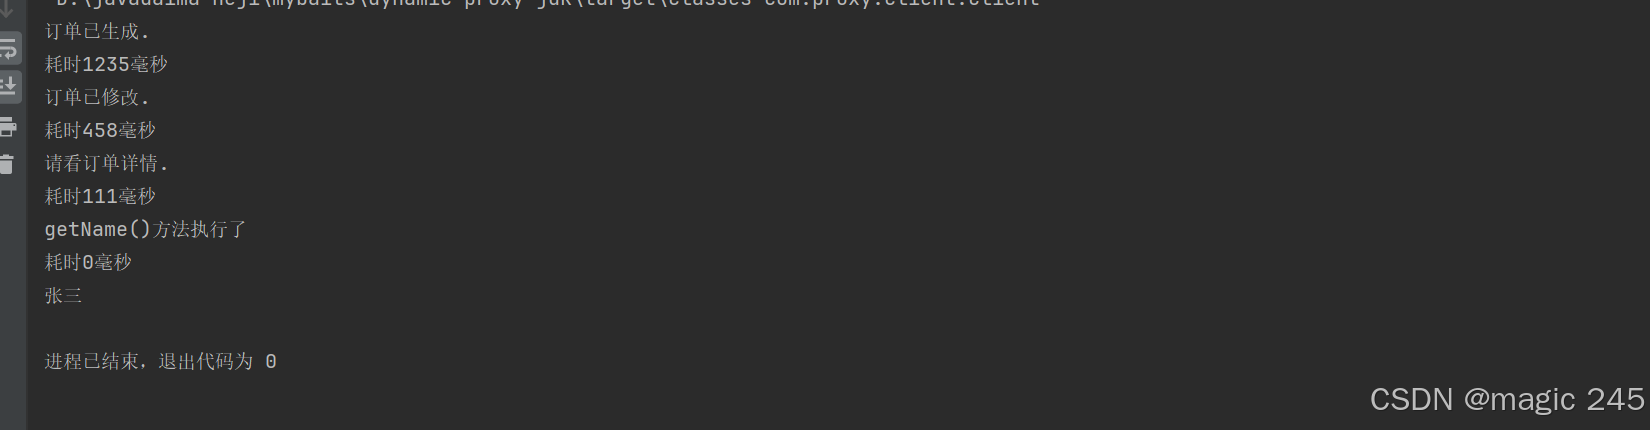
proxyObj.generate();
proxyObj.modify();
proxyObj.detail();
String name = proxyObj.getName();
System.out.println(name);
}
}大家可能会比较好奇:那个InvocationHandler接口中的invoke()方法没看见在哪里调用呀? 注意:当你调用代理对象的代理方法的时候,注册在InvocationHandler接口中的invoke()方法会被调用。也就是上面代码第24 25 26行,这三行代码中任意一行代码执行,注册在InvocationHandler接口中的invoke()方法都会被调用。 执行结果:
学到这里可能会感觉有点懵,折腾半天,到最后这不是还得写一个接口的实现类吗?没省劲儿呀?
你要这样想就错了!!!!
我们可以看到,不管你有多少个Service接口,多少个业务类,这个TimerInvocationHandler接口是不是只需要写一次就行了,代码是不是得到复用了!!!!
而且最重要的是,以后程序员只需要关注核心业务的编写了,像这种统计时间的代码根本不需要关注。因为这种统计时间的代码只需要在调用处理器中编写一次即可。
到这里,JDK动态代理的原理就结束了。
不过我们看以下这个代码确实有点繁琐,对于客户端来说,用起来不方便:
我们可以提供一个工具类:ProxyUtil,封装一个方法:
package com.proxy.util;
import com.proxy.service.TimerInvocationHandler;
import java.lang.reflect.Proxy;
/**
* @className ProxyUtil
* @since 1.0
**/
public class ProxyUtil {
/**
* 封装一个工具方法,可以通过这个方法获取代理对象。
* @param target
* @return
*/
public static Object newProxyInstance(Object target){
// 底层是调用的还是JDK的动态代理。
return Proxy.newProxyInstance(target.getClass().getClassLoader(),
target.getClass().getInterfaces(),
new TimerInvocationHandler(target));
}
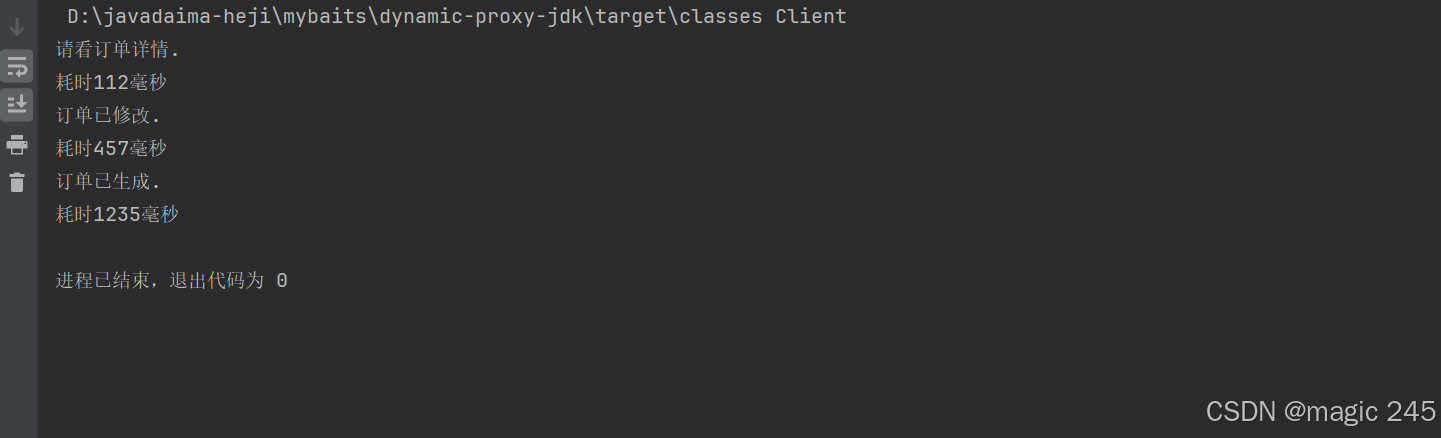
}这样客户端代码就不需要写那么繁琐了:
public class Client {
    public static void main(String[] args) {
        // 创建目标对象
        OrderService target = new OrderServiceImpl();
        // 创建代理对象
        OrderService orderServiceProxy = (OrderService) ProxyUtil.newProxyInstance(target);
        // 调用代理对象的代理方法
        orderServiceProxy.detail();
        orderServiceProxy.modify();
        orderServiceProxy.generate();
    }
}
⑵.CGLIB动态代理
CGLIB既可以代理接口,又可以代理类。底层采用继承的方式实现。所以被代理的目标类不能使用final修饰。 使用CGLIB,需要引入它的依赖:
<dependency>
  <groupId>cglib</groupId>
  <artifactId>cglib</artifactId>
  <version>3.3.0</version>
</dependency>
我们准备一个没有实现接口的类,如下:
/**
 * 目标类
 * @className UserService
 * @since 1.0
 **/
public class UserService {

    // 目标方法
    public boolean login(String username, String password){
        System.out.println("系统正在验证身份...");
        if ("admin".equals(username) && "123".equals(password)) {
            return true;
        }
        return false;
    }

    // 目标方法
    public void logout(){
        System.out.println("系统正在退出...");
    }
}
使用CGLIB在内存中为UserService类生成代理类,并创建对象:
package com.proxy.client;

import com.proxy.service.TimerMethodInterceptor;
import com.proxy.service.UserService;
import net.sf.cglib.proxy.Enhancer;

/**

 * @className Client
 * @since 1.0
 **/


public class Client {
    public static void main(String[] args) {
        // 创建字节码增强器对象
        // 这个对象是CGLIB库当中的核心对象,就是依靠它来生成代理类。
        Enhancer enhancer = new Enhancer();

        // 告诉CGLIB父类是谁。告诉CGLIB目标类是谁。
        enhancer.setSuperclass(UserService.class);

        // 设置回调(等同于JDK动态代理当中的调用处理器。InvocationHandler)
        // 在CGLIB当中不是InvocationHandler接口,是方法拦截器接口:MethodInterceptor
        enhancer.setCallback(new TimerMethodInterceptor());

        // 创建代理对象
        // 这一步会做两件事:
        // 第一件事:在内存中生成UserService类的子类,其实就是代理类的字节码。
        // 第二件事:创建代理对象。
        // 父类是UserService,子类这个代理类一定是UserService
        UserService userServiceProxy = (UserService) enhancer.create();

        // 建议大家能够把CGLIB动态代理生成的代理对象的名字格式有点印象。
        // 根据这个名字可以推测框架底层是否使用了CGLIB动态代理
        System.out.println(userServiceProxy);

        // 调用代理对象的代理方法。
        boolean success = userServiceProxy.login("admin", "123");
        System.out.println(success ? "登录成功" : "登录失败");

        userServiceProxy.logout();
    }
}


// 底层本质
//class UserService$$EnhancerByCGLIB$$82cb55e3 extends UserService{}
和JDK动态代理原理差不多,在CGLIB中需要提供的不是InvocationHandler,而是:net.sf.cglib.proxy.MethodInterceptor 编写MethodInterceptor接口实现类:
public class TimerMethodInterceptor implements MethodInterceptor {
    @Override
    public Object intercept(Object target, Method method, Object[] objects, MethodProxy methodProxy) throws Throwable {
        return null;
    }
}
MethodInterceptor接口中有一个方法intercept(),该方法有4个参数: 第一个参数:目标对象 第二个参数:目标方法 第三个参数:目标方法调用时的实参 第四个参数:代理方法 在MethodInterceptor的intercept()方法中调用目标以及添加增强:
package com.proxy.service;


import net.sf.cglib.proxy.MethodInterceptor;
import net.sf.cglib.proxy.MethodProxy;

import java.lang.reflect.Method;

/**

 * @className TimerMethodInterceptor
 * @since 1.0
 **/
public class TimerMethodInterceptor implements MethodInterceptor {

    @Override
    public Object intercept(Object target, Method method, Object[] objects, MethodProxy methodProxy) throws Throwable {
        // 前面增强
        long begin = System.currentTimeMillis();

        // 怎么调用目标对象的目标方法呢?
        Object retValue = methodProxy.invokeSuper(target, objects);

        // 后面增强
        long end = System.currentTimeMillis();
        System.out.println("耗时"+(end - begin)+"毫秒");

        return retValue;
    }
}
回调已经写完了,可以修改客户端程序了:
public class Client {
    public static void main(String[] args) {
        // 创建字节码增强器
        Enhancer enhancer = new Enhancer();
        // 告诉cglib要继承哪个类
        enhancer.setSuperclass(UserService.class);
        // 设置回调接口
        enhancer.setCallback(new TimerMethodInterceptor());
        // 生成源码,编译class,加载到JVM,并创建代理对象
        UserService userServiceProxy = (UserService)enhancer.create();

        userServiceProxy.login();
        userServiceProxy.logout();

    }
}
对于高版本的JDK,如果使用CGLIB,需要在启动项中添加两个启动参数:
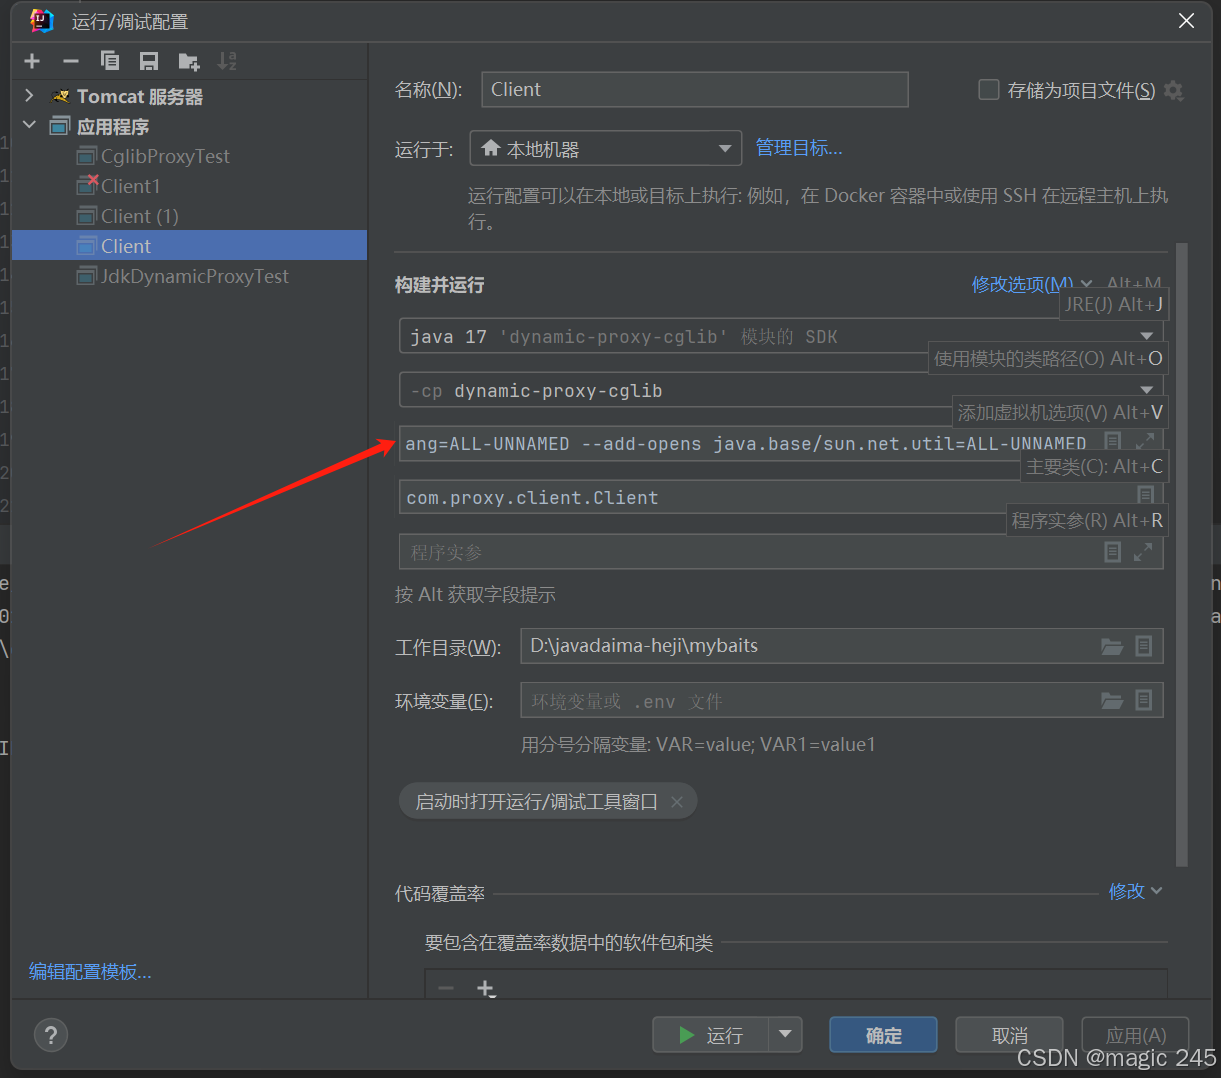
填写 VM 选项
-
在左侧列表中选择你的运行配置(如
Client)。 -
在右侧的 VM options 输入框中,将两个参数合并为一行输入:
--add-opens java.base/java.lang=ALL-UNNAMED --add-opens java.base/sun.net.util=ALL-UNNAMED
执行结果: 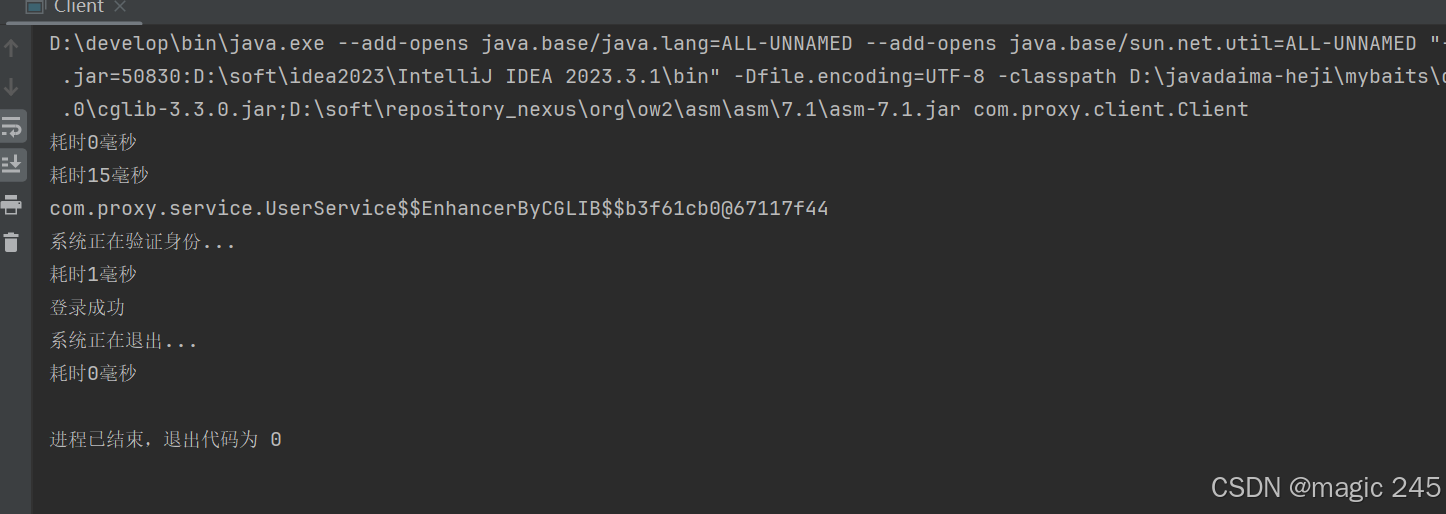
三、面向切面编程AOP
IoC使软件组件松耦合。AOP让你能够捕捉系统中经常使用的功能,把它转化成组件。
AOP(Aspect Oriented Programming):面向切面编程,面向方面编程。(AOP是一种编程技术)
AOP是对OOP的补充延伸。
AOP底层使用的就是动态代理来实现的。
Spring的AOP使用的动态代理是:JDK动态代理 + CGLIB动态代理技术。Spring在这两种动态代理中灵活切换,如果是代理接口,会默认使用JDK动态代理,如果要代理某个类,这个类没有实现接口,就会切换使用CGLIB。当然,你也可以强制通过一些配置让Spring只使用CGLIB。
1.AOP介绍
一般一个系统当中都会有一些系统服务,例如:日志、事务管理、安全等。这些系统服务被称为:交叉业务
这些交叉业务几乎是通用的,不管你是做银行账户转账,还是删除用户数据。日志、事务管理、安全,这些都是需要做的。
如果在每一个业务处理过程当中,都掺杂这些交叉业务代码进去的话,存在两方面问题:
-
第一:交叉业务代码在多个业务流程中反复出现,显然这个交叉业务代码没有得到复用。并且修改这些交叉业务代码的话,需要修改多处。
-
第二:程序员无法专注核心业务代码的编写,在编写核心业务代码的同时还需要处理这些交叉业务。
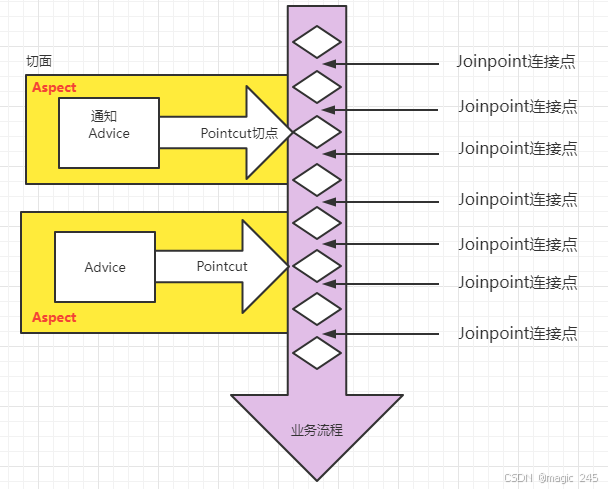
使用AOP可以很轻松的解决以上问题。 请看下图,可以帮助你快速理解AOP的思想:
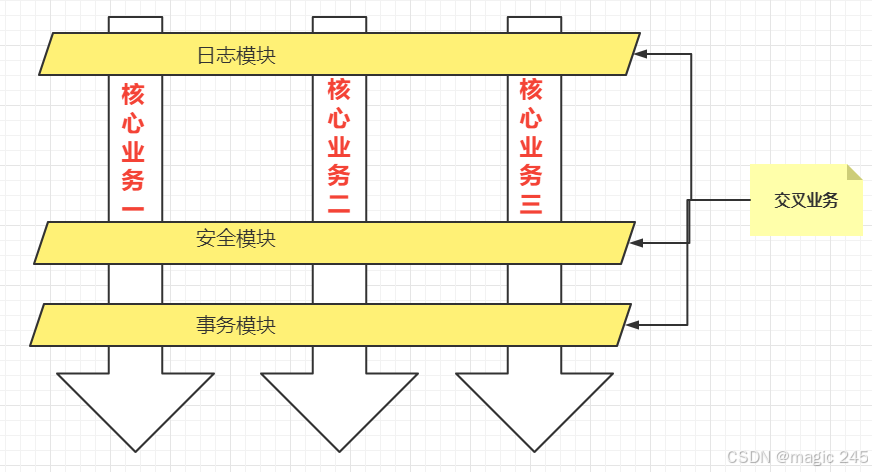
用一句话总结AOP:将与核心业务无关的代码独立的抽取出来,形成一个独立的组件,然后以横向交叉的方式应用到业务流程当中的过程被称为AOP。 AOP的优点:
-
第一:代码复用性增强。
-
第二:代码易维护。
-
第三:使开发者更关注业务逻辑。
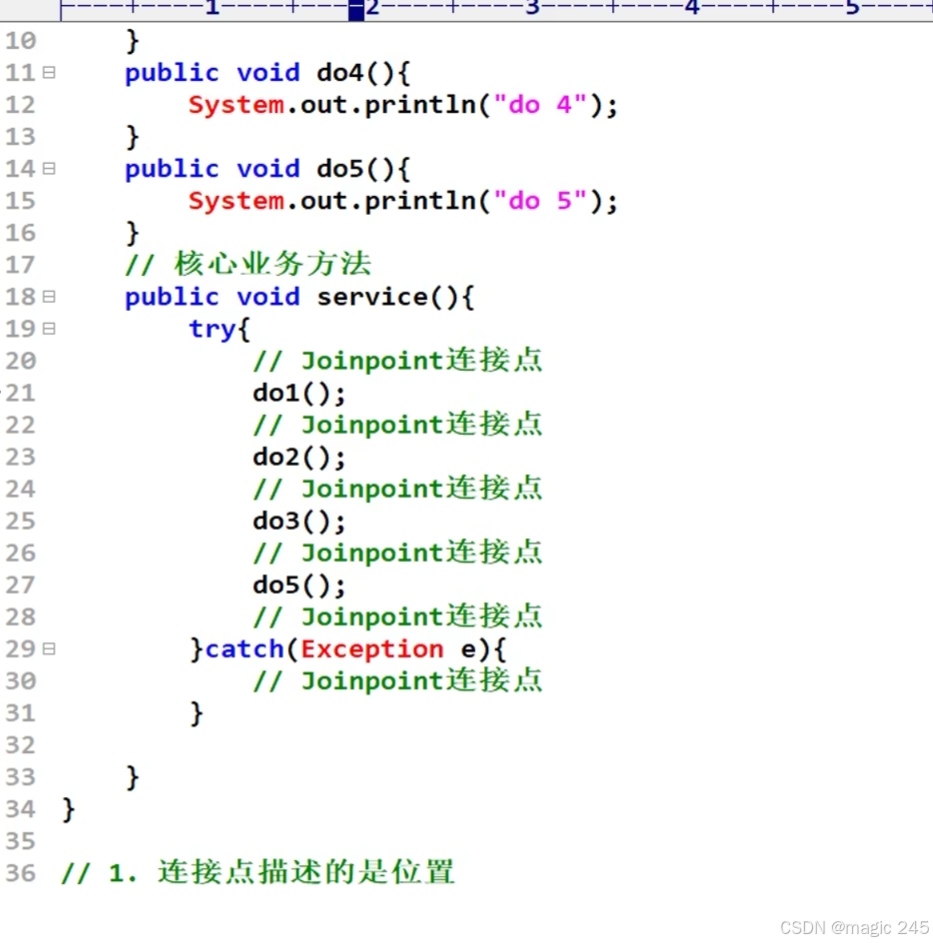
2.AOP的七大术语
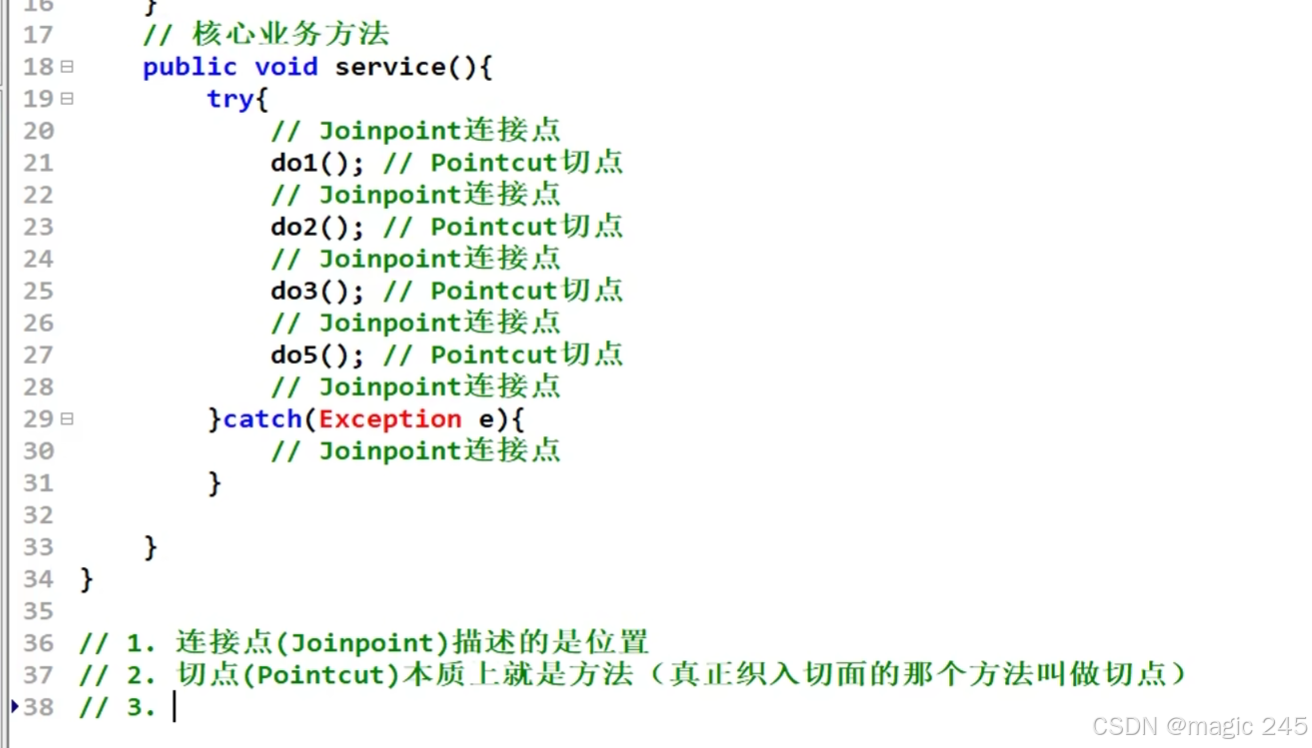
public class UserService{
    public void do1(){
        System.out.println("do 1");
    }
    public void do2(){
        System.out.println("do 2");
    }
    public void do3(){
        System.out.println("do 3");
    }
    public void do4(){
        System.out.println("do 4");
    }
    public void do5(){
        System.out.println("do 5");
    }
    // 核心业务方法
    public void service(){
        do1();
        do2();
        do3();
        do5();
    }
}-
连接点 Joinpoint
- 在程序的整个执行流程中,可以织入切面的位置。方法的执行前后,异常抛出之后等位置。
-
切点 Pointcut
- 在程序执行流程中,真正织入切面的方法。(一个切点对应多个连接点)
-
通知 Advice
-
通知又叫增强,就是具体你要织入的代码。
-
通知包括:
-
前置通知
-
后置通知
-
环绕通知:放方法前后
-
异常通知:放catch
-
最终通知:放finally
-
-
-
切面 Aspect
- 切点 + 通知就是切面。
-
织入 Weaving
- 把通知应用到目标对象上的过程。
-
代理对象 Proxy
- 一个目标对象被织入通知后产生的新对象。
-
目标对象 Target
- 被织入通知的对象。
通过下图,大家可以很好的理解AOP的相关术语:
3.切点表达式
切点表达式用来定义通知(Advice)往哪些方法上切入。 切入点表达式语法格式:
execution([访问控制权限修饰符] 返回值类型 [全限定类名]方法名(形式参数列表) [异常])访问控制权限修饰符:
-
可选项。
-
没写,就是4个权限都包括。
-
写public就表示只包括公开的方法。
返回值类型:
-
必填项。
-
- 表示返回值类型任意。
全限定类名:
-
可选项。
-
两个点".."代表当前包以及子包下的所有类。
-
省略时表示所有的类。
方法名:
-
必填项。
-
*表示所有方法。
-
set*表示所有的set方法。
形式参数列表:
-
必填项
-
() 表示没有参数的方法
-
(..) 参数类型和个数随意的方法
-
(*) 只有一个参数的方法
-
(*, String) 第一个参数类型随意,第二个参数是String的。
异常:
-
可选项。
-
省略时表示任意异常类型。
理解以下的切点表达式:
execution(public * org.example.mall.service.*.delete*(..))

execution(* com.powernode.mall..*(..))

execution(* *(..))
4.使用Spring的AOP
Spring对AOP的实现包括以下3种方式:
-
第一种方式:Spring框架结合AspectJ框架实现的AOP,基于注解方式。
-
第二种方式:Spring框架结合AspectJ框架实现的AOP,基于XML方式。
-
第三种方式:Spring框架自己实现的AOP,基于XML配置方式。
实际开发中,都是Spring+AspectJ来实现AOP。所以我们重点学习第一种和第二种方式。
什么是AspectJ?
(Eclipse组织的一个支持AOP的框架。AspectJ框架是独立于Spring框架之外的一个框架,Spring框架用了AspectJ) AspectJ项目起源于帕洛阿尔托(Palo Alto)研究中心(缩写为PARC)。该中心由Xerox集团资助,Gregor Kiczales领导,从1997年开始致力于AspectJ的开发,1998年第一次发布给外部用户,2001年发布1.0 release。为了推动AspectJ技术和社团的发展,PARC在2003年3月正式将AspectJ项目移交给了Eclipse组织,因为AspectJ的发展和受关注程度大大超出了PARC的预期,他们已经无力继续维持它的发展。
⑴.准备工作
使用Spring+AspectJ的AOP需要引入的依赖如下:
<!--spring context依赖-->
<dependency>
  <groupId>org.springframework</groupId>
  <artifactId>spring-context</artifactId>
  <version>6.0.0-M2</version>
</dependency>
<!--spring aop依赖-->
<dependency>
  <groupId>org.springframework</groupId>
  <artifactId>spring-aop</artifactId>
  <version>6.0.0-M2</version>
</dependency>
<!--spring aspects依赖-->
<dependency>
  <groupId>org.springframework</groupId>
  <artifactId>spring-aspects</artifactId>
  <version>6.0.0-M2</version>
</dependency>
Spring配置文件中添加context命名空间和aop命名空间
<?xml version="1.0" encoding="UTF-8"?>
<beans xmlns="http://www.springframework.org/schema/beans"
       xmlns:xsi="http://www.w3.org/2001/XMLSchema-instance"
       xmlns:context="http://www.springframework.org/schema/context"
       xmlns:aop="http://www.springframework.org/schema/aop"
       xsi:schemaLocation="http://www.springframework.org/schema/beans http://www.springframework.org/schema/beans/spring-beans.xsd
                           http://www.springframework.org/schema/context http://www.springframework.org/schema/context/spring-context.xsd
                           http://www.springframework.org/schema/aop http://www.springframework.org/schema/aop/spring-aop.xsd">

</beans>
⑵.基于AspectJ的AOP注解式开发
没有接口使用cglib代理
①实现步骤
Ⅰ第一步:定义目标类以及目标方法
package com.spring6.service;
import org.springframework.stereotype.Service;
/**
目标类
* @className UserService
* @since 1.0
**/
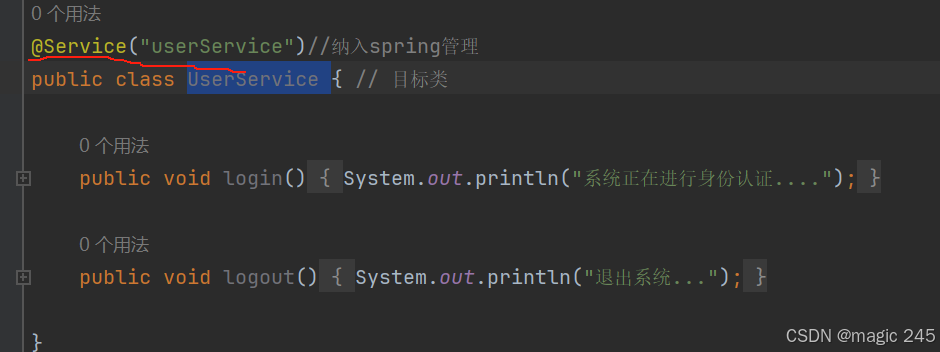
@Service("userService")//纳入spring管理
public class UserService { // 目标类
public void login(){ // 目标方法
System.out.println("系统正在进行身份认证....");
}
public void logout(){
System.out.println("退出系统...");
}
}Ⅱ.第二步:定义切面类
package com.spring6.service;
import org.aspectj.lang.JoinPoint;
import org.aspectj.lang.ProceedingJoinPoint;
import org.aspectj.lang.Signature;
import org.aspectj.lang.annotation.*;
import org.springframework.core.annotation.Order;
import org.springframework.stereotype.Component;
/**
* @className LogAspect
* @since 1.0
**/
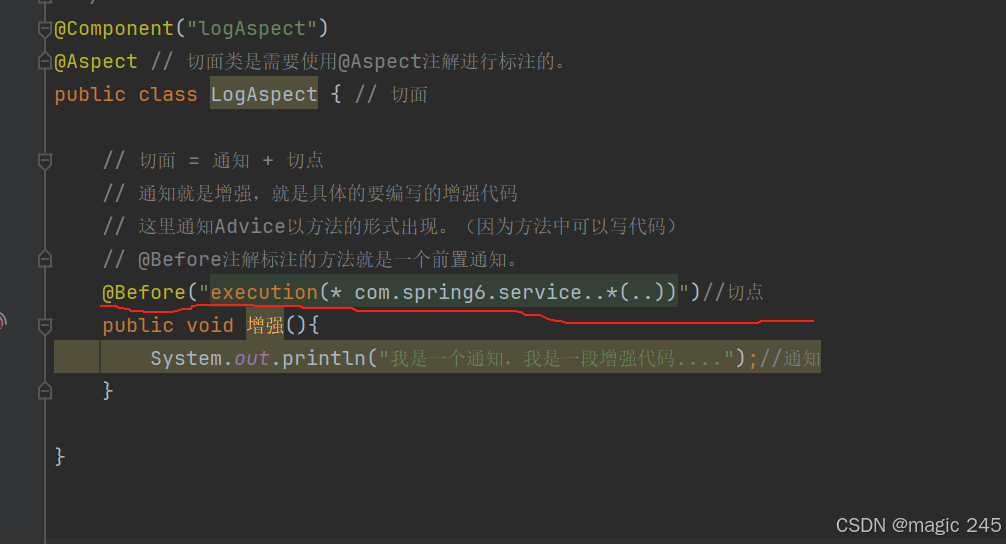
@Component("logAspect")
@Aspect // 切面类是需要使用@Aspect注解进行标注的。
public class LogAspect { // 切面
// 切面 = 通知 + 切点
// 通知就是增强,就是具体的要编写的增强代码
// 这里通知Advice以方法的形式出现。(因为方法中可以写代码)
// @Before注解标注的方法就是一个前置通知。
@Before("execution(* com.spring6.service..*(..))")//切点
public void 增强(){
System.out.println("我是一个通知,我是一段增强代码....");//通知
}
}Ⅲ.第三步:目标类和切面类都纳入spring bean管理
在目标类UserService添加**@Component或@Service**注解。
在切面类LogAspect类上添加**@Component**注解。

Ⅳ.第四步:在spring配置文件中添加组建扫描
<?xml version="1.0" encoding="UTF-8"?>
<beans xmlns="http://www.springframework.org/schema/beans"
       xmlns:xsi="http://www.w3.org/2001/XMLSchema-instance"
       xmlns:context="http://www.springframework.org/schema/context"
       xmlns:aop="http://www.springframework.org/schema/aop"
       xsi:schemaLocation="http://www.springframework.org/schema/beans http://www.springframework.org/schema/beans/spring-beans.xsd
                           http://www.springframework.org/schema/context http://www.springframework.org/schema/context/spring-context.xsd
                           http://www.springframework.org/schema/aop http://www.springframework.org/schema/aop/spring-aop.xsd">
    <!--开启组件扫描-->
    <context:component-scan base-package="com.spring6.service"/>
</beans>
Ⅴ.第五步:在切面类中添加通知

Ⅵ.第六步:在通知上添加切点表达式
注解@Before表示前置通知。
Ⅶ.第七步:在spring配置文件中启用自动代理
<?xml version="1.0" encoding="UTF-8"?>
<beans xmlns="http://www.springframework.org/schema/beans"
       xmlns:xsi="http://www.w3.org/2001/XMLSchema-instance"
       xmlns:context="http://www.springframework.org/schema/context"
       xmlns:aop="http://www.springframework.org/schema/aop"
       xsi:schemaLocation="http://www.springframework.org/schema/beans http://www.springframework.org/schema/beans/spring-beans.xsd
                           http://www.springframework.org/schema/context http://www.springframework.org/schema/context/spring-context.xsd
                           http://www.springframework.org/schema/aop http://www.springframework.org/schema/aop/spring-aop.xsd">

    <!--组件扫描-->
    <context:component-scan base-package="com.spring6.service"/>

    <!--开启aspectj的自动代理-->
    <!--spring容器在扫描类的时候,查看该类上是否有@Aspect注解,如果有,则给这个类生成代理对象。-->
    <!--
        proxy-target-class="true"  表示强制使用CGLIB动态代理
        proxy-target-class="false" 这是默认值,表示接口使用JDK动态代理,反之使用CGLIB动态代理。
     -->
    <aop:aspectj-autoproxy proxy-target-class="true"/>

</beans>
<aop:aspectj-autoproxy proxy-target-class="true"/> 开启自动代理之后,凡事带有@Aspect注解的bean都会生成代理对象。 proxy-target-class="true" 表示采用cglib动态代理。
proxy-target-class="false" 表示采用jdk动态代理。默认值是false。即使写成false,当没有接口的时候,也会自动选择cglib生成代理类。
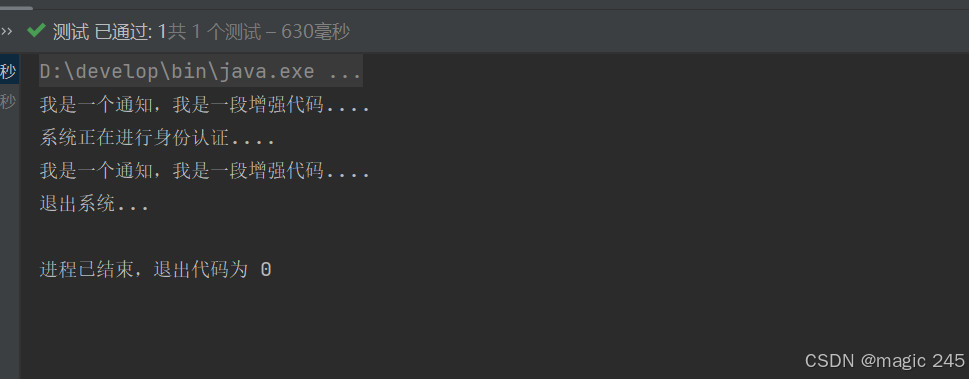
测试程序:
    @Test
    public void testBefore(){
        ApplicationContext applicationContext = new ClassPathXmlApplicationContext("spring.xml");

        UserService userService = applicationContext.getBean("userService", UserService.class);
        userService.login();
        userService.logout();

    }
②通知类型
通知类型包括:
-
前置通知:@Before 目标方法执行之前的通知
-
后置通知:@AfterReturning 目标方法执行之后的通知
-
环绕通知:@Around 目标方法之前添加通知,同时目标方法执行之后添加通知。
-
异常通知:@AfterThrowing 发生异常之后执行的通知
-
最终通知:@After 放在finally语句块中的通知
接下来,编写程序来测试这几个通知的执行顺序:
package com.spring6.service;
import org.aspectj.lang.JoinPoint;
import org.aspectj.lang.ProceedingJoinPoint;
import org.aspectj.lang.Signature;
import org.aspectj.lang.annotation.*;
import org.springframework.core.annotation.Order;
import org.springframework.stereotype.Component;
/**
* @className LogAspect
* @since 1.0
**/
@Component("logAspect")
@Aspect // 切面类是需要使用@Aspect注解进行标注的。
public class LogAspect { // 切面
// 切面 = 通知 + 切点
// 通知就是增强,就是具体的要编写的增强代码
// 这里通知Advice以方法的形式出现。(因为方法中可以写代码)
// @Before注解标注的方法就是一个前置通知。
/* @Before("execution(* com.spring6.service..*(..))")//切点
public void 增强(){
System.out.println("我是一个通知,我是一段增强代码....");//通知
}*/
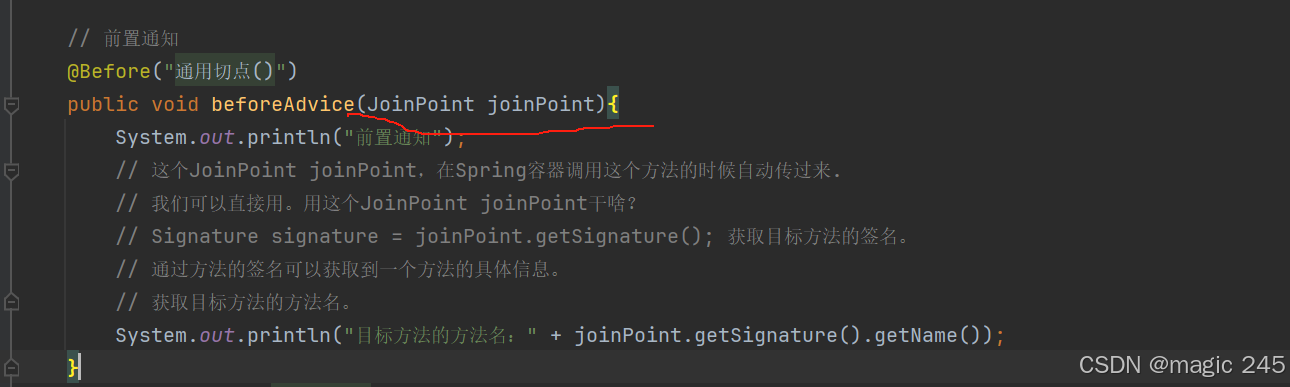
@Before("execution(* com.spring6.service..*(..))")
public void beforeAdvice(){
System.out.println("前置通知");
}
@AfterReturning("execution(* com.spring6.service.OrderService.*(..))")
public void afterReturningAdvice(){
System.out.println("后置通知");
}
// 环绕通知(环绕是最大的通知,在前置通知之前,在后置通知之后。)
@Around("execution(* com.spring6.service.OrderService.*(..))")
public void aroundAdvice(ProceedingJoinPoint proceedingJoinPoint) throws Throwable {
System.out.println("环绕通知开始");
// 执行目标方法。
proceedingJoinPoint.proceed();
System.out.println("环绕通知结束");
}
@AfterThrowing("execution(* com.spring6.service.OrderService.*(..))")
public void afterThrowingAdvice(){
System.out.println("异常通知");
}
@After("execution(* com.spring6.service.OrderService.*(..))")
public void afterAdvice(){
System.out.println("最终通知");
}
}Test
    @Test
    public void testBefore(){
        ApplicationContext applicationContext = new ClassPathXmlApplicationContext("spring.xml");


        OrderService orderService = applicationContext.getBean("orderService", OrderService.class);
        orderService.generate();
    }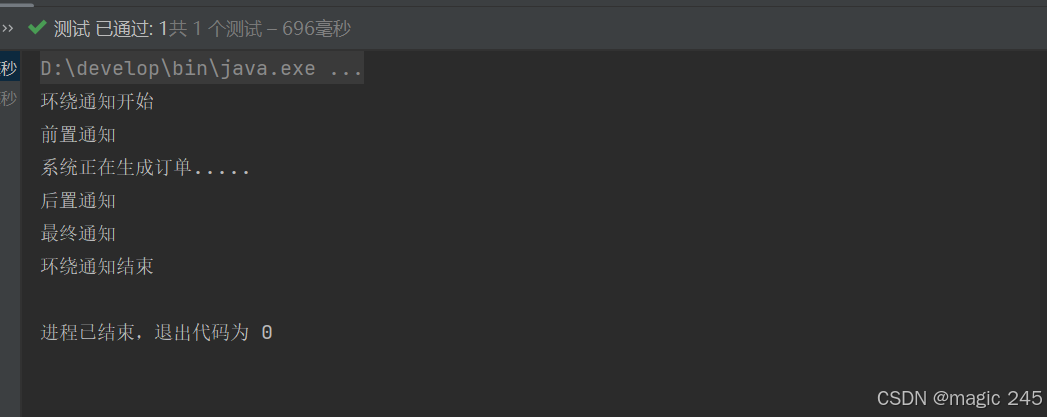
通过上面的执行结果就可以判断他们的执行顺序了,这里不再赘述。
结果中没有异常通知,这是因为目标程序执行过程中没有发生异常。我们尝试让目标方法发生异常:
@Service("orderService")
public class OrderService { // 目标类
// 目标方法
public void generate(){
System.out.println("系统正在生成订单.....");
if (1 == 1) {
throw new RuntimeException("运行时异常");//模拟异常发生
}
}
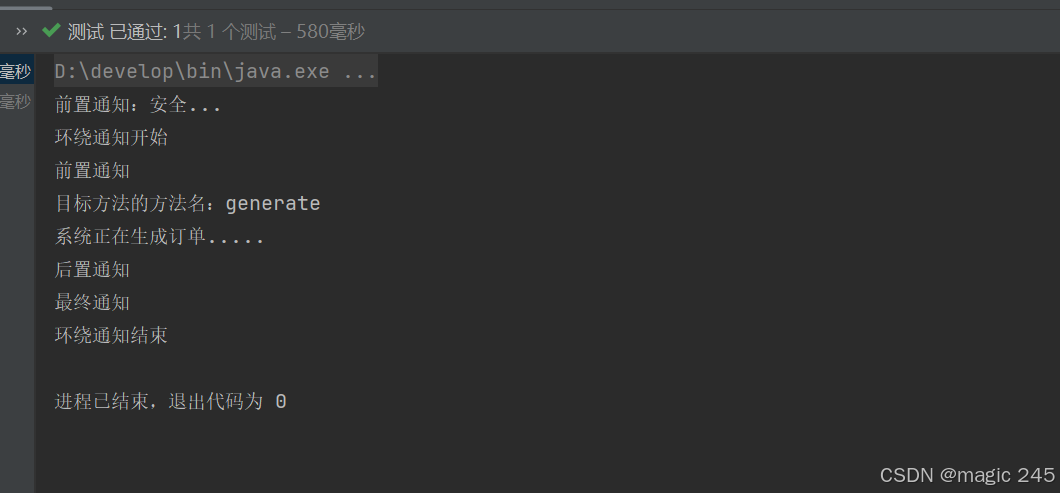
}再次执行测试程序,结果如下:

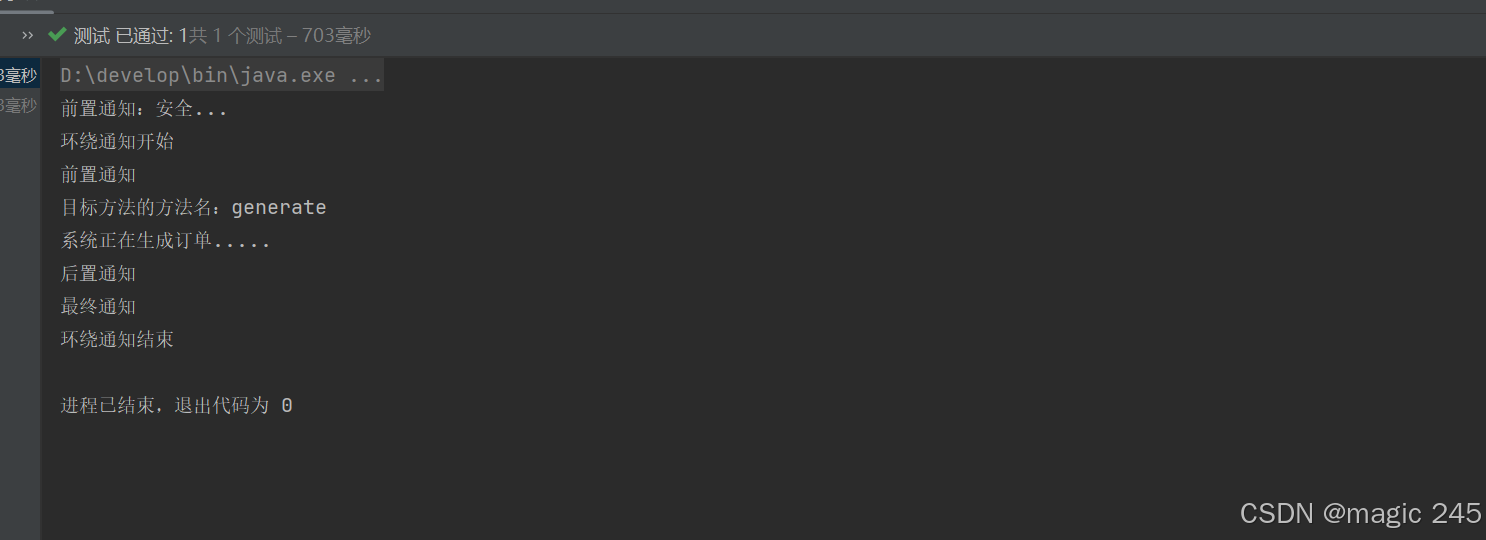
通过测试得知,当发生异常之后,最终通知也会执行,因为最终通知@After会出现在finally语句块中。 出现异常之后,后置通知 和环绕通知的结束部分不会执行。
③切面的先后顺序
我们知道,业务流程当中不一定只有一个切面,可能有的切面控制事务,有的记录日志,有的进行安全控制,如果多个切面的话,顺序如何控制:
可以使用@Order注解来标识切面类,为@Order注解的value指定一个整数型的数字,数字越小,优先级越高。
再定义一个切面类,如下:

package com.spring6.service;

import org.aspectj.lang.annotation.Aspect;
import org.aspectj.lang.annotation.Before;
import org.springframework.core.annotation.Order;
import org.springframework.stereotype.Component;

/**
 * @className SecurityAspect
 * @since 1.0
 **/
@Aspect
@Component
@Order(1) // 数字越小,优先级越高。
public class SecurityAspect { // 安全切面

    // 通知 + 切点
    @Before("execution(* com.spring6.service..*(..))")

    public void beforeAdvice(){
        System.out.println("前置通知:安全...");
    }

}

package com.spring6.service;

import org.aspectj.lang.JoinPoint;
import org.aspectj.lang.ProceedingJoinPoint;
import org.aspectj.lang.Signature;
import org.aspectj.lang.annotation.*;
import org.springframework.core.annotation.Order;
import org.springframework.stereotype.Component;

/**

 * @className LogAspect
 * @since 1.0
 **/
@Component("logAspect")
@Aspect // 切面类是需要使用@Aspect注解进行标注的。
@Order(2) // 数字越小,优先级越高。
public class LogAspect { // 切面

    // 切面 = 通知 + 切点
    // 通知就是增强,就是具体的要编写的增强代码
    // 这里通知Advice以方法的形式出现。(因为方法中可以写代码)
    // @Before注解标注的方法就是一个前置通知。
  /*  @Before("execution(* com.spring6.service..*(..))")//切点
    public void 增强(){
        System.out.println("我是一个通知,我是一段增强代码....");//通知
    }*/
@Before("execution(* com.spring6.service..*(..))")
    public void beforeAdvice(){
    System.out.println("前置通知");
}
    @AfterReturning("execution(* com.spring6.service.OrderService.*(..))")
    public void afterReturningAdvice(){
        System.out.println("后置通知");
    }
    // 环绕通知(环绕是最大的通知,在前置通知之前,在后置通知之后。)
    @Around("execution(* com.spring6.service.OrderService.*(..))")
    public void aroundAdvice(ProceedingJoinPoint proceedingJoinPoint) throws Throwable {

        System.out.println("环绕通知开始");
        // 执行目标方法。
        proceedingJoinPoint.proceed();
        System.out.println("环绕通知结束");
    }


    @AfterThrowing("execution(* com.spring6.service.OrderService.*(..))")
    public void afterThrowingAdvice(){
        System.out.println("异常通知");
    }

    @After("execution(* com.spring6.service.OrderService.*(..))")
    public void afterAdvice(){
        System.out.println("最终通知");
    }


}
Test
   @Test
    public void testBefore(){
        ApplicationContext applicationContext = new ClassPathXmlApplicationContext("spring.xml");


        OrderService orderService = applicationContext.getBean("orderService", OrderService.class);
        orderService.generate();
    }
④优化使用切点表达式
观看以下代码中的切点表达式:
package com.spring6.service;

import org.aspectj.lang.JoinPoint;
import org.aspectj.lang.ProceedingJoinPoint;
import org.aspectj.lang.Signature;
import org.aspectj.lang.annotation.*;
import org.springframework.core.annotation.Order;
import org.springframework.stereotype.Component;

/**

 * @className LogAspect
 * @since 1.0
 **/
@Component("logAspect")
@Aspect // 切面类是需要使用@Aspect注解进行标注的。
@Order(2) // 数字越小,优先级越高。
public class LogAspect { // 切面

    // 切面 = 通知 + 切点
    // 通知就是增强,就是具体的要编写的增强代码
    // 这里通知Advice以方法的形式出现。(因为方法中可以写代码)
    // @Before注解标注的方法就是一个前置通知。
  /*  @Before("execution(* com.spring6.service..*(..))")//切点
    public void 增强(){
        System.out.println("我是一个通知,我是一段增强代码....");//通知
    }*/
@Before("execution(* com.spring6.service..*(..))")
    public void beforeAdvice(){
    System.out.println("前置通知");
}
    @AfterReturning("execution(* com.spring6.service.OrderService.*(..))")
    public void afterReturningAdvice(){
        System.out.println("后置通知");
    }
    // 环绕通知(环绕是最大的通知,在前置通知之前,在后置通知之后。)
    @Around("execution(* com.spring6.service.OrderService.*(..))")
    public void aroundAdvice(ProceedingJoinPoint proceedingJoinPoint) throws Throwable {

        System.out.println("环绕通知开始");
        // 执行目标方法。
        proceedingJoinPoint.proceed();
        System.out.println("环绕通知结束");
    }


    @AfterThrowing("execution(* com.spring6.service.OrderService.*(..))")
    public void afterThrowingAdvice(){
        System.out.println("异常通知");
    }

    @After("execution(* com.spring6.service.OrderService.*(..))")
    public void afterAdvice(){
        System.out.println("最终通知");
    }


}
缺点是:
-
第一:切点表达式重复写了多次,没有得到复用。
-
第二:如果要修改切点表达式,需要修改多处,难维护。
可以这样做:将切点表达式单独的定义出来,在需要的位置引入即可。如下:
/**

 * @className LogAspect
 * @since 1.0
 **/
@Component("logAspect")
@Aspect // 切面类是需要使用@Aspect注解进行标注的。
@Order(2) // 数字越小,优先级越高。
public class LogAspect { // 切面

    // 切面 = 通知 + 切点
    // 通知就是增强,就是具体的要编写的增强代码
    // 这里通知Advice以方法的形式出现。(因为方法中可以写代码)
    // @Before注解标注的方法就是一个前置通知。
  /*  @Before("execution(* com.spring6.service..*(..))")//切点
    public void 增强(){
        System.out.println("我是一个通知,我是一段增强代码....");//通知
    }*/

    // 定义通用的切点表达式
    @Pointcut("execution(* com.spring6.service..*(..))")
    public void 通用切点(){
        // 这个方法只是一个标记,方法名随意,方法体中也不需要写任何代码。
    }
@Before("通用切点()")
    public void beforeAdvice(){
    System.out.println("前置通知");
}
    @AfterReturning("通用切点()")
    public void afterReturningAdvice(){
        System.out.println("后置通知");
    }
    // 环绕通知(环绕是最大的通知,在前置通知之前,在后置通知之后。)
    @Around("通用切点()")
    public void aroundAdvice(ProceedingJoinPoint proceedingJoinPoint) throws Throwable {

        System.out.println("环绕通知开始");
        // 执行目标方法。
        proceedingJoinPoint.proceed();
        System.out.println("环绕通知结束");
    }


    @AfterThrowing("通用切点()")
    public void afterThrowingAdvice(){
        System.out.println("异常通知");
    }

    @After("通用切点()")
    public void afterAdvice(){
        System.out.println("最终通知");
    }

}
使用@Pointcut注解来定义独立的切点表达式。
注意这个@Pointcut注解标注的方法随意,只是起到一个能够让@Pointcut注解编写的位置。
执行测试程序:

连接点
⑤全注解式开发AOP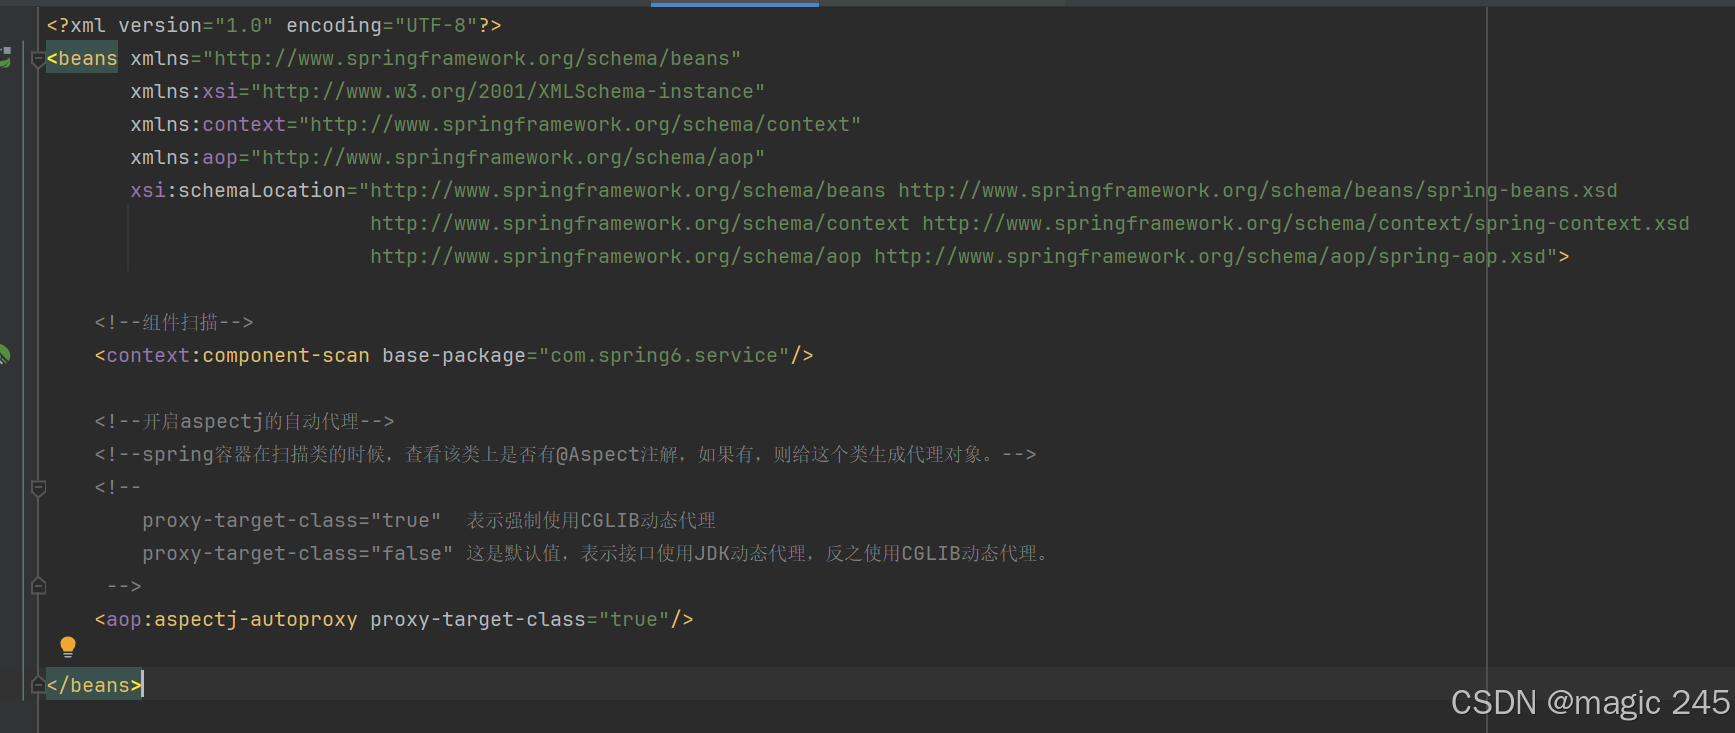
就是编写一个类,在这个类上面使用大量注解来代替spring的配置文件,spring配置文件消失了,如下:
package com.spring6.service;

import org.springframework.context.annotation.ComponentScan;
import org.springframework.context.annotation.Configuration;
import org.springframework.context.annotation.EnableAspectJAutoProxy;

/**

 * @className Spring6Config
 * @since 1.0
 **/
@Configuration // 代替spring.xml文件
@ComponentScan({"com.spring6.service"}) // 组件扫描
@EnableAspectJAutoProxy(proxyTargetClass = true) // 启用aspectj的自动代理机制。
public class Spring6Config {
}
Test
    @Test
    public void testNoXml(){
        ApplicationContext applicationContext = new AnnotationConfigApplicationContext(Spring6Config.class);
        OrderService orderService = applicationContext.getBean("orderService", OrderService.class);
        orderService.generate();
    }
⑶.基于XML配置方式的AOP(了解)
第一步:编写目标类
/**

 * @className UserService
 * @since 1.0
 **/
public class UserService {//目标对象
    public void logout(){ //目标方法
        System.out.println("系统正在安全退出...");
    }
}
第二步:编写切面类,并且编写通知
/**

 * @className TimerAspect
 * @since 1.0
 **/
public class TimerAspect {

    // 通知
    public void aroundAdvice(ProceedingJoinPoint joinPoint) throws Throwable {
        // 前环绕
        long begin = System.currentTimeMillis();
        // 目标
        joinPoint.proceed();
        // 后环绕
        long end = System.currentTimeMillis();
        System.out.println("耗时"+(end - begin)+"毫秒");
    }
}
第三步:编写spring配置文件
<?xml version="1.0" encoding="UTF-8"?>
<beans xmlns="http://www.springframework.org/schema/beans"
xmlns:xsi="http://www.w3.org/2001/XMLSchema-instance"
xmlns:context="http://www.springframework.org/schema/context"
xmlns:aop="http://www.springframework.org/schema/aop"
xsi:schemaLocation="http://www.springframework.org/schema/beans http://www.springframework.org/schema/beans/spring-beans.xsd
http://www.springframework.org/schema/context http://www.springframework.org/schema/context/spring-context.xsd
http://www.springframework.org/schema/aop http://www.springframework.org/schema/aop/spring-aop.xsd">
<!--纳入spring ioc-->
<bean id="userService" class="com.spring6.service.UserService"></bean>
<bean id="timerAspect" class="com.spring6.service.TimerAspect"></bean>
<!--aop的配置-->
<aop:config>
<!--切点表达式-->
<aop:pointcut id="mypointcut" expression="execution(* com.spring6.service..*(..))" />
<!--切面:通知 + 切点-->
<aop:aspect ref="timerAspect">
<aop:around method="aroundAdvice" pointcut-ref="mypointcut"/>
</aop:aspect>
</aop:config>
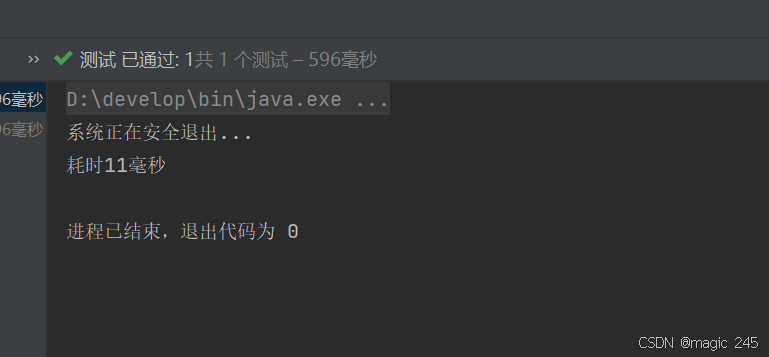
</beans>测试程序:
    @Test
    public void testXml(){
        ApplicationContext applicationContext = new ClassPathXmlApplicationContext("spring.xml");
        UserService userService = applicationContext.getBean("userService", UserService.class);
        userService.logout();
    }
5.AOP的实际案例:事务处理
项目中的事务控制是在所难免的。在一个业务流程当中,可能需要多条DML语句共同完成,为了保证数据的安全,这多条DML语句要么同时成功,要么同时失败。
这就需要添加事务控制的代码。例如以下伪代码:
class 业务类1{
    public void 业务方法1(){
        try{
            // 开启事务
            startTransaction();

            // 执行核心业务逻辑
            step1();
            step2();
            step3();
            ....

            // 提交事务
            commitTransaction();
        }catch(Exception e){
            // 回滚事务
            rollbackTransaction();
        }
    }
    public void 业务方法2(){
        try{
            // 开启事务
            startTransaction();

            // 执行核心业务逻辑
            step1();
            step2();
            step3();
            ....

            // 提交事务
            commitTransaction();
        }catch(Exception e){
            // 回滚事务
            rollbackTransaction();
        }
    }
    public void 业务方法3(){
        try{
            // 开启事务
            startTransaction();

            // 执行核心业务逻辑
            step1();
            step2();
            step3();
            ....

            // 提交事务
            commitTransaction();
        }catch(Exception e){
            // 回滚事务
            rollbackTransaction();
        }
    }
}

class 业务类2{
    public void 业务方法1(){
        try{
            // 开启事务
            startTransaction();

            // 执行核心业务逻辑
            step1();
            step2();
            step3();
            ....

            // 提交事务
            commitTransaction();
        }catch(Exception e){
            // 回滚事务
            rollbackTransaction();
        }
    }
    public void 业务方法2(){
        try{
            // 开启事务
            startTransaction();

            // 执行核心业务逻辑
            step1();
            step2();
            step3();
            ....

            // 提交事务
            commitTransaction();
        }catch(Exception e){
            // 回滚事务
            rollbackTransaction();
        }
    }
    public void 业务方法3(){
        try{
            // 开启事务
            startTransaction();

            // 执行核心业务逻辑
            step1();
            step2();
            step3();
            ....

            // 提交事务
            commitTransaction();
        }catch(Exception e){
            // 回滚事务
            rollbackTransaction();
        }
    }
}
//......
可以看到,这些业务类中的每一个业务方法都是需要控制事务的,而控制事务的代码又是固定的格式,都是:
try{
    // 开启事务
    startTransaction();

    // 执行核心业务逻辑
    //......

    // 提交事务
    commitTransaction();
}catch(Exception e){
    // 回滚事务
    rollbackTransaction();
}这个控制事务的代码就是和业务逻辑没有关系的"交叉业务"。以上伪代码当中可以看到这些交叉业务的代码没有得到复用,并且如果这些交叉业务代码需要修改,那必然需要修改多处,难维护,怎么解决?可以采用AOP思想解决。可以把以上控制事务的代码作为环绕通知,切入到目标类的方法当中。
接下来我们做一下这件事,有两个业务类,如下:
/**

 * @className AccountService
 * @since 1.0
 **/
@Service
public class AccountService { // 目标对象

    // 目标方法
    // 转账的业务方法
    public void transfer(){
        System.out.println("银行账户正在完成转账操作...");
    }

    // 目标方法
    // 取款的业务方法
    public void withdraw(){
        System.out.println("正在取款,请稍后...");
    }

}

/**

 * @className OrderService
 * @since 1.0
 **/
@Service
public class OrderService { // 目标对象

    // 目标方法
    // 生成订单的业务方法
    public void generate(){
        System.out.println("正在生成订单...");
    }

    // 目标方法
    // 取消订单的业务方法
    public void cancel(){
        System.out.println("订单已取消...");
    }

}
注意,以上两个业务类已经纳入spring bean的管理,因为都添加了@Component注解。
接下来我们给以上两个业务类的4个方法添加事务控制代码,使用AOP来完成:
@Component
@Aspect
public class TransactionAspect {

    // 编程式事务解决方案。
    @Around("execution(* com.spring6.service..*(..))")
    public void aroundAdvice(ProceedingJoinPoint joinPoint){
        try {
            // 前环绕
            System.out.println("开启事务");
            // 执行目标
            joinPoint.proceed();
            // 后环绕
            System.out.println("提交事务");
        } catch (Throwable e) {
            System.out.println("回滚事务");
        }
    }


}
你看,这个事务控制代码是不是只需要写一次就行了,并且修改起来也没有成本。
编写测试程序:
   @Test
    public void testTransaction(){
        ApplicationContext applicationContext = new ClassPathXmlApplicationContext("spring.xml");
        AccountService accountService = applicationContext.getBean("accountService", AccountService.class);
        OrderService orderService = applicationContext.getBean("orderService", OrderService.class);

        accountService.transfer();
        accountService.withdraw();
        orderService.generate();
        orderService.cancel();
    }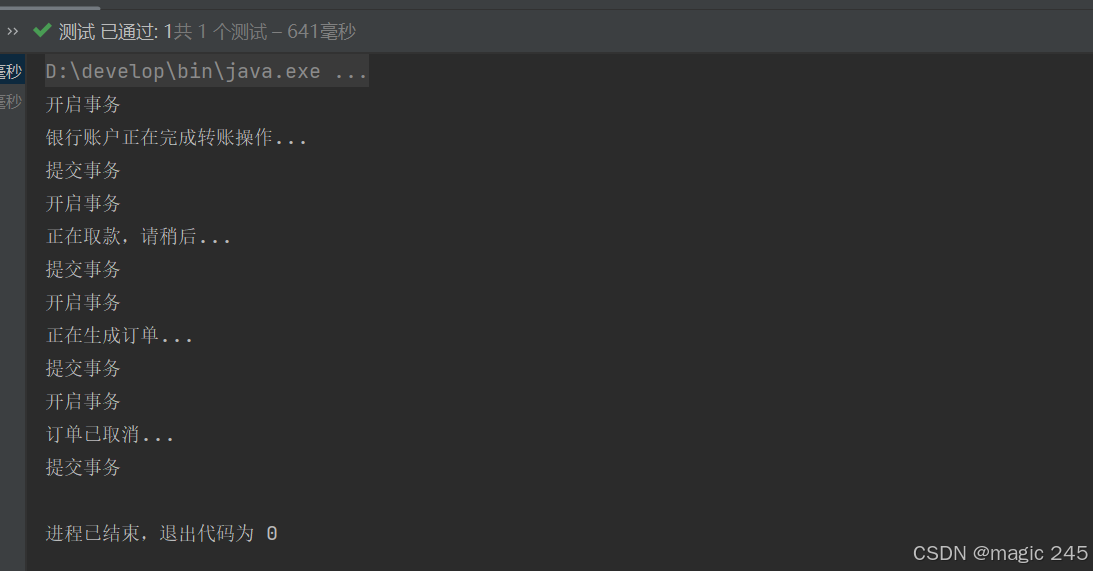
通过测试可以看到,所有的业务方法都添加了事务控制的代码。
6.AOP的实际案例:安全日志
需求是这样的:项目开发结束了,已经上线了。运行正常。客户提出了新的需求:凡事在系统中进行修改操作的,删除操作的,新增操作的,都要把这个人记录下来。因为这几个操作是属于危险行为。例如有业务类和业务方法:
/**
 * @className VipService
 * @since 1.0
 **/
@Service
public class VipService {

    public void saveVip(){
        System.out.println("新增会员信息");
    }

    public void deleteVip(){
        System.out.println("删除会员信息");
    }

    public void modifyVip(){
        System.out.println("修改会员信息");
    }

    public void getVip(){
        System.out.println("获取会员信息");
    }
}

/**
 * @className UserService
 * @since 1.0
 **/
@Service
public class UserService {

    public void saveUser(){
        System.out.println("新增用户信息");
    }

    public void deleteUser(){
        System.out.println("删除用户信息");
    }

    public void modifyUser(){
        System.out.println("修改用户信息");
    }

    public void getUser(){
        System.out.println("获取用户信息");
    }
}
注意:已经添加了@Component注解。
接下来我们使用aop来解决上面的需求:编写一个负责安全的切面类
package com.spring6.biz;
import org.aspectj.lang.JoinPoint;
import org.aspectj.lang.annotation.Aspect;
import org.aspectj.lang.annotation.Before;
import org.aspectj.lang.annotation.Pointcut;
import org.springframework.stereotype.Component;
import java.text.SimpleDateFormat;
import java.util.Date;
/**
* @className SecurityLogAspect
* @since 1.0
**/
@Component
@Aspect
public class SecurityLogAspect {
@Pointcut("execution(* com.spring6.biz..save*(..))")
public void savePointcut(){}
@Pointcut("execution(* com.spring6.biz..delete*(..))")
public void deletePointcut(){}
@Pointcut("execution(* com.spring6.biz..modify*(..))")
public void modifyPointcut(){}
@Before("savePointcut() || deletePointcut() || modifyPointcut()")
public void beforeAdvice(JoinPoint joinPoint){
// 系统时间
SimpleDateFormat sdf = new SimpleDateFormat("yyyy-MM-dd HH:mm:ss SSS");
String nowTime = sdf.format(new Date());
// 输出日志信息
System.out.println(nowTime + " zhangsan : " + joinPoint.getSignature().getDeclaringTypeName() + "." + joinPoint.getSignature().getName());
}
}
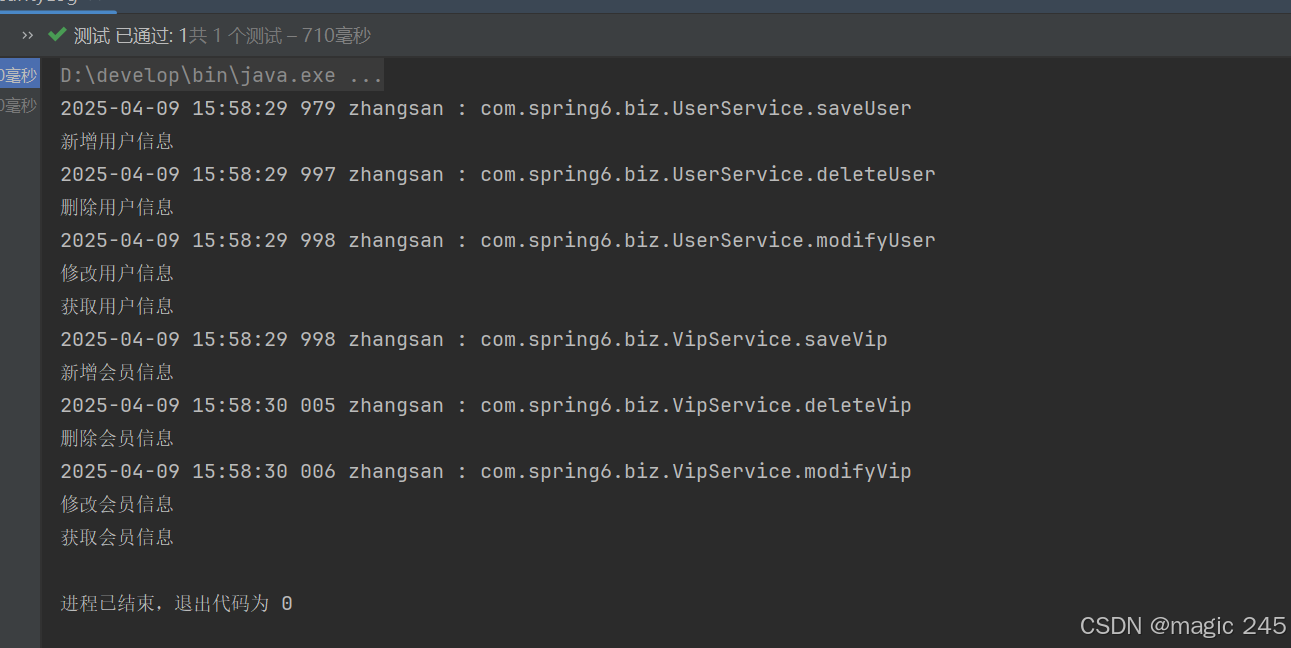
@Test
public void testSecurityLog(){
ApplicationContext applicationContext = new ClassPathXmlApplicationContext("spring.xml");
UserService userService = applicationContext.getBean("userService", UserService.class);
VipService vipService = applicationContext.getBean("vipService", VipService.class);
userService.saveUser();
userService.deleteUser();
userService.modifyUser();
userService.getUser();
vipService.saveVip();
vipService.deleteVip();
vipService.modifyVip();
vipService.getVip();
}