前言
在当下,绝大多数的开发者在开发中后台系统,不管是前端、后端都是在干着一些CRUD的工作,绝大部分都是重复的工作,一些搜索条件、一个表格、一些按钮。看似忙碌的工作,实则对个人的提升意义不大,因为做一个跟做一百个的影响差别不大。如果能有一个可以沉淀出来可复用、支持灵活拓展的方案,那么我们就可以将重复的工作尽可能的抹平,只需要对定制化的功能进行开发,这对我们的开发效率将是一个很大的提升。下面介绍的基于领域模型的建站模式的DSL的设计与实现将实现这一想法,将80%的可复用的业务能力交给配置完成,剩余20%的内容通过定制化开发完成。
一、什么是 DSL ?
在理解什么是DSL之前,我们先了解一下什么是 领域模型。

领域模型就是解决方案。就是描述具体的某一个业务领域的抽象和简化的表示,它是针对特定领域里的关键事物以及其关联的表现,它是为了解决特定问题的抽象的模型。比如一个公司中人力资源部门、财务部门、技术部门都属于一个特定的领域,它解决了特定的问题。 总的来说,领域模型我通俗的理解是它先找到业务中的实际场景,以领域模型为中心去驱动项目的开发,精髓在于面向对象去分析,抽象事物的能力。
 DSL(Domain-Specific Language) 是一种专用于特定领域的计算机语言,设计针对某一特定领域的问题解决。通常用于描述界面布局、组件配置、和行为逻辑,以简化和加速前端开发过程。这也就要求 DSL 具备强大的配置能力,让使用者用起来更简单。DSL就是根据自定义的DSL规则来书写一份DSL脚本,也就是具体的 Schema Config 配置,里面包含了想要生成的页面内容(搜索条件、表格、按钮、弹窗、抽屉...)。
二、如何设计 DSL ?
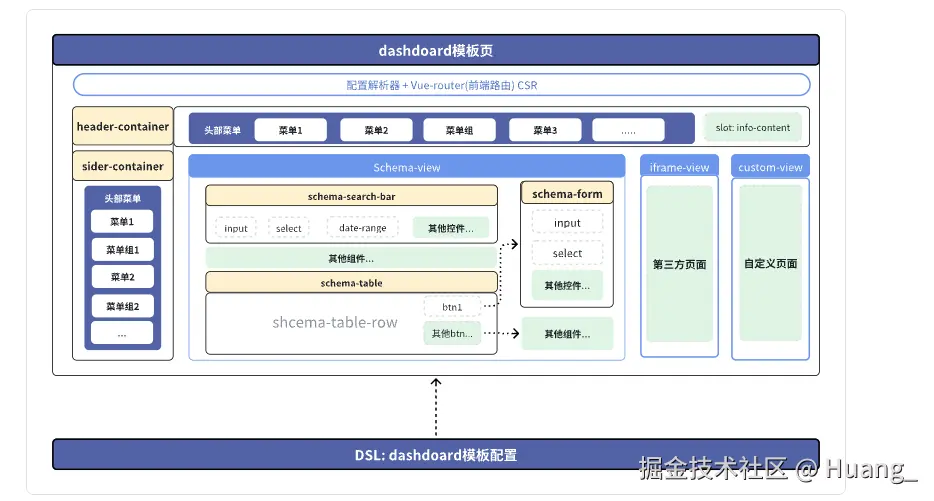
 上面是一份 mode 为 dashborad 的 DSL 配置(根据业务可以由很多mode不一样的配置),这一份配置用来生成对应的页面。生成的页面设计图如下:
三、如何书写 DSL?
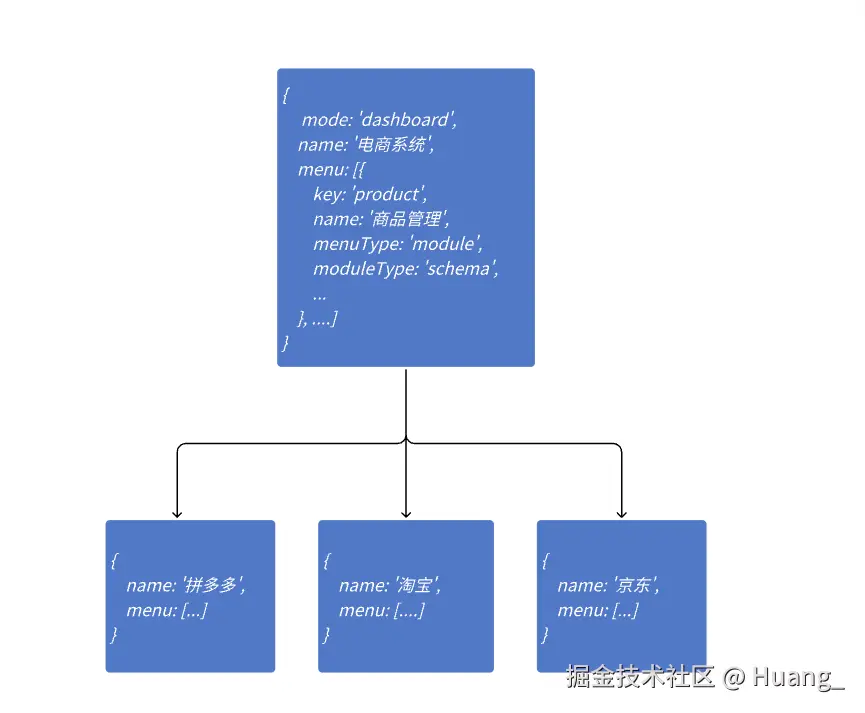
根据上面的设计,我们一份DSL的设计是生成一份中后台的系统,他的颗粒度是一个站点,而不是一个模块或者一个页面。这时候问题就来了,如果我们有多个站点,比如拼多多电商系统、淘宝电商系统、京东电商系统,那么我们就需要三份DSL配置,而且其中大部分的配置都是相同,这样的话,我们目标解决80%重复的工作提升的并没有想象中的极致。这只是由原来重复的书写页面变成重复的配置,依然会有大量的时间浪费。如下图所示一样。
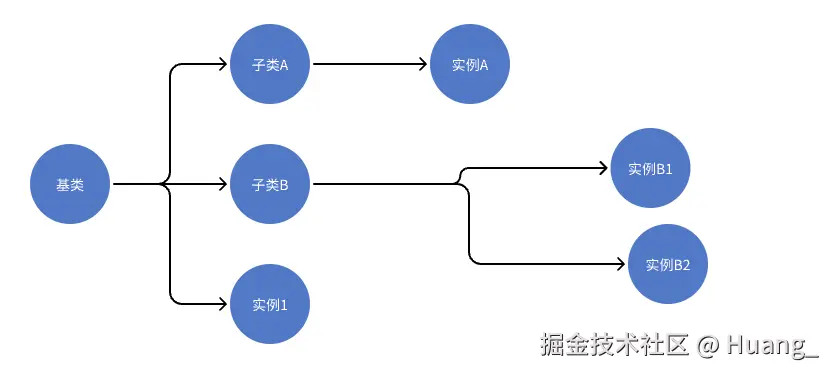
 基于上面的问题,我们可以知道三份配置只有一小部分的字段属性可能不一样,一部分还是一样的配置。我们思考一下,能不能将重复的配置抽象出来,不一样的配置由各自的项目配置去实现呢?这就需要借助面向对象的思想了。面向对象的三大特征:封装、继承、多态。
 最终设计呈现:
四、具体实现
3.1 文件结构
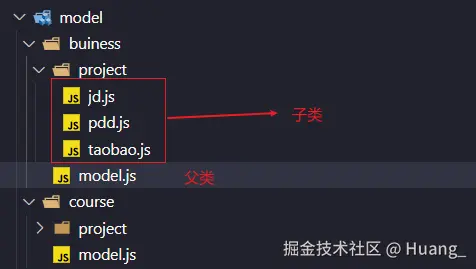
3.2 子类继承基类的实现
js
const _ = require("lodash");
const glob = require("glob");
const path = require("path");
const { sep } = path;

/**
 * project 继承 model 的方法
 * @param {object} model
 * @param {object} project
 */
const projectExtendModel = (model, project) => {
  return _.mergeWith({}, model, project, (modelValue, projValue) => {
    // 处理数组合并的特殊情况
    if (Array.isArray(modelValue) && Array.isArray(projValue)) {
      let result = [];
      // 如果 project 有的键值, model 也有 --> 修改(重载)
      // 如果 project 没有的键值,model有 --> 则继承
      for (let i = 0; i < modelValue.length; i++) {
        const modelItem = modelValue[i];
        const projItem = projValue.find(projItem => projItem.key === modelItem.key);
       result.push(!projItem ? modelItem : projectExtendModel(modelItem, projItem));
      }

       // 如果是 project 有的键值,model 没有 --> 新增
       for (let i = 0; i < projValue.length; i++) {
        const projItem = projValue[i];
        const modelItem = modelValue.find(modelItem => modelItem.key === projItem.key);
        if (!modelItem) {
          result.push(projValue[i]);
        }
      }

      return result;
    }
  })
}

/**
 * 解析 model 配置,并返回组织且继承 model 之后的数据节后
 * [{
 *   model: ${model},
 *   project: {
 *     proj1Key: ${proj1},
 *     proj2Key: ${proj2}
 *   }
 * }, ...]
 */

module.exports = (app) => {
  // 存储组织之后的数据
  const modelList = [];
  // 获取 model 目录
  const modelPath = path.resolve(app.baseDir, `.${sep}model`);
  // 获取 model 下面的所有文件
  const fileList = glob.sync(path.resolve(modelPath, `.${sep}**${sep}**.js`));
  fileList.forEach(file => {
    // file = path.resolve(file);
    // 如果 file 是当前目录的话,就不处理
    if (file.indexOf('index.js') > -1) {
      return;
    }
    // 如果不是,区分 model 和 project
    // 在 windows 中 glob 会将 \ 转为 /, 所以直接用 / 来判断
    const type = file.indexOf(`/project/`) > -1 ? "project" : "model";
    // 如果是 model
    if (type === 'model') {
      const modelKey = file.match(/\/model\/(.*?)\/model\.js/)?.[1];
      let modelItem = modelList.find(item => item?.model?.key === modelKey);
      // 如果 modelItem 不存在,则创建一个
      if (!modelItem) {
        modelItem = {};
        modelList.push(modelItem);
      }
      modelItem.model = require(path.resolve(file));
      // 注入 modelKey
      modelItem.model.key = modelKey;
    }
    // 如果是 project
    if (type === "project") {
      const modelKey = file.match(/\/model\/(.*?)\/project\//)?.[1];
      const projKey = file.match(/\/project\/(.*?)\.js/)?.[1];
      let modelItem = modelList.find(item => item?.model?.key === modelKey);
      // 如果 modelItem 不存在,则创建一个
      if (!modelItem) {
        modelItem = {};
        modelList.push(modelItem);
      }

      // 如果 modelItem.project 不存在,则创建一个
      if (!modelItem.project) {
        modelItem.project = {};
      }

      modelItem.project[projKey] = require(path.resolve(file));
      // 注入 projKey
      modelItem.project[projKey].key = projKey;
      // 注入 modelKey
      modelItem.project[projKey].modelKey = modelKey;
    }
  });

  // 数据结构进一步组织, project 继承 model 的公共模块
  modelList.forEach(item => {
    const { model, project } = item;
    for (const key in project) {
      project[key] = projectExtendModel(model, project[key]);
    }
  });

  return modelList;
};
4.3 页面实现
4.3.1 入口准备
当我们通过子类继承基类之后,我们就得到了不同站点的具体的schema配置,接下来就是需要将配置的内容转化为页面。 首页结构:
js
<template>
  <!-- 全局配置国际化 -->
  <el-config-provider :locale="zhCn">
    <header-view
      :proj-name="projName"
      @menu-select="onMenuSelect"
    >
      <template #main-content>
        <router-view />
      </template>
    </header-view>
  </el-config-provider>
</template>
4.3.2 headerView
headerView 主要负责头部菜单的实现,同时为用户预留定制化的空间。主要有三部分内容,如下图所示:
 具体实现:
具体实现:
js
// header-view
<header-container :title="projName">
<!-- 菜单插槽 -->
<template #menu-content>
<!-- 根据 menuList 渲染 -->
</template>
<!-- 设置区域插槽 -->
<template #setting-content>
<!-- 根据 projectList 渲染 -->
</template>
<!-- 主要内容插槽 -->
<template #main-content>
<slot name="main-content" />
</template>
</header-container>
// header-container
<template>
<!-- 布局容器 -->
<el-container class="container">
<!-- 头部区域 -->
<el-header class="header-container">
<el-row class="header-row">
<!-- 左上角:logo、项目标题区域 -->
</el-row>
<!-- 插槽:中间菜单区域 -->
<slot name="menu-content" />
<!-- 右上方用户信息区域 -->
<el-row
align="middle"
justify="end"
class="setting-panel"
>
<!-- 插槽:设置区域 -->
<slot name="setting-content" />
</el-row>
</el-row>
</el-header>
<!-- 内容区域 -->
<el-main class="main-container">
<!-- 插槽:核心内容区域 -->
<slot name="main-content" />
</el-main>
</el-container>
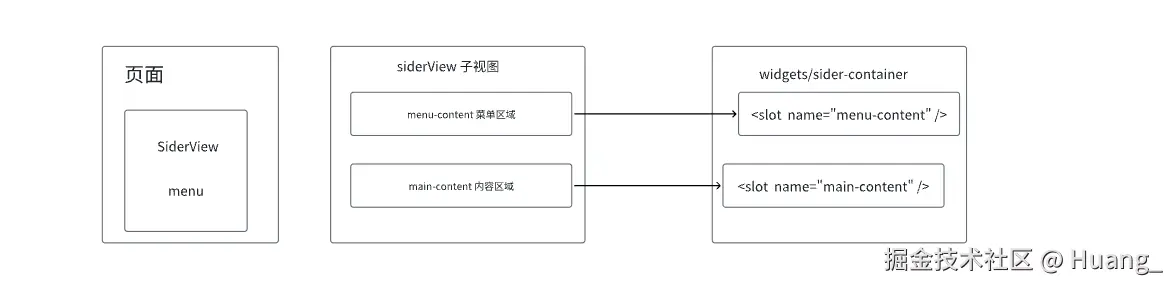
</template>4.3.3 siderView
moduleType === sider ,实现类似headerView
js
{
    key: "data",
    name: "数据分析",
    menuType: "module",
    moduleType: "sider",
    siderConfig: {
      menu: [{
        key: "analysis",
        name: "电商罗盘",
        menuType: "module",
        moduleType: "custom",
        customConfig: {
          path: "/todo"
        }
      }]
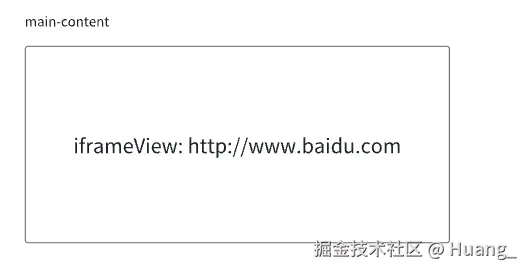
4.3.4 iframeView
moduleType === iframe
js
{
            key: "shop-data",
            name: "店铺数据",
            menuType: "module",
            moduleType: "iframe",
            iframeConfig: {
              path: "https://www/baidu.com"
            }
          },
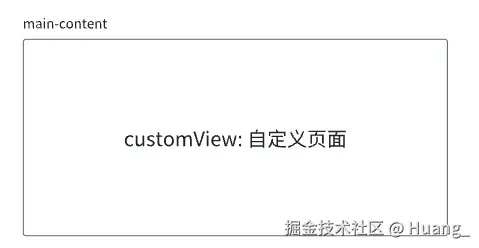
4.3.5 customView
js
{
        key: "analysis",
        name: "电商罗盘",
        menuType: "module",
        moduleType: "custom",
        customConfig: {
          path: "/todo"
        }
      }
4.3.6 schemaView
schemaView 主要通过一份jsonschema的配置渲染出来main-content的内容,下面是一份schemaConfig的配置:
js
 schemaConfig: {
      api: "/api/proj/product",
      schema: {
        type: "object",
        properties: {
          product_id: {
            type: "string",
            label: "商品ID",
            tableOption: {
              // width: 180,
              "show-overflow-tooltip": true
            },
            searchOption: {
              comType: "input"
            }
          },
          product_name: {
            type: "string",
            label: "商品名称",
            tableOption: {
              // width: 180
            },
            searchOption: {
              comType: "input",
            }
          },
          price: {
            type: "number",
            label: "价格",
            tableOption: {
              // width: 120
            }
          },
          inventory: {
            type: "number",
            label: "库存",
            tableOption: {
              // width: 120
            }
          },
          status: {
            type: "status",
            label: "状态",
            tableOption: {
              // width: 120
              // enum: { 1: '上架', 0: '下架' }
            },
            searchOption: {
              comType: "dynamicSelect",
              // enumList: [{ value: 1, label: "上架" }, { value: 0, label: "下架" }],
              api: '/api/proj/status_enum'
            }
          },
          create_time: {
            type: "string",
            label: "创建时间",
            tableOption: {
              // width: 180
            },
            searchOption: {
              comType: "dateRange"
            }
          },
          create_person: {
            type: "string",
            label: "创建人",
            tableOption: {
              // width: 120
            }
          },
        },
      },
      tableConfig: {
        headerButtons: [{
          type: "primary",
          plain: true,
          label: "新增",
          eventKey: "addShowComponent",
          eventOption: {},
        }],
        rowButtons: [{
          type: "warning",
          label: "修改",
          eventKey: "editShowComponent",
          eventOption: {}
        }, {
          type: "danger",
          label: "删除",
          eventKey: "remove",
          eventOption: {
            params: {
              product_id: "schema::product_id"
            }
          }
        }]
      }
    }
schemaConfig 渲染逻辑,上面的 schemaConfig 只是生成了schema-search-bar、schema-table以及一些动态组件(即search-bar 的输入框、选择框、时间选择器...)。
 schemaConfig的解析器通过书写一份 schema hooks 来解析不同 option 的schema,并将处理后的 option 提供给 schema-view 解析使用
js
import { ref, watch, onMounted, nextTick } from "vue";
import { useRoute } from "vue-router";
import { useMenuStore } from "$store";
import { cloneDeep } from "lodash";

export const useSchema = () => {
  const route = useRoute();
  const menuStore = useMenuStore();
  const { sider_key: siderKey, key } = route.query;
  const api = ref("");
  const tableSchema = ref({});
  const tableConfig = ref({});
  const searchSchema = ref({});
  const searchConfig = ref({});

  onMounted(()=> {
    buildData();
  });

  watch([
    () => key,
    () => siderKey,
    () => menuStore.menuList,
  ], () => {
    buildData();
  }, { deep: true });

  // 构造 schema 相关配置,返回给 schema-view 解析使用
  const buildData = () => {
    const menuItem = menuStore.findMenuItem({
      key: "key",
      value: siderKey ?? route.query.key
    });

    if (menuItem?.schemaConfig) {
      const { schemaConfig: sConfig } = menuItem;
      api.value = sConfig?.api ?? "";

      const configSchema = cloneDeep(sConfig?.schema ?? {});
      tableSchema.value = {};
      tableConfig.value = undefined;
      searchSchema.value = {};
      searchConfig.value = undefined;
      nextTick(() => {
        // 构造 tableSchema 和 tableConfig
        tableSchema.value = buildSchemaDto(configSchema, "table");
        tableConfig.value = sConfig.tableConfig;
        // 构造 searchSchema 和 searchConfig
        const schemaDto = buildSchemaDto(configSchema, "search");
        for (const key in schemaDto.properties) {
          if (route.query[key] !== undefined) {
            schemaDto.properties[key].option.default = route.query[key];
          };
        };
        searchSchema.value = schemaDto;
        searchConfig.value = sConfig.searchConfig;
      });
    };
  };

  /**
   * 通用构建 schema 方法
   * 只返回需要的 schema 信息
   * @param {object} _schema
   * @param {string} comName
   */
  const buildSchemaDto = (_schema, comName) => {
    if (!_schema?.properties) {
      return {};
    };

    const schemaDto = {
      api: "",
      properties: {}
    };

    // 提取有效的 schema 信息(清除杂质)
    for (const key in _schema.properties) {
      const props = _schema.properties[key];
      if (props[`${comName}Option`]) {
        let propsDto = {};
        // 提取 props 中的非 option 的属性,存储到 propsDto 中
        for (const pKey in props) {
          // 如果属性不包含Option, 则添加到 propsDto 中
          if (pKey.indexOf("Option") === -1) {
            propsDto[pKey] = props[pKey];
          };
        };
        // 处理 `${comName}Option` 中的信息,将其属性统一处理成 option, 存储到 propsDto 中
        propsDto = Object.assign({}, propsDto, { option: props[`${comName}Option`] });
        schemaDto.properties[key] = propsDto;
      }
    };

    return schemaDto;
  };
  return {
    api,
    tableSchema,
    tableConfig,
    searchSchema,
    searchConfig
  };
};
这份schema不仅仅是上面样例的功能,它还可以配置不同站点同一模块的schema在API的对应字段属性,请求方法。还可以通过这份schema生成库表,描述属性在库表的字段等等。随着业务的进行,这份schema会越来越强大,覆盖的场景越来越多。这也就解决我们开头说的磨平80%的重复的工作,剩余20%定制化。
学习声明 :本文知识体系来源于
哲玄前端(抖音ID:44622831736)大前端全栈实践课程,结合个人学习实践进行整理。