❤️ 如果你也关注 AI 的发展现状,且对 AI 应用开发感兴趣,我会每日分享大模型与 AI 领域的开源项目和应用,提供运行实例和实用教程,帮助你快速上手AI技术!
🥦 AI 在线答疑 -> 智能检索历史文章和开源项目 -> 丰富的 AI 工具库 -> 每日更新 -> 尽在微信公众号 -> 搜一搜:蚝油菜花 🥦
🎨 「扩散模型控制革命!开源框架让DiT听懂多模态指令,秒出精准构图」
大家好,我是蚝油菜花。当同行还在为扩散模型的不可控性头疼时,这个中国团队已经让AI绘画进入「指哪打哪」的精准时代!
你是否经历过这些AI生成噩梦:
- 🖼️ 输入详细描述却得到四不像的扭曲构图
- 🕵️♂️ 需要同时控制边缘+深度+色彩,结果模型完全跑偏
- ⏳ 高分辨率生成等到咖啡凉透才出图...
今天要解剖的 EasyControl ,正在重写可控生成规则!这个由Tiamat AI与上海科大联合打造的开源利器,用三大黑科技炸穿创作瓶颈:
- ✅ 多条件并行控制:Canny边缘/深度图/语义分割等信号同时输入,构图精准度提升300%
- ✅ 分辨率解放:一套权重支持从512px到4K的任意比例输出,告别重复训练
- ✅ 推理加速:因果注意力+KV缓存技术,生成速度比传统方案快2.8倍
已有游戏团队用它批量生成场景原画,电商公司靠它产出百万级广告素材------你的创作流程,准备好迎接「控制自由」了吗?
🚀 快速阅读
EasyControl是基于扩散变换器架构的创新控制框架。
- 功能:支持多条件并行控制与任意分辨率图像生成。
- 技术:采用轻量级LoRA模块实现条件注入,结合因果注意力机制优化推理效率。
EasyControl 是什么
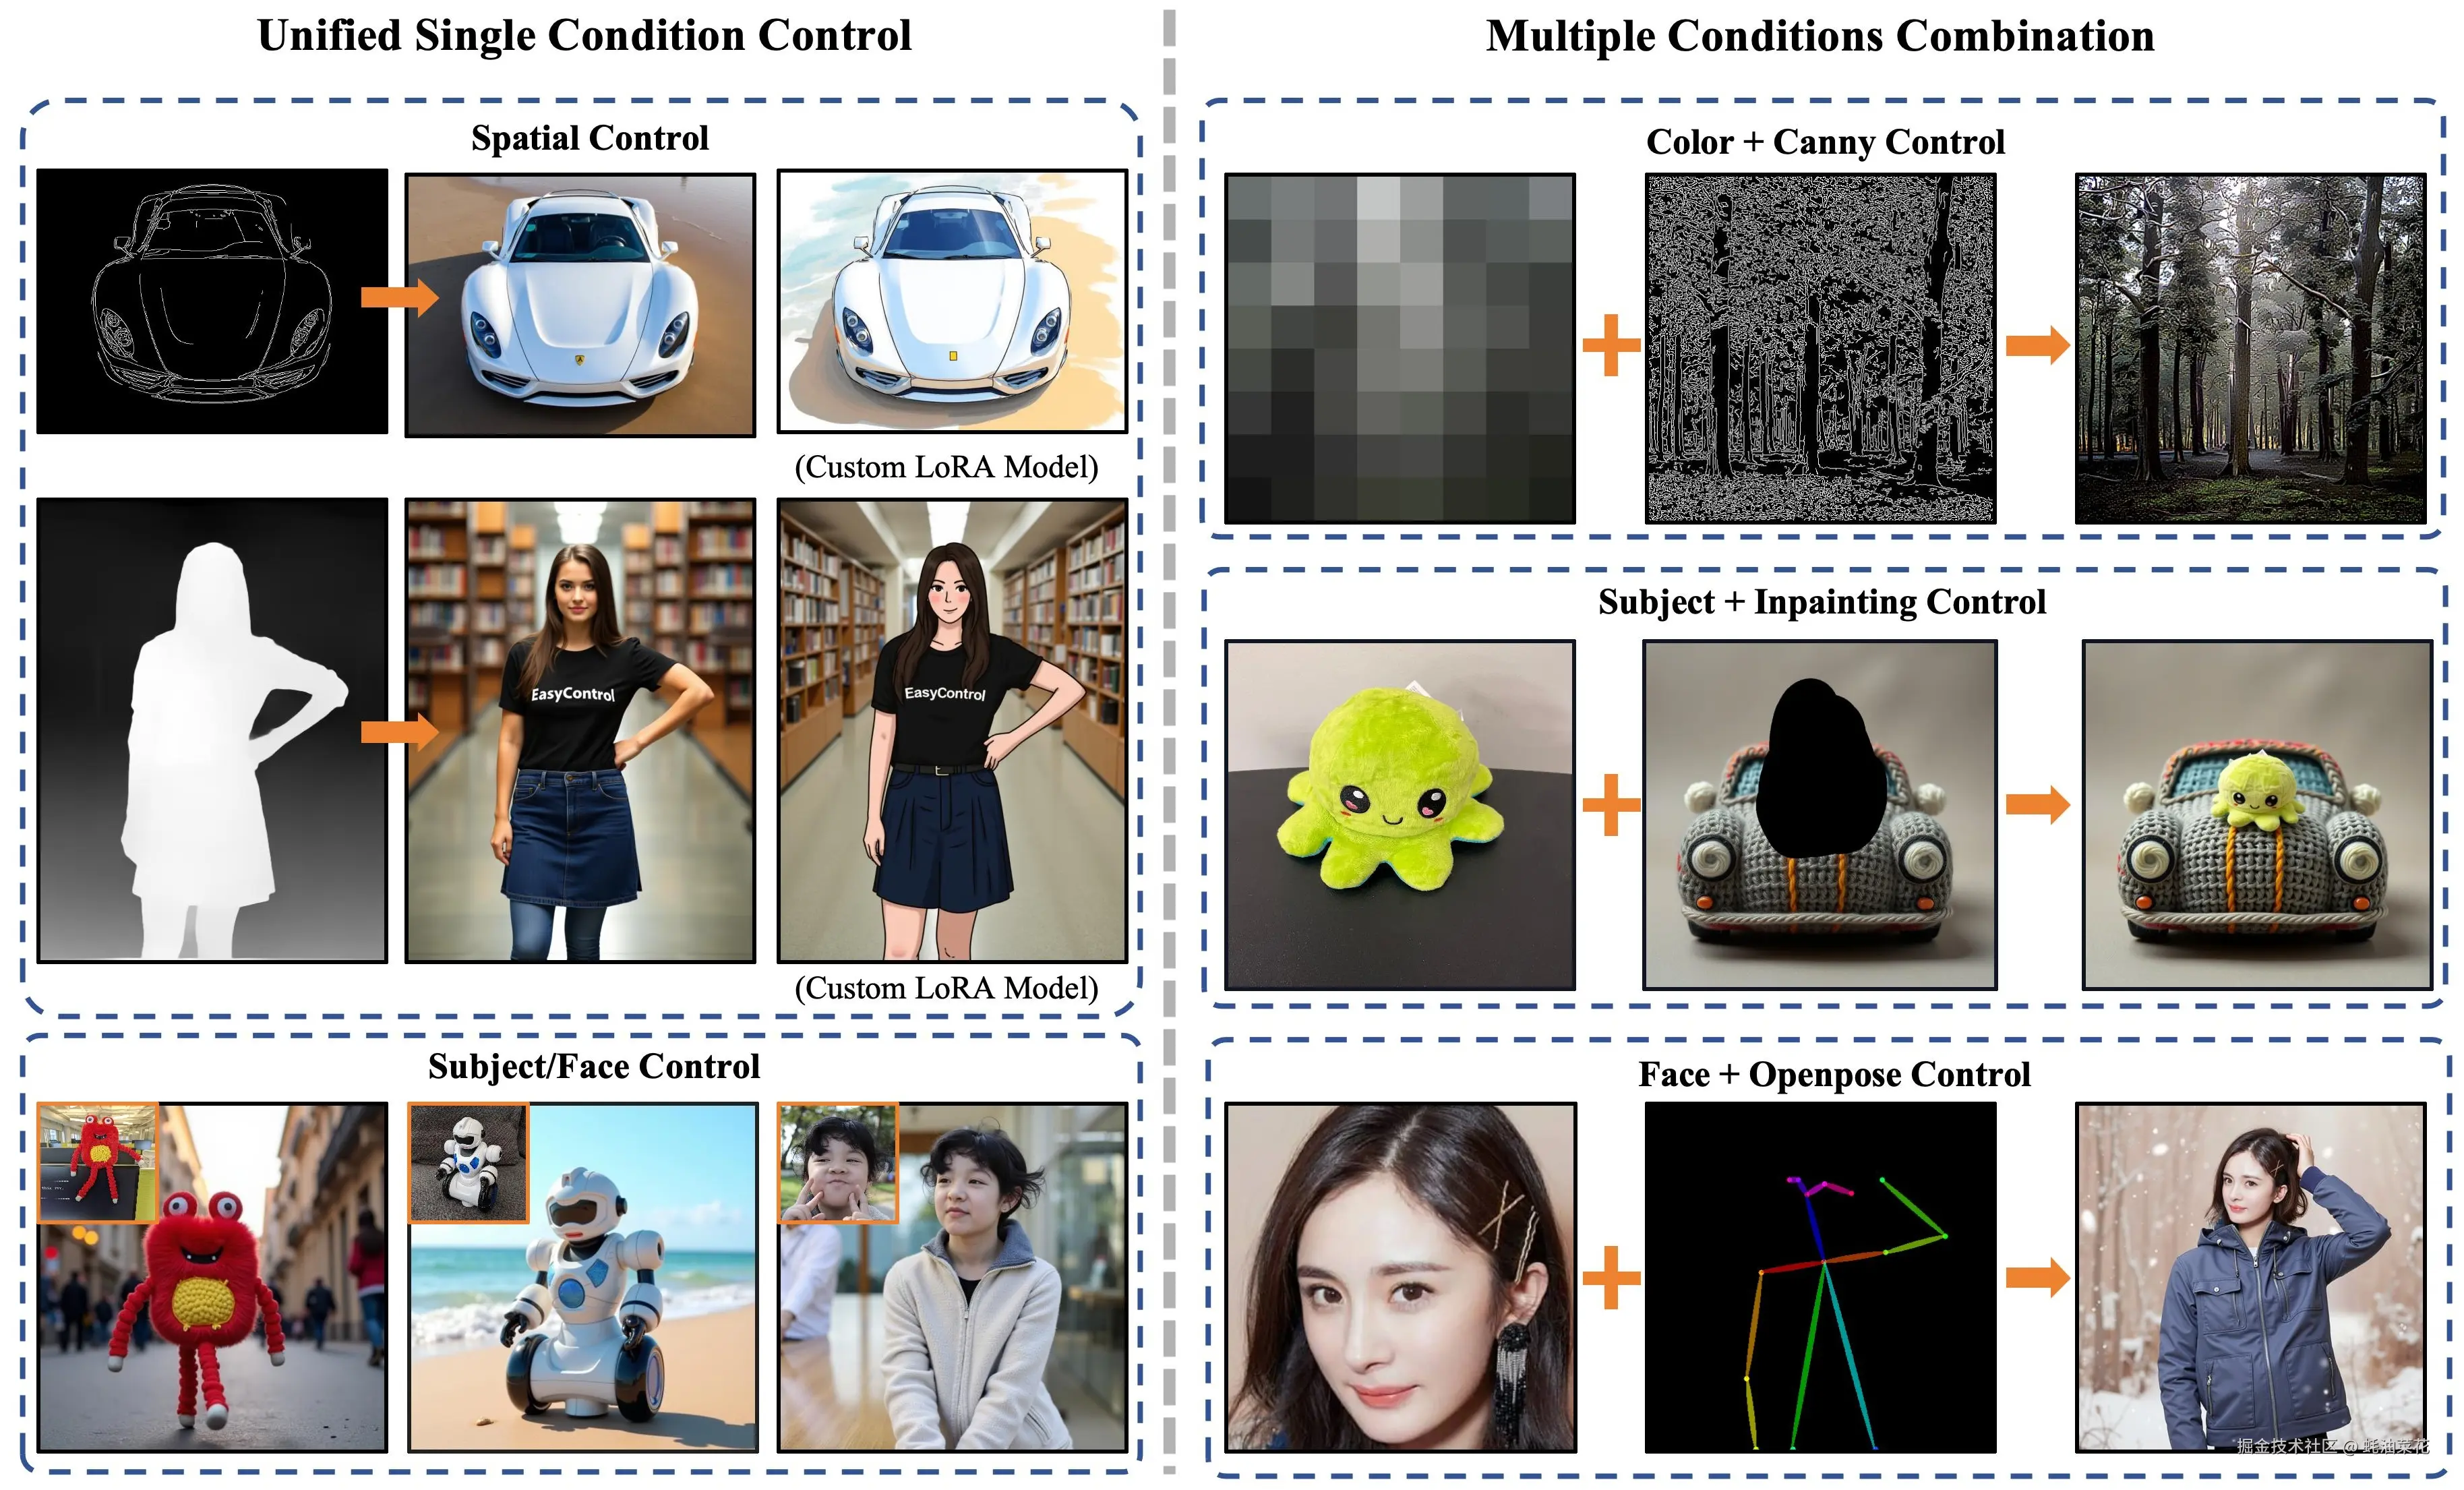
EasyControl 是 Tiamat AI 开源的基于扩散变换器(Diffusion Transformer,DiT)架构的高效灵活控制框架,通过轻量级条件注入 LoRA 模块,独立处理条件信号,实现即插即用功能,兼容现有模型,支持零样本条件多模态预训练,提升模型灵活性和通用性。
位置感知训练范式将输入条件标准化为固定分辨率,支持生成图像具有任意宽高比和长宽比,优化计算效率,提高生成图像质量和灵活性。因果注意力机制与 KV 缓存技术的结合,显著降低图像合成延迟,提升推理效率,使模型在单条件和多条件控制下均能保持高质量输出,实现文本一致性和可控性。
EasyControl 的主要功能
- 多条件控制能力:支持Canny边缘检测、深度信息、HED边缘草图、图像修复、人体姿态、语义分割等多种控制信号输入。
- 高效图像生成:支持多种分辨率和长宽比的图像生成,适用于图像生成、风格转换等任务。
- 吉卜力风格转换:通过专用LoRA模型实现肖像到吉卜力动画风格的转换。
EasyControl 的技术原理
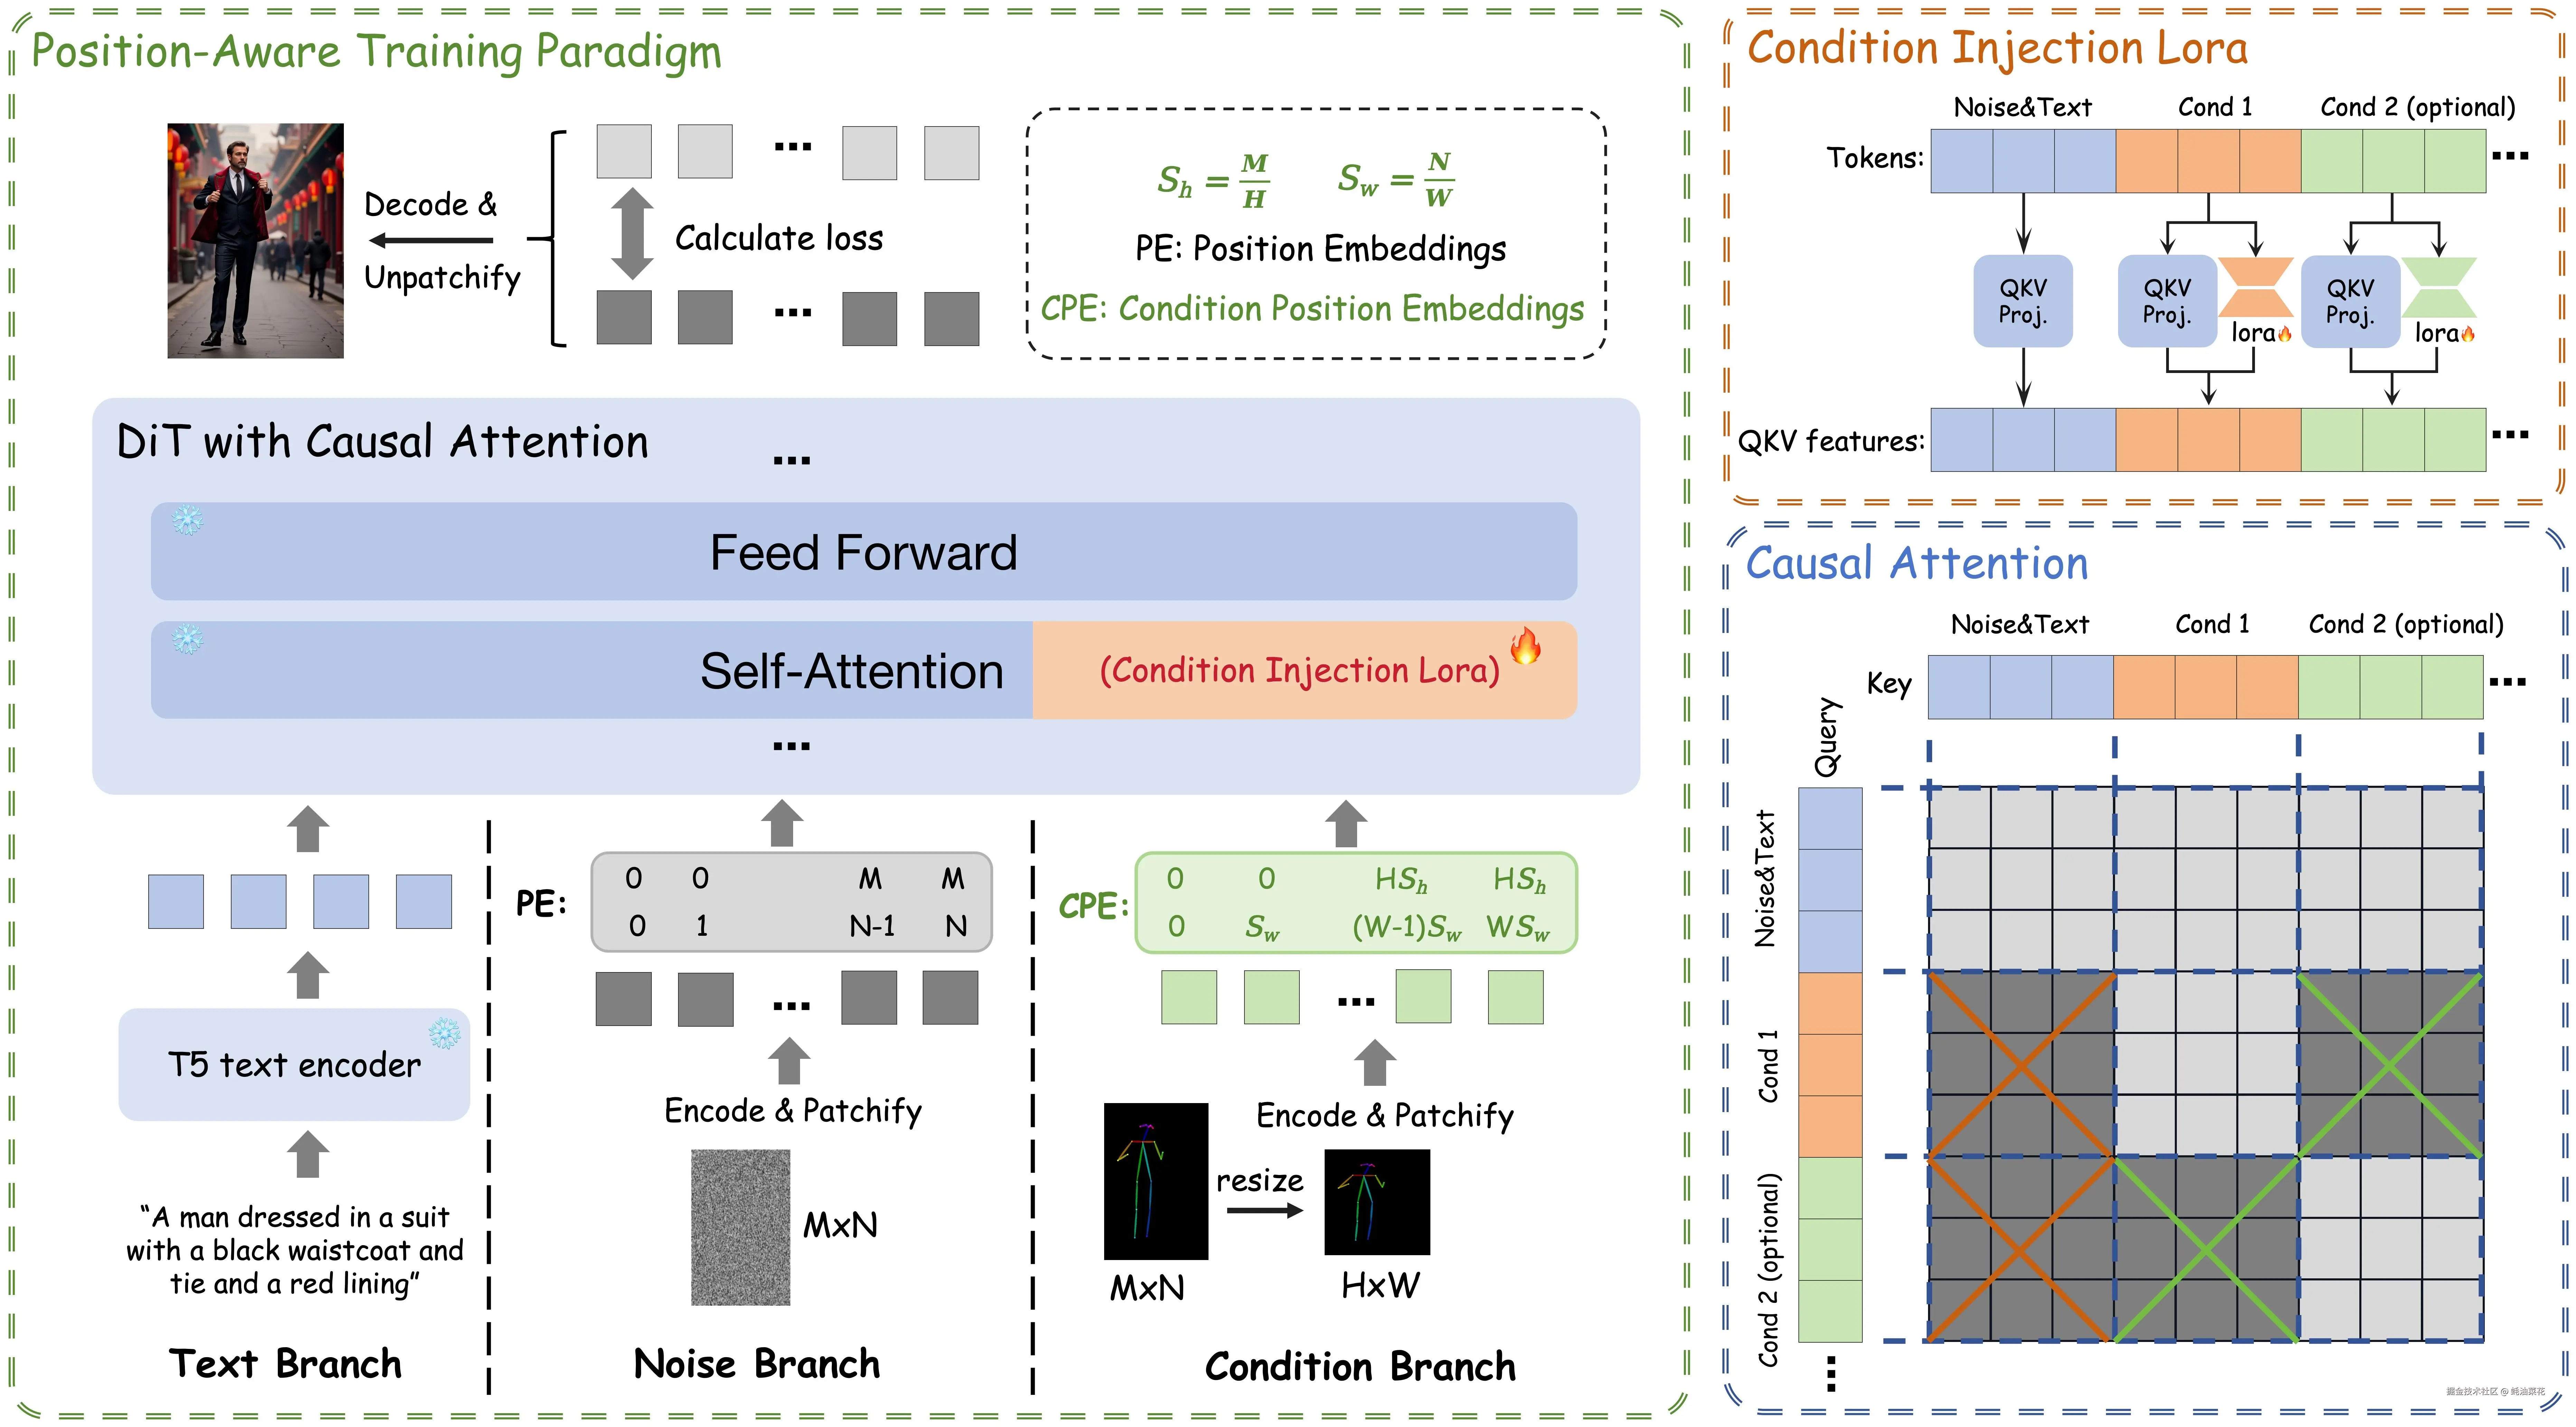
- 轻量级条件注入LoRA模块:独立处理条件信号并注入预训练模型,实现零样本多条件泛化。
- 位置感知训练范式:标准化输入条件分辨率,支持任意宽高比图像生成。
- 因果注意力机制:结合KV缓存技术,减少重复计算,提升推理速度。
如何运行 EasyControl
下面将详细介绍如何安装和使用 EasyControl。
安装
我们建议使用 Python 3.10 和支持 CUDA 的 PyTorch。要设置环境:
bash
# 创建一个新的 conda 环境
conda create -n easycontrol python=3.10
conda activate easycontrol

# 安装其他依赖项
pip install -r requirements.txt
下载
你可以直接从Hugging Face下载模型。
- Hugging Face :huggingface.co/EasyControl...
或者使用 Python 脚本下载:
python
from huggingface_hub import hf_hub_download
hf_hub_download(repo_id="Xiaojiu-Z/EasyControl", filename="models/canny.safetensors", local_dir="./")
hf_hub_download(repo_id="Xiaojiu-Z/EasyControl", filename="models/depth.safetensors", local_dir="./")
hf_hub_download(repo_id="Xiaojiu-Z/EasyControl", filename="models/hedsketch.safetensors", local_dir="./")
hf_hub_download(repo_id="Xiaojiu-Z/EasyControl", filename="models/inpainting.safetensors", local_dir="./")
hf_hub_download(repo_id="Xiaojiu-Z/EasyControl", filename="models/pose.safetensors", local_dir="./")
hf_hub_download(repo_id="Xiaojiu-Z/EasyControl", filename="models/seg.safetensors", local_dir="./")
hf_hub_download(repo_id="Xiaojiu-Z/EasyControl", filename="models/subject.safetensors", local_dir="./")
hf_hub_download(repo_id="Xiaojiu-Z/EasyControl", filename="models/Ghibli.safetensors", local_dir="./")
如果你无法访问 Hugging Face,可以使用hf-mirror下载模型:
python
export HF_ENDPOINT=https://hf-mirror.com
huggingface-cli download --resume-download Xiaojiu-Z/EasyControl --local-dir checkpoints --local-dir-use-symlinks False- hf-mirror :hf-mirror.com/
使用
以下是一个基本的使用 EasyControl 的示例:
模型初始化
python
import torch
from PIL import Image
from src.pipeline import FluxPipeline
from src.transformer_flux import FluxTransformer2DModel
from src.lora_helper import set_single_lora, set_multi_lora

def clear_cache(transformer):
    for name, attn_processor in transformer.attn_processors.items():
        attn_processor.bank_kv.clear()

# 初始化模型
device = "cuda"
base_path = "FLUX.1-dev"  # 你的基础模型路径
pipe = FluxPipeline.from_pretrained(base_path, torch_dtype=torch.bfloat16, device=device)
transformer = FluxTransformer2DModel.from_pretrained(
    base_path,
    subfolder="transformer",
    torch_dtype=torch.bfloat16,
    device=device
)
pipe.transformer = transformer
pipe.to(device)

# 加载控制模型
lora_path = "./checkpoints/models"
control_models = {
    "canny": f"{lora_path}/canny.safetensors",
    "depth": f"{lora_path}/depth.safetensors",
    "hedsketch": f"{lora_path}/hedsketch.safetensors",
    "pose": f"{lora_path}/pose.safetensors",
    "seg": f"{lora_path}/seg.safetensors",
    "inpainting": f"{lora_path}/inpainting.safetensors",
    "subject": f"{lora_path}/subject.safetensors",
}
单条件控制
python
# 单个空间条件控制示例
path = control_models["canny"]
set_single_lora(pipe.transformer, path, lora_weights=[1], cond_size=512)

# 生成图像
prompt = "海滩上的一辆漂亮的汽车"
spatial_image = Image.open("./test_imgs/canny.png").convert("RGB")

image = pipe(
    prompt,
    height=720,
    width=992,
    guidance_scale=3.5,
    num_inference_steps=25,
    max_sequence_length=512,
    generator=torch.Generator("cpu").manual_seed(5),
    spatial_images=[spatial_image],
    cond_size=512,
).images[0]

# 生成后清除缓存
clear_cache(pipe.transformer)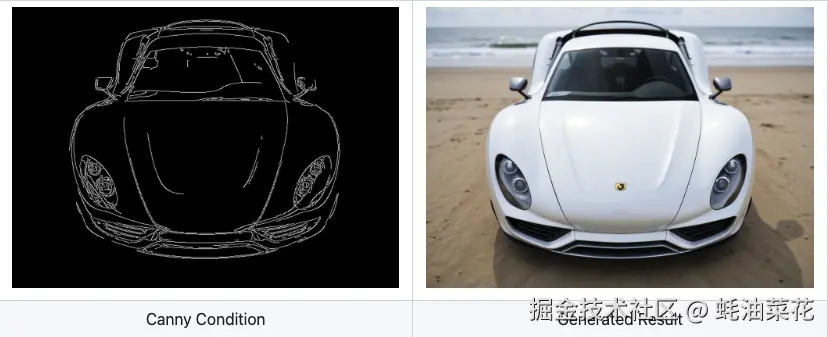
python
# 单个主体条件控制示例
path = control_models["subject"]
set_single_lora(pipe.transformer, path, lora_weights=[1], cond_size=512)

# 生成图像
prompt = "图书馆中的 SKS"
subject_image = Image.open("./test_imgs/subject_0.png").convert("RGB")

image = pipe(
    prompt,
    height=1024,
    width=1024,
    guidance_scale=3.5,
    num_inference_steps=25,
    max_sequence_length=512,
    generator=torch.Generator("cpu").manual_seed(5),
    subject_images=[subject_image],
    cond_size=512,
).images[0]

# 生成后清除缓存
clear_cache(pipe.transformer)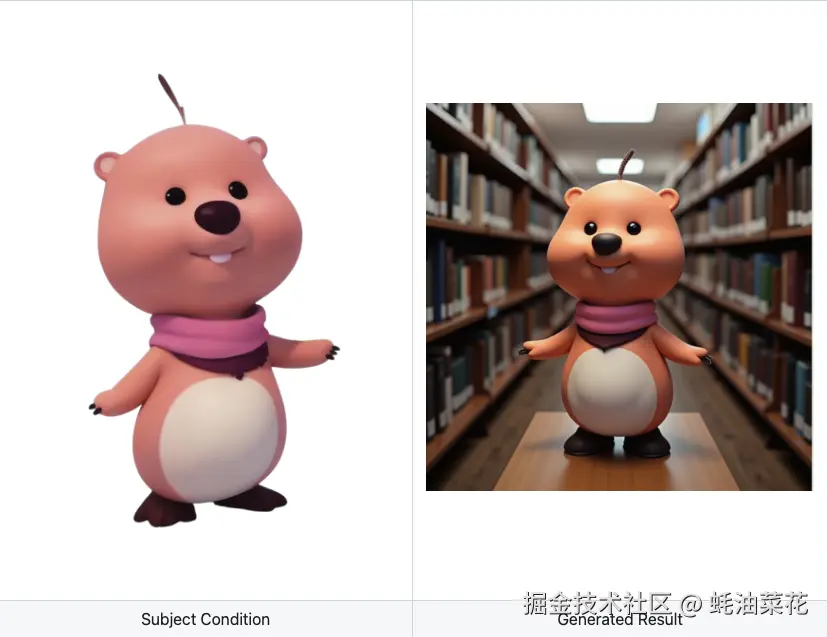
多条件控制
python
# 多条件控制示例
paths = [control_models["subject"], control_models["inpainting"]]
set_multi_lora(pipe.transformer, paths, lora_weights=[[1], [1]], cond_size=512)

prompt = "车上的 SKS"
subject_images = [Image.open("./test_imgs/subject_1.png").convert("RGB")]
spatial_images = [Image.open("./test_imgs/inpainting.png").convert("RGB")]

image = pipe(
    prompt,
    height=1024,
    width=1024,
    guidance_scale=3.5,
    num_inference_steps=25,
    max_sequence_length=512,
    generator=torch.Generator("cpu").manual_seed(42),
    subject_images=subject_images,
    spatial_images=spatial_images,
    cond_size=512,
).images[0]

# 生成后清除缓存
clear_cache(pipe.transformer)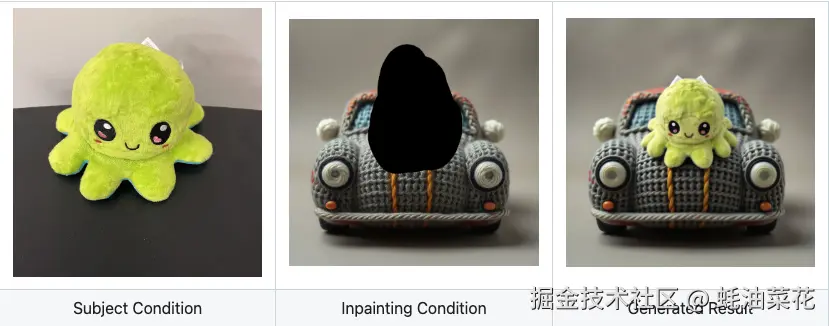
吉卜力风格肖像生成
python
import spaces
import os
import json
import time
import torch
from PIL import Image
from tqdm import tqdm
import gradio as gr

from safetensors.torch import save_file
from src.pipeline import FluxPipeline
from src.transformer_flux import FluxTransformer2DModel
from src.lora_helper import set_single_lora, set_multi_lora, unset_lora

# 初始化图像处理器
base_path = "black-forest-labs/FLUX.1-dev"
lora_base_path = "./checkpoints/models"


pipe = FluxPipeline.from_pretrained(base_path, torch_dtype=torch.bfloat16)
transformer = FluxTransformer2DModel.from_pretrained(base_path, subfolder="transformer", torch_dtype=torch.bfloat16)
pipe.transformer = transformer
pipe.to("cuda")

def clear_cache(transformer):
    for name, attn_processor in transformer.attn_processors.items():
        attn_processor.bank_kv.clear()

# 定义 Gradio 接口
@spaces.GPU()
def single_condition_generate_image(prompt, spatial_img, height, width, seed, control_type):
    # 设置控制类型
    if control_type == "Ghibli":
        lora_path = os.path.join(lora_base_path, "Ghibli.safetensors")
    set_single_lora(pipe.transformer, lora_path, lora_weights=[1], cond_size=512)

    # 处理图像
    spatial_imgs = [spatial_img] if spatial_img else []
    image = pipe(
        prompt,
        height=int(height),
        width=int(width),
        guidance_scale=3.5,
        num_inference_steps=25,
        max_sequence_length=512,
        generator=torch.Generator("cpu").manual_seed(seed),
        subject_images=[],
        spatial_images=spatial_imgs,
        cond_size=512,
    ).images[0]
    clear_cache(pipe.transformer)
    return image

# 定义 Gradio 接口组件
control_types = ["Ghibli"]


# 创建 Gradio Blocks 接口
with gr.Blocks() as demo:
    gr.Markdown("# 使用 EasyControl 生成吉卜力风格的控制图像")
    gr.Markdown("该模型仅在 **100 张真实亚洲面孔** 及其 **GPT-4o 生成的吉卜力风格对应物** 上训练,保留面部特征并应用标志性的动漫风格。")
    gr.Markdown("使用 EasyControl 和吉卜力控制 LoRAs 生成图像。(由于硬件限制,只能生成低分辨率图像。对于高分辨率(1024+),请自行设置环境。)")

    gr.Markdown("**[注意!!]**:使用吉卜力控制 LoRA 的推荐提示应包括触发词:`Ghibli Studio style, Charming hand-drawn anime-style illustration`")

    with gr.Tab("吉卜力条件生成"):
        with gr.Row():
            with gr.Column():
                prompt = gr.Textbox(label="提示", value="Ghibli Studio style, Charming hand-drawn anime-style illustration")
                spatial_img = gr.Image(label="吉卜力图像", type="pil")  # 上传图像文件
                height = gr.Slider(minimum=256, maximum=1024, step=64, label="高度", value=768)
                width = gr.Slider(minimum=256, maximum=1024, step=64, label="宽度", value=768)
                seed = gr.Number(label="种子", value=42)
                control_type = gr.Dropdown(choices=control_types, label="控制类型")
                single_generate_btn = gr.Button("生成图像")
            with gr.Column():
                single_output_image = gr.Image(label="生成图像")


    # 将按钮链接到函数
    single_generate_btn.click(
        single_condition_generate_image,
        inputs=[prompt, spatial_img, height, width, seed, control_type],
        outputs=single_output_image
    )

# 启动 Gradio 应用
demo.queue().launch()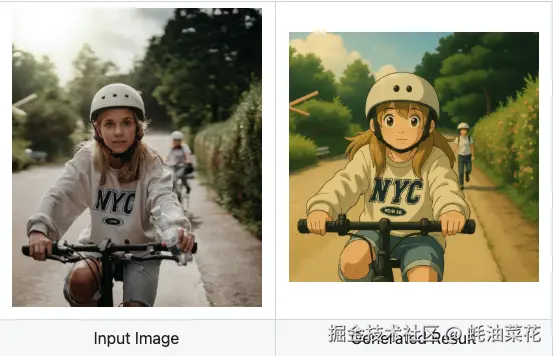
使用建议
- 每次生成后使用
clear_cache(pipe.transformer)清除缓存 - 为了获得最佳性能:
- 从
guidance_scale=3.5开始,并根据结果进行调整 - 使用
num_inference_steps=25以平衡质量和速度
- 从
- 使用
set_multi_loraAPI 时,确保主体 LoRA 路径(subject)在空间 LoRA 路径(canny, depth, hedsketch 等)之前。
资源
- 项目主页 :easycontrolproj.github.io/
- GitHub 仓库 :github.com/Xiaojiu-z/E...
- HuggingFace 仓库 :huggingface.co/Xiaojiu-Z/E...
❤️ 如果你也关注 AI 的发展现状,且对 AI 应用开发感兴趣,我会每日分享大模型与 AI 领域的开源项目和应用,提供运行实例和实用教程,帮助你快速上手AI技术!
🥦 AI 在线答疑 -> 智能检索历史文章和开源项目 -> 丰富的 AI 工具库 -> 每日更新 -> 尽在微信公众号 -> 搜一搜:蚝油菜花 🥦