前言
之前公司有个需求,要在用户上传的文档上添加批注,涉及到一些图形的绘制,这可以用 canvas 实现;还要求当点击某些批注时有交互效果,比如颜色进行高亮。众所周知,无论你在 <canvas> 元素上绘制多少内容,能通过 js 获取到的对象只有 canvas 节点本身,那么要如何实现对 canvas 画布上的某个元素的交互效果呢。实现方案不止一种,本文就来说说我的做法。
将图片绘制到画布
定义类 CanvasAnnotate,new CanvasAnnotate() 时需传入一个 <canvas> 节点的 id canvasId,以及文档图片的地址 imgUrl,等使用时只需例如 new CanvasAnnotate('myCanvas', './imgs/1.jpg') 就能实现完整功能。
在 CanvasAnnotate 的构造器内,首先会生成个图片对象并在图片加载后调用 initStage 将图片绘制到 canvas 画布上:
typescript
// 代码片段 1
class CanvasAnnotate {
  canvas: HTMLCanvasElement | null = null
  ctx: CanvasRenderingContext2D | null = null
  img: HTMLImageElement
  constructor(canvasId: string, imgUrl: string) {
    this.canvas = document.getElementById(canvasId) as HTMLCanvasElement ?? null
    this.ctx = this.canvas.getContext('2d')
    this.img = new Image()
    if (!this.canvas || !this.ctx) {
      console.error('Canvas 或 Canvas context 为空')
      return
    }
    this.img.onload = this.initStage.bind(this)
    this.img.onerror = () => console.error('图片加载失败')
    this.img.src = imgUrl
  }
}
调用 initStage 时需用 bind 绑定 this 为 CanvasAnnotate 的实例,不然 initStage 内的 this 会指向图片对象。
initStage 定义如下,如果传入的文档图片尺寸大于画布,需先计算出缩小的比例 scale。考虑到图片如果损坏,则图片的宽高会为 0,作为除数就有问题,所以用了三元运算符处理。:
typescript
// 代码片段 2
initStage() {
  // 计算图片的缩放比例
  const scale = Math.min(
    this.canvas.width / (this.img.width !== 0 ? this.img.width : 1),
    this.canvas.height / (this.img.height !== 0 ? this.img.height : 1)
  )
  this.width = this.img.width * scale
  this.height = this.img.height * scale

  // 清除画布
  this.ctx.clearRect(0, 0, this.width, this.height)
  // 绘制图片
  this.ctx.drawImage(this.img, 0, 0, this.width, this.height)
}
定义图形类
基类
现在来处理标注图形的绘制,为了简便,我就用矩形和圆形来演示。先定义类 BaseShape 作为所有图形的基类:
typescript
// 代码片段 3
class BaseShape {
  // 存储事件绑定
  listeners: { [key in EventEnum]?: ((e: MouseEvent) => void)[] } = {}
  constructor(
    public id: string,
    public ctx: CanvasRenderingContext2D,
    public color: string
  ) { }
  // 路径
  get path(): Path2D {
    return new Path2D()
  }
  // 绘制
  draw() {
    this.ctx.fillStyle = this.color
    this.ctx.fill(this.path)
  }
  // 添加事件绑定
  on(eventName: EventEnum, callback: (e: any) => void) {
    if (!this.listeners[eventName]) {
      this.listeners[eventName] = []
    }
    this.listeners[eventName]?.push(callback)
  }
  // 判断点是否在路径区域内
  isPointInRegion(x: number, y: number): boolean {
    return this.ctx.isPointInPath(this.path, x, y)
  }
}constructor()接收 3 个所有图形都有的属性作为参数:id作为图形实例的唯一标识,用于表明是哪个图形触发了事件;ctx就是canvas的上下文对象;color为图形绘制时填充或描边的颜色。
listeners用于存储各个图形绑定的事件,值为一个对象,对象的 key 为事件名称,比如'click',value 为对应事件触发时要调用的回调函数数组;path是一个Path2D类型的值,在不同的具体图形子类中会重写,以返回不同的图形路径;draw用于给当前路径上色;on用于给图形添加事件绑定。如果某个图形需要单独绑定某个事件,就可以通过图形实例的on方法;isPointInRegion即为交互实现的关键 ,它通过ctx.isPointInPath(this.path, x, y)方法判断当前路径中是否包含指定点 (x, y)。this.path为要检查的Path2D路径,这也是path的值需为Path2D类型的原因。若指定点包含在指定的路径内,会返回true,否则返回false。
子类
具体图形类的定义如下:
typescript
// 代码片段 4
/** 矩形 */
class Rectangle extends BaseShape {
  listeners = {
    [EventEnum.CLICK]: [
      (e: MouseEvent) => {
        const x = e.offsetX
        const y = e.offsetY
        const isInRegion = this.isPointInRegion(x, y)
        const oldColor = this.color
        const newColor = isInRegion ? 'red' : defaultColor
        if (oldColor !== newColor) {
          this.color = newColor
          this.draw()
        }
      }
    ]
  }
  constructor(
    id: string,
    ctx: CanvasRenderingContext2D,
    color: string,
    public x: number,
    public y: number,
    public width: number,
    public height: number
  ) {
    super(id, ctx, color)
  }
  get path() {
    const rectPath = new Path2D()
    rectPath.rect(this.x, this.y, this.width, this.height)
    return rectPath
  }
}

/** 圆 */
class CircleCircle extends BaseShape {
  constructor(
    id: string,
    ctx: CanvasRenderingContext2D,
    color: string,
    public x: number,
    public y: number,
    public radius: number,
    public startAngle: number,
    public endAngle: number
  ) {
    super(id, ctx, color)
  }
  get path() {
    const rectPath = new Path2D()
    rectPath.arc(this.x, this.y, this.radius, this.startAngle, this.endAngle)
    return rectPath
  }
}
对于矩形,我这里统一绑定了 click 事件,被点击的矩形会变成红色,其它矩形则为默认色。其实就是再次对路径填充一次颜色。传给 isPointInRegion 的x 和 y 的值通过鼠标事件的属性 offsetX 和 offsetY 获得。
绘制图形
我们有了生成矩形和圆形的类,就可以在代码片段 2 的 initStage 中,进行绘制了:
typescript
// 代码片段 5
initStage() {
  // ...
  // 添加要绘制的图形
  const rect0 = new Rectangle('rect0', this.ctx, defaultColor, 0, 0, 100, 100)
  const rect1 = new Rectangle('rect1', this.ctx, defaultColor, 300, 0, 100, 100)
  const circle0 = new CircleCircle('circle0', this.ctx, defaultColor, 200, 400, 50, 0, 2 * Math.PI)
  this.shapes.push(rect0, rect1, circle0)
  // 绘制图形
  this.drawGraphics()
}
将矩形 rect0 和 rect1 以及圆形 circle0 都放进 shapes 数组,在 draw 方法中循环遍历,进行填色处理:
typescript
// 代码片段 6
drawGraphics() {
  if (this.isDrawing) return
  this.isDrawing = true
  this.shapes.forEach(shape => {
    shape.draw()
  })
  this.isDrawing = false
}
事件监听
还是在 initStage 内,我们可以针对某个图形添加单独的事件绑定,比如当点击某个图形时,打印被点击图形的 id。调用图形的 on 方法后就会往对应图形的 listeners 对象中,添加事件绑定了:
typescript
// 代码片段 7
this.addShapeClickListener(rect0)
this.addShapeClickListener(rect1)
this.addShapeClickListener(circle0)

addShapeClickListener(shape: BaseShape) {
  shape.on(EventEnum.CLICK, (e) => {
    if (e.offsetX !== undefined && e.offsetY !== undefined) {
      const isInRegion = shape.isPointInRegion(e.offsetX, e.offsetY)
      if (isInRegion) {
        console.log(shape.id)
      }
    }
  })
}
最后就是对 canvas 添加事件监听,当事件触发时,就在回调中对存放了所有图形的 shapes 数组进行遍历,如果某个图形的 listeners 对象中有 key 为对应的事件名称,则遍历 key 的 value,即绑定的那些对应事件的回调,逐个调用:
typescript
this.handleListeners()
handleListeners() {
this.handleClick = (e: MouseEvent) => {
this.shapes.forEach((shape) => {
const listeners = shape.listeners[EventEnum.CLICK]
if (listeners) {
listeners.forEach((listener) => listener(e))
}
})
}
this.canvas.addEventListener(EventEnum.CLICK, this.handleClick)
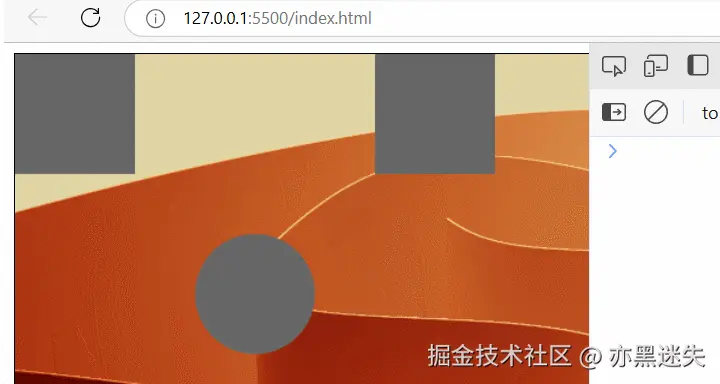
}效果展示
效果如下,点击矩形会变红,点击某个图形则打印该图形的 id: