我们在使用 Android Canvas 绘制各种图案或者 bitmap 时,如果需要旋转或平移图案,可能会这样用:
kotlin
canvas.save()
canvas.translate(xxx)
canvas.scale(xxx)
canvas.rotate(xxx)
canvas.restore()
用过的同学应该很熟悉这种写法,这是最常见的 Canvas 转换方式,而它本质上就是用 Matrix 来实现的。
Matrix 是什么
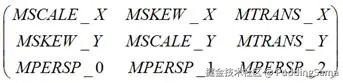
Matrix 本质上是一个 3x3 的矩阵
java
    public static final int MSCALE_X = 0;   //!< use with getValues/setValues
    public static final int MSKEW_X  = 1;   //!< use with getValues/setValues
    public static final int MTRANS_X = 2;   //!< use with getValues/setValues
    public static final int MSKEW_Y  = 3;   //!< use with getValues/setValues
    public static final int MSCALE_Y = 4;   //!< use with getValues/setValues
    public static final int MTRANS_Y = 5;   //!< use with getValues/setValues
    public static final int MPERSP_0 = 6;   //!< use with getValues/setValues
    public static final int MPERSP_1 = 7;   //!< use with getValues/setValues
    public static final int MPERSP_2 = 8;   //!< use with getValues/setValues
根据这几个名称我们大概也能知道它们分别代表的功能:
- 缩放(Scale)
对应 MSCALE_X 与 MSCALE_Y - 位移(Translate)
对应 MTRANS_X 与 MTRANS_Y - 错切(Skew)
对应 MSKEW_X 与 MSKEW_Y - 旋转(Rotate)
旋转没有专门的数值来计算,Matrix 会通过计算缩放与错切来处理旋转。
对应 Matrix 的方法分别是:
scss
xxxScale()
xxxTranslate()
xxxSkew()
xxxRotate()
每种转换分别有 set、pre、post 三种变种,下面我们用一个demo演示下。
Matrix 简单应用
kotlin
  override fun onDraw(canvas: Canvas) {
    super.onDraw(canvas)
    canvas.drawColor(Color.WHITE)
    canvas.drawBitmap(bitmap, matrix, paint)
  }
比如这段代码,绘制一个 bitmap,并传了一个默认的 Matrix,即没有任何转换的 Matrix,效果如下

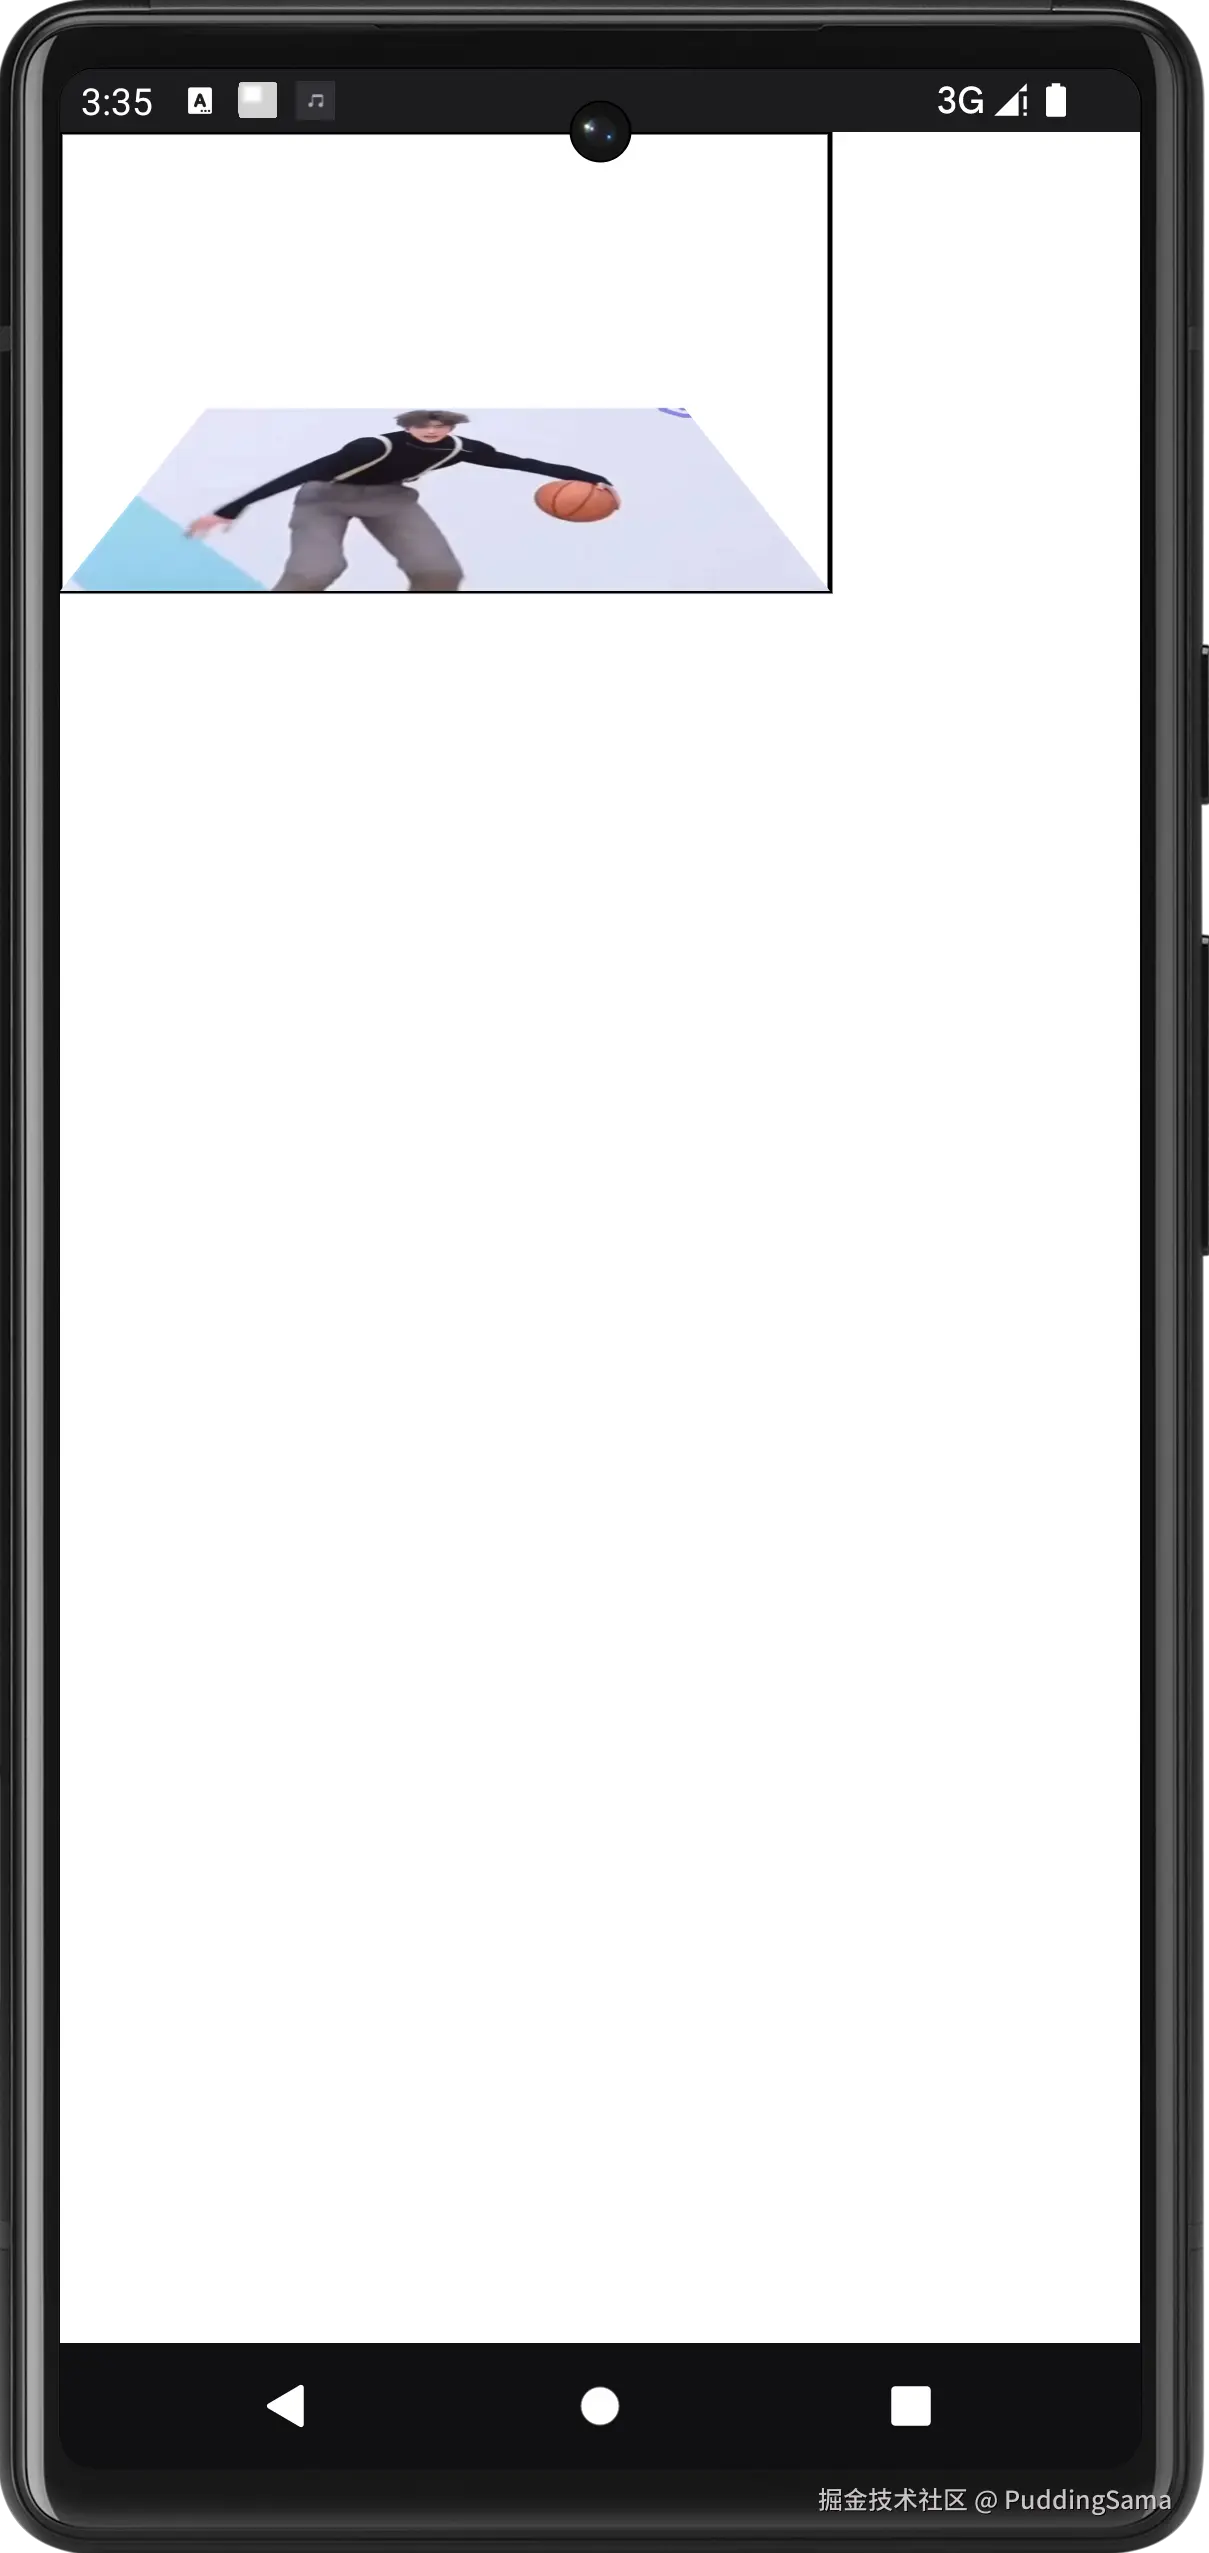
现在我们来实现一个效果,将图片居中、放大、旋转50度,看看如何实现,首先看代码:
kotlin
override fun onDraw(canvas: Canvas) {
  super.onDraw(canvas)
  canvas.drawColor(Color.WHITE)
  matrix.postTranslate(width / 2f - bitmap.width / 2f, height / 2f - bitmap.height / 2f)
  matrix.postScale(2f, 2f, width / 2f, height / 2f)
  matrix.postRotate(50f, width / 2f, height / 2f)
  canvas.drawBitmap(bitmap, matrix, paint)
}
主要分三部:
- 将图片移动到屏幕中心点
- 从屏幕中心点放大2倍
- 沿中心点旋转 50 度

这几种转换是比较常见的,多数人应该都用过,Android View 也提供了相关的方法setTranslation、setScale、setRotation,大家应该都不陌生。细心的人可能会发现,我这边转化使用的方法都是 post开头,而 Matrix 提供了三种方式,分别是 set、post、pre,它们有什么区别,该怎么用呢?
Matrix set/post/pre 的区别
set
set 方法用于直接设置矩阵的值,它会丢弃矩阵之前的所有变换信息,将矩阵重置为新的变换矩阵。从线性代数的角度看,这相当于用一个新的矩阵完全替换原矩阵,而不涉及矩阵乘法。
kotlin
matrix.postTranslate(width / 2f - bitmap.width / 2f, height / 2f - bitmap.height / 2f)
matrix.postScale(2f, 2f, width / 2f, height / 2f)
matrix.setTranslate(100f,100f)
matrix.postRotate(50f, width / 2f, height / 2f)
比如这段代码,实际生效的只有3、4行,set 之前的操作都会被覆盖。
post
post 方法用于在已有变换之后添加新的变换。从线性代数的角度看,这相当于将新的变换矩阵后乘到原矩阵上。假设原矩阵为 A,新的变换矩阵为 B,那么最终的变换矩阵 C=A×B。
kotlin
matrix.postTranslate(width / 2f - bitmap.width / 2f, height / 2f - bitmap.height / 2f)
matrix.postScale(2f, 2f, width / 2f, height / 2f)
比如这段代码的执行顺序,会先执行 translate 然后执行 scale。
pre
pre 方法用于在已有变换之前添加新的变换。从线性代数的角度看,这相当于将新的变换矩阵前乘到原矩阵上。假设原矩阵为 A,新的变换矩阵为 B,那么最终的变换矩阵 C = B x A。
kotlin
matrix.preTranslate(width / 2f - bitmap.width / 2f, height / 2f - bitmap.height / 2f)
matrix.postScale(2f, 2f, width / 2f, height / 2f)
比如这段代码,会先执行 scale 再执行 translate。
其实 pre 与 post 的差异就是矩阵乘法顺序的问题。区别于普通乘法AxB=BxA,矩阵的乘法是不支持这种交换定律的。所以它们执行的顺序不同会导致结果的不同。
关于矩阵算法大家可从其他途径了解,不了解其实也不影响对这些 API 的理解,只需要知道它们之间的差异就行。
总结:如果需要复合变换,在多数情况建议都使用post,原因很简单,就是这种方式比较符合思维习惯,其转换顺序是按照代码顺序一步一步地处理。而 pre 是倒着执行,不容易思考,更不推荐pre与post混用,会很容易被绕晕。
3D 转换
前面我们介绍了 Matrix 的 translate、scale、rotate 方法,这些一般是用来做平面转换。而 skew 方法--斜切,一般用来做 3D 转换,不过这个方法提供的是转换的原子能力,不是我们正常理解的转换。如:沿某个zhou旋转多少度,skew 是不能直接做到的。在 Android 里做 3D 转换一般使用 Camera,注意这个Camera可不是android.hardwar.Camera 而是 android.graphics.Camera,camera 提供了更符合现实习惯的 API。
比如,之前绘制的图片,如果要沿底边旋转50度,可以这样处理
kotlin
override fun onDraw(canvas: Canvas) {
    canvas.drawRect(0f, 0f, bitmap.width.toFloat(), bitmap.height.toFloat(), paint)
    camera.rotateX(50f)
    camera.getMatrix(matrix)
    matrix.preTranslate(-bitmap.width / 2f, -bitmap.height.toFloat())
    matrix.postTranslate(bitmap.width / 2f, bitmap.height.toFloat())
    canvas.drawBitmap(bitmap, matrix, paint)
  }
代码比较简单,camera.rotateX(50f)是沿X轴旋转 50°
arduino
matrix.preTranslate(-bitmap.width / 2f, -bitmap.height.toFloat())
matrix.postTranslate(bitmap.width / 2f, bitmap.height.toFloat())这两行是移动画布的位置。诶,之前不是说尽量不要pre``post混用吗,怎么这边就这样用了。这其实是 Camera 旋转的一个固定用法,比较简单。原因是 Camera的位置是在原点的 Z 轴,所以在旋转之前需要先将需要旋转的位置移动到 Camera 的正面位置,旋转之后再还原。我们用图来简单描述下:
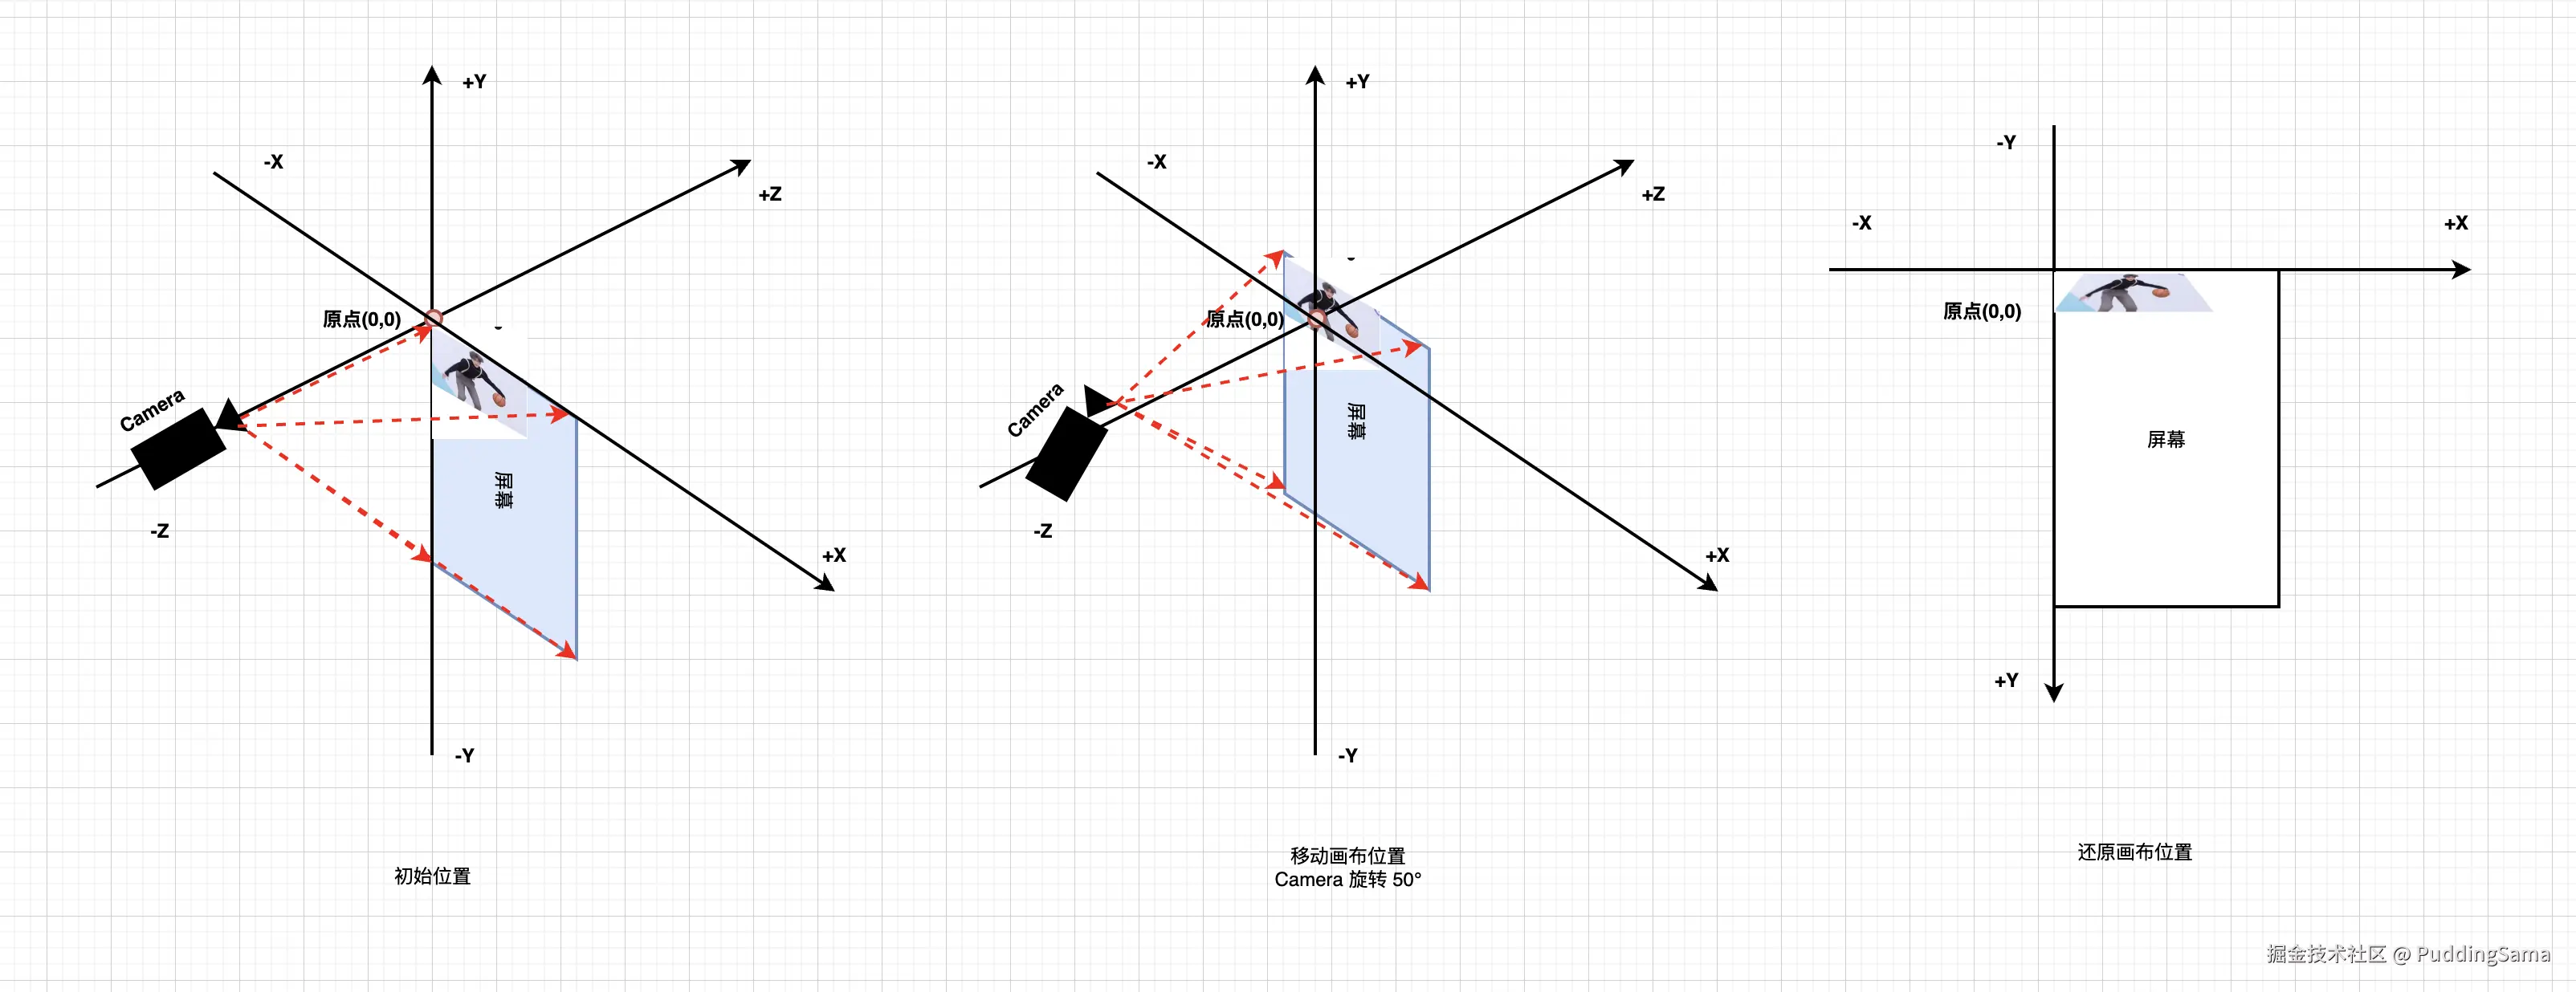
根据这个图示应该就比较明了上面代码的运行逻辑了吧。
其他常用方法
转换点
kotlin
/**
 * Apply this matrix to the array of 2D points, and write the transformed points back into the
 * array
 *
 * @param pts The array [x0, y0, x1, y1, ...] of points to transform.
 */
public void mapPoints(float[] pts) {
    mapPoints(pts, 0, pts, 0, pts.length >> 1);
}
转换 Rect
(一般用来处理位移和缩放,因为 Rect 描述的始终是一个正矩形。所以如果 Matrix 中有旋转,最终还是会得到一个标准 Rect)
kotlin
/**
 * Apply this matrix to the src rectangle, and write the transformed rectangle into dst. This is
 * accomplished by transforming the 4 corners of src, and then setting dst to the bounds of
 * those points.
 *
 * @param dst Where the transformed rectangle is written.
 * @param src The original rectangle to be transformed.
 * @return the result of calling rectStaysRect()
 */
public boolean mapRect(RectF dst, RectF src) {
    if (dst == null || src == null) {
        throw new NullPointerException();
    }
    return nMapRect(native_instance, dst, src);
}
这两个方法应用场景都比较广,通常应用场景出现在处理缩放上。比如,需要将相机的画面等比例缩放到屏幕上,因为相机的分辨率与屏幕不同,所以就需要缩放,这时候就可以用到
逆矩阵
kotlin
/**
 * If this matrix can be inverted, return true and if inverse is not null, set inverse to be the
 * inverse of this matrix. If this matrix cannot be inverted, ignore inverse and return false.
 */
public boolean invert(Matrix inverse) {
    return nInvert(native_instance, inverse.native_instance);
}
逆矩阵顾名思义,则是会得到一个相反的矩阵,在需要处理一些还原转换时会比较常用。
结尾
到这里关于 Matrix 常用的内容就讲完了,希望对大家有用,有疑问也可以在评论区讨论。