深入理解 Update-Enter-Exit 模式
-
- 一、数据绑定三态:Update、Enter、Exit
- 二、基础概念
-
-
- [1. Update 选区 - 处理已有元素](#1. Update 选区 - 处理已有元素)
- [2. Enter 选区 - 处理新增数据](#2. Enter 选区 - 处理新增数据)
- [3. Exit 选区 - 处理多余元素](#3. Exit 选区 - 处理多余元素)
-
- 三、完整工作流程
- 四、三种状态的底层原理
-
-
- 数据绑定过程解析
- [键函数(Key Function)](#键函数(Key Function))
-
- 五、实战技巧
-
-
- [1. 平滑过渡处理](#1. 平滑过渡处理)
- [2. 复杂数据更新策略](#2. 复杂数据更新策略)
-
- 六、常见问题
-
-
- [1. 为什么有时候Enter选区不起作用?](#1. 为什么有时候Enter选区不起作用?)
- [2. 如何避免内存泄漏?](#2. 如何避免内存泄漏?)
-
- 七、视觉化解释
- 小结
- 下章预告:选择、插入、删除元素
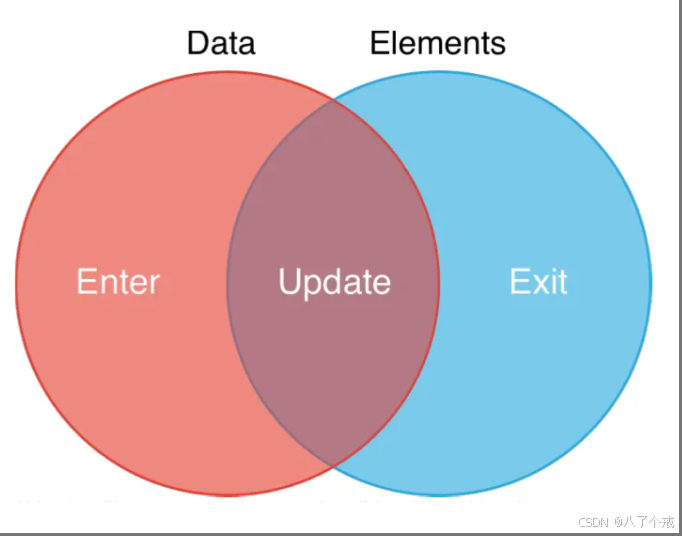
一、数据绑定三态:Update、Enter、Exit
D3.js 的数据绑定遵循一个强大的模式,称为 Update-Enter-Exit 模式,这是D3处理数据与DOM元素匹配的核心机制。
三种状态的直观理解
| 状态 | 描述 | 类比 |
|---|---|---|
Update |
数据与元素匹配的部分 | 现有员工的岗位调整 |
Enter |
数据比元素多,需要创建新元素 | 新招聘的员工 |
Exit |
元素比数据多,需要移除多余元素 | 离职的员工 |
二、基础概念
1. Update 选区 - 处理已有元素
js
// 基础用法
const update = d3.selectAll("p")
  .data([1, 2, 3]); // 自动创建Update选区

update.text(d => d); // 更新匹配的元素
2. Enter 选区 - 处理新增数据
js
const enter = update.enter(); // 获取Enter选区

enter.append("p") // 为多出的数据创建新元素
  .text(d => d);
3. Exit 选区 - 处理多余元素
js
const exit = update.exit(); // 获取Exit选区

exit.remove(); // 删除没有数据对应的元素
三、完整工作流程
👇 场景代码实例:歌词动态展示
html
<!DOCTYPE html>
<html>
<head>
  <script src="https://d3js.org/d3.v7.min.js"></script>
  <style>
    .lyric {
      padding: 8px;
      margin: 4px;
      border-left: 3px solid #3498db;
      transition: all 0.3s;
    }
    .new {
      background-color: #e3f2fd;
    }
  </style>
</head>
<body>
  <button id="change-btn">切换歌词段落</button>
  <div id="lyric-container">
    <div class="lyric">初始歌词1</div>
    <div class="lyric">初始歌词2</div>
  </div>

  <script>
    const lyricsSets = [
      ["Verse 1: 起风了", "Verse 2: 云散了"],
      ["Chorus: 阳光正好", "Chorus: 微风不燥", "Bridge: 时光荏苒"],
      ["Outro: 故事未完", "Outro: 待续..."]
    ];

    let currentSet = 0;

    d3.select("#change-btn").on("click", function() {
      currentSet = (currentSet + 1) % lyricsSets.length;
      updateLyrics(lyricsSets[currentSet]);
    });

    function updateLyrics(lyrics) {
      // 1. 数据绑定
      const lyricsUpdate = d3.select("#lyric-container")
        .selectAll(".lyric")
        .data(lyrics);

      // 2. 处理Update选区
      lyricsUpdate
        .classed("new", false)
        .text(d => d);

      // 3. 处理Enter选区
      lyricsUpdate.enter()
        .append("div")
        .attr("class", "lyric new")
        .text(d => d)
        .style("opacity", 0)
        .transition()
        .duration(500)
        .style("opacity", 1);

      // 4. 处理Exit选区
      lyricsUpdate.exit()
        .transition()
        .duration(500)
        .style("opacity", 0)
        .remove();
    }
  </script>
</body>
</html>
👇
运行看效果
四、三种状态的底层原理
数据绑定过程解析
- 数据匹配:D3通过
__data__属性将数据与DOM元素关联 - 创建选区:
js
const selection = d3.selectAll("div").data([1, 2, 3]);- selection._groups0 → Update选区
- selection._enter → Enter选区
- selection._exit → Exit选区
键函数(Key Function)
js
// 使用键函数精确控制数据匹配
const data = [
  {id: 1, text: "第一段"},
  {id: 2, text: "第二段"}
];

d3.selectAll(".paragraph")
  .data(data, d => d.id) // 使用id作为匹配键
  .text(d => d.text);
五、实战技巧
1. 平滑过渡处理
js
// Enter + Update合并处理
const circles = svg.selectAll("circle")
  .data(data);

circles.enter()
  .append("circle")
  .attr("r", 0)
  .merge(circles) // 合并Enter和Update选区
  .transition()
  .attr("r", d => d.value)
  .attr("cx", (d, i) => i * 30);
2. 复杂数据更新策略
js
function updateChart(newData) {
  // 数据绑定
  const bars = chart.selectAll(".bar")
    .data(newData, d => d.id); // 使用唯一标识

  // 退出元素淡出
  bars.exit()
    .transition()
    .duration(600)
    .style("opacity", 0)
    .remove();

  // 新元素从左侧滑入
  bars.enter()
    .append("rect")
    .attr("class", "bar")
    .attr("x", -100)
    .attr("y", d => yScale(d.category))
    .merge(bars)
    .transition()
    .duration(600)
    .attr("x", 0)
    .attr("width", d => xScale(d.value));
}
六、常见问题
1. 为什么有时候Enter选区不起作用?
检查父容器选择是否正确,确保在正确的上下文中添加新元素:
js
// 正确做法
d3.select("#container").selectAll("div")
  .data(data)
  .enter()
  .append("div"); // 会添加到#container内

// 错误做法
d3.selectAll("div") // 可能选不到父容器
  .data(data)
  .enter()
  .append("div");
2. 如何避免内存泄漏?
始终处理Exit选区,及时移除不需要的元素:
js
// 最佳实践
update.exit()
  .transition() // 可选的动画效果
  .remove();
七、视觉化解释
数据与元素匹配示意图
初始元素: [A, B, C]
新数据:   [X, B, Y, Z]

匹配过程:
1. Update: B (通过键函数匹配)
2. Enter: X, Y, Z (新数据)
3. Exit: A, C (无匹配数据)
小结
- Update-Enter-Exit 是D3数据驱动的核心模式
-
Update: 处理数据与元素匹配的部分
-
Enter: 处理新增数据,创建新元素
-
Exit: 处理多余元素,安全移除
- 键函数 可以精确控制数据匹配逻辑
- 平滑过渡 技巧可以提升用户体验
- 始终遵循 数据绑定三部曲:
js
const update = selection.data(data);
update.enter().append(); // 处理新增
update.exit().remove();  // 处理移除