【树莓派 PICO 2 测评】采集 DS18B20 数据及 OLED 显示
本文介绍了树莓派 PICO 2 采集 DS18B20 数据以及 OLED 显示环境温度信息。
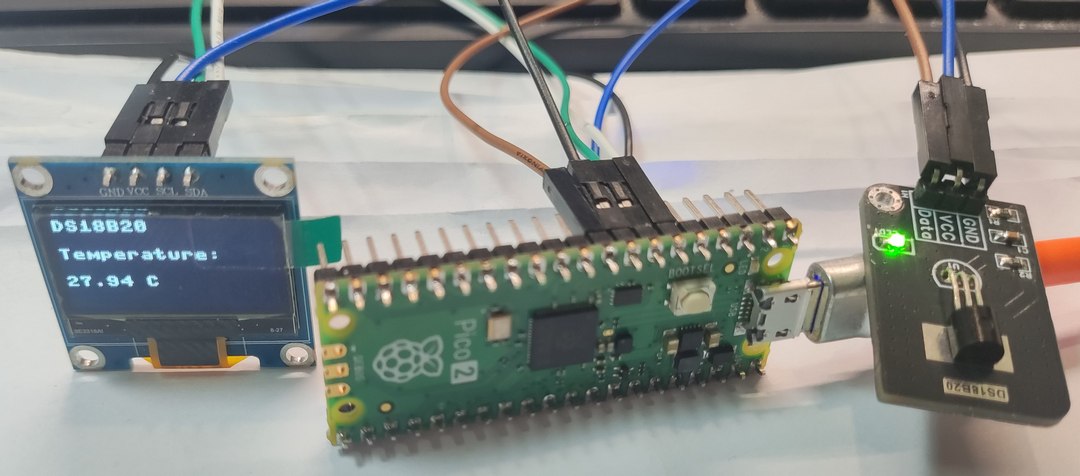
硬件连接
OLED_SCL -> GPIO5
OLED_SDA -> GPIO4
DS18B20 -> GPIO6

DS18B20模块详见:DS18B20模块 - 立创开源硬件平台 .
DS18B20
串口打印 DS18B20 传感器数据
代码
python
import machine, onewire, ds18x20, time
ds_pin = machine.Pin(4) # 定义 ds18x20 传感器数据引脚
ow = onewire.OneWire(ds_pin)# 使能单总线
ds = ds18x20.DS18X20(ow) # 传感器为 DS18x20
roms = ds.scan() # 扫描单总线上的传感器地址,支持多个传感器同时连接
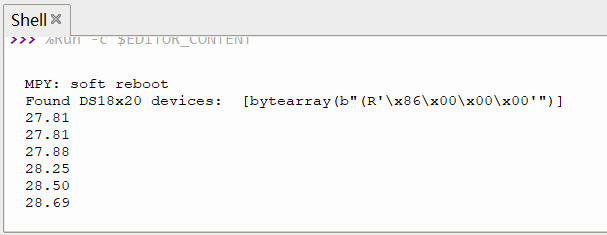
print('Found DS18x20 devices: ', roms)
while True:
ds.convert_temp() # 温度采集转换
time.sleep_ms(750) # 初始化延时,以获取正确读数
for rom in roms:
temp = ds.read_temp(roms[0]) # 温度显示, rom[0] 为第 1 个 DS18B20
print("{:.2f}".format(temp)) # 打印温度数值,保留两位小数
time.sleep(1)效果
动态演示
IIC OLED
添加 ssd1306.py 至树莓派 Pico 2 根目录
python
# MicroPython SSD1306 OLED driver, I2C and SPI interfaces created by Adafruit

import time
import framebuf

# register definitions
SET_CONTRAST        = const(0x81)
SET_ENTIRE_ON       = const(0xa4)
SET_NORM_INV        = const(0xa6)
SET_DISP            = const(0xae)
SET_MEM_ADDR        = const(0x20)
SET_COL_ADDR        = const(0x21)
SET_PAGE_ADDR       = const(0x22)
SET_DISP_START_LINE = const(0x40)
SET_SEG_REMAP       = const(0xa0)
SET_MUX_RATIO       = const(0xa8)
SET_COM_OUT_DIR     = const(0xc0)
SET_DISP_OFFSET     = const(0xd3)
SET_COM_PIN_CFG     = const(0xda)
SET_DISP_CLK_DIV    = const(0xd5)
SET_PRECHARGE       = const(0xd9)
SET_VCOM_DESEL      = const(0xdb)
SET_CHARGE_PUMP     = const(0x8d)


class SSD1306:
    def __init__(self, width, height, external_vcc):
        self.width = width
        self.height = height
        self.external_vcc = external_vcc
        self.pages = self.height // 8
        # Note the subclass must initialize self.framebuf to a framebuffer.
        # This is necessary because the underlying data buffer is different
        # between I2C and SPI implementations (I2C needs an extra byte).
        self.poweron()
        self.init_display()

    def init_display(self):
        for cmd in (
            SET_DISP | 0x00, # off
            # address setting
            SET_MEM_ADDR, 0x00, # horizontal
            # resolution and layout
            SET_DISP_START_LINE | 0x00,
            SET_SEG_REMAP | 0x01, # column addr 127 mapped to SEG0
            SET_MUX_RATIO, self.height - 1,
            SET_COM_OUT_DIR | 0x08, # scan from COM[N] to COM0
            SET_DISP_OFFSET, 0x00,
            SET_COM_PIN_CFG, 0x02 if self.height == 32 else 0x12,
            # timing and driving scheme
            SET_DISP_CLK_DIV, 0x80,
            SET_PRECHARGE, 0x22 if self.external_vcc else 0xf1,
            SET_VCOM_DESEL, 0x30, # 0.83*Vcc
            # display
            SET_CONTRAST, 0xff, # maximum
            SET_ENTIRE_ON, # output follows RAM contents
            SET_NORM_INV, # not inverted
            # charge pump
            SET_CHARGE_PUMP, 0x10 if self.external_vcc else 0x14,
            SET_DISP | 0x01): # on
            self.write_cmd(cmd)
        self.fill(0)
        self.show()

    def poweroff(self):
        self.write_cmd(SET_DISP | 0x00)

    def contrast(self, contrast):
        self.write_cmd(SET_CONTRAST)
        self.write_cmd(contrast)

    def invert(self, invert):
        self.write_cmd(SET_NORM_INV | (invert & 1))

    def show(self):
        x0 = 0
        x1 = self.width - 1
        if self.width == 64:
            # displays with width of 64 pixels are shifted by 32
            x0 += 32
            x1 += 32
        self.write_cmd(SET_COL_ADDR)
        self.write_cmd(x0)
        self.write_cmd(x1)
        self.write_cmd(SET_PAGE_ADDR)
        self.write_cmd(0)
        self.write_cmd(self.pages - 1)
        self.write_framebuf()

    def fill(self, col):
        self.framebuf.fill(col)

    def pixel(self, x, y, col):
        self.framebuf.pixel(x, y, col)

    def scroll(self, dx, dy):
        self.framebuf.scroll(dx, dy)

    def text(self, string, x, y, col=1):
        self.framebuf.text(string, x, y, col)


class SSD1306_I2C(SSD1306):
    def __init__(self, width, height, i2c, addr=0x3c, external_vcc=False):
        self.i2c = i2c
        self.addr = addr
        self.temp = bytearray(2)
        # Add an extra byte to the data buffer to hold an I2C data/command byte
        # to use hardware-compatible I2C transactions.  A memoryview of the
        # buffer is used to mask this byte from the framebuffer operations
        # (without a major memory hit as memoryview doesn't copy to a separate
        # buffer).
        self.buffer = bytearray(((height // 8) * width) + 1)
        self.buffer[0] = 0x40  # Set first byte of data buffer to Co=0, D/C=1
        self.framebuf = framebuf.FrameBuffer1(memoryview(self.buffer)[1:], width, height)
        super().__init__(width, height, external_vcc)

    def write_cmd(self, cmd):
        self.temp[0] = 0x80 # Co=1, D/C#=0
        self.temp[1] = cmd
        self.i2c.writeto(self.addr, self.temp)

    def write_framebuf(self):
        # Blast out the frame buffer using a single I2C transaction to support
        # hardware I2C interfaces.
        self.i2c.writeto(self.addr, self.buffer)

    def poweron(self):
        pass


class SSD1306_SPI(SSD1306):
    def __init__(self, width, height, spi, dc, res, cs, external_vcc=False):
        self.rate = 10 * 1024 * 1024
        dc.init(dc.OUT, value=0)
        res.init(res.OUT, value=0)
        cs.init(cs.OUT, value=1)
        self.spi = spi
        self.dc = dc
        self.res = res
        self.cs = cs
        self.buffer = bytearray((height // 8) * width)
        self.framebuf = framebuf.FrameBuffer1(self.buffer, width, height)
        super().__init__(width, height, external_vcc)

    def write_cmd(self, cmd):
        self.spi.init(baudrate=self.rate, polarity=0, phase=0)
        self.cs.high()
        self.dc.low()
        self.cs.low()
        self.spi.write(bytearray([cmd]))
        self.cs.high()

    def write_framebuf(self):
        self.spi.init(baudrate=self.rate, polarity=0, phase=0)
        self.cs.high()
        self.dc.high()
        self.cs.low()
        self.spi.write(self.buffer)
        self.cs.high()

    def poweron(self):
        self.res.high()
        time.sleep_ms(1)
        self.res.low()
        time.sleep_ms(10)
        self.res.high()
Thonny IDE 新建文件,粘贴该库代码,文件 - 另存为 - Raspberry Pi Pico - 命名为 ssd1306.py - OK .
设备扫描
调用 ssd1306 库文件实现 IIC 设备扫描
代码
python
# I2C Scanner MicroPython
from machine import Pin, SoftI2C

# You can choose any other combination of I2C pins
i2c = SoftI2C(scl=Pin(5), sda=Pin(4))

print('I2C SCANNER')
devices = i2c.scan()

if len(devices) == 0:
  print("No i2c device !")
else:
  print('i2c devices found:', len(devices))

  for device in devices:
    print("I2C hexadecimal address: ", hex(device))
效果

文字显示
调用 ssd1306 库文件实现 IIC OLED 设备连接并显示文本
代码
python
from machine import Pin, SoftI2C
import ssd1306
#You can choose any other combination of I2C pins
i2c = SoftI2C(scl=Pin(5), sda=Pin(4))
oled_width = 128
oled_height = 64
oled = ssd1306.SSD1306_I2C(oled_width, oled_height, i2c)
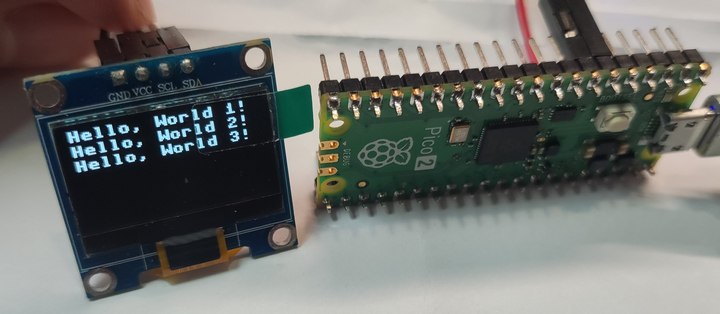
oled.text('Hello, World 1!', 0, 0)
oled.text('Hello, World 2!', 0, 10)
oled.text('Hello, World 3!', 0, 20)
oled.show()效果
传感器显示
结合前面关于 DS18B20 温度传感器的测试,将温度数据显示在 OLED 屏幕上
代码
python
import machine, onewire, ds18x20, time
from machine import Pin, SoftI2C
import ssd1306

# initialize oled
i2c = SoftI2C(scl=Pin(5), sda=Pin(4))   # initialize IIC: scl--> 5, sda --> 4
oled_width = 128
oled_height = 64
oled = ssd1306.SSD1306_I2C(oled_width, oled_height, i2c)

# initialize DS18B20
ow= onewire.OneWire(Pin(6))   # 使能单总线
ds = ds18x20.DS18X20(ow)        # 传感器 DS18B20
rom = ds.scan()         # 扫描单总线上的传感器地址,支持多个传感器同时连接

while True:

    ds.convert_temp()   # 温度采集转换
    temp = ds.read_temp(rom[0]) # 温度显示, rom[0] 为第 1 个 DS18B20
    #temp_str = str(round(temp, 2)) # 保留两位小数
    temp_str = str('%.2f'%temp) # 保留两位小数
    print(temp_str)

    # Show data
    oled.fill(0)   # 清屏背景黑色
    oled.text('DS18B20', 0, 0)
    oled.text('Temperature:',0,20)
    oled.text(temp_str +' C',0,40) # 显示 temp
    oled.show()

    time.sleep_ms(1000)
效果
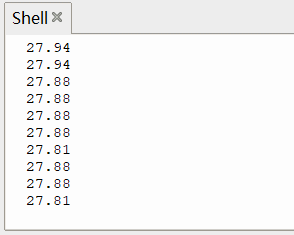
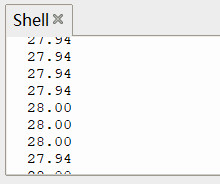
同时 Shell 打印温度值
总结
本文介绍了树莓派 PICO 2 采集 DS18B20 数据以及 OLED 显示环境温度信息,从 SSD1306 驱动库文件开始,实现 IIC 设备扫描、OLED 文字显示、DS18B20 传感器读取、传感器数据的 OLED 显示。为 IIC 驱动的相关硬件开发与传感器的应用提供了参考。