一、搭建DNS服务
配置主服务器
1.修改核心配置文件
root@DNS-master \~# vim /etc/named.conf
options {
listen-on port 53 { 192.168.111.107;192.168.111.100; };
directory "/var/named";
};
zone "haha.com" IN {
type master;
file "haha.com";
allow-transfer { 192.168.111.108; };
};
zone "111.168.192.in-addr.arpa" IN {
type master;
file "haha.fanxiang";
allow-transfer { 192.168.111.108; };
};
2.编写正向区域数据文件
root@DNS-master \~# cat /var/named/haha.com
$TTL 1D
@ IN SOA ns1.haha.com. root.haha.com (0 1H 1H 1H 2D)
IN NS ns1
IN NS ns2
ns1 IN A 192.168.111.107
ns2 IN A 192.168.111.108
www IN A 192.168.111.200
txt IN TXT "AaBbCcDdEeFf"
3.编写反向区域数据文件
root@DNS-master \~# cat /var/named/haha.fanxiang
$TTL 1D
@ IN SOA ns1.haha.com. root.haha.com. (0 1H 1H 1H 2D)
IN NS ns1
IN NS ns2
ns1 IN A 192.168.111.107
ns2 IN A 192.168.111.108
200 IN PTR www.haha.com.
txt IN TXT "AaBbCcDdEeFf"
4.功能测试
root@DNS-master \~# dig -t A www.haha.com @192.168.111.107
; <<>> DiG 9.16.23-RH <<>> -t A www.haha.com @192.168.111.107
;; global options: +cmd
;; Got answer:
;; ->>HEADER<<- opcode: QUERY, status: NOERROR, id: 13434
;; flags: qr aa rd ra; QUERY: 1, ANSWER: 1, AUTHORITY: 0, ADDITIONAL: 1
;; OPT PSEUDOSECTION:
; EDNS: version: 0, flags:; udp: 1232
; COOKIE: 89b0d8539659c6b70100000067fa382166d0738782ee7997 (good)
;; QUESTION SECTION:
;www.haha.com. IN A
;; ANSWER SECTION:
www.haha.com. 86400 IN A 192.168.111.200
;; Query time: 2 msec
;; SERVER: 192.168.111.107#53(192.168.111.107)
;; WHEN: Sat Apr 12 17:53:37 CST 2025
;; MSG SIZE rcvd: 85
配置从服务器
1.修改核心配置文件
root@DNS-slave \~# cat /etc/named.conf
options {
listen-on port 53 { 192.168.111.108;192.168.111.100; };
directory "/var/named";
};
zone "haha.com" IN {
type slave;
file "slaves/haha.com";
masters { 192.168.111.107; };
allow-transfer { none; };
};
zone "111.168.192.in-addr.arpa" IN {
type slave;
file "slaves/haha.fanxiang";
masters { 192.168.111.107; };
allow-transfer { none; };
};
2.功能测试
root@DNS-slave \~# systemctl restart named
root@DNS-slave \~# dig -t A www.haha.com @192.168.111.108
; <<>> DiG 9.16.23-RH <<>> -t A www.haha.com @192.168.111.108
;; global options: +cmd
;; Got answer:
;; ->>HEADER<<- opcode: QUERY, status: NOERROR, id: 53862
;; flags: qr aa rd ra; QUERY: 1, ANSWER: 1, AUTHORITY: 0, ADDITIONAL: 1
;; OPT PSEUDOSECTION:
; EDNS: version: 0, flags:; udp: 1232
; COOKIE: 98940855eb1f6e400100000067fa385dd1f147c06a630f38 (good)
;; QUESTION SECTION:
;www.haha.com. IN A
;; ANSWER SECTION:
www.haha.com. 86400 IN A 192.168.111.200
;; Query time: 1 msec
;; SERVER: 192.168.111.108#53(192.168.111.108)
;; WHEN: Sat Apr 12 17:54:37 CST 2025
;; MSG SIZE rcvd: 85
二、搭建 Web服务器
1、配置nginx
root@web01 \~# cat /etc/nginx/conf.d/haha.conf
server{
listen 80;
server_name www.haha.com;
root /usr/share/nginx/html;
access_log /var/log/nginx/haha_access.log;
error_log /var/log/nginx/haha_error.log;
}
2、修改DNS
root@web01 \~# nmcli c modify ens160 ipv4.dns 192.168.111.100
root@web01 \~# nmcli c up ens160
Connection successfully activated (D-Bus active path: /org/freedesktop/NetworkManager/ActiveConnection/3)
3、编写欢迎页面
root@web01 \~# echo "welcome web01" > /usr/share/nginx/html/index.html
4、测试服务
root@web01 \~# curl 192.168.111.201
welcome web01
5、复制配置文件到web02和web03中
root@web01 \~# scp /etc/nginx/conf.d/haha.conf root@192.168.111.202:/etc/nginx/conf.d/haha.conf
root@192.168.111.202's password:
haha.conf 100% 165 106.4KB/s 00:00
root@web01 \~# scp /etc/nginx/conf.d/haha.conf root@192.168.111.203:/etc/nginx/conf.d/haha.conf
root@192.168.111.203's password:
haha.conf 100% 165 101.4KB/s 00:00
6、修改web02和web03欢迎页面
root@web02 \~# echo "welcome web02" > /usr/share/nginx/html/index.html
root@web03 \~# echo "welcome web03" > /usr/share/nginx/html/index.html
7、修改web02和web03的DNS
8、启动服务并测试
root@web02 \~# curl 192.168.111.202
welcome web02
root@web03 \~# curl 192.168.111.203
welcome web03
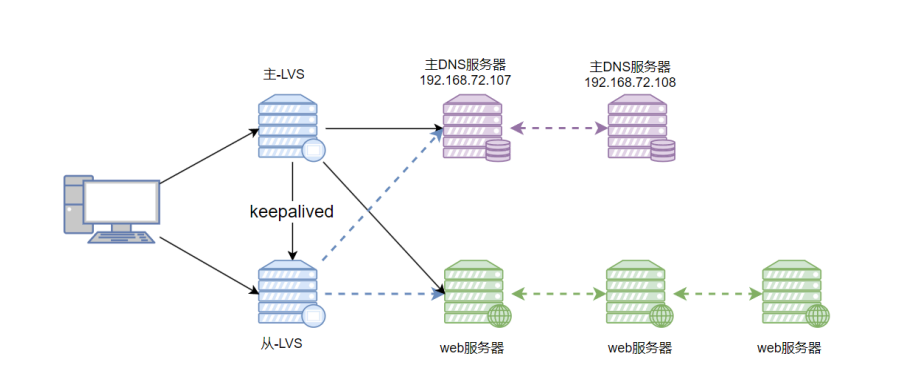
三、搭建Keepalived+Lvs
1.安装keepalived和ipvsadm
2、配置keepalived
root@LB-master \~# cat /etc/keepalived/keepalived.conf
global_defs {
router_id LVS_MASTER
}
vrrp_instance VI_1 {
state MASTER
interface ens160
virtual_router_id 51
priority 100
advert_int 1
authentication {
auth_type PASS
auth_pass 1111
}
virtual_ipaddress {
192.168.111.100
}
}
vrrp_instance VI_2 {
state MASTER
interface ens160
virtual_router_id 50
priority 100
advert_int 1
authentication {
auth_type PASS
auth_pass 1111
}
virtual_ipaddress {
192.168.111.200
}
}
virtual_server 192.168.111.100 53 {
delay_loop 6
lb_algo rr
lb_kind NAT
persistence_timeout 10
protocol UDP
real_server 192.168.111.107 53 {
weight 1
MISC_CHECK {
connect_timeout 3
misc_path "/etc/keepalived/haha.sh -h 192.168.111.107 txt.haha.com"
}
}
real_server 192.168.111.108 53 {
weight 1
MISC_CHECK {
connect_timeout 3
misc_path "/etc/keepalived/haha.sh -h 192.168.111.108 txt.haha.com"
}
}
}
virtual_server 192.168.111.200 80 {
delay_loop 6
lb_algo wrr
lb_kind DR
persistence_timeout 10
protocol TCP
real_server 192.168.111.201 80 {
weight 3
TCP_CHECK {
connect_timeout 3
retry 3
delay_before_retry 3
}
}
real_server 192.168.111.202 80 {
weight 1
TCP_CHECK {
connect_timeout 3
retry 3
delay_before_retry 3
}
}
real_server 192.168.111.203 80 {
weight 1
TCP_CHECK {
connect_timeout 3
retry 3
delay_before_retry 3
}
}
}
3、编写执行脚本
root@LB-master \~# cat /etc/keepalived/haha.sh
#!/bin/bash
$# -le 2 && { echo "usage: $0 -h <ip>"; exit 2; }
domain=$3
while getopts "h:" OPT; do
case $OPT in
h)
host=$OPTARG
;;
*)
echo "usage: $0 -h <ip>" && exit 1
;;
esac
done
dig @{host} txt {domain} +time=1 | grep "\<AaBbCcDdEeFf\>" >/dev/null
exit $?
[root@LB-
4、将配置文件复制到backup中并修改
root@LB-backup \~# cat /etc/keepalived/keepalived.conf
global_defs {
router_id LVS_MASTER
}
vrrp_instance VI_1 {
state BACKUP
interface ens160
virtual_router_id 51
priority 80
advert_int 1
authentication {
auth_type PASS
auth_pass 1111
}
virtual_ipaddress {
192.168.111.100
}
}
vrrp_instance VI_2 {
state BACKUP
interface ens160
virtual_router_id 50
priority 80
advert_int 1
authentication {
auth_type PASS
auth_pass 1111
}
virtual_ipaddress {
192.168.111.200
}
}
virtual_server 192.168.111.100 53 {
delay_loop 6
lb_algo rr
lb_kind NAT
persistence_timeout 10
protocol UDP
real_server 192.168.111.107 53 {
weight 1
MISC_CHECK {
connect_timeout 3
misc_path "/etc/keepalived/haha.sh -h 192.168.111.107 txt.haha.com"
}
}
real_server 192.168.111.108 53 {
weight 1
MISC_CHECK {
connect_timeout 3
misc_path "/etc/keepalived/haha.sh -h 192.168.111.108 txt.haha.com"
}
}
}
virtual_server 192.168.111.200 80 {
delay_loop 6
lb_algo wrr
lb_kind DR
persistence_timeout 10
protocol TCP
real_server 192.168.111.201 80 {
weight 3
TCP_CHECK {
connect_timeout 3
retry 3
delay_before_retry 3
}
}
real_server 192.168.111.202 80 {
weight 1
TCP_CHECK {
connect_timeout 3
retry 3
delay_before_retry 3
}
}
real_server 192.168.111.203 80 {
weight 1
TCP_CHECK {
connect_timeout 3
retry 3
delay_before_retry 3
}
}
}
5、重启服务
root@LB-master \~# systemctl restart keepalived.service ipvsadm.service
root@LB-backup \~# systemctl restart keepalived.service ipvsadm.service
6、查看LVS规则
root@LB-master \~# ipvsadm -ln
IP Virtual Server version 1.2.1 (size=4096)
Prot LocalAddress:Port Scheduler Flags
-> RemoteAddress:Port Forward Weight ActiveConn InActConn
TCP 192.168.111.200:80 wrr persistent 10
-> 192.168.111.201:80 Route 3 0 0
-> 192.168.111.202:80 Route 1 0 0
-> 192.168.111.203:80 Route 1 0 0
UDP 192.168.111.100:53 rr persistent 10
-> 192.168.111.107:53 Masq 1 0 0
-> 192.168.111.108:53 Masq 1 0 0
四、修改DNS
主DNS
1、增加虚拟ip
root@DNS-master \~# ifconfig lo:1 192.168.111.100 netmask 255.255.255.255 up
2、配置内核参数
root@DNS-master \~# cat /etc/sysctl.conf
sysctl settings are defined through files in
/usr/lib/sysctl.d/, /run/sysctl.d/, and /etc/sysctl.d/.
Vendors settings live in /usr/lib/sysctl.d/.
To override a whole file, create a new file with the same in
/etc/sysctl.d/ and put new settings there. To override
only specific settings, add a file with a lexically later
name in /etc/sysctl.d/ and put new settings there.
For more information, see sysctl.conf(5) and sysctl.d(5).
net.ipv4.ip_forward= 1
root@DNS-master \~# sysctl -p
net.ipv4.ip_forward = 1
3、增加路由
root@DNS-master \~# route add -host 192.168.111.100 dev lo:1
从DNS
与主DNS配置一样
五、修改Web服务(三台web配置一样)
1、添加虚拟ip
root@web01 \~# ifconfig lo:1 192.168.111.200 netmask 255.255.255.255 up
2、配置内核参数
root@web01 \~# vim /etc/sysctl.conf
root@web01 \~# sysctl -p
net.ipv4.conf.lo.arp_ignore = 1
net.ipv4.conf.lo.arp_announce = 2
net.ipv4.conf.all.arp_ignore = 1
net.ipv4.conf.all.arp_announce = 2
3、增加路由
root@web01 \~# route add -host 192.168.111.200 dev lo:1
4.重启服务,测试功能
root@web01 \~# curl www.haha.com
welcome web01
六、测试V
IP地址可以轮询访问写的web界面,证明我们的服务已经写好了。
七、扩展
这个项目还可以融入tomcat、时间服务器以及NFS来搭建一个更加完整的架构!!