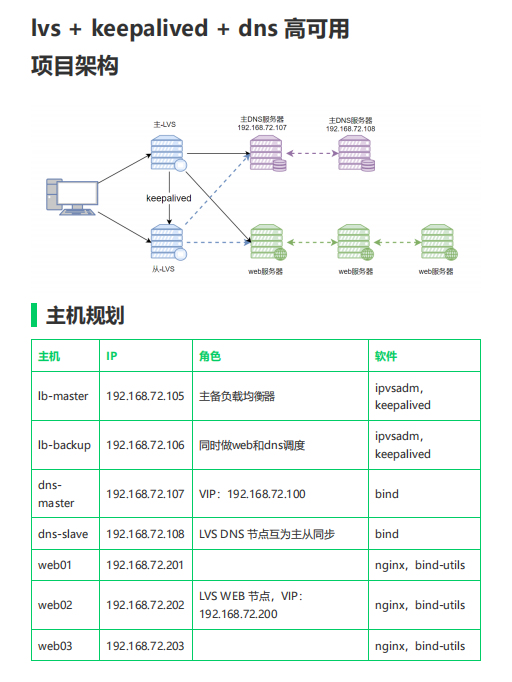
项目题目
实验步骤:
1.规划各自IP地址:
以lb-backup为例,修改ip地址即可
[root@lb-backup ~]# nmcli connection modify ens160 ipv4.addresses 192.168.72.106/24 ipv4.dns 223.5.5.5 ipv4.gateway 192.168.72.2 ipv4.method manual connection.autoconnect yes
[root@lb-backup ~]# nmcli connection up ens160
2.**搭建DNS服务-**配置主DNS服务
2.1、安装bind软件
[root@dns-master ~]# dnf install bind -y2.2、修改核心配置文件
[root@dns-master ~]# cat /etc/named.conf
options {
listen-on port 53 { 192.168.72.107;192.168.72.100; };
directory "/var/named";
};
//正向解析
zone "chengke.com" IN {
type master;
file "chengke.zone";
allow-transfer { 192.168.72.108; };
};
//反向解析
zone "72.168.192.in-addr.arpa" IN {
type master;
file "chengke.fanxiang";
allow-transfer { 192.168.72.108; };
};
[root@dns-master ~]# named-checkconf //检查域名系统配置文件语法正确性
2.3、编写正向解析区域数据文件
[root@dns-master ~]# cat /var/named/chengke.zone
$TTL 1D
@ IN SOA @ root.chengke.com. (0
1H 1D 1W 3D)
IN NS ns1.chengke.com.
IN NS ns2
ns1 IN A 192.168.72.107
ns2 IN A 192.168.72.108
www IN A 192.168.72.200
txt IN TXT "AaBbCcDdEeFf"
[root@dns-master ~]# named-checkzone chengke.com /var/named/chengke.zone //检查配置
2.4、编写反向解析区域数据文件
[root@dns-master ~]# cp -a /var/named/chengke.zone
/var/named/test.fanxiang
[root@dns-master ~]# cat /var/named/chengke.fanxiang
$TTL 1D
@ IN SOA @ root.chengke.com. (0
1H 1D 1W 3D)
IN NS ns1.chengke.com.
IN NS ns2
ns1 IN A 192.168.72.107
ns2 IN A 192.168.72.108
200 IN PTR www.chengke.com.
txt IN TXT "AaBbCcDdEeFf"
2.5、功能测试
[root@dns-master ~]# systemctl start named
[root@dns-master ~]# dig -t NS chengke.com @192.168.72.107
[root@dns-master ~]# dig -t A www.chengke.com @192.168.72.107
[root@dns-master ~]# dig -x 192.168.72.200 @192.168.72.107//反向
3.**搭建DNS服务-**配置从DNS服务
3.1、安装bind软件
[root@dns-slave ~]# dnf install bind -y3.2、修改主配置文件
[root@dns-slave ~]# scp root@192.168.72.107:/etc/named.conf
/etc/named.conf
[root@dns-slave ~]# cat /etc/named.conf
options {
listen-on port 53 { 192.168.72.108;192.168.72.100; };
directory "/var/named";
};
zone "chengke.com" IN {
type slave;
file "slaves/chengke.zone";
masters { 192.168.72.107; };
allow-transfer { none; };
};
zone "72.168.192.in-addr.arpa" IN {
type slave;
masters { 192.168.72.107; };
file "slaves/chengke.fanxiang";
allow-transfer { none; };
};
[root@dns-slave ~]# named-checkconf
3.3、功能测试
[root@dns-slave ~]# dig -t A www.chengke.com @192.168.72.107
[root@dns-slave ~]# dig -t A www.chengke.com @192.168.72.108
4.搭建Web服务器
4.1、安装nginx
[root@web01 ~]# dnf install nginx -y4.2、配置nginx
[root@web01 ~]# cat /etc/nginx/conf.d/web.conf
server {
listen 80;
server_name www.chengke.com;
root /usr/share/nginx/html;
}
4.3.修改DNS
[root@web01 ~]# nmcli d show ens160 | grep DNS
IP4.DNS[1]: 223.5.5.5
[root@web01 ~]# nmcli c m ens160 ipv4.dns 192.168.72.100
[root@web01 ~]# nmcli c up ens160
Connection successfully activated (D-Bus active path:
/org/freedesktop/NetworkManager/ActiveConnection/3)
[root@web01 ~]# nmcli d show ens160 | grep DNS
IP4.DNS[1]: 192.168.72.100
4.4、编写页面
[root@web01 ~]# echo $(hostname) - $(hostname -I) > /usr/share/nginx/html/index.html4.5启动服务
[root@web01 ~]# systemctl start nginx
[root@web01 ~]# curl localhost
web01 - 192.168.72.201
4.6、复制配置文件到web2和web3
scp /etc/nginx/conf.d/web.conf 192.168.72.202:/etc/nginx/conf.d/
scp /etc/nginx/conf.d/web.conf 192.168.72.203:/etc/nginx/conf.d/

[root@web03 ~]# cat /etc/nginx/conf.d/web.conf  //检查
server {
listen 80;
server_name www.chengke.com;
root /usr/share/nginx/html;
}
4.7、修改web02和web03的欢迎页面
[root@web02 ~]# echo $(hostname) - $(hostname -I) > /usr/share/nginx/html/index.html
[root@web03 ~]# echo $(hostname) - $(hostname -I) > /usr/share/nginx/html/index.html
4.8、修改web02和web03的DNS 如上
4.9、启动web02和web03的服务 测试
[root@web02 ~]# systemctl start nginx
[root@web02 ~]# curl localhost
web02 - 192.168.72.202
[root@web03 ~]# systemctl start nginx
[root@web03 ~]# curl localhost
web03 - 192.168.72.203
5.搭建keepalived+lvs------master
5.1、安装keepalived和ipvsadm
[root@lb-master ~]# dnf install keepalived ipvsadm5.2、配置keepavlied
[root@lb-master ~]# cat/etc/keepalived/keepalived.conf
global_defs {
router_id LVS_master
}
vrrp_instance VI_web {
    state MASTER
    interface ens160
    virtual_router_id 51
    priority 100
    advert_int 1
    authentication {
    auth_type PASS
    auth_pass 1111
        }
virtual_ipaddress {
    192.168.72.200
        }
}
virtual_server 192.168.72.200 80 {
    delay_loop 6
    lb_algo wrr
    lb_kind DR
    protocol TCP
    real_server 192.168.72.201 80 {
    weight 3
    TCP_CHECK {
        connect_timeout 3
        retry 3
        delay_before_retry 3
            }
    }
real_server 192.168.72.202 80 {
    weight 2
    TCP_CHECK {
        connect_timeout 3
        retry 3
        delay_before_retry 3
               }
    }
real_server 192.168.72.203 80 {
    weight 1
    TCP_CHECK {
        connect_timeout 3
        retry 3
        delay_before_retry 3
        }
    }
}
vrrp_instance VI_dns {
    state BACKUP
    interface ens160
    virtual_router_id 52
    priority 80
    advert_int 1
    authentication {
    auth_type PASS
    auth_pass 1111
       }
    virtual_ipaddress {
        192.168.72.100
    }
}
virtual_server 192.168.72.100 53 {
    delay_loop 6
    lb_algo rr
    lb_kind DR
    protocol UDP
    real_server 192.168.72.107 53 {
        weight 1
        MISC_CHECK {
            connect_timeout 3
            misc_path "/etc/keepalived/checkdns.sh -h 192.168.72.107 txt.chengke.com"
                  }
}
real_server 192.168.72.108 53 {
    weight 1
    MISC_CHECK {
        connect_timeout 3
        misc_path "/etc/keepalived/checkdns.sh -h 192.168.72.108 txt.chengke.com"
        }
    }
}
5.3、编写执行的脚本并修改权限
[root@lb-master ~]# cat /etc/keepalived/checkdns.sh
#!/bin/bash

[ $# -le 2 ] && { echo "usage: $0 -h <ip>"; exit 2; }
domain=$3
while getopts "h:" OPT; do
	case $OPT in
		h)
			host=$OPTARG
			;;
		*)
			echo "usage: $0 -h <ip>" && exit 1
			;;
	esac
done
dig @${host} txt ${domain} +time=1 | grep "\<AaBbCcDdEeFf\>" > /dev/null
exit $?

[root@lb-master ~]# chmod a+x /etc/keepalived/checkdns.sh
6.搭建keepalived+lvs------bakcup
6.1、安装keepalived和ipvsadm
[root@lb-backup ~]# dnf install keepalived ipvsadm6.2、复制keepalived的配置文件和shell脚本到backup服务
[root@lb-master ~]# scp /etc/keepalived/keepalived.conf 192.168.72.106:/etc/keepalived
[root@lb-master ~]# scp /etc/keepalived/checkdns.sh 192.168.72.106:/etc/keepalived
6.3、修改配置文件
[root@lb-backup ~]# cat /etc/keepalived/keepalived.conf
global_defs {
   router_id LVS_backup
}

vrrp_instance VI_web {
    state BACKUP
    interface ens160
    virtual_router_id 51
    priority 80
    advert_int 1
    authentication {
        auth_type PASS
        auth_pass 1111
    }
    virtual_ipaddress {
       192.168.72.200
    }
}

virtual_server 192.168.72.200 80 {
    delay_loop 6
    lb_algo wrr
    lb_kind DR
    protocol TCP

    real_server 192.168.72.201 80 {
        weight 3
        TCP_CHECK {
            connect_timeout 3
            retry 3
            delay_before_retry 3
        }
    }

    real_server 192.168.72.202 80 {
        weight 2
        TCP_CHECK {
            connect_timeout 3
            retry 3
            delay_before_retry 3
        }
    }
    real_server 192.168.72.203 80 {
        weight 1
        TCP_CHECK {
            connect_timeout 3
            retry 3
            delay_before_retry 3
        }
    }
}

vrrp_instance VI_dns {
    state MASTER
    interface ens160
    virtual_router_id 52
    priority 100
    advert_int 1
    authentication {
        auth_type PASS
        auth_pass 1111
    }
    virtual_ipaddress {
       192.168.72.100
    }
}

virtual_server 192.168.72.100 53 {
    delay_loop 6
    lb_algo wrr
    lb_kind DR
    protocol UDP

    real_server 192.168.72.107 53 {
        weight 1
        MISC_CHECK {
            connect_timeout 3
	    misc_path "/etc/keepalived/checkdns.sh -h 192.168.72.107 txt.chengke.com"
        }
    }

    real_server 192.168.72.108 53 {
        weight 2
        MISC_CHECK {
            connect_timeout 3
	    misc_path "/etc/keepalived/checkdns.sh -h 192.168.72.107 txt.chengke.com"
        }
    }
}
6.4、lb-master和lb-backup 启动服务
[root@lb-master ~]# dnf install bind-utils -y
[root@lb-backup ~]# dnf install bind-utils -y
//规则保存到指定文件
[root@lb-backup ~]# ipvsadm-save -n > /etc/sysconfig/ipvsadm
[root@lb-master ~]# ipvsadm-save -n > /etc/sysconfig/ipvsadm

[root@lb-master ~]# systemctl start keepalived ipvsadm
[root@lb-backup ~]# systemctl start keepalived.service ipvsadm.service
6.5、查看lvs规则
[root@lb-master ~]# ^C
[root@lb-master ~]# ipvsadm -ln
IP Virtual Server version 1.2.1 (size=4096)
Prot LocalAddress:Port Scheduler Flags
  -> RemoteAddress:Port           Forward Weight ActiveConn InActConn
TCP  192.168.72.200:80 wrr
  -> 192.168.72.201:80            Route   3      0          0
  -> 192.168.72.202:80            Route   2      0          0
  -> 192.168.72.203:80            Route   1      0          0
UDP  192.168.72.100:53 wrr
  -> 192.168.72.107:53            Route   1      0          0
  -> 192.168.72.108:53            Route   1      0          0
7.添加虚拟IP
DNS:
[root@dns-slave ~]# ifconfig lo:0 192.168.72.100 netmask 255.255.255.255 up
[root@dns-slave ~]# route add -host 192.168.72.100 dev lo:0
[root@dns-master ~]# ifconfig lo:0 192.168.72.100 netmask 255.255.255.255 up
[root@dns-master ~]# route add -host 192.168.72.100 dev lo:0

web:
[root@web01 ~]# ifconfig lo:0 192.168.72.200 netmask 255.255.255.255 up
[root@web01 ~]# route add -host 192.168.72.200 dev lo:0
[root@web02 ~]# ifconfig lo:0 192.168.72.200 netmask 255.255.255.255 up
[root@web02 ~]# route add -host 192.168.72.200 dev lo:0
[root@web03 ~]# ifconfig lo:0 192.168.72.200 netmask 255.255.255.255 up
[root@web03 ~]# route add -host 192.168.72.200 dev lo:0
8.配置DNS内核参数
[root@dns-slave ~]# cat /etc/sysctl.conf
# sysctl settings are defined through files in
# /usr/lib/sysctl.d/, /run/sysctl.d/, and /etc/sysctl.d/.
#
# Vendors settings live in /usr/lib/sysctl.d/.
# To override a whole file, create a new file with the same in
# /etc/sysctl.d/ and put new settings there. To override
# only specific settings, add a file with a lexically later
# name in /etc/sysctl.d/ and put new settings there.
#
# For more information, see sysctl.conf(5) and sysctl.d(5).
net.ipv4.conf.lo.arp_ignore = 1
net.ipv4.conf.lo.arp_announce = 2
net.ipv4.conf.all.arp_ignore = 1
net.ipv4.conf.all.arp_announce = 2
[root@dns-slave ~]# sysctl -p
net.ipv4.conf.lo.arp_ignore = 1
net.ipv4.conf.lo.arp_announce = 2
net.ipv4.conf.all.arp_ignore = 1
net.ipv4.conf.all.arp_announce = 2

[root@dns-master ~]# cat /etc/sysctl.conf
# sysctl settings are defined through files in
# /usr/lib/sysctl.d/, /run/sysctl.d/, and /etc/sysctl.d/.
#
# Vendors settings live in /usr/lib/sysctl.d/.
# To override a whole file, create a new file with the same in
# /etc/sysctl.d/ and put new settings there. To override
# only specific settings, add a file with a lexically later
# name in /etc/sysctl.d/ and put new settings there.
#
# For more information, see sysctl.conf(5) and sysctl.d(5).
net.ipv4.conf.lo.arp_ignore = 1
net.ipv4.conf.lo.arp_announce = 2
net.ipv4.conf.all.arp_ignore = 1
net.ipv4.conf.all.arp_announce = 2
[root@dns-master ~]# sysctl -p
net.ipv4.conf.lo.arp_ignore = 1
net.ipv4.conf.lo.arp_announce = 2
net.ipv4.conf.all.arp_ignore = 1
net.ipv4.conf.all.arp_announce = 2
9.配置Web服务器内核参数
[root@web01 ~]# vim /etc/sysctl.conf
[root@web01 ~]# sysctl -p
net.ipv4.conf.all.arp_ignore = 1
net.ipv4.conf.lo.arp_ignore = 1
net.ipv4.conf.all.arp_announce = 2
net.ipv4.conf.lo.arp_announce = 2
net.ipv4.ip_forward = 0
[root@web02 ~]# vim /etc/sysctl.conf
[root@web02 ~]# sysctl -p
net.ipv4.conf.all.arp_ignore = 1
net.ipv4.conf.lo.arp_ignore = 1
net.ipv4.conf.all.arp_announce = 2
net.ipv4.conf.lo.arp_announce = 2
net.ipv4.ip_forward = 0
[root@web03 ~]# vim /etc/sysctl.conf
[root@web03 ~]# sysctl -p
net.ipv4.conf.all.arp_ignore = 1
net.ipv4.conf.lo.arp_ignore = 1
net.ipv4.conf.all.arp_announce = 2
net.ipv4.conf.lo.arp_announce = 2
net.ipv4.ip_forward = 0
项目测试 :
打开百度输入 192.168.72.200 进行访问


项目完成!!!