前言
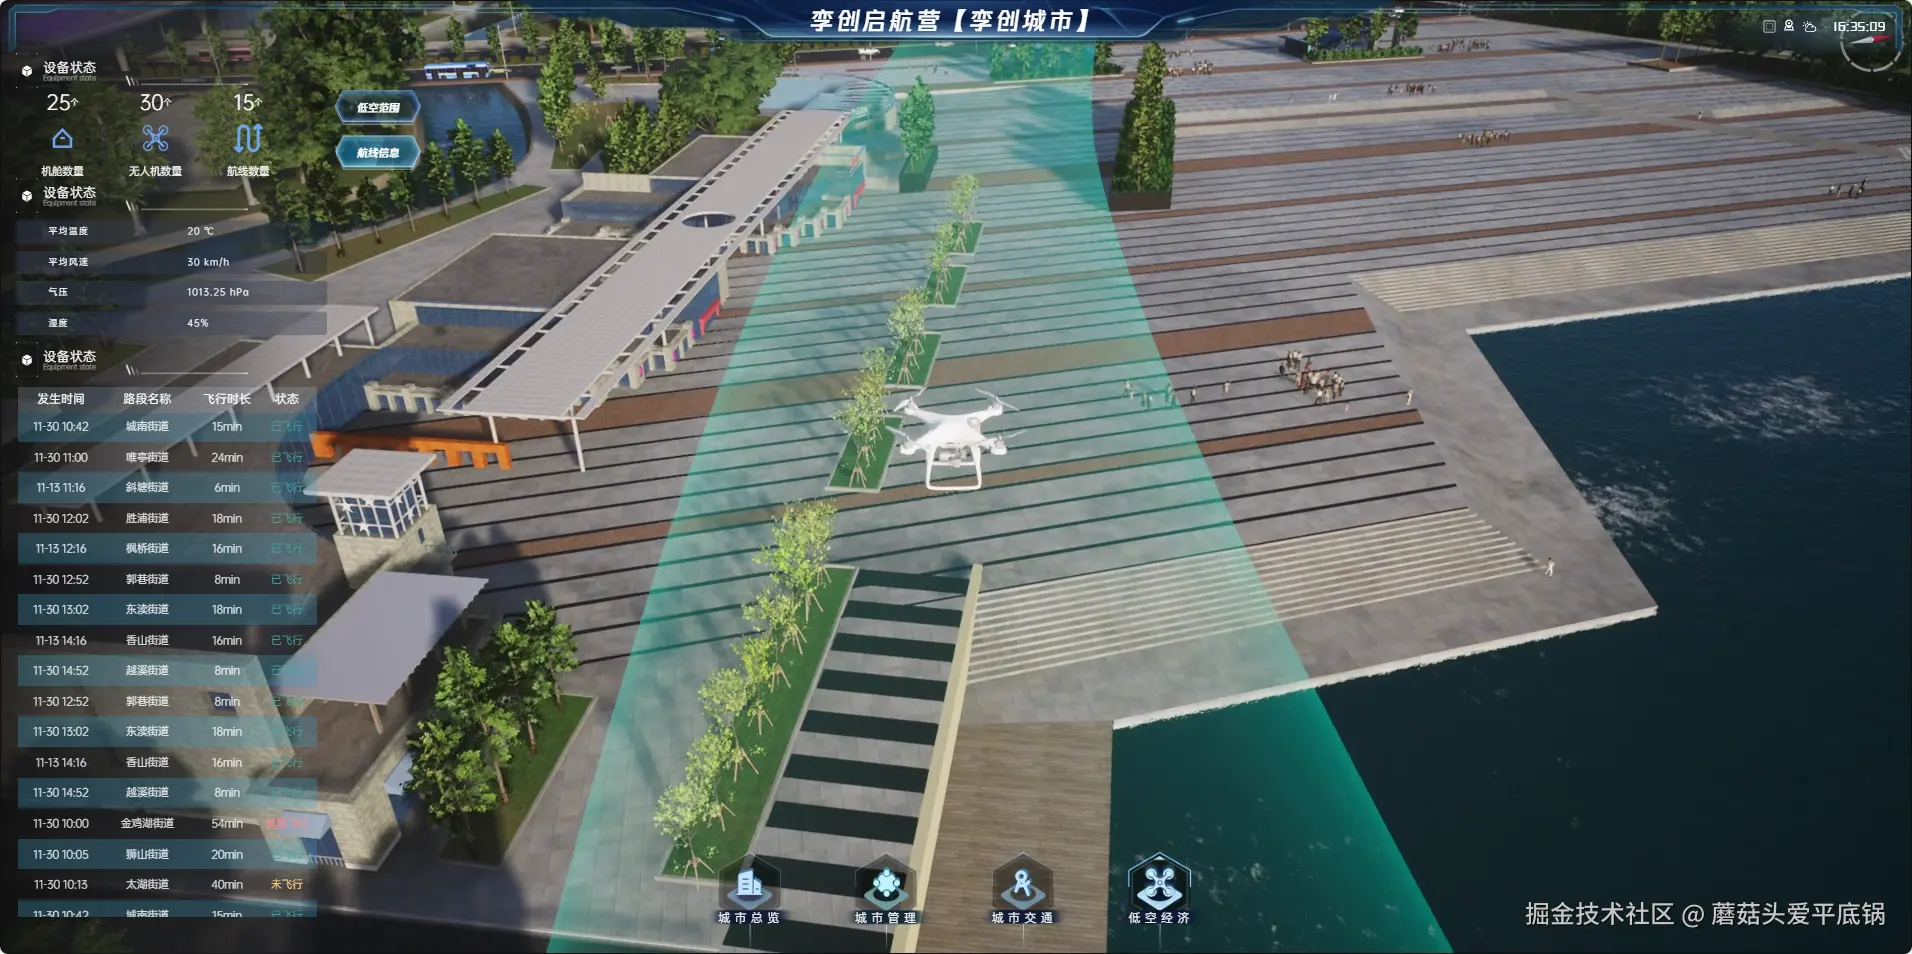
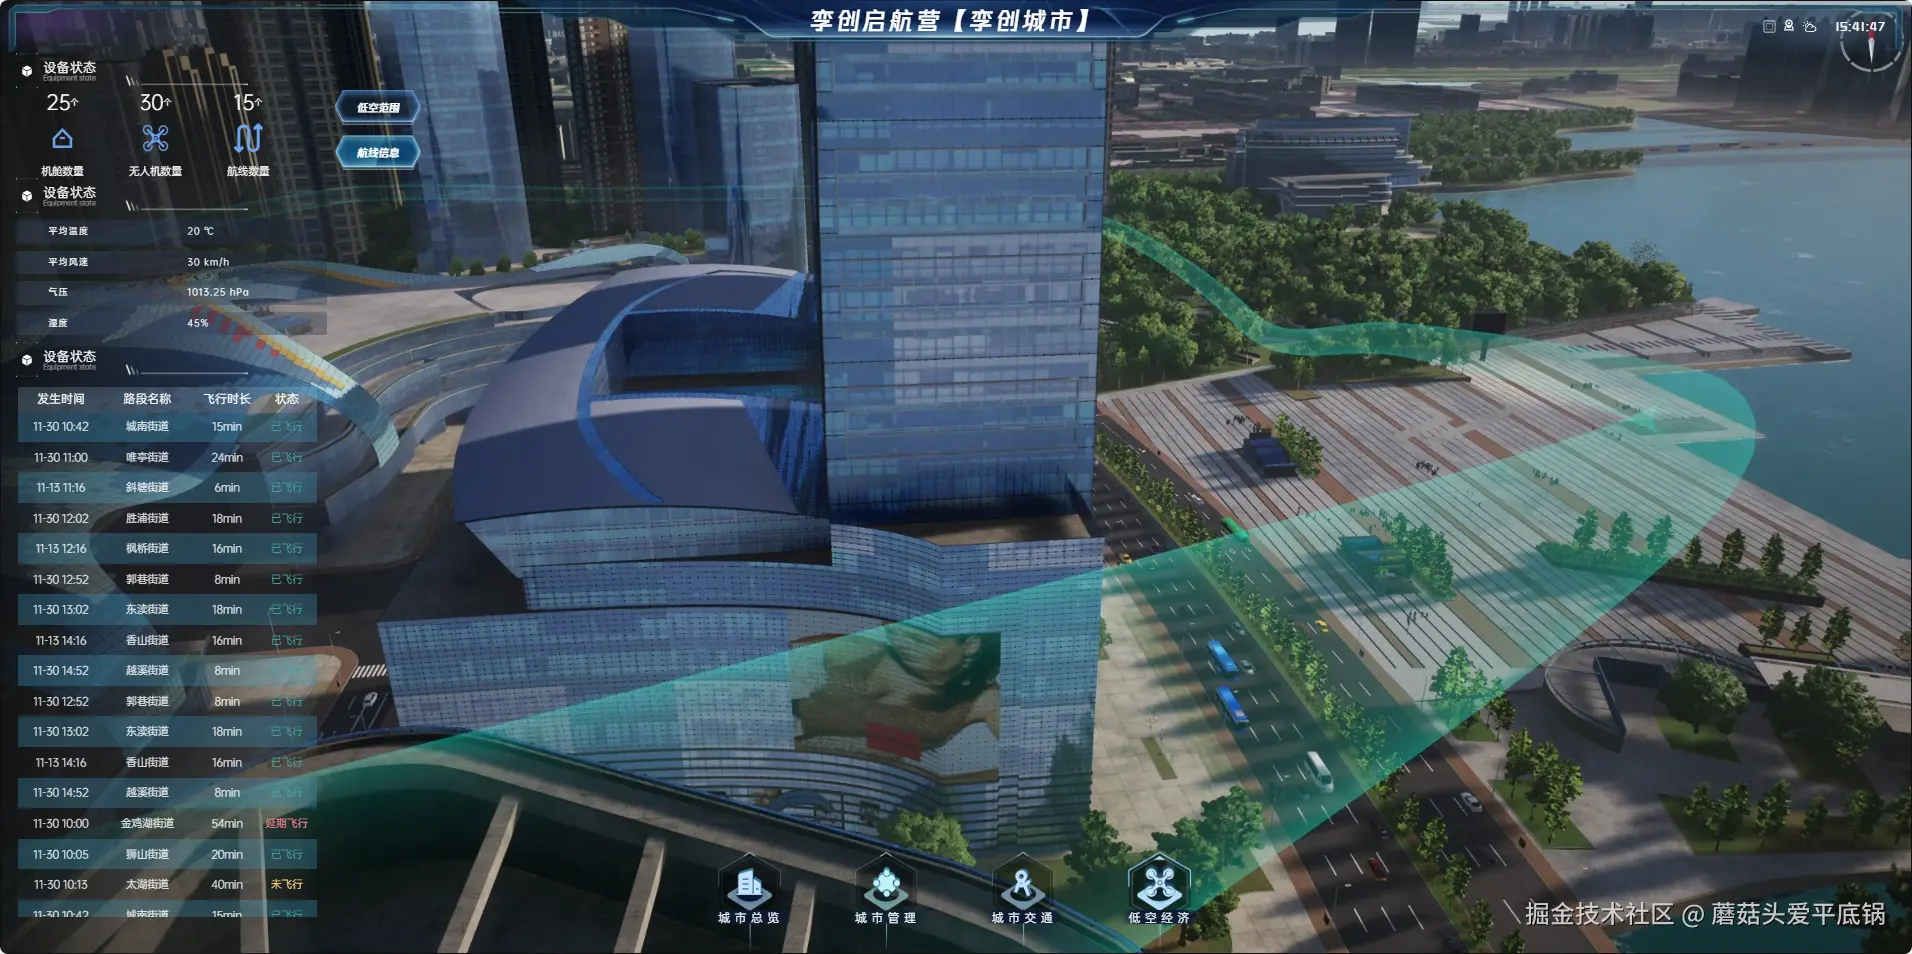
今天蘑菇头将带来dts的最后一个功能,实现一个无人机航线信息的功能。当我们点击航线信息之后,在场景中会生成无人机的航线,包括无人机的位置,然后当我们点击无人机的点位之后,会跳转到无人机的视角,对无人机进行位移模拟,在位移的同时还创建了一条无人机的航道,可以让无人机跟着管道进行位移,模拟无人机飞行的功能,快来看看是如何实现的吧。
实现思路
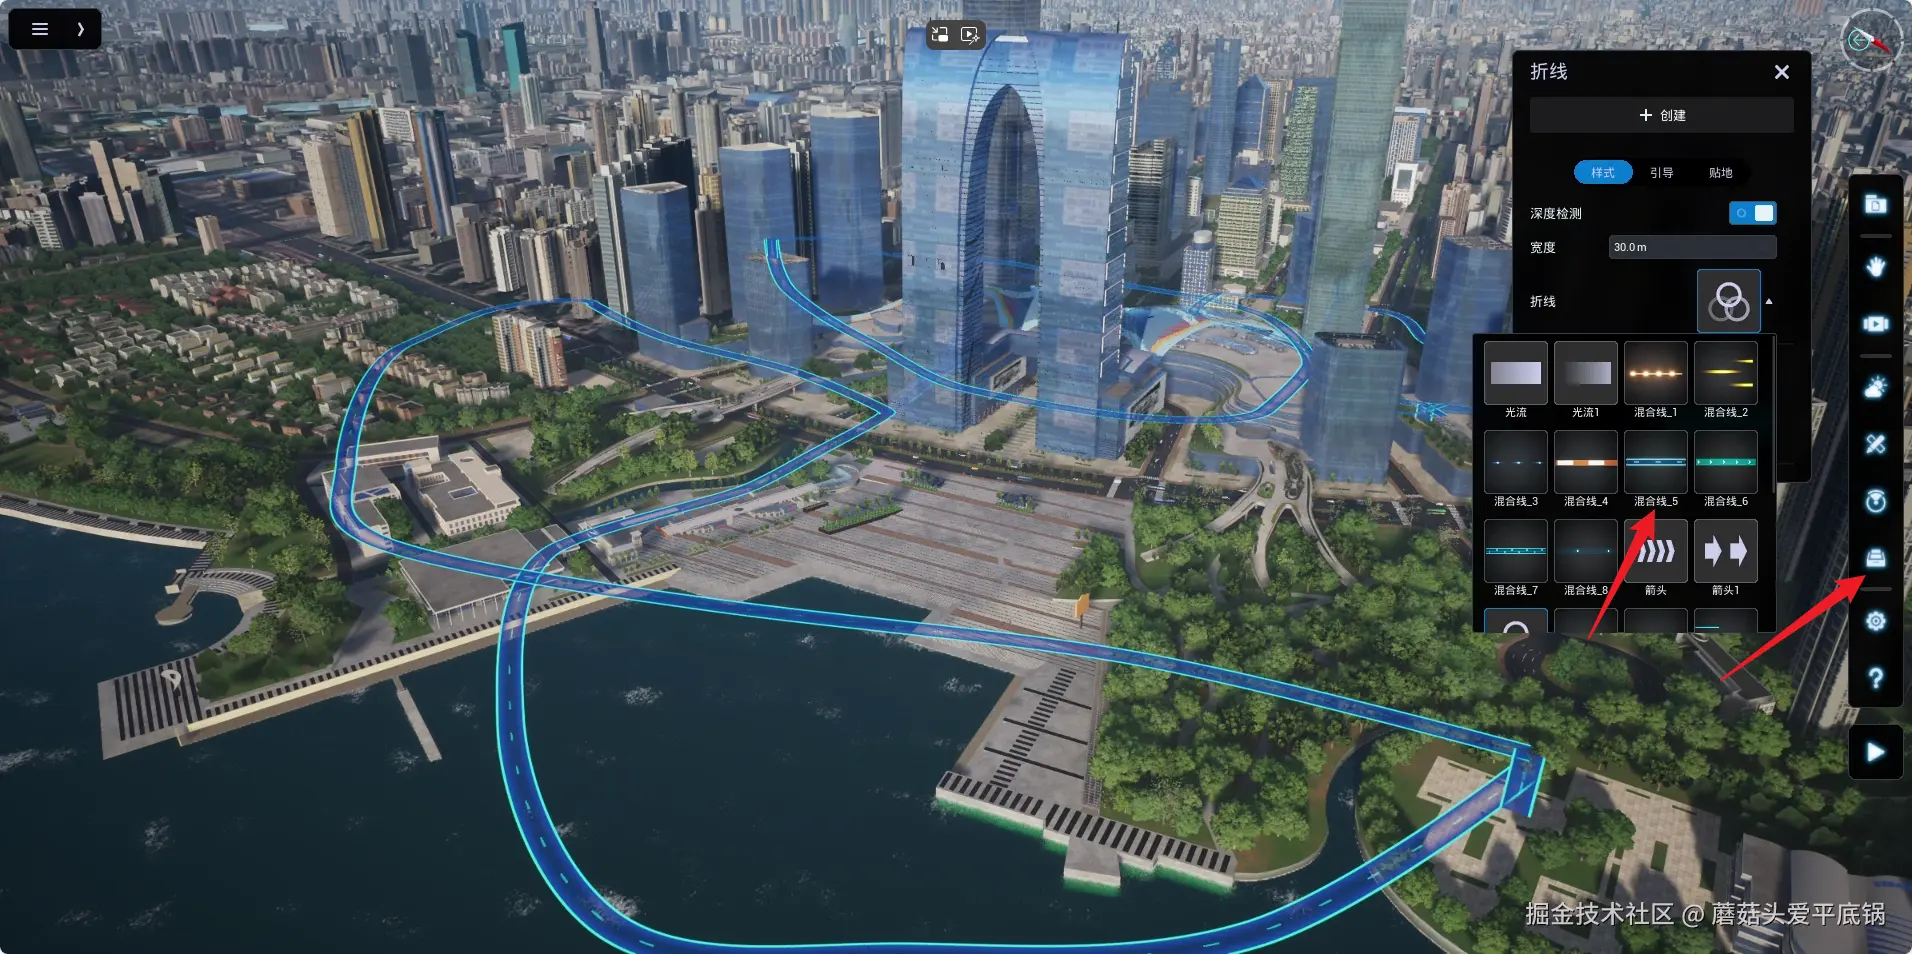
首先我们先添加航线信息,也是一些线,我们使用polyline进行绘制,绘制需要的数据在fun文件夹下。这次我们使用polyline的自定义材质进行绘制,这里我们可以在explorer的折现中找一个又科技风格的线来,复制图层名称到material字段下即可。
typescript
const polylineIds: string[] = []
// 添加无人机轨迹
const addDronePolyline = async () => {
    const polyLineList: any[] = []
    airLineData.forEach((item, index) => {
        //自定义材质的折线
        let p2 = {
            id: 'airline_polyline_' + index, //折线唯一标识id
            coordinates: item.coordinates, //构成折线的坐标点数组

            coordinateType: 0, //坐标系类型,取值范围:0为Projection类型,1为WGS84类型,2为火星坐标系(GCJ02),3为百度坐标系(BD09),默认值:0
            range: [1, 1000000], //可视范围:[近裁距离, 远裁距离],取值范围: [任意负值, 任意正值]
            thickness: 120, //折线宽度
            shape: 1, //折线类型 0:直线, 1:曲线  注意:设置为曲线非常影响添加效率
            depthTest: true, //是否做深度检测 开启后会被地形高度遮挡
            style: PolylineStyle.Normal, //折线样式 参考样式枚举:PolylineStyle
            tiling: 0, //材质贴图平铺比例
            material: '/JC_CustomAssets/PolylineLibrary/Exhibition/混合线_5', //自定义材质路径 设置后style相关参数会失效
            scalarParameters: [
                { name: '亮度1', value: 1 },
                { name: 'U缩放', value: 1 },
                { name: 'V缩放', value: 0.7 * 1000 }
            ], //材质数值类型参数
            vectorParameters: [{ name: '颜色1', value: [0, 1, 1] }] //材质数组类型参数
        }
        polylineIds.push(p2.id)
        polyLineList.push(p2)
    })
    fdapi.polyline.add(polyLineList)
}
OK,有了这个轨迹之后我们在添加一些起始点位,使用的还是我们的老朋友marker进行添加,在这里有一个userdata字段是用户自定义信息,我们用这个来作为maker的唯一标识,为后续添加点击事件做铺垫。
arduino
const addAirLineMarker = () => {
    // marker添加
    const markerList: any = []
    airLineData.forEach((item: any, index: number) => {
        const coordinate = item.coordinates[1]
        const size = 0.8
        let o1 = {
            id: 'airLine_marker_' + index,
            groupId: 'airLine_marker',
            userData: item.name,
            coordinate: coordinate, //坐标位置
            coordinateType: 0, //默认0是投影坐标系,也可以设置为经纬度空间坐标系值为1
            anchors: [(-56 / 2) * size, 72 * size], //锚点,设置Marker的整体偏移,取值规则和imageSize设置的宽高有关,图片的左上角会对准标注点的坐标位置。示例设置规则:x=-imageSize.width/2,y=imageSize.height
            imageSize: [56 * size, 72 * size], //图片的尺寸
            range: [1, 10000000], //可视范围
            imagePath: '@path:无人机.png', //显示图片路径
            autoHidePopupWindow: true, //失去焦点后是否自动关闭弹出窗口
            autoHeight: false, // 自动判断下方是否有物体
            displayMode: 2, //智能显示模式  开发过程中请根据业务需求判断使用四种显示模式
            clusterByImage: true, // 聚合时是否根据图片路径分类,即当多个marker的imagePath路径参数相同时按路径对marker分类聚合
            priority: 0, //避让优先级
            occlusionCull: false //是否参与遮挡剔除
        }
        markerList.push(o1)
    })
    fdapi.marker.add(markerList)
}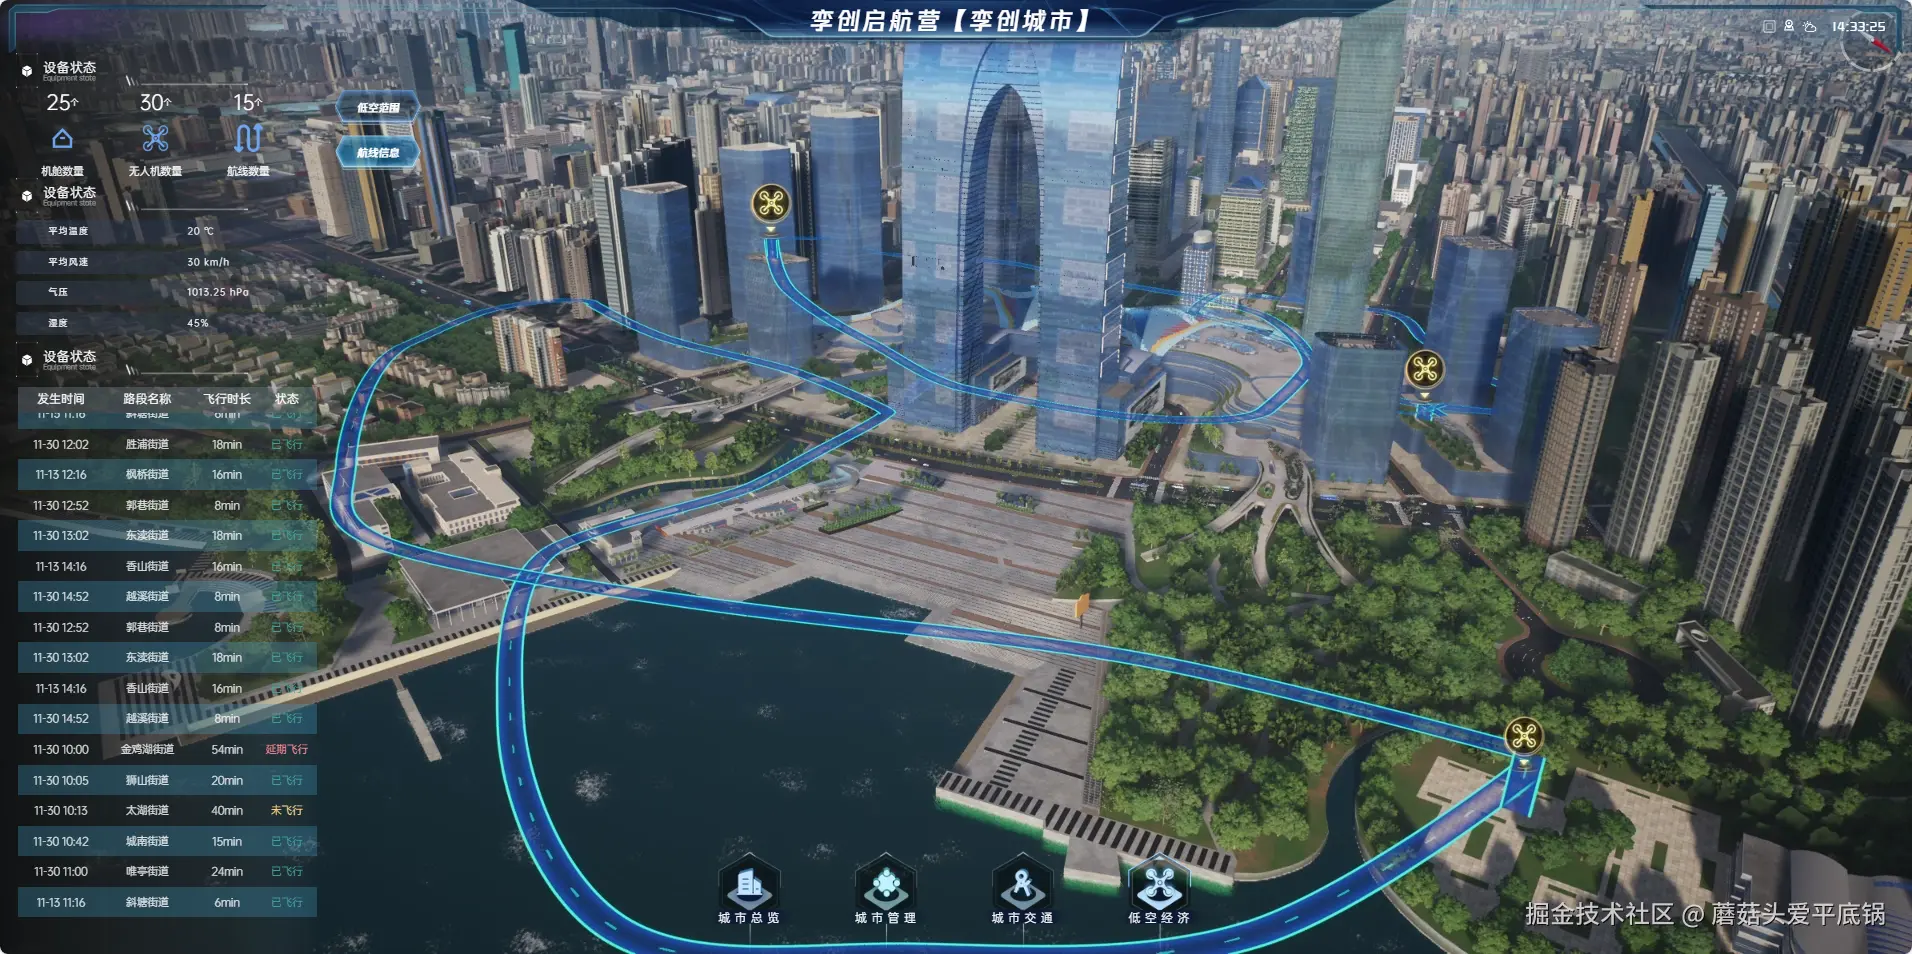
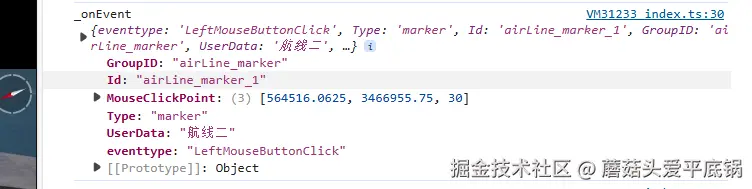
接下来就是我们的重头戏了,我们怎么去做点位的点击事件,然后开始无人机的飞行。还记得点击marker可以在初始化实例的_onEvent事件中捕捉到吗?
在Player组件的digtalTwinUtils方法里我们定义了_onReady和_onEvent方法,在_onEvent方法里面内置了很多交互事件名称和监听,通过打印这个事件对象可以发现这里就有eventtype等信息,还有当前点击的maker信息。利用这些信息(UserData)我们就能在这里去添加无人机以及管道了。
typescript
export const _onEvent = (e: any) => {
    console.log('_onEvent', e)
}
ini
export const _onEvent = (e: any) => {
    console.log('_onEvent', e)
    if (e.eventtype === 'LeftMouseButtonClick') {
        if (e.Type === 'marker') {
            if (e.GroupID === 'airLine_marker') {
                airLineMarkerClick(e.UserData)
            }
        }
    }
}
首先我们定义一个无人机的点击事件,这个点击事件入参为当前点击的UserData即航线信息,通过这个信息来动态添加无人机以及管道。在添加无人机和管道前,需要将此前添加的marker和polyline删除以免产生干扰,然后创建飞行轨迹-管道模型以及无人机,然后就是模拟无人机飞行了。
第一点删除此前轨迹线路与点位
go
// 1、删除轨迹线路 与 点位
fdapi.polyline.delete(polylineIds)
fdapi.marker.deleteByGroupId('airLine_marker')
第二点创建飞行轨迹管道模型
这里需要拿到管道的位置信息,所以我们的点击事件会写在init同一个文件夹下。通过splineMesh类的add方法进行添加,SplineMesh类,提供绘制路径模型对象相关的操作。
php
// 2、创建一个飞行轨迹-管道模型
const addSplineMeshBycoords = async (coords: number[][]) => {
    await fdapi.splineMesh.add({
        id: 'splineMesh',
        groupId: 'groupAll',
        userData: '路径模型',
        coordinateType: 0, // 坐标系类型
        coordinates: coords, //路径模型坐标数组
        range: [0, 100000], // 可见范围
        forwardAxis: 0, //路径模型的轴朝向,取值范围:[0,1,2] 分别对应X、Y、Z三个轴
        upDirection: [0, 0, 1], //路径模型的方向向量,默认值:[0, 0, 0]
        scale: 5, //路径模型轴朝向的缩放值,默认值:1
        style: 15 //参考SplineMeshStyle样式枚举
    })
}
第三点无人机飞行-创建无人机
这里我们使用CustomObject类,他提供用户自定义对象相关的操作一般通过api.customObject调用其方法。所以我使用add方法去添加一个无人机。
typescript
// 3、无人机飞行-创建自定义对象-无人机
const createFlyModel = async (location: number[]) => {
    let o = {
        id: 'fly', //自定义对象唯一id
        pakFilePath: '@path:DTS_Library.pak', //资源库pak文件路径,推荐使用cloud内置的文件资源管理器加载pak并使用@path方式传入参数
        assetPath: '/JC_CustomAssets/ObjectLibrary/Exhibition/交通工具/其他/无人机_1', //资源目录,自定义对象在pak文件资源包里的相对路径
        location: location, //位置坐标
        coordinateType: 0, // 坐标系类型
        rotation: [0, 0, 0], // 世界坐标系旋转
        range: [0, 100000], //可见范围
        localRotation: [0, 0, 0], //模型自身旋转
        scale: [1, 1, 1], //模型缩放
        isEffectRotation: true, //是否开启旋转效果
        smoothMotion: 1, //1: 平滑移动,0: 跳跃移动
        supportAttach: false, //不支持贴画贴合
        visible: true, //模型加载后默认是否显示
        autoHeight: false //是否开启自动高度 开启后自动贴地不再使用坐标Z
    }
    await fdapi.customObject.add(o)
}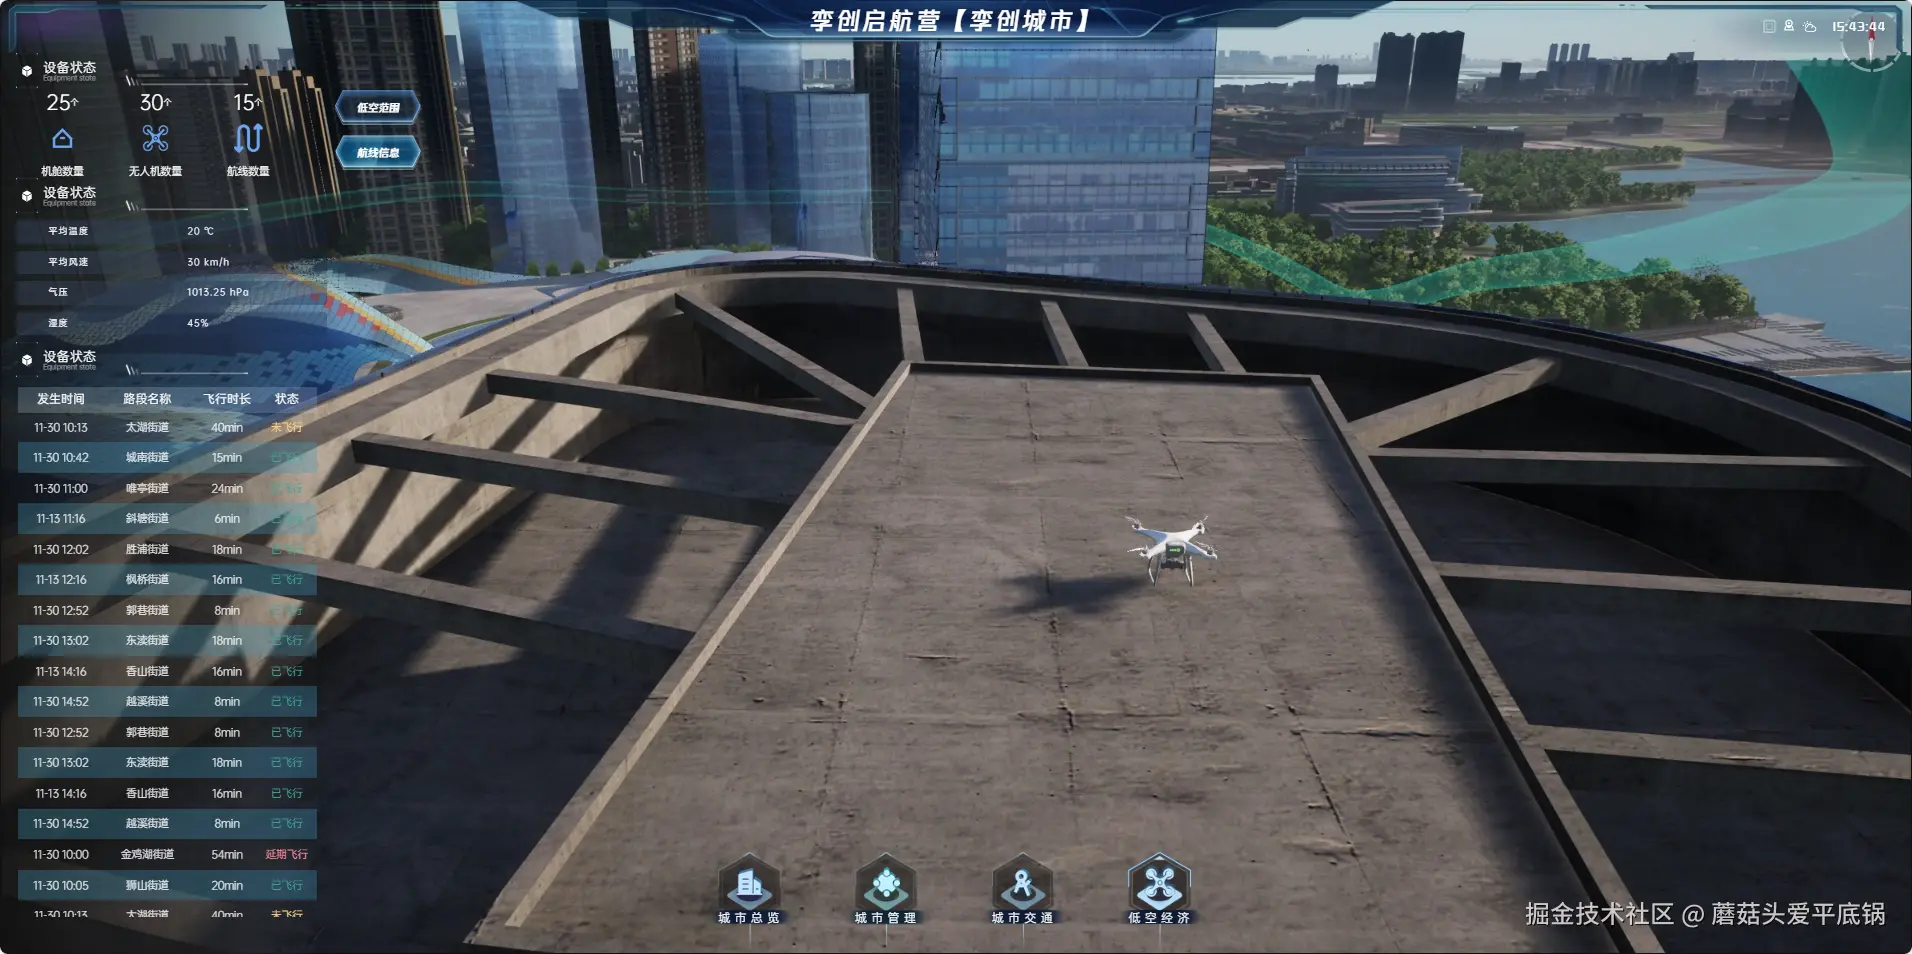
第四点无人机飞行-设置自定义相机跟随
这里我们通过customObject类提供的方法进行设置,为了让无人机飞行效果更好,所以我们去计算了每两个点之间的时间,并且将无人机飞行设置成三段位移,分别是竖直起飞,横向飞行,竖直降落,为了让三段位移衔接更加丝滑一点我们还用了setTimeOut来适配。接下来是完整的点击事件方法,以及startMove方法和计算两点之间距离的方法。
typescript
export const airLineMarkerClick = async (name: any) => {
    const airLine = airLineData.find(item => item.name === name)
    console.log('airLine', airLine);

    if (airLine) {
        // 1、删除轨迹线路 与 点位
        fdapi.polyline.delete(polylineIds)
        fdapi.marker.deleteByGroupId('airLine_marker')
        // 2、创建一个飞行轨迹-管道模型
        addSplineMeshBycoords(airLine.coordinates)
        // 3、无人机飞行-创建无人机
        await createFlyModel(airLine.coordinates[0])
        // 4、无人机飞行-设置自定义相机跟随
        setTimeout(() => {
            const flyLocations = JSON.parse(JSON.stringify(airLine.coordinates))
            flyLocations.shift()
            flyLocations.pop()

            fdapi.customObject.setLocation('fly', airLine.coordinates[1], 3)
            setTimeout(() => {
                const time = startMove({ id: 'fly', locations: flyLocations })
                setTimeout(() => {
                    fdapi.customObject.setLocation('fly', airLine.coordinates[airLine.coordinates.length - 1], 3)
                }, time * 1000)
            }, 4000)
        }, 1000)
        fdapi.customObject.focus('fly', 5, 0, [0, 0, 0], 3)
    }
}
typescript
// 4、无人机飞行-无人机飞行
const startMove = ({ id, locations, v = 60 }: { id: string; locations: number[][]; v?: number }) => {
    let pathPointArr = []
    let time = 0
    for (let i = 0; i < locations.length; i++) {
        if (i !== 0) {
            const Distance = calculateDistance(locations[i - 1], locations[i])
            const t = (Distance / 1000 / v) * 60 * 60
            time += t
        }

        //构造数组元素 每1秒移动一次
        let elementPoint = { time: time, coordinate: locations[i] }
        pathPointArr.push(elementPoint)
    }
    //车辆按GPS轨迹移动
    fdapi.customObject.startMove(id, 0, pathPointArr)

    return time
}
typescript
// 计算两点距离
function calculateDistance(coord1: number[], coord2: number[]) {
    var distance = Math.sqrt(Math.pow(coord2[0] - coord1[0], 2) + Math.pow(coord2[1] - coord1[1], 2) + Math.pow(coord2[2] - coord1[2], 2))
    return distance
}
这样我们就完成了模拟无人机飞行的功能了。
最后不要忘了退出时做一些清理操作。
go
export const exitDrone = async () => {
    fdapi.polyline.delete(polylineIds)
    fdapi.marker.deleteByGroupId('airLine_marker')
    fdapi.splineMesh.delete('splineMesh')
    fdapi.customObject.delete('fly')
}
涉及的飞渡api
- 添加线-fdapi.polyline.delete()
- 添加点-fdapi.marker.add()
- 添加管道线-fdapi.splineMesh.add()
- 添加用户自定义对象- fdapi.customObject.add()
- 自定义对象按轨迹点移动-fdapi.customObject.startMove()