1. BidiQueue 和 BidiQueueEnd
蓝牙协议栈里面有很多 BidiQueue ,本节就专门来梳理这块内容。
2. BidiQueue 介绍
BidiQueue,是 Host 与 Controller 层通信的中枢之一, acl_queue_、sco_queue_、iso_queue_ 都是 BidiQueue 类型。让我们一起看一下这个结构。
c
// system/gd/hci/hci_layer.cc
struct HciLayer::impl {

  // Acl packets
  BidiQueue<AclView, AclBuilder> acl_queue_{3 /* TODO: Set queue depth */};
  os::EnqueueBuffer<AclView> incoming_acl_buffer_{acl_queue_.GetDownEnd()};

  // SCO packets
  BidiQueue<ScoView, ScoBuilder> sco_queue_{3 /* TODO: Set queue depth */};
  os::EnqueueBuffer<ScoView> incoming_sco_buffer_{sco_queue_.GetDownEnd()};

  // ISO packets
  BidiQueue<IsoView, IsoBuilder> iso_queue_{3 /* TODO: Set queue depth */};
  os::EnqueueBuffer<IsoView> incoming_iso_buffer_{iso_queue_.GetDownEnd()};

}
c
// system/gd/common/bidi_queue.h
template <typename TUP, typename TDOWN>
class BidiQueue {
public:
explicit BidiQueue(size_t capacity)
: up_queue_(capacity),
down_queue_(capacity),
up_end_(&down_queue_, &up_queue_),
down_end_(&up_queue_, &down_queue_) {}
BidiQueueEnd<TDOWN, TUP>* GetUpEnd() {
return &up_end_;
}
BidiQueueEnd<TUP, TDOWN>* GetDownEnd() {
return &down_end_;
}
private:
::bluetooth::os::Queue<TUP> up_queue_;
::bluetooth::os::Queue<TDOWN> down_queue_;
BidiQueueEnd<TDOWN, TUP> up_end_;
BidiQueueEnd<TUP, TDOWN> down_end_;
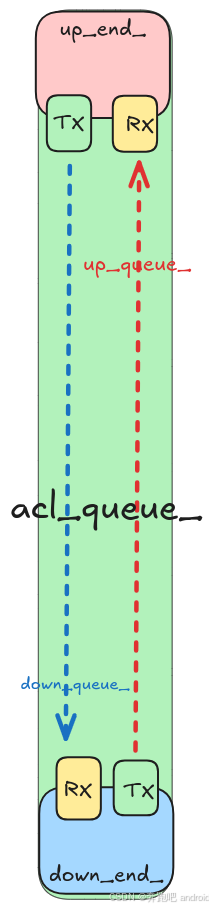
};BidiQueue 是一个"双向队列",允许:
- 一端用于 接收下行数据(发往控制器);
- 另一端用于 接收上行数据(来自控制器)。
这个类是 蓝牙 Host 与 Controller 之间异步通信的基础设施,为不同方向的数据流提供独立的缓冲和控制。
1. 模版参数解释
c
template <typename TUP, typename TDOWN>TUP:上行数据类型(从 Controller -> Host)TDOWN:下行数据类型(从 Host -> Controller)
举例:
c
BidiQueue<AclView, AclBuilder> acl_queue_{3 /* TODO: Set queue depth */};- acl_queue_ 的上行 数据包类型为 AclView
- acl_queue_ 的下行 数据包类型为 AclBuilder
2. 构造函数
c
explicit BidiQueue(size_t capacity)
      : up_queue_(capacity),
        down_queue_(capacity),
        up_end_(&down_queue_, &up_queue_),
        down_end_(&up_queue_, &down_queue_) {}
c
  ::bluetooth::os::Queue<TUP> up_queue_;
::bluetooth::os::Queue<TDOWN> down_queue_;- 他们的类型都是 bluetooth::os::Queue
- up_queue_ : 初始化 上行数据缓存队列, 队列最大 可以容纳 capacity 包数据, 这里是3
- down_queue_ : 初始化 下行数据缓存队列, 队列最大 可以容纳 capacity 包数据, 这里是3
c
  BidiQueueEnd<TDOWN, TUP> up_end_;
  BidiQueueEnd<TUP, TDOWN> down_end_;


up_end_(&down_queue_, &up_queue_);
down_end_(&up_queue_, &down_queue_);
1. 例如 acl_queue_
举个例子,我们用 acl_queue_ 来解释。
假设 ACL 数据的队列是:
c
BidiQueue<AclView, AclBuilder> acl_queue_{3 /* TODO: Set queue depth */};- acl_queue_ 的上行 数据包类型为 AclView
- acl_queue_ 的下行 数据包类型为 AclBuilder
c
explicit BidiQueue(size_t capacity)
      : up_queue_(capacity),
        down_queue_(capacity),
        up_end_(&down_queue_, &up_queue_),
down_end_(&up_queue_, &down_queue_) {}- up_queue_ : 初始化 上行数据缓存队列, 队列最大 可以容纳 capacity 包数据, 这里是3
- down_queue_ : 初始化 下行数据缓存队列, 队列最大 可以容纳 capacity 包数据, 这里是3

这个 up_end 是谁用的?
- 答:协议栈中,偏上层使用例如 l2cap 侧使用
tx_ = &down_queue_:l2cap 侧 发送数据, 需要通过up_end 的 tx 放入down_queue_中, 此时 hcihal 侧的 down_end端,就会从 rx ,也就是down_queue_中读出数据, 然后通过 hal 发送给 controler.rx_ = &up_queue_: hal 侧过来的数据 会通过down_end 端的 tx 放入 up_queue_ 中, up_end 只需要从 rxup_queue_里 去读,就可以拿到 hal 侧数据
这个 down_end 是谁用的?
- 答: 协议栈中, 偏下层使用, hcihal 侧使用
tx_ = &up_queue_: hal 侧过来的数据 会通过down_end 端的 tx 放入 up_queue_ 中, up_end 只需要从 rxup_queue_里 去读,就可以拿到 hal 侧数据rx_ = &down_queue_:l2cap 侧 发送数据, 需要通过up_end 的 tx 放入down_queue_中, 此时 hcihal 侧的 down_end端,就会从 rx ,也就是down_queue_中读出数据, 然后通过 hal 发送给 controler.
3. 获取上下端
c
  BidiQueueEnd<TDOWN, TUP>* GetUpEnd() {
    return &up_end_;
  }

  BidiQueueEnd<TUP, TDOWN>* GetDownEnd() {
    return &down_end_;
  }
4. 小结
| 项目 | 描述 |
|---|---|
BidiQueue<TUP, TDOWN> |
支持双向异步通信的队列 |
up_queue_ / down_queue_ |
分别对应上行/下行缓存 |
up_end_ / down_end_ |
用于向外暴露操作接口 |
RegisterDequeue() |
异步消费机制的核心 |
| 用法示例 | ACL 音频数据、事件通知、HCI Command 等 |
3. BidiQueueEnd 介绍
这个类是一个 方向接口类 :负责一端的收发。
c
// system/gd/common/bidi_queue.h

template <typename TENQUEUE, typename TDEQUEUE>
class BidiQueueEnd : public ::bluetooth::os::IQueueEnqueue<TENQUEUE>, public ::bluetooth::os::IQueueDequeue<TDEQUEUE> {
 public:
  using EnqueueCallback = Callback<std::unique_ptr<TENQUEUE>()>;
  using DequeueCallback = Callback<void()>;

  BidiQueueEnd(::bluetooth::os::IQueueEnqueue<TENQUEUE>* tx, ::bluetooth::os::IQueueDequeue<TDEQUEUE>* rx)
      : tx_(tx), rx_(rx) {}

  void RegisterEnqueue(::bluetooth::os::Handler* handler, EnqueueCallback callback) override {
    tx_->RegisterEnqueue(handler, callback);
  }

  void UnregisterEnqueue() override {
    tx_->UnregisterEnqueue();
  }

  void RegisterDequeue(::bluetooth::os::Handler* handler, DequeueCallback callback) override {
    rx_->RegisterDequeue(handler, callback);
  }

  void UnregisterDequeue() override {
    rx_->UnregisterDequeue();
  }

  std::unique_ptr<TDEQUEUE> TryDequeue() override {
    return rx_->TryDequeue();
  }

 private:
  ::bluetooth::os::IQueueEnqueue<TENQUEUE>* tx_;
  ::bluetooth::os::IQueueDequeue<TDEQUEUE>* rx_;
};
1. 模版参数讲解
通俗理解 BidiQueueEnd<TENQUEUE, TDEQUEUE>
这个类是一个 方向接口类 :负责一端 的收发。
它继承了两个接口:
public IQueueEnqueue<TENQUEUE>, public IQueueDequeue<TDEQUEUE>
也就是说,这个类:
-
允许你往某个队列"写"(enqueue)数据(用
TENQUEUE类型) -
也允许你从某个队列"读"(dequeue)数据(用
TDEQUEUE类型)
但注意:不是往同一个队列读写!它是两个方向!
你可以把它理解为一个"单端口",连接两个方向的队列:
2. tx_ 和 rx_
c
  ::bluetooth::os::IQueueEnqueue<TENQUEUE>* tx_;
  ::bluetooth::os::IQueueDequeue<TDEQUEUE>* rx_;


  BidiQueueEnd(::bluetooth::os::IQueueEnqueue<TENQUEUE>* tx, ::bluetooth::os::IQueueDequeue<TDEQUEUE>* rx)
: tx_(tx), rx_(rx) {}-
tx_: BidiQueueEnd 要发的东西,会写入 tx 对应的 队列中 -
rx_: BidiQueueEnd 要接收的东西,会从 rx 对应的 队列中 去取
3. 如何 将数据加入到 tx
在 BidiQueueEnd 类中, 很奇怪, 只有如下几个函数, 只是注册 入队回调、 出队回调、 还有尝试出队。 没有看到, 具体入队 是如何入队的, 也就是如何 加入到 tx 对应的队列中, 没有专门的函数, 那我们是如何 操作的呢?
- RegisterEnqueue
- UnregisterEnqueue
- RegisterDequeue
- UnregisterDequeue
- TryDequeue
其实 BidiQueueEnd 并不主动调用 Enqueue(),而是提供了 RegisterEnqueue() 给"生产者"注册数据生成器。然后由 Queue 本身决定何时调用回调来触发数据入队。
也就是说:
tx_是一个实现了IQueueEnqueue<T>接口的实际队列(如Queue<T>)RegisterEnqueue(handler, callback)注册了一个异步回调- 队列内部在"有空间时"会调用这个回调,向队列中拉取(enqueue)数据
这是一种 "拉"模式入队:不是你自己塞进去,而是注册一个"我要数据的时候你给我",由队列来决定何时触发。
c
// system/gd/common/bidi_queue.h
  void RegisterEnqueue(::bluetooth::os::Handler* handler, EnqueueCallback callback) override {
    tx_->RegisterEnqueue(handler, callback); // 这里调用了 bluetooth::os::Queue 类中 RegisterEnqueue 函数
  }
具体细节 请看 bluetooth::os::Queue 类中 RegisterEnqueue 函数的解析。
4. 如何从 rx 上获取数据
其实 BidiQueueEnd 并不主动调用 dequeue(),而是提供了 RegisterDequeue() 给"消费者"注册数据消费回调。然后由 Queue 本身决定何时调用回调来触发数据出队。
c
// system/gd/common/bidi_queue.h
  void RegisterDequeue(::bluetooth::os::Handler* handler, DequeueCallback callback) override {
    rx_->RegisterDequeue(handler, callback);
  }

  std::unique_ptr<TDEQUEUE> TryDequeue() override {
    return rx_->TryDequeue();
}- 从 rx 上 读数据, 这里直接调用了 bluetooth::os::Queue::RegisterDequeue 和 TryDequeue 函数, 具体见 bluetooth::os::Queue 中的分析
这是一种 "拉"模式出队:不是你自己主动去出队数据包,而是注册一个"消费回调",由队列来决定何时让你消费,何时让你出队。
4. Queue 介绍
c
  ::bluetooth::os::Queue<TUP> up_queue_;
::bluetooth::os::Queue<TDOWN> down_queue_;- 我们的 up_queue_ 和 down_queue_ 都是 Queue 类型
本节就来探索一下它的定义和实现。看明白他,就可以知道 BidiQueueEnd 中的 tx 和 rx 是如何 写数据和读数据的。
1. 定义
c
// system/gd/os/queue.h
template <typename T>
class Queue : public IQueueEnqueue<T>, public IQueueDequeue<T> {
 public:
  // A function moving data from enqueue end buffer to queue, it will be continually be invoked until queue
  // is full. Enqueue end should make sure buffer isn't empty and UnregisterEnqueue when buffer become empty.
  using EnqueueCallback = common::Callback<std::unique_ptr<T>()>;
  // A function moving data form queue to dequeue end buffer, it will be continually be invoked until queue
  // is empty. TryDequeue should be use in this function to get data from queue.
  using DequeueCallback = common::Callback<void()>;
  // Create a queue with |capacity| is the maximum number of messages a queue can contain
  explicit Queue(size_t capacity);
  ~Queue();
  // Register |callback| that will be called on |handler| when the queue is able to enqueue one piece of data.
  // This will cause a crash if handler or callback has already been registered before.
  void RegisterEnqueue(Handler* handler, EnqueueCallback callback) override;
  // Unregister current EnqueueCallback from this queue, this will cause a crash if not registered yet.
  void UnregisterEnqueue() override;
  // Register |callback| that will be called on |handler| when the queue has at least one piece of data ready
  // for dequeue. This will cause a crash if handler or callback has already been registered before.
  void RegisterDequeue(Handler* handler, DequeueCallback callback) override;
  // Unregister current DequeueCallback from this queue, this will cause a crash if not registered yet.
  void UnregisterDequeue() override;

  // Try to dequeue an item from this queue. Return nullptr when there is nothing in the queue.
  std::unique_ptr<T> TryDequeue() override;

 private:
  void EnqueueCallbackInternal(EnqueueCallback callback);
  // An internal queue that holds at most |capacity| pieces of data
  std::queue<std::unique_ptr<T>> queue_;
  // A mutex that guards data in this queue
  std::mutex mutex_;

  class QueueEndpoint {
   public:
#ifdef OS_LINUX_GENERIC
    explicit QueueEndpoint(unsigned int initial_value)
        : reactive_semaphore_(initial_value), handler_(nullptr), reactable_(nullptr) {}
    ReactiveSemaphore reactive_semaphore_;
#endif
    Handler* handler_;
    Reactor::Reactable* reactable_;
  };

  QueueEndpoint enqueue_;
  QueueEndpoint dequeue_;
};- 他的实现部分在 system/gd/os/linux_generic/queue.tpp 中
2. 构建和析构
c
template <typename T>
Queue<T>::Queue(size_t capacity) : enqueue_(capacity), dequeue_(0){};

template <typename T>
Queue<T>::~Queue() {
  ASSERT_LOG(enqueue_.handler_ == nullptr, "Enqueue is not unregistered");
  ASSERT_LOG(dequeue_.handler_ == nullptr, "Dequeue is not unregistered");
};- 构建和析构都比较简单,这里主要看一下 capacity , 我们之前在创建 Queue 时,这里传入的是 3
c
  class QueueEndpoint {
   public:
#ifdef OS_LINUX_GENERIC
    explicit QueueEndpoint(unsigned int initial_value) // 这里传入的 3 其实是为了初始化信号量的
        : reactive_semaphore_(initial_value), handler_(nullptr), reactable_(nullptr) {}
    ReactiveSemaphore reactive_semaphore_;
#endif
    Handler* handler_;
    Reactor::Reactable* reactable_;
  };

  QueueEndpoint enqueue_;
  QueueEndpoint dequeue_;
};
3. RegisterEnqueue
BidiQueueEnd 在向
c
template <typename T>
void Queue<T>::RegisterEnqueue(Handler* handler, EnqueueCallback callback) {
  std::lock_guard<std::mutex> lock(mutex_);
  ASSERT(enqueue_.handler_ == nullptr);
  ASSERT(enqueue_.reactable_ == nullptr);
  enqueue_.handler_ = handler;


  // 重点是这里
  enqueue_.reactable_ = enqueue_.handler_->thread_->GetReactor()->Register(
      enqueue_.reactive_semaphore_.GetFd(),
      base::Bind(&Queue<T>::EnqueueCallbackInternal, base::Unretained(this), std::move(callback)),
      base::Closure());
}
这段干了三件事:
- enqueue_.reactive_semaphore_.GetFd(): 获取 enqueue_ (入队) 的信号量文件描述符(fd), 是否大于3
- 使用该 fd 向 Reactor 注册监听(类似 epoll 注册事件)
- 一旦 fd 可写(信号量触发),就调用 EnqueueCallbackInternal
换句话说:RegisterEnqueue() 实际上是
- "注册一个写入触发回调"
- "在某个线程的事件循环(Reactor)上监听是否该执行回调"
4. EnqueueCallbackInternal
当 线程满足 信号量条件后,开始回调 EnqueueCallbackInternal 函数时:
c
template <typename T>
void Queue<T>::EnqueueCallbackInternal(EnqueueCallback callback) {
  std::unique_ptr<T> data = callback.Run(); // 调用我们之前  调用tx->RegisterEnqueue 时传入的函数,回调返回时, 会返回一个包
  ASSERT(data != nullptr);
  std::lock_guard<std::mutex> lock(mutex_);
  enqueue_.reactive_semaphore_.Decrease(); // 入对的(tx)   信号量 -1
  queue_.push(std::move(data)); // 将这个包 加入到 队列中。  这就是入队。
  dequeue_.reactive_semaphore_.Increase(); // 出对的(rx) 信号量 +1
}- 这里就是真正 回调 callback 向 tx 对应的 队列中 写入数据的地方。
- 这里采用异步的方式向 对列中加入数据。 如果 入队的 信号量 > 0, 在调用 RegisterEnqueue 时,会立马 向队列中 dequeue_ 加入包, 如何信号量 < 0 那么就会等等 >0 , 在写入队列。
5. RegisterDequeue
c
template <typename T>
void Queue<T>::RegisterDequeue(Handler* handler, DequeueCallback callback) {
  std::lock_guard<std::mutex> lock(mutex_);
  ASSERT(dequeue_.handler_ == nullptr);
  ASSERT(dequeue_.reactable_ == nullptr);
  dequeue_.handler_ = handler;


  dequeue_.reactable_ = dequeue_.handler_->thread_->GetReactor()->Register(
      dequeue_.reactive_semaphore_.GetFd(), callback, base::Closure());
}- 这里和 RegisterEnqueue 异曲同工, 这里不过获取的是 出队的(rx)的 信号量, 当满足条件直接回调 当前的 callback
一般会在 callback 中调用 TryDequeue 函数
6. TryDequeue
c
template <typename T>
std::unique_ptr<T> Queue<T>::TryDequeue() {
  std::lock_guard<std::mutex> lock(mutex_);

  if (queue_.empty()) {
    return nullptr;
  }

  dequeue_.reactive_semaphore_.Decrease(); // 出队 -1

  std::unique_ptr<T> data = std::move(queue_.front());
  queue_.pop(); // 从刚刚加入的 队列中出队

  enqueue_.reactive_semaphore_.Increase(); // 入队 +1

  return data; // 将出队的数据返回
}- TryDequeue 函数是在 RegisterDequeue(callback) 的 callback 函数中调用的。
- TryDequeue 返回 出队的包, 例如 hciLayer 中会将 这个包, 通过 hal 接口发送给 controller.
5. 用法案例分析
1. host 该如何将数据发送给 controller侧
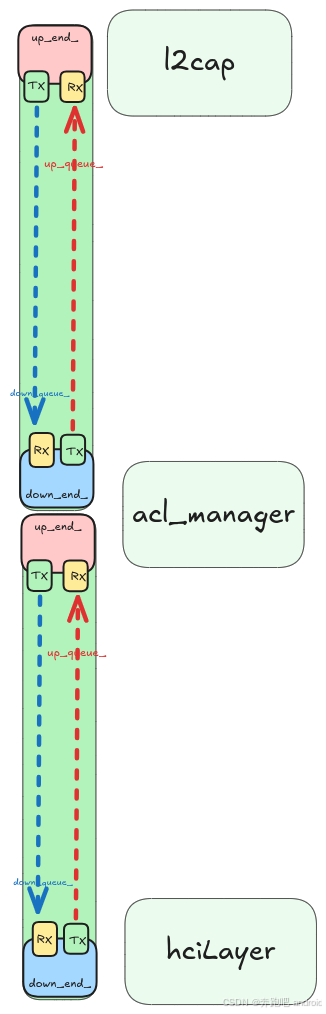
上面我们已经介绍了 BidiQueue 和 BidiQueueEnd, 那我们就结合代码来实际探索一下,host 侧 该如何使用 Up_end 端的 tx 写入数据到 down_queue_ 中。
而 Down_end 端是如何 从 Rx 中, 取出数据 发送给 controller 的。

- 再次强度 这里分析的 up_end_ .tx ==> down_queue_ ==> downd_end_.tx 他们是使用同一个 Queue 类型的对象 down_queue_
1. Down_end 注册 Rx 的回调
分析如何 从 down_queue_ 中读出数据包:
- 在 HciLayer 模块的 Start 函数调用时, 我们有如下的代码:
c
// system/gd/hci/hci_layer.cc
void HciLayer::Start() {

impl_->acl_queue_.GetDownEnd()->RegisterDequeue(handler, BindOn(impl_, &impl::on_outbound_acl_ready));

}
c
// system/gd/common/bidi_queue.h
  BidiQueueEnd<TUP, TDOWN>* GetDownEnd() {
    return &down_end_;
  }

  void RegisterDequeue(::bluetooth::os::Handler* handler, DequeueCallback callback) override {
    rx_->RegisterDequeue(handler, callback);
  }
c
explicit BidiQueue(size_t capacity)
      : up_queue_(capacity),
        down_queue_(capacity),
        up_end_(&down_queue_, &up_queue_),
down_end_(&up_queue_, &down_queue_) {}- impl_->acl_queue_.GetDownEnd(): 首先获取到 acl_queue_ 的 down_end_
- RegisterDequeue() : 向 acl_queue_ 的 down_end_ 的 Rx (对应 down_queue_ 队列) 注册了 callback 函数(impl::on_outbound_acl_ready)。
从上面代码可以清晰的看到, 当我们的 acl_queue_. down_queue_ 队列中有数据, 就会 自动 回调到 impl::on_outbound_acl_ready 函数。
c
// system/gd/hci/hci_layer.cc
  void on_outbound_acl_ready() {
    auto packet = acl_queue_.GetDownEnd()->TryDequeue(); // // 尝试从acl_queue_ 的 down_end_ 的 Rx (对应 down_queue_ 队列)  中出队一包数据
    std::vector<uint8_t> bytes;
    BitInserter bi(bytes);
    packet->Serialize(bi);
    hal_->sendAclData(bytes); // 通过 HciHal module 发送给 controller
  }
c
// system/gd/common/bidi_queue.h
  std::unique_ptr<TDEQUEUE> TryDequeue() override {
    return rx_->TryDequeue(); // 尝试从 rx 中出队一包数据
  }
2. 注册 upend.tx 回调
分析如何 向 down_queue_ 写入数据包:
c
// system/gd/hci/hci_layer.cc

common::BidiQueueEnd<AclBuilder, AclView>* HciLayer::GetAclQueueEnd() {
  return impl_->acl_queue_.GetUpEnd();
}
c
// system/gd/hci/acl_manager.cc

// 在加载 AclManager 时会触发 该函数调用,请看 AclManager 模块分析, 这里不展开讲解
struct AclManager::impl {
  impl(const AclManager& acl_manager) : acl_manager_(acl_manager) {}

  void Start() {
    hci_layer_ = acl_manager_.GetDependency<HciLayer>();
    handler_ = acl_manager_.GetHandler();
    controller_ = acl_manager_.GetDependency<Controller>();

    // 1.  这里通过 hci_layer_->GetAclQueueEnd 获取到了 acl_queue_.up_end
    round_robin_scheduler_ = new RoundRobinScheduler(handler_, controller_, hci_layer_->GetAclQueueEnd());

    hci_queue_end_ = hci_layer_->GetAclQueueEnd(); // 这里也获取到了 acl_queue_.up_end
    hci_queue_end_->RegisterDequeue(
        handler_, common::Bind(&impl::dequeue_and_route_acl_packet_to_connection, common::Unretained(this))); // 这里向 acl_queue_.up_end.rx 注册了回调,


...

  }


// system/gd/hci/acl_manager/round_robin_scheduler.cc
RoundRobinScheduler::RoundRobinScheduler(
    os::Handler* handler, Controller* controller, common::BidiQueueEnd<AclBuilder, AclView>* hci_queue_end)
: handler_(handler), controller_(controller), hci_queue_end_(hci_queue_end){...}- 这里看到 RoundRobinScheduler 构造函数里面, 将 acl_queue_.up_end 赋值给了 RoundRobinScheduler.hci_queue_end_
c
// system/gd/common/bidi_queue.h
  void RegisterEnqueue(::bluetooth::os::Handler* handler, EnqueueCallback callback) override {
    tx_->RegisterEnqueue(handler, callback);
  }


// system/gd/hci/acl_manager/round_robin_scheduler.cc
void RoundRobinScheduler::send_next_fragment() {
  if (!enqueue_registered_.exchange(true)) {
    hci_queue_end_->RegisterEnqueue(
        handler_, common::Bind(&RoundRobinScheduler::handle_enqueue_next_fragment, common::Unretained(this)));
  }
}- 在 RoundRobinScheduler::send_next_fragment 函数中 我们向 acl_queue_.up_end.tx 注册了 回调函数 RoundRobinScheduler::handle_enqueue_next_fragment
根据 Queue.RegisterEnqueue 中我们介绍的, 当down_queue_ 满足条件,就会从 RoundRobinScheduler::handle_enqueue_next_fragment 函数中,索取 数据包 加入到 down_queue_ 队列中。
- RoundRobinScheduler::send_next_fragment 如何调用的, 我们在其他 文章中分析。暂时不展开,可以只需要知道是如何 写入 down_queue_ 中即可。
2. controller 如何将数据传递给 host 侧
上面我们已经介绍了 BidiQueue 和 BidiQueueEnd, 那我们就结合代码来实际探索一下,controller 侧 该如何使用 downd_end 端的 tx 写入数据到 up_queue_ 中。
而 up_end 端是如何 从 Rx 中, 取出数据 发送给 controller 的。
- 再次强度 这里分析的 downd_end_ .tx ==> up_queue_ ==> up_end_.tx 他们是使用同一个 Queue 类型的对象 up_queue_
1. 注册 up_queue_.tx 回调
- 当controller 将数据发送给 就会触发 hcihalModule 回调之前注册到 HciLayer::hal_callbacks, 此时就会回调到 aclDataReceived 函数
c
struct HciLayer::hal_callbacks : public hal::HciHalCallbacks {

  void aclDataReceived(hal::HciPacket data_bytes) override {
    auto packet = packet::PacketView<packet::kLittleEndian>(std::make_shared<std::vector<uint8_t>>(move(data_bytes)));
    auto acl = std::make_unique<AclView>(AclView::Create(packet)); // 将上报的数据放入 acl 中
    module_.impl_->incoming_acl_buffer_.Enqueue(move(acl), module_.GetHandler()); // 1. 这里是关键
  }


...
}

// system/gd/hci/hci_layer.cc
  os::EnqueueBuffer<AclView> incoming_acl_buffer_{acl_queue_.GetDownEnd()}; // 获取到  acl_queue_.downd_end


// system/gd/os/queue.h
  void Enqueue(std::unique_ptr<T> t, os::Handler* handler) {
    std::lock_guard<std::mutex> lock(mutex_);
    buffer_.push(std::move(t)); // 向将 收到的 acl 数据放入 buffer_ 中
    if (!enqueue_registered_.exchange(true)) {
      // 向 up_queue_.tx 注册回调   enqueue_callback
      queue_->RegisterEnqueue(handler, common::Bind(&EnqueueBuffer<T>::enqueue_callback, common::Unretained(this)));
    }
  }


// 当 up_queue_.tx 满足条件,就会触发回调, 向 up_queue_.tx  对应的队列 写入数据
// system/gd/os/queue.h
  std::unique_ptr<T> enqueue_callback() {
    std::lock_guard<std::mutex> lock(mutex_);
    std::unique_ptr<T> enqueued_t = std::move(buffer_.front()); // 从buffer_ 中获取 第一包数据
    buffer_.pop(); // 出队
    if (buffer_.empty() && enqueue_registered_.exchange(false)) {
      queue_->UnregisterEnqueue();
      if (!callback_on_empty_.is_null()) {
        std::move(callback_on_empty_).Run();
      }
    }
    return enqueued_t; // enqueued_t 将数据 内容返回, 此时在 Queue::EnqueueCallbackInternal  将返回的包,加入到 up_queue_ 队列中
  }
2. 注册 up_queue_.rx 回调
c
// system/gd/hci/acl_manager.cc

// 在加载 AclManager 时会触发 该函数调用,请看 AclManager 模块分析, 这里不展开讲解
struct AclManager::impl {
  impl(const AclManager& acl_manager) : acl_manager_(acl_manager) {}

  void Start() {
    hci_layer_ = acl_manager_.GetDependency<HciLayer>();
    handler_ = acl_manager_.GetHandler();
    controller_ = acl_manager_.GetDependency<Controller>();

    // 1.  这里通过 hci_layer_->GetAclQueueEnd 获取到了 acl_queue_.up_end
    round_robin_scheduler_ = new RoundRobinScheduler(handler_, controller_, hci_layer_->GetAclQueueEnd());

    hci_queue_end_ = hci_layer_->GetAclQueueEnd(); // 这里也获取到了 acl_queue_.up_end
    hci_queue_end_->RegisterDequeue(
        handler_, common::Bind(&impl::dequeue_and_route_acl_packet_to_connection, common::Unretained(this))); // 这里向 acl_queue_.up_end.rx 注册了回调,


...

}- 这里向 acl_queue_.up_end.rx 注册了回调, dequeue_and_route_acl_packet_to_connection ,当 up_queue_ 中有数据时,将自动触发这个回调 调用。
c
// system/gd/hci/acl_manager.cc
  void dequeue_and_route_acl_packet_to_connection() {
    auto packet = hci_queue_end_->TryDequeue(); // 从 HCI 层的 上行队列 中取出一包数据。
    ASSERT(packet != nullptr);
    if (!packet->IsValid()) { // 检查 HCI header 是否有效、数据是否溢出等。
      LOG_INFO("Dropping invalid packet of size %zu", packet->size());
      return;
    }
    uint16_t handle = packet->GetHandle(); // HCI ACL 包中有一个 12bit 的连接句柄字段,代表是哪个连接发送来的数据。
    if (handle == kQualcommDebugHandle) return;

    // 区分 classic / le 链接类型
    // 将数据 发往 上层 l2cap 层。
    if (classic_impl_->send_packet_upward(
            handle, [&packet](struct acl_manager::assembler* assembler) { assembler->on_incoming_packet(*packet); }))
      return;

	// 将数据 发往 上层 l2cap 层。
    if (le_impl_->send_packet_upward(
            handle, [&packet](struct acl_manager::assembler* assembler) { assembler->on_incoming_packet(*packet); }))
      return;
    LOG_INFO("Dropping packet of size %zu to unknown connection 0x%0hx", packet->size(), packet->GetHandle());
  }
这个函数从 HCI 上行队列中出队一个 ACL 数据包,然后:
- 判断 packet 合法性
- 根据
handle查找对应连接(classic 或 le) - 如果找到了,就调用
assembler->on_incoming_packet()进行分片组包 - 最终,assembler 会将完整的 L2CAP 包上交给 L2CAP 层处理
其实讲到这里大家应该就对 BidiQueue BidiQueueEnd 已经彻底理解了。 接下来的内容感兴趣 就看,不感兴趣就忽略。 上面的数据,既然都已经 发到 acl 侧了, 那是如何 进一步上报到 l2cap 层的。那我们接着分析一下。
1. 如何继续转发到更高层
c
classic_impl_->send_packet_upward(
            handle,
            [&packet](struct acl_manager::assembler* assembler) {
	            assembler->on_incoming_packet(*packet);
            }

);classic_impl_是 classic ACL 管理器send_packet_upward(handle, callback)的意思是:- 找到该连接对应的
assembler - 如果找到了,就执行传入的 lambda,也就是调用
assembler->on_incoming_packet(*packet) - 如果没找到,就返回 false(进入 le_impl_ 检查)
- 找到该连接对应的
c
assembler->on_incoming_packet(*packet);这一步是关键:
assembler会把 packet 的 payload 提取出来- 如果这个 packet 是分片的一部分,会暂存
- 如果它是最后一个 fragment(根据 HCI header + L2CAP header 判断),就把这些 fragment 拼成一个完整 L2CAP PDU
一旦完整包拼好,assembler 会调用:
这个 channel 就是 L2CAP 的 DynamicChannel,它会把 payload 进一步交给:
SDP
RFCOMM
AVCTP
或者你车机上跑的 HFP、PBAP 等 profile 协议
既然 struct assembler 这么重要, 那我们就单独分析一下
struct assembler
assembler 是什么?
- 从 controller(通过 HCI 层)收集 ACL 包,将分片的 L2CAP PDU 重新组合成完整的数据包,并准备好送入 L2CAP 层
c
// system/gd/hci/acl_manager/assembler.h
struct assembler {
  assembler(AddressWithType address_with_type, AclConnection::QueueDownEnd* down_end, os::Handler* handler)
      : address_with_type_(address_with_type), down_end_(down_end), handler_(handler) {

AddressWithType address_with_type_;
AclConnection::QueueDownEnd* down_end_;
os::Handler* handler_;
PacketViewForRecombination recombination_stage_;
size_t remaining_sdu_continuation_packet_size_;
std::queue<packet::PacketView<packet::kLittleEndian>> incoming_queue_;

} | 成员名 | 作用 |
|---|---|
address_with_type_ |
该连接对应的远端地址 |
down_end_ |
和 L2CAP 对应的数据下发端(BidiQueue DownEnd) |
handler_ |
事件派发线程 |
recombination_stage_ |
临时拼接分片使用的缓存 |
remaining_sdu_continuation_packet_size_ |
还差多少 bytes 才能拼完一个完整 L2CAP 包 |
incoming_queue_ |
一旦拼接好,存放完整 L2CAP PDU 的地方 |
enqueue_registered_ |
标志是否已注册向下层(L2CAP)出队的处理回调 |
on_incoming_packet 这个函数是 ACL 包传入时的入口 ,由 HciLayer → AclManager 调用。
我们来一步步走它做了什么。
c
  void on_incoming_packet(AclView packet) {
    PacketView<packet::kLittleEndian> payload = packet.GetPayload();
    auto payload_size = payload.size();

    // ACL 包头中带广播标记的要丢弃。
    auto broadcast_flag = packet.GetBroadcastFlag();
    if (broadcast_flag == BroadcastFlag::ACTIVE_PERIPHERAL_BROADCAST) {
      LOG_WARN("Dropping broadcast from remote");
      return;
    }


    auto packet_boundary_flag = packet.GetPacketBoundaryFlag();
    if (packet_boundary_flag == PacketBoundaryFlag::FIRST_NON_AUTOMATICALLY_FLUSHABLE) {
      LOG_ERROR("Controller is not allowed to send FIRST_NON_AUTOMATICALLY_FLUSHABLE to host except loopback mode");
      return;
    }


    // 判断是否是 分片, CONTINUING_FRAGMENT 表示是续包

    if (packet_boundary_flag == PacketBoundaryFlag::CONTINUING_FRAGMENT) {
      if (remaining_sdu_continuation_packet_size_ < payload_size) {
        LOG_WARN("Remote sent unexpected L2CAP PDU. Drop the entire L2CAP PDU");
        recombination_stage_ =
            PacketViewForRecombination(PacketView<packet::kLittleEndian>(std::make_shared<std::vector<uint8_t>>()));
        remaining_sdu_continuation_packet_size_ = 0;
        return;
      }

      // 减去剩余的待拼接字节数
      remaining_sdu_continuation_packet_size_ -= payload_size;
      // 将 fragment 的 payload 加入临时缓存 recombination_stage_
      recombination_stage_.AppendPacketView(payload);
      if (remaining_sdu_continuation_packet_size_ != 0) {
        return; // 如果还没拼完,直接返回
      } else {
        // 否则拼好了,就继续后续处理
        payload = recombination_stage_;
        recombination_stage_ =
            PacketViewForRecombination(PacketView<packet::kLittleEndian>(std::make_shared<std::vector<uint8_t>>()));
      }
    } else if (packet_boundary_flag == PacketBoundaryFlag::FIRST_AUTOMATICALLY_FLUSHABLE) { // FIRST_AUTOMATICALLY_FLUSHABLE(首包)


      if (recombination_stage_.size() > 0) {
        LOG_ERROR("Controller sent a starting packet without finishing previous packet. Drop previous one.");
      }
      auto l2cap_pdu_size = GetL2capPduSize(packet); // 提取出 L2CAP header 的 length 字段(L2CAP payload 的总长)

      // 如果一包就能收完,直接处理
      remaining_sdu_continuation_packet_size_ = l2cap_pdu_size - (payload_size - kL2capBasicFrameHeaderSize);
      if (remaining_sdu_continuation_packet_size_ > 0) { // 表示一包处理不了,需要分包处理
        recombination_stage_ = payload; // 将数据加入 缓存 recombination_stage_
        return;
      }

    }
    if (incoming_queue_.size() > kMaxQueuedPacketsPerConnection) {
      LOG_ERROR("Dropping packet from %s due to congestion", address_with_type_.ToString().c_str());
      return;
    }
    // 一旦拼好,放入 incoming_queue_ , 放入的是完整的一包 ,此时 payload 是一个 **完整的 L2CAP PDU**(包括 L2CAP Header)
    incoming_queue_.push(payload);
    if (!enqueue_registered_->exchange(true)) {

      // 注册 Enqueue 回调 → 通知 L2CAP 来取
      down_end_->RegisterEnqueue(handler_,
                                 common::Bind(&assembler::on_le_incoming_data_ready, common::Unretained(this)));
    }
  }
c
if (!enqueue_registered_->exchange(true)) {
  down_end_->RegisterEnqueue(handler_,
     common::Bind(&assembler::on_le_incoming_data_ready, common::Unretained(this)));
}- 看到这里是不是笑了, 也就是说 hciLayer 和 acl_manager 之间 有一个 通道,互为了 up_end 和 downd_end, 现在 acl_manager 和 l2cap 之间还有另外一个 通道互为 up_end 和 downd_end.
c
// system/gd/hci/acl_manager/assembler.h
if (!enqueue_registered_->exchange(true)) {
  down_end_->RegisterEnqueue(handler_,
     common::Bind(&assembler::on_le_incoming_data_ready, common::Unretained(this)));
}- 这里是向 acl_manager 和 l2cap 通道, 中的down_end 的 tx 中注册回调。 当满足条件后, 通过 回调 on_le_incoming_data_ready 将数据写入 down_end 的 tx 队列中。
c
  // Invoked from some external Queue Reactable context
  std::unique_ptr<packet::PacketView<packet::kLittleEndian>> on_le_incoming_data_ready() {
    auto packet = incoming_queue_.front();
    incoming_queue_.pop(); // 出队
    if (incoming_queue_.empty() && enqueue_registered_->exchange(false)) {
      down_end_->UnregisterEnqueue();
    }
    return std::make_unique<PacketView<packet::kLittleEndian>>(packet); // 返回一包
  } // 返回的数据,被 Queue::EnqueueCallbackInternal 放入了 tx 对应的队列中了。
如果要找到 l2cap 是哪里读的, 那就需要弄清楚 acl_manager 和 l2cap 之间的通道是谁。
请看初始化:
c
// system/gd/hci/acl_manager/classic_impl.h

  void create_and_announce_connection(
      ConnectionCompleteView connection_complete, Role current_role, Initiator initiator) {
...
    auto queue = std::make_shared<AclConnection::Queue>(10); // 创建了一个  queue
    auto queue_down_end = queue->GetDownEnd(); // 关注这个
    round_robin_scheduler_->Register(RoundRobinScheduler::ConnectionType::CLASSIC, handle, queue);
    std::unique_ptr<ClassicAclConnection> connection(
        new ClassicAclConnection(std::move(queue)/*将这个 queue 传入了 ClassicAclConnection 中*/, acl_connection_interface_, handle, address));
    connection->locally_initiated_ = initiator == Initiator::LOCALLY_INITIATED;
    connections.add(
        handle,
        AddressWithType{address, AddressType::PUBLIC_DEVICE_ADDRESS},
        queue_down_end, // 关注这个
        handler_,
        connection->GetEventCallbacks([this](uint16_t handle) { this->connections.invalidate(handle); }));
...
  }


    void add(
        uint16_t handle,
        const AddressWithType& remote_address,
        AclConnection::QueueDownEnd* queue_end,
        os::Handler* handler,
        ConnectionManagementCallbacks* connection_management_callbacks) {
      std::unique_lock<std::mutex> lock(acl_connections_guard_);
      auto emplace_pair = acl_connections_.emplace(
          std::piecewise_construct,
          std::forward_as_tuple(handle),
          std::forward_as_tuple(remote_address, queue_end, handler)); // 这个地方 会创建一个  acl_connection 对象, 传入了 queue_end
      ASSERT(emplace_pair.second);  // Make sure the connection is unique
      emplace_pair.first->second.connection_management_callbacks_ = connection_management_callbacks;
    }


// 在 acl_connection 构造函数中 new acl_manager::assembler
// system/gd/hci/acl_manager/classic_impl.h
acl_connection(AddressWithType address_with_type, AclConnection::QueueDownEnd* queue_down_end, os::Handler* handler)
      : address_with_type_(address_with_type),
        assembler_(new acl_manager::assembler(address_with_type, queue_down_end, handler)) {}


// 在 assembler 构造函数中 传入了 down_end , 最终赋值给了 down_end_
assembler(AddressWithType address_with_type, AclConnection::QueueDownEnd* down_end, os::Handler* handler)
: address_with_type_(address_with_type), down_end_(down_end), handler_(handler) {} - 从上述的代码中我们不难发现, 最终assembler.down_end_ 来源于 create_and_announce_connection 函数中:
- auto queue = std::make_sharedAclConnection::Queue(10); // 创建了一个 queue
- new ClassicAclConnection(std::move(queue) /将这个 queue 传入了 ClassicAclConnection 中/,
有了上述的信息, 我们就可以顺利找到, 该通道的 upend:
c
// system/gd/hci/acl_manager/classic_acl_connection.cc
ClassicAclConnection::ClassicAclConnection(std::shared_ptr<Queue> queue,
                                           AclConnectionInterface* acl_connection_interface, uint16_t handle,
                                           Address address)
    : AclConnection(queue->GetUpEnd()/*在这里获取到了 对应的upend*/, handle), acl_connection_interface_(acl_connection_interface), address_(address) {
  pimpl_ = new ClassicAclConnection::impl(acl_connection_interface, std::move(queue), address, handle);
}


// system/gd/hci/acl_manager/acl_connection.h
AclConnection(QueueUpEnd* queue_up_end, uint16_t handle) : queue_up_end_(queue_up_end), handle_(handle) {}


// ClassicAclConnection 是继承于 AclConnection
// system/gd/hci/acl_manager/acl_connection.cc
AclConnection::QueueUpEnd* AclConnection::GetAclQueueEnd() const {
  return queue_up_end_;
}
那 queue->GetUpEnd() 他对应的 rx 的注册回调又在哪里呢???
c
// system/main/shim/acl.cc
  ClassicShimAclConnection(
      SendDataUpwards send_data_upwards, OnDisconnect on_disconnect,
      const shim::legacy::acl_classic_link_interface_t& interface,
      os::Handler* handler,
      std::unique_ptr<hci::acl_manager::ClassicAclConnection> connection,
      CreationTime creation_time)
      : ShimAclConnection(connection->GetHandle(), send_data_upwards /*先记住这里*/, handler,
                          connection->GetAclQueueEnd()/*这里获取了 upend*/, creation_time),
        on_disconnect_(on_disconnect),
        interface_(interface),
        connection_(std::move(connection)) {}


// system/main/shim/acl.cc
  ShimAclConnection(const HciHandle handle, SendDataUpwards send_data_upwards,
                    os::Handler* handler,
                    hci::acl_manager::AclConnection::QueueUpEnd* queue_up_end,
                    CreationTime creation_time)
      : handle_(handle),
        handler_(handler),
        send_data_upwards_(send_data_upwards),
        queue_up_end_(queue_up_end), // 将 up_end 赋值给了 queue_up_end_
        creation_time_(creation_time) {
    // 最终向 up_end 的rx 注册了回调。
    queue_up_end_->RegisterDequeue(
        handler_, common::Bind(&ShimAclConnection::data_ready_callback,
                               common::Unretained(this)));
}- 看到这里我们就找到了 通道对应的 rx 回调。
当 acl_manager 将数据写入 downd_end .tx 时, up_end.rx 将会调用 这里的 ShimAclConnection::data_ready_callback 函数
c
  void data_ready_callback() {
    auto packet = queue_up_end_->TryDequeue(); // 从 upend.rx 队列中拿出数据
    uint16_t length = packet->size();
    std::vector<uint8_t> preamble;
    preamble.push_back(LowByte(handle_));
    preamble.push_back(HighByte(handle_));
    preamble.push_back(LowByte(length));
    preamble.push_back(HighByte(length));
    BT_HDR* p_buf = MakeLegacyBtHdrPacket(std::move(packet), preamble); // 封装为 p_buf
    ASSERT_LOG(p_buf != nullptr,
               "Unable to allocate BT_HDR legacy packet handle:%04x", handle_);
    if (send_data_upwards_ == nullptr) {
      LOG_WARN("Dropping ACL data with no callback");
      osi_free(p_buf);
    } else if (do_in_main_thread(FROM_HERE,
                                 base::Bind(send_data_upwards_ /*继续调用这里加数据向上传*/, p_buf)) !=
               BT_STATUS_SUCCESS) {
      osi_free(p_buf);
    }
}- send_data_upwards_ 赋值是在 创建 ShimAclConnection 对象时赋值的,
c
// system/main/shim/acl.cc
void shim::legacy::Acl::OnConnectSuccess(
    std::unique_ptr<hci::acl_manager::ClassicAclConnection> connection) {
  ASSERT(connection != nullptr);
  auto handle = connection->GetHandle();
  bool locally_initiated = connection->locally_initiated_;
  const hci::Address remote_address = connection->GetAddress();
  const RawAddress bd_addr = ToRawAddress(remote_address);

  pimpl_->handle_to_classic_connection_map_.emplace(
      handle, std::make_unique<ClassicShimAclConnection>(
                  acl_interface_.on_send_data_upwards /* send_data_upwards_ 就是 它   */,
                  std::bind(&shim::legacy::Acl::OnClassicLinkDisconnected, this,
                            std::placeholders::_1, std::placeholders::_2),
                  acl_interface_.link.classic, handler_, std::move(connection),
                  std::chrono::system_clock::now()));
...
}
c
// system/main/shim/acl_legacy_interface.cc
const acl_interface_t GetAclInterface() {
  acl_interface_t acl_interface{
.on_send_data_upwards = acl_rcv_acl_data, - 所以最终会回调到这里 acl_rcv_acl_data
c
// system/stack/acl/btm_acl.cc
void acl_rcv_acl_data(BT_HDR* p_msg) {
  acl_header_t acl_header{
      .handle = HCI_INVALID_HANDLE,
      .hci_len = 0,
  };
  const uint8_t* p = (uint8_t*)(p_msg + 1) + p_msg->offset;

  STREAM_TO_UINT16(acl_header.handle, p);
  acl_header.handle = HCID_GET_HANDLE(acl_header.handle);

  STREAM_TO_UINT16(acl_header.hci_len, p);
  if (acl_header.hci_len < L2CAP_PKT_OVERHEAD ||
      acl_header.hci_len != p_msg->len - sizeof(acl_header)) {
    LOG_WARN("Received mismatched hci header length:%u data_len:%zu",
             acl_header.hci_len, p_msg->len - sizeof(acl_header));
    osi_free(p_msg);
    return;
  }
  l2c_rcv_acl_data(p_msg); // 最终将 数据传入 l2cap
}


// system/stack/l2cap/l2c_main.cc

/*******************************************************************************
 *
 * Function         l2c_rcv_acl_data
 *
 * Description      This function is called from the HCI Interface when an ACL
 *                  data packet is received.
 *
 * Returns          void
 *
 ******************************************************************************/
void l2c_rcv_acl_data(BT_HDR* p_msg) {
  uint8_t* p = (uint8_t*)(p_msg + 1) + p_msg->offset;

  /* Extract the handle */
  uint16_t handle;
  STREAM_TO_UINT16(handle, p);
  uint8_t pkt_type = HCID_GET_EVENT(handle);
  handle = HCID_GET_HANDLE(handle);

  /* Since the HCI Transport is putting segmented packets back together, we */
  /* should never get a valid packet with the type set to "continuation"    */
  if (pkt_type == L2CAP_PKT_CONTINUE) {
    L2CAP_TRACE_WARNING("L2CAP - received packet continuation");
    osi_free(p_msg);
    return;
  }

  uint16_t hci_len;
  STREAM_TO_UINT16(hci_len, p);
  if (hci_len < L2CAP_PKT_OVERHEAD || hci_len != p_msg->len - 4) {
    /* Remote-declared packet size must match HCI_ACL size - ACL header (4) */
    L2CAP_TRACE_WARNING("L2CAP - got incorrect hci header");
    osi_free(p_msg);
    return;
  }

  uint16_t l2cap_len, rcv_cid;
  STREAM_TO_UINT16(l2cap_len, p);
  STREAM_TO_UINT16(rcv_cid, p);

  /* Find the LCB based on the handle */
  tL2C_LCB* p_lcb = l2cu_find_lcb_by_handle(handle);
  if (!p_lcb) {
    /* There is a slight possibility (specifically with USB) that we get an */
    /* L2CAP connection request before we get the HCI connection complete.  */
    /* So for these types of messages, hold them for up to 2 seconds.       */
    if (l2cap_len == 0) {
      L2CAP_TRACE_WARNING("received empty L2CAP packet");
      osi_free(p_msg);
      return;
    }
    uint8_t cmd_code;
    STREAM_TO_UINT8(cmd_code, p);

    if ((p_msg->layer_specific != 0) || (rcv_cid != L2CAP_SIGNALLING_CID) ||
        (cmd_code != L2CAP_CMD_INFO_REQ && cmd_code != L2CAP_CMD_CONN_REQ)) {
      bool qcom_debug_log = (handle == 3804 && ((rcv_cid & 0xff) == 0xff) &&
                             p_msg->layer_specific == 0);

      if (!qcom_debug_log) {
        L2CAP_TRACE_ERROR(
            "L2CAP - rcvd ACL for unknown handle:%d ls:%d cid:%d opcode:%d cur "
            "count:%d",
            handle, p_msg->layer_specific, rcv_cid, cmd_code,
            list_length(l2cb.rcv_pending_q));
      }

      osi_free(p_msg);
      return;
    }

    L2CAP_TRACE_WARNING(
        "L2CAP - holding ACL for unknown handle:%d ls:%d cid:%d opcode:%d cur "
        "count:%d",
        handle, p_msg->layer_specific, rcv_cid, cmd_code,
        list_length(l2cb.rcv_pending_q));
    p_msg->layer_specific = 2;
    list_append(l2cb.rcv_pending_q, p_msg);

    if (list_length(l2cb.rcv_pending_q) == 1) {
      alarm_set_on_mloop(l2cb.receive_hold_timer, BT_1SEC_TIMEOUT_MS,
                         l2c_receive_hold_timer_timeout, NULL);
    }
    return;
}- l2c_rcv_acl_data 函数在 l2cap 章节分析, 这里先记录
5. 小结
该模型广泛应用于 Android 蓝牙协议栈中:
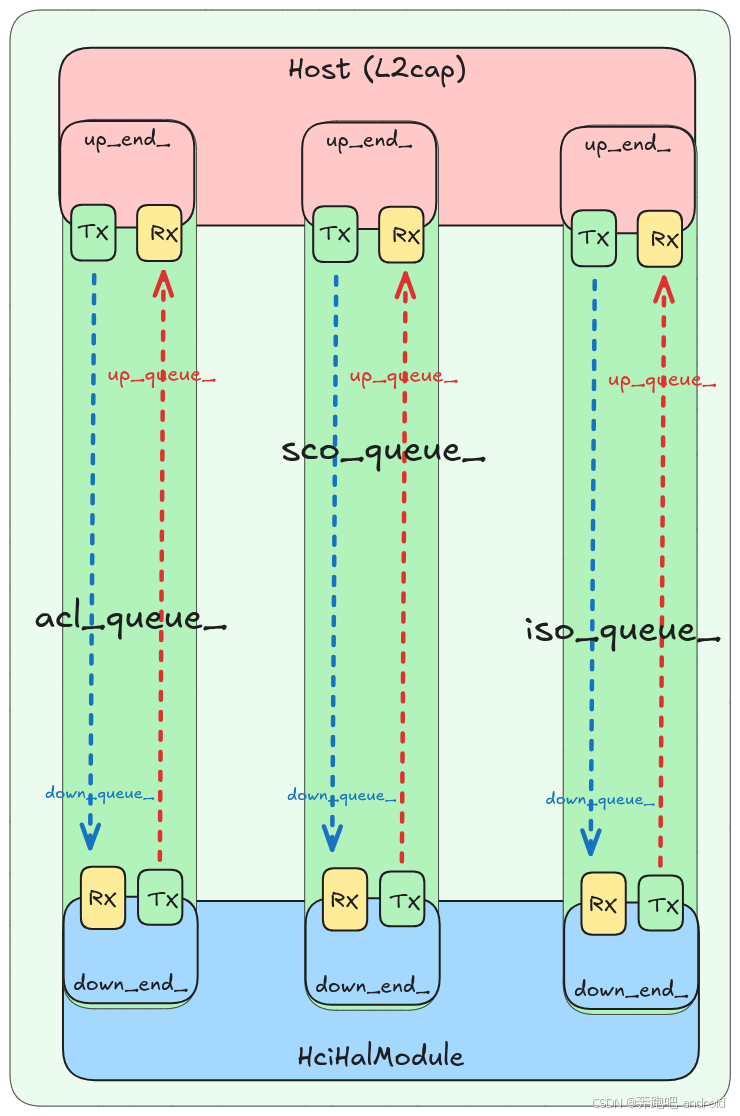
- 管理 ACL 数据(L2CAP)
- 控制器事件处理(Command/Event)
- 同样逻辑适用于 SCO、ISO 通道(共享同一模式)
每种通道(ACL/SCO/ISO)都使用一组独立的BidiQueue,实现高度解耦、线程安全的数据通路。