文章目录
-
-
- 文章目标
- 技术选型
- 工程搭建
-
- [1. 初始化项目](#1. 初始化项目)
- [2. 安装开发依赖](#2. 安装开发依赖)
- [3. 项目结构](#3. 项目结构)
- [4. 配置文件](#4. 配置文件)
-
-
- tsconfig.json
- .eslintrc.js
- eslint.config
- .prettierrc.js
- rollup.config.cjs
- [创建 .gitignore文件](#创建 .gitignore文件)
-
- [设置 Git 钩子](#设置 Git 钩子)
- 创建示例工具函数
- [8. 版本管理和发布](#8. 版本管理和发布)
- [9 工具函数测试方案](#9 工具函数测试方案)
-
- [1. 安装测试依赖](#1. 安装测试依赖)
- [2. 配置 Jest](#2. 配置 Jest)
- [更新 tsconfig.json](#更新 tsconfig.json)
- [4. 编写测试用例](#4. 编写测试用例)
- 最后的package.json
- 最后工程目录
- 构建结果目录
- 发布npm
- npm包地址
- 总结
-
文章目标
- 从0开始。搭建一套自己的工具函数库,工程打包后支持commonjs模块的引入,es模块的引入。还支持script的形式引入。还支持工程化项目的unplugin-auto-import插件。并将打包结果发布到npm。这套模板也可以用于封装一些个性化的js库,不单单限于工具函数库的一套工程化模板。
技术选型
- 构建工具:rollup
- 语言:typescript
- 代码规范:eslint阿里规范
- 工程模块:es模块
工程搭建
1. 初始化项目
首先创建项目目录并初始化 npm:
bash
mkdir cm-utils
cd my-utils
npm init -y
2. 安装开发依赖
安装所有必要的开发依赖:
bash
npm install -D typescript rollup @rollup/plugin-node-resolve @rollup/plugin-commonjs @rollup/plugin-typescript @rollup/plugin-terser rollup-plugin-dts rimraf

npm install -D eslint @typescript-eslint/parser @typescript-eslint/eslint-plugin eslint-config-ali prettier eslint-config-prettier eslint-plugin-prettier

npm install -D husky lint-staged
3. 项目结构
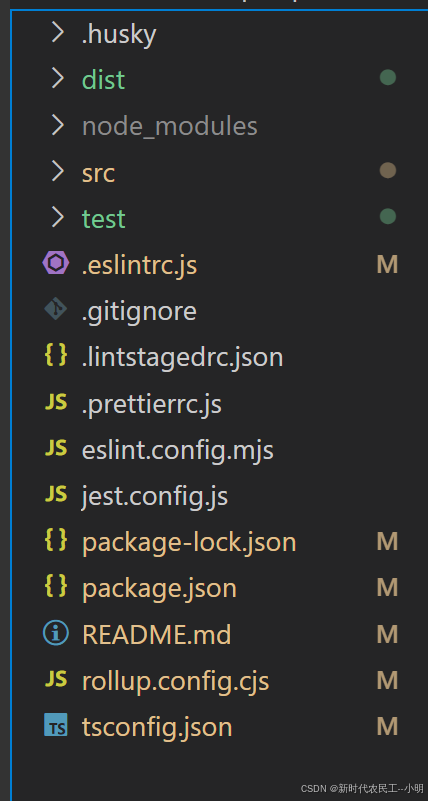
创建以下目录结构:
text
my-utils/
├── src/
│   ├── index.ts        # 主入口文件
│   ├── utils/          # 工具函数目录
│   │   ├── debounce.ts
│   │   ├── throttle.ts
│   │   └── ...         # 其他工具函数
├── test/               # 测试目录
├── .eslintrc.js        # ESLint 配置
├── .prettierrc.js      # Prettier 配置
├── tsconfig.json       # TypeScript 配置
├── rollup.config.js    # Rollup 配置
└── package.json
4. 配置文件
tsconfig.json
json
{
  "compilerOptions": {
    "target": "es6",
    "module": "esnext",
    "strict": true,
    "moduleResolution": "node",
    "esModuleInterop": true,
    "skipLibCheck": true,
    "forceConsistentCasingInFileNames": true,
    "baseUrl": ".",
    "paths": {
      "@/*": ["src/*"]
    },
    "lib": ["es6", "dom"],
    "outDir": "dist/ts_temp"
  },
  "include": ["src/**/*"],
  "exclude": ["node_modules", "dist", "**/*.test.ts"],
  "types": ["jest", "node"]
}
.eslintrc.js
js
module.exports = {
  settings: {
    'import/resolver': {
      node: {
        extensions: ['.js', '.jsx', '.ts', '.tsx'],
      },
    },
  },
  fixOnSave: true,
  extends: [
    'ali',
    'plugin:@typescript-eslint/recommended',
    'prettier',
    'plugin:prettier/recommended',
  ],
  parser: '@typescript-eslint/parser',
  plugins: ['@typescript-eslint'],
  root: true,
  env: {
    node: true,
    jest: true,
  },
  ignorePatterns: ['.eslintrc.js'],
  rules: {
    '@typescript-eslint/interface-name-prefix': 'off',
    '@typescript-eslint/explicit-function-return-type': 'off',
    '@typescript-eslint/explicit-module-boundary-types': 'off',
    '@typescript-eslint/no-explicit-any': 'off',
    'no-explicit-any': 'off',
  },
};
eslint.config
- 在项目根目录下执行如下命令
bash
npx eslint --init
# 根据命令行提示进行安装
.prettierrc.js
js
module.exports = {
  semi: true,
  trailingComma: 'all',
  singleQuote: true,
  printWidth: 100,
  tabWidth: 2,
  arrowParens: 'avoid',
};
rollup.config.cjs
js
const resolve = require('@rollup/plugin-node-resolve');
const commonjs = require('@rollup/plugin-commonjs');
const typescript = require('@rollup/plugin-typescript');
const terser = require('@rollup/plugin-terser');
const dts = require('rollup-plugin-dts').default;
const path = require('path');
const fs = require('fs');

// 彻底清理目录
const cleanDist = () => {
  if (fs.existsSync('dist')) {
    fs.rmSync('dist', { recursive: true, force: true });
  }
  fs.mkdirSync('dist', { recursive: true });
};

cleanDist();

const packageJson = require('./package.json');

// 每个构建目标独立配置
const builds = [
  // 1. 先单独生成类型声明
  {
    input: 'src/index.ts',
    output: {
      file: 'dist/types/index.d.ts',
      format: 'esm',
    },
    plugins: [
      typescript({
        tsconfig: './tsconfig.json',
        declaration: true,
        declarationDir: 'dist/types',
        emitDeclarationOnly: true, // 只生成声明
        outDir: 'dist/types', // 必须与declarationDir相同
      }),
    ],
  },

  // 2. ESM构建
  {
    input: 'src/index.ts',
    output: {
      file: packageJson.module,
      format: 'esm',
      sourcemap: true,
    },
    plugins: [
      resolve(),
      commonjs(),
      typescript({
        tsconfig: './tsconfig.json',
        outDir: path.dirname(packageJson.module),
        declaration: false, // 禁用声明生成
      }),
    ],
  },

  // 3. CJS构建
  {
    input: 'src/index.ts',
    output: {
      file: packageJson.main,
      format: 'cjs',
      sourcemap: true,
    },
    plugins: [
      resolve(),
      commonjs(),
      typescript({
        tsconfig: './tsconfig.json',
        outDir: path.dirname(packageJson.main),
        declaration: false,
      }),
    ],
  },

  // 4. UMD构建
  {
    input: 'src/index.ts',
    output: {
      file: 'dist/cm-utils.umd.js',
      format: 'umd',
      name: 'MyUtils',
      sourcemap: true,
    },
    plugins: [
      resolve(),
      commonjs(),
      typescript({
        tsconfig: './tsconfig.json',
        outDir: 'dist',
        declaration: false,
      }),
    ],
  },

  // 5. UMD压缩版
  {
    input: 'src/index.ts',
    output: {
      file: 'dist/cm-utils.umd.min.js',
      format: 'umd',
      name: 'MyUtils',
      sourcemap: true,
    },
    plugins: [
      resolve(),
      commonjs(),
      typescript({
        tsconfig: './tsconfig.json',
        outDir: 'dist',
        declaration: false,
      }),
      terser(),
    ],
  },

  // 6. 最终类型声明处理
  {
    input: 'dist/types/index.d.ts',
    output: {
      file: 'dist/index.d.ts',
      format: 'esm',
    },
    plugins: [dts()],
    external: [/\.(css|less|scss)$/],
  },
];

// 只导出非空配置
module.exports = builds.filter(Boolean);
创建 .gitignore文件
text
node_modules设置 Git 钩子
初始化 husky 并设置 pre-commit 钩子:
bash
npx husky install
npx husky add .husky/pre-commit "npx lint-staged"
创建 .lintstagedrc.json 文件:
json
{
  "src/**/*.ts": [
    "eslint --fix",
    "prettier --write"
  ]
}
创建示例工具函数
在 src/utils/debounce.ts 中
ts
type DebounceFunction<T extends (...args: any[]) => any> = (
  ...args: Parameters<T>
) => void;

export function debounce<T extends (...args: any[]) => any>(
  func: T,
  wait: number,
  immediate?: boolean
): DebounceFunction<T> {
  let timeout: ReturnType<typeof setTimeout> | null;

  return function (this: any, ...args: Parameters<T>) {
    const context = this;
    const later = () => {
      timeout = null;
      if (!immediate) func.apply(context, args);
    };

    const callNow = immediate && !timeout;
    if (timeout) clearTimeout(timeout);
    timeout = setTimeout(later, wait);

    if (callNow) func.apply(context, args);
  };
}
在 src/index.ts 中:
ts
export * from './utils/debounce';
// 导出其他工具函数...
8. 版本管理和发布
安装 standard-version 用于版本管理:
bash
npm install -D standard-version更新 package.json 的 scripts:
json
{
  "scripts": {
    "release": "standard-version && npm publish"
  }
}
9 工具函数测试方案
为了确保你的工具函数库质量,我会为你提供一套完整的测试方案。我们将使用 Jest 测试框架来测试 TypeScript 编写的工具函数。
1. 安装测试依赖
bash
npm install -D jest @types/jest ts-jest @jest/globals2. 配置 Jest
创建 jest.config.js
js
module.exports = {
  preset: 'ts-jest',
  testEnvironment: 'node',
  moduleFileExtensions: ['ts', 'js', 'json'],
  rootDir: '.',
  testRegex: '.*\\.test\\.ts$',
  transform: {
    '^.+\\.(t|j)s$': 'ts-jest',
  },
  collectCoverageFrom: ['src/**/*.(t|j)s'],
  coverageDirectory: './coverage',
  coverageReporters: ['text', 'html'],
  coverageThreshold: {
    global: {
      branches: 80,
      functions: 80,
      lines: 80,
      statements: 80,
    },
  },
};
更新 tsconfig.json
确保 TypeScript 配置支持测试类型:
json
{
  "compilerOptions": {
    // ...其他配置保持不变
    "types": ["jest", "node"]
  }
}
4. 编写测试用例
示例:测试 debounce 函数
在 test/utils/debounce.test.ts 中:
js
import { debounce } from '../../src/utils/debounce';
import { jest } from '@jest/globals';

describe('debounce', () => {
  jest.useFakeTimers();

  it('should delay the function call', () => {
    const mockFn = jest.fn();
    const debounced = debounce(mockFn, 1000);

    debounced();
    expect(mockFn).not.toHaveBeenCalled();

    // 快进时间
    jest.advanceTimersByTime(500);
    expect(mockFn).not.toHaveBeenCalled();

    // 快进剩余时间
    jest.advanceTimersByTime(500);
    expect(mockFn).toHaveBeenCalledTimes(1);
  });

  it('should call function immediately if immediate is true', () => {
    const mockFn = jest.fn();
    const debounced = debounce(mockFn, 1000, true);

    debounced();
    expect(mockFn).toHaveBeenCalledTimes(1);

    // 快进时间不应再次调用
    jest.advanceTimersByTime(1000);
    expect(mockFn).toHaveBeenCalledTimes(1);
  });

  it('should cancel previous call when called multiple times', () => {
    const mockFn = jest.fn();
    const debounced = debounce(mockFn, 1000);

    debounced();
    jest.advanceTimersByTime(500);
    debounced(); // 取消前一个调用
    jest.advanceTimersByTime(500);
    expect(mockFn).not.toHaveBeenCalled();

    jest.advanceTimersByTime(500);
    expect(mockFn).toHaveBeenCalledTimes(1);
  });

  it('should pass arguments correctly', () => {
    const mockFn = jest.fn();
    const debounced = debounce(mockFn, 1000);

    debounced('arg1', 'arg2');
    jest.runAllTimers();

    expect(mockFn).toHaveBeenCalledWith('arg1', 'arg2');
  });
});
最后的package.json
json
{
  "name": "@renjinming/xm-utils",
  "version": "1.0.0",
  "description": "A collection of utility functions",
  "main": "dist/cjs/index.js",
  "module": "dist/esm/index.js",
  "types": "dist/index.d.ts",
  "files": [
    "dist"
  ],
  "type": "commonjs",
  "scripts": {
    "clean": "rimraf dist",
    "build:pwd": "npm run clean && rollup -c --bundleConfigAsCjs",
    "build": "rollup -c --bundleConfigAsCjs",
    "prepublishOnly": "npm run build",
    "lint": "eslint src --ext .ts",
    "format": "prettier --write \"src/**/*.ts\"",
    "prepare": "husky install",
    "release": "standard-version && npm publish",
    "test": "jest",
    "test:watch": "jest --watch",
    "test:coverage": "jest --coverage",
    "test:ci": "jest --ci --coverage"
  },
  "keywords": [
    "utils",
    "utilities",
    "tools",
    "functions"
  ],
  "author": "Your Name",
  "license": "MIT",
  "devDependencies": {
    "@eslint/js": "^9.25.0",
    "@eslint/json": "^0.12.0",
    "@jest/globals": "^29.7.0",
    "@rollup/plugin-commonjs": "^28.0.3",
    "@rollup/plugin-node-resolve": "^16.0.1",
    "@rollup/plugin-terser": "^0.4.4",
    "@rollup/plugin-typescript": "^12.1.2",
    "@types/jest": "^29.5.14",
    "@typescript-eslint/eslint-plugin": "^8.30.1",
    "@typescript-eslint/parser": "^8.30.1",
    "eslint": "^9.25.0",
    "eslint-config-ali": "^16.1.1",
    "eslint-config-prettier": "^10.1.2",
    "eslint-plugin-prettier": "^5.2.6",
    "globals": "^16.0.0",
    "husky": "^9.1.7",
    "jest": "^29.7.0",
    "lint-staged": "^15.5.1",
    "prettier": "^3.5.3",
    "rimraf": "^5.0.10",
    "rollup": "^4.40.0",
    "rollup-plugin-dts": "^6.2.1",
    "standard-version": "^9.5.0",
    "ts-jest": "^29.3.2",
    "typescript": "^5.8.3",
    "typescript-eslint": "^8.30.1"
  },
  "lint-staged": {
    "*.{js,ts,jsx,tsx}": [
      "eslint --fix",
      "prettier --write"
    ]
  },
  "publishConfig": {
    "access": "public"
  }
}
最后工程目录
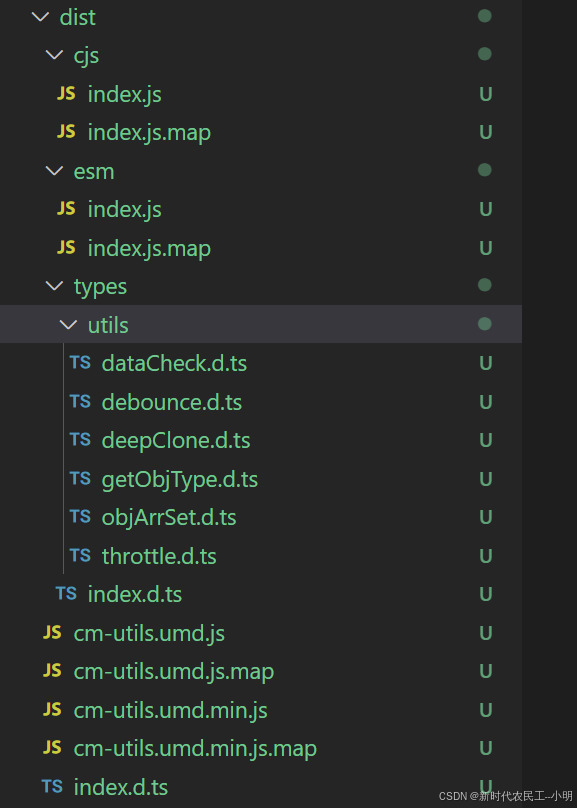
构建结果目录
发布npm
1.注册npm账号
2.登录npm
- 需要注意一点的是,大家的npm镜像地址可能设置的都是淘宝镜像,需要先切换为npm官方镜像地址
bash
npm config set registry https://registry.npmjs.org/然后在登录
bash
npm login3.构建生产版本
bash
npm run build版本号管理(可选)
手动修改:直接编辑 package.json 中的 version 字段。
自动升级(推荐):
bash
npx standard-version会根据 Git 提交记录自动升级版本号(major/minor/patch)。
4.模拟发布测试
bash
npm pack --dry-run➔ 检查输出的文件列表是否仅包含 dist/ 和必要的配置文件。
6. 实际发布
bash
npm publish- 如果是修改提交必须要修改版本信息,不然提交会403 执行上面的升级命令在进行发布
➔ 若包名冲突或无权限,会报错。
7.发布403错误
如果发布403可能是包名已经存在。可以用下面的命令试试看有没有,如果存在可以修改package.json的name重新定义包名
bash
npm view @renjinming/xm-utils # 检查包名占用8.发布成功验证
- 查询包在npm上的所有版本
bash
npm view @renjinming/xm-utils versions- 安装使用,我这里为了方便就用node环境简单演示一下
bash
npm i @renjinming/xm-utils
js
const { getObjType } = require("@renjinming/xm-utils");
const type = getObjType("123");
console.log(type); // "string"

const type2 = getObjType(123);
console.log(type2); // "number"

const type3 = getObjType({ name: "renjinming" });
console.log(type3); // "object"

const type4 = getObjType([1, 2, 3]);
console.log(type4); // "array"

const type5 = getObjType(null);
console.log(type5); // "null"

const type6 = getObjType(undefined);
console.log(type6); // "undefined"
const type7 = getObjType(function () {});
console.log(type7); // "function"

const type8 = getObjType(new Date());
console.log(type8); // "date"
const type9 = getObjType(/a/);
console.log(type9); // "regexp"
npm包地址
https://www.npmjs.com/package/@renjinming/xm-utils
总结
- 文档是后面整理的,可能会少了有些内容,项目已上传git,可以直接clone,https://gitee.com/public_12/xm-utlis-templet
- 遗留的问题。由于个人对jest测试框架不是很熟悉,测试用例也没写完整,还有就是在commit代码时,没有自动校验代码,不晓得问题在哪里,阁下要是有解决方案,或者是对项目有更好的改进。欢迎留言或者提交 PR,我个人也会持续的改进。
- 整理不易,如果对你有所帮助 记得点个赞喔,