性能调优在研发的职业生涯中占据着关键地位。对于专业的后端开发人员而言,当遇到页面加载迟缓、接口响应耗时较长的情况时,需要深入思考并实施有效的优化策略。一般来说,后端性能优化存在几种较为常见的思路,其中包括增加服务器资源、引入缓存机制以及将串行操作转换为并行操作。本文将着重围绕如何通过将串行操作转换为并行操作来实现性能优化展开探讨。
1 适用场景
并非所有场景都适宜将串行操作转变为并行操作,在决定采用此优化方案之前,必须进行全面且深入的考量。以技术派的实际应用场景为例,其首页的布局结构呈现出适合进行并行优化的特点。首页存在四大板块的信息展示区域,并且这些板块之间不存在前后依赖关系,这就意味着各板块的信息获取过程能够并行执行。

与之类似的是电商详情页的场景,当后端通过一个接口返回所有信息时,诸如商品详情信息、推荐商品信息、店铺信息、评价信息以及广告位信息等相互独立、无依赖关系的信息封装服务,同样可以采用并行执行的方式来提升性能。
2 并行访问改造实例
2.1 改造目标
本次改造的关键入口位于 com.github.paicoding.forum.web.front.home.helper.IndexRecommendHelper#buildIndexVo 方法内。在该方法中,除了第一个用于获取类目信息的方法需要首先执行外,其余的信息补充操作均具备并行执行的条件。为了准确统计各个方法以及整个接口的耗时情况,我们借助了 Spring 框架中的 StopWatch 工具,以下是具体的方法实现代码示例:
java
public IndexVo buildIndexVo(String activeTab) {
    IndexVo vo = new IndexVo();
    CategoryDTO category = categories(activeTab, vo);
    StopWatch stopWatch = new StopWatch("首页信息返回");
    stopWatch.start("类目文章获取");
    vo.setArticles(articleList(category.getCategoryId()));
    stopWatch.stop();
    stopWatch.start("置顶文章获取");
    vo.setTopArticles(topArticleList(category));
    stopWatch.stop();
    stopWatch.start("轮播图获取");
    vo.setHomeCarouselList(homeCarouselList());
    stopWatch.stop();
    stopWatch.start("侧边栏信息");
    vo.setSideBarItems(sidebarService.queryHomeSidebarList());
    stopWatch.stop();
    vo.setCurrentCategory(category.getCategory());
    vo.setCategoryId(category.getCategoryId());
    stopWatch.start("登录用户信息获取");
    vo.setUser(loginInfo());
    stopWatch.stop();
    prettyPrint(stopWatch);
    return vo;
}

// 由于stopWatch默认的输出单位是纳秒,为了更直观地理解耗时情况,将其转换为毫秒进行输出
private void prettyPrint(StopWatch stopWatch) {
    StopWatch.TaskInfo[] taskInfos = stopWatch.getTaskInfo();
    StringBuilder sb = new StringBuilder();
    sb.append('\n');
    sb.append("StopWatch '").append(stopWatch.getId()).append("': running time = ").append(stopWatch.getTotalTimeMillis()).append(" ms");
    sb.append('\n');
    if (taskInfos.length < 1) {
        sb.append("No task info kept");
    } else {
        sb.append("---------------------------------------------\n");
        sb.append("ms         %     Task name\n");
        sb.append("---------------------------------------------\n");
        NumberFormat nf = NumberFormat.getNumberInstance();
        nf.setMinimumFractionDigits(3);
        nf.setGroupingUsed(false);
        NumberFormat pf = NumberFormat.getPercentInstance();
        pf.setMinimumIntegerDigits(2);
        pf.setMinimumFractionDigits(2);
        pf.setGroupingUsed(false);
        for (StopWatch.TaskInfo task : taskInfos) {
            sb.append(nf.format(task.getTimeNanos() / 1000_000.0)).append("  ");
            sb.append(pf.format((double) task.getTimeNanos() / stopWatch.getTotalTimeNanos())).append("  ");
            sb.append(task.getTaskName()).append("\n");
        }
    }
    System.out.println(sb.toString());
}
在当前串行执行的模式下,经过评估,若将其改造为并行访问模式,乐观估计整体耗时将缩短至 40ms 左右,相应地,整体性能有望提升 50%以上。

2.2 并行改造
将串行调用转换为并行调用的常见实现方式包括使用独立线程或者线程池。在技术派的实践中,重点采用了借助 CompletableFuture 来实现并行访问的方案,具体内容如下:
2.2.1 CompletableFuture 基础知识点
CompletableFuture 是 Java 8 引入的一款强大的异步编程工具,能够高效地处理异步操作的结果。其常见的使用方式涵盖以下多个方面:
- 创建实例 :可以通过调用
CompletableFuture.supplyAsync()等静态方法来创建一个异步执行的任务实例。 - 异步操作处理 :利用
thenApply()、thenAccept()、thenRun()等方法对异步操作的结果进行相应的处理。 - 异常处理 :通过
exceptionally()、handle()、whenComplete()等方法来捕获并处理异步操作过程中可能出现的异常情况。 - 组合实例 :运用
thenCompose()、thenCombine()、allOf()等方法将多个CompletableFuture实例进行串联,从而构建出一个完整的异步操作链。 - 等待操作完成 :使用
CompletableFuture.allOf()方法来等待所有相关的CompletableFuture实例都执行完毕后,再进行后续的操作。 - 取消操作 :通过调用
cancel()方法来取消正在执行的异步操作,并使用isCancelled()方法来判断该操作是否已经成功取消。 - 获取结果 :使用
get()方法等待异步操作执行完成,并获取其操作结果;若希望在操作尚未完成时获取一个默认值,则可以使用getNow()方法。 - 设置超时 :借助
completeOnTimeout()、orTimeout()等方法来为异步操作设置合理的超时时间,当操作在规定时间内未完成时,将返回预设的默认值或者抛出相应的异常。
2.2.2 并行调度封装工具类 AsyncUtil
com.github.paicoding.forum.core.async.AsyncUtil是一个异步工具类,主要用于管理异步任务的执行,提供了线程池管理、带超时控制的任务执行、异步任务并发执行等功能。下面详细介绍其代码逻辑:
- 线程工厂和执行器服务
java
private static final ThreadFactory THREAD_FACTORY = new ThreadFactory() {
    private final ThreadFactory defaultFactory = Executors.defaultThreadFactory();
    private final AtomicInteger threadNumber = new AtomicInteger(1);

    public Thread newThread(Runnable r) {
        Thread thread = this.defaultFactory.newThread(r);
        if (!thread.isDaemon()) {
            thread.setDaemon(true);
        }
        thread.setName("paicoding-" + this.threadNumber.getAndIncrement());
        return thread;
    }
};
private static ExecutorService executorService;
private static SimpleTimeLimiter simpleTimeLimiter;THREAD_FACTORY:自定义线程工厂,将线程设置为守护线程,并为线程命名。executorService:线程池执行器服务。simpleTimeLimiter:用于设置任务执行的超时时间。
- 静态代码块和线程池初始化
java
static {
    initExecutorService(Runtime.getRuntime().availableProcessors() * 2, 50);
}

public static void initExecutorService(int core, int max) {
    max = Math.max(core, max);
    executorService = new ExecutorBuilder()
            .setCorePoolSize(core)
            .setMaxPoolSize(max)
            .setKeepAliveTime(0)
            .setKeepAliveTime(0, TimeUnit.SECONDS)
            .setWorkQueue(new SynchronousQueue<Runnable>())
            .setHandler(new ThreadPoolExecutor.CallerRunsPolicy())
            .setThreadFactory(THREAD_FACTORY)
            .buildFinalizable();
    simpleTimeLimiter = SimpleTimeLimiter.create(executorService);
}- 静态代码块在类加载时调用
initExecutorService方法初始化线程池。 initExecutorService方法使用 ExecutorBuilder 构建线程池,设置核心线程数、最大线程数、工作队列等参数。
- 带超时时间的任务执行
java
public static <T> T callWithTimeLimit(long time, TimeUnit unit, Callable<T> call) throws ExecutionException, InterruptedException, TimeoutException {
    return simpleTimeLimiter.callWithTimeout(call, time, unit);
}
使用 SimpleTimeLimiter 执行带超时时间的任务,若任务执行时间超过指定时间,抛出 TimeoutException。
- 任务执行方法
java
public static void execute(Runnable call) {
    executorService.execute(call);
}

public static <T> Future<T> submit(Callable<T> t) {
    return executorService.submit(t);
}execute:提交一个 Runnable 任务到线程池执行。submit:提交一个 Callable 任务到线程池执行,并返回一个 Future 对象。
- 线程休眠方法
java
public static boolean sleep(Number timeout, TimeUnit timeUnit) {
    try {
        timeUnit.sleep(timeout.longValue());
        return true;
    } catch (InterruptedException var3) {
        return false;
    }
}

public static boolean sleep(Number millis) {
    return millis == null ? true : sleep(millis.longValue());
}

public static boolean sleep(long millis) {
    if (millis > 0L) {
        try {
            Thread.sleep(millis);
        } catch (InterruptedException var3) {
            return false;
        }
    }
    return true;
}
提供了不同参数形式的线程休眠方法,处理 InterruptedException 异常。
- 内部类
CompletableFutureBridge
CompletableFutureBridge是AsyncUtil里的内部类,其主要功能是管理多个CompletableFuture异步任务的并发执行,并且记录每个任务的执行耗时。下面详细剖析其代码逻辑:
supplyAsync系列方法:异步执行带返回结果的任务。
java
 public <T> CompletableFutureBridge supplyAsync(Supplier<T> supplier, String taskName) {
     stopWatch.start(taskName);
     CompletableFuture<T> future = CompletableFuture.supplyAsync(supplier, executorService);
     futures.add(future);
     future.whenComplete((r, e) -> {
         stopWatch.stop();
         taskTimeMap.put(taskName, stopWatch.getLastTaskTimeMillis());
     });
     return this;
 }

 public <T> CompletableFutureBridge supplyAsyncWithTimeRecord(Supplier<T> supplier, String taskName) {
     return supplyAsync(() -> {
         long start = System.currentTimeMillis();
         try {
             return supplier.get();
         } finally {
             taskTimeMap.put(taskName, System.currentTimeMillis() - start);
         }
     }, taskName);
 }
supplyAsync方法:启动一个带返回值的异步任务,将其加入futures列表。在任务完成时,停止计时并把任务耗时存入taskTimeMap。supplyAsyncWithTimeRecord方法:在supplyAsync基础上,使用System.currentTimeMillis()记录任务的开始和结束时间,计算并存储任务耗时。
runAsync系列方法:异步执行无返回结果的任务。
bash
 public CompletableFutureBridge runAsync(Runnable runnable, String taskName) {
     stopWatch.start(taskName);
     CompletableFuture<Void> future = CompletableFuture.runAsync(runnable, executorService);
     futures.add(future);
     future.whenComplete((r, e) -> {
         stopWatch.stop();
         taskTimeMap.put(taskName, stopWatch.getLastTaskTimeMillis());
     });
     return this;
 }

 public CompletableFutureBridge runAsyncWithTimeRecord(Runnable runnable, String taskName) {
     return runAsync(() -> {
         long start = System.currentTimeMillis();
         try {
             runnable.run();
         } finally {
             taskTimeMap.put(taskName, System.currentTimeMillis() - start);
         }
     }, taskName);
 }
runAsync方法:启动一个无返回值的异步任务,将其加入futures列表。在任务完成时,停止计时并把任务耗时存入taskTimeMap。runAsyncWithTimeRecord方法:在runAsync基础上,使用System.currentTimeMillis()记录任务的开始和结束时间,计算并存储任务耗时。
allExecuted方法:等待所有任务执行完成,并记录总耗时。
bash
 public CompletableFutureBridge allExecuted() {
     CompletableFuture<Void> allFutures = CompletableFuture.allOf(futures.toArray(new CompletableFuture[0]));
     allFutures.join();
     stopWatch.stop();
     return this;
 }
allExecuted方法:使用CompletableFuture.allOf方法等待所有异步任务执行完成,调用join方法阻塞当前线程直到所有任务完成,最后停止计时。
prettyPrint方法:打印任务执行的耗时信息。
java
public void prettyPrint() {
    if (EnvUtil.isDev()) {
        StringBuilder sb = new StringBuilder("\n");
        sb.append("【").append(name).append("】 总耗时: ").append(stopWatch.getTotalTimeMillis()).append("ms\n");
        for (Map.Entry<String, Long> entry : taskTimeMap.entrySet()) {
            sb.append(" - ").append(entry.getKey()).append(": ").append(entry.getValue()).append("ms\n");
        }
        log.info(sb.toString());
    }
}
}
prettyPrint方法:仅在开发环境下打印任务执行的耗时信息,包含任务组的总耗时以及每个任务的耗时。
- 并发执行器创建方法
java
public static CompletableFutureBridge concurrentExecutor(String... name) {
    if (name.length > 0) {
        return new CompletableFutureBridge(name[0]);
    }
    return new CompletableFutureBridge();
}
创建一个 CompletableFutureBridge 对象,用于管理并发任务。
综上所述,AsyncUtil 类提供了一套完整的异步任务执行和管理方案,包括线程池管理、超时控制、并发执行和耗时统计等功能。
2.2.3 并发执行调度
在 AsyncUtil 类中,提供了一个用于实例化 CompletableFutureBridge 的便捷方法 concurrentExecutor(String... name)。通过该方法,对 IndexRecommendHelper 中的原有实现方式进行了替换,具体代码如下:
java
public IndexVo buildIndexVo(String activeTab) {
IndexVo vo = new IndexVo();
CategoryDTO category = categories(activeTab, vo);
vo.setCategoryId(category.getCategoryId());
vo.setCurrentCategory(category.getCategory());
// 并行调度实例,用于提升接口响应性能
AsyncUtil.concurrentExecutor("首页响应")
.runAsyncWithTimeRecord(() -> vo.setArticles(articleList(category.getCategoryId())), "文章列表")
.runAsyncWithTimeRecord(() -> vo.setTopArticles(topArticleList(category)), "置顶文章")
.runAsyncWithTimeRecord(() -> vo.setHomeCarouselList(homeCarouselList()), "轮播图")
.runAsyncWithTimeRecord(() -> vo.setSideBarItems(sidebarService.queryHomeSidebarList()), "侧边栏")
.runAsyncWithTimeRecord(() -> vo.setUser(loginInfo()), "用户信息")
.allExecuted()
.prettyPrint();
return vo;
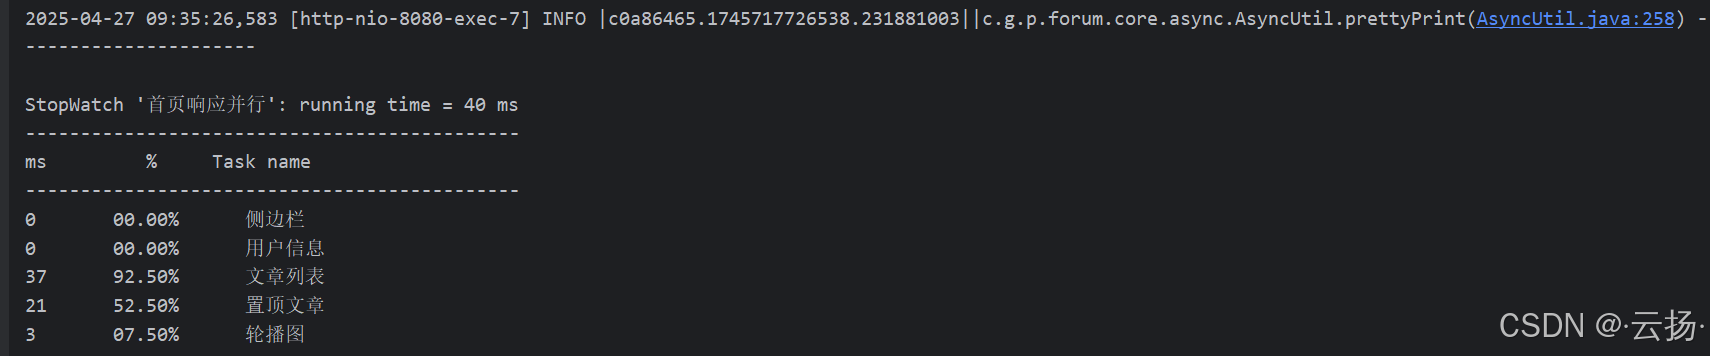
}在完成上述改造后,对实际的访问耗时进行监测,发现整体耗时主要取决于耗时最长的文章列表返回操作。值得注意的是,文章列表的响应耗时从原来的 80ms 显著降低至 40ms(该变化可能受到机器运行环境不稳定等因素的影响)。
3 小结
本文系统地介绍了如何利用 Java 8 中的 CompletableFuture 工具,将串行操作转换为并行操作,从而实现性能优化的具体方法和实践过程。在实际的性能提升工作中,将串行操作转换为并行操作是一种在缓存优化之外被广泛应用的有效手段。然而,在应用这一手段时,开发人员还需要综合考虑诸多因素,例如线程池参数的合理配置、任务执行异常的妥善处理、系统监控的有效实施以及避免上下文切换过程中信息的丢失等问题。特别是在涉及事务处理的场景中,更要高度关注由于主子线程操作可能导致的事务一致性问题,以确保系统的稳定性和可靠性。
4 参考链接
- 技术派并行访问性能优化
- 项目仓库(GitHub):https://github.com/itwanger/paicoding