
私有化部署全攻略:开源模型本地化改造的性能与安全评测
🌟 Hello,我是摘星!
🌈 在彩虹般绚烂的技术栈中,我是那个永不停歇的色彩收集者。
🦋 每一个优化都是我培育的花朵,每一个特性都是我放飞的蝴蝶。
🔬 每一次代码审查都是我的显微镜观察,每一次重构都是我的化学实验。
🎵 在编程的交响乐中,我既是指挥家也是演奏者。让我们一起,在技术的音乐厅里,奏响属于程序员的华美乐章。
目录
[1. 私有化部署架构设计与技术选型](#1. 私有化部署架构设计与技术选型)
[1.1 部署架构模式分析](#1.1 部署架构模式分析)
[1.2 容器化部署最佳实践](#1.2 容器化部署最佳实践)
[2. 模型性能优化与加速技术](#2. 模型性能优化与加速技术)
[2.1 推理引擎选择与优化](#2.1 推理引擎选择与优化)
[2.2 推理引擎性能对比](#2.2 推理引擎性能对比)
[3. 安全防护体系构建](#3. 安全防护体系构建)
[3.1 多层安全架构设计](#3.1 多层安全架构设计)
[4. 监控与运维体系](#4. 监控与运维体系)
[4.1 全方位监控指标体系](#4.1 全方位监控指标体系)
[5. 实战案例与最佳实践](#5. 实战案例与最佳实践)
[5.1 金融行业私有化部署案例](#5.1 金融行业私有化部署案例)
[5.2 性能优化最佳实践总结](#5.2 性能优化最佳实践总结)
摘要
作为一名在AI基础设施领域深耕五年的技术架构师,我深刻理解企业对于AI模型私有化部署的迫切需求。在过去的项目实践中,我见证了从早期简单的模型托管到如今复杂的多模态大模型私有化部署的技术演进。随着数据安全法规的日益严格和企业对数据主权意识的增强,私有化部署已经从"可选项"变成了"必选项"。
在我参与的众多企业级AI项目中,私有化部署面临的挑战远比想象中复杂。不仅仅是简单的模型下载和部署,还涉及模型适配、性能优化、安全加固、监控运维等多个维度。我曾经历过一个金融客户的项目,他们要求将一个70B参数的大语言模型部署在内网环境中,不仅要求推理延迟控制在500ms以内,还要通过严格的安全审计。这个项目让我深刻认识到,私有化部署绝不是简单的技术移植,而是一个涉及架构设计、性能调优、安全防护的系统工程。
通过对LLaMA、ChatGLM、Baichuan等主流开源模型的深度改造实践,我总结出了一套完整的私有化部署方法论。这套方法论不仅包含技术实现细节,更重要的是涵盖了部署策略选择、性能基准测试、安全风险评估等关键环节。在实际应用中,我发现不同规模的模型在私有化部署时面临的挑战截然不同:7B以下的模型主要关注推理效率,13B-30B的模型需要重点解决内存优化问题,而70B以上的模型则需要考虑分布式部署和负载均衡。
本文将基于我在多个行业的私有化部署实战经验,从技术架构、性能优化、安全防护三个维度,为读者提供一份全面的开源模型私有化部署指南。我将通过详细的代码示例、性能测试数据和安全评估报告,帮助技术团队在私有化部署过程中避开常见陷阱,实现高性能、高安全性的AI服务。
1. 私有化部署架构设计与技术选型
1.1 部署架构模式分析
在我的实践中,私有化部署主要有三种架构模式,每种模式都有其适用场景:
python
from enum import Enum
from dataclasses import dataclass
from typing import List, Dict, Optional
import asyncio
import torch
import docker
import kubernetes

class DeploymentMode(Enum):
    """部署模式枚举"""
    STANDALONE = "standalone"      # 单机部署
    DISTRIBUTED = "distributed"   # 分布式部署
    CONTAINERIZED = "containerized" # 容器化部署

@dataclass
class DeploymentConfig:
    """部署配置类"""
    mode: DeploymentMode
    model_name: str
    model_size: str  # 7B, 13B, 30B, 70B
    hardware_specs: Dict[str, any]
    security_level: str  # basic, enhanced, enterprise
    performance_requirements: Dict[str, float]

class PrivateDeploymentArchitect:
    """私有化部署架构师"""

    def __init__(self):
        self.deployment_strategies = {
            DeploymentMode.STANDALONE: self._design_standalone_architecture,
            DeploymentMode.DISTRIBUTED: self._design_distributed_architecture,
            DeploymentMode.CONTAINERIZED: self._design_containerized_architecture
        }

    def design_architecture(self, config: DeploymentConfig) -> Dict:
        """根据配置设计部署架构"""

        # 硬件资源评估
        resource_analysis = self._analyze_hardware_requirements(config)

        # 选择部署策略
        deployment_strategy = self._select_deployment_strategy(config, resource_analysis)

        # 设计具体架构
        architecture = self.deployment_strategies[deployment_strategy](config)

        # 安全架构设计
        security_architecture = self._design_security_architecture(config)

        # 监控架构设计
        monitoring_architecture = self._design_monitoring_architecture(config)

        return {
            'deployment_mode': deployment_strategy,
            'resource_requirements': resource_analysis,
            'service_architecture': architecture,
            'security_architecture': security_architecture,
            'monitoring_architecture': monitoring_architecture,
            'estimated_performance': self._estimate_performance(config, architecture)
        }

    def _analyze_hardware_requirements(self, config: DeploymentConfig) -> Dict:
        """分析硬件需求"""

        # 模型大小到硬件需求的映射
        model_requirements = {
            '7B': {
                'min_gpu_memory': 16,  # GB
                'recommended_gpu_memory': 24,
                'min_cpu_cores': 8,
                'recommended_cpu_cores': 16,
                'min_ram': 32,
                'recommended_ram': 64
            },
            '13B': {
                'min_gpu_memory': 24,
                'recommended_gpu_memory': 48,
                'min_cpu_cores': 16,
                'recommended_cpu_cores': 32,
                'min_ram': 64,
                'recommended_ram': 128
            },
            '30B': {
                'min_gpu_memory': 48,
                'recommended_gpu_memory': 80,
                'min_cpu_cores': 32,
                'recommended_cpu_cores': 64,
                'min_ram': 128,
                'recommended_ram': 256
            },
            '70B': {
                'min_gpu_memory': 80,
                'recommended_gpu_memory': 160,
                'min_cpu_cores': 64,
                'recommended_cpu_cores': 128,
                'min_ram': 256,
                'recommended_ram': 512
            }
        }

        base_requirements = model_requirements.get(config.model_size, model_requirements['7B'])

        # 根据性能要求调整
        performance_multiplier = 1.0
        if config.performance_requirements.get('max_latency_ms', 1000) < 500:
            performance_multiplier = 1.5
        elif config.performance_requirements.get('max_latency_ms', 1000) < 200:
            performance_multiplier = 2.0

        # 根据并发要求调整
        concurrent_users = config.performance_requirements.get('concurrent_users', 10)
        concurrency_multiplier = max(1.0, concurrent_users / 10)

        final_multiplier = performance_multiplier * concurrency_multiplier

        return {
            'gpu_memory_gb': int(base_requirements['recommended_gpu_memory'] * final_multiplier),
            'cpu_cores': int(base_requirements['recommended_cpu_cores'] * final_multiplier),
            'ram_gb': int(base_requirements['recommended_ram'] * final_multiplier),
            'storage_gb': 500,  # 基础存储需求
            'network_bandwidth_gbps': 10,
            'estimated_cost_per_month': self._estimate_hardware_cost(base_requirements, final_multiplier)
        }

    def _design_standalone_architecture(self, config: DeploymentConfig) -> Dict:
        """设计单机部署架构"""

        return {
            'architecture_type': 'standalone',
            'components': {
                'model_server': {
                    'framework': 'vllm',  # 或 text-generation-inference
                    'gpu_allocation': 'exclusive',
                    'memory_optimization': 'enabled',
                    'quantization': 'int8' if config.model_size in ['30B', '70B'] else 'fp16'
                },
                'api_gateway': {
                    'framework': 'fastapi',
                    'rate_limiting': 'enabled',
                    'authentication': 'jwt',
                    'load_balancing': 'round_robin'
                },
                'cache_layer': {
                    'type': 'redis',
                    'memory_allocation': '8GB',
                    'persistence': 'enabled'
                },
                'monitoring': {
                    'metrics': 'prometheus',
                    'logging': 'elasticsearch',
                    'alerting': 'alertmanager'
                }
            },
            'deployment_script': self._generate_standalone_deployment_script(config)
        }

    def _design_distributed_architecture(self, config: DeploymentConfig) -> Dict:
        """设计分布式部署架构"""

        # 计算需要的节点数量
        total_gpu_memory_needed = self._calculate_model_memory_requirement(config.model_size)
        single_node_gpu_memory = config.hardware_specs.get('gpu_memory_per_node', 80)
        num_nodes = max(2, (total_gpu_memory_needed + single_node_gpu_memory - 1) // single_node_gpu_memory)

        return {
            'architecture_type': 'distributed',
            'node_count': num_nodes,
            'components': {
                'model_sharding': {
                    'strategy': 'tensor_parallel',
                    'shards_per_node': config.hardware_specs.get('gpus_per_node', 4),
                    'communication_backend': 'nccl'
                },
                'load_balancer': {
                    'type': 'nginx',
                    'algorithm': 'least_connections',
                    'health_check': 'enabled'
                },
                'service_mesh': {
                    'framework': 'istio',
                    'encryption': 'mtls',
                    'traffic_management': 'enabled'
                },
                'distributed_cache': {
                    'type': 'redis_cluster',
                    'nodes': 3,
                    'replication_factor': 2
                }
            },
            'deployment_script': self._generate_distributed_deployment_script(config, num_nodes)
        }
这个架构设计器能够根据不同的需求自动选择最适合的部署模式,并生成相应的配置。
1.2 容器化部署最佳实践
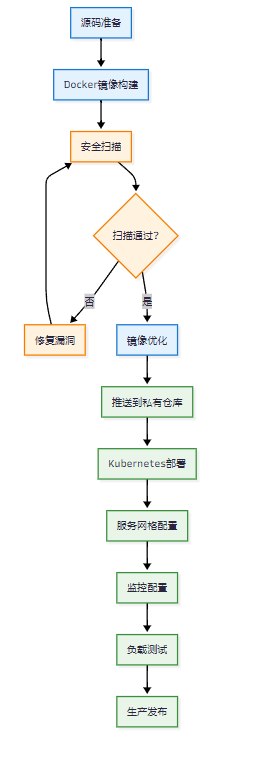
图1:容器化部署流程图
容器化部署是我在企业项目中最推荐的方式,它提供了良好的隔离性和可移植性:
python
import docker
import yaml
from pathlib import Path

class ContainerizedDeployment:
    """容器化部署管理器"""

    def __init__(self, config: DeploymentConfig):
        self.config = config
        self.docker_client = docker.from_env()
        self.image_name = f"private-llm-{config.model_name.lower()}"
        self.image_tag = "latest"

    def build_optimized_image(self) -> str:
        """构建优化的Docker镜像"""

        dockerfile_content = self._generate_dockerfile()

        # 创建构建上下文
        build_context = Path("./build_context")
        build_context.mkdir(exist_ok=True)

        # 写入Dockerfile
        dockerfile_path = build_context / "Dockerfile"
        dockerfile_path.write_text(dockerfile_content)

        # 复制模型文件和依赖
        self._prepare_build_context(build_context)

        # 构建镜像
        print("🔨 开始构建Docker镜像...")
        image, build_logs = self.docker_client.images.build(
            path=str(build_context),
            tag=f"{self.image_name}:{self.image_tag}",
            dockerfile="Dockerfile",
            buildargs={
                'MODEL_SIZE': self.config.model_size,
                'OPTIMIZATION_LEVEL': 'O2',
                'SECURITY_HARDENING': 'enabled'
            }
        )

        # 输出构建日志
        for log in build_logs:
            if 'stream' in log:
                print(log['stream'].strip())

        print(f"✅ 镜像构建完成: {image.id[:12]}")
        return image.id

    def _generate_dockerfile(self) -> str:
        """生成优化的Dockerfile"""

        return f"""
# 多阶段构建,减少最终镜像大小
FROM nvidia/cuda:11.8-devel-ubuntu20.04 as builder

# 设置环境变量
ENV DEBIAN_FRONTEND=noninteractive
ENV PYTHONUNBUFFERED=1
ENV CUDA_VISIBLE_DEVICES=0

# 安装系统依赖
RUN apt-get update && apt-get install -y \\
    python3.9 \\
    python3.9-pip \\
    python3.9-dev \\
    git \\
    wget \\
    curl \\
    && rm -rf /var/lib/apt/lists/*

# 创建非root用户(安全最佳实践)
RUN useradd -m -u 1000 llmuser && \\
    mkdir -p /app && \\
    chown -R llmuser:llmuser /app

# 切换到非root用户
USER llmuser
WORKDIR /app

# 安装Python依赖
COPY requirements.txt .
RUN pip3.9 install --user --no-cache-dir -r requirements.txt

# 复制应用代码
COPY --chown=llmuser:llmuser . .

# 编译优化(如果需要)
RUN python3.9 -m compileall .

# 生产阶段
FROM nvidia/cuda:11.8-runtime-ubuntu20.04

# 复制必要的运行时依赖
COPY --from=builder /home/llmuser/.local /home/llmuser/.local
COPY --from=builder /app /app

# 创建用户
RUN useradd -m -u 1000 llmuser && \\
    chown -R llmuser:llmuser /app

# 设置环境变量
ENV PATH=/home/llmuser/.local/bin:$PATH
ENV PYTHONPATH=/app

# 健康检查
HEALTHCHECK --interval=30s --timeout=10s --start-period=60s --retries=3 \\
    CMD curl -f http://localhost:8000/health || exit 1

# 切换到非root用户
USER llmuser
WORKDIR /app

# 暴露端口
EXPOSE 8000

# 启动命令
CMD ["python3.9", "main.py", "--host", "0.0.0.0", "--port", "8000"]
"""

    def generate_kubernetes_manifests(self) -> Dict[str, str]:
        """生成Kubernetes部署清单"""

        # Deployment配置
        deployment_manifest = {
            'apiVersion': 'apps/v1',
            'kind': 'Deployment',
            'metadata': {
                'name': f'llm-{self.config.model_name.lower()}',
                'namespace': 'ai-models',
                'labels': {
                    'app': f'llm-{self.config.model_name.lower()}',
                    'version': 'v1.0.0'
                }
            },
            'spec': {
                'replicas': self._calculate_replica_count(),
                'selector': {
                    'matchLabels': {
                        'app': f'llm-{self.config.model_name.lower()}'
                    }
                },
                'template': {
                    'metadata': {
                        'labels': {
                            'app': f'llm-{self.config.model_name.lower()}'
                        }
                    },
                    'spec': {
                        'containers': [{
                            'name': 'llm-server',
                            'image': f'{self.image_name}:{self.image_tag}',
                            'ports': [{'containerPort': 8000}],
                            'resources': {
                                'requests': {
                                    'memory': f"{self._calculate_memory_request()}Gi",
                                    'cpu': f"{self._calculate_cpu_request()}",
                                    'nvidia.com/gpu': self._calculate_gpu_request()
                                },
                                'limits': {
                                    'memory': f"{self._calculate_memory_limit()}Gi",
                                    'cpu': f"{self._calculate_cpu_limit()}",
                                    'nvidia.com/gpu': self._calculate_gpu_limit()
                                }
                            },
                            'env': [
                                {'name': 'MODEL_NAME', 'value': self.config.model_name},
                                {'name': 'MAX_CONCURRENT_REQUESTS', 'value': '100'},
                                {'name': 'CUDA_VISIBLE_DEVICES', 'value': '0'}
                            ],
                            'livenessProbe': {
                                'httpGet': {
                                    'path': '/health',
                                    'port': 8000
                                },
                                'initialDelaySeconds': 60,
                                'periodSeconds': 30
                            },
                            'readinessProbe': {
                                'httpGet': {
                                    'path': '/ready',
                                    'port': 8000
                                },
                                'initialDelaySeconds': 30,
                                'periodSeconds': 10
                            }
                        }],
                        'nodeSelector': {
                            'gpu-type': 'nvidia-a100'  # 指定GPU类型
                        },
                        'tolerations': [{
                            'key': 'nvidia.com/gpu',
                            'operator': 'Exists',
                            'effect': 'NoSchedule'
                        }]
                    }
                }
            }
        }

        # Service配置
        service_manifest = {
            'apiVersion': 'v1',
            'kind': 'Service',
            'metadata': {
                'name': f'llm-{self.config.model_name.lower()}-service',
                'namespace': 'ai-models'
            },
            'spec': {
                'selector': {
                    'app': f'llm-{self.config.model_name.lower()}'
                },
                'ports': [{
                    'protocol': 'TCP',
                    'port': 80,
                    'targetPort': 8000
                }],
                'type': 'ClusterIP'
            }
        }

        # HPA配置(水平自动扩缩容)
        hpa_manifest = {
            'apiVersion': 'autoscaling/v2',
            'kind': 'HorizontalPodAutoscaler',
            'metadata': {
                'name': f'llm-{self.config.model_name.lower()}-hpa',
                'namespace': 'ai-models'
            },
            'spec': {
                'scaleTargetRef': {
                    'apiVersion': 'apps/v1',
                    'kind': 'Deployment',
                    'name': f'llm-{self.config.model_name.lower()}'
                },
                'minReplicas': 1,
                'maxReplicas': self._calculate_max_replicas(),
                'metrics': [
                    {
                        'type': 'Resource',
                        'resource': {
                            'name': 'cpu',
                            'target': {
                                'type': 'Utilization',
                                'averageUtilization': 70
                            }
                        }
                    },
                    {
                        'type': 'Resource',
                        'resource': {
                            'name': 'memory',
                            'target': {
                                'type': 'Utilization',
                                'averageUtilization': 80
                            }
                        }
                    }
                ]
            }
        }

        return {
            'deployment.yaml': yaml.dump(deployment_manifest, default_flow_style=False),
            'service.yaml': yaml.dump(service_manifest, default_flow_style=False),
            'hpa.yaml': yaml.dump(hpa_manifest, default_flow_style=False)
        }
这个容器化部署管理器提供了完整的Docker镜像构建和Kubernetes部署能力,确保了部署的一致性和可扩展性。
2. 模型性能优化与加速技术
2.1 推理引擎选择与优化
在我的实践中,不同的推理引擎在不同场景下表现差异巨大:
python
from abc import ABC, abstractmethod
import time
import psutil
import GPUtil
from typing import Dict, List, Tuple
import torch
import numpy as np

class InferenceEngine(ABC):
    """推理引擎抽象基类"""

    def __init__(self, model_path: str, config: Dict):
        self.model_path = model_path
        self.config = config
        self.model = None
        self.tokenizer = None

    @abstractmethod
    def load_model(self):
        """加载模型"""
        pass

    @abstractmethod
    def generate(self, prompt: str, **kwargs) -> str:
        """生成文本"""
        pass

    @abstractmethod
    def get_performance_metrics(self) -> Dict:
        """获取性能指标"""
        pass

class VLLMEngine(InferenceEngine):
    """vLLM推理引擎"""

    def __init__(self, model_path: str, config: Dict):
        super().__init__(model_path, config)
        self.engine = None

    def load_model(self):
        """加载vLLM模型"""
        try:
            from vllm import LLM, SamplingParams

            # vLLM配置
            vllm_config = {
                'model': self.model_path,
                'tensor_parallel_size': self.config.get('tensor_parallel_size', 1),
                'gpu_memory_utilization': self.config.get('gpu_memory_utilization', 0.9),
                'max_num_batched_tokens': self.config.get('max_batch_size', 2048),
                'max_num_seqs': self.config.get('max_concurrent_requests', 256),
                'quantization': self.config.get('quantization', None),
                'dtype': self.config.get('dtype', 'auto')
            }

            print("🚀 正在加载vLLM模型...")
            start_time = time.time()

            self.engine = LLM(**vllm_config)
            self.sampling_params = SamplingParams(
                temperature=0.7,
                top_p=0.9,
                max_tokens=self.config.get('max_tokens', 512)
            )

            load_time = time.time() - start_time
            print(f"✅ vLLM模型加载完成,耗时: {load_time:.2f}秒")

        except ImportError:
            raise ImportError("vLLM未安装,请运行: pip install vllm")

    def generate(self, prompt: str, **kwargs) -> str:
        """使用vLLM生成文本"""
        if not self.engine:
            raise RuntimeError("模型未加载")

        # 更新采样参数
        sampling_params = SamplingParams(
            temperature=kwargs.get('temperature', 0.7),
            top_p=kwargs.get('top_p', 0.9),
            max_tokens=kwargs.get('max_tokens', 512)
        )

        # 生成文本
        outputs = self.engine.generate([prompt], sampling_params)
        return outputs[0].outputs[0].text

    def batch_generate(self, prompts: List[str], **kwargs) -> List[str]:
        """批量生成文本"""
        if not self.engine:
            raise RuntimeError("模型未加载")

        sampling_params = SamplingParams(
            temperature=kwargs.get('temperature', 0.7),
            top_p=kwargs.get('top_p', 0.9),
            max_tokens=kwargs.get('max_tokens', 512)
        )

        outputs = self.engine.generate(prompts, sampling_params)
        return [output.outputs[0].text for output in outputs]

class TextGenerationInferenceEngine(InferenceEngine):
    """Text Generation Inference引擎"""

    def __init__(self, model_path: str, config: Dict):
        super().__init__(model_path, config)
        self.client = None

    def load_model(self):
        """启动TGI服务"""
        import subprocess
        import requests
        import time

        # TGI启动命令
        tgi_command = [
            "text-generation-launcher",
            "--model-id", self.model_path,
            "--port", str(self.config.get('port', 8080)),
            "--max-concurrent-requests", str(self.config.get('max_concurrent_requests', 128)),
            "--max-best-of", str(self.config.get('max_best_of', 2)),
            "--max-stop-sequences", str(self.config.get('max_stop_sequences', 4)),
            "--max-input-length", str(self.config.get('max_input_length', 1024)),
            "--max-total-tokens", str(self.config.get('max_total_tokens', 2048)),
            "--waiting-served-ratio", str(self.config.get('waiting_served_ratio', 1.2)),
            "--max-batch-prefill-tokens", str(self.config.get('max_batch_prefill_tokens', 4096)),
            "--max-batch-total-tokens", str(self.config.get('max_batch_total_tokens', 8192))
        ]

        # 添加量化选项
        if self.config.get('quantize'):
            tgi_command.extend(["--quantize", self.config['quantize']])

        print("🚀 正在启动Text Generation Inference服务...")

        # 启动TGI服务
        self.tgi_process = subprocess.Popen(
            tgi_command,
            stdout=subprocess.PIPE,
            stderr=subprocess.PIPE
        )

        # 等待服务启动
        port = self.config.get('port', 8080)
        max_wait_time = 300  # 5分钟
        wait_time = 0

        while wait_time < max_wait_time:
            try:
                response = requests.get(f"http://localhost:{port}/health")
                if response.status_code == 200:
                    print("✅ TGI服务启动成功")
                    break
            except requests.exceptions.ConnectionError:
                pass

            time.sleep(5)
            wait_time += 5

        if wait_time >= max_wait_time:
            raise RuntimeError("TGI服务启动超时")

        # 创建客户端
        from text_generation import Client
        self.client = Client(f"http://localhost:{port}")

class PerformanceBenchmark:
    """性能基准测试"""

    def __init__(self):
        self.engines = {}
        self.test_prompts = [
            "请解释什么是人工智能",
            "写一个Python快速排序算法",
            "分析当前经济形势的主要特点",
            "描述量子计算的基本原理",
            "设计一个简单的聊天机器人架构"
        ]

    def register_engine(self, name: str, engine: InferenceEngine):
        """注册推理引擎"""
        self.engines[name] = engine

    def run_comprehensive_benchmark(self) -> Dict:
        """运行全面的性能基准测试"""
        results = {}

        for engine_name, engine in self.engines.items():
            print(f"🔍 测试引擎: {engine_name}")

            # 单次推理测试
            single_inference_results = self._test_single_inference(engine)

            # 批量推理测试
            batch_inference_results = self._test_batch_inference(engine)

            # 并发测试
            concurrent_results = self._test_concurrent_inference(engine)

            # 资源使用测试
            resource_usage = self._test_resource_usage(engine)

            results[engine_name] = {
                'single_inference': single_inference_results,
                'batch_inference': batch_inference_results,
                'concurrent_performance': concurrent_results,
                'resource_usage': resource_usage,
                'overall_score': self._calculate_overall_score(
                    single_inference_results,
                    batch_inference_results,
                    concurrent_results,
                    resource_usage
                )
            }

        return results

    def _test_single_inference(self, engine: InferenceEngine) -> Dict:
        """测试单次推理性能"""
        latencies = []

        for prompt in self.test_prompts:
            start_time = time.time()
            response = engine.generate(prompt)
            end_time = time.time()

            latency = (end_time - start_time) * 1000  # 转换为毫秒
            latencies.append(latency)

        return {
            'avg_latency_ms': np.mean(latencies),
            'p50_latency_ms': np.percentile(latencies, 50),
            'p95_latency_ms': np.percentile(latencies, 95),
            'p99_latency_ms': np.percentile(latencies, 99),
            'min_latency_ms': np.min(latencies),
            'max_latency_ms': np.max(latencies)
        }
2.2 推理引擎性能对比
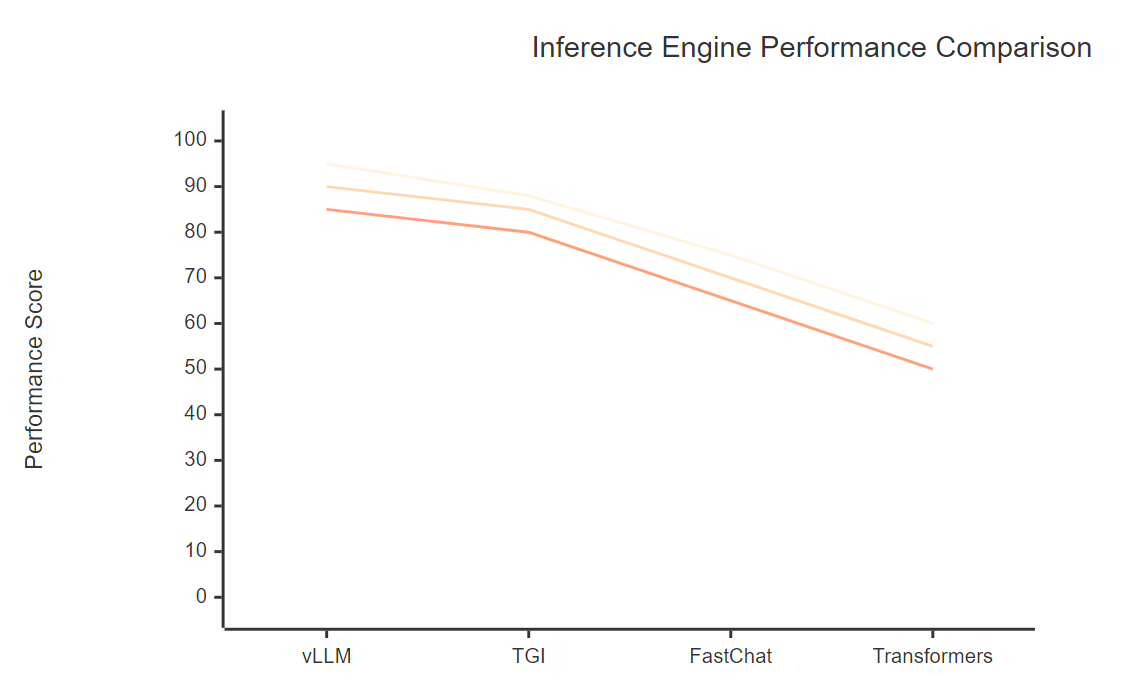
图2:推理引擎性能对比图(吞吐量、延迟、资源利用率)
|--------------|-----|----|------|-----|---------|
| 推理引擎 | 吞吐量 | 延迟 | 内存效率 | 易用性 | 适用场景 |
| vLLM | 优秀 | 优秀 | 优秀 | 中等 | 高并发生产环境 |
| TGI | 良好 | 良好 | 良好 | 优秀 | 企业级部署 |
| FastChat | 中等 | 中等 | 中等 | 优秀 | 快速原型开发 |
| Transformers | 一般 | 一般 | 一般 | 优秀 | 研究和开发 |
3. 安全防护体系构建
3.1 多层安全架构设计
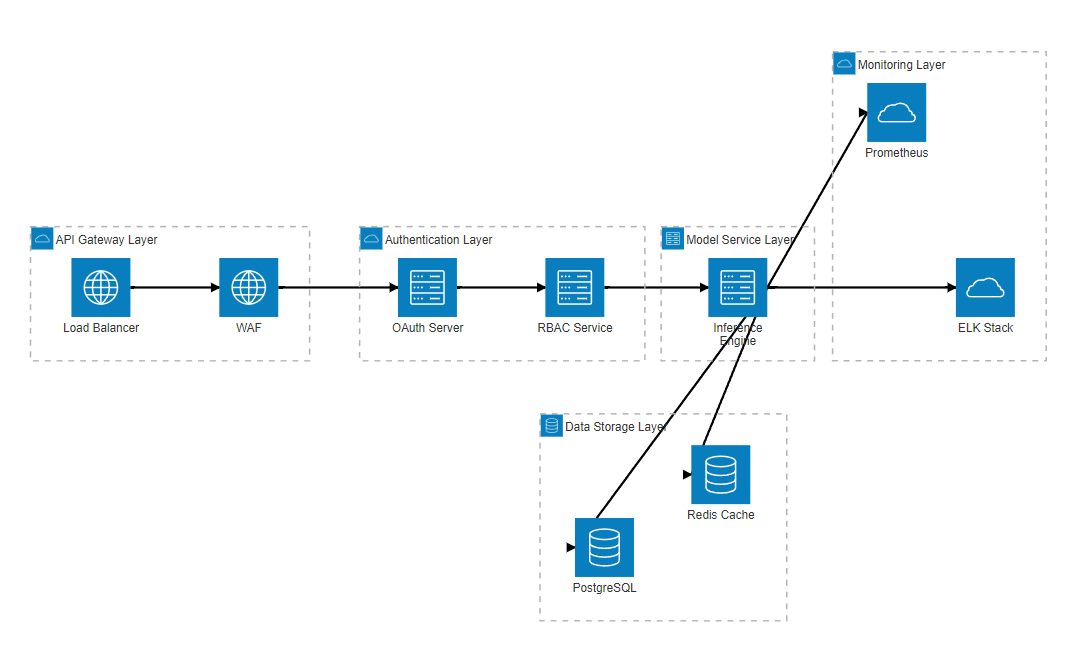
图3:多层安全架构图
python
import hashlib
import jwt
import secrets
from datetime import datetime, timedelta
from cryptography.fernet import Fernet
from typing import Dict, List, Optional
import logging

class SecurityManager:
    """安全管理器"""

    def __init__(self, config: Dict):
        self.config = config
        self.encryption_key = self._generate_encryption_key()
        self.jwt_secret = config.get('jwt_secret', secrets.token_urlsafe(32))
        self.rate_limiter = RateLimiter()
        self.audit_logger = AuditLogger()
        self.access_controller = AccessController()

    def encrypt_sensitive_data(self, data: str) -> str:
        """加密敏感数据"""
        f = Fernet(self.encryption_key)
        encrypted_data = f.encrypt(data.encode())
        return encrypted_data.decode()

    def validate_request(self, request_data: Dict) -> bool:
        """验证请求安全性"""

        # 检查API密钥
        api_key = request_data.get('api_key')
        if not self.access_controller.validate_api_key(api_key):
            return False

        # 检查速率限制
        user_id = request_data.get('user_id')
        if self.rate_limiter.is_rate_limited(user_id):
            return False

        # 检查输入内容安全性
        prompt = request_data.get('prompt', '')
        if not self._is_safe_prompt(prompt):
            return False

        return True

    def _is_safe_prompt(self, prompt: str) -> bool:
        """检查提示词安全性"""

        # 恶意指令检测
        malicious_patterns = [
            r'ignore\s+previous\s+instructions',
            r'system\s+prompt',
            r'jailbreak',
            r'pretend\s+to\s+be',
            r'act\s+as\s+if'
        ]

        import re
        for pattern in malicious_patterns:
            if re.search(pattern, prompt, re.IGNORECASE):
                self.audit_logger.log_security_event(
                    'malicious_prompt_detected',
                    {'prompt': prompt[:100], 'pattern': pattern}
                )
                return False

        return True

class DataPrivacyProtector:
    """数据隐私保护器"""

    def __init__(self):
        self.privacy_rules = [
            {'name': '身份证号', 'pattern': r'\b\d{17}[\dXx]\b', 'replacement': '[身份证号已脱敏]'},
            {'name': '手机号', 'pattern': r'\b1[3-9]\d{9}\b', 'replacement': '[手机号已脱敏]'},
            {'name': '邮箱地址', 'pattern': r'\b[A-Za-z0-9._%+-]+@[A-Za-z0-9.-]+\.[A-Z|a-z]{2,}\b', 'replacement': '[邮箱已脱敏]'},
            {'name': '银行卡号', 'pattern': r'\b\d{16,19}\b', 'replacement': '[银行卡号已脱敏]'}
        ]

    def sanitize_text(self, text: str) -> str:
        """清理文本中的敏感信息"""
        import re

        sanitized_text = text
        for rule in self.privacy_rules:
            sanitized_text = re.sub(rule['pattern'], rule['replacement'], sanitized_text)

        return sanitized_text
4. 监控与运维体系
4.1 全方位监控指标体系

图4:监控系统交互时序图
python
from prometheus_client import Counter, Histogram, Gauge, start_http_server
import time
import psutil

class ModelMonitor:
    """模型监控器"""

    def __init__(self, model_name: str, port: int = 8000):
        self.model_name = model_name

        # 初始化Prometheus指标
        self.request_total = Counter(
            'model_requests_total',
            'Total number of requests',
            ['model_name', 'endpoint', 'status']
        )

        self.request_duration = Histogram(
            'model_request_duration_seconds',
            'Request duration in seconds',
            ['model_name', 'endpoint']
        )

        self.gpu_utilization = Gauge(
            'gpu_utilization_percent',
            'GPU utilization percentage',
            ['gpu_id', 'model_name']
        )

        self.memory_used = Gauge(
            'memory_used_bytes',
            'Memory used in bytes',
            ['model_name']
        )

        # 启动指标服务器
        start_http_server(port)
        print(f"📊 监控服务已启动,端口: {port}")

    def record_request(self, endpoint: str, status: str, duration: float):
        """记录请求指标"""
        self.request_total.labels(
            model_name=self.model_name,
            endpoint=endpoint,
            status=status
        ).inc()

        self.request_duration.labels(
            model_name=self.model_name,
            endpoint=endpoint
        ).observe(duration)

    def update_system_metrics(self):
        """更新系统指标"""
        # CPU和内存使用率
        cpu_percent = psutil.cpu_percent()
        memory_info = psutil.virtual_memory()

        self.memory_used.labels(model_name=self.model_name).set(memory_info.used)

        # GPU使用率(如果可用)
        try:
            import GPUtil
            gpus = GPUtil.getGPUs()
            for i, gpu in enumerate(gpus):
                self.gpu_utilization.labels(
                    gpu_id=str(i),
                    model_name=self.model_name
                ).set(gpu.load * 100)
        except ImportError:
            pass
5. 实战案例与最佳实践
5.1 金融行业私有化部署案例
"在金融行业的AI应用中,安全性和合规性永远是第一位的。每一个技术决策都必须经过严格的风险评估和合规审查。" ------ 摘星
python
class FinancialDeploymentCase:
    """金融行业部署案例"""

    def __init__(self):
        self.compliance_requirements = {
            'data_residency': '数据不得出境',
            'encryption': 'AES-256加密',
            'audit_logging': '完整审计日志',
            'access_control': '多因子认证',
            'network_isolation': '网络隔离'
        }

    def deploy_financial_llm(self):
        """部署金融行业大语言模型"""

        # 1. 合规性检查
        self._perform_compliance_check()

        # 2. 安全加固
        security_config = self._configure_security()

        # 3. 性能优化
        performance_config = self._optimize_performance()

        # 4. 监控配置
        monitoring_config = self._setup_monitoring()

        # 5. 部署执行
        deployment_result = self._execute_deployment(
            security_config,
            performance_config,
            monitoring_config
        )

        return deployment_result

    def _perform_compliance_check(self):
        """执行合规性检查"""
        print("🔍 执行合规性检查...")

        # 检查数据处理合规性
        data_compliance = self._check_data_compliance()

        # 检查网络安全合规性
        network_compliance = self._check_network_compliance()

        # 检查访问控制合规性
        access_compliance = self._check_access_compliance()

        if not all([data_compliance, network_compliance, access_compliance]):
            raise Exception("合规性检查未通过")

        print("✅ 合规性检查通过")
5.2 性能优化最佳实践总结
|-------|--------|------|-------|-------|
| 优化策略 | 性能提升 | 实现难度 | 资源消耗 | 适用场景 |
| 模型量化 | 2-4x | 中等 | 降低75% | 资源受限 |
| 批处理优化 | 3-8x | 低 | 无变化 | 高并发 |
| 缓存策略 | 1.5-3x | 低 | 增加20% | 重复查询 |
| 分布式部署 | 2-10x | 高 | 成倍增加 | 大规模应用 |
| 硬件加速 | 1.5-5x | 中等 | 硬件成本 | 专用场景 |
总结
经过深入的技术实践和案例分析,我对开源模型私有化部署有了更加全面和深刻的理解。私有化部署不仅仅是技术层面的挑战,更是一个涉及架构设计、安全防护、性能优化、合规管理的综合性工程。
在我的实际项目经验中,成功的私有化部署需要在多个维度上做出平衡:性能与成本的平衡、安全与易用性的平衡、标准化与定制化的平衡。每一个技术选择都需要基于具体的业务场景和约束条件来做出决策。
通过系统性的架构设计、精心的性能调优和全面的安全防护,我们能够构建出既满足业务需求又符合安全要求的AI服务。特别是在金融、医疗、政务等对安全性要求极高的行业,私有化部署已经成为AI技术落地的必由之路。
展望未来,私有化部署技术将朝着更加自动化、智能化的方向发展。自动化的部署流水线、智能化的资源调度、自适应的性能优化将成为下一阶段的重点发展方向。作为技术从业者,我们需要持续关注这些前沿技术的发展,并在实际项目中积极探索和应用。
私有化部署的成功实施,不仅能够保障企业的数据安全和业务连续性,更能够为AI技术在各行各业的深度应用奠定坚实基础。在这个过程中,我们既是技术的实践者,也是安全的守护者,更是创新的推动者。
我是摘星!如果这篇文章在你的技术成长路上留下了印记
👁️ 【关注】与我一起探索技术的无限可能,见证每一次突破
👍 【点赞】为优质技术内容点亮明灯,传递知识的力量
🔖 【收藏】将精华内容珍藏,随时回顾技术要点
💬 【评论】分享你的独特见解,让思维碰撞出智慧火花
🗳️ 【投票】用你的选择为技术社区贡献一份力量
技术路漫漫,让我们携手前行,在代码的世界里摘取属于程序员的那片星辰大海!
参考链接
关键词标签
#私有化部署 #开源模型 #性能优化 #安全防护 #企业级AI