- 操作系统:ubuntu22.04
- OpenCV版本:OpenCV4.9
- IDE:Visual Studio Code
- 编程语言:C++11
算法描述
在二值图像中查找轮廓。
该函数使用253中的算法从二值图像检索轮廓。轮廓是形状分析以及对象检测和识别的有用工具。请参阅 OpenCV 示例目录中的 squares.cpp。
注意 :
函数文本ID为 "org.opencv.imgproc.shape.findContours"。
函数原型
cpp
GArray<GArray<Point> > cv::gapi::findContours
(
 	const GMat &  	src,
	const RetrievalModes  	mode,
	const ContourApproximationModes  	method,
	const GOpaque< Point > &  	offset
)
参数
- 参数 src:输入灰度图像 CV_8UC1。非零像素被视为 1。零像素保持为 0,因此图像被视为二值图像。您可以使用 compare、inRange、threshold、adaptiveThreshold、Canny 等方法从灰度或彩色图像创建二值图像。如果 mode 等于 RETR_CCOMP,则输入也可以是标签的 32 位整数图像 (CV_32SC1)。如果 mode 是 RETR_FLOODFILL,则仅支持 CV_32SC1。
- 参数 mode:轮廓检索模式,参见 RetrievalModes。
- 参数 method:轮廓近似方法,参见 ContourApproximationModes。
- 参数 offset:可选偏移量,每个轮廓点都会根据此偏移量进行移动。当轮廓是从图像 ROI 中提取并需要在整个图像上下文中进行分析时,这非常有用。
返回值
检测到的轮廓的 GArray。每个轮廓都存储为点的 GArray。
代码示例
cpp
#include <opencv2/gapi.hpp>
#include <opencv2/gapi/core.hpp>
#include <opencv2/gapi/imgproc.hpp>
#include <opencv2/opencv.hpp>
using namespace cv;
using namespace cv::gapi;
int main() {
// 读取输入图像,这里假设为灰度图像
Mat src = imread("/media/dingxin/data/study/OpenCV/sources/images/Lenna.png", IMREAD_GRAYSCALE);
if (src.empty()) {
std::cerr << "无法读取图像" << std::endl;
return -1;
}
// 转换为二值图像
Mat binary;
threshold(src, binary, 127, 255, THRESH_BINARY);
// 创建一个彩色版的输入图像,以便绘制彩色边框
Mat src_color;
cvtColor(src, src_color, COLOR_GRAY2BGR);
// 定义G-API网络
GMat in;
auto contours_op = gapi::findContours(in, RETR_EXTERNAL, CHAIN_APPROX_SIMPLE); // 移除偏移点参数
GComputation comp(GIn(in), GOut(contours_op));
// 使用G-API获取轮廓
std::vector<std::vector<Point>> contours_host; // Host storage for contours
// Apply the computation to get contours
comp.apply(cv::gin(binary), cv::gout(contours_host)); // 使用gin和gout宏来包装输入和输出
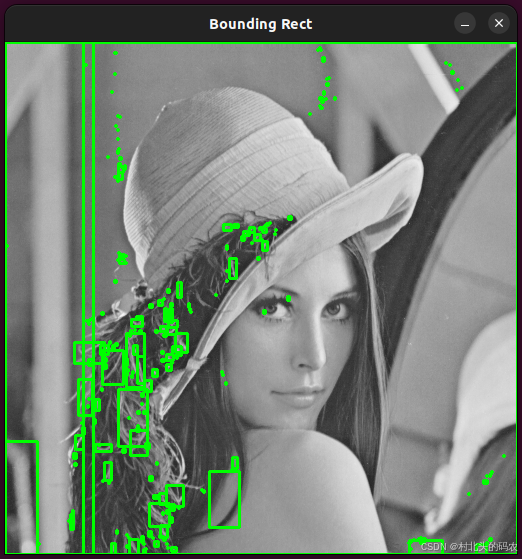
// 对于每个轮廓,计算并绘制边界矩形
for (const auto& contour : contours_host) {
// 使用OpenCV获取边界矩形
Rect bounding_rect = boundingRect(contour);
// 确保边界矩形不会超出图像边界
bounding_rect &= Rect(0, 0, src.cols, src.rows);
// 额外检查以防止空矩形或其他问题
if (bounding_rect.width == 0 || bounding_rect.height == 0) continue;
// 在原图上绘制矩形
rectangle(src_color, bounding_rect.tl(), bounding_rect.br(), Scalar(0, 255, 0), 2);
}
// 显示结果
imshow("Bounding Rect", src_color);
waitKey();
return 0;
}运行结果