- 机器人软件开发
- 什么是 P、PI 和 PID 控制器?
- 比例 (P) 控制器
- 比例积分 (PI) 控制器
- 比例-积分-微分 (PID) 控制器
- 横向控制简介
- CARLA ROS2 集成
- 纵向控制
- 横向控制
- 关键要点
- 结论
- 引用
机器人软件开发
机器人技术是一个多学科领域,涉及机械设计和计算机科学的各个领域,例如计算机体系结构、网络和数据库。由于它集成了不同的领域,它通常被视为系统工程。机器人技术的核心软件组件是数学密集型的,必须经过高度优化才能保持低延迟。机器人技术的主要软件组件是:
- 知觉
- 规划
- 控制
无论其环境如何,通用的 autonomous stack 将如下所示(见下图),至少在其初始迭代中是这样。该堆栈由 4 个子堆栈组成,即传感器堆栈、感知堆栈、规划和控制堆栈。传感器堆栈由前后两个摄像头以及车辆顶部的 LiDAR 组成。感知堆栈包括定位和地图构建 (我们在整个系列中一直在讨论这一点),高清地图对于导航也非常重要,但已经提出了一些方法,可以即时创建高清地图,最后是用于检测地标和了解可驾驶区域的对象检测和分割。
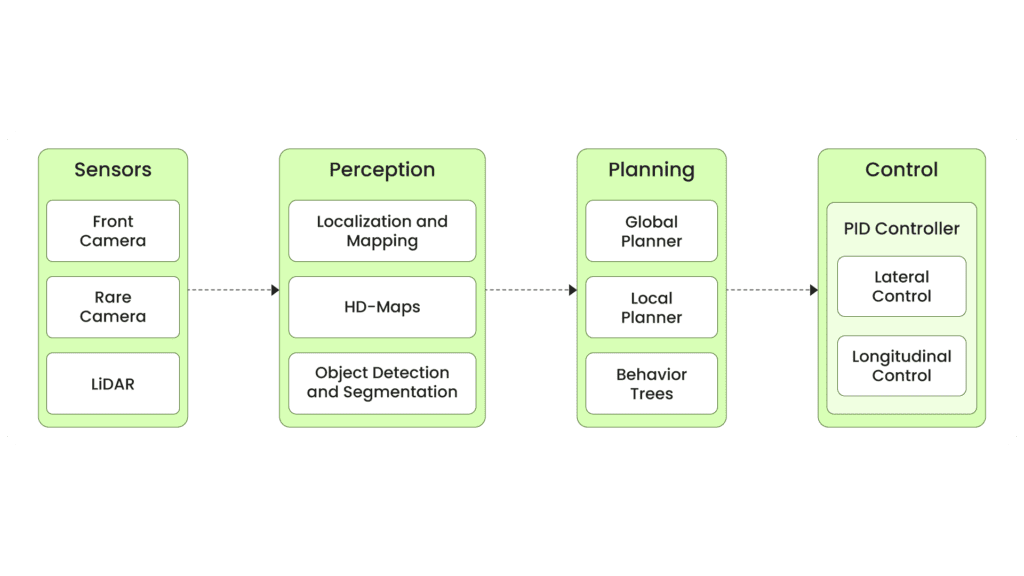
规划模块分为三个部分。众所周知,对于许多用例来说,拥有全局和本地规划器可能就足够了,但是在处理不同的场景时,机器人需要有一个行为树。让我们以自动驾驶汽车为例。可能存在诸如遵循红绿灯、停车或越野驾驶等场景,在这些场景中,不同的任务需要不同的规划者。最后是控件 --- 通常,经过良好调整的 PID 控制器用于执行器信号。它通常分为两个步骤:用于航点跟踪的横向控制和用于速度管理的纵向控制。在本文中,我们将更详细地探讨控制部分。
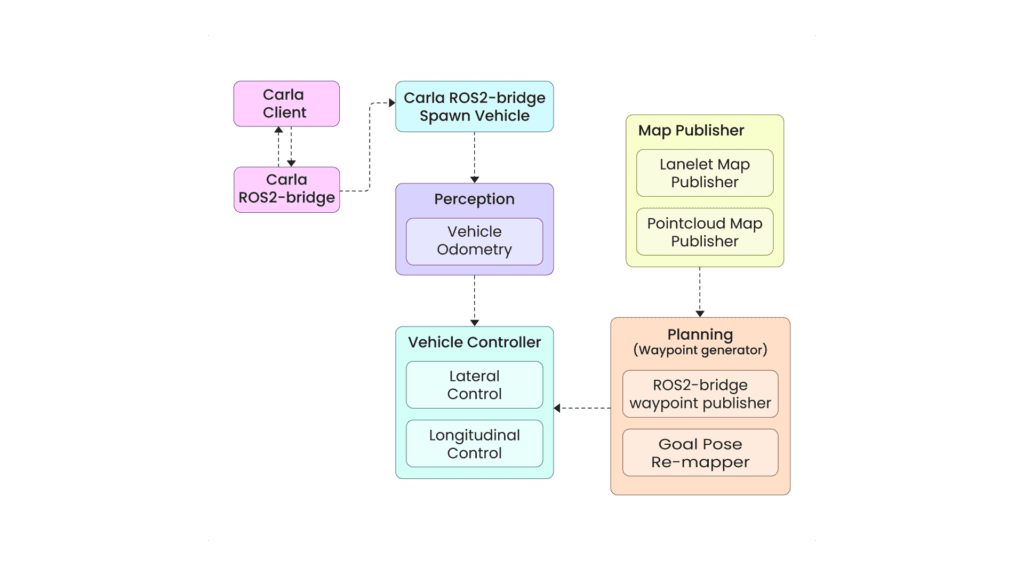
如果我们要在 CARLA 中设计一辆基本的自动驾驶汽车,我们将如何做到这一点?强调 "in CARLA" 因为它将位于模拟器内部,这使得在结构化环境中工作变得更加容易。此外,我们可以利用 CARLA 提供的所有 API 优势 来获得大量预先计算的估计值。下面的系统架构显示了如何使用 CARLA 和 ROS 2 创建自主路径跟踪车辆。
AV系统
我们首先启动 CARLA 客户端和 CARLA ROS 桥。这两个模块进行通信以将数据从 CARLA 发送到 ROS 2。最初,这将提供有关 CARLA 世界、天气和状态的信息。接下来,需要启动 CARLA ros-bridge 生成车辆 节点,以便在 CARLA 世界中生成车辆,这将通过 ROS 2 主题提供有关车辆、传感器数据和交通的大量信息。之后,启动Lanelet 和 Point Cloud 地图,让我们可以看到可驾驶区域。
Lanelet 地图 和点云地图可以了解周围环境和可驾驶区域。在我们了解之后,我们可动 waypoint generator 。它采用车辆的起点和目标位置来生成最短路径,该路径由航点组成。路径点本质上是定义全局路径的一系列 3D 点。车辆的任务是沿着这些航路点到达其目标。为此,使用了 PID 控制器,该控制器采用航路点坐标和车辆的里程计(每个时间戳的当前位置和方向)来生成执行器信号。里程计数据也来自 CARLA。
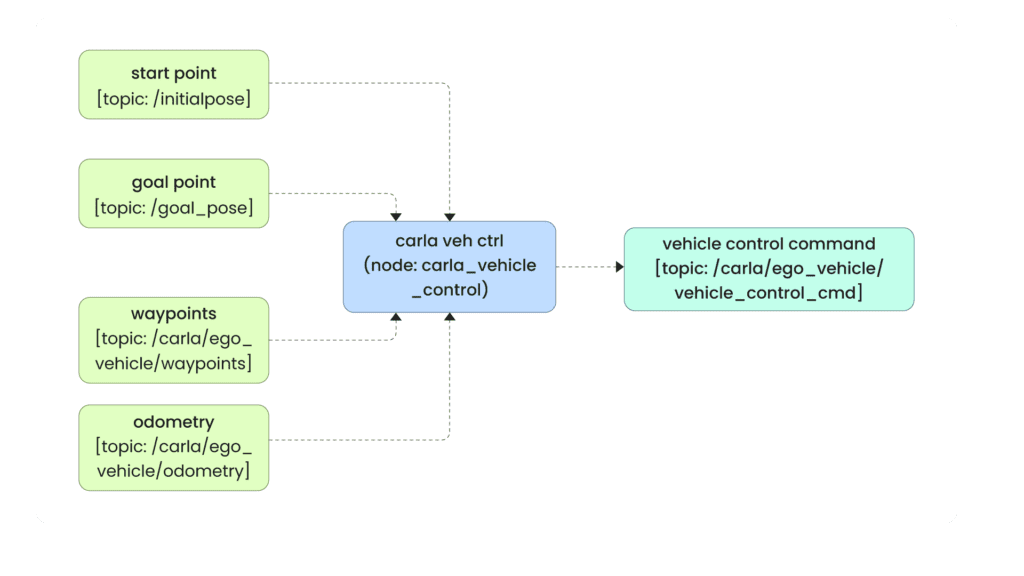
从 ROS 2 的角度来看,系统是这样工作的:节点是工作流的核心。它订阅了开始和结束位置主题,以及为车辆生成的航路点,并使用车辆的里程计 来计算控制命令。主题接收这些控制命令并移动车辆。整个系统在 RViz2 中可视化。carla vehicle ctrl``/carla/ego_vehicle/vehicle_control_cmd
由于 CARLA 已经处理了里程计和规划,我们将主要专注于车辆控制。为此,我们决定使用 PID 控制器,但可以探索更高级的控制器。以下是我们将涵盖的主题:
- 什么是 P、PI 和 PID 控制器?
- 实现 PID 控制 python。
- 什么是纵向控制和横向控制?
什么是 P、PI 和 PID 控制器?
如前所述,我们将使用 PID 控制器 通过生成必要的执行器信号,使车辆沿所需轨迹移动。但在此之前,"执行器信号 "实际上是什么意思?执行器是将电能转化为物理运动的机器人部件,通常是机器人关节中的电机或液压系统。控制器的工作是产生适量的电能以实现所需的运动。例如,如果你有一辆车,希望它从一个地方行驶到另一个地方,或者如果你有一个机械臂,希望它从桌子上抓一个苹果,规划器会给你所需的物理运动------它可以表示为速度曲线、轨迹,或两者兼而有之。控制者的工作是遵循建议的路径。
现在我们了解了目的,让我们来探索一下控制器是如何实现的。有不同类型的控制器可用,例如 PID 控制器、模糊逻辑控制器、模型预测控制 (MPC)、非线性模型预测控制 (NLMPC)、神经网络控制器、基于 RL 的控制器等。但在本文中,我们将重点介绍 PID 控制器,它是最简单但最高效的控制器之一。传说中,经过适当调整的 PID 控制器仍然可以让所有现代控制器物有所值。尽管它是最古老的控制器方法之一(已有 100 多年的历史),但它仍在工业和学术界使用。
PID 控制器中的 P、I 和 D 分别代表比例、积分和导数。每个术语都有助于控制机器人。让我们用一个例子来分解一下:假设您有一辆自动驾驶汽车,想在保持 50 m/s 速度的同时从家到办公室。以恒定速度自动驾驶车辆是一项称为巡航控制 的高级驾驶员辅助系统 (ADAS) 功能。
从控制的角度来看,目标是通过根据当前车速和目标速度之间的差异不断调整油门来实现这一目标。从图示上讲,它可以表示如下:
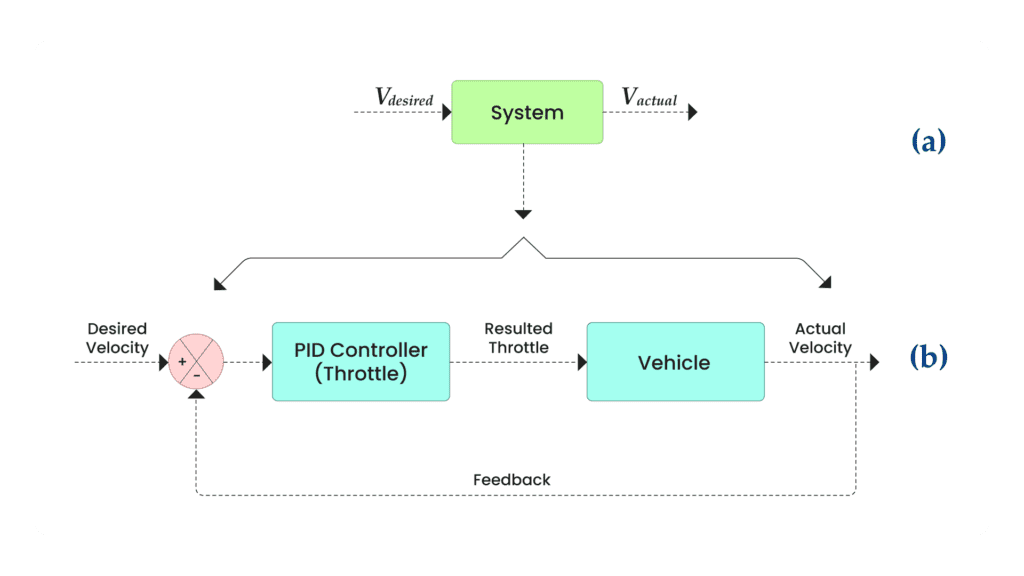
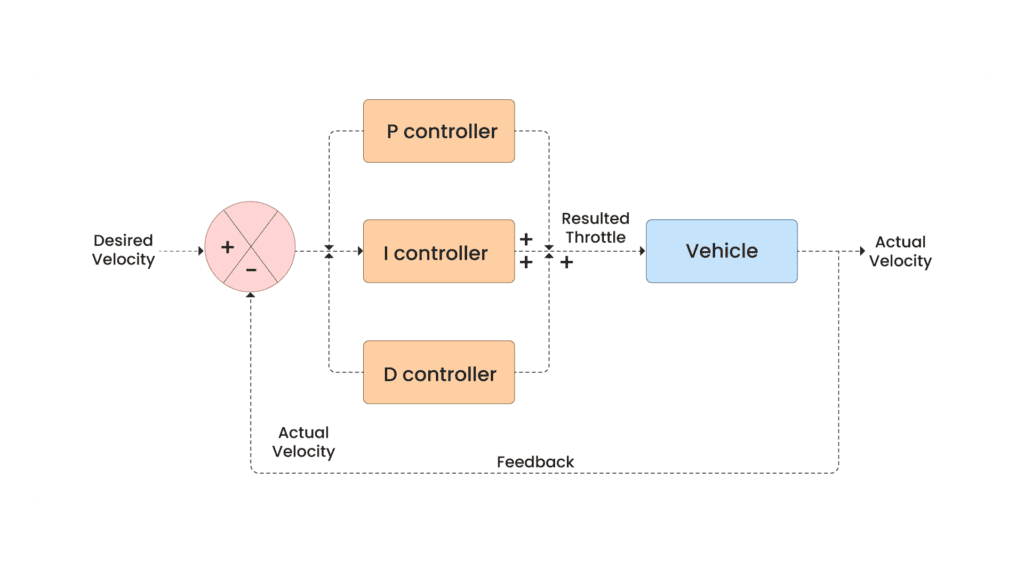
在高层次上,你可以把它想象成一个系统,你提供所需的速度,它返回系统响应------实际的速度(见上面的图 a)。控制器的目标是使实际速度等于所需的速度,这意味着它们之间的差异最终应该达到零。
如果我们放大系统(如图 a),您将看到(图 b)控制器和车辆(作为工艺/工厂)。在这里,控制器的工作是将所需速度和实际速度作为输入,并计算它们之间的差值以产生节流值。向 PID 控制器提供飞行器的响应称为闭环反馈。
现在我们已经全面了解了 PID 控制器的作用,让我们纠缠 PID 控制器并了解 P、I 和 D 项的贡献。
比例 (P) 控制器
P 控制器解决当前速度和所需速度之间的差值。例如,如果当前速度为 0 且目标为 50 m/s,则需要增加节流阀以缩小该间隙。误差越大,应用的调节就越多,这意味着调节与误差成正比,表示为:
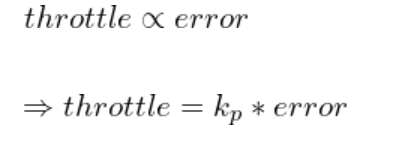
在数学上,这可以写成

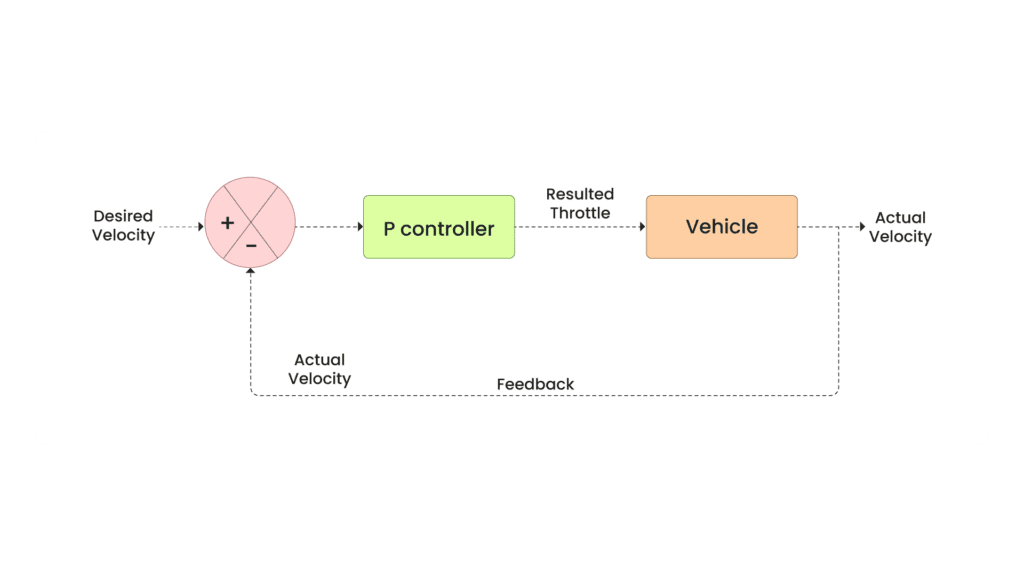
下面的框图表示反馈控制系统中使用的比例 (P) 控制器,用于调节车辆的速度。将所需速度输入到系统中,并与实际速度进行比较以确定误差。该误差被馈送到 P 控制器中,该控制器根据误差的成比例增益调整车辆的油门。输出是车辆的实际速度,它被反馈到系统中进行连续调整,保持所需的速度。循环通过反馈闭合,确保实时校正飞行器的速度。
下面是简单 P 控制器的 python 代码
python
import numpy as np
import matplotlib.pyplot as plt
from matplotlib.widgets import Slider

# Define PID Controller class with resistance
class PIDControllerWithResistance:
    def __init__(self, Kp, set_point=0, resistance_factor=0.1):
        self.Kp = Kp
        self.set_point = set_point
        self.resistance_factor = resistance_factor  # Resistance to throttle (e.g., air resistance, friction)

    def update(self, current_value, dt):
        # Apply the same PID control logic but factor in resistance
        error = self.set_point - current_value
        output = self.Kp * error
        return output - self.resistance_factor * current_value  # Reduce output by a resistance factor

# Simulation parameters
dt = 0.1  # Time step
time = np.arange(0, 50, dt)  # Simulation time

# Initialize the PID controller with disturbance (resistance)
pid_with_resistance = PIDControllerWithResistance(Kp=1.0, set_point=50, resistance_factor=0.2)

# Initial conditions
speed = 0
throttle_with_resistance = []
speed_record_with_resistance = []

# Simulate the system with resistance
for t in time:
    control = pid_with_resistance.update(speed, dt)
    speed += control * dt  # Speed is affected by throttle control and resistance
    throttle_with_resistance.append(control)
    speed_record_with_resistance.append(speed)

# Plot setup
fig, ax = plt.subplots()
plt.subplots_adjust(left=0.1, bottom=0.3)

l, = plt.plot(time, speed_record_with_resistance, label="Speed Output (With Resistance)")
plt.axhline(pid_with_resistance.set_point, color='r', linestyle='--', label='Set Point')
plt.xlabel('Time [s]')
plt.ylabel('Speed [m/s]')
plt.title('PID Cruise Control with Resistance')
plt.legend()
plt.show()
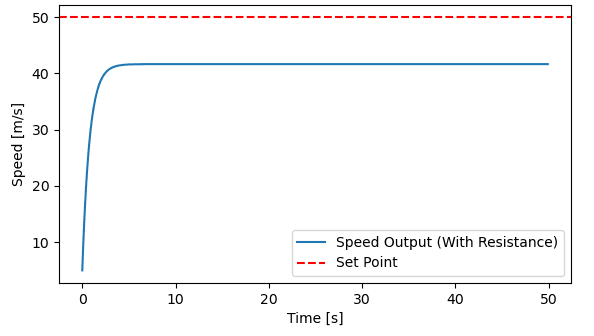
结果:
此代码做了一些假设:
- 我们假设油门和车速之间的关系是线性的,这意味着增加油门会增加速度。这就是为什么我们简单地做 .通过将 乘以 ,我们确保速度在每个小的时间间隔内逐渐变化,模拟逐渐变化。
speed += control * dt``control``dt - 为简单起见,我们假设在这个模型中,阻力与速度成线性比例。
我们首先定义 class,它接受
value、set-point 和 resistance 值。在 update 函数中,我们计算误差并将其乘以
得到节流。我们还包括 .PIDControllerWithResistance``self.set_point - current_value``output - self.resistance_factor * current_value
- 将阻力系数乘以当前速度 () 可创建一个更真实的模型,其中阻力随速度的增加而增加。
current_value - 通过从输出节气门值中减去这个阻力分量,我们模拟了需要更多的节气门来保持更高的速度,从而使车辆更难以更高的速度加速。
我们从 0 到 50 循环遍历时间戳,保持 0.1,并调用控制器的 update 函数来获得结果速度。然而,正如你所看到的,仅使用比例控制是不够的。尽管速度接近设定点,但它从未完全达到设定点。稳态和设定点之间的这种差值称为 。此时,误差变得如此之小,以至于即使将其乘以
也会导致最小的变化,而速度几乎保持不变。dt``Steady State Error
比例积分 (PI) 控制器
正如我们所看到的,响应速度接近设定点,但并没有完全达到它。为了解决这个问题,我们可以在 Proportional 控制器旁边添加一个 Integral 控制器。Integral 控制器查看过去的错误并随着时间的推移累积它们。这种正误差的累积有助于将响应推向更接近设定点。
在数学上,这可以写成

微分 (D) 控制器现已与 PI 控制器并联添加,形成比例-积分-微分 (PID) 控制器。该系统用于反馈回路中,以调节车辆的速度,通过考虑现在、过去和预测的未来误差来提高精度。将所需速度与实际速度进行比较以计算误差。该误差被馈送到三个控制器中:比例 (P) 控制器,对当前误差做出反应,积分 (I) 控制器,解释随时间累积的误差,以及导数 (D) 控制器,通过考虑误差的变化率来预测未来的误差。这些控制器的输出组合在一起以调整车辆的油门,并将实际速度反馈到系统中进行连续校正,确保以更高的精度和稳定性保持所需的速度。
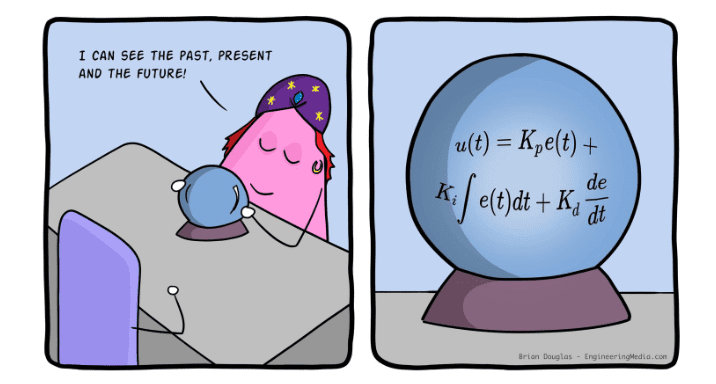
该方程式在编写时考虑了离散时间。 值通常是通过反复试验找到的,尽管有一些算法可用于调整增益值。表示导数收益。
以下是 PID 控制器的 python 代码
python
import numpy as np
import matplotlib.pyplot as plt
from matplotlib.widgets import Slider

# Define PID Controller class with resistance
class PIDControllerWithResistance:
    def __init__(self, Kp, Ki, Kd, set_point=0, resistance_factor=0.1):
        self.Kp = Kp
        self.Ki = Ki
        self.Kd = Kd
        self.set_point = set_point
        self.prev_error = 0
        self.integral = 0
        self.resistance_factor = resistance_factor  # Resistance to throttle (e.g., air resistance, friction)

    def update(self, current_value, dt):
        # Apply the same PID control logic but factor in resistance
        error = self.set_point - current_value
        self.integral += error * dt
        derivative = (error - self.prev_error) / dt
        output = self.Kp * error + self.Ki * self.integral + self.Kd * derivative
        self.prev_error = error
        return output - self.resistance_factor * current_value  # Reduce output by a resistance factor

# Simulation parameters
dt = 0.1  # Time step
time = np.arange(0, 50, dt)  # Simulation time

# Initialize the PID controller with disturbance (resistance)
pid_with_resistance = PIDControllerWithResistance(Kp=1.0, Ki=0.05, Kd=0.01, set_point=50, resistance_factor=0.05)

# Initial conditions
speed = 0
throttle_with_resistance = []
speed_record_with_resistance = []

# Simulate the system with resistance
for t in time:
    control = pid_with_resistance.update(speed, dt)
    speed += control * dt  # Speed is affected by throttle control and resistance
    throttle_with_resistance.append(control)
    speed_record_with_resistance.append(speed)

# Plot setup
fig, ax = plt.subplots()
plt.subplots_adjust(left=0.1, bottom=0.3)

l, = plt.plot(time, speed_record_with_resistance, label="Velocity Output (With Resistance)")
plt.axhline(pid_with_resistance.set_point, color='r', linestyle='--', label='Set Point')
plt.xlabel('Time [s]')
plt.ylabel('Velocity [m/s]')
plt.title('PID Cruise Control with Resistance')
plt.legend()
plt.show()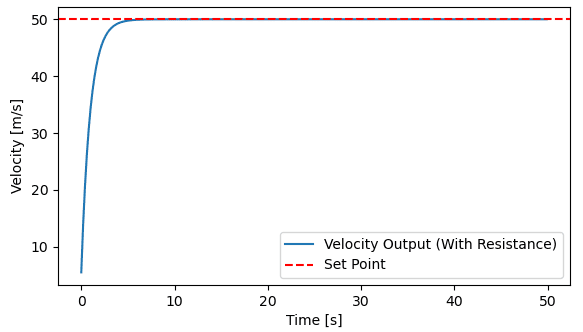
该代码与 PI 控制器代码非常相似,只是在 PI 控制器输出中添加了导数项。它的计算公式为 。derivative = (error - self.prev_error) / dt
总结 PID 控制器,P 查看当前错误,I 查看过去的错误,D 预测未来的错误。它们共同调节输出响应以达到所需的结果。
横向控制简介
当将机器人从一个位置移动到另一个位置时,仅使用速度控制(通常称为纵向控制)不足以确保准确的路径跟踪。虽然纵向控制控制机器人的速度,但规划器通常会生成一个由从机器人当前位置到目标的 3D 航路点组成的轨迹。为了有效地遵循这一轨迹,机器人还需要横向控制,调整其转向角度或方向以保持所需的路径。横向控制对于处理偏差、确保平稳导航和实现精确定位至关重要,尤其是在复杂环境中移动时。
有各种类型的侧向控制器旨在处理此任务,每种类型都适用于不同的应用和条件。这些控制器可以大致分为几何控制器和动态控制器。
- 几何控制器:
- Pure Pursuit (胡萝卜追随)
- 赤 柱
- PID (PID)
- 动态控制器:
- MPC 控制器
- 其他控制系统
- 滑动模式、反馈线性化等
CARLA ROS2 集成
现在我们已经了解了 PID 控制器,让我们使用它在 CARLA 中移动我们的车辆。只有两个主文件用于执行此作,并且 ;我们将一一介绍它们。vehicle_ctrl.py``lat_lon_ctrl.py
首先了解 中的纵向和横向控制代码。下面的代码取自 CARLA 本身,略有修改。lat_lon_ctrl.py
python
from collections import deque
import math
import numpy as np
import carla
from agents.tools.misc import get_speed

...

class PIDLongitudinalController():
    """
    PIDLongitudinalController implements longitudinal control using a PID.
    """

    def __init__(self, vehicle, K_P=1.0, K_I=0.0, K_D=0.0, dt=0.03):
        """
        Constructor method.

            :param vehicle: actor to apply to local planner logic onto
            :param K_P: Proportional term
            :param K_D: Differential term
            :param K_I: Integral term
            :param dt: time differential in seconds
        """
        self._vehicle = vehicle
        self._k_p = K_P
        self._k_i = K_I
        self._k_d = K_D
        self._dt = dt
        self._error_buffer = deque(maxlen=10)

    def run_step(self, target_speed, debug=False):
        """
        Execute one step of longitudinal control to reach a given target speed.

            :param target_speed: target speed in Km/h
            :param debug: boolean for debugging
            :return: throttle control
        """
        current_speed = get_speed(self._vehicle)

        if debug:
            print('Current speed = {}'.format(current_speed))

        return self._pid_control(target_speed, current_speed)

    def _pid_control(self, target_speed, current_speed):
        """
        Estimate the throttle/brake of the vehicle based on the PID equations

            :param target_speed:  target speed in Km/h
            :param current_speed: current speed of the vehicle in Km/h
            :return: throttle/brake control
        """

        error = target_speed - current_speed
        self._error_buffer.append(error)

        if len(self._error_buffer) >= 2:
            _de = (self._error_buffer[-1] - self._error_buffer[-2]) / self._dt
            _ie = sum(self._error_buffer) * self._dt
        else:
            _de = 0.0
            _ie = 0.0

        return np.clip((self._k_p * error) + (self._k_d * _de) + (self._k_i * _ie), -1.0, 1.0)

    def change_parameters(self, K_P, K_I, K_D, dt):
        """Changes the PID parameters"""
        self._k_p = K_P
        self._k_i = K_I
        self._k_d = K_D
        self._dt = dt


class PIDLateralController():
    """
    PIDLateralController implements lateral control using a PID.
    """

    def __init__(self, vehicle, offset=0, K_P=1.0, K_I=0.0, K_D=0.0, dt=0.03):
        """
        Constructor method.

            :param vehicle: actor to apply to local planner logic onto
            :param offset: distance to the center line. If might cause issues if the value
                is large enough to make the vehicle invade other lanes.
            :param K_P: Proportional term
            :param K_D: Differential term
            :param K_I: Integral term
            :param dt: time differential in seconds
        """
        self._vehicle = vehicle
        self._k_p = K_P
        self._k_i = K_I
        self._k_d = K_D
        self._dt = dt
        self._offset = offset
        self._e_buffer = deque(maxlen=10)

    def run_step(self, waypoint):
        """
        Execute one step of lateral control to steer
        the vehicle towards a certain waypoin.

            :param waypoint: target waypoint
            :return: steering control in the range [-1, 1] where:
            -1 maximum steering to left
            +1 maximum steering to right
        """
        return self._pid_control(waypoint, self._vehicle.get_transform())

    def _pid_control(self, waypoint, vehicle_transform):
        """
        Estimate the steering angle of the vehicle based on the PID equations

            :param waypoint: target waypoint
            :param vehicle_transform: current transform of the vehicle
            :return: steering control in the range [-1, 1]
        """
        # Get the ego's location and forward vector
        ego_loc = vehicle_transform.location
        v_vec = vehicle_transform.get_forward_vector()
        v_vec = np.array([v_vec.x, v_vec.y, 0.0])

        # Get the vector vehicle-target_wp
        if self._offset != 0:
            # Displace the wp to the side
            w_tran = waypoint
            r_vec = w_tran.get_right_vector()
            w_loc = w_tran.location + carla.Location(x=self._offset*r_vec.x,
                                                         y=self._offset*r_vec.y)
        else:
            w_loc = waypoint.location

        w_vec = np.array([w_loc.x - ego_loc.x,
                          w_loc.y - ego_loc.y,
                          0.0])

        wv_linalg = np.linalg.norm(w_vec) * np.linalg.norm(v_vec)
        if wv_linalg == 0:
            _dot = 1
        else:
            _dot = math.acos(np.clip(np.dot(w_vec, v_vec) / (wv_linalg), -1.0, 1.0))
        _cross = np.cross(v_vec, w_vec)
        if _cross[2] < 0:
            _dot *= -1.0

        self._e_buffer.append(_dot)
        if len(self._e_buffer) >= 2:
            _de = (self._e_buffer[-1] - self._e_buffer[-2]) / self._dt
            _ie = sum(self._e_buffer) * self._dt
        else:
            _de = 0.0
            _ie = 0.0

        return np.clip((self._k_p * _dot) + (self._k_d * _de) + (self._k_i * _ie), -1.0, 1.0)

    def change_parameters(self, K_P, K_I, K_D, dt):
        """Changes the PID parameters"""
        self._k_p = K_P
        self._k_i = K_I
        self._k_d = K_D
        self._dt = dt
纵向控制
PIDLongitudinalControllerclass 包含纵向控制的代码,我们首先初始化 PID 增益、Carla Vehicle 实例和误差缓冲区(用于 D-Control)。 是从外部函数迭代调用 PID 更新的函数的函数。真正的魔力在于函数内部。实现非常简单,类似于上面的 PID 实现。我们首先计算误差,填充列表。如果有 2 个以上的元素,那么我们计算导数误差 () 和积分误差 (),最后通过将其从 -1 裁剪到 1 来返回总控制输出为 。run_step``_pid_control``_pid_control``error = target_speed - current_speed``self._error_buffer``self._error_buffer``_de``_ie``np.clip((self._k_p * error) + (self._k_d * _de) + (self._k_i * _ie), -1.0, 1.0)
横向控制
横向控制有点棘手。在跳入代码之前,我们先看看横向误差是如何计算的。误差表示为无人机前向矢量和航路点矢量之间的有符号角。角度的标志是根据车辆是在所需路径的左侧还是右侧来决定。角度应为正 (向右) 或负 (向左)。
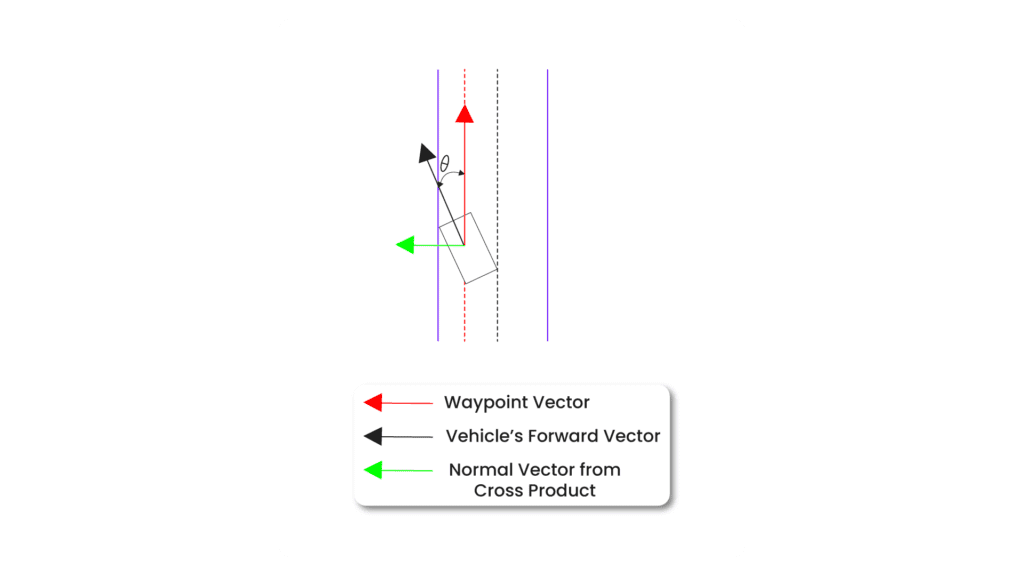
在自动驾驶汽车的横向控制中,主要目标是使车辆保持在正确的轨迹或路径上。车辆的横向控制通常与最小化与该所需路径的偏差有关,这是通过控制转向角来实现的。您提供的代码使用 PID (Proportional, Integral, Derivative) 控制器根据此偏差调整车辆的转向角。
让我们来看看代码。 是定义横向控制的位置。以下是误差角的计算方法,PIDLateralController
- 车辆的前向矢量 (v_vec):
正向向量表示无人机当前移动的方向,该方向源自无人机的变换 ()。它是一个 3D 向量,但由于车辆在 2D 平面上移动,因此仅使用 x 和 y 分量。vehicle_transform.get_forward_vector()

- 航点矢量 ():
w_vec
航路点向量表示从机体的当前位置 () 到目标航路点 () 的方向:ego_loc``w_loc
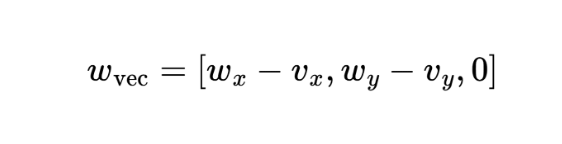
- 点积和角度:
机体航向与目标航点之间的误差由机体的前向矢量与航点矢量之间的角度来测量。这是使用点积和这些向量的大小计算的:
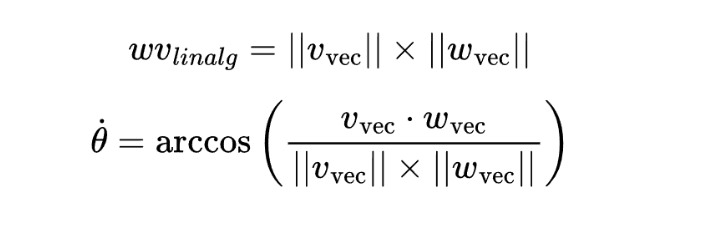
此角度 () 表示以弧度为单位的横向误差。_dot
- Sign 的叉积:
为了确定无人机是在所需路径的左侧还是右侧(即误差的符号),计算前向矢量和航点矢量之间的叉积:

叉积的第三个分量(z 分量)的符号确定角度应该是正 (向右) 还是负 (向左)。如果 z 分量为负,则角度反转:
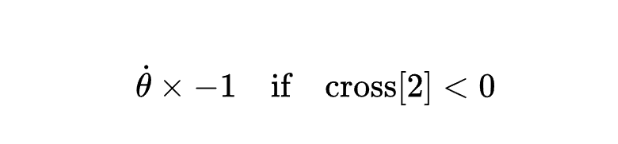
因此,横向误差 () 是一个有符号角度,表示无人机需要转向多少才能与航点对齐。_dot
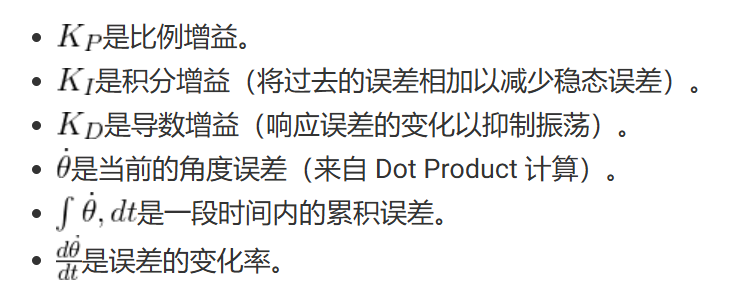
PID 控制应用
错误 () 被传递到 PID 控制器中,PID 控制器使用以下公式:_dot

现在我们已经完成了 PID 控制,让我们看看如何使用 ROS 2 运行它。
现在让我们来看看 .vehicle_ctrl.py
python
class CarlaVehicleControl(Node):
    def __init__(self):
        super().__init__('carla_route_planner')


        # Subscribers
        self.initialpose_sub = self.create_subscription(
            PoseWithCovarianceStamped,
            '/initialpose',
            self.initialpose_callback,
            10
        )
        self.goal_pose_sub = self.create_subscription(
            PoseStamped,
            '/goal_pose',
            self.goal_pose_callback,
            10
        )
        self.waypt_sub = self.create_subscription(
            Path,
            '/carla/ego_vehicle/waypoints',
            self.waypoints_callback,
            10
        )
        # Subscriber to the /carla/ego_vehicle/odometry topic
        self.odom_sub = self.create_subscription(
            Odometry,
            '/carla/ego_vehicle/odometry',
            self.odometry_callback,
            10)


        self.vehicle_control_publisher = self.create_publisher(CarlaEgoVehicleControl,
                                                      '/carla/ego_vehicle/vehicle_control_cmd',
                                                      10)

        # Initialize Carla client and map
        self.client = Client('localhost', 2000)
        self.client.set_timeout(10.0)

        # Get the current world
        self.world = self.client.get_world()


        # Check if Town01 is already loaded
        if 'Town01' not in self.world.get_map().name:
            print("Town01 is not loaded. Loading Town01...")
            self.world = self.client.load_world('Town01')
            print("Done!")
        else:
            print("Town01 is already loaded.")


        self.map = self.world.get_map()
        # Initialize GlobalRoutePlanner
        self.route_planner = GlobalRoutePlanner(self.map, 2.0)

        # Get all actors (vehicles, pedestrians, etc.) in the world
        self.actors = self.world.get_actors()

        # Filter to get only the vehicles get the 0-th veh as there is only one veh
        self.vehicle = self.actors.filter('vehicle.*')[0]

        # Placeholders for start and end poses
        self.start_pose = None
        self.end_pose = None
        self.waypoints_list = []
        self.odom = None

        # TF2 listener and buffer
        # self.tf_buffer = Buffer()
        # self.tf_listener = TransformListener(self.tf_buffer, self)
        # self.vehicle_loc = None

    def odometry_callback(self, msg):


        self.get_logger().info(f"Received odometry data: {msg.pose.pose.position.x}, {msg.pose.pose.position.y}, {msg.pose.pose.position.z}")

        # Extract position and orientation from Odometry message
        x = msg.pose.pose.position.x
        y = -msg.pose.pose.position.y
        z = msg.pose.pose.position.z

        print(" ^^^^ ODOM XYZ: ", x,y,z )

        orientation_q = msg.pose.pose.orientation
        roll, pitch, yaw = euler_from_quaternion(
            [orientation_q.x, orientation_q.y, orientation_q.z, orientation_q.w])

        # Create a carla.Location object
        location = carla.Location(x=x, y=y, z=z)

        # Create a carla.Rotation object
        rotation = carla.Rotation(roll=roll, pitch=pitch, yaw=yaw)

        # Create a carla.Transform object
        transform = carla.Transform(location, rotation)

        self.odom = transform

    def waypoints_callback(self, msg):
        # self.waypoints_list.clear()  # Clear the list before storing new waypoints

        # Iterate through all the waypoints in the Path message
        for pose in msg.poses:
            # Extract the position from the pose
            x = pose.pose.position.x
            y = -pose.pose.position.y
            z = pose.pose.position.z

            # Extract the orientation (quaternion) from the pose
            orientation_q = pose.pose.orientation
            roll, pitch, yaw = euler_from_quaternion(
                [orientation_q.x, orientation_q.y, orientation_q.z, orientation_q.w])

            # Create a carla.Location object
            location = carla.Location(x=x, y=y, z=z)

            # Create a carla.Rotation object
            rotation = carla.Rotation(roll=roll, pitch=pitch, yaw=yaw)

            # Create a carla.Transform object
            transform = carla.Transform(location, rotation)

            # Store the Waypoint in the global list
            self.waypoints_list.append(transform)

            self.get_logger().info(f"Stored {len(self.waypoints_list)} waypoints as carla.libcarla.Waypoint objects.")

    def create_ctrl_msg(self, throttle, steer, brake):
        control_msg = CarlaEgoVehicleControl()
        control_msg.throttle = throttle
        control_msg.steer = steer
        control_msg.brake = brake
        return control_msg

    def initialpose_callback(self, msg):
        self.get_logger().info("Received initialpose")
        self.start_pose = msg.pose.pose

    def goal_pose_callback(self, msg):
        self.get_logger().info("Received goal_pose")
        self.end_pose = msg.pose
        # Clear the waypoints list for the new goal
        self.waypoints_list.clear()
    def get_transform(self, vehicle_location, angle, d=6.4):
        a = math.radians(angle)
        location = carla.Location(
            d * math.cos(a), d * math.sin(a), 2.0) + vehicle_location
        return carla.Transform(location, carla.Rotation(yaw=180 + angle, pitch=-15))

    def setup_PID(self, vehicle):
        """
        This function creates a PID controller for the vehicle passed to it
        """
        args_lateral_dict = {
            'K_P': 0.5,  # Reduced proportional gain for smoother steering
            'K_D': 0.1,  # Small derivative gain to dampen oscillations
            'K_I': 0.01, # Small integral gain to correct for long-term drift
            'dt': 0.05
        }

        args_long_dict = {
            'K_P': 0.2,  # Slightly lower gain for acceleration control
            'K_D': 0.3,  # Moderate derivative gain
            'K_I': 0.01, # Small integral gain
            'dt': 0.05
        }

        PID= VehiclePIDController(vehicle,args_lateral=args_lateral_dict,args_longitudinal=args_long_dict)

        return PID


    def find_dist_veh(self, vehicle_loc,target):
        dist = math.sqrt( (target.location.x - vehicle_loc.x)**2 + \
                         (target.location.y - vehicle_loc.y)**2 )

        return dist


    def drive_through_plan(self, planned_route, vehicle, speed, PID):
        """
        This function drives throught the planned_route with the speed passed in the argument

        """

        i=0
        waypt_cnt = len(planned_route)-1
        target=planned_route[0]

        cnt = 0
        while True:

            self.world.get_spectator().set_transform(self.get_transform(vehicle.get_location() +
                                                                carla.Location(z=1, x=0.5),
                                                                vehicle.get_transform().rotation.yaw-180))

            # vehicle_loc =  vehicle.get_location()
            vehicle_loc =  self.odom.location

            distance_v = self.find_dist_veh(vehicle_loc,target)


            control = PID.run_step(speed,target)
            # vehicle.apply_control(control)
            ctrl_msg = self.create_ctrl_msg(control.throttle,
                                            control.steer,
                                            control.brake)
            self.vehicle_control_publisher.publish(ctrl_msg)

            if i==(len(planned_route)-1):
                print("last waypoint reached")
                break


            if (distance_v<3.5):

                control = PID.run_step(speed,target)
                # vehicle.apply_control(control)
                ctrl_msg = self.create_ctrl_msg(control.throttle,
                            control.steer,
                            control.brake)
                self.vehicle_control_publisher.publish(ctrl_msg)
                i=i+1
                target=planned_route[i]


            if cnt%5==0:
                print("=----------------------------------------------------------")
                print(f"\n{GREEN} ***** from current loc to {i}/{waypt_cnt} waypoint distance: {distance_v}{RESET}\n")
                print("ROS2 vehilce location: ", self.odom.location)
                print("CARLA vehilce location: ", vehicle.get_location())
                print("target location: ", target.location)
                rclpy.spin_once(self)

            # time.sleep(0.1)  # Add a slight delay to reduce control frequency
            # time.sleep(1)  # Add a 1-second delay

            # print("throttle: ", control.throttle)
            cnt+=1

        control = PID.run_step(0,planned_route[len(planned_route)-1])
        # vehicle.apply_control(control)
        ctrl_msg = self.create_ctrl_msg(control.throttle,
                            control.steer,
                            control.brake)
        self.vehicle_control_publisher.publish(ctrl_msg)


    def run(self):
        desired_velocity=10 #Km/h

        while rclpy.ok():
            rclpy.spin_once(self)

            if self.start_pose is None or self.end_pose is None:
                self.get_logger().info(f'Start pose: {self.start_pose}, End pose: {self.end_pose}')

            elif not self.waypoints_list:
                self.get_logger().info('Waiting for waypoints to be generated...')

            else:
                # Delay to ensure waypoints are populated
                self.get_logger().info('Waiting a bit for waypoints to be fully populated...')
                time.sleep(1)  # Add a 1-second delay
                self.get_logger().info(f'Generated {len(self.waypoints_list)} waypoints from start to end pose')


                # calculating life time of the marker
                total_dist = self.find_dist_veh(self.waypoints_list[0].location, self.waypoints_list[len(self.waypoints_list)-1])
                marker_life_time = (total_dist/desired_velocity) * 3.6


                # Draw waypoints on the Carla map
                for w in self.waypoints_list:
                    # print("self.waypoints_list: ",w.location)
                    self.world.debug.draw_string(w.location, 'O', draw_shadow=False,
                                                 color=Color(r=255, g=0, b=0), life_time=5000000.0,
                                                 persistent_lines=True)


                # drive the vehicle
                PID=self.setup_PID(self.vehicle)
                self.drive_through_plan(self.waypoints_list,self.
                                        vehicle,desired_velocity,
                                        PID)


                # After processing, break the loop if needed
                break

def main(args=None):
    rclpy.init(args=args)
    route_planner = CarlaVehicleControl()
    route_planner.run()
    rclpy.shutdown()
如果您一直在关注 robotics 系列,上面的代码应该很容易理解。代码的核心在于 and 函数。run()``drive_through_plan()
-
调用 main 函数时,回调将转到该函数。您会注意到我们没有使用 ,而是使用 .这是因为 Continuous 旋转以收集所有已发布的数据。然而,我们不能仅仅为了这个目的而旋转------我们还需要根据输入来移动车辆。如果我们只关注这一点,我们可能会错过已发布的数据,导致车辆失控并可能撞墙。
这可以通过以下方式处理:
run()``rclpy.spin()``rclpy.spin_once(self)``rclpy.spin()- 在单独的线程中运行这两个任务。
- 运行 with 来收集已发布的数据,在循环中时,定期使用 来更新 subscriber 变量。
rclpy.spin_once()``while rclpy.ok()``drive_through_plan``rclpy.spin_once()
-
工作原理的解释如下:它首先设置一个目标轨迹点并进入一个 while 循环。此循环一直持续到飞机到达其目标位置。在循环中,它首先计算车辆位置与目标航点之间的距离,然后使用 PID 控制器根据所需的速度和目标航点计算转向和油门值。这些值将应用于车辆。此过程将重复,直到机体与目标航点之间的距离小于 3.5。此时,它会重新计算油门和转向值,应用它们,并更新目标航点。如果迭代到达最后一个航点,则车辆会根据所需的速度 0 制动并应用控制。此外,在该条件中,它会执行以更新里程计值。
drive_through_plan``if cnt%5==0:``rclpy.spin_once(self)
一切就绪后,剩下的工作就是运行代码并观察它的运行情况。
python
# in a new terminal, run carla first
# ./CarlaUE4.sh  # or ./CarlaUE4.sh -prefernvidia # $ ~/carla_simulator/PythonAPI/util/config.py --map Town01
$CARLA_ROOT/CarlaUE4.sh -quality-level=Low -prefernvidia -nosound

# in a new terminal, get inside the `carla-ros-bridge/colcon_ws` folder and source the workspace; launch the `carla ros-bridge`
cd ~/carla-ros-bridge/colcon_ws && source install/setup.bash
ros2 launch carla_ros_bridge carla_ros_bridge.launch.py synchronous_mode:=True town:=Town01 # <town number, eg: 03>


# in a new terminal, launch the objects.json; launch ros-bridge
# cd ~/carla-ros-bridge/colcon_ws
cd ~/carla-ros-bridge/colcon_ws && source install/setup.bash

ros2 launch carla_spawn_objects carla_example_ego_vehicle.launch.py spawn_sensors_only:=False objects_definition_file:=<absolute path to>/src/vehicle_ctrl/vehicle_ctrl/config/objects.json


# load the town1 lanelet map
python src/vehicle_ctrl/vehicle_ctrl/map.py


# in new terminal, launch the rviz2 [set the global frame to map in rviz2]
rviz2 -d /src/vehicle_ctrl/rviz2/carla_map_spawn_anywherev2.rviz


# in a new terminal, get inside the `carla-ros-bridge/colcon_ws` folder and source the workspace; waypoint publisher
cd ~/carla-ros-bridge/colcon_ws && source install/setup.bash
ros2 launch carla_waypoint_publisher carla_waypoint_publisher.launch.py


# goal remap
python src/vehicle_ctrl/vehicle_ctrl/remap_goal.py


# waypoint following using carls ros-bridge
python src/vehicle_ctrl/vehicle_ctrl/simple_ctrl.py