摘要:
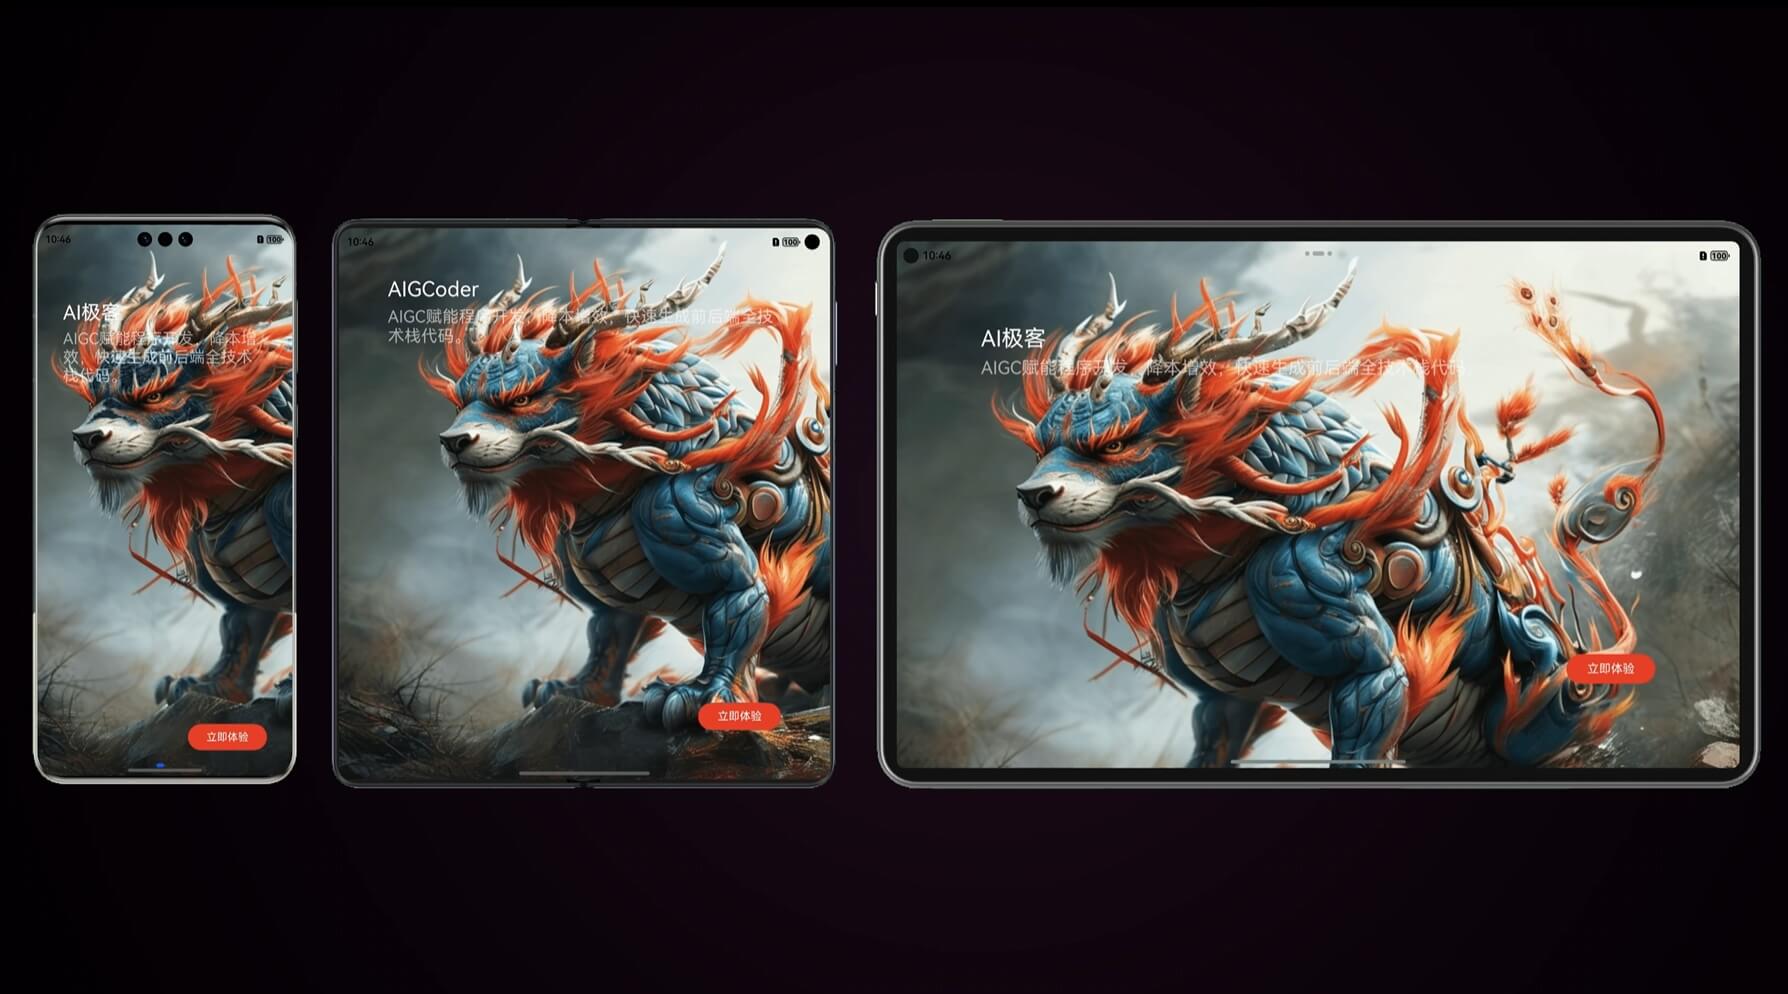
轮播图导航(A_SwiperNav):实现沉浸式体验的App全屏轮播引导页效果。可设置图片数据(含文本、图片地址、路由、标题、子标题),可设置按钮颜色。
一、在页面当中调用轮播图导航组件
打开"pages/lndex.ets",我们只需要输入"A_SwiperNav",然后给属性data和color赋值。如下图所示:
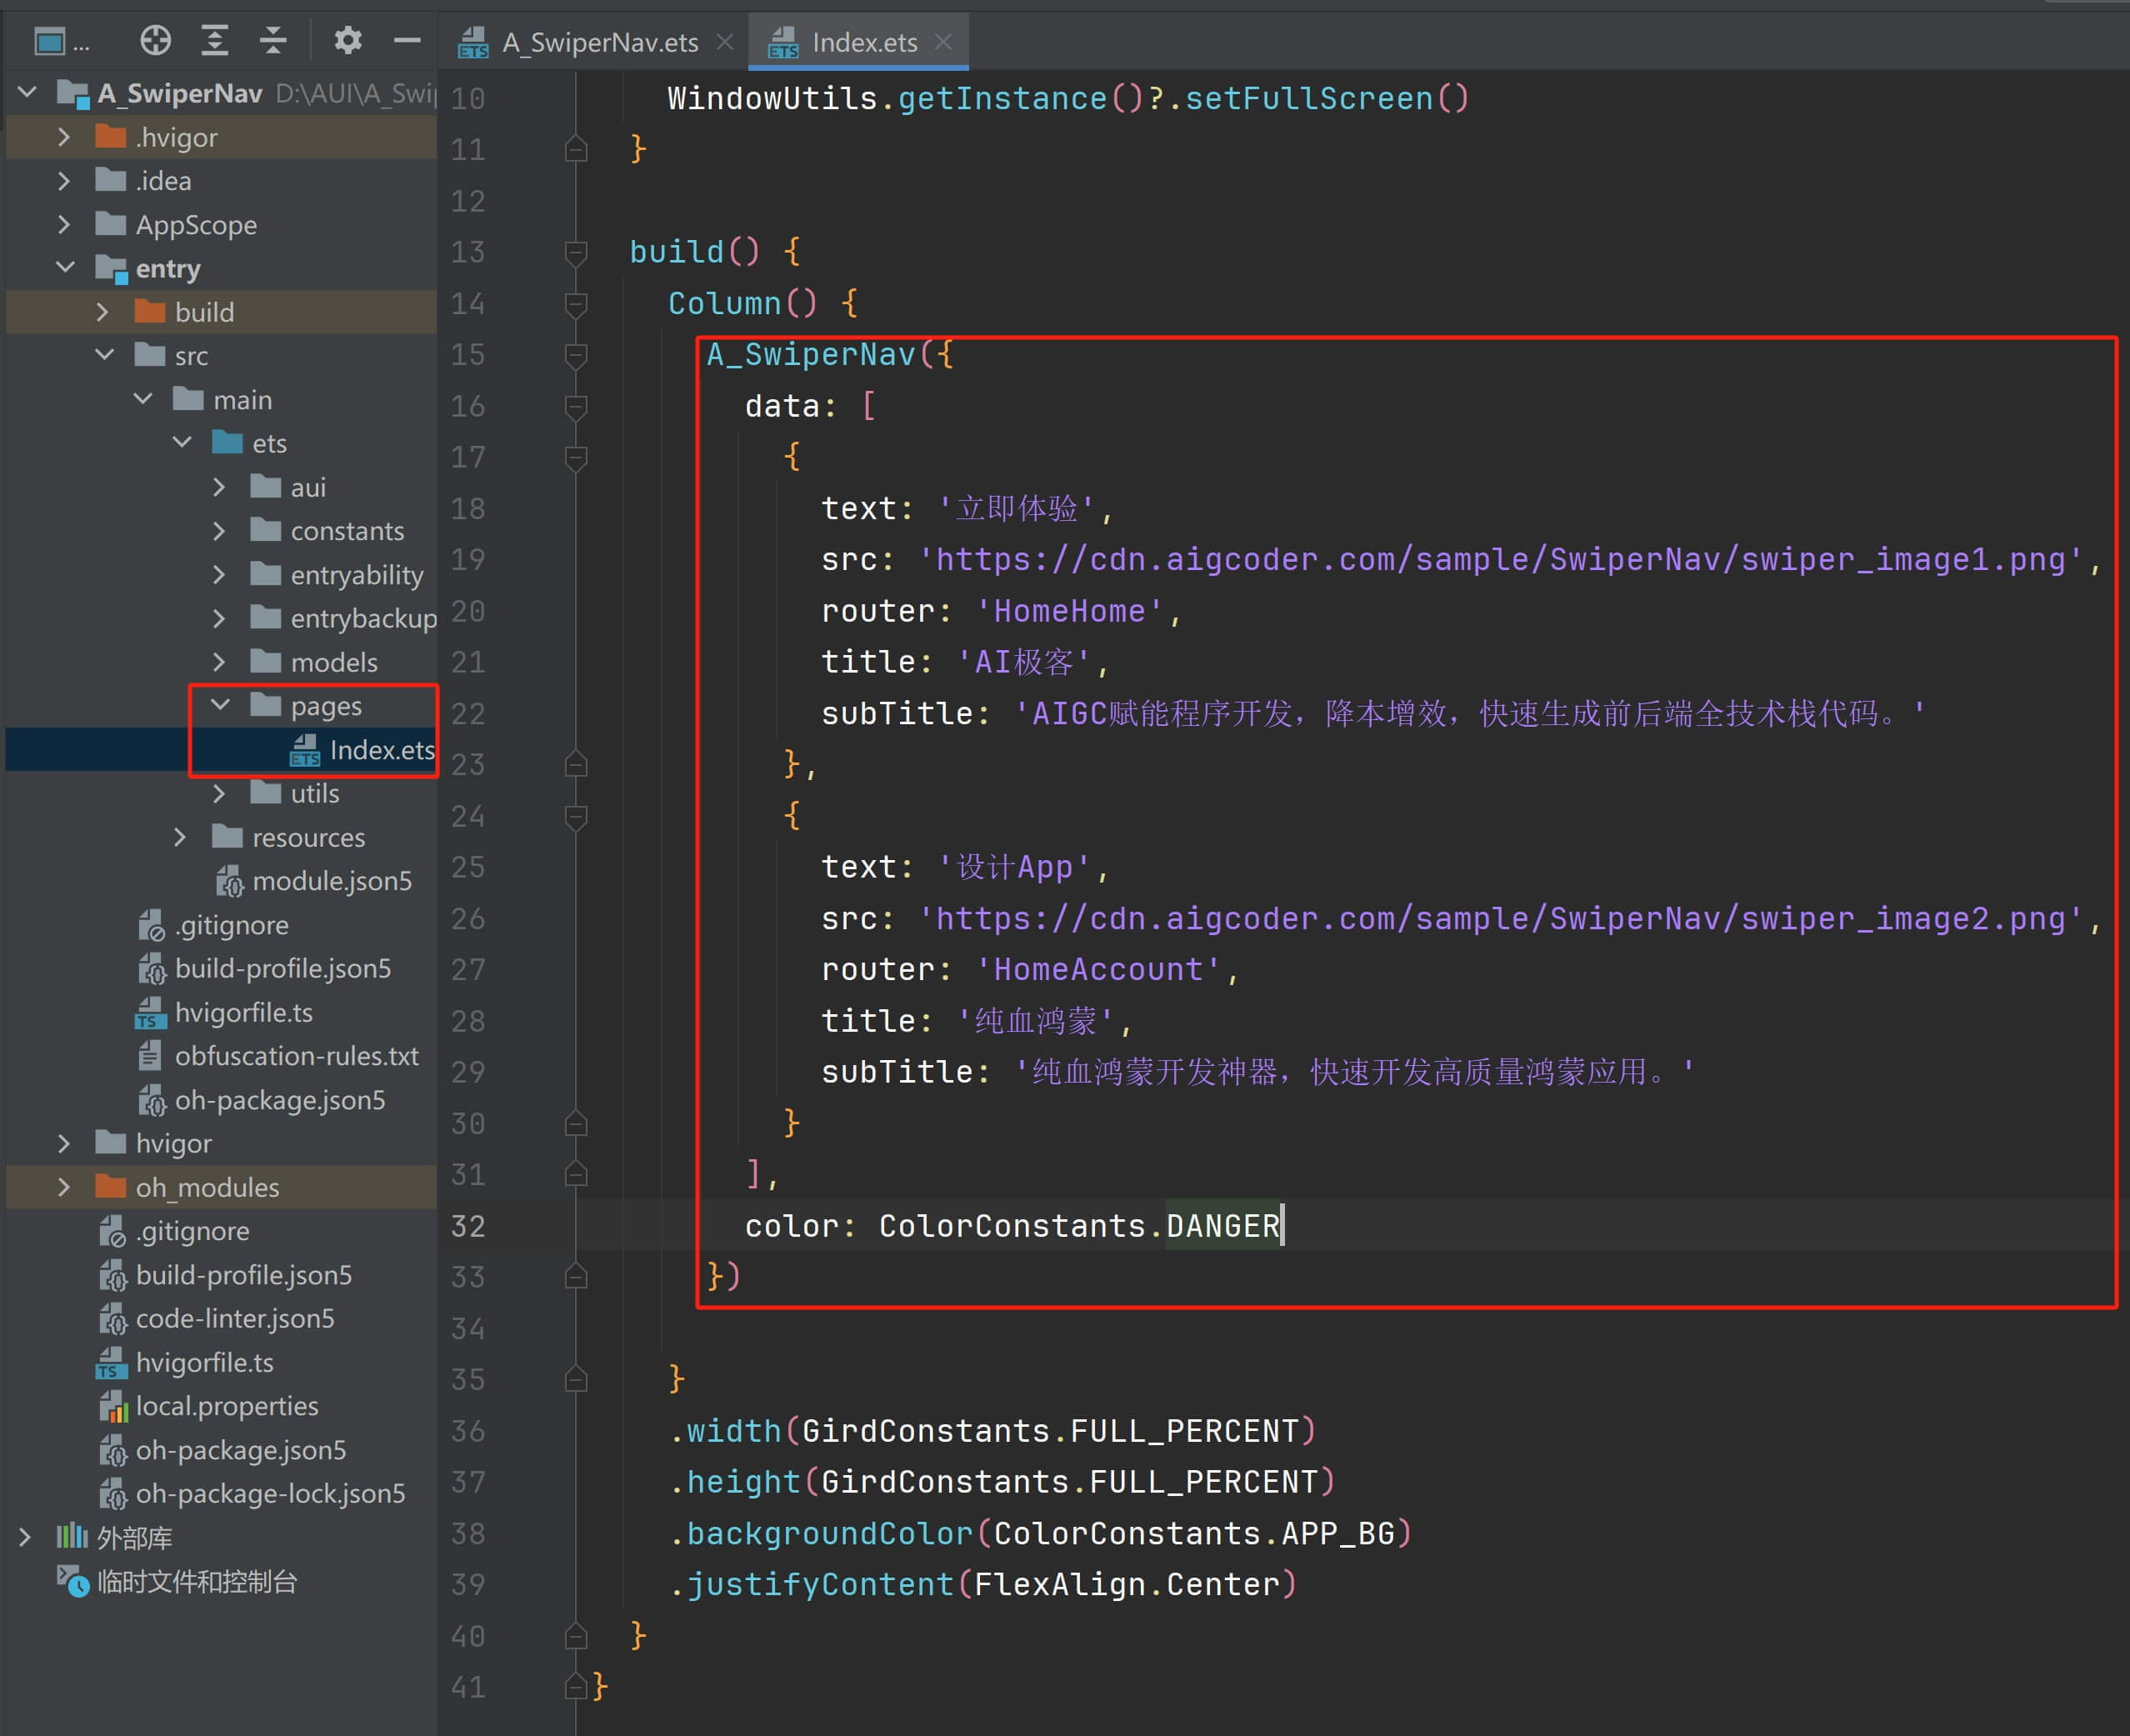
示范代码如下:
`import { A_SwiperNav } from '../aui/navigation/A_SwiperNav'
import { ColorConstants } from '../constants/ColorConstants'
import { GirdConstants } from '../constants/GirdConstants'
import { WindowUtils } from '../utils/WindowUtils'
@Entry
@Component
struct Index {
aboutToAppear() {
WindowUtils.getInstance()?.setFullScreen()
}
build() {
Column() {
A_SwiperNav({
data: [
{
text: '立即体验',
src: 'https://cdn.aigcoder.com/sample/SwiperNav/swiper_image1.png',
router: 'HomeHome',
title: 'AI极客',
subTitle: 'AIGC赋能程序开发,降本增效,快速生成前后端全技术栈代码。'
},
{
text: '设计App',
src: 'https://cdn.aigcoder.com/sample/SwiperNav/swiper_image2.png',
router: 'HomeAccount',
title: '纯血鸿蒙',
subTitle: '纯血鸿蒙开发神器,快速开发高质量鸿蒙应用。'
}
],
color: ColorConstants.DANGER
})
}
.width(GirdConstants.FULL_PERCENT)
.height(GirdConstants.FULL_PERCENT)
.backgroundColor(ColorConstants.APP_BG)
.justifyContent(FlexAlign.Center)
}
}
`
在DevEco Studio中选择本地模拟器,然后运行示范项目,效果如下:

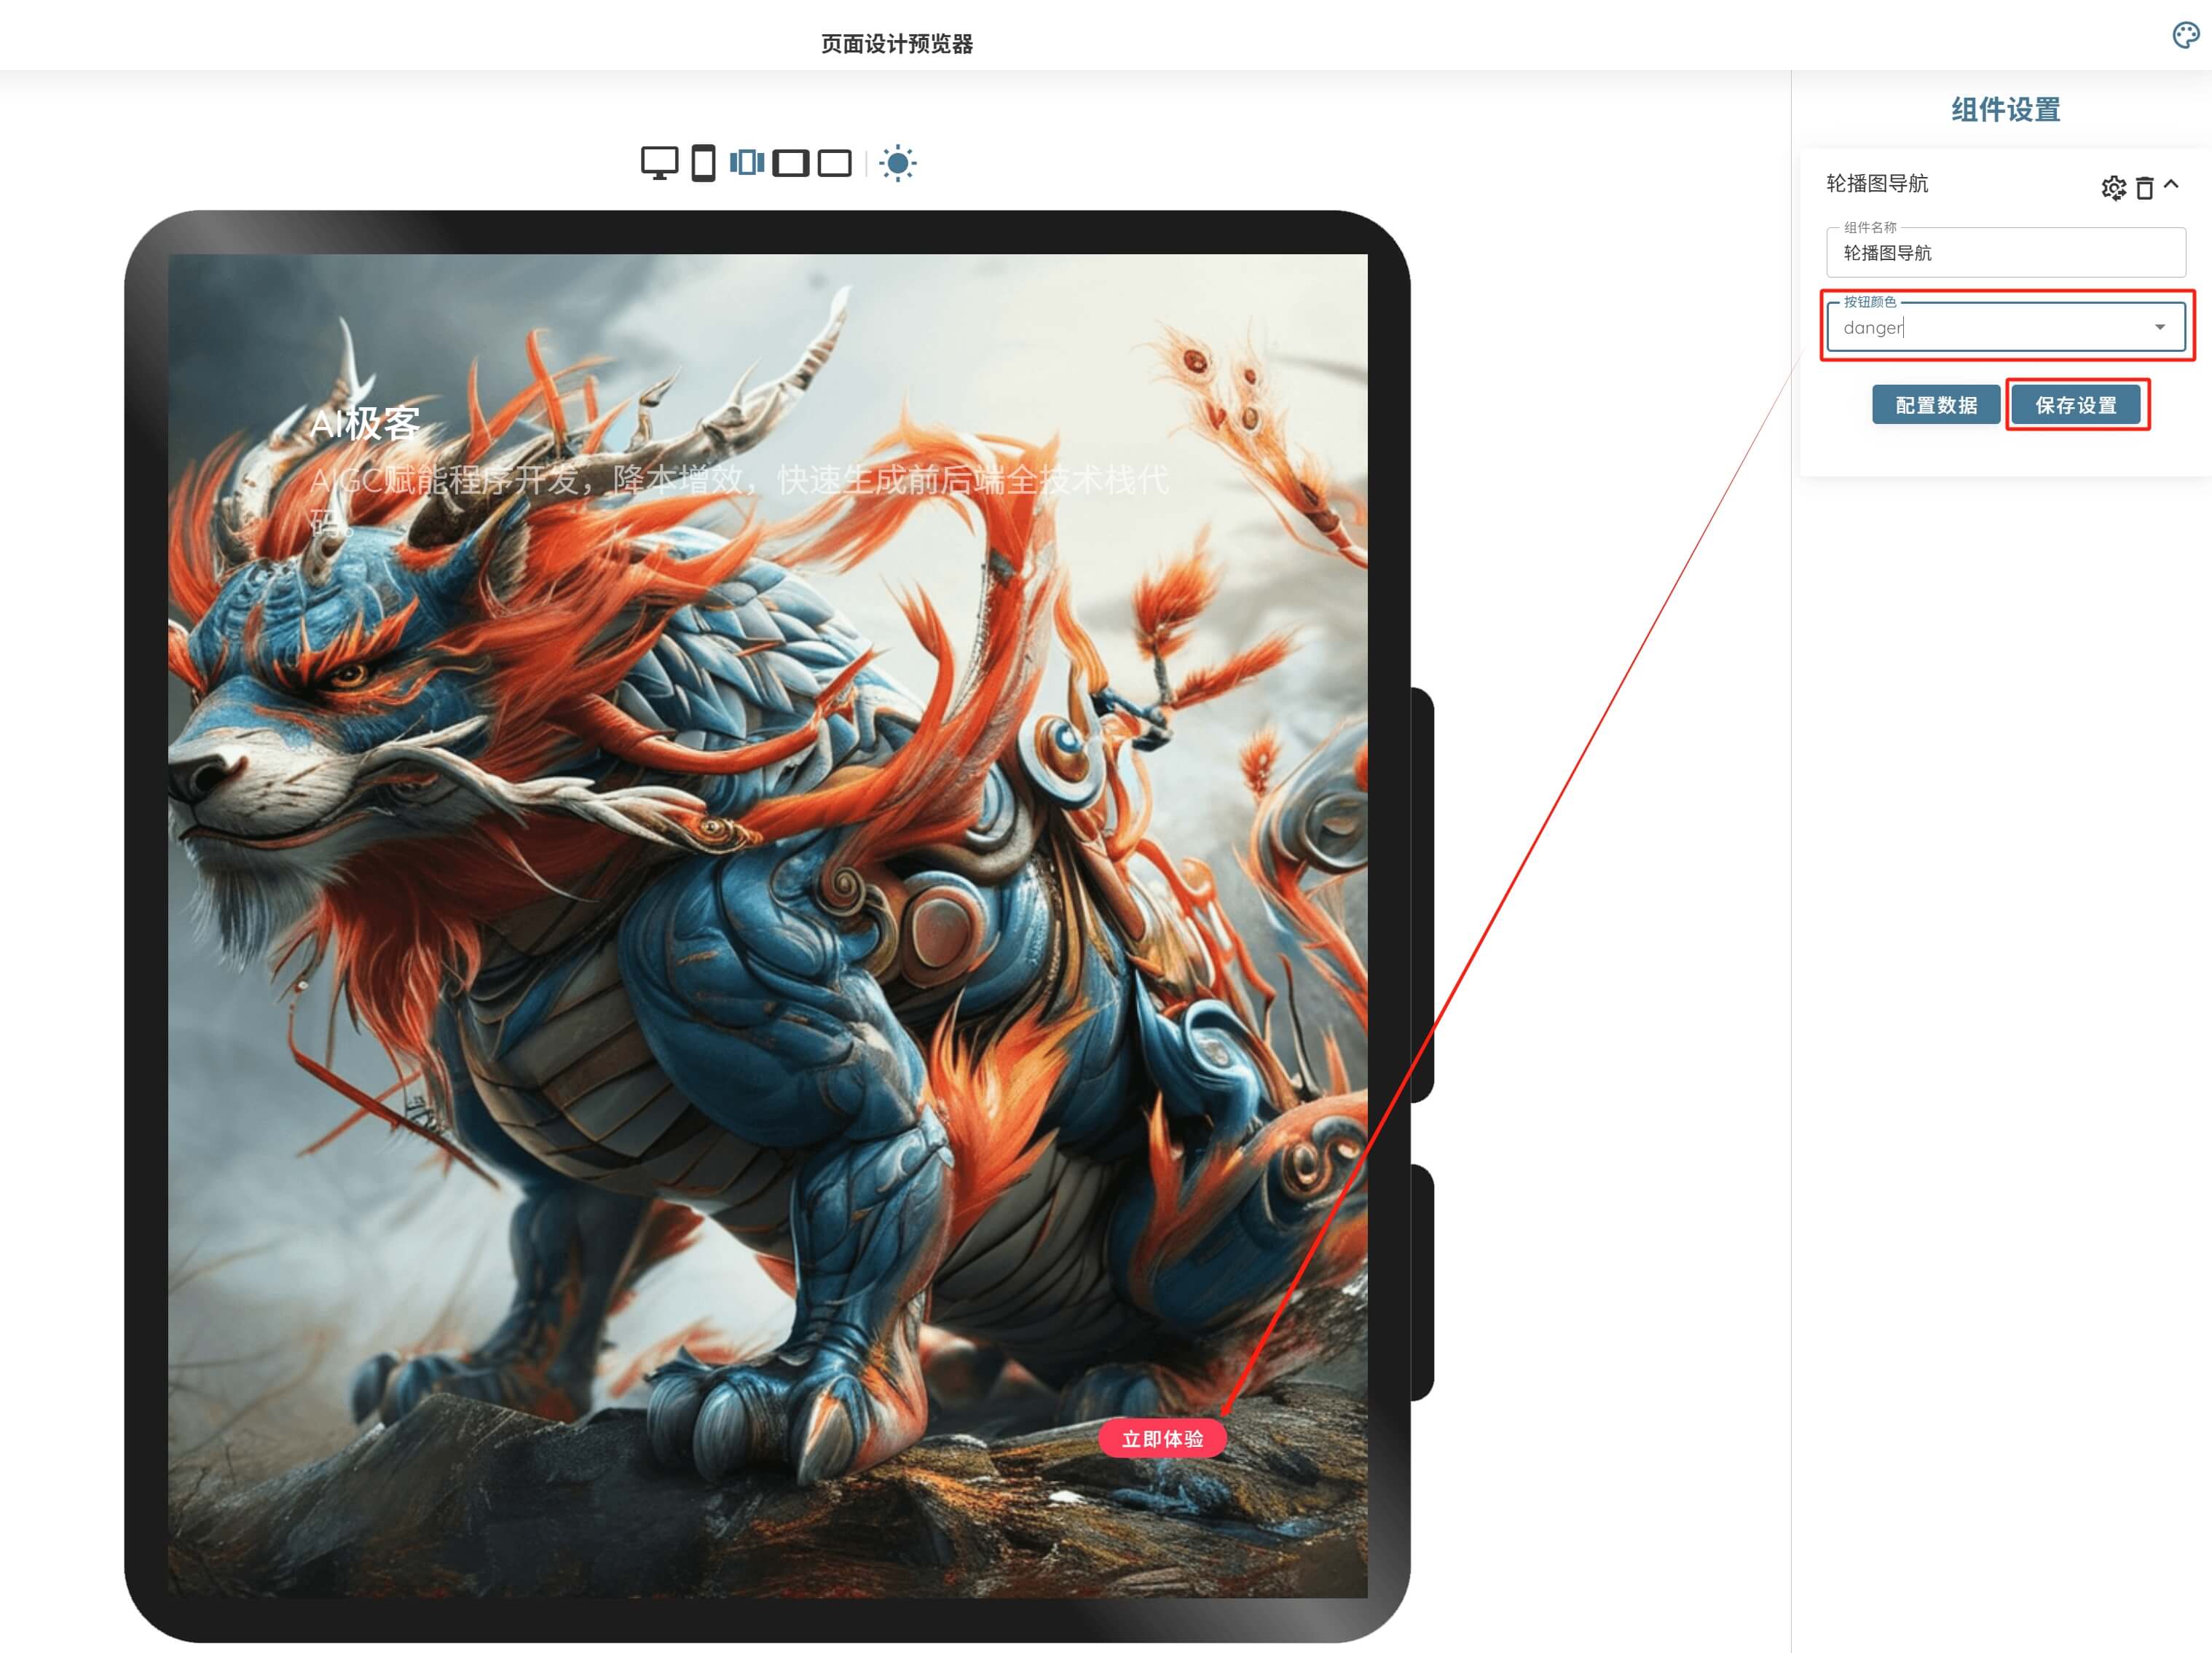
二、在线排版
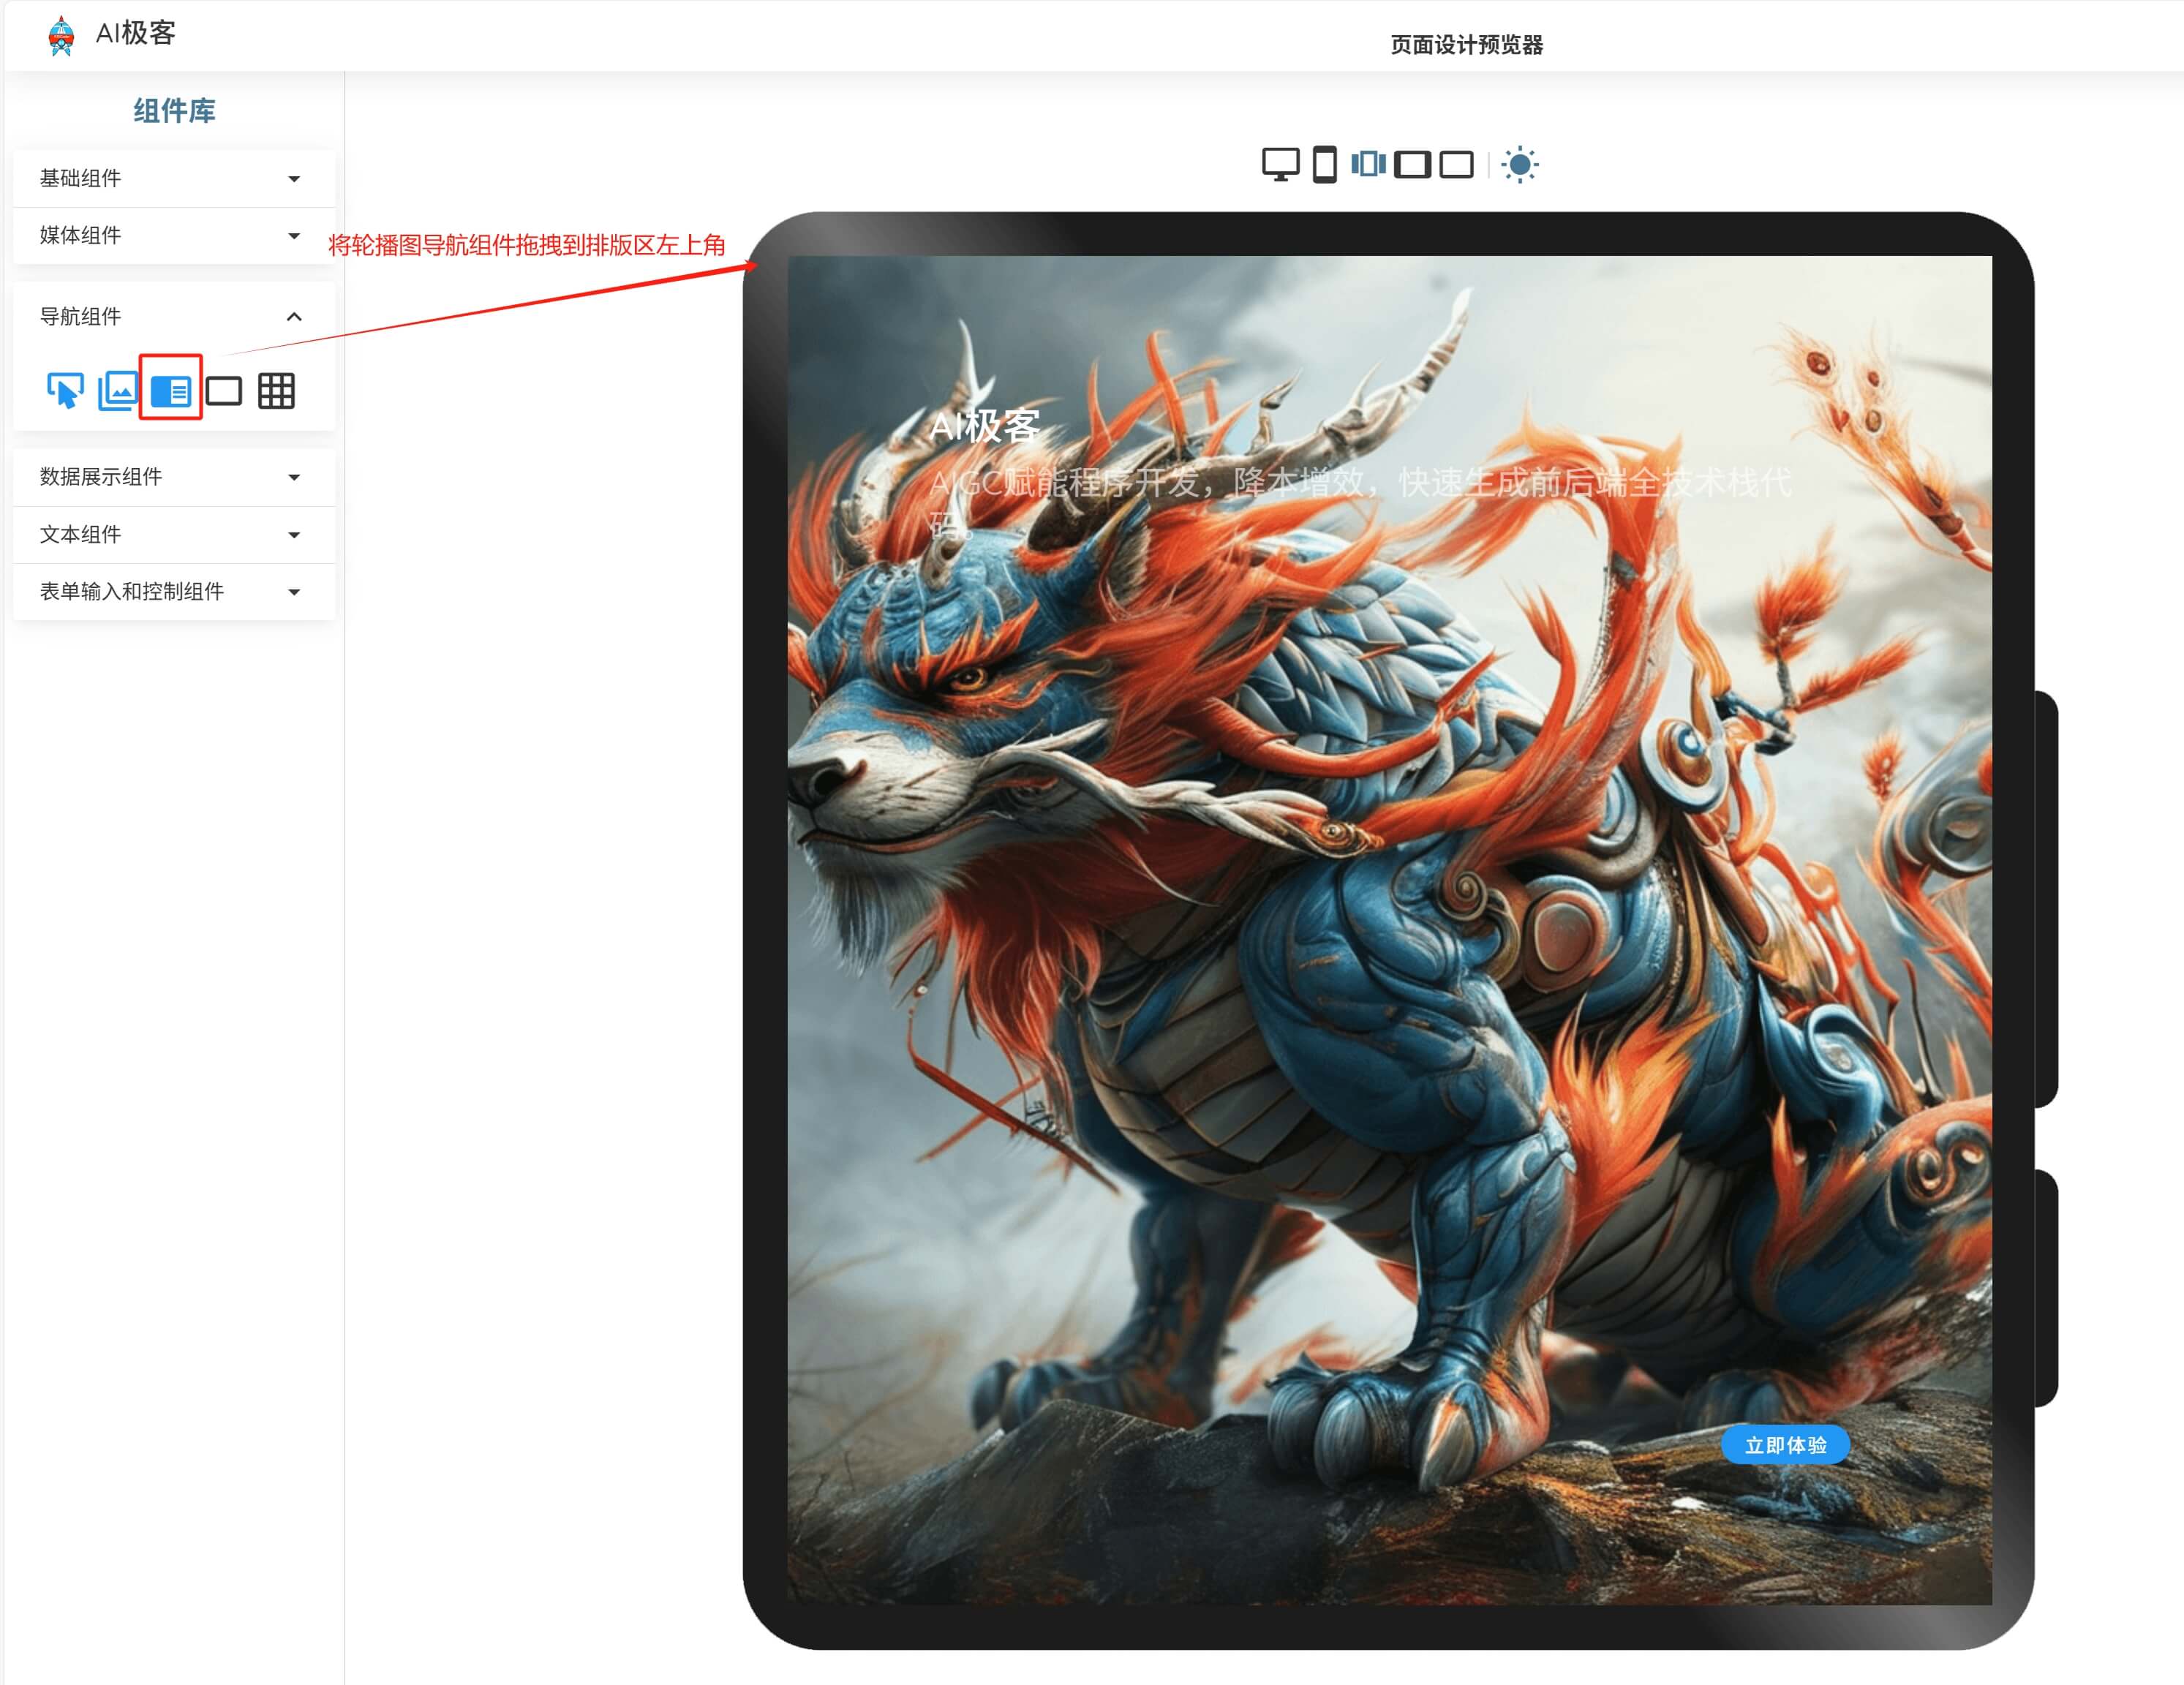
提示:轮播图导航组件是App引导页专用组件,其它类型页面无法使用该组件。
将轮播图导航组件拖拽到排版区左上角,如下图所示:
配置导航项的数据。注意:初始化数据中的路由"/home"必须改为存在的页面,否则生成鸿蒙代码时无法通过数据有效性检查。
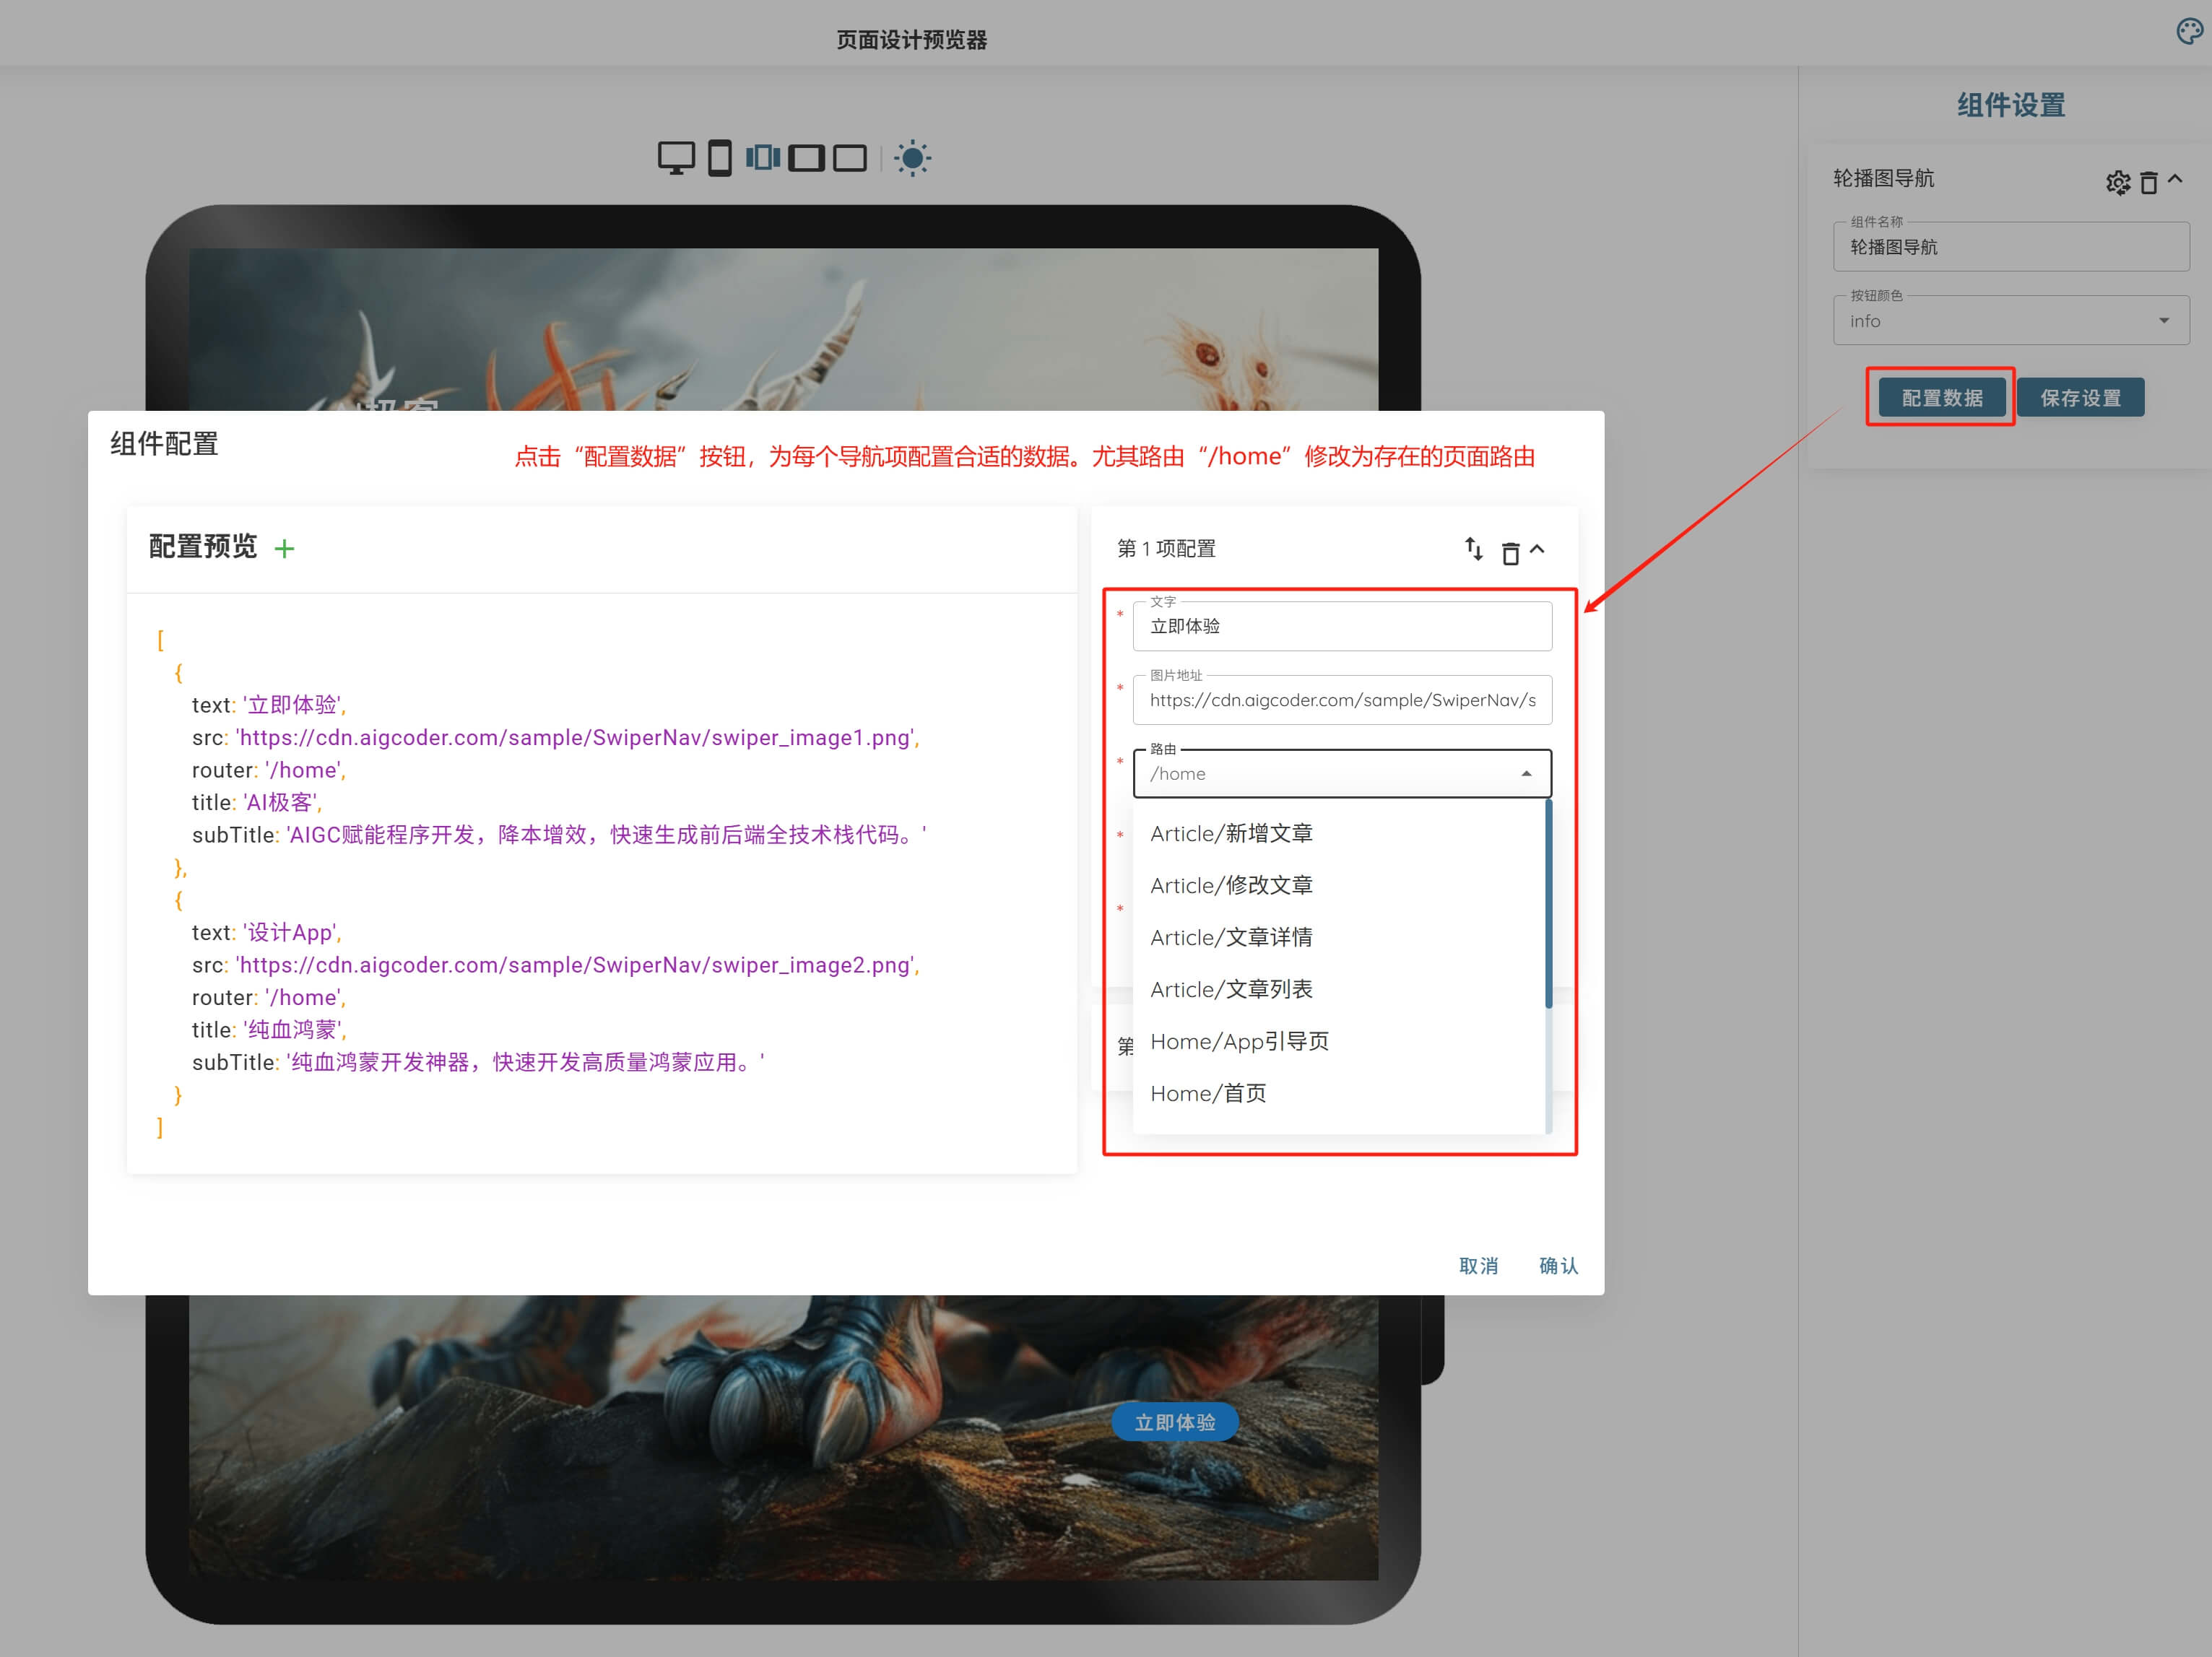
可选择不同的导航按钮颜色,点击"保存设置":
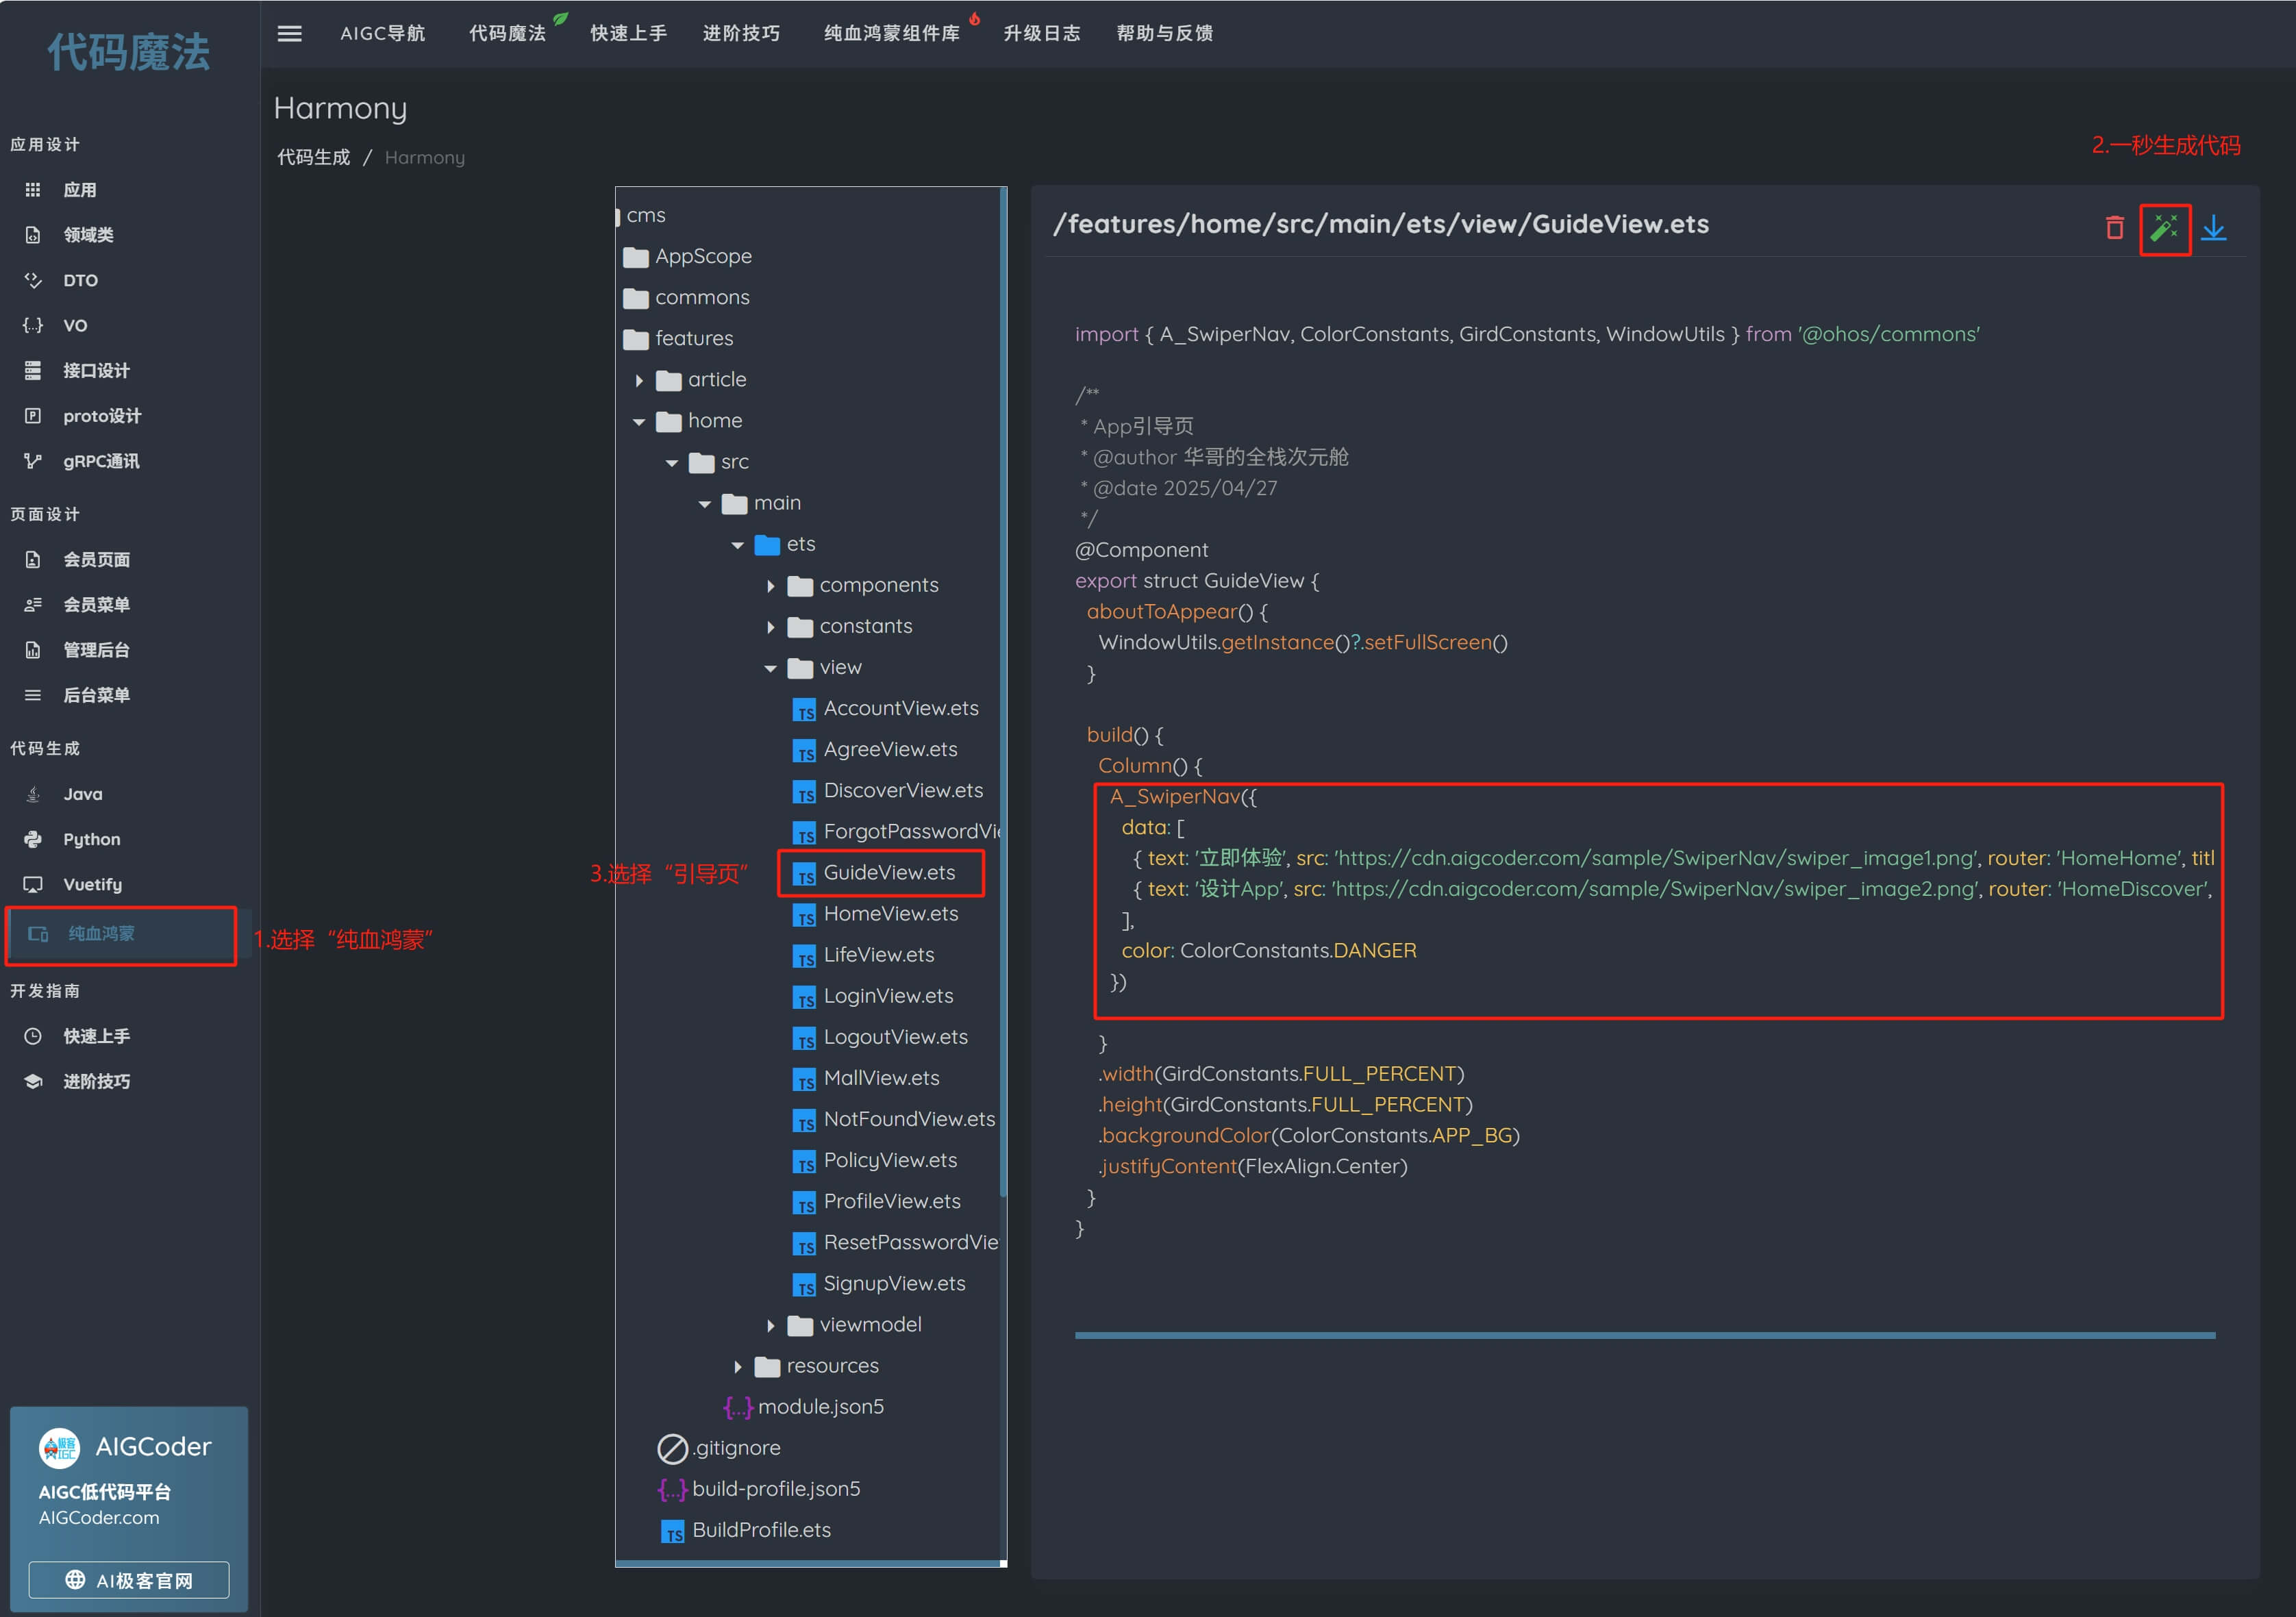
生成纯血鸿蒙代码:
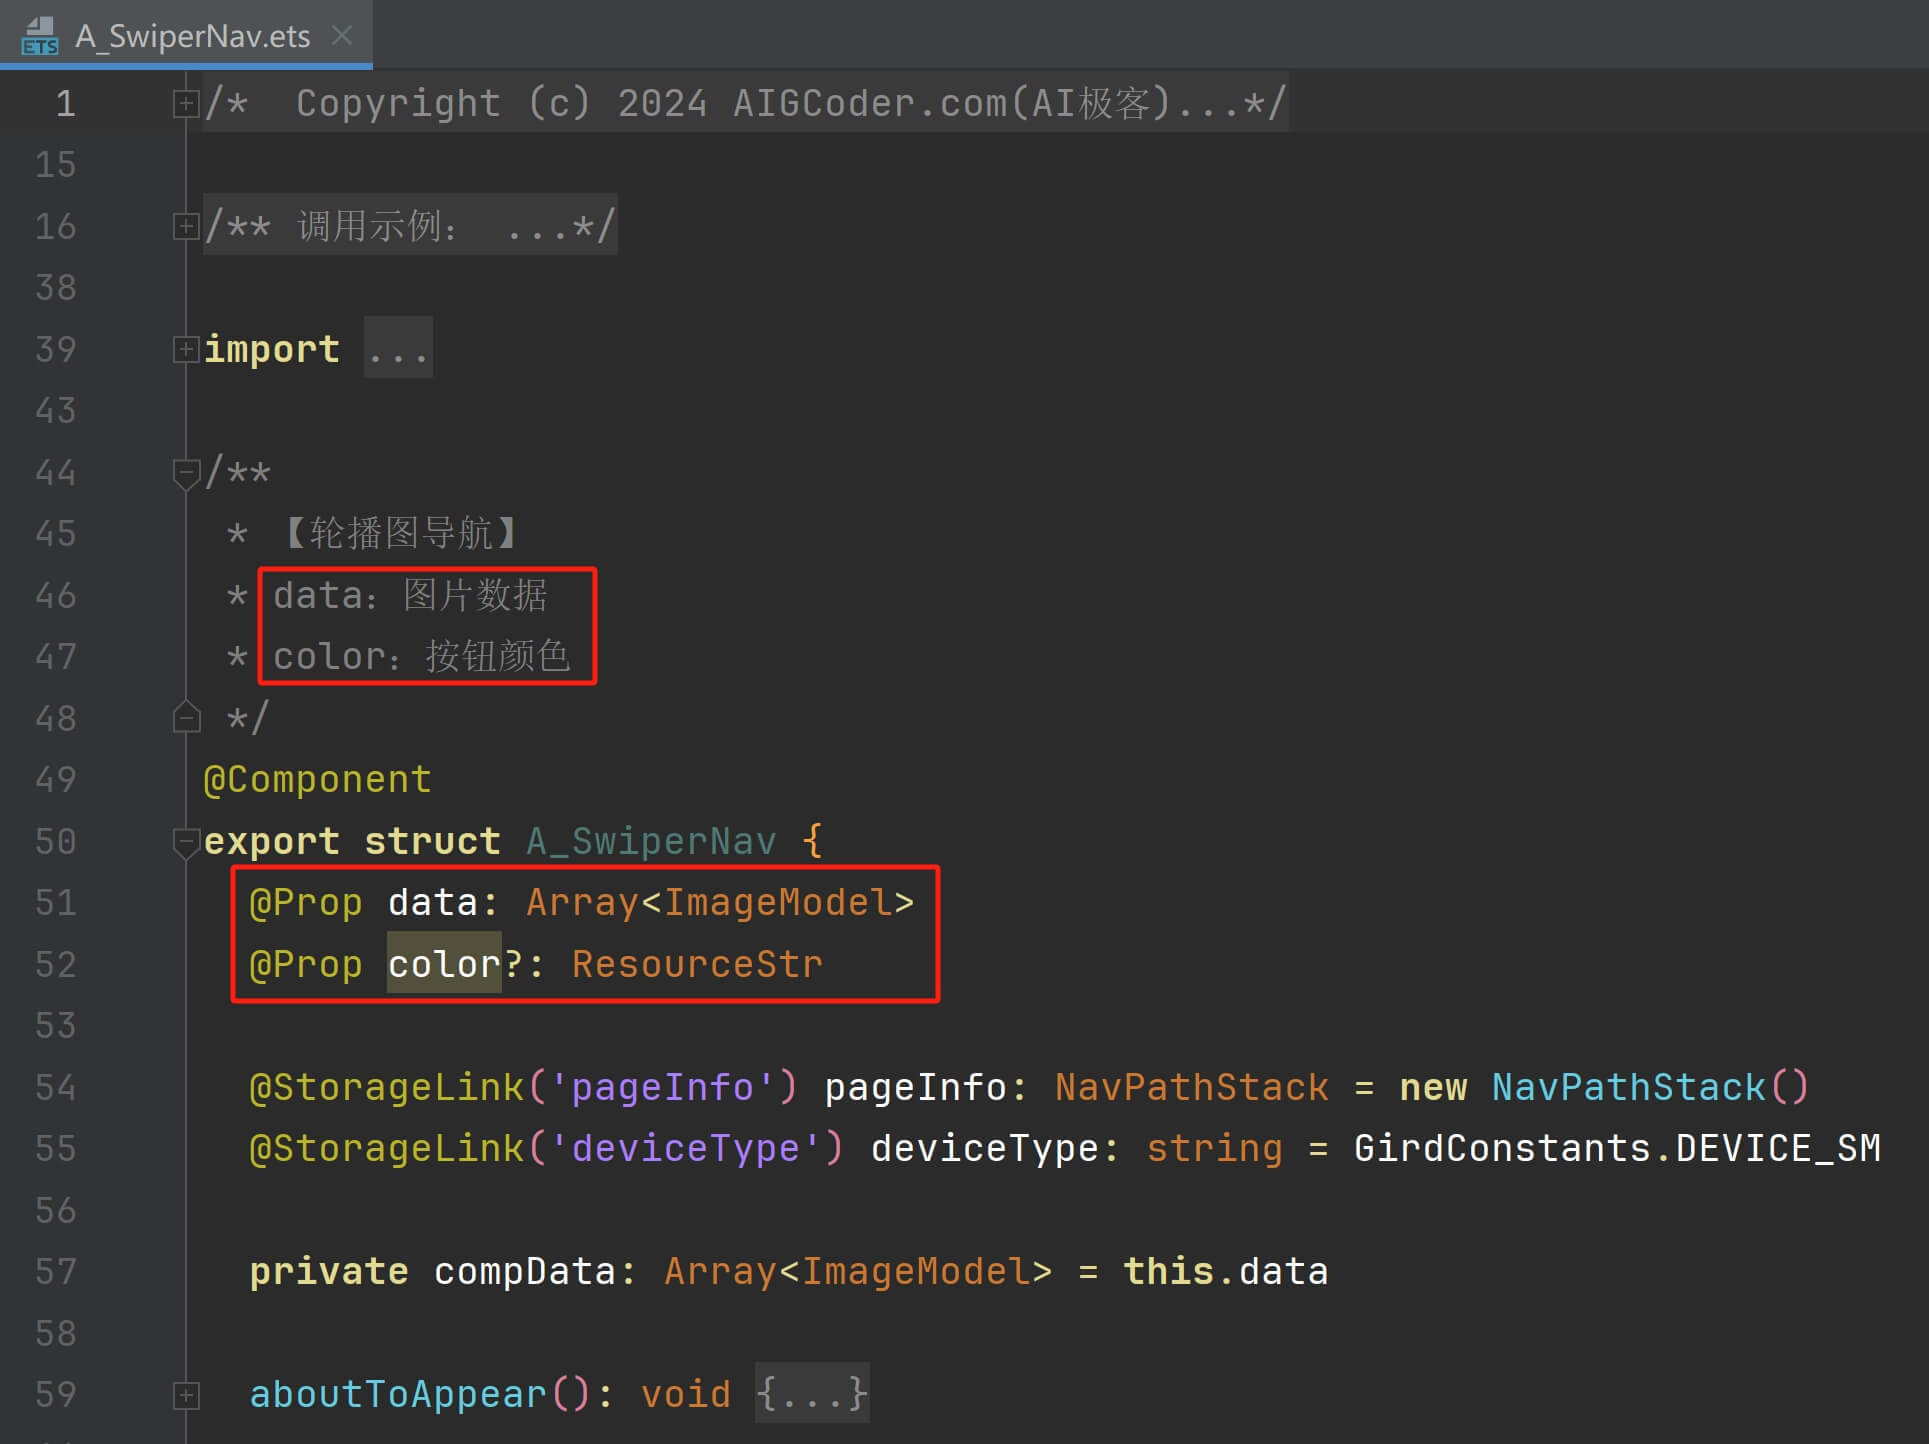
三、源码解析
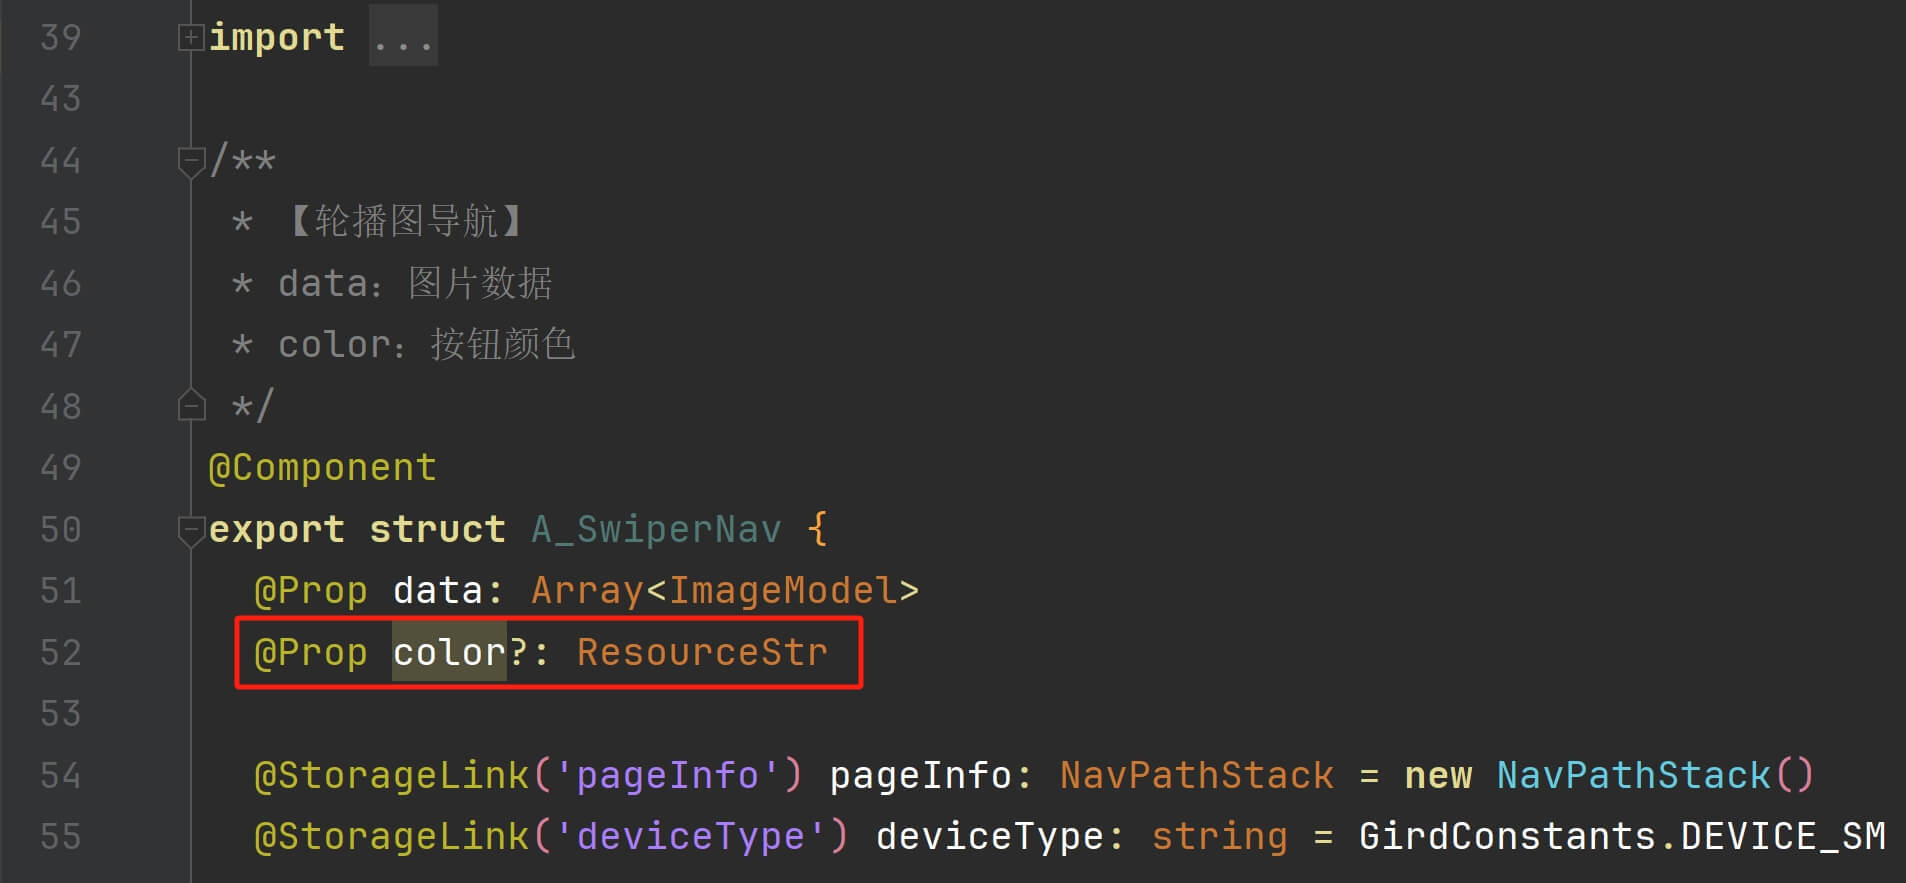
轮播图导航组件有两个属性,data(轮播图数据)和color(按钮颜色):
data 是一个数组(Array)类型的数据,它接受 ImageModel 的数据结构,包含图片地址、按钮、文字、大标题、子标题和页面跳转的路由:
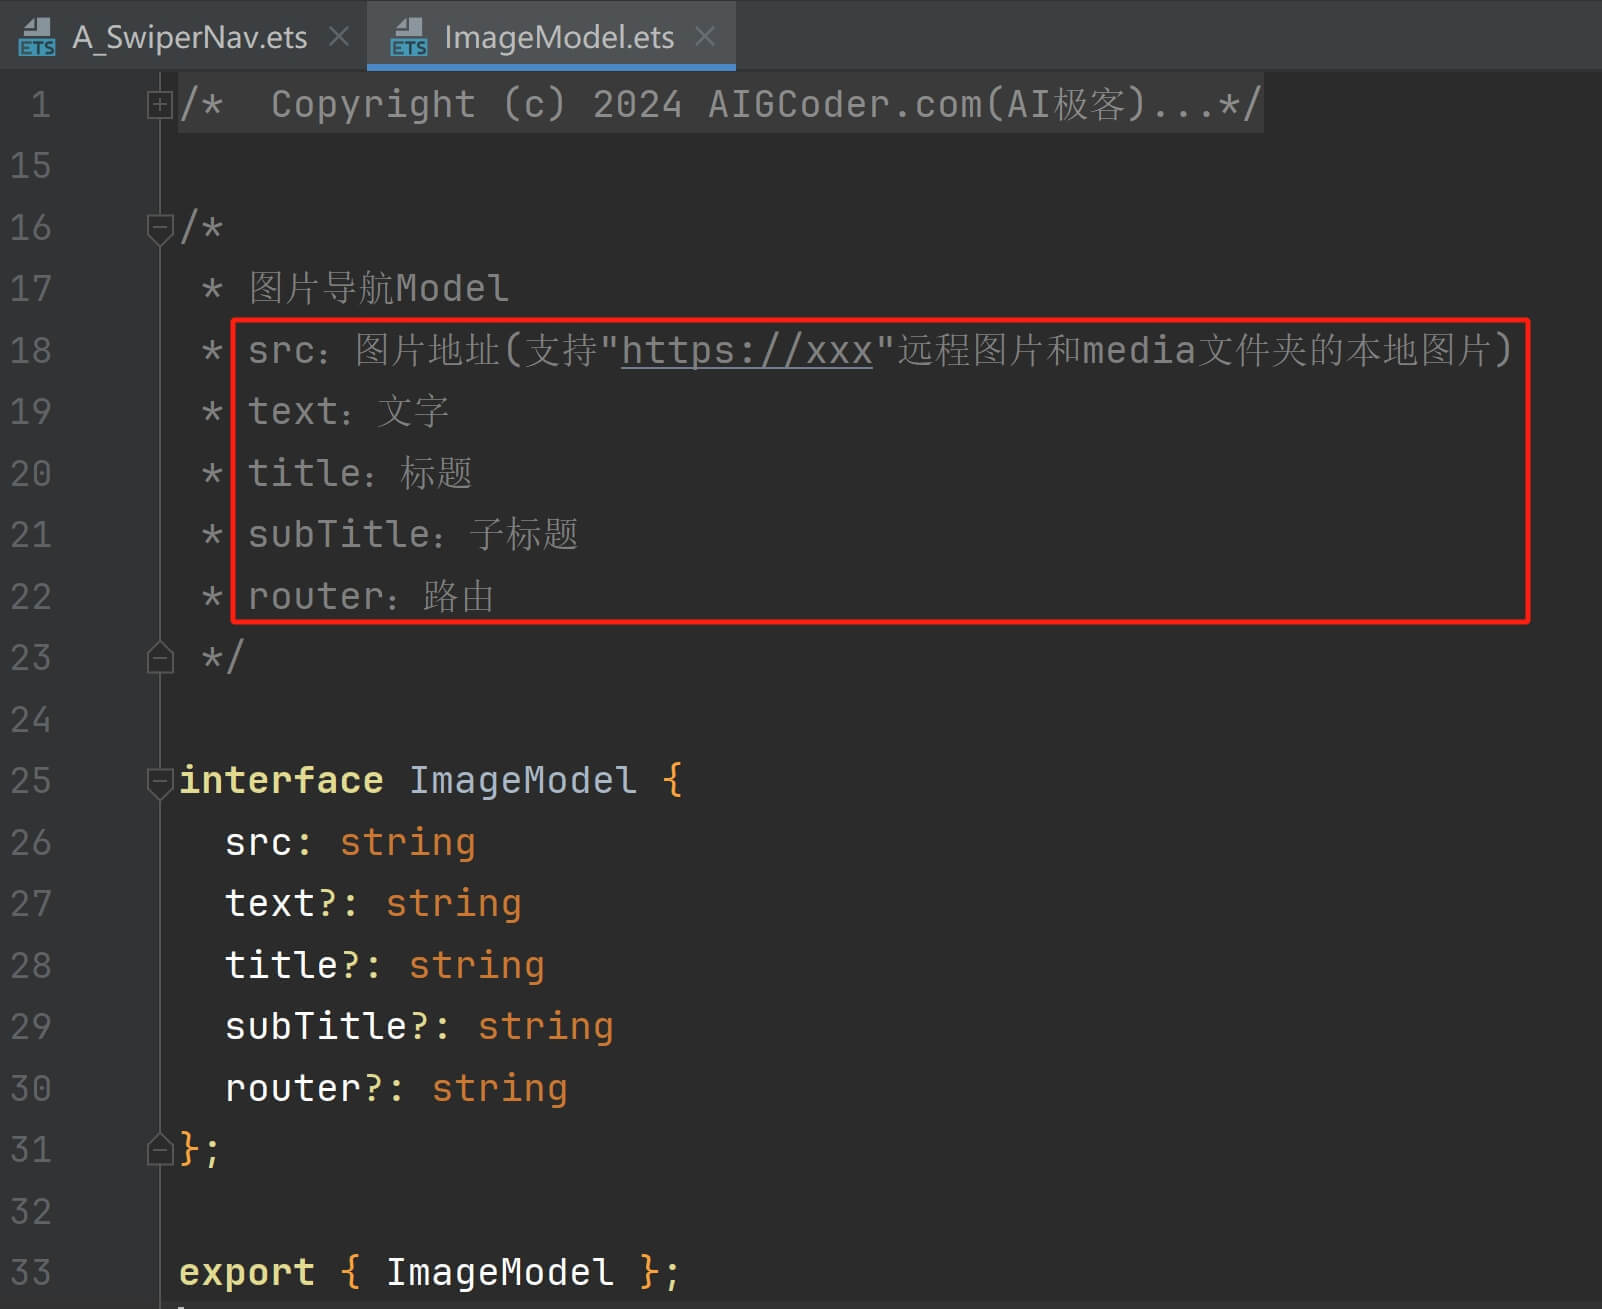
ImageModel源码如下:
`/*
- 图片导航Model
- src:图片地址(支持"https://xxx"远程图片和media文件夹的本地图片)
- text:文字
- title:标题
- subTitle:子标题
- router:路由
*/
interface ImageModel {
src: string
text?: string
title?: string
subTitle?: string
router?: string
};
export { ImageModel };
`
现在,我们继续分析轮播图导航组件 A_SwiperNav 的源码。
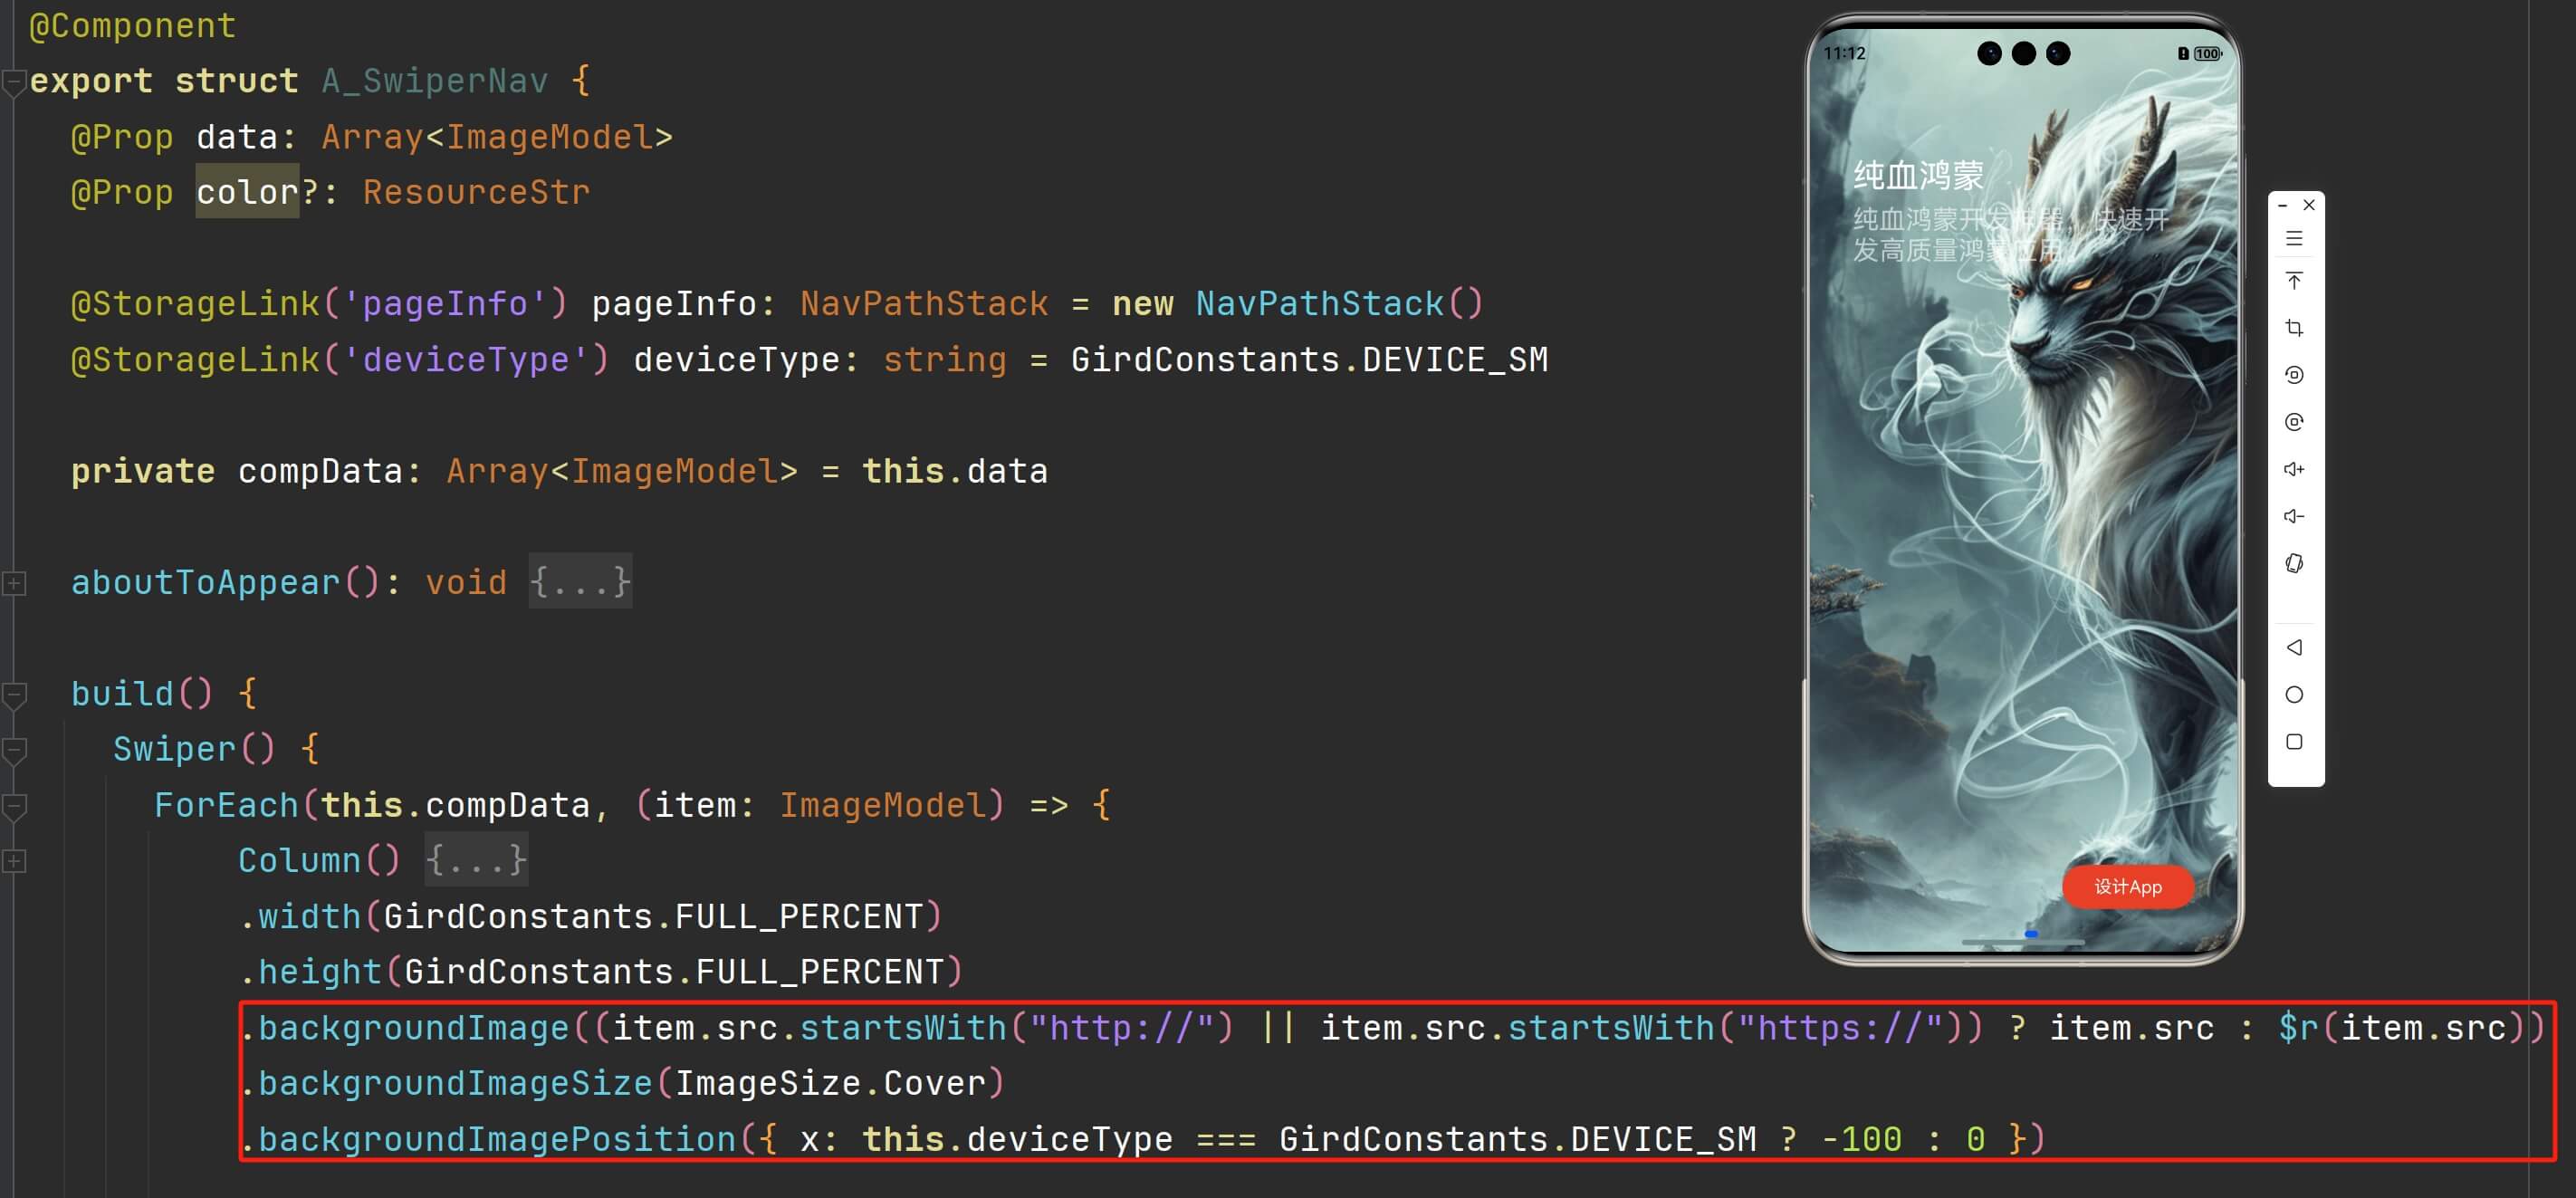
aboutToAppear函数在创建自定义组件的新实例后,在执行其build()函数之前执行。 在aboutToAppear函数中 检查轮播图的数据,如果图片的地址不是以http或者https开头的时候,会被认为是一个本地资源图片:
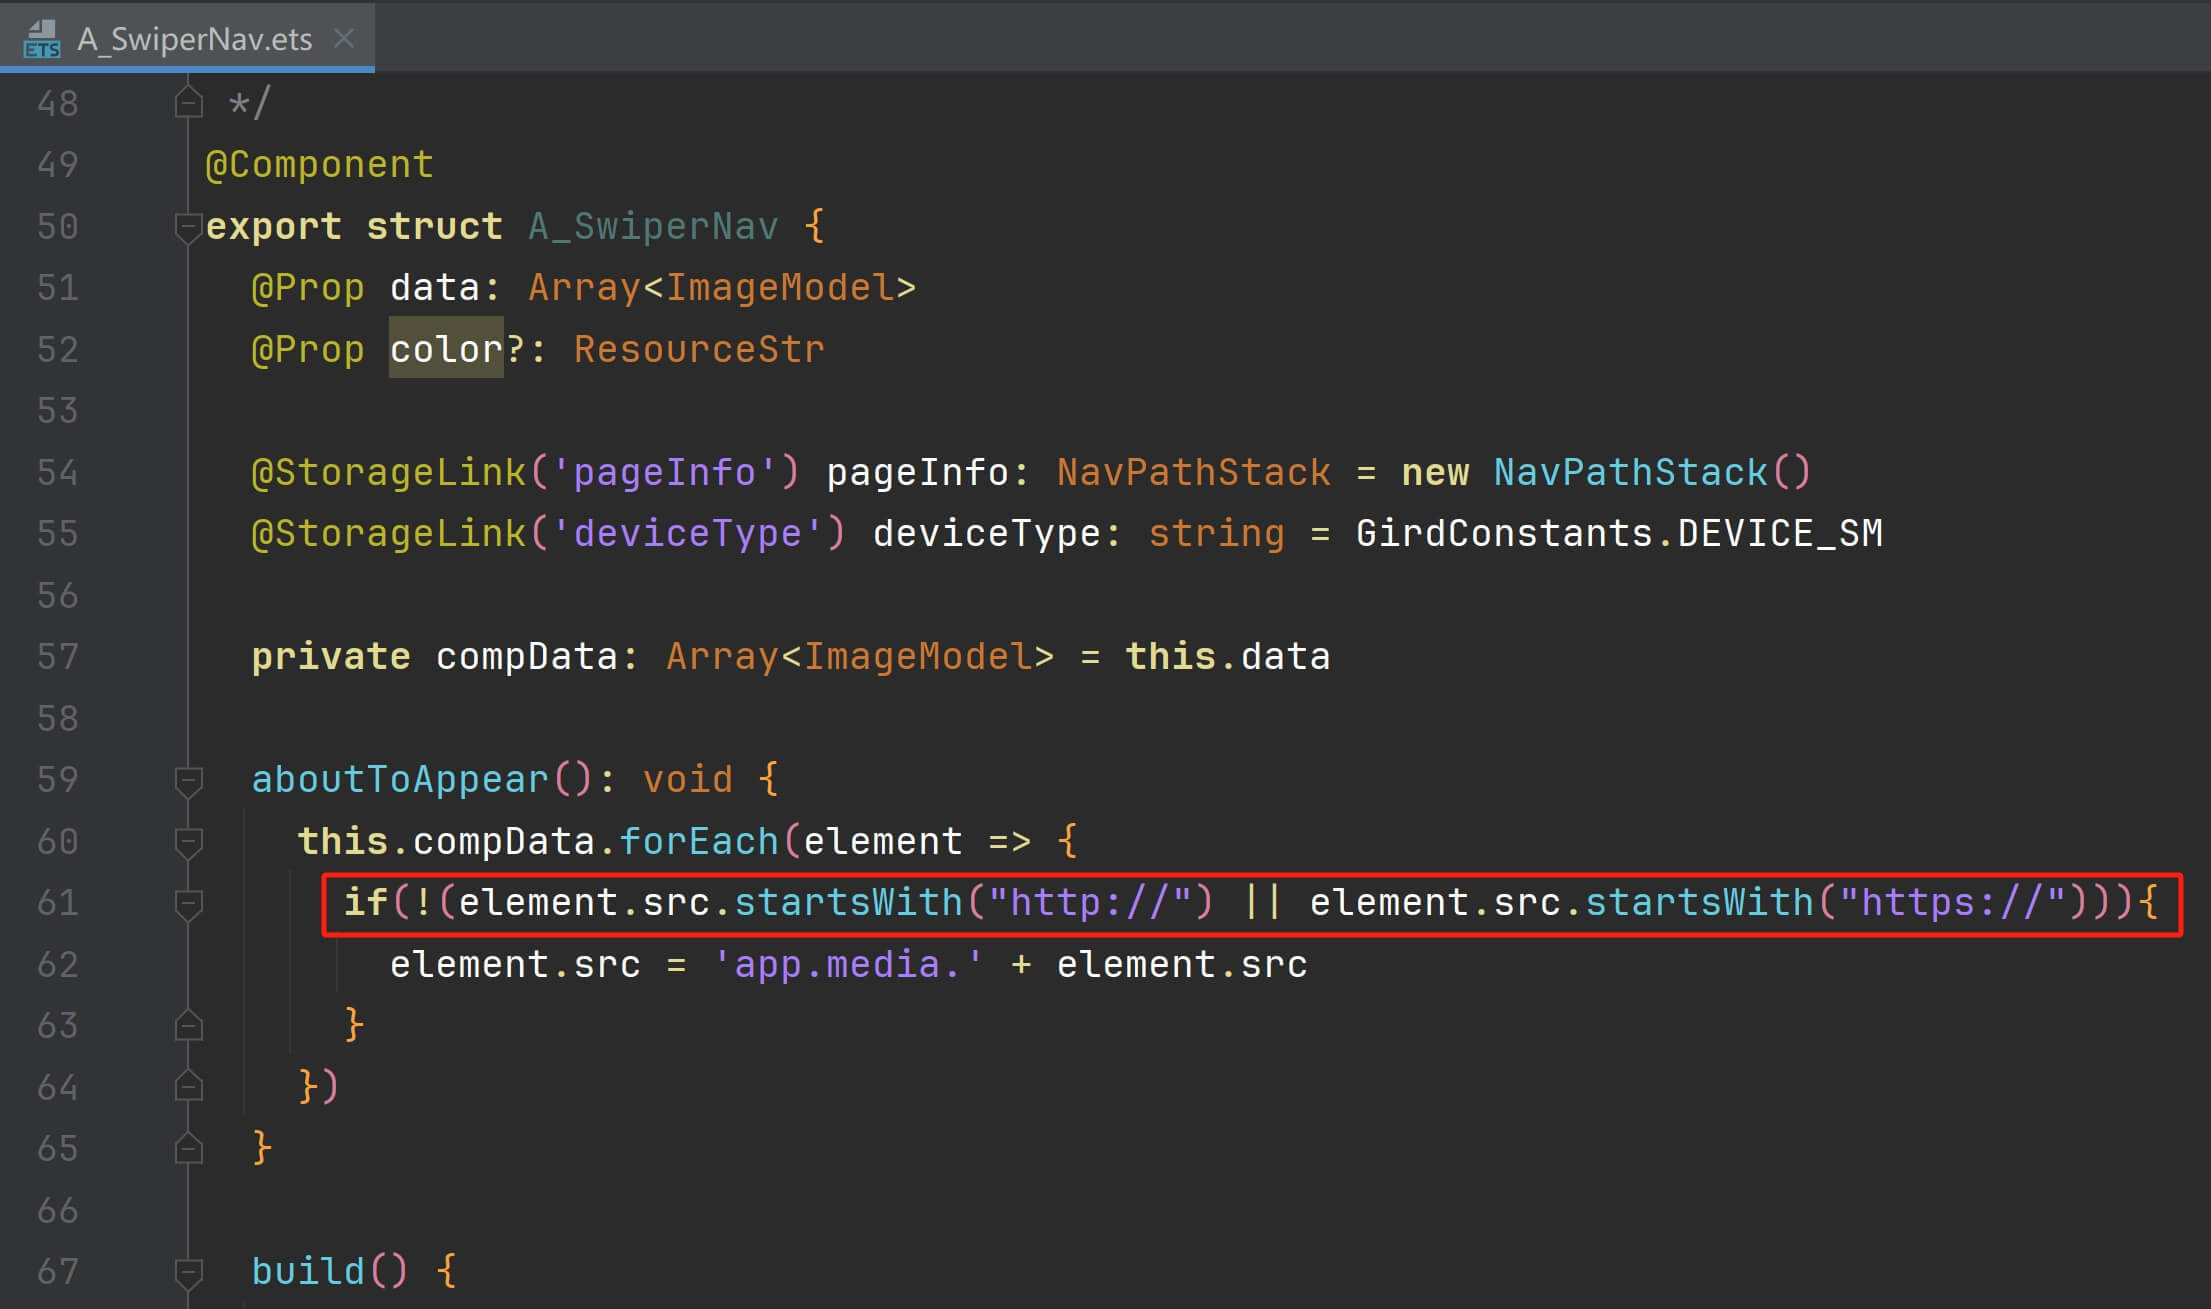
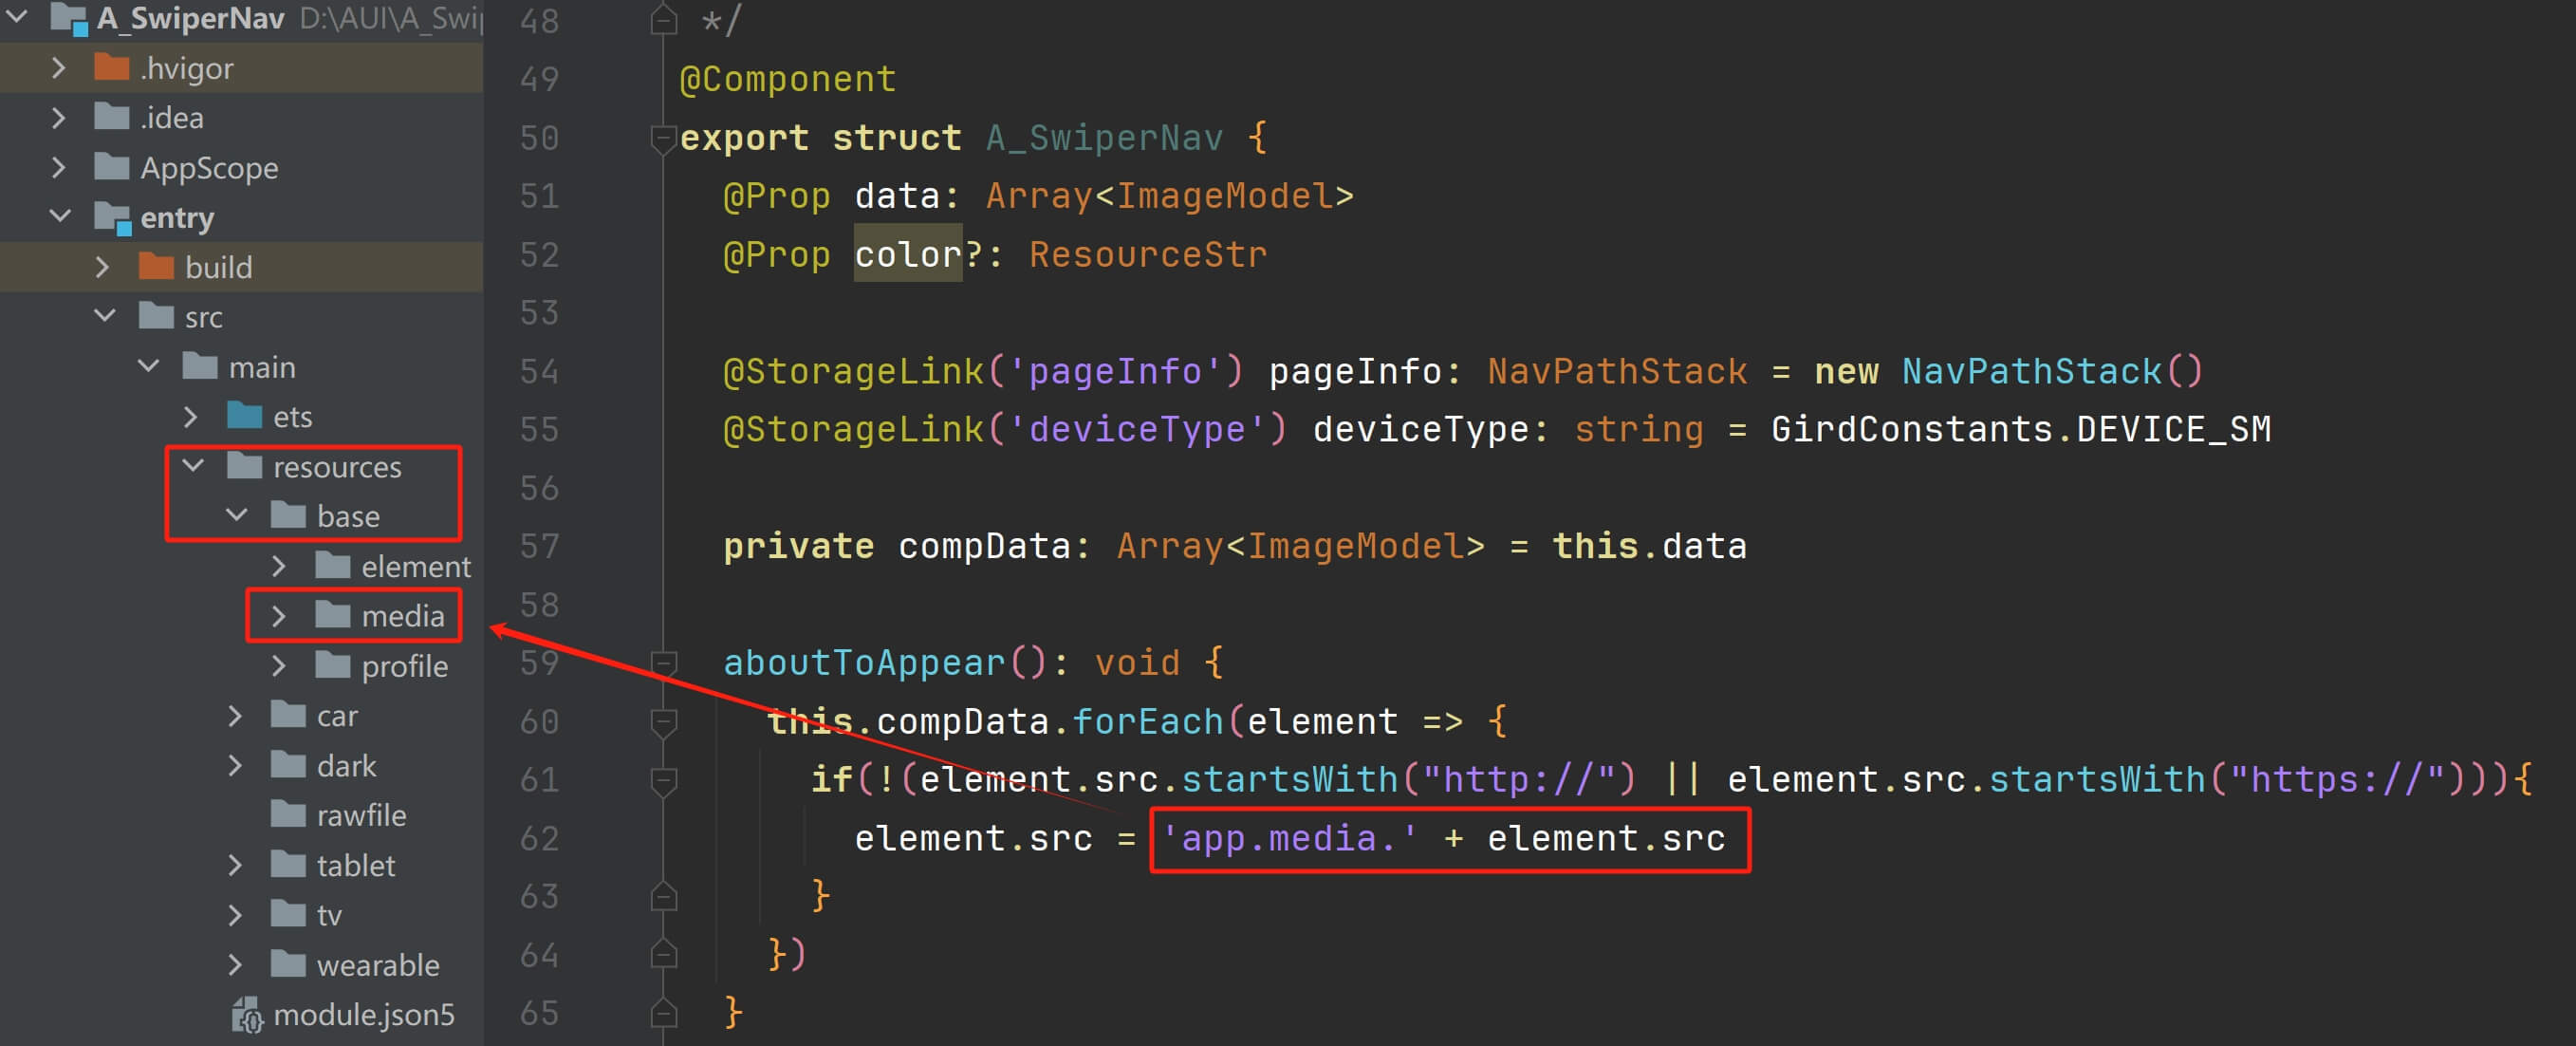
那么会给这个图片地址之前加上一个"app.media."的前缀, 它会对应"/resources/base/media"下面的资源文件 :
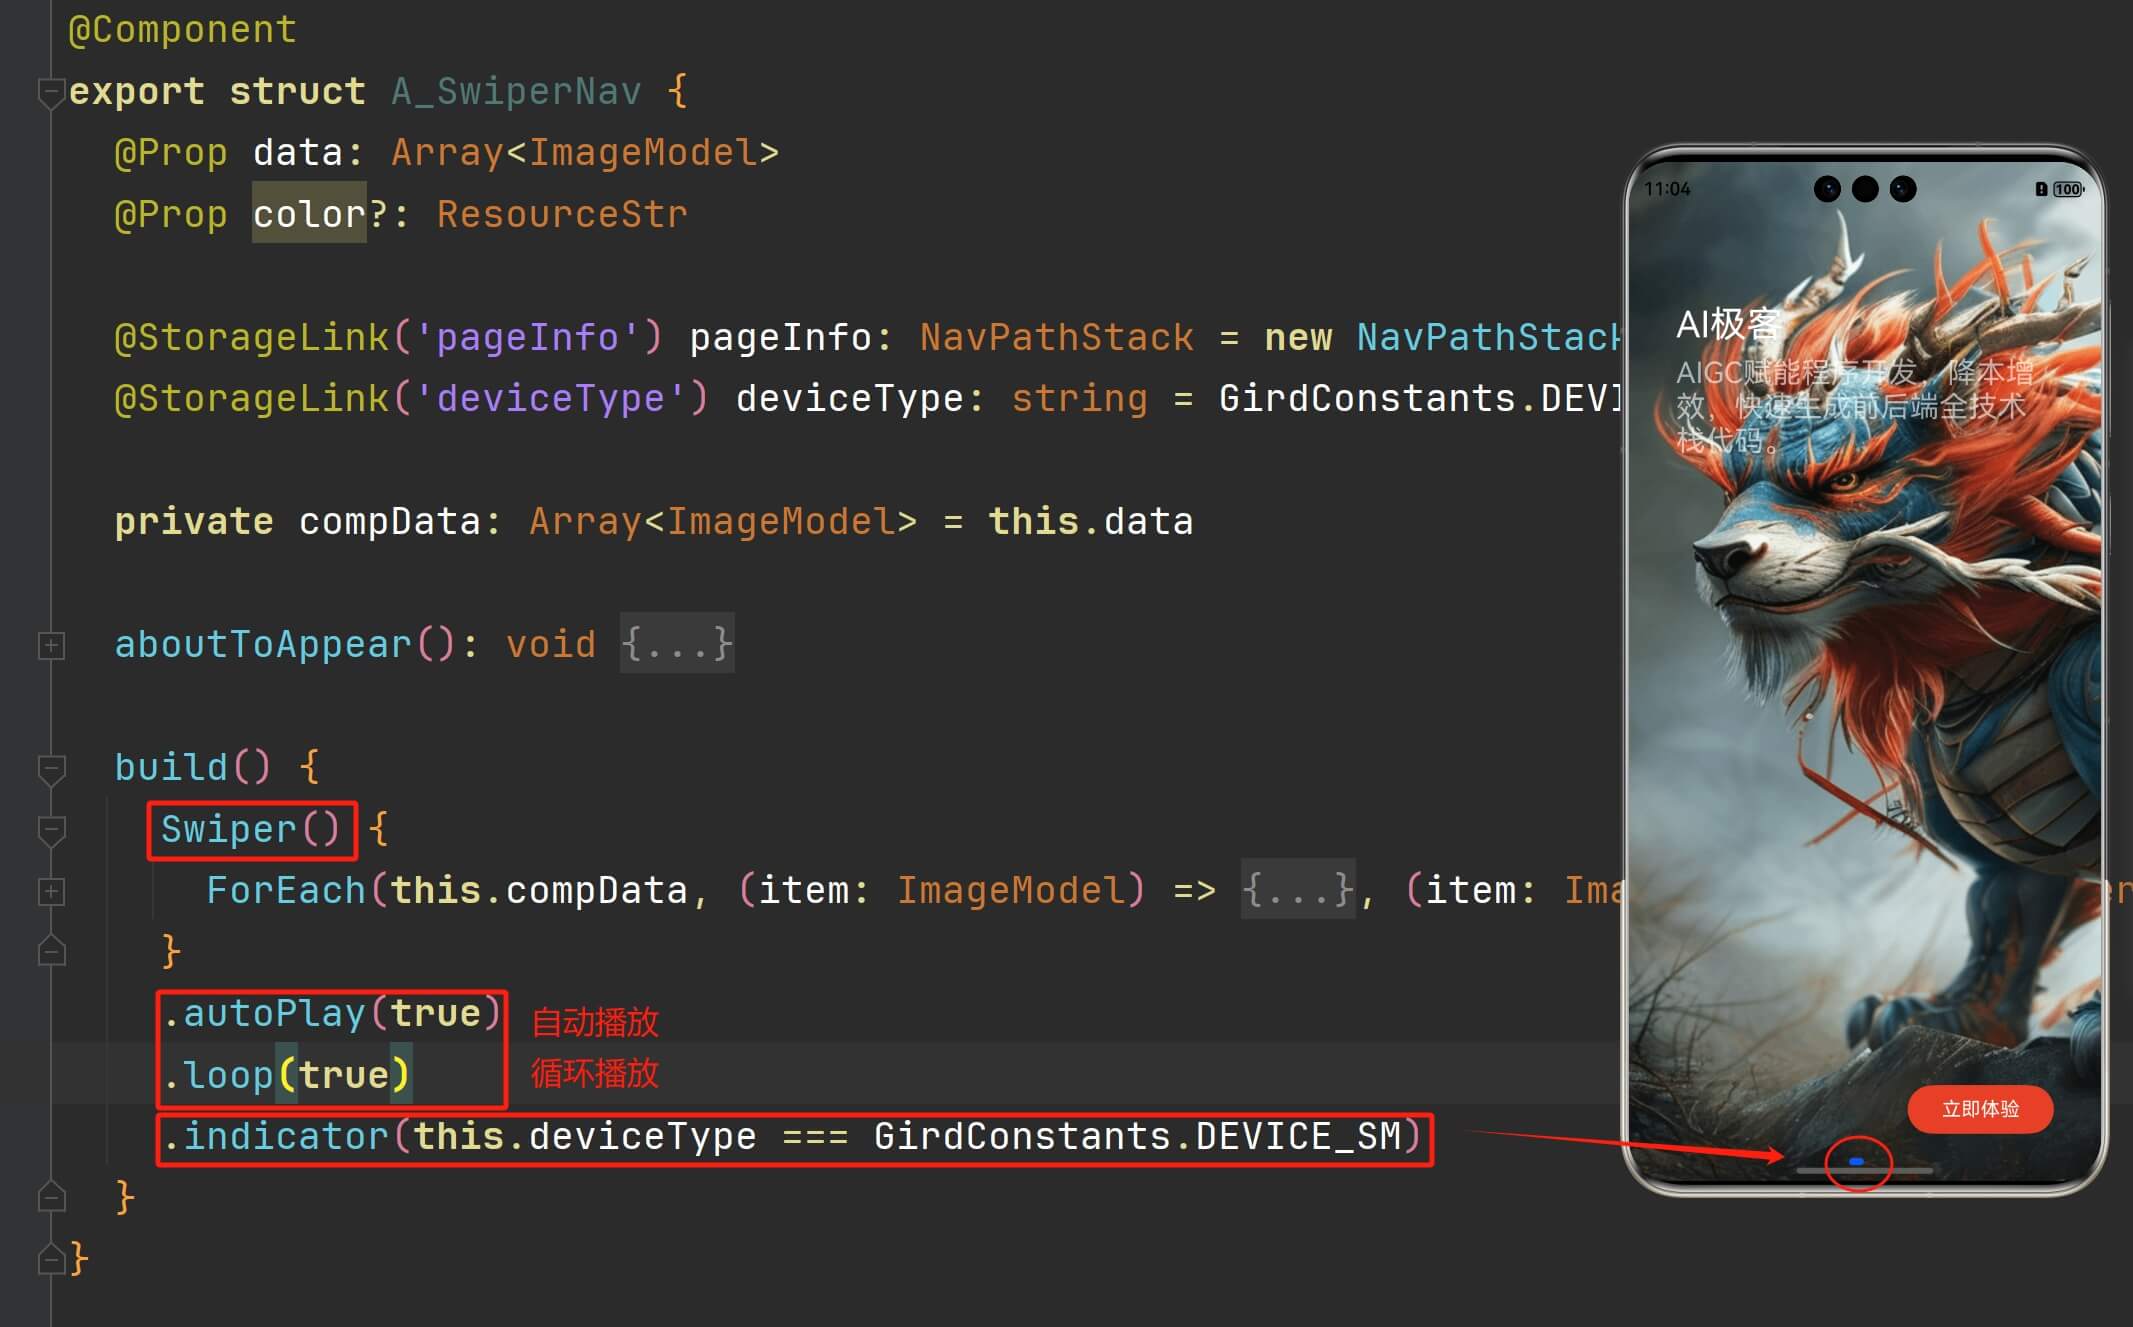
轮播图导航组件是在鸿蒙官方 Swiper 组件的基础之上做的二次封装。它会自动播放(autoPlay),循环播放(loop),下面的指示的点(indicator)会在设备类型是手机类型(DEVICE_SM)的时候才显示,如下图所示的这个蓝色的点。(在平板和折叠屏下面这个点是不显示的):
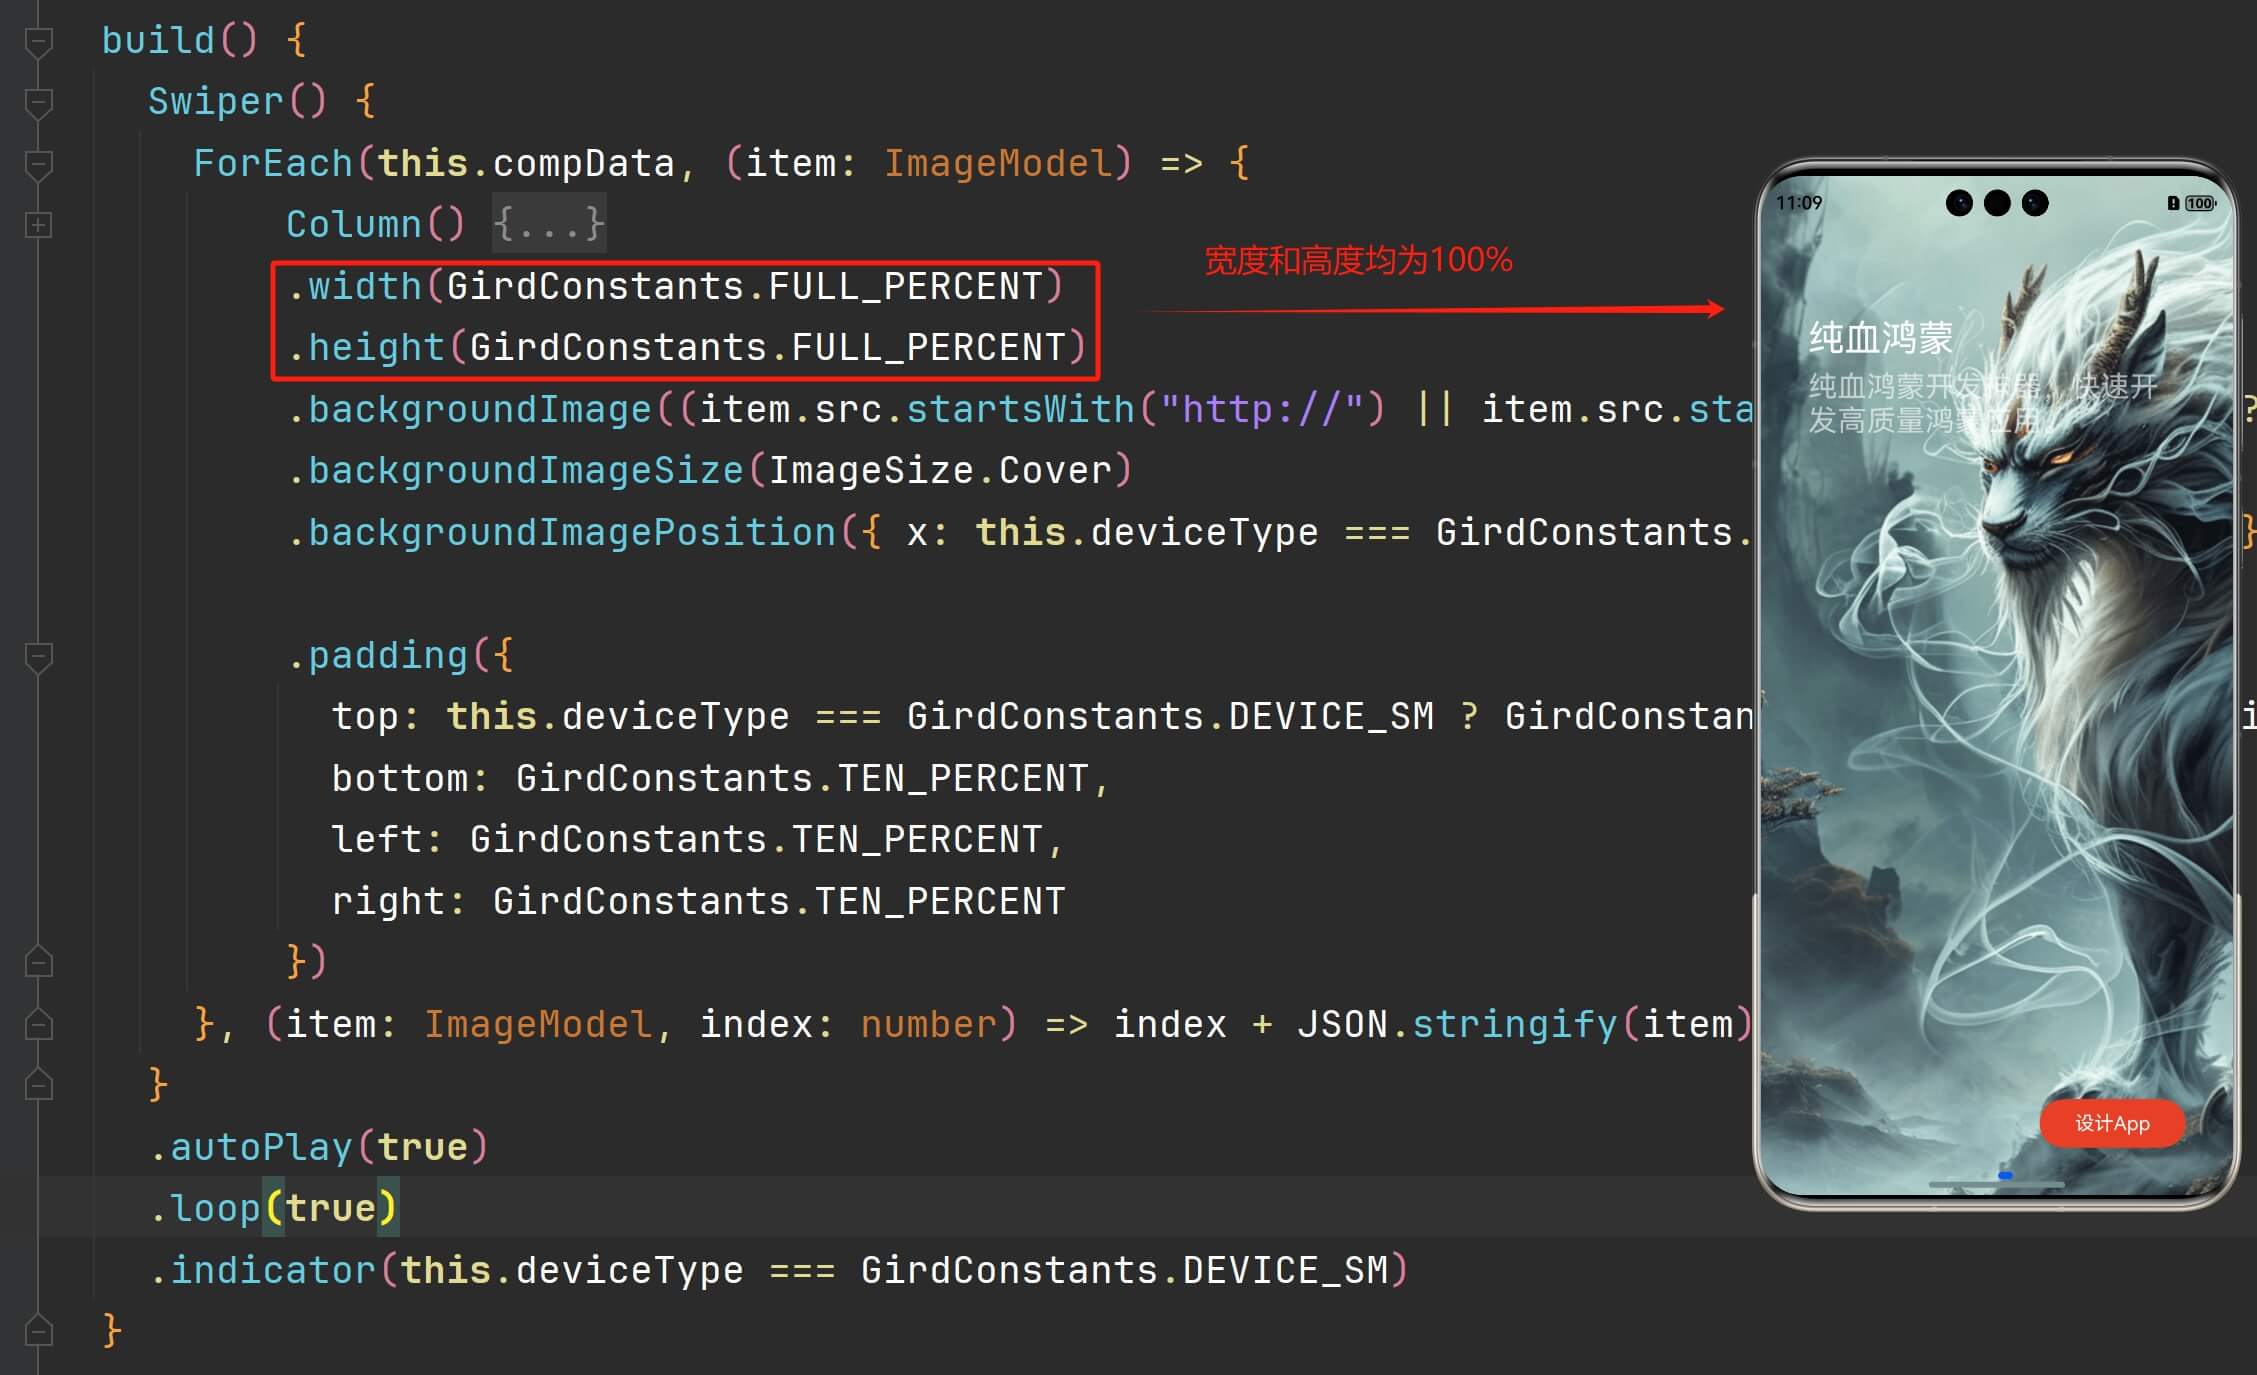
轮播图的数据通过 ForEach 的方式进行循环,里面首先会有一个列组件(Column),控制轮播背景图片的表现,列组件的宽度和高度都是100%(FULL_PERCENT),这个就使轮播图撑满整个屏幕,实现沉浸式的体验:
当背景图片是远程地址的时候,就直接显示这个远程地址(item.src),否则,会通过 "
r
"也就是用资源的方式来调用【
r"也就是用资源的方式来调用【r(item.src)】。图片的模式是采用Cover的方式来铺满。背景图的位置x坐标(也就是横坐标),当设备类型是手机的时候,会将它的坐标向左偏移 100vp,平板和折叠屏的时候不做改变,这样三端设备显示同一张远程图片的时候,相对显示都达到最完美的程度:
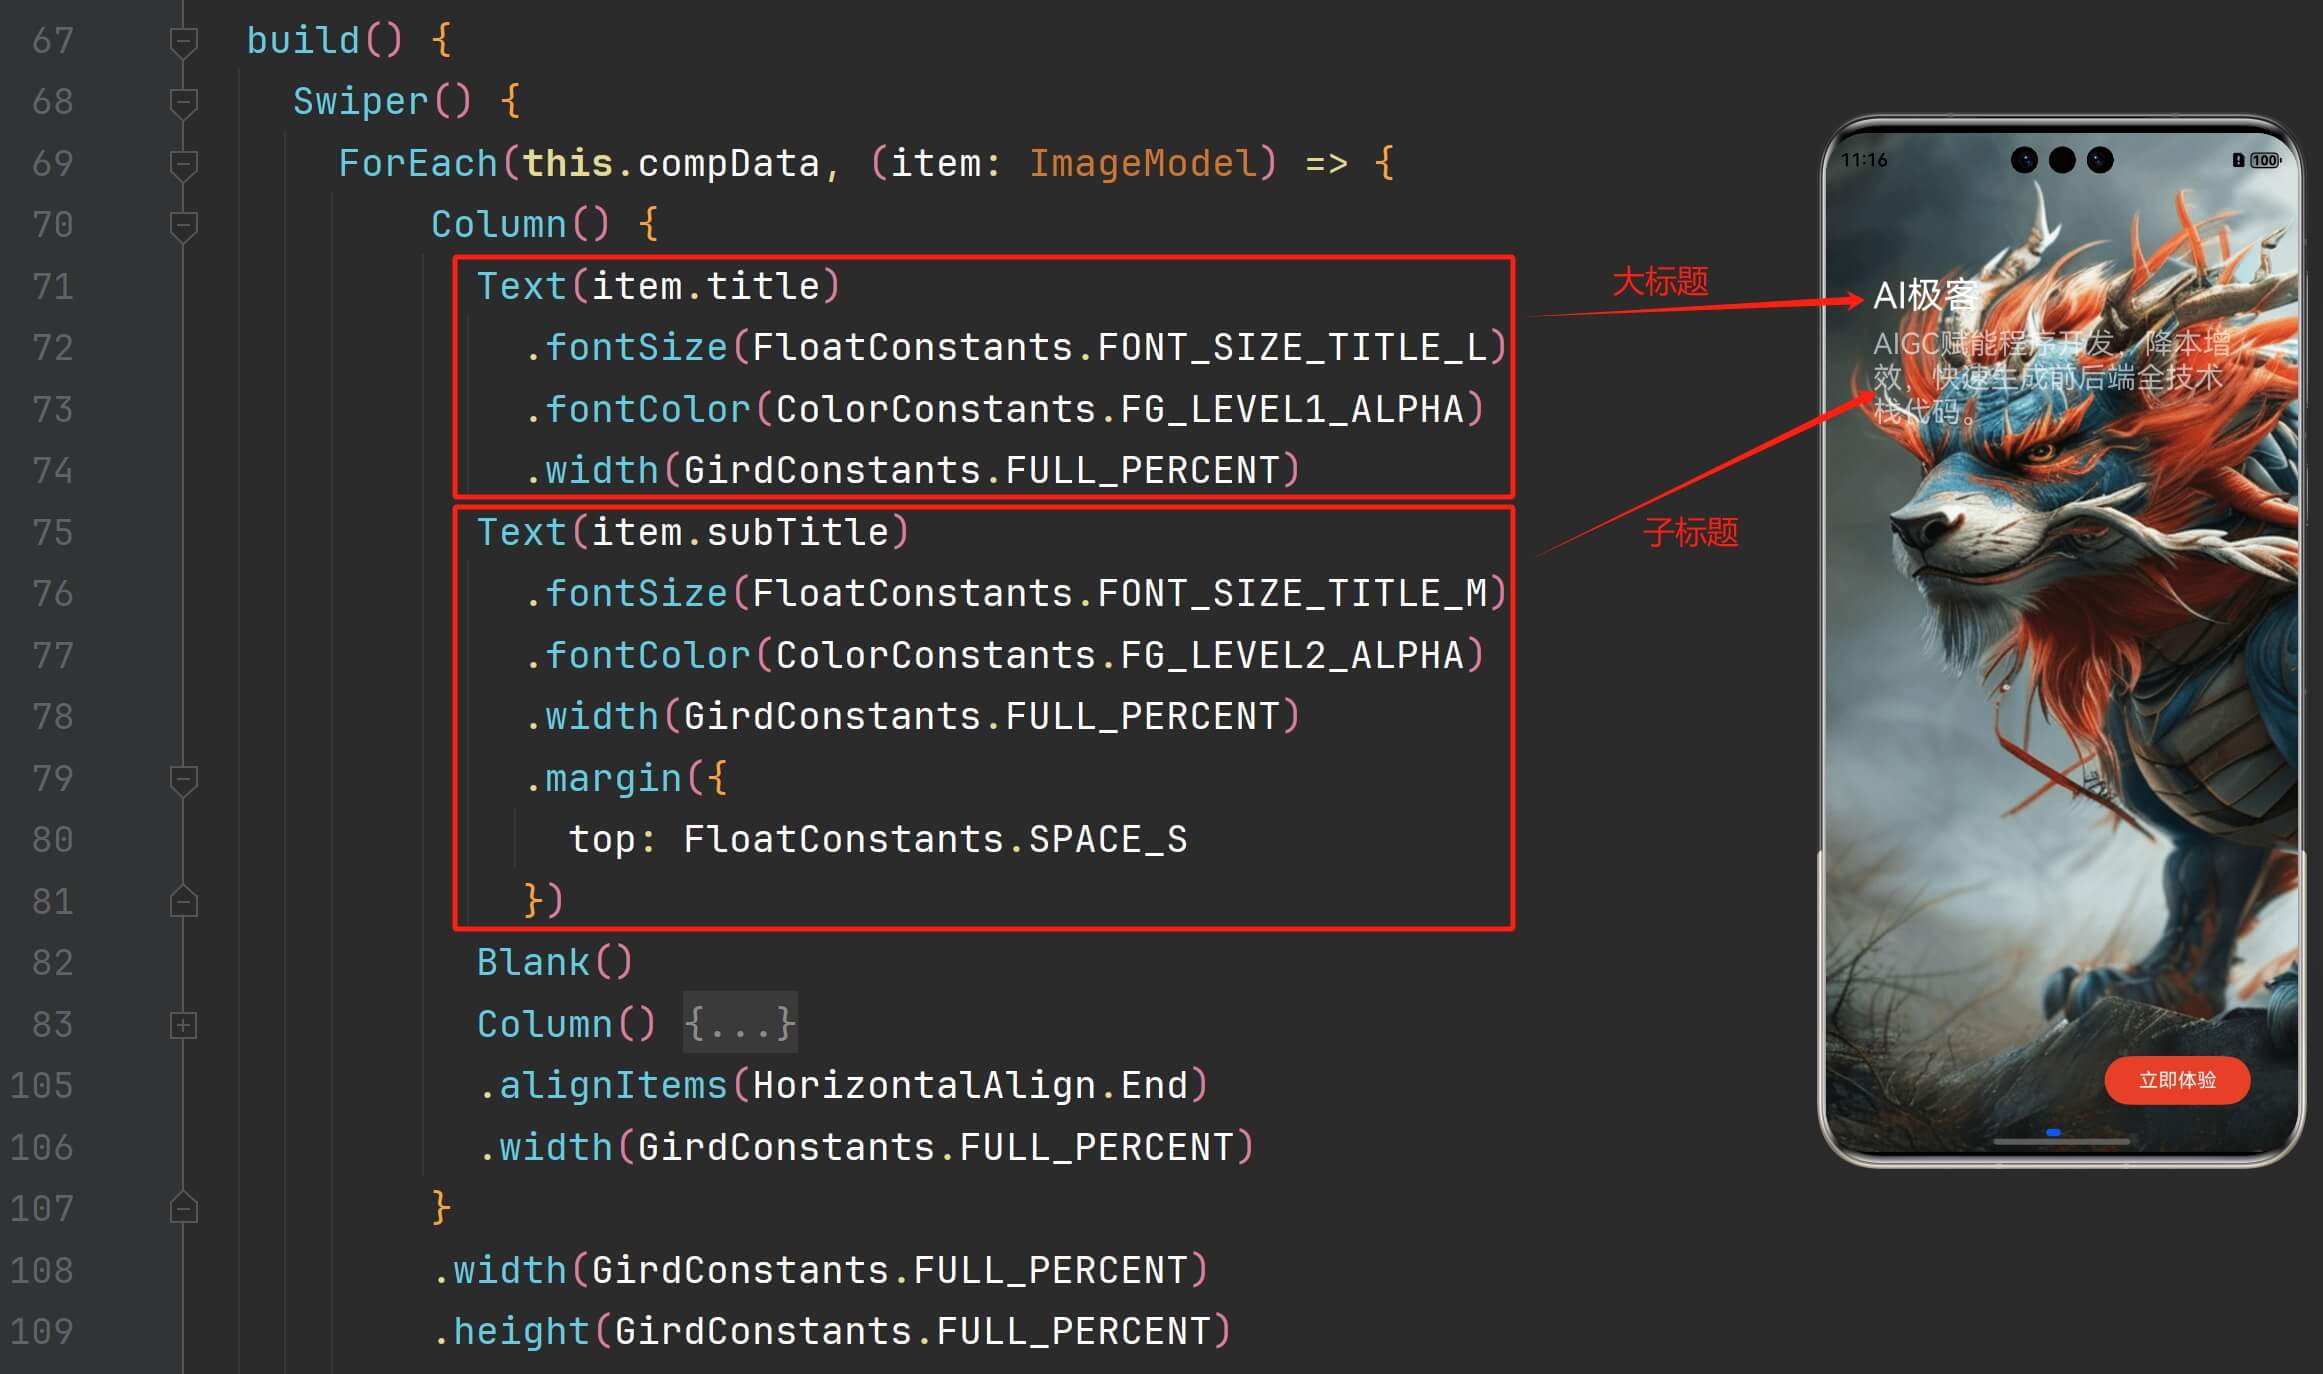
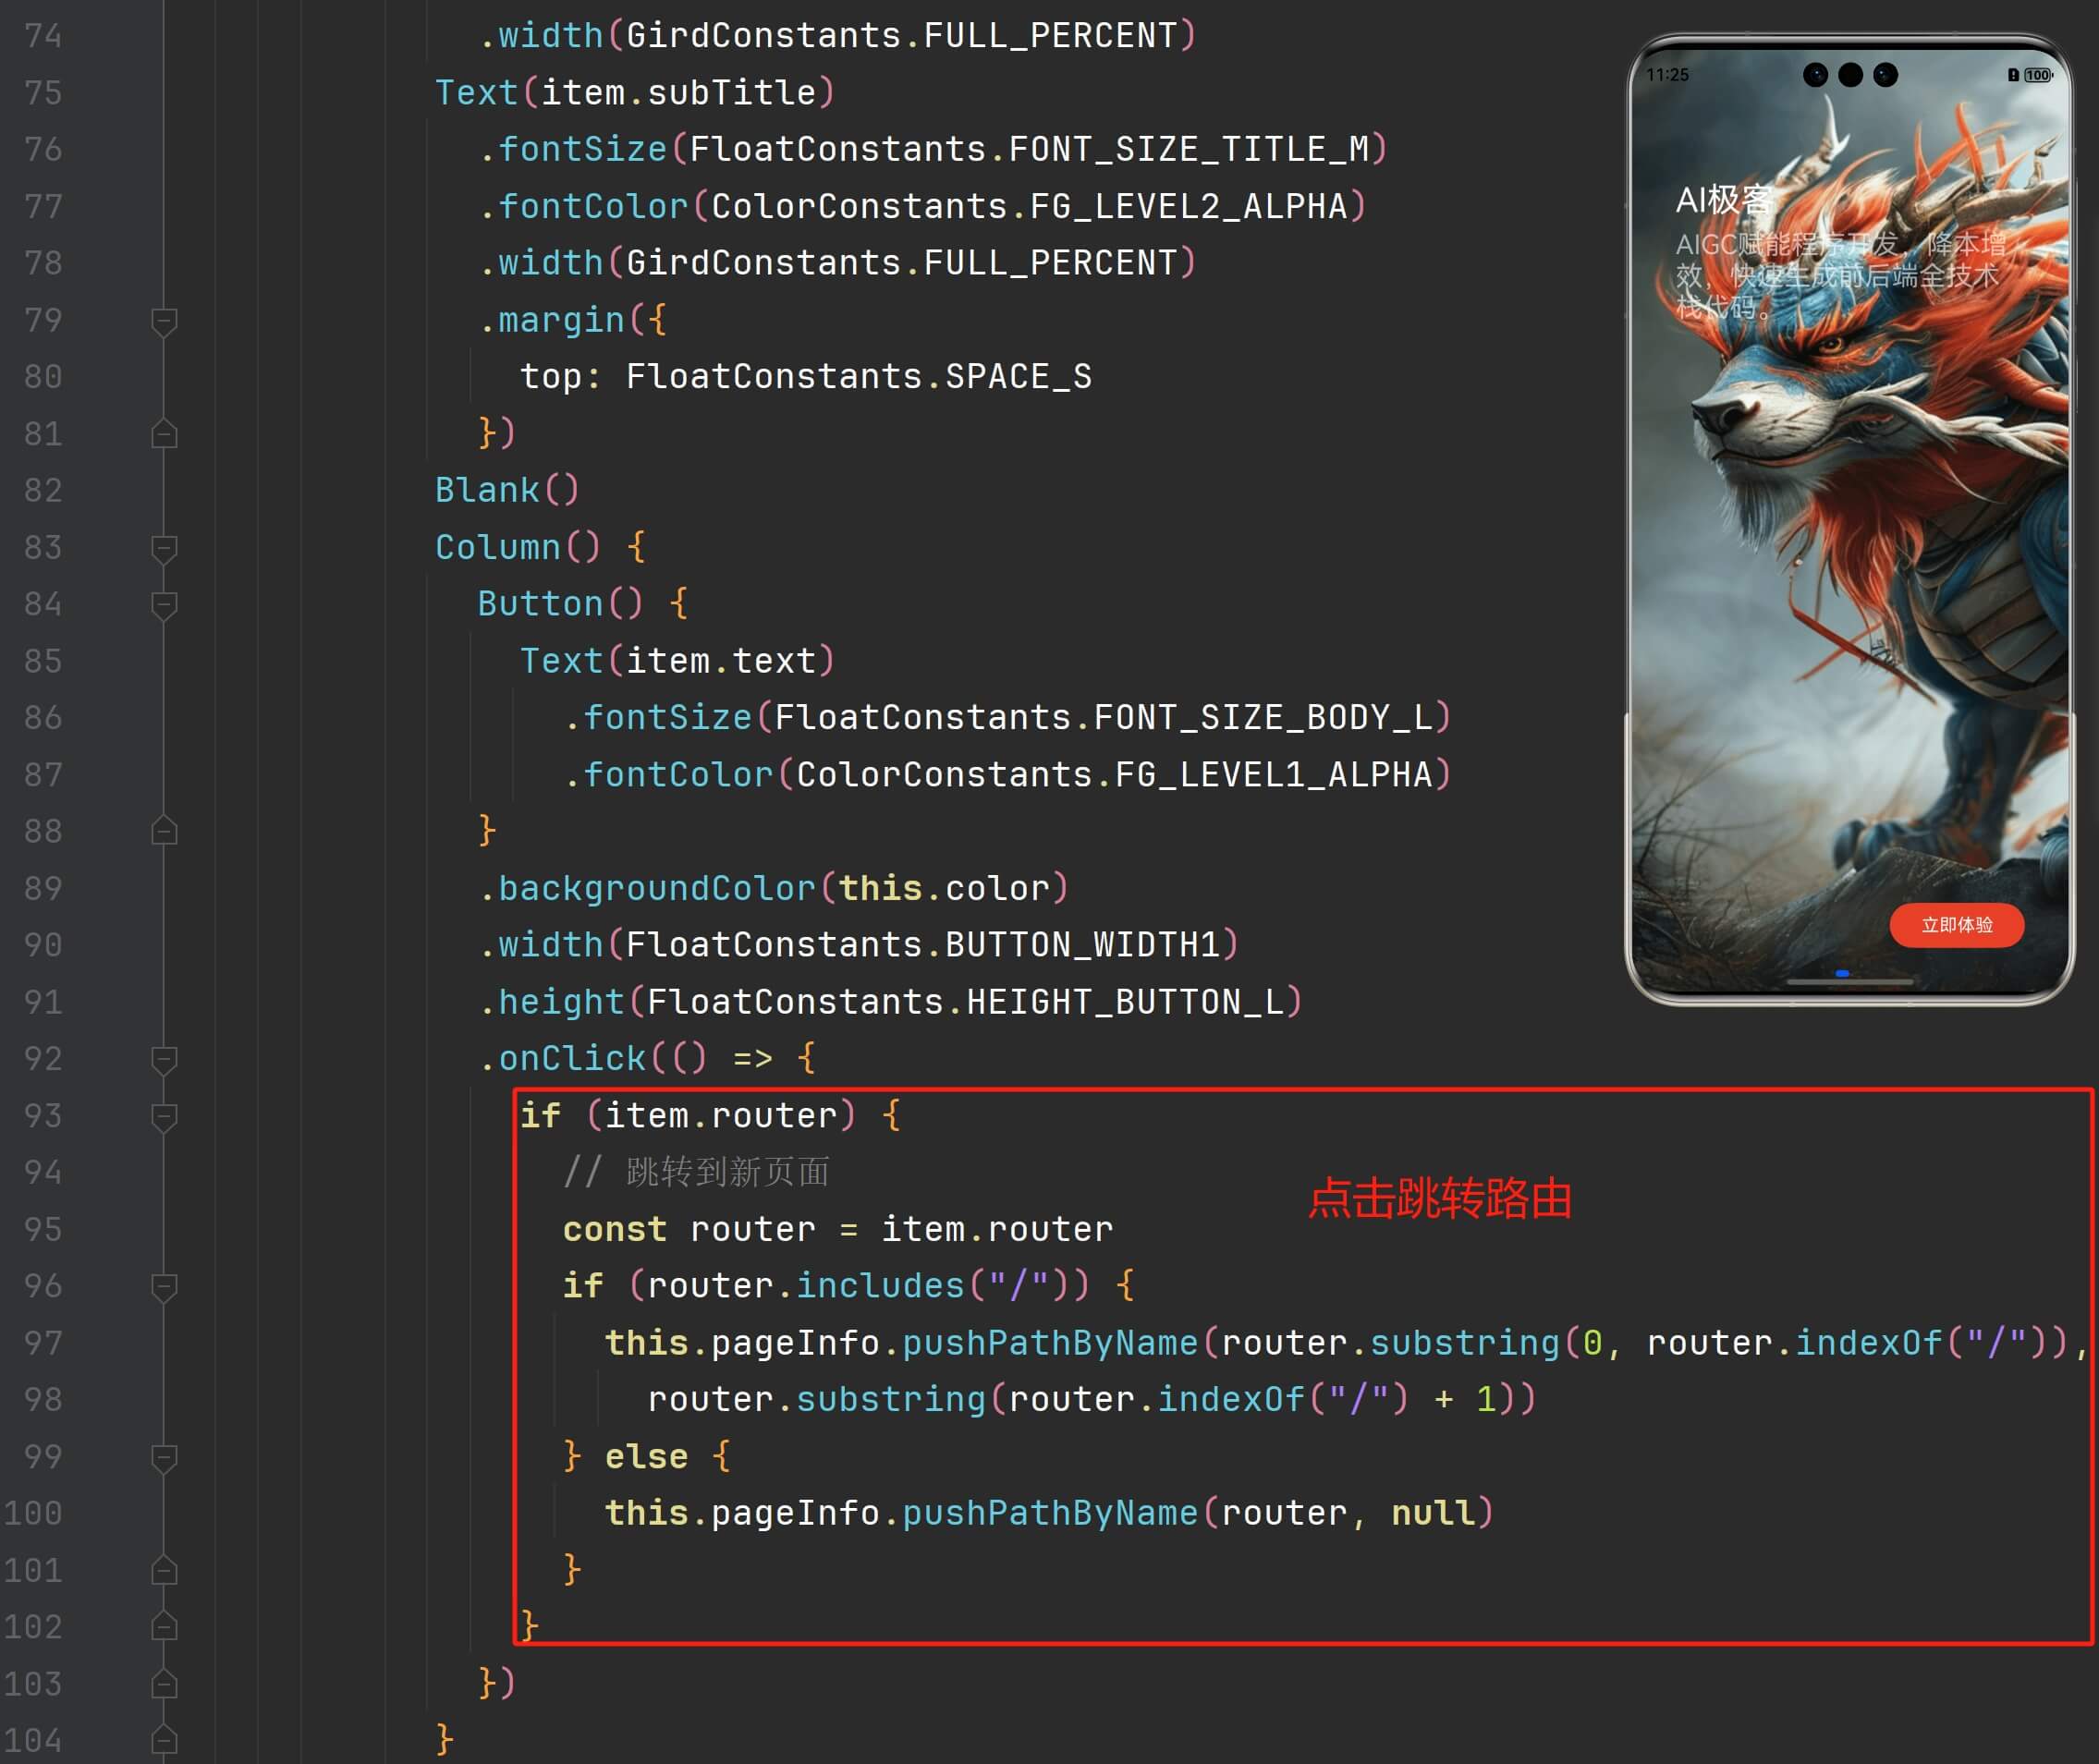
展开列组件,这里最主要的是由两个文本组件(Text)和一个按钮组件(Button)组成,第一个文本组件对应的是轮播图上面的大标题(item.title),这里设置它的文字内容、字号、颜色和宽度,第二个文本组件显示的是子标题(item.subTitle),如下图所示:
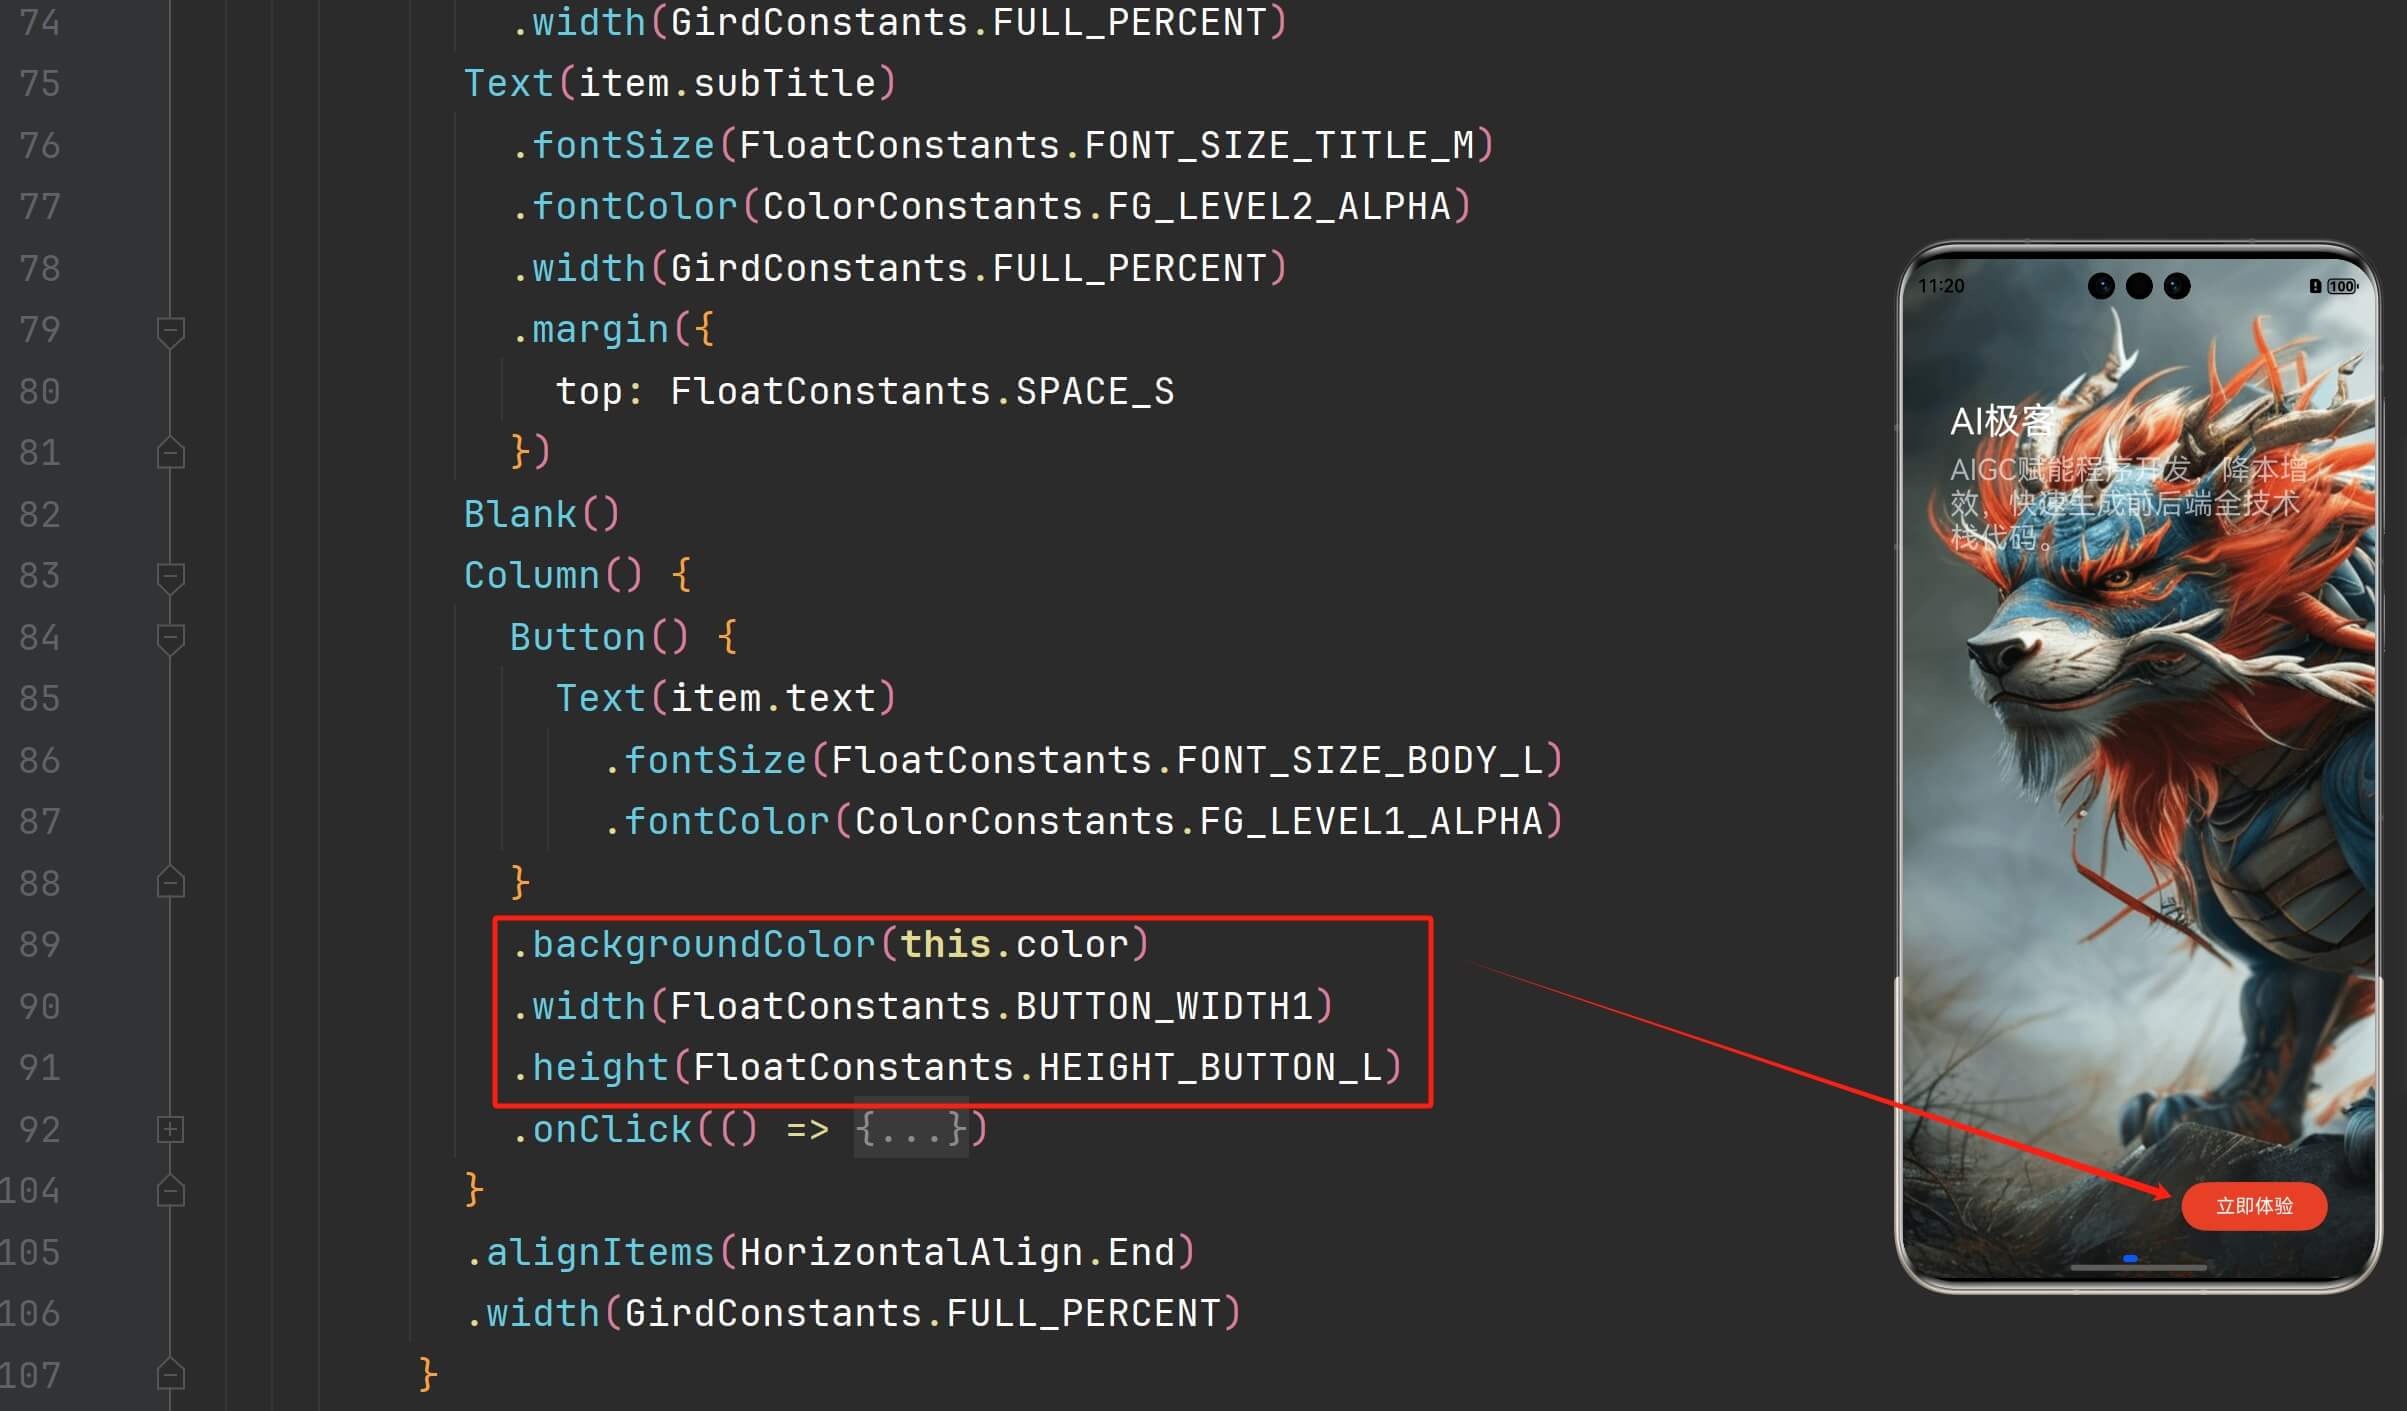
这里的 this.color 使用的是按钮颜色属性:
该按钮有个点击事件,当路由值不为空的时候,它会跳转到这个路由目标,如下图所示:
轮播图导航组件的源码如下:
`/*
- Copyright (c) 2024 AIGCoder.com(AI极客)
- Licensed under the Apache License, Version 2.0 (the "License");
- you may not use this file except in compliance with the License.
- You may obtain a copy of the License at
http://www.apache.org/licenses/LICENSE-2.0- Unless required by applicable law or agreed to in writing, software
- distributed under the License is distributed on an "AS IS" BASIS,
- WITHOUT WARRANTIES OR CONDITIONS OF ANY KIND, either express or implied.
- See the License for the specific language governing permissions and
- limitations under the License.
*/
import { ColorConstants } from "../../constants/ColorConstants"
import { FloatConstants } from "../../constants/FloatConstants"
import { GirdConstants } from "../../constants/GirdConstants"
import { ImageModel } from "../../models/ImageModel"
/**
- 【轮播图导航】
- data:图片数据
- color:按钮颜色
*/
@Component
export struct A_SwiperNav {
@Prop data: Array
@Prop color?: ResourceStr
@StorageLink('pageInfo') pageInfo: NavPathStack = new NavPathStack()
@StorageLink('deviceType') deviceType: string = GirdConstants.DEVICE_SM
private compData: Array = this.data
aboutToAppear(): void {
this.compData.forEach(element => {
if(!(element.src.startsWith("http://") || element.src.startsWith("https://"))){
element.src = 'app.media.' + element.src
}
})
}
build() {
Swiper() {
ForEach(this.compData, (item: ImageModel) => {
Column() {
Text(item.title)
.fontSize(FloatConstants.FONT_SIZE_TITLE_L)
.fontColor(ColorConstants.FG_LEVEL1_ALPHA)
.width(GirdConstants.FULL_PERCENT)
Text(item.subTitle)
.fontSize(FloatConstants.FONT_SIZE_TITLE_M)
.fontColor(ColorConstants.FG_LEVEL2_ALPHA)
.width(GirdConstants.FULL_PERCENT)
.margin({
top: FloatConstants.SPACE_S
})
Blank()
Column() {
Button() {
Text(item.text)
.fontSize(FloatConstants.FONT_SIZE_BODY_L)
.fontColor(ColorConstants.FG_LEVEL1_ALPHA)
}
.backgroundColor(this.color)
.width(FloatConstants.BUTTON_WIDTH1)
.height(FloatConstants.HEIGHT_BUTTON_L)
.onClick(() => {
if (item.router) {
// 跳转到新页面
const router = item.router
if (router.includes("/")) {
this.pageInfo.pushPathByName(router.substring(0, router.indexOf("/")),
router.substring(router.indexOf("/") + 1))
} else {
this.pageInfo.pushPathByName(router, null)
}
}
})
}
.alignItems(HorizontalAlign.End)
.width(GirdConstants.FULL_PERCENT)
}
.width(GirdConstants.FULL_PERCENT)
.height(GirdConstants.FULL_PERCENT)
.backgroundImage((item.src.startsWith("http://") || item.src.startsWith("https://")) ? item.src : $r(item.src))
.backgroundImageSize(ImageSize.Cover)
.backgroundImagePosition({ x: this.deviceType === GirdConstants.DEVICE_SM ? -100 : 0 })
      .padding({
        top: this.deviceType === GirdConstants.DEVICE_SM ? GirdConstants.THIRTY_PERCENT : GirdConstants.TEN_PERCENT,
        bottom: GirdConstants.TEN_PERCENT,
        left: GirdConstants.TEN_PERCENT,
        right: GirdConstants.TEN_PERCENT
      })
  }, (item: ImageModel, index: number) => index + JSON.stringify(item))
}
.autoPlay(true)
.loop(true)
.indicator(this.deviceType === GirdConstants.DEVICE_SM)
}
}
`
下面还有一个按钮组件。按钮组件的背景颜色设置为变量 this.color: