👨⚕️ 主页: gis分享者
👨⚕️ 感谢各位大佬 点赞👍 收藏⭐ 留言📝 加关注✅!
文章目录
- 一、🍀前言
-
- [1.1 ☘️Physijs 物理引擎](#1.1 ☘️Physijs 物理引擎)
-
- [1.1.1 ☘️代码示例](#1.1.1 ☘️代码示例)
- [1.1.2 ☘️方法/属性](#1.1.2 ☘️方法/属性)
- 二、🍀使用Physijs物理引擎,加载各种几何体网格对象
-
- [1. ☘️实现思路](#1. ☘️实现思路)
- [2. ☘️代码样例](#2. ☘️代码样例)
一、🍀前言
本文详细介绍如何基于threejs在三维场景中使用Physijs物理引擎,加载各种几何体网格对象,亲测可用。希望能帮助到您。一起学习,加油!加油!
1.1 ☘️Physijs 物理引擎
Three.js 的 Physi.js 是一个基于 Physijs 的物理引擎插件,用于为 Three.js 场景添加物理模拟(如碰撞检测、重力、刚体动力学等)。
1.1.1 ☘️代码示例
javascript
// 初始化 Physi.js 场景
const scene = new Physijs.Scene();

// 创建带有物理效果的立方体
const box = new Physijs.BoxMesh(
  new THREE.BoxGeometry(1, 1, 1),
  new THREE.MeshBasicMaterial({ color: 0xff0000 })
);
scene.add(box);

// 监听碰撞事件
box.addEventListener('collision', (otherObject) => {
  console.log('发生碰撞!', otherObject);
});

// 在动画循环中更新物理
function animate() {
  requestAnimationFrame(animate);
  scene.simulate(); // 更新物理模拟
  renderer.render(scene, camera);
}
animate();
1.1.2 ☘️方法/属性
Physijs.Scene
创建支持物理的 Three.js 场景。
mesh.setLinearVelocity()
设置物体的线性速度(移动速度)。
mesh.setAngularVelocity()
设置物体的角速度(旋转速度)。
mesh.addEventListener()
监听碰撞事件(如 'collision')。
new Physijs.BoxMesh()
创建带有长方体碰撞体的物体。
new Physijs.SphereMesh()
创建带有球体碰撞体的物体。
scene.simulate()
在渲染循环中调用,更新物理模拟。
Physijs.createMaterial(material, friction, restitution)
创建物理材质,影响摩擦力和弹性。
参数:
material:Three.js 材质(如 THREE.MeshPhongMaterial)。
friction:摩擦系数(默认 0.8)。
restitution:弹性系数(默认 0)。
二、🍀使用Physijs物理引擎,加载各种几何体网格对象
1. ☘️实现思路
- 1、引入'physi.js',创建Physijs物理引擎三维场景scene,设置scene场景重力信息。
- 2、初始化camera相机,定义相机位置 camera.position.set,设置相机方向camera.lookAt,场景scene添加camera。
- 3、创建THREE.SpotLight环境光源ambi,scene场景加入ambi。创建THREE.SpotLight聚光灯光源light,设置light位置、投影和光强信息,scene场景加入light。
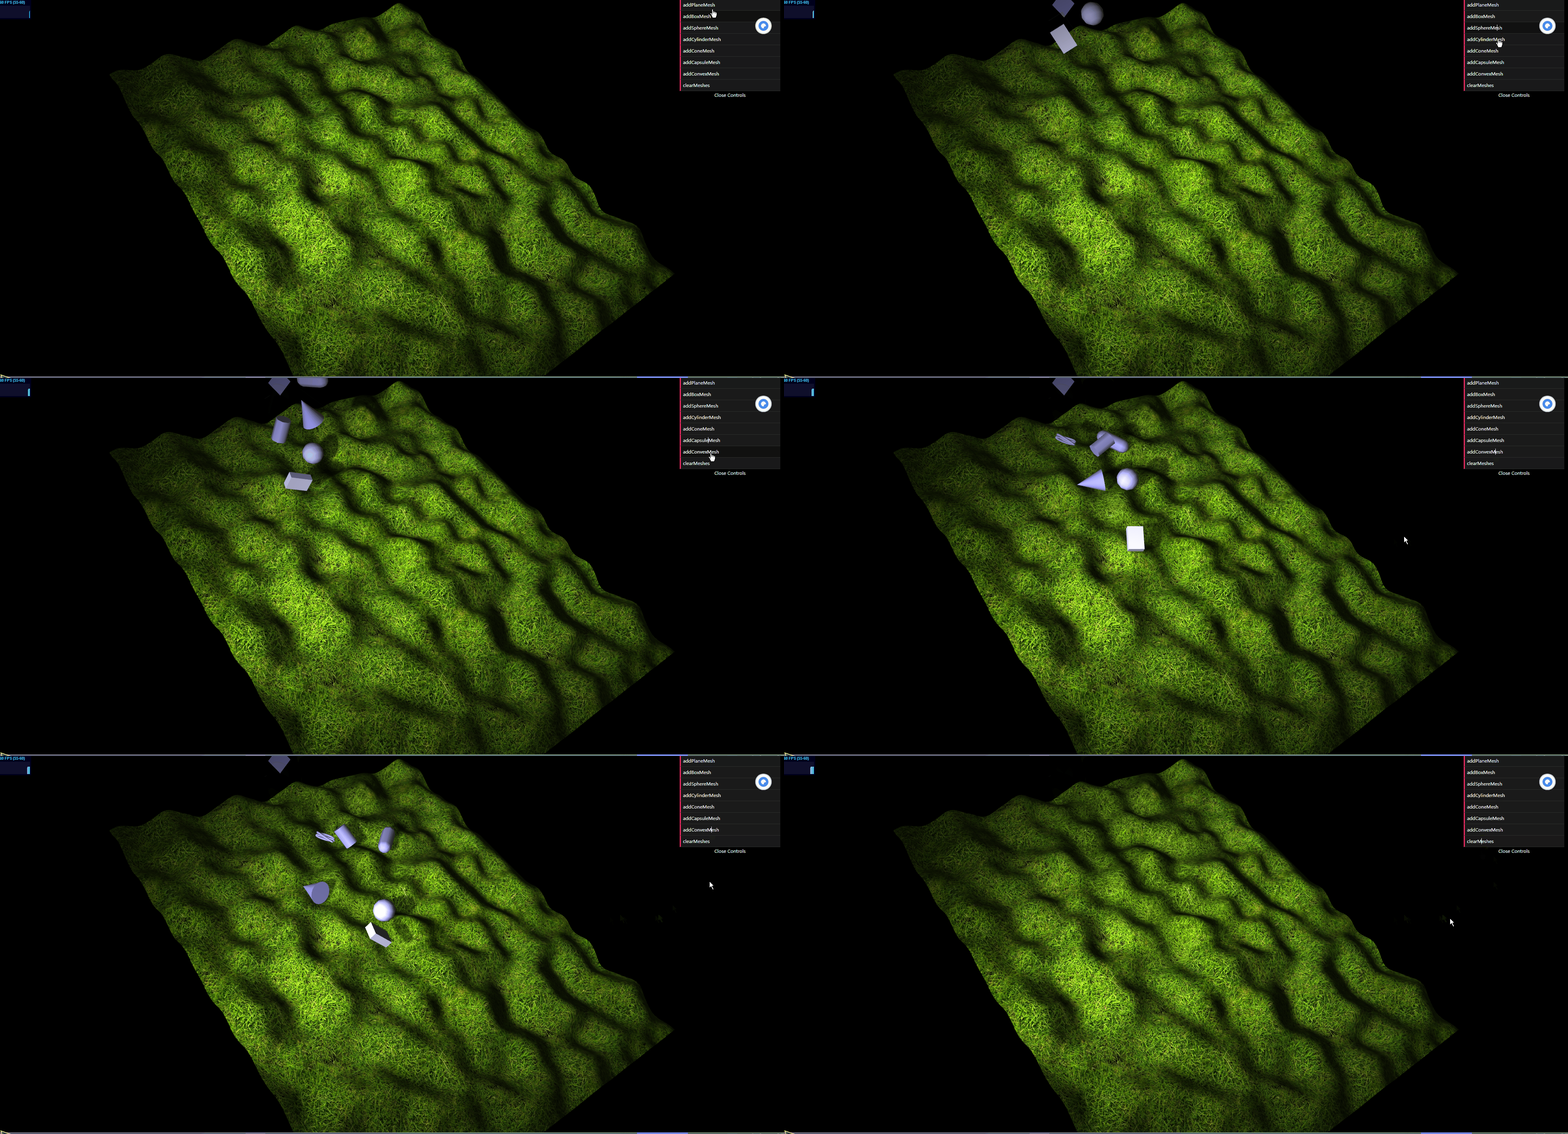
- 4、加载几何模型:定义createHeightMap方法,使用'grasslight-big.jpg'贴图创建二维平面网格对象,用于模拟草皮地面。定义controls方法,内部定义addPlaneMesh方法用于添加物理碰撞二维平面体,定义addBoxMesh方法用于添加物理碰撞立方体,定义addSphereMesh方法用于添加物理碰撞球体,addCylinderMesh方法用于添加物理碰撞圆柱体,addConeMesh方法用于添加物理碰撞圆锥体,addCapsuleMesh方法用于添加物理碰撞胶囊体,addConvexMesh方法用于添加物理碰撞环面扭结体,定义clearMeshes方法用于清除添加的碰撞对象,调用createHeightMap方法创建草地平面。定义render方法,进行三维场景的渲染。具体代码参考下面代码样例。
- 5、加入gui控制。加入stats监控器,监控帧数信息。
2. ☘️代码样例
html
<!DOCTYPE html>
<html>
<head>
    <style>
        body {
            margin: 0;
            overflow: hidden;
            background-color: #000000;
        }
    </style>
    <title>学习threejs,使用Physijs物理引擎,加载各种几何体网格对象</title>
    <script type="text/javascript" src="../libs/three.js"></script>
    <script type="text/javascript" src="../libs/stats.js"></script>
    <script type="text/javascript" src="../libs/physi.js"></script>
    <script type="text/javascript" src="../libs/dat.gui.js"></script>
    <script type="text/javascript" src="../libs/chroma.js"></script>
    <script type="text/javascript" src="../libs/perlin.js"></script>

    <script type="text/javascript">

        'use strict';

        Physijs.scripts.worker = '../libs/physijs_worker.js';
        Physijs.scripts.ammo = '../libs/ammo.js';

        var scale = chroma.scale(['blue', 'white']);

        var initScene, render, applyForce, setMousePosition, mouse_position,
                ground_material, box_material,
                projector, renderer, render_stats, physics_stats, scene, ground, light, camera, box, boxes = [];
		// 初始化三维场景
        initScene = function () {

            renderer = new THREE.WebGLRenderer({antialias: true});
            renderer.setSize(window.innerWidth, window.innerHeight);

            renderer.setClearColor(new THREE.Color(0x000000));
            renderer.shadowMapEnabled = true;


            document.getElementById('viewport').appendChild(renderer.domElement);

            render_stats = new Stats();
            render_stats.domElement.style.position = 'absolute';
            render_stats.domElement.style.top = '1px';
            render_stats.domElement.style.left = '1px';
            render_stats.domElement.style.zIndex = 100;
            document.getElementById('viewport').appendChild(render_stats.domElement);

			// 创建Physijs物理引擎三维场景scene
            scene = new Physijs.Scene({reportSize: 10, fixedTimeStep: 1 / 60});
			// 设置scene中的重力
            scene.setGravity(new THREE.Vector3(0, -20, 0));
			// 创建相机
            camera = new THREE.PerspectiveCamera(
                    35,
                    window.innerWidth / window.innerHeight,
                    1,
                    1000
            );
            camera.position.set(105, 85, 85);
            camera.lookAt(new THREE.Vector3(0, 0, 0));
            scene.add(camera);

            // 创建环境光源ambi,scene场景添加ambi
            var ambi = new THREE.AmbientLight(0x222222);
            scene.add(ambi);

            // 创建聚光灯光源light,设置light的位置、投影、光强等信息
            light = new THREE.SpotLight(0xFFFFFF);
            light.position.set(40, 50, 100);
            light.castShadow = true;
            light.shadowMapDebug = true;
            light.shadowCameraNear = 10;
            light.shadowCameraFar = 200;
            light.intensity = 1.5;


            var meshes = [];
            scene.add(light);

            var controls = new function () {
                this.addSphereMesh = function () {
                    var sphere = new Physijs.SphereMesh(
                            new THREE.SphereGeometry(3, 20),
                            getMaterial()
                    );
                    setPosAndShade(sphere);
                    meshes.push(sphere);
                    scene.add(sphere);
                };
                this.addBoxMesh = function () {
                    var cube = new Physijs.BoxMesh(
                            new THREE.BoxGeometry(4, 2, 6),
                            getMaterial()
                    );
                    setPosAndShade(cube);

                    meshes.push(cube);
                    scene.add(cube);
                };

                this.addCylinderMesh = function () {
                    var cylinder = new Physijs.CylinderMesh(
                            new THREE.CylinderGeometry(2, 2, 6),
                            getMaterial()
                    );
                    setPosAndShade(cylinder);

                    meshes.push(cylinder);
                    scene.add(cylinder);
                };
                this.addConeMesh = function () {
                    var cone = new Physijs.ConeMesh(
                            new THREE.CylinderGeometry(0, 3, 7, 20, 10),
                            getMaterial()
                    );
                    setPosAndShade(cone);

                    meshes.push(cone);
                    scene.add(cone);
                };
                this.addPlaneMesh = function () {
                    var plane = new Physijs.PlaneMesh(
                            new THREE.PlaneGeometry(5, 5, 10, 10),
                            getMaterial()
                    );
                    setPosAndShade(plane);

                    meshes.push(plane);
                    scene.add(plane);
                };
                this.addCapsuleMesh = function () {
                    var merged = new THREE.Geometry();
                    var cyl = new THREE.CylinderGeometry(2, 2, 6);
                    var top = new THREE.SphereGeometry(2);
                    var bot = new THREE.SphereGeometry(2);

                    var matrix = new THREE.Matrix4();
                    matrix.makeTranslation(0, 3, 0);
                    top.applyMatrix(matrix);

                    var matrix = new THREE.Matrix4();
                    matrix.makeTranslation(0, -3, 0);
                    bot.applyMatrix(matrix);

                    // merge to create a capsule
                    merged.merge(top);
                    merged.merge(bot);
                    merged.merge(cyl);

                    // create a physijs capsule mesh
                    var capsule = new Physijs.CapsuleMesh(
                            merged,
                            getMaterial()
                    );
                    setPosAndShade(capsule);

                    meshes.push(capsule);
                    scene.add(capsule);
                };
                this.addConvexMesh = function () {
                    var convex = new Physijs.ConvexMesh(
                            new THREE.TorusKnotGeometry(0.5, 0.3, 64, 8, 2, 3, 10),
                            getMaterial()
                    );

                    setPosAndShade(convex);

                    meshes.push(convex);
                    scene.add(convex);

                };
                this.clearMeshes = function () {
                    meshes.forEach(function (e) {
                        scene.remove(e);
                    });
                    meshes = [];
                }

            };

            var gui = new dat.GUI();
            gui.add(controls, 'addPlaneMesh');
            gui.add(controls, 'addBoxMesh');
            gui.add(controls, 'addSphereMesh');
            gui.add(controls, 'addCylinderMesh');
            gui.add(controls, 'addConeMesh');
            gui.add(controls, 'addCapsuleMesh');
            gui.add(controls, 'addConvexMesh');
            gui.add(controls, 'clearMeshes');

            var date = new Date();
            var pn = new Perlin('rnd' + date.getTime());
            var map = createHeightMap(pn);
            scene.add(map);

            requestAnimationFrame(render);
            scene.simulate();
        };


        function createHeightMap(pn) {

            var ground_material = Physijs.createMaterial(
                    new THREE.MeshLambertMaterial(
                            {
                                map: THREE.ImageUtils.loadTexture('../assets/textures/ground/grasslight-big.jpg')
                            }),
                    .3,
                    .8
            );

            var ground_geometry = new THREE.PlaneGeometry(120, 100, 100, 100);
            for (var i = 0; i < ground_geometry.vertices.length; i++) {
                var vertex = ground_geometry.vertices[i];
                var value = pn.noise(vertex.x / 10, vertex.y / 10, 0);
                vertex.z = value * 10;
            }
            ground_geometry.computeFaceNormals();
            ground_geometry.computeVertexNormals();

            var ground = new Physijs.HeightfieldMesh(
                    ground_geometry,
                    ground_material,
                    0, // mass
                    100,
                    100
            );
            ground.rotation.x = Math.PI / -2;
            ground.rotation.y = 0.4;
            ground.receiveShadow = true;

            return ground;
        }

        function setPosAndShade(obj) {
            obj.position.set(
                    Math.random() * 20 - 45,
                    40,
                    Math.random() * 20 - 5
            );

            obj.rotation.set(Math.random() * 2 * Math.PI, Math.random() * 2 * Math.PI, Math.random() * 2 * Math.PI);
            obj.castShadow = true;
        }

        function getMaterial() {
            var material = Physijs.createMaterial(
                    new THREE.MeshLambertMaterial(
                            {
                                color: scale(Math.random()).hex(),
//                                opacity: 0.8,
//                                transparent: true
                            }), 0.5, 0.7);

            return material;
        }

        render = function () {
            requestAnimationFrame(render);
            renderer.render(scene, camera);
            render_stats.update();
            scene.simulate(undefined, 2);
        };

        window.onload = initScene;

    </script>
</head>
<body>
<div id="viewport"></div>
</body>
</html>
效果如下:
