1. SGCC_Electricity 应用介绍
SGCC_Electricity 是一个用于将国家电网(State Grid Corporation of China,简称 SGCC)的电费和用电量数据接入 Home Assistant 的自定义集成组件。通过该应用,用户可以实时追踪家庭用电量情况,并将每日用电量数据保存到数据库中,以便后续查询和分析。
1.1. 核心功能
-
实时数据接入
- 电费与用电量同步:SGCC_Electricity 能够直接从国家电网的官方系统获取用户家庭的实时电费和用电量数据,并同步到 Home Assistant 中。
- 自动化更新:支持设置定时更新频率,确保 Home Assistant 中的数据始终与国家电网的最新数据保持一致。
-
数据存储与历史查询
- 数据库存储:应用支持将每日用电量数据保存到用户指定的数据库中(如 Sqlite3 等),确保历史数据有迹可循。
- 历史数据查询:用户可以通过 Home Assistant 的界面或第三方工具查询历史用电量数据,分析用电趋势,制定节能计划。
-
可视化展示
- Home Assistant 仪表板集成:SGCC_Electricity 提供的数据可以直接在 Home Assistant 的仪表板中展示,用户可以自定义仪表板,以图表、卡片等形式直观地查看用电量情况。
- 多维度分析:支持按日、周、月等时间维度分析用电量,帮助用户更好地了解家庭用电习惯。
1.2. 使用场景
- 家庭节能管理:用户可以通过 SGCC_Electricity 实时了解家庭用电量情况,发现高耗电设备或时段,及时调整用电习惯,实现节能减排。
- 智能家居联动:结合 Home Assistant 的其他功能,用户可以设置自动化规则,如当用电量超过一定阈值时自动关闭非必要电器,或根据用电量情况调整室内温度等。
- 数据分析与报告:对于需要定期提交用电量报告的用户(如企业、学校等),SGCC_Electricity 提供的历史数据查询功能可以大大简化报告制作流程。
1.3. 关于Home Assistant
Home Assistant是一个开源的智能家居自动化系统,其核心特点是将本地控制和隐私保护放在首位。它由全球范围内的爱好者和DIY(自己动手做)热衷者组成的社区推动发展,并且在2024年被列为顶级开源项目之一。以下是关于Home Assistant的简单概述:
- 开源与社区驱动:Home Assistant是一个非营利项目,由Open Home Foundation支持,它不能被出售或收购。该系统的开发依赖于一个活跃且友好的全球社区,成员们热衷于分享他们对智能家居的热情和技术。
- 本地控制与隐私:Home Assistant强调本地控制,意味着用户的数据和操作主要在本地设备上处理,而不是上传到云端,这有助于保护用户隐私。
- 语音助手集成:Home Assistant支持与主流语音助手如Alexa和Google Assistant的集成,允许用户通过语音命令控制家中的智能设备。
- 自定义与扩展性:作为一个开源项目,Home Assistant提供了高度的自定义和扩展性,用户可以根据自己的需求添加功能或集成新的设备。
- 快速且私密的语音助手:Home Assistant还拥有自己的语音助手,它运行在价格实惠的硬件上,提供极快的响应速度,并且支持唤醒词功能,同时保证用户数据的私密性。
- 社区参与:Home Assistant的社区非常活跃,用户可以参与讨论、分享经验,甚至贡献代码来改进系统。
- 最新动态与路线图:用户可以通过Home Assistant的官方网站了解项目的最新进展、发布说明、博客文章以及未来的发展路线图。
- Home Assistant的官方网站是https://www.home-assistant.io/,用户可以在这里找到更多关于系统的详细信息、安装指南、设备集成列表以及社区资源等。
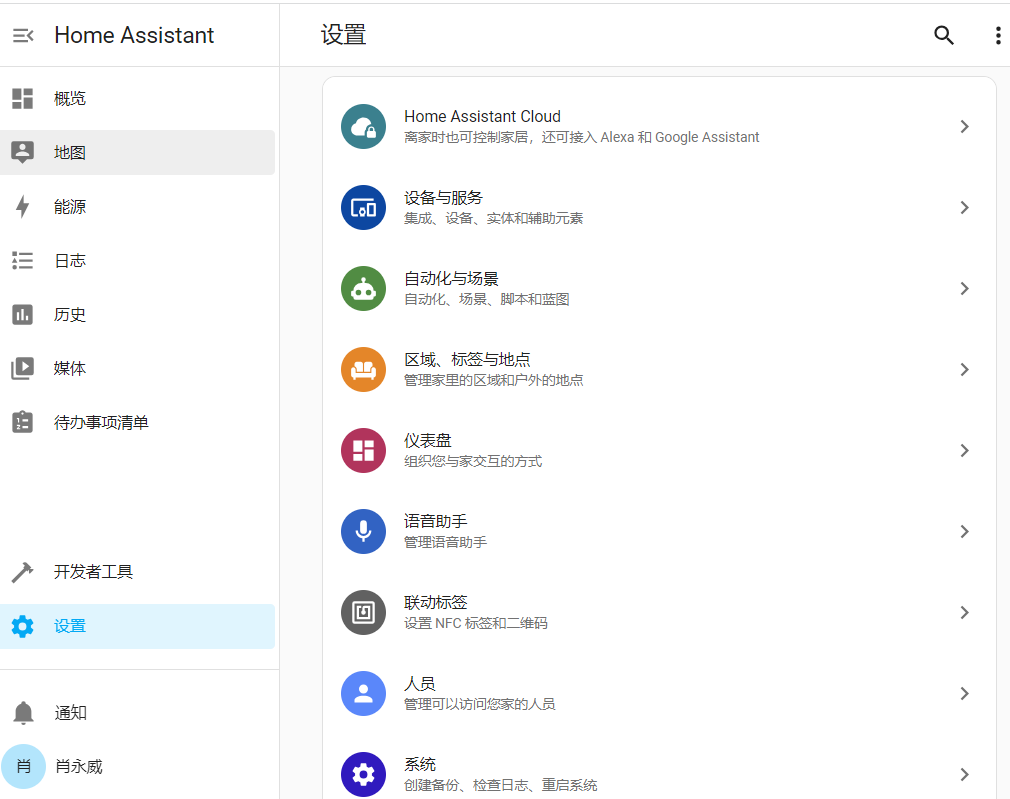
2. 系统快速部署
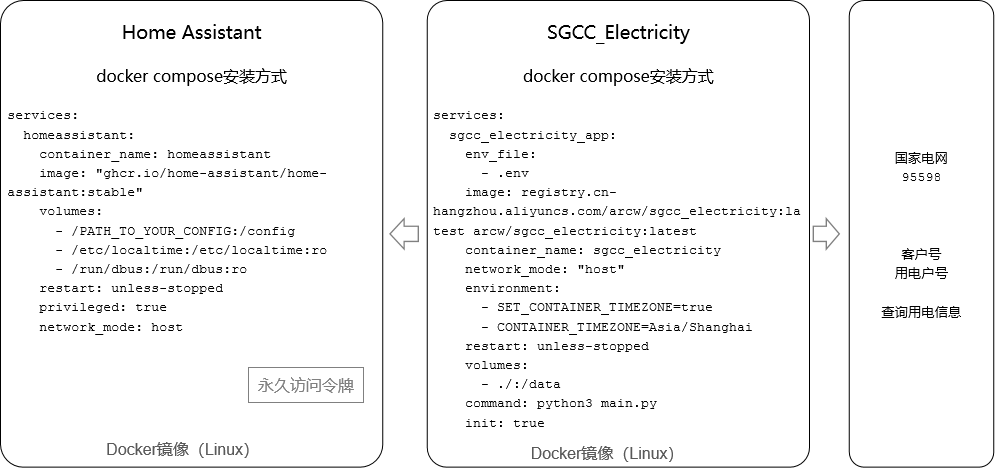
2.1. 系统概述
Docker镜像部署方式
系统由SGCC_Electricity 应用系统和Home Assistant系统平台构成,其中Home Assistant是本地私有化离线方式。
2.2. CentOS7 离线安装Docker
Docker 离线安装包下载地址https://download.docker.com/linux/centos/7/x86_64/stable/Packages/。
依赖包参考如下文档,在此只安装核心文件。
cmd
[root@DeepLearning ha]#rpm -ivh docker-ce-cli-19.03.12-3.el7.x86_64.rpm
[root@DeepLearning ha]#rpm -ivh container-selinux-2.119.1-1.c57a6f9.el7.noarch.rpm
[root@DeepLearning ha]#rpm -ivh containerd.io-1.2.13-3.2.el7.x86_64.rpm
[root@DeepLearning ha]#rpm -ivh docker-ce-18.09.0-3.el7.x86_64.rpm
[root@DeepLearning ha]#rpm -ivh docker-compose-plugin-2.6.0-3.el7.x86_64.rpm - 启动 Docker 服务
安装完成后,启动 Docker 服务:
cmd
[root@DeepLearning ha]#systemctl start docker- 设置 Docker 开机自启:
cmd
[root@DeepLearning ha]#systemctl enable docker- 检查 Docker 安装
确保 Docker 本身已正确安装:
cmd
[root@DeepLearning ha]#docker --version2.3. 安装Home Assistant镜像
官方安装文档,参考https://www.home-assistant.io/installation/linux。
随着 Docker 命令变得越来越复杂,切换到使用 docker compose 可能会更合适,因为它支持在服务失败或系统重启时自动重启。创建一个 compose.yml 文件(注:实际文件名为 docker-compose.yml)。
创建ha目录,创建docker-compose.yml文件,把如下内容编辑进去。
cmd
[root@DeepLearning ha]#mkdir ha
[root@DeepLearning ha]#touch docker-compose.yml
[root@DeepLearning ha]#nano docker-compose.yml
docker compose 安装方式,镜像配置文件。
yml
services:
  homeassistant:
    container_name: homeassistant
    image: ghcr.io/home-assistant/home-assistant:stable # 中国地区镜像地址:ghcr.nju.edu.cn/home-assistant/home-assistant:stable或者用你自己的 $
    volumes:
      - "./config:/config"
      - "/etc/localtime:/etc/localtime:ro"
      - "/run/dbus:/run/dbus:ro" # 蓝牙设备需要
    environment:
      - SET_CONTAINER_TIMEZONE=true
      - CONTAINER_TIMEZONE=Asia/Shanghai
    restart: unless-stopped
    privileged: true
从中国区镜像地址安装镜像。
cmd
[root@DeepLearning ha]#docker compose up --build -dDocker 容器默认运行在独立的网络命名空间中,若未显式映射端口,外部无法访问。设置ports端口,如下配置所示。
cmd
[root@DeepLearning ha]#vi docker-compose.yml
yml
services:
  homeassistant:
    container_name: homeassistant
    image: ghcr.nju.edu.cn/home-assistant/home-assistant:stable
    ports:
      - "8123:8123" # 关键:将容器的 8123 端口映射到宿主机的 8123 端口
    volumes:
      - "./config:/config"
      - "/etc/localtime:/etc/localtime:ro"
      - "/run/dbus:/run/dbus:ro"
    environment:
      - SET_CONTAINER_TIMEZONE=true
      - CONTAINER_TIMEZONE=Asia/Shanghai
    restart: unless-stopped
    privileged: true
停止当前服务,重新启动服务。
cmd
docker compose down # 停止当前服务
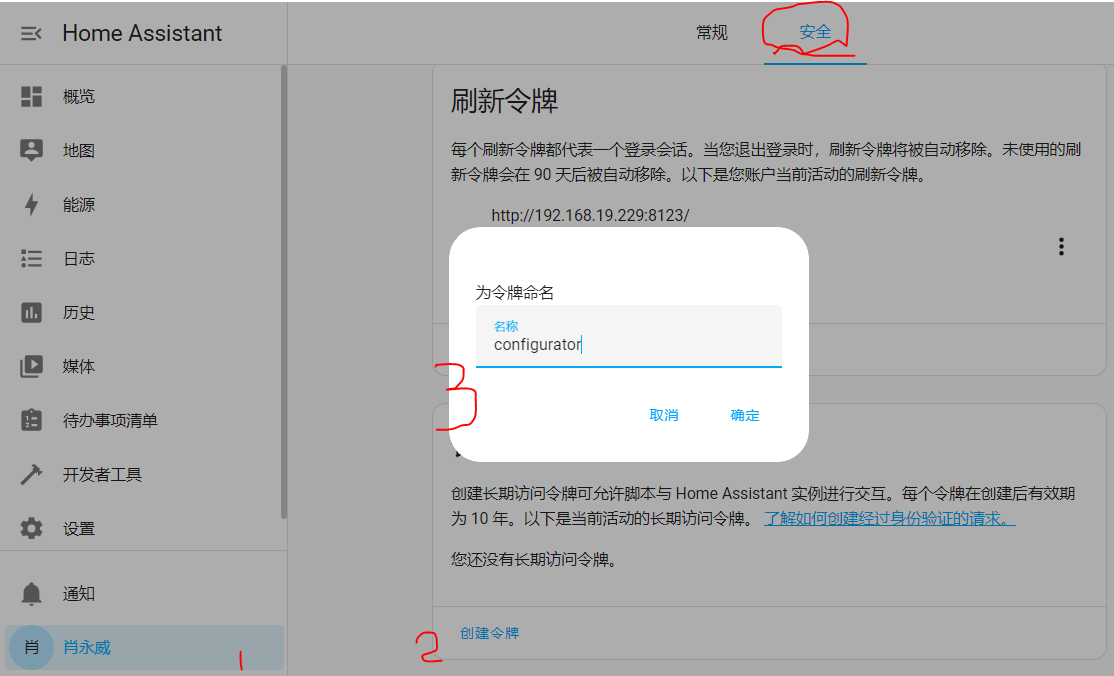
docker compose up -d # 重新启动服务2.4. Home Assistant获取永久访问令牌
https://blog.csdn.net/qq_25886111/article/details/106282492
2.5. 安装sgcc_electricity镜像
2.5.1. 克隆仓库
git clone https://github.com/ARC-MX/sgcc_electricity_new.git
# 如果github网络环境不好的话可以使用国内镜像,完全同步的,个人推荐使用国内镜像
# git clone https://gitee.com/ARC-MX/sgcc_electricity_new.git
cd sgcc_electricity_new
2.5.2. 创建环境变量文件
cp example.env .env
vim .env # 参考以下文件编写.env文件
.env
### 以下项都需要修改
## 国网登录信息
# 修改为自己的登录账号
PHONE_NUMBER="xxx"
# 修改为自己的登录密码
PASSWORD="xxxx"
# 排除指定用户ID,如果出现一些不想检测的ID或者有些充电、发电帐号、可以使用这个环境变量,如果有多个就用","分隔,","之间不要有空格
IGNORE_USER_ID=xxxxxxx,xxxxxxx,xxxxxxx

# SQLite 数据库配置
# or False 不启用数据库储存每日用电量数据。
ENABLE_DATABASE_STORAGE=True
# 数据库名,默认为homeassistant
DB_NAME="homeassistant.db"
# COLLECTION_NAME默认为electricity_daily_usage_{国网用户id},不支持修改。

## homeassistant配置
# 改为你的localhost为你的homeassistant地址
HASS_URL="http://localhost:8123/"
# homeassistant的长期令牌
HASS_TOKEN="eyxxxxx"

## selenium运行参数
# 任务开始时间,24小时制,例如"07:00"则为每天早上7点执行,第一次启动程序如果时间晚于早上7点则会立即执行一次,每隔12小时执行一次。
JOB_START_TIME="07:00"
# 每次操作等待时间,推荐设定范围为[2,30],该值表示每次点击网页后所要等待数据加载的时间,如果出现"no such element"诸如此类的错误可适当调大该值,如果硬件性能较好可以适当调小该值
RETRY_WAIT_TIME_OFFSET_UNIT=15


## 记录的天数, 仅支持填写 7 或 30
# 国网原本可以记录 30 天,现在不开通智能缴费只能查询 7 天造成错误
DATA_RETENTION_DAYS=7

## 余额提醒
# 是否缴费提醒
RECHARGE_NOTIFY=Flase
# 余额
BALANCE=5.0
# pushplus token 如果有多个就用","分隔,","之间不要有空格,单个就不要有","
PUSHPLUS_TOKEN=xxxxxxx,xxxxxxx,xxxxxxx
2.5.3. 运行
我已经优化了镜像环境,将镜像的地址配置为阿里云,如果要使用docker hub的源可以将docker-compose.yml中 image: registry.cn-hangzhou.aliyuncs.com/arcw/sgcc_electricity:latest 改为 arcw/sgcc_electricity:latest
yml
services:
  sgcc_electricity_app:
    env_file:
      - .env
    image: registry.cn-hangzhou.aliyuncs.com/arcw/sgcc_electricity:latest # for use docker.io: arcw/sgcc_electricity:latest
    privileged: true # 这是后加上的
    container_name: sgcc_electricity
    network_mode: "host"
    environment:
      - SET_CONTAINER_TIMEZONE=true
      - CONTAINER_TIMEZONE=Asia/Shanghai
    restart: unless-stopped
    volumes:
      - ./:/data        # if you want to read homeassistant.db, homeassistant.db is in the container at /data/
    command: python3 main.py
    init: true
运行获取传感器名称:
docker-compose up -d
docker-compose logs sgcc_electricity_app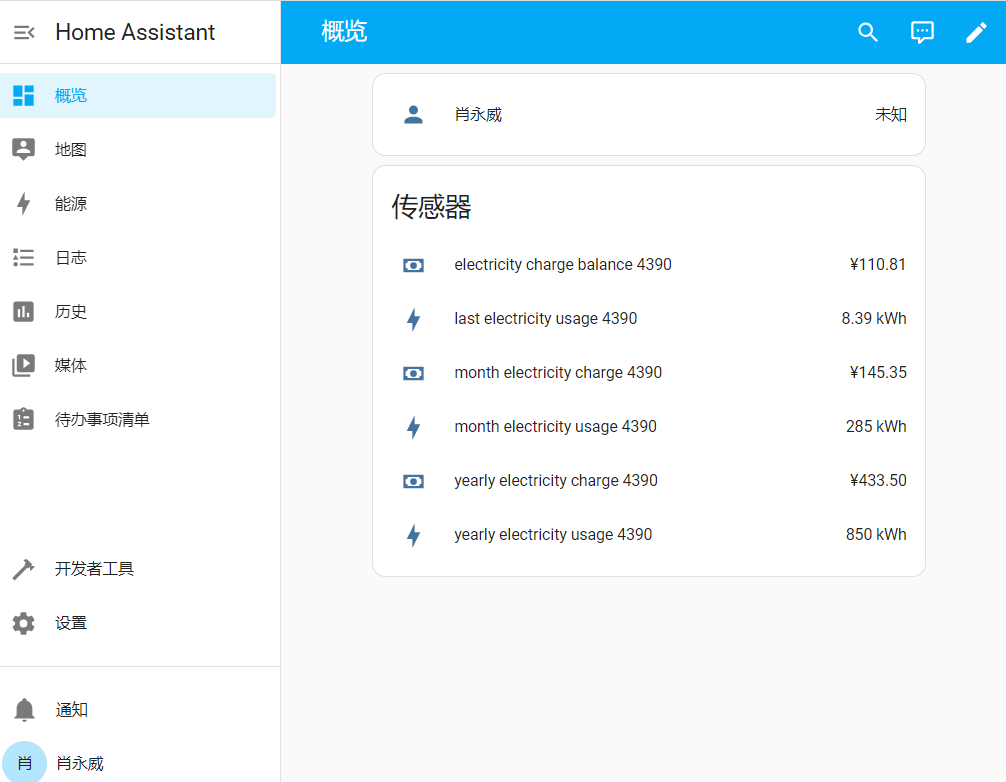
3. 实践中所遇到的问题:
3.1. docker: 'compose' is not a docker command
docker compose version
docker: 'compose' is not a docker command.
Docker Compose 是一个独立的工具,需要单独安装。根据你的 Docker 版本和环境,选择适合的安装方法。
3.2. 运行docker镜像,报权限错:
OpenBLAS blas_thread_init: pthread_create failed for thread 1 of 6: Operation not permitted
解决方案:
增加参数,privileged: true:这会授予容器几乎所有的内核功能,类似于使用 docker run --privileged。
cmd
vim docker-compose.yml
yml
services:
  sgcc_electricity_app:
    env_file:
      - .env
    image: registry.cn-hangzhou.aliyuncs.com/arcw/sgcc_electricity:latest # for use docker.io: arcw/sgcc_electricity:latest
    container_name: sgcc_electricity
    network_mode: "host"
    environment:
      - SET_CONTAINER_TIMEZONE=true
      - CONTAINER_TIMEZONE=Asia/Shanghai
    restart: unless-stopped
    volumes:
      - ./:/data        # if you want to read homeassistant.db, homeassistant.db is in the container at /data/
    command: python3 main.py
    init: true
参考:
1. https://github.com/ARC-MX/sgcc_electricity_new
2. https://www.home-assistant.io/installation/linux
3.花陌黎呀. Home Assistant获取永久访问令牌. CSDN博客. 2020.05
4.一枚小爪哇. 【CentOS7离线安装Docker】. CSDN博客. 2021.12