瀑布流
-
- [1. 解释](#1. 解释)
- [2. 形成结构和样式](#2. 形成结构和样式)
- [3. 自定义指令](#3. 自定义指令)
1. 解释
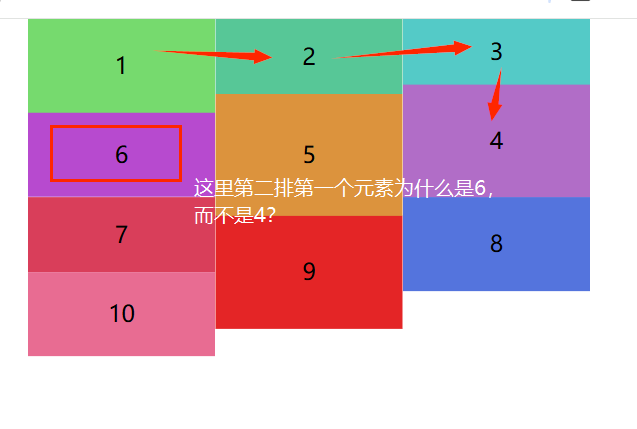
- 瀑布流特征:
- 等宽不等高:元素宽度固定,高度根据内容自适应。
- 错落排列:元素像瀑布一样从上到下依次填充,自动寻找最短列插入
体现:图中第一排1,2,3元素中,3是最短高度,就是该行最短列。
2. 形成结构和样式
html
<template>
  <div class="page-main">
    <div class="card">
      <!-- v-waterfall是自定义指令 属性值是个回调函数-->
      <div v-waterfall="el => updateLayout(el)" class="card-item" v-for="item in cardDate" :key="item.id"
        :style="{ background: item.color, height: item.height }">
        <p class="text">{{ item.id }}</p>
      </div>
    </div>
  </div>
</template>
javascript
//这是<script>data中的数据,结构是通过v-for遍历的
 cardDate: [
        { id: 1, color: '#76da6e', height: '100px' },
        { id: 2, color: '#57c797', height: '80px' },
        { id: 3, color: '#54cac7', height: '70px' },
        { id: 4, color: '#b16dc7', height: '120px' },
        { id: 5, color: '#dc933d', height: '130px' },
        { id: 6, color: '#b74acf', height: '90px' },
        { id: 7, color: '#d93e5a', height: '80px' },
        { id: 8, color: '#5474dd', height: '100px' },
        { id: 9, color: '#e42526', height: '120px' },
        { id: 10, color: '#e86c92', height: '90px' }
      ],
css
<style scoped>
/* .page-main {
  position: relative;
} */

.card {
  position: relative;
  margin: 0 auto;
  width: calc(3 * 200px);
  /* 3列,每列200px宽度*/
}

.card-item {
  /* 相对于最近的非static定位的祖先元素(.card)定位(0,0) */
  position: absolute;
  width: 200px;

  /* 使得内容居中(可省略) */
  display: flex;
  align-items: center;
  justify-content: center;

  color: black;
  font-size: 24px;
  /* 监听到css样式变化,过渡0.3s效果 */
  transition: all 0.3s;
}
</style>
未加上js动态计算每个元素的位置---初始样子是将所有元素重叠在一起(如图)
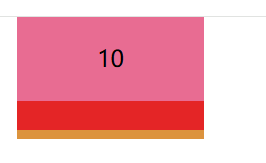
然后就要计算出每块元素应该存在的位置(top和left)【css中每块元素position都是absolute,而且没有设置边偏移,默认都是0】
DOM元素尺寸属性不了解可以看这里有图文说明
javascript
<script>
export default {
name: 'App',
data() {
return {
cardDate: [
{ id: 1, color: '#76da6e', height: '100px' },
{ id: 2, color: '#57c797', height: '80px' },
{ id: 3, color: '#54cac7', height: '70px' },
{ id: 4, color: '#b16dc7', height: '120px' },
{ id: 5, color: '#dc933d', height: '130px' },
{ id: 6, color: '#b74acf', height: '90px' },
{ id: 7, color: '#d93e5a', height: '80px' },
{ id: 8, color: '#5474dd', height: '100px' },
{ id: 9, color: '#e42526', height: '120px' },
{ id: 10, color: '#e86c92', height: '90px' }
],
columnHeights: [0, 0, 0] //每列元素的高度
}
},
directives: {
waterfall: {
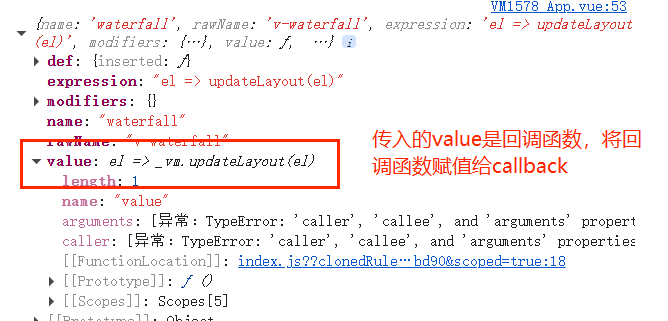
inserted(el, binding) {
const callback = binding.value || {};
callback(el);
}
}
},
methods: {
updateLayout(item) {
const column = this.getMinColumnHeight(this.columnHeights);
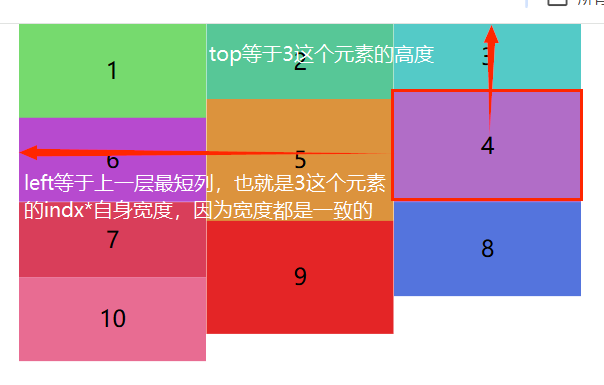
//计算每个元素位移x轴和y轴距离
const itemTop = this.columnHeights[column];
const itemLeft = column * item.clientWidth;
item.style.transform = `translate(${itemLeft}px,${itemTop}px)`;
//此时该元素item已经定位完成
//则重新跟新原本最短列为this.columnHeights[column] + item.offsetHeight;
this.columnHeights[column] += item.offsetHeight;
},
getMinColumnHeight(arr) {
let min = Math.min(...arr);
return arr.indexOf(min) != -1 ? arr.indexOf(min) : 0;
}
},
}
</script>3. 自定义指令
javascript
directives: {
    waterfall: {
      inserted(el, binding) {
        console.log(binding);
        const callback = binding.value || {};
        callback(el);
      }
    }
  },
el则是每个cart-item元素
(注:本文例子参考这个b站视频,我进行了补充)