摘要:掌握PyQt5绘图核心控件,轻松实现窗体绘图、文字渲染、几何图形绘制及图像加载。本文附带完整代码示例与效果图,助你快速上手GUI图形开发。
绘图基础:为什么需要这些控件?
在GUI开发中,绘图功能是数据可视化、游戏开发、图像编辑等场景的核心需求。PyQt5通过以下四大类实现绘图:
- QPainter:绘图引擎,执行底层绘制操作
- QPen:控制线条样式(颜色/粗细/虚线等)
- QBrush:控制填充样式(纯色/渐变/图案)
- QPixmap :图像加载与渲染
📌 关键特性:所有绘图操作必须在paintEvent()事件中完成,通过begin()和end()方法包裹。
核心控件详解与实战
QPainter:绘图引擎
核心能力:
python
def paintEvent(self, event):
    painter = QPainter(self)
    painter.begin(self)
    # 绘制操作...
    painter.end()
常用方法速查表:
| 方法 | 功能 | 示例 |
|---|---|---|
| drawText() | 文字渲染 | painter.drawText(rect, alignment, "文本") |
| drawEllipse() | 绘制椭圆 | painter.drawEllipse(x, y, w, h) |
| fillRect() | 矩形填充 | painter.fillRect(rect, QColor(255,0,0)) |
文字绘制示例
python
import sys
from PyQt5.QtWidgets import QApplication,QWidget
from PyQt5.QtGui import QPainter,QColor,QFont
from PyQt5.QtCore import Qt
class Drawing(QWidget):
def __init__(self,parent=None):
super(Drawing,self).__init__(parent)
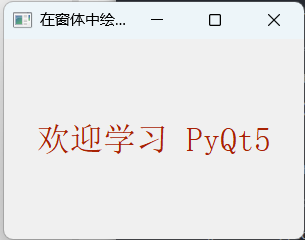
self.setWindowTitle("在窗体中绘画出文字例子")
self.resize(300,200)
self.text='欢迎学习 PyQt5'
def paintEvent(self,event):
painter=QPainter(self)
painter.begin(self)
# 自定义的绘画方法
self.drawText(event,painter)
painter.end()
def drawText(self,event,qp):
#设置笔的颜色
qp.setPen(QColor(168,34,3))
#设置字体
qp.setFont(QFont('SimSun',20))
#画出文本
qp.drawText(event.rect(),Qt.AlignCenter,self.text)
if __name__ == '__main__':
app=QApplication(sys.argv)
demo=Drawing()
demo.show()
sys.exit(app.exec_())运行效果
QPen:线条控制大师
6种预定义线型对比:
- Qt.SolidLine:实线(默认)
- Qt.DashLine:虚线
- Qt.DotLine:点线
- Qt.DashDotLine:点划线
- Qt.DashDotDotLine:双点划线
- Qt.CustomDashLine:自定义模式
自定义虚线技巧:
python
pen = QPen(Qt.red,  3)
pen.setStyle(Qt.CustomDashLine)
pen.setDashPattern([5,  2, 1, 2])  # 5px实线+2px空白+1px实线+2px空白
QBrush:填充艺术家
9种经典填充模式:
python
# 示例:创建不同填充样式的矩形
patterns = [
    Qt.SolidPattern,      # 纯色填充
    Qt.Dense5Pattern,     # 密集斜线
    Qt.DiagCrossPattern,  # 交叉网格
    Qt.HorPattern,        # 水平线
    Qt.VerPattern,        # 垂直线
    Qt.BDiagPattern       # 反斜线
]
渐变填充进阶(需配合QLinearGradient):
python
gradient = QLinearGradient(0, 0, 100, 100)
gradient.setColorAt(0,  Qt.blue)
gradient.setColorAt(1,  Qt.white)
brush = QBrush(gradient)
QPixmap:图像处理专家
核心功能对比:
| 方法 | 与QImage区别 | 适用场景 |
|---|---|---|
| load() | 专为显示优化 | 界面图片加载 |
| scaled() | 保持宽高比缩放 | 缩略图生成 |
| save() | 支持压缩格式 | 截图保存 |
图像加载最佳实践:
自适应标签大小的图像加载
python
pixmap = QPixmap("image.jpg")
pixmap = pixmap.scaled(
    label.size(),
    Qt.KeepAspectRatio,
    Qt.SmoothTransformation
)
label.setPixmap(pixmap)
性能优化建议
- 双缓冲技术:通过QPixmap缓存绘制结果,避免闪烁
- 局部重绘:使用update(QRect)而非全局刷新
- 资源复用:重复使用的QPen/QBrush建议设为成员变量
完整项目示例
简易画板实现思路:
- 继承QWidget重写mouseMoveEvent
- 使用QPainterPath记录笔迹
- 通过QPixmap保存画布状态
python
class SketchWidget(QWidget):
    def __init__(self):
        super().__init__()
        self.path  = QPainterPath()
        self.pen  = QPen(Qt.blue,  3, Qt.SolidLine)

    def mouseMoveEvent(self, event):
        self.path.lineTo(event.pos())
        self.update()
📢 互动提问:你在PyQt5绘图时遇到过哪些难题?欢迎在评论区留言讨论!