单点登录背景
在公司发展初期,公司拥有的系统不多,通常一个两个,每个系统都有自己的登录模块,运营人员每天用自己的账号登陆,很方便,但是,随着企业的发展,用到的系统随之增加,运营人员在操作不同的系统时,需要多次登录,而且每个系统的账号都不一样,这对于运营人员来说很不方便,也是就想到是不是可以在一个系统登陆,其它系统就不用登陆了呢?那么单点登录就是解决这个问题。
单点登录:全称Single Sign On 简称就是SSO。它的解释就是:在多个应用系统中,只需要登陆一次,就可以访问其他相互信任的应用系统。
单点登录(Single Sign-On,简称SSO)是一种身份验证和授权机制,允许用户在一次登录后,就能访问多个相互信任的应用系统,而无需在每个应用系统中重新进行身份验证。SSO的目标是提供更便捷的用户体验,减少用户需要记忆和输入的凭据,同时提高系统的安全性。
SSO 的基本原理涉及到以下几个关键概念:
一、认证中心(Authentication Center): SSO 系统中有一个认证中心,负责验证用户的身份。用户只需要在认证中心进行一次录,然后就能够在所有信任该认证中心的应用中访问资源。
二、 令牌(Token): 用户在认证中心登录成功后,认证中心会生成一个令牌。令牌是一段包含用户身份信息和权限信息的数据,通常是经过加密和签名的。这个令牌可以在用户访问其他应用时用于身份验证和授权。
三、 单点登录请求流程: 当用户访问一个需要身份验证的应用时,应用会发起一个单点登录请求。这个请求会被重定向到认证中心,用户需要在认证中心输入凭据进行登录。认证中心验证用户身份后,生成一个令牌,并将令牌返回给应用。
四、 单点登录响应流程: 应用在收到令牌后,会对令牌进行验证。验证通过后,应用允许用户访问资源。这个验证通常包括检查令牌的有效期、签名是否正确等。
五、 单点注销: 如果用户在一个应用注销,认证中心会通知其他应用注销用户的会话,以确保用户在所有应用中都注销。
六、 安全性保障: 为了保障安全性,令牌需要经过适当的加密和签名,并且应用在接收到令牌后需要进行有效性验证。同时,通信过程中使用 HTTPS 进行加密,防止信息被窃取或篡改。
总体来说,SSO 的原理是通过在认证中心进行一次登录,然后通过令牌在各个应用之间传递身份信息,从而实现用户只需登录一次就能访问多个应用的目标。这提高了用户体验,减少了密码管理的负担,同时要求各个应用信任和兼容相同的身份认证机制。
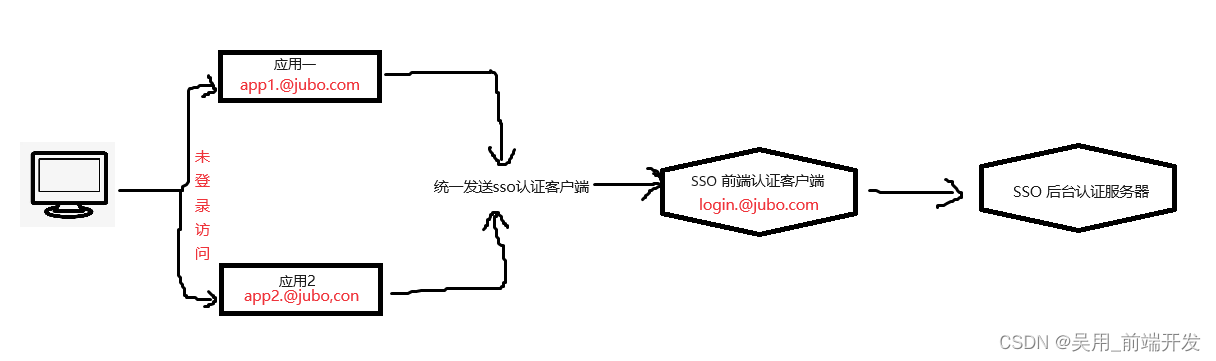
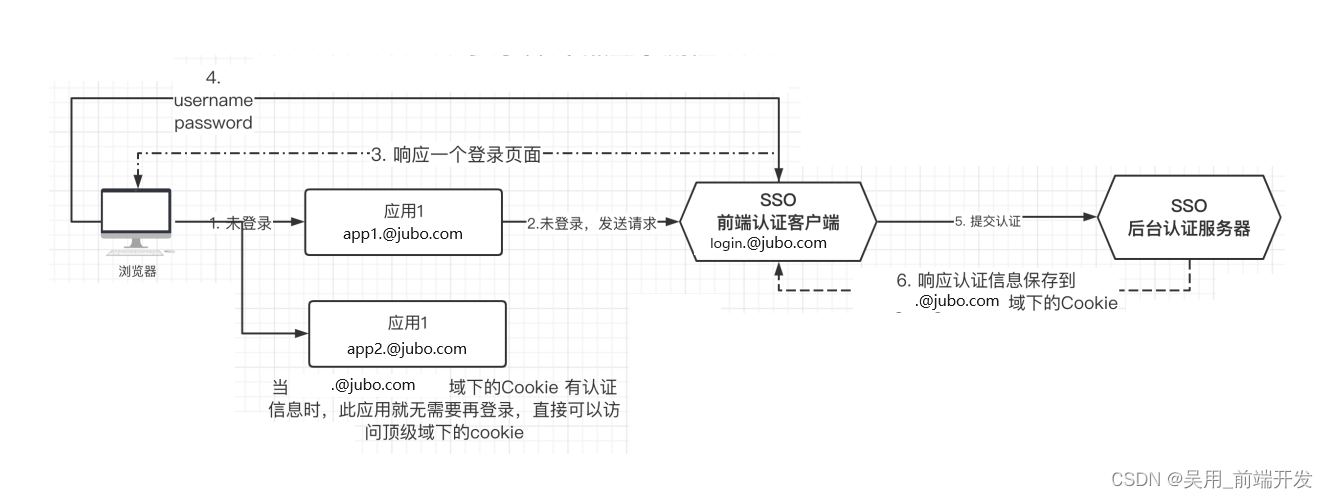
上图中,分别是应用1,应用2,sso应用,应用1,应用2没有登录模块,而sso只有登录模块,没有其他业务模块,当应用1,应用2需要登陆的时候,需要跳转到sso系统完成登录,其他的应用系统也就随之登录了。
基于同域下Cookie实现SSO
同一个公司的各种系统,一般情况下只有一个域名,通过二级域名区分不同的系统。比如我们有个域名叫做 @jubo.com,同事有两个业务系统分别为:app1.@jubo.com和app2.@jubo.com 我们只要在login.@jubo.com登录,app1.@jubo.com和app2.@jubo.com就业登陆了。
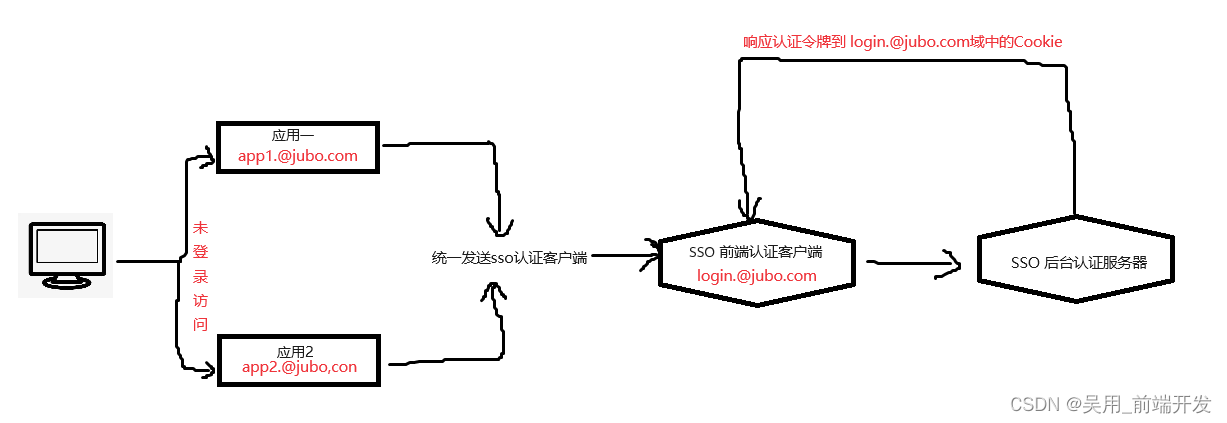
通过上面的登录认证的机制,我们可以知道,在login.@jubo.com中登陆了,其实是在login.@jubo.com的服务端认证中心记录的登录状态并响应了登录状态(令牌)给浏览器,浏览器将登陆状态令牌写入到login.@jubocom域的Cookie中。
问题:如何让app1.@jubo.com 和 app2.@jubo.com登录呢?
Cookie是不能跨域的,我们Cookie的domain值是login.@jubo.com,而在app1.@jubo.com和app2.@jubo.com发送请求是获取不到domain值是login.@jubo.com的Cookie,从而请求时带上访问令牌的。
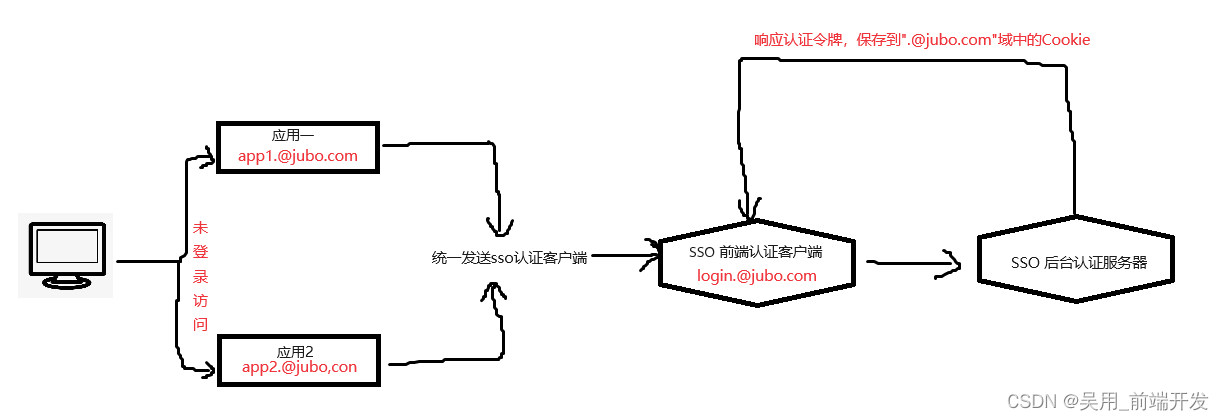
针对这个问题,SSO登录以后,可以将Cookie的域设置为顶域,即.@jubo.com,这样所有子域的系统都可以访问到顶域的Cookie。这样Cookie跨域问题就能解决了。
在设置Cookie时,只能设置顶域和自己的域,不能设置其他域,比如:我们不能在自己的系统中给baidu.com的域设置Cookie
基于Vue-cli脚手架常见项目
一、下载安装node.js和npm 下载
二、配置npm淘宝镜像
javascript
	npm config set registry https://registry.npm.taobao.org
	npm config get registry
三、安装Vue-cli脚手架
- 设置全局安装模块保存目录npm config set prefix 'D:\02-devInstall\npm'
- 查看全局保存目录 npm root -g
- 安装全局Vue-cli脚手架 npm install -g @vue/cli
四、创建SSO项目,及其项目结构
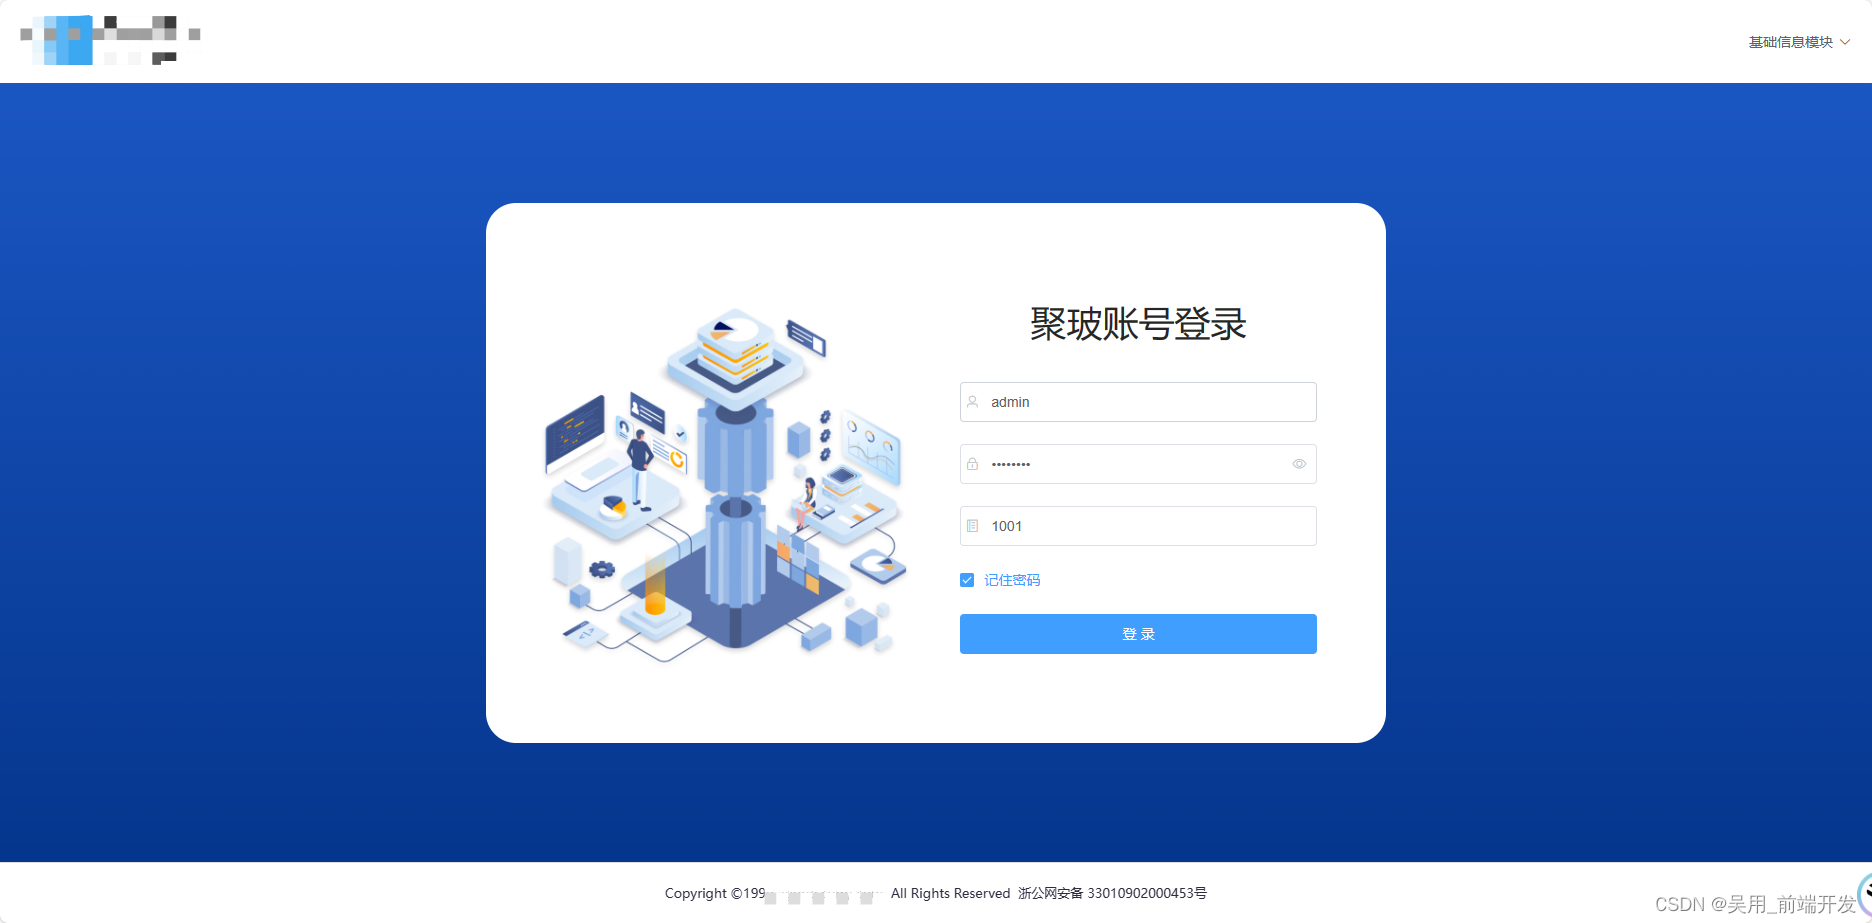
- 创建头部区域 /src/components/layout/AppFooter/index.vue
javascript
<template>
<!-- 底部 -->
<div class="sso-footer">
<div class="footer-info">
Copyright ©1999 xxxx.com/.com All Rights Reserved
<a href="http://www.xxx.com/" target="_blank" rel="nofollow"> 浙公网安备 xxxx号</a>
</div>
</div>
</template>
<script>
export default {
}
</script>
<style scoped>
/* 底部 */
.sso-footer {
position: fixed;
bottom: 0;
left: 0;
width: 100%;
margin: 0 auto; /* 居中 */
line-height: 60px;
border-top: 1px solid #ddd;
}
.footer-info {
text-align: center;
font-size: 13px;
color: #2C2C40;
}
.footer-info a {
color: #2C2C40;
text-decoration: none;
}
</style>- 创建中间部分
javascript
<template>
  <div class="login">
    <el-row class="row-box">
        <el-col :span="12" class="row-box-left">
          <div class="row-box-left_img"></div>
        </el-col>
        <el-col :span="12" class="row-box-right">
          <el-form ref="loginForm" :model="loginData" :rules="loginRules" class="form_body login-form">
          <div class="title">聚玻账号登录</div>
          <el-form-item prop="username">
            <el-input
              v-model="loginData.username"
              type="text"
              auto-complete="off"
              placeholder="账号"
            >
            <i slot="prefix"  class="el-icon-user" ></i>
          </el-input>
          </el-form-item>
          <el-form-item prop="password">
            <el-input
              v-model="loginData.password"
              type="password"
              auto-complete="off"
              placeholder="密码"
              show-password
            >
            <i slot="prefix"  class="el-icon-lock" ></i></el-input>
          </el-form-item>
          <el-form-item prop="tenantId">
            <el-input
              v-model="loginData.tenantId"
              type="text"
              auto-complete="off"
              placeholder="租户号"
            >
            <i slot="prefix"  class="el-icon-notebook-2" ></i>
            </el-input>
          </el-form-item>
          <el-checkbox v-model="loginData.rememberMe" style="margin:0px 0px 25px 0px;">记住密码</el-checkbox>
          <el-form-item style="width:100%;">
            <el-button
              :loading="subState"
              size="medium"
              type="primary"
              style="width:100%; height: 40px;"
              @click.native.prevent="loginSubmit"
            >
              <span v-if="subState">登 录 中...</span>
              <span v-else>登 录</span>
            </el-button>
          </el-form-item>
        </el-form>
        </el-col>
    </el-row>
  </div>
</template>
<script >
import { isvalidUsername } from '@/utils/validate'
import { PcCookie,Key } from "@/utils/cookie"
import {getXieyi,getUserByUsername,register} from "@/api/auth"
export default {
    data () {
      return {
      loginRules: {
        username: [
          { required: true, trigger: "blur", message: "请输入您的账号" }
        ],
        password: [
          { required: true, trigger: "blur", message: "请输入您的密码" }
        ],
        tenantId: [
          { required: true, trigger: "blur", message: "请输入您的租户号" }
        ],
        // code: [{ required: true, trigger: "change", message: "请输入验证码" }]
      },
        tab:  1, // 高亮当前标签名
        reverse:  1, // 旋转 1 登录,2 注册
        loginMessage: '', //登录错误提示信息
        regMessage: '', //注册错误提示信息
        subState: false, //提交状态
        xieyi: false, // 显示隐藏协议内容
        xieyiContent: null, // 协议内容
        redirectURL: '//localhost/open-platform-admin/index', // 登录成功后重写向地址
        loginData: { // 登录表单数据
          username:undefined,
          password:undefined,
          tenantId:undefined,
          rememberMe:undefined,
        },
        registerData: { // 注册表单数据
            username: '',
            password: '',
            repassword: '',
            check: false
        },
      }
    },
    async created(){
      // 首先查看是否记住密码,有则直接渲染到页面中
	    if(PcCookie.get('username') && PcCookie.get('password') && PcCookie.get('tenantId')) {
	      this.loginData.username = PcCookie.get('username');
	      this.loginData.password = PcCookie.get('password');
	      this.loginData.tenantId = PcCookie.get('tenantId');
	      this.loginData.rememberMe = true;
	    }
      //判断url上是否带有redirectUrl参数
      if(this.$route.query.redirectURL){
        console.log("判断url上是否带有redirectUrl参数",this.$route.query.redirectURL)
        this.redirectURL = this.$route.query.redirectURL
      }
      //获取协议内容
      this.xieyiContent = await getXieyi()
    },
    methods: {
      // 切换标签
      changetab (int) {
          this.tab = int;
          let _that = this;
          setTimeout(() => {
            this.reverse = int
          }, 200)
      },
      // 提交登录
      loginSubmit() {
        // 如果登陆中不允许登录
        if(this.subState){
          return false
        }
        // return
        //判断是否记住密码
        if(this.loginData.rememberMe) {
	          // 记住密码
	          PcCookie.set('username', this.loginData.username); //保存帐号到cookie,有效期7天
	          PcCookie.set('password', this.loginData.password); //保存密码到cookie,有效期7天
            PcCookie.set('tenantId',this.loginData.tenantId);//保存密码到cookie,有效期7天
	        } else {
	          // 清除已记住的密码
	          PcCookie.remove('username');
	          PcCookie.remove('password');
	          PcCookie.remove('tenantId');
	        }
        this.$refs.loginForm.validate(valid => {
          if (valid) {
            this.subState = true //提交中
            // 提交登录,不要以 / 开头
            this.$store.dispatch("UserLogin",this.loginData).then(response=>{
              const {code,msg} = response
                if(code === "200"){
                  //跳转回来源页面 this.redirectURL
                  window.location.href = this.$store.state.auth.basicInformation.redirectURL
                  this.$refs.loginData.resetFields();
                  this.$refs.loginData.clearValidate();
                }else{
                  this.loginMessage = msg
                  this.$message({
                  message: msg,
                  type: 'error'
                });
              }
              //提交完
              this.subState = false

            }).catch(err=>{
              // 进度条结束
              this.subState =  false //提交完
              // this.loginMessage = "系统繁忙,请稍后重试"
            })
          }
        });
      },
      // 提交注册
      async regSubmit() {
        //如果在登陆中不允许登录
        if(this.subState){
          return false
        }
        // if( !isvalidUsername(this.registerData.username) ) {
        //   this.regMessage = '请输入4-30位用户名, 中文、数字、字母和下划线'
        //   return false
        // }
        // 校验用户名是否存在
        const { code, message, data } = await getUserByUsername(this.registerData.username)
        // 不为 20000,则后台校验用户名有问题
        if( code !== 20000 ) {
          this.regMessage = message
          return false
        }
        if( data ) { // data是 true 已被注册,false未被注册
          this.regMessage = '用户名已被注册,请重新输入用户名'
          return false
        }
        if (this.registerData.password.length < 6 ||
          this.registerData.password.length > 30) {
          this.regMessage = '请输入6-30位密码,区分大小写且不可有空格'
          return false
        }
        if (this.registerData.password !== this.registerData.repPassword) {
          this.regMessage = '两次输入密码不一致'
          return false
        }
        if (!this.registerData.check) {
          this.regMessage = '请阅读并同意用户协议'
          return false
        }
        this.subState = true // 提交中

        // 提交注册
        register(this.registerData).then(response =>{
          this.subState = false
          const {code,message} = response
          if(code === 20000) {
            // 注册成功,切换登录页
            this.$message({
              message: '恭喜你,注册成功',
              type: 'success'
            });
            setTimeout(() => {
              this.changetab(1)
            }, 1000);
          }else {
            this.regMessage = message
          }
        }).catch(error => {
          this.subState = false
          this.regMessage = '系统繁忙,请稍后重试'
        })
      }
    },
}
</script>
<style scoped>
/* @import '../../assets/style/login.css';  */
</style>
<style scoped>
@import '../../assets/style/login.css';
  .login{
    /* 自动计算高度 100vh 整屏高度-(头部高83+底部高61) */
    /* min-height: calc(100vh - 143px);
    height:calc(100vh - 143px); */
    position: absolute;
    top: 83px;
    bottom: 60px;
    left: 0px;
    right: 0px;
    background-image: url("../../assets/image/login-beijing.png");
    background-repeat: no-repeat;
    background-size: 100%;
    background-repeat: repeat;
    background-size: cover;
    display: flex;
    justify-content: center;
    align-items: center;
  }
  .title {
  margin: 0px auto 30px auto;
  margin-bottom: 40px;
  text-align: center;
  color: #707070;
  font-size: 36px;
  font-family: Microsoft YaHei-Regular, Microsoft YaHei;
  font-weight: 400;
  color: rgba(0,0,0,0.85);
  line-height: 40px;
}
  .row-box{
    background: #FFF;
    height:540px;
    width: 900px;
    margin: 0px auto;
    border-radius: 30px;
  }
  .row-box-left{
    height: 100%;
    width: 45%;
    border-radius: 30px;
    position: relative;
  }
  .row-box-left_img{
    width: 400px;
    height:400px;
    position: absolute;
    left: 28%;
    top: 25%;
    margin-left: -74px;
    margin-top: -50px;
    background: linear-gradient(to bottom right, #50a3a2, #78cc6d 100%);
    background-image: url("../../assets/image/aps-login.png");
    background-repeat:no-repeat;
    background-size:cover ;
  }
  .row-box-right{
    height: 100%;
    width: 55%;
    border-radius: 30px;
    /* background: red; */
  }
  .login-form{
    width: 72%;
    margin: 0px auto;
    margin-top:20%;
  }
  .el-input {
    height: 40px;

  }
  input {
      height: 40px;
    }
  .input-icon {
    height: 40px;
    line-height: 40px;
    width: 14px;
    margin-left: 2px;
  }
  @media screen and (max-width: 1100px) {
  .row-box{
      width:60%;
      height: 540px;
      border-radius: 30px;
    }
   .row-box-left{
    display: none;
   }
   .row-box-right{
    width: 100% !important;
    margin-top: 0px ;
   }
}
</style>- 创建底部区域
javascript
<template>
    <div class="sso-header">
        <div class="logo">
            <div class="logo-img">
                <img src="@/assets/image/logo.png" alt="">
            </div>
        </div>
        <div class="right-select">
           <div class="xl">
            <el-dropdown>
                <span class="point el-dropdown-link">{{this.$store.state.auth.basicInformation.title}}<i class="el-icon-arrow-down el-icon--right"></i>
                </span>
                <el-dropdown-menu slot="dropdown">
                    <!-- <el-dropdown-item class="isActive">APS智能排程系统</el-dropdown-item>
                    <el-dropdown-item>WMS仓储系统</el-dropdown-item>
                    <el-dropdown-item>聚易联</el-dropdown-item> -->
                    <el-dropdown-item :class="item.isActive?'isActive':''" v-for="(item,index) in selectData" :key="index" @click.native="selectClick(item)">{{item.title}}</el-dropdown-item>
                </el-dropdown-menu>
            </el-dropdown>
           </div>
        </div>
    </div>
</template>
<script>
import {platformGetList} from "@/api/auth"
export default {
    data(){
        return {
            title:"基础云",
            selectData:[],
            id:null,
        }
    },
    created(){
        this.platformGetList()
        // console.log("process.env.VUE_APP_BASE_API",process.env.NODE_ENV,process.env.VUE_APP_SERVICE_URL)
        if(process.env.NODE_ENV === "development"){
            this.selectData=[
                {title:"基础信息模块",url:"http://localhost:7001/basic-web/",isActive:true,id:"1651478710725455875"},
                {title:"APS智能排程系统",url:"http://localhost:81/ ",isActive:false,id:"2222222222222222222"},
                {title:"开放平台后台",url:"http://localhost:81/",isActive:false,id:"333333333333333333333"},
                {title:"生产操作系统",url:"http://www.baidu.com",isActive:false,id:"4444444444444444444444"},
            ]
        }else if(process.env.NODE_ENV === "test"){
            this.selectData=[
                {title:"基础信息模块",url:"http://192.168.10.30/basic-web/",isActive:true,id:"1651478710725455875"},
                {title:"APS智能排程系统",url:"http://localhost:81/ ",isActive:false,id:"2222222222222222222"},
                {title:"开放平台后台",url:"http://localhost:81/",isActive:false,id:"333333333333333333333"},
                {title:"生产操作系统",url:"http://www.baidu.com",isActive:false,id:"4444444444444444444444"},
            ]
        }
        //获取URL数据
        var url = window.location.href ;   //获取当前url
        if(url.indexOf("redirectURL")===-1){
            for(let i=0;i<this.selectData.length;i++){
                if(this.selectData[i].isActive === true){
                    this.title = this.selectData[i].title
                    this.$store.dispatch("setRedirectURL",this.selectData[i])
                    break
                }
            }
        }else{
            // URL携带参数
            // URL没有携带参数
            var dz_url = url.split('#')[0];  //获取#/之前的字符串
            var cs = dz_url.split('?')[1];  //获取?之后的参数字符串
            var cs_arr = cs.split('&');   //参数字符串分割为数组
            var cs={};
            this.removeActive()
            for(var i=0;i<cs_arr.length;i++){         //遍历数组,拿到json对象
                cs[cs_arr[i].split('=')[0]] = cs_arr[i].split('=')[1]
            }
            for(var i=0;i<this.selectData.length;i++){         //遍历数组,拿到json对象
                if(this.selectData[i].id === cs.id){
                    this.selectData[i].isActive = true
                }
            }
            for(let i=0;i<this.selectData.length;i++){
                if(this.selectData[i].id === cs.id){
                    cs.redirectURL = this.selectData[i].url
                    break
                }
            }
            this.$store.dispatch("setRedirectURL",{title:decodeURI(cs.title),url:decodeURIComponent(cs.redirectURL),id:cs.id})
        }
    },
    methods:{
        //获取平台列表
        platformGetList(){
            // console.log("!!!!!!!!!!!!!!!!!!!")
            // platformGetList().then(res=>{
            //     console.log("!!!!!!!!!!!!!!!!!!!",res)
            // })
        },
        selectClick(item){
            this.removeActive()
            item.isActive = true
            this.title = item.title
            this.id = item.id
            this.$store.dispatch("setRedirectURL",item)
            this.$forceUpdate()
        },
        //去除其他的isActice
        removeActive(){
           for(let i=0;i<this.selectData.length;i++){
            this.selectData[i].isActive = false
           }
        }
    },
}
</script>
<style scoped>
.point{
    cursor: pointer;
}
.isActive{
    color: #1A55C0;
}
    .sso-header {
        width: 100%;
        height: 80px;
        /* border-top: 3px solid #345dc2; */
        z-index: 10;
        display: flex;
    }
    .logo{
        width: 50%;
        height: 50px;
        margin-top: 15px;
    }
    .logo-img{
        height: 100%;
        width: 150px;
    }
    .right-select{
        width: 50%;
        height: 60px;
        margin-top: 11px;
    }
    .logo-img img{
        height: 50px;
        margin-left: 38px;
    }
    .xl{
        float: right;
        margin-right: 20px;
        line-height: 60px;
    }
</style>- 创建布局组件
javascript
<template>
    <div>
        <app-header></app-header>
        <div>
            <!-- 主区域组件渲染 -->
            <router-view></router-view>
        </div>
        <app-footer></app-footer>
    </div>
</template>
<script>
import AppHeader from '@/components/layout/AppHeader'
import AppFooter from '@/components/layout/AppFooter'
export default {
components: { AppHeader, AppFooter },
}
</script>
<style >

</style>- app.vue路由渲染入口
javascript
<template>
  <div id="app">
    <router-view></router-view>
  </div>
</template>

<script>

export default {
  name: 'App',
}
</script>
登录&注册组件与路由配置
javascript
import Vue from 'vue'
import Router from "vue-router"
import store from "@/store"
Vue.use(Router)

const router = new Router({
    mode:"history",
    base:"customer-login-web",
    routes:[
        {
            path: '/',
            component: ()=> import('@/components/layout'),
            children: [
                {
                    path: '',
                    component: ()=> import('@/views/auth/login'),
                }
            ]
        },
        // 刷新组件路由配置
        {
            path: '/refresh',
            component: ()=> import('@/components/layout'),
            children: [
                {
                    path: '',
                    component: ()=> import('@/views/auth/refresh'),
                }
            ]
        }
    ]
})
//路由拦截
router.beforeEach((to,from,next)=>{
    console.log("to.path",to.path)
    if(to.path === '/logout'){
        //退出
        store.dispatch('UserLoginOut', to.query.redirectURL)
    }else{
        next()
    }
})

export default router
在 /src/main.js 将 router 路由对象添加到 Vue实例中,顺便把Vuex状态管理
store/index.js 也添加中Vue实例中。
javascript
import Vue from 'vue'
import App from './App.vue'
import router from "./router" // ++++
import store from './store' // ++++
Vue.config.productionTip = false
new Vue({
router, // ++++
store, // ++++
render: h => h(App),
}).$mount('#app')
封装Axios与Mock数据
整合 Axios,/src/utils/request.js
javascript
import axios from 'axios'

const service = axios.create({
  // .env.development 和 .env.productiont
  baseURL: process.env.VUE_APP_BASE_API, // url = base url + request url
  withCredentials: true,//携带身份认证文件(cookie)
  timeout: 10000 // request timeout
})

// 请求拦截器
service.interceptors.request.use(
  config => {
    return config
  },
  error => {
    return Promise.reject(error)
  }
)

// 响应拦截器
service.interceptors.response.use(
  response => {
    // 正常响应
    const res = response.data
    return res
  },
  error => {
    // 响应异常
    return Promise.reject(error)
  }
)

export default service
对接 Mock.js 模拟数据接口
官网:https://www.easy-mock.com/ 服务器不稳定,访问不了
文档:https://www.easy-mock.com/docs
看文档自己添加接口【登录接口,登出接口】
登录功能实现
- 门户客户端要求登陆时,输入用户名密码,认证客户端提交数据给认证服务器。
- 认证服务器校验用户名密码是否合法,合法相应用户基本令牌userInfo,访问令牌 access_token 、刷新令
牌 refresh_token。不合法响应错误信息。
定义 Api 调用登录接口
登录时,要在请求头带上客户端ID和客户端密码,并且在请求头指定数据格式。
javascript
import request from '@/utils/request'
// 数据格式
const headers = { 'Content-Type': 'application/x-www-form-urlencoded' }
// 请求头添加 Authorization: Basic client_id:client_secret
const auth = {
	username: 'mxg-blog-admin', // client_id
	password: '123456' // client_secret
}
// 登录,获取 token 接口
export function login(data) {
	return request({
		headers,
		auth,
		url: `/auth/login`,
		method: 'post',
		params: data
	})
}
Vuex 登录信息状态管理
当登录成功后,后台响应的 userInfo、access_token、refresh_token 信息使用 Vuex 进行管理,并且将这些信息
保存到浏览器 Cookie 中。
- 安装 js-cookie 和 vuex 模块.
javascript
npm install --save js-cookie vuex- 在 /src/store/index.js 创建 Vuex.Store 实例 ,导入 ./modules/auth.js 状态模块
javascript
import Vue from 'vue'
import Vuex from 'vuex'
import auth from './modules/auth' // auth 状态模块
Vue.use(Vuex)
const store = new Vuex.Store({
	modules: {
		auth
	}
})
export default store- 检查 mengxuegu-auth-center/src/main.js 是否将 store 已添加到Vue 实例中。
- 创建认证状态模块文件 src/store/modules/auth.js 中添加对 userInfo、access_token、refresh_token 状
态的管理
javascript
import { login } from '@/api/auth'
import { PcCookie, Key } from '@/utils/cookie' // 对 cookie 操作
// 定义状态,state必须是function
const state = {
	userInfo: PcCookie.get(Key.userInfoKey)
	? JSON.parse(PcCookie.get(Key.userInfoKey)) : null, // 用户信息对象
	accessToken: PcCookie.get(Key.accessTokenKey), // 访问令牌字符串
	refreshToken: PcCookie.get(Key.refreshTokenKey), // 刷新令牌字符串
}
// 改变状态值
const mutations = {
	// 赋值用户状态
	SET_USER_STATE (state, data) {
		console.log('SET_USER_STATE', data)
		// 状态赋值
		const { userInfo, access_token, refresh_token } = data
		state.userInfo = userInfo
		state.accessToken = access_token
		state.refreshToken = refresh_token
		// 保存到cookie中
		PcCookie.set(Key.userInfoKey, userInfo)
		PcCookie.set(Key.accessTokenKey, access_token)
		PcCookie.set(Key.refreshTokenKey, refresh_token)
	},
	// 重置用户状态,退出和登录失败时用
	RESET_USER_STATE (state) {
		// 状态置空
		state.userInfo = null
		state.accessToken = null
		state.refreshToken = null
		// 移除cookie
		PcCookie.remove(Key.userInfoKey)
		PcCookie.remove(Key.accessTokenKey)
		PcCookie.remove(Key.refreshTokenKey)
	}
}
	// 定义行为
	const actions = {
	// 登录操作 ++++++++++++++++++++++++++ 4.
	UserLogin ({ commit }, userInfo) {
		const { username, password } = userInfo
		return new Promise((resolve, reject) => {
			// 调用登录接口 /api/auth.js#login
			login({ username: username.trim(), password: password }).then(response => {
				// 获取响应值
				const { code, data } = response
			if(code === 20000) {
				// 状态赋值
				commit('SET_USER_STATE', data)
			}
			resolve(response) // 不要少了
		}).catch(error => {
			// 重置状态
			commit('RESET_USER_STATE')
			reject(error)
		})
	})
	}
}
export default {
	state,
	mutations,
	actions
}
查看 utils/cookie.js 设置了保存的时长与域,对应域设置在 .env.development 和 .env.production 文件里的
javascript
# cookie保存的域名,utils/cookie.js 要用
VUE_APP_COOKIE_DOMAIN = 'location'
提交登录触发 action
在登录页 src/views/auth/login.vue 的 created 生命钩子里获取redirectURL,是引发跳转到登录页的引发跳
转 URL ,登录成功后需要重定向回 redirectURL。
javascript
created() {
	// 判断URL上是否带有redirectURL参数
	if(this.$route.query.redirectURL) {
		this.redirectURL = this.$route.query.redirectURL
	}
},
methods: {
}
修改 src/views/auth/login.vue 的 loginSubmit 方法,触发 store/modules/auth.js 中的 UserLogin 进行登
录。并导入 @/utils/validate 正则表达式校验用户名是否合法。
javascript
import {isvalidUsername} from '@/utils/validate' // 校验规则
export default {
	methods: {
		// 提交登录
		loginSubmit() {
			// 如果在登录中,不允许登录
			if(this.subState) {
			return false;
		}
		if(!isvalidUsername(this.loginData.username)) {
			this.loginMessage = '请输入正确用户名'
			return false
		}
		if (this.loginData.password.length < 6) {
			this.loginMessage = '请输入正确的用户名或密码';
			return false;
		}
		this.subState = true // 提交中
		// 提交登录 , 不要以 / 开头
		this.$store.dispatch('UserLogin', this.loginData).then((response) => {
		const { code, message } = response
		if(code === 20000) {
			// 跳转回来源页面
			window.location.href = this.redirectURL
		}else {
			this.loginMessage = message
		}
			this.subState = false // 提交完
		}).catch(error => {
		// 进度条结束
			this.subState = false // 提交完
			this.loginMessage = '系统繁忙,请稍后重试'
		})
	},
},
单点退出系统
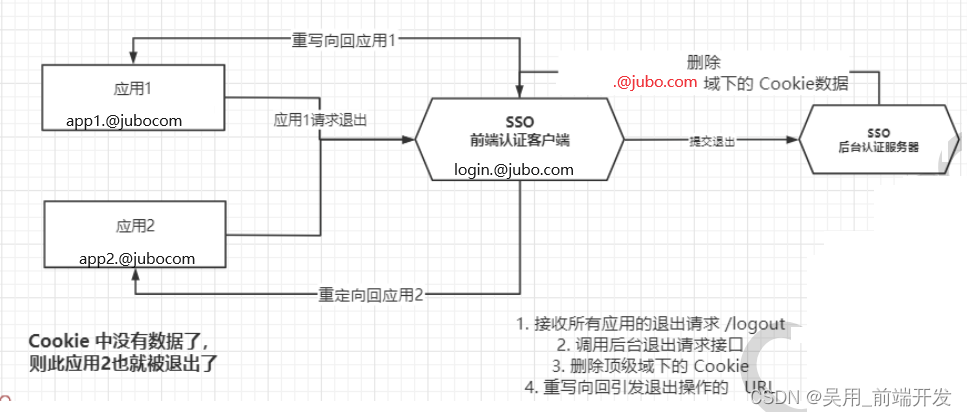
所有应用系统退出,全部发送请求到当前认证中心进行处理,发送请求后台删除用户登录数据,并将 cookie 中的
用户数据清除。
退出系统需求分析
定义 Vuex 退出行为
- 在 src/store/modules/login.js 状态管理文件中的 actions 对象中添加调用 logout 退出api方法。退出成功
后回到登录页。
javascript
// 1. 导入 logout ,+++++++
import { login, logout } from '@/api/login'
// 定义行为
const actions = {
	// 2. 退出,++++++
	UserLogout({ state, commit }, redirectURL) {
		// 调用退出接口, 上面不要忘记导入 logout 方法
		logout(state.accessToken).then(() => {
			// 重置状态
			commit('RESET_USER_STATE')
			// // 退出后,重写向地址,如果没有传重写向到登录页 /
			window.location.href = redirectURL || '/'
		}).catch(() => {
			// 重置状态
			commit('RESET_USER_STATE')
			window.location.href = redirectURL || '/'
		})
	}
}
路由拦截器退出操作
应用系统访问 http://localhost:7000/logout?redirectURL=xxx 进行退出,我们添加路由前置拦截 /logout 路
由请求进行调用 UserLogout 进行退出操作。
javascript
import Vue from 'vue'
import Router from 'vue-router'
Vue.use(Router)
const router = new Router({
	mode: 'history',
	routes: [
		{
			path: '/',
			component: ()=> import('@/components/layout'),
			children: [
				{
					path: '',
					component: ()=> import('@/views/auth/login'),
				}
			]
		},
	]
})
// 导入vuex状态对象store ++++++
import store from '@/store'
// 路由拦截器 ++++++
router.beforeEach((to, from , next) => {
	if(to.path === '/logout') {
		// 退出
		store.dispatch('UserLogout', to.query.redirectURL)
	}else {
		next()
	}
})
export default router
测试
访问:http://localhost:7000/logout?redirectURL=http://www.@jubo.com
查看:浏览器 cookie 没有值
刷新令牌获取新令牌
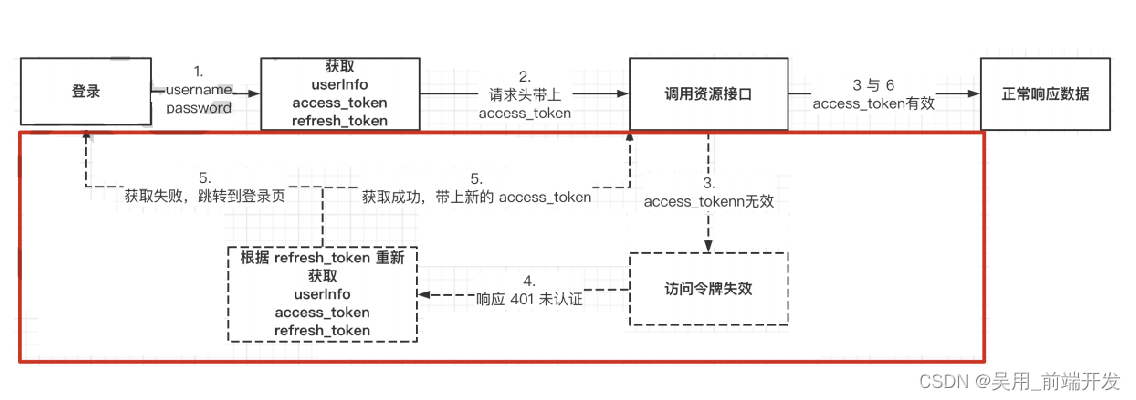
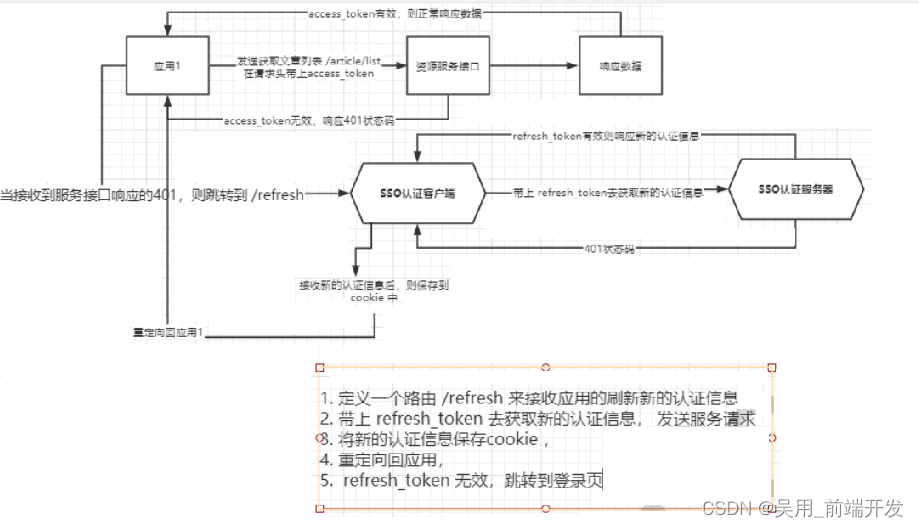
当应用系统请求后台资源接口时,要在请求头带上 accessToken 去请求接口,如果 accessToken 有效,资源服务
器正常响应数据。
如果访问令牌 accessToken 过期,资源服务器会响应 401 状态码 。当应用系统接收到 401 状态码时,通过刷新令牌 refreshToken 获取去请求新令牌完成新的重新身份。
创建刷新令牌组件
在认证前端 jubo-auth-center 创建一个刷新组件,用于接收应用系统发送请求到认证前端,进行刷新令牌重新身份认证。
刷新组件以弹窗方式:提示正在重新身份认证
- 创建组件模板 jubo-auth-center/src/views/auth/refr
javascript
<template>
	<div>
	<!-- 弹窗 -->
		<div v-show="visiabe" >
		<!--这里是要展示的内容层-->
			<div class="content">
				<span v-html="message"></apan>
			</div>
			<!--半透明背景层-->
			<div class="over"></div>
		</div>
	</div>
</template>- 添加模板样式
javascript
<style coped>
	.content {
		position: fixed;
		height: 120px;
		width: 500px;
		line-height: 120px;
		text-align: center;
		font-size: 19px;
		color: #303133;
		background-color: #fff;
		border-radius: 0.25rem;
		left: 50%;
		top: 30%;
		transform: translate(-50%, -50%);
		z-index: 1000;
	}
	a {
		color: #345dc2;
		text-decoration: none;
	}
	a:hover {
		text-decoration: underline;
	}
	.over {
		position: fixed;
		width: 100%;
		height: 100%;
		opacity: 0.5; /* 透明度为50% */
		filter: alpha(opacity=50);
		top: 0;
		left: 0;
		z-index: 999;
		background-color: #000;
	}
</style>- data选项中声明变量, created 钩子中获取重写向URL,和发送请求刷新身份
javascript
<script >
export default {
	data () {
		return {
			visiabe: 1, // 1 打开弹窗,0 关闭弹窗
			message: '请稍等,正在重新身份认证...',
			redirectURL: null
		}
	},
	created () {
		this.redirectURL = this.$route.query.redirectURL || '/'
		this.refreshLogin()
	},
	methods: {
		// 刷新令牌登录
		refreshLogin () {
		}
	}
};
</script>- 添加刷新组件路由配置
在 jubo-auth-center/src/router/index.js 添加刷新组件的路由配置
javascript
const router = new Router({
	mode: 'history',
	routes: [
		{
			path: '/',
			component: ()=> import('@/components/layout'),
			children: [
				{
				path: '',
				component: ()=> import('@/views/auth/login'),
				}
			]
		},
		// 刷新组件路由配置 +++++
		{
			path: '/refresh',
			component: ()=> import('@/components/layout'),
			children: [
				{
					path: '',
					component: ()=> import('@/views/auth/refresh'),
				}
			]
		}
	]
})- 定义 Api 调用刷新令牌接口
添加调用 刷新令牌获取新令牌接口 API 方法,在 jubo-auth-center/src/api/auth.js
javascript
// 刷新令牌接口 ++++++++++++++++++++++++++
export function refreshToken (refreshToken) {
	return request({
		headers,
		auth,
		url: `/auth/user/refreshToken`,
		method: 'get',
		params: {
			refreshToken
		}
	})
}- Vuex 发送请求与重置状态
store/modules/login.js 添加如下代码,导入 refreshToke,actions 中 添加发送刷新令牌请求 行为。
javascript
// 1. 导入 refreshToken +++++
import { login, logout, refreshToken } from '@/api/auth'
import { PcCookie, Key } from '@/utils/cookie' // 对 cookie 操作
// 省略。。。
// 定义行为
const actions = {
	// 2. 发送刷新令牌 ++++++++++++
	SendRefreshToken({ state, commit }) {
		return new Promise((resolve, reject) => {
			// 判断是否有刷新令牌
			if(!state.refreshToken) {
				commit('RESET_USER_STATE')
				reject('没有刷新令牌')
				return
			}
			// 发送刷新请求
			refreshToken(state.refreshToken).then(response => {
				// console.log('刷新令牌新数据', response)
				// 更新用户状态新数据
				commit('SET_USER_STATE', response.data)
				resolve() // 正常响应钩子
			}).catch(error => {
				// 重置状态
				commit('RESET_USER_STATE')
				reject(error)
			})
		})
	},
}- 重构刷新令牌组件,在 jubo-auth-center/src/views/auth/refresh.vue 中的 refreshLogin 方法中触发store/modules/auth.js 中的 SendRefreshToken 行为来完成刷新身份。
javascript
methods: {
	// 刷新令牌登录
	refreshLogin () {
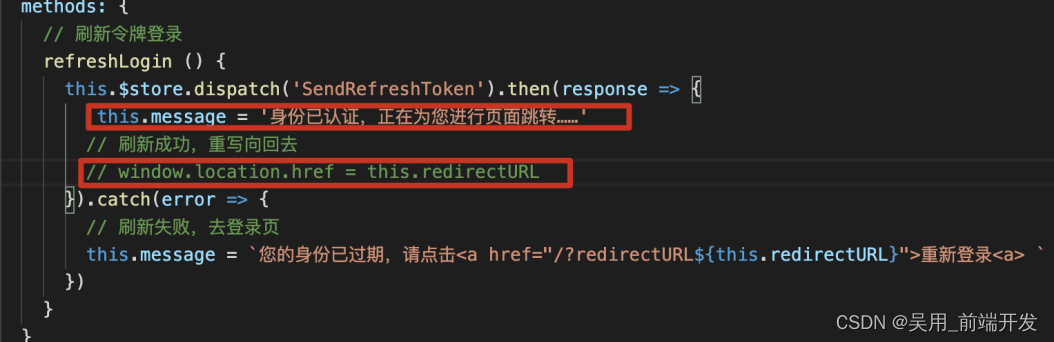
		this.$store.dispatch('SendRefreshToken').then(response => {
			// this.message = '身份已认证,正在为您进行页面跳转......'
			// 刷新成功,重写向回去
			window.location.href = this.redirectURL
		}).catch(error => {
			// 刷新失败,去登录页
			this.message =
			`您的身份已过期,请点击<a href="/?redirectURL${this.redirectURL}">重新登录<a> `
		})
	}
}
测试刷新令牌
- 重启 mengxuegu-auth-center 项目
- 访问认证登录页 http://localhost:7000/ ,进行正常登录。
- 登录后,再次访问 http://localhost:7000/ 登录页,打开浏览器控制台确保 Cookie 中有值
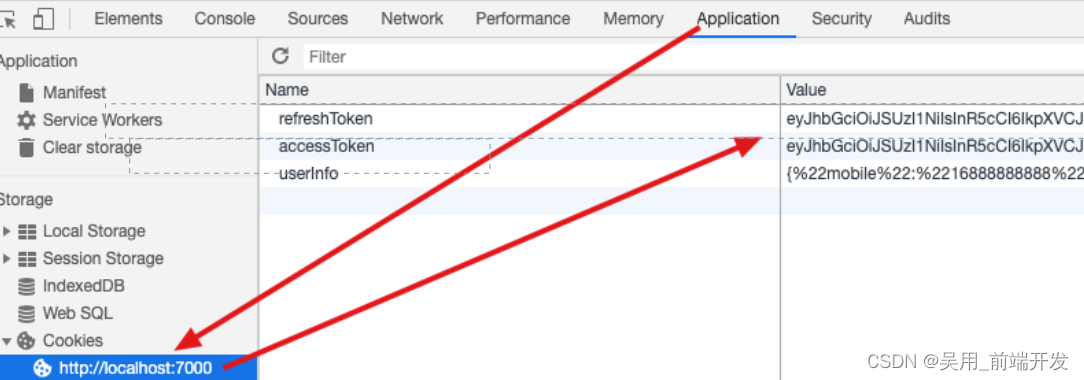
- 将 Cookie 中的 accessToken 删掉,认为 accessToken 已经过期了,就可以刷新令牌了。

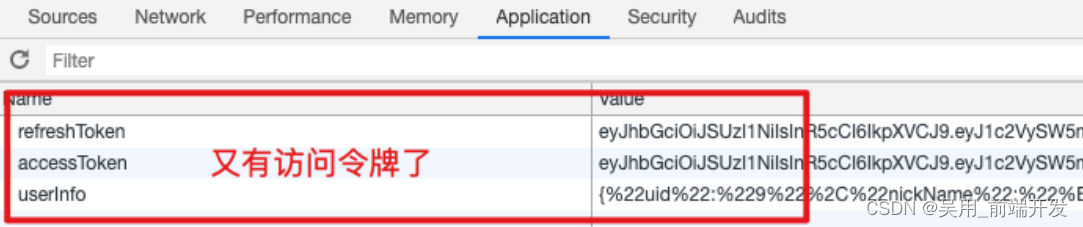
- 访问http://localhost:7000/refresh?redirectURL=http://localhost:3000/ 后,重定向回http://localhost:3000/ 并且cookie中又有访问令牌了。
- 如果你想看是否正常响应,可以把跳转 window.location.href 注释掉,向 this.message 添加提示信息。
将单点登录融入到实际项目中,系统-身份认证+退出+刷新令牌
- 登录功能
分析登录功能
重点核心关注 src\permission.js 路由拦截器,如果没有 token ,则跳转登录页。登录后我们在路由拦截器中,从Cookie中获取认证信息( userInfo、access_token、refresh_token)。
- 实现跳转认证客户端: 修改 src\permission.js 路由拦截器,如果没有 token ,则跳转认证客户端 http://localhost:7000
一、.env.development 和 .env.production 分别添加认证中心URL VUE_APP_AUTH_CENTER_URL 和 Cookie认证,信息保存域 VUE_APP_AUTH_DOMAIN (后面从 cookie 获取认证信息时有用)。.env.development 定义变量, 需要以 VUE_APP_ 开头。
- .env.development 定义变量, 需要以 VUE_APP_ 开头。
javascript
#开发环境,认证中心地址,需要以 `VUE_APP_` 开头
VUE_APP_AUTH_CENTER_URL = '//localhost:7000'
#开发环境,认证信息保存在哪个域名下。需要以 `VUE_APP_` 开头。
VUE_APP_AUTH_DOMAIN = 'localhost'- .env.production 定义变量, 需要以 VUE_APP_ 开头。
javascript
# 生产环境,认证中心地址,需要以 `VUE_APP_` 开头
VUE_APP_AUTH_CENTER_URL = '//login.@jubo.com'
# 生产环境,认证信息保存在哪个域名下。需要以 `VUE_APP_` 开头。
VUE_APP_AUTH_DOMAIN = '.mengxuegu.com'
添加后重启才会有效果
- 修改 src\permission.js 路由拦截器,如果没有 token ,则跳转认证客户端 http://localhost:7000
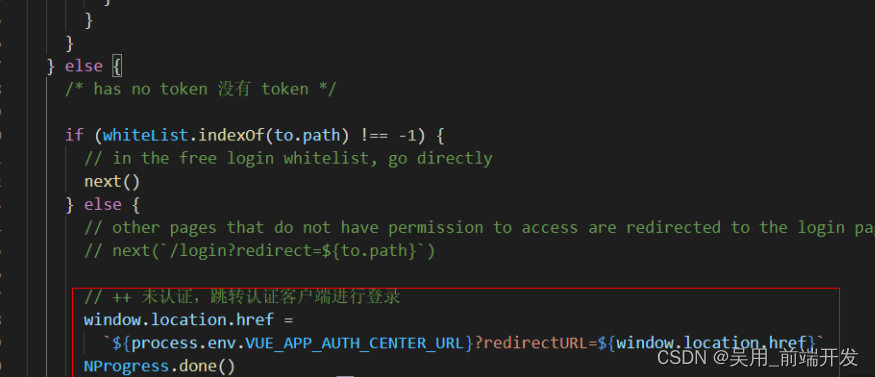
javascript
if (whiteList.indexOf(to.path) !== -1) {
	// in the free login whitelist, go directly
	next()
} else {
	// other pages that do not have permission to access are redirected to the login page.
	// next(`/login?redirect=${to.path}`)
	// ++ 未认证,跳转认证客户端进行登录 ++
	window.location.href = `${process.env.VUE_APP_AUTH_CENTER_URL}?redirectURL=${window.location.href}`
	NProgress.done()
}- 测试
先启动 mengxuegu-auth-center
重启 mengxuegu-blog-admin
将浏览器中 cookie 清空,再访问首页 http://localhost:9528/
观察浏览器,会重写向到认证客户端
http://localhost:7000/?redirectURL=http%3A%2F%2Flocalhost% 3A9528%2F
登录成功后,又会重写回认证客户端。正常应该是重写向到博客权限管理系统,是因为 管理系统无法正 确获取 cookie 中的认证信息,获取不到就又要求登录。
- 路由拦截器获取认证信息
当登录成功后,我们要重写向回引发跳转到登录页的地址。 当重写向回来后,我们可以从浏览器 Cookie 中获取认证信息 (userInfo、access_token、refresh_token)。
- 创建Cookie工具类 src/utils/cookie.js
注意: .env.development 和 .env.production 要添加 VUE_APP_AUTH_DOMAIN 配置认证信息保存在cookie 的哪个域名下
javascript
import Cookies from 'js-cookie'

// Cookie的key值
export const Key = {
  accessTokenKey: 'accessToken', // 访问令牌在cookie的key值
  refreshTokenKey: 'refreshToken', // 刷新令牌在cookie的key值
  userInfoKey: 'userInfo'
}

class CookieClass {
  constructor() {
    this.domain = process.env.VUE_APP_COOKIE_DOMAIN // 域名
    this.expireTime = 30 // 30 天
  }

  set(key, value, expires, path = '/') {
    CookieClass.checkKey(key);
    Cookies.set(key, value, {expires: expires || this.expireTime, path: path, domain: this.domain})
  }

  get(key) {
    CookieClass.checkKey(key)
    return Cookies.get(key)
  }

  remove(key, path = '/') {
    CookieClass.checkKey(key)
    Cookies.remove(key, {path: path, domain: this.domain})
  }

  geteAll() {
    Cookies.get();
  }

  static checkKey(key) {
    if (!key) {
      throw new Error('没有找到key。');
    }
    if (typeof key === 'object') {
      throw new Error('key不能是一个对象。');
    }
  }
}

// 导出
export const PcCookie = new CookieClass()- 在 permission.js 导入 cookie.js 获取认证信息,此文件做路由拦截使用,在 permission.js 从cookie 中获取 accessToken 、userInfo
javascript
import router from './router'
import store from './store'
import { Message } from 'element-ui'
import NProgress from 'nprogress' // progress bar
import 'nprogress/nprogress.css' // progress bar style
import { getToken } from '@/utils/auth' // get token from cookie
import getPageTitle from '@/utils/get-page-title'

// 导入cookie.js工具
import {PcCookie, Key} from '@/utils/cookie'

NProgress.configure({ showSpinner: false }) // NProgress Configuration

const whiteList = ['/login'] // no redirect whitelist

/**
 * 1. 从cookie获取token(导入cookie.js)
 * 2. 如果有token, 再访问/login,则跳转到首页,如果访问其他路由,从cookie中获取用户信息,然后跳转目标路由
 * 3. 如果没有token, 则从白名单中查看是否包含了目标路由,如果包含,则直接放行。如果不包含,则跳转到登录页面
 */
router.beforeEach(async(to, from, next) => {
  // start progress bar
  NProgress.start()

  // set page title
  document.title = getPageTitle(to.meta.title)

  // determine whether the user has logged in
  // const hasToken = getToken()
  // 从cookie中获取访问令牌
  const hasToken = PcCookie.get(Key.accessTokenKey)

  if (hasToken) {
    if (to.path === '/login') {
      // if is logged in, redirect to the home page
      next({ path: '/' })
      NProgress.done()
    } else {
      // 从cookie中获取用户信息
      const hasGetUserInfo = PcCookie.get(Key.userInfoKey)
      if (hasGetUserInfo) {
        // 如果有用户信息,则通过用户id来获取当前用户所拥有的菜单和按钮权限
        if(store.getters.init === false) {

          // 还未查询用户权限信息,下面则触发 action 来进行查询
          store.dispatch('menu/GetUserMenu').then(() => {
            // 继续访问目标路由且不会留下history记录
            next({...to, replace: true})
          }).catch(error => {
            Message({message: '获取用户权限信息失败', type: 'error'})
          })

        }else {
          // 跳转到目标路由
          next()
        }
      } else {
        // 如果没有用户信息,则没有登录,没有登录则跳转认证客户端
        window.location.href = `${process.env.VUE_APP_AUTH_CENTER_URL}?redirectURL=${window.location.href}`
      }
    }
  } else {
 	 // has no token 没有 token
    if (whiteList.indexOf(to.path) !== -1) {
      next()
    } else {
      // ++ 未认证,跳转认证客户端进行登录
      window.location.href = `${process.env.VUE_APP_AUTH_CENTER_URL}?redirectURL=${window.location.href}`
      NProgress.done()
    }
  }
})

router.afterEach(() => {
  // finish progress bar
  NProgress.done()
})
请求头添加访问令牌 accessToken,针对每个请求,如果有访问令牌 accessToken, 请求头带上令牌 Authorization: Bearer token,修改 jubo-blog-admin/src/utils/request.js
javascript
import axios from 'axios'
import { MessageBox, Message } from 'element-ui'
import store from '@/store'
import { getToken } from '@/utils/auth'

import {PcCookie, Key} from '@/utils/cookie'

// create an axios instance  /test
const service = axios.create({
  baseURL: process.env.VUE_APP_BASE_API, // url = base url + request url
  // withCredentials: true, // send cookies when cross-domain requests
  timeout: 5000 // request timeout
})

// request interceptor
service.interceptors.request.use(
  config => {
    // do something before request is sent

    // 从cookie获取token
    const accessToken = PcCookie.get(Key.accessTokenKey)
    if (accessToken) {
      // oauth2
      // Authorization: Bearer xxxxx
      config.headers.Authorization = `Bearer ${accessToken}`
    }
    return config
  },
  error => {
    // do something with request error
    console.log(error) // for debug
    return Promise.reject(error)
  }
)

// response interceptor
service.interceptors.response.use(
  /**
   * If you want to get http information such as headers or status
   * Please return  response => response
  */

  /**
   * Determine the request status by custom code
   * Here is just an example
   * You can also judge the status by HTTP Status Code
   */
  response => {
    const res = response.data

    // if the custom code is not 20000, it is judged as an error.
    if (res.code !== 20000) {
      Message({
        message: res.message || 'Error',
        type: 'error',
        duration: 5 * 1000
      })

      // 50008: Illegal token; 50012: Other clients logged in; 50014: Token expired;
      if (res.code === 50008 || res.code === 50012 || res.code === 50014) {
        // to re-login
        MessageBox.confirm('You have been logged out, you can cancel to stay on this page, or log in again', 'Confirm logout', {
          confirmButtonText: 'Re-Login',
          cancelButtonText: 'Cancel',
          type: 'warning'
        }).then(() => {
          store.dispatch('user/resetToken').then(() => {
            location.reload()
          })
        })
      }
      return Promise.reject(new Error(res.message || 'Error'))
    } else {
      return res
    }
  },
  error => {
    // 非401状态码,则直接提示信息
    if(error.response && error.response.status !== 401) {
        Message({
          message: error.message,
          type: 'error',
          duration: 5 * 1000
        })
        return Promise.reject(error)
    }

    // 401 未认证或者访问令牌过期,未认证则要通过刷新令牌获取新的认证信息
    let isLock = true // 防止重复发送刷新请求
    if(isLock && PcCookie.get(Key.refreshTokenKey)) {
      isLock = false // 在发送后,将此值 设置为false
      // 跳转到认证中心客户端,实现刷新令牌效果
      window.location.href =
         `${process.env.VUE_APP_AUTH_CENTER_URL}/refresh?redirectURL=${window.location.href}`
    }else {
      //没有刷新令牌,则跳转到认证客户端进行重新认证
      window.location.href =
         `${process.env.VUE_APP_AUTH_CENTER_URL}?redirectURL=${window.location.href}`
    }

    return Promise.reject('令牌过期,重新认证')
  }
)

export default service
思路和主体代码都写上去啦,完结~