目录
1、labelme安装和打开
在python3.9及以上环境中安装labelme,labelme要用到pyqt,所以在使用labelme之前要安装pyqt。
python
pip install pyqt
pip install labelme
进入存放标注图像文件夹的目录,提前设置要标注的文件夹、具体标签以及存放的文件夹。其中image是图像文件夹,labels是要存放标签的文件夹,labels.txt是提前设置的标签。
python
labelme image --output labels --labels labels.txt打开的界面如下图所示

2、边界框和关键点标注
在标注时,要将目标框和对应的关键点分为一组,关键点也类似
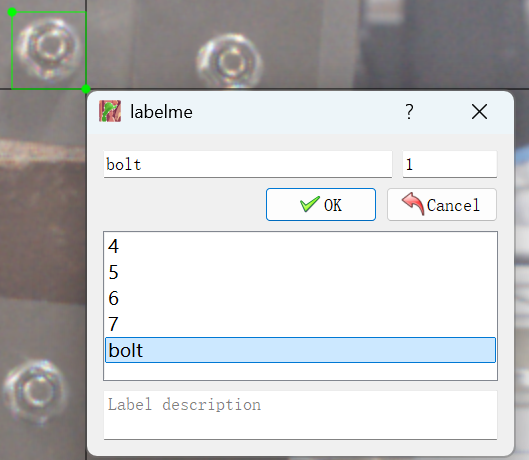
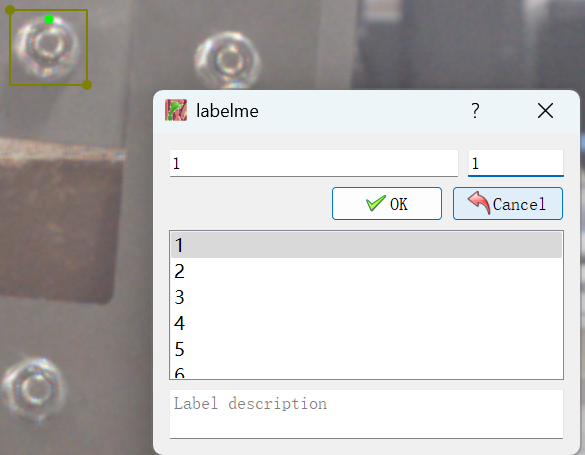
标注完后记得点击上面save按钮
3、将lamelme的json格式转成yolo可以使用的txt格式
转换代码如下,可以将json格式根据group_id将目标和关键点对应起来,然后转成txt格式,每行格式为<class_id> <x_center> <y_center> <kp1_x> <kp1_y> <kp1_vis> <kp2_x> <kp2_y> <kp2_vis> ... <kpN_x> <kpN_y> <kpN_vis>
python
import os
import json
from PIL import Image

def convert_labelme_to_yolo_keypoints(json_path, image_dir, output_dir, class_id=0, num_keypoints=7):
    os.makedirs(output_dir, exist_ok=True)

    with open(json_path, 'r') as f:
        data = json.load(f)

    image_file = data.get("imagePath", os.path.basename(json_path).replace(".json", ".jpg"))
    image_path = os.path.join(image_dir, image_file)
    image = Image.open(image_path)
    width, height = image.size

    shapes = data['shapes']
    objects = {}  # key: group_id, value: {'bbox': [...], 'keypoints': {}}

    for shape in shapes:
        g_id = shape.get("group_id")
        if g_id is None:
            continue

        label = shape['label']
        shape_type = shape['shape_type']
        pts = shape['points']

        if g_id not in objects:
            objects[g_id] = {'bbox': None, 'keypoints': {}}

        if shape_type == "rectangle" and label == "bolt":
            x1, y1 = pts[0]
            x2, y2 = pts[1]
            objects[g_id]['bbox'] = [min(x1, x2), min(y1, y2), max(x1, x2), max(y1, y2)]
        elif shape_type == "point":
            try:
                kp_id = int(label)
                objects[g_id]['keypoints'][kp_id] = pts[0]
            except ValueError:
                pass  # skip if label is not a number

    # Write YOLO-style .txt
    txt_name = os.path.basename(json_path).replace('.json', '.txt')
    out_path = os.path.join(output_dir, txt_name)

    with open(out_path, 'w') as f:
        for obj in objects.values():
            if obj['bbox'] is None:
                continue  # skip if no box

            x1, y1, x2, y2 = obj['bbox']
            x_center = (x1 + x2) / 2 / width
            y_center = (y1 + y2) / 2 / height
            box_w = (x2 - x1) / width
            box_h = (y2 - y1) / height

            keypoints = []
            for i in range(1, num_keypoints + 1):
                if i in obj['keypoints']:
                    x, y = obj['keypoints'][i]
                    keypoints += [x / width, y / height, 2]
                else:
                    keypoints += [0.0, 0.0, 0]  # 不存在该关键点

            line = f"{class_id} {x_center:.6f} {y_center:.6f} {box_w:.6f} {box_h:.6f} " + \
                   " ".join([f"{kp:.6f}" if isinstance(kp, float) else str(kp) for kp in keypoints])
            f.write(line + '\n')

    print(f"✅ 转换完成: {out_path}")


json_dir = r"path\to\labels"
image_dir = r"path\to\images"
output_dir = r"path\to\labels"

for file in os.listdir(json_dir):
    if file.endswith(".json"):
        json_path = os.path.join(json_dir, file)
        convert_labelme_to_yolo_keypoints(json_path, image_dir, output_dir)
4、将数据和标签按照9比1分为训练集和测试集
代码如下
python
import os
import random
import shutil

# 原始文件夹路径
images_dir = 'path\to\images'
labels_dir = 'path\to\labels'

# 目标文件夹路径
train_image_dir = r'path\to\images\train'
val_image_dir = r'path\to\images\val'
train_label_dir = r'path\to\labels\train'
val_label_dir = r'path\to\labels\val'

# 创建输出文件夹
os.makedirs(train_image_dir, exist_ok=True)
os.makedirs(val_image_dir, exist_ok=True)
os.makedirs(train_label_dir, exist_ok=True)
os.makedirs(val_label_dir, exist_ok=True)

# 获取图像文件列表
image_files = [f for f in os.listdir(images_dir) if f.lower().endswith(('.jpg', '.jpeg', '.png'))]

# 打乱并划分
random.shuffle(image_files)
split_idx = int(0.9 * len(image_files))
train_files = image_files[:split_idx]
val_files = image_files[split_idx:]

# 拷贝函数
def copy_split(file_list, img_src, lbl_src, img_dst, lbl_dst):
    for fname in file_list:
        # 拷贝图像
        shutil.copy(os.path.join(img_src, fname), os.path.join(img_dst, fname))
        # 拷贝标签
        label_name = os.path.splitext(fname)[0] + '.txt'
        label_src_path = os.path.join(lbl_src, label_name)
        label_dst_path = os.path.join(lbl_dst, label_name)
        if os.path.exists(label_src_path):
            shutil.copy(label_src_path, label_dst_path)
        else:
            print(f"⚠️ 缺少标签: {label_src_path}")

# 执行拷贝
copy_split(train_files, images_dir, labels_dir, train_image_dir, train_label_dir)
copy_split(val_files, images_dir, labels_dir, val_image_dir, val_label_dir)

print("✅ 划分完成!图像和标签已按 9:1 存放到 images/train, images/val 和 labels/train, labels/val。")