基础篇
一、入门案例解析
1、parent
- 开发SpringBoot程序要继承spring-boot-starter-parent
- spring-boot-starter-parent中定义了若干个依赖管理
- 继承parent模块可以避免多个依赖使用相同技术时出现依赖版本冲突
- 继承parent的形式也可以采用引入依赖的形式实现效果
2、starter
- 开发SpringBoot程序需要导入坐标时通常导入对应的starter
- 每个不同的starter根据功能不同,通常包含多个依赖坐标
- 使用starter可以实现快速配置的效果,达到简化配置的目的
3、引导类
- SpringBoot工程提供引导类用来启动程序
- SpringBoot工程启动后创建并初始化Spring容器
- 扫描引导类所在包及其子包下的类,创建相应的对象
4、内嵌tomcat
- 内嵌Tomcat服务器是SpringBoot辅助功能之一
- 内嵌Tomcat工作原理是将Tomcat服务器作为对象运行,并将该对象交给Spring容器管理
- 变更内嵌服务器思想是去除现有服务器,添加全新的服务器
5、属性配置
- application.properties
properties
server.port=80- application.yml
yml
server:
port: 81- application.yaml
yaml
server:
  port: 81
配置文件优先级:
application.properties > application.yml > application.yaml
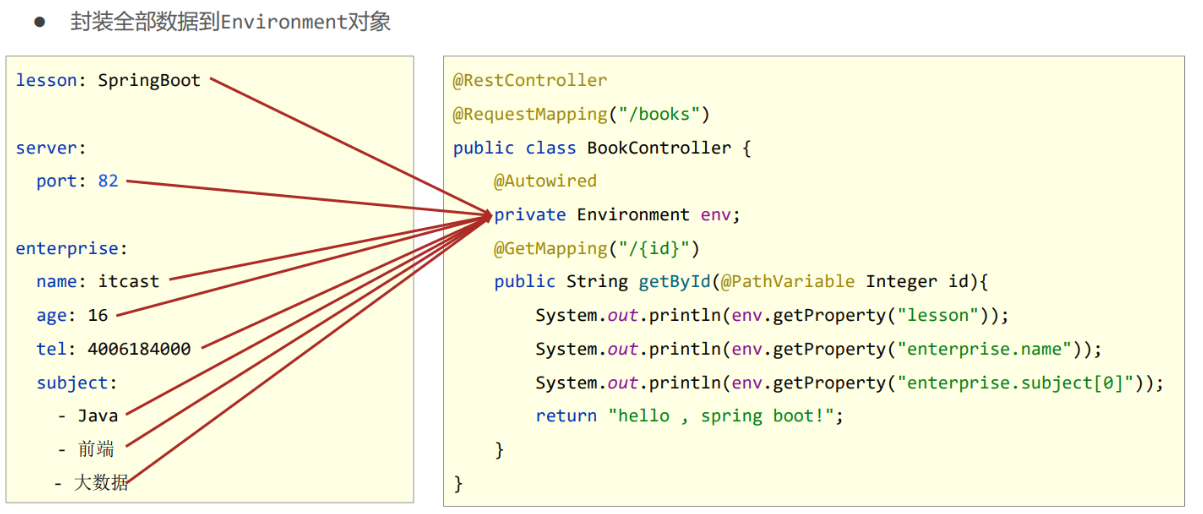
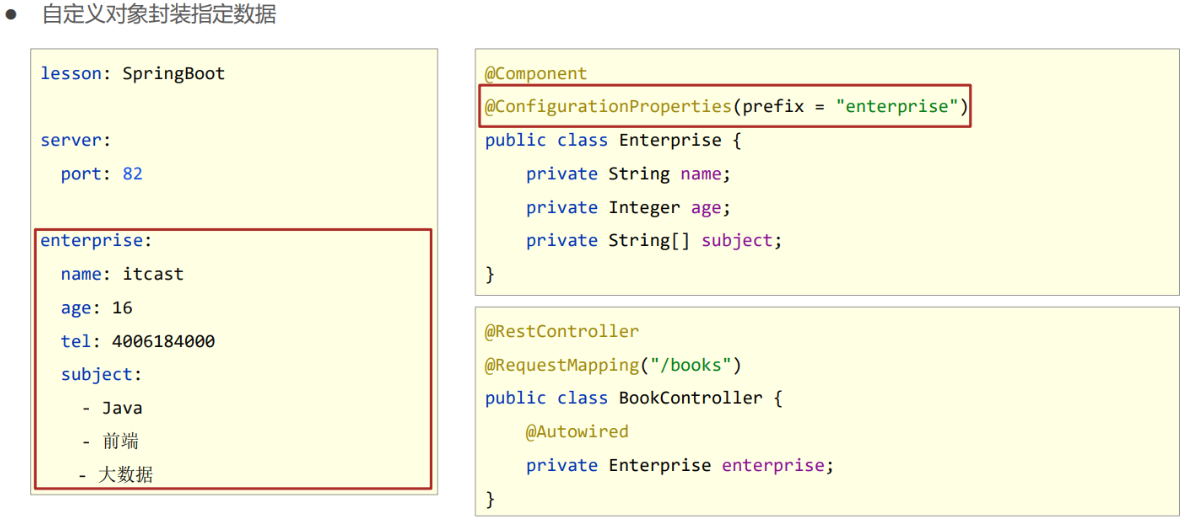
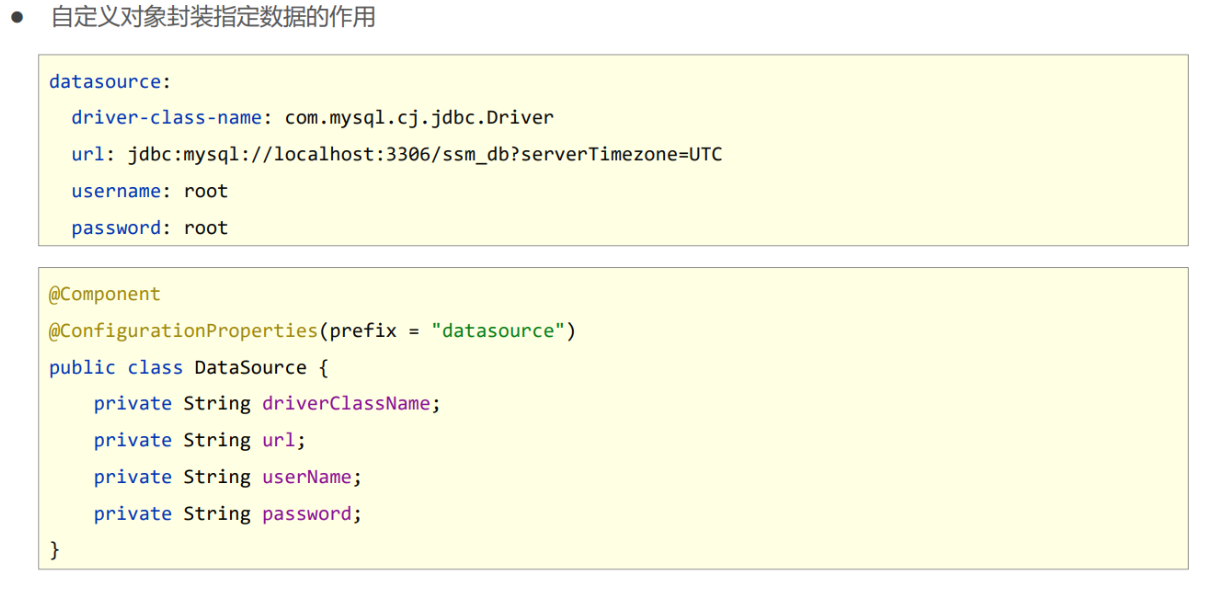
6、yaml数据读取
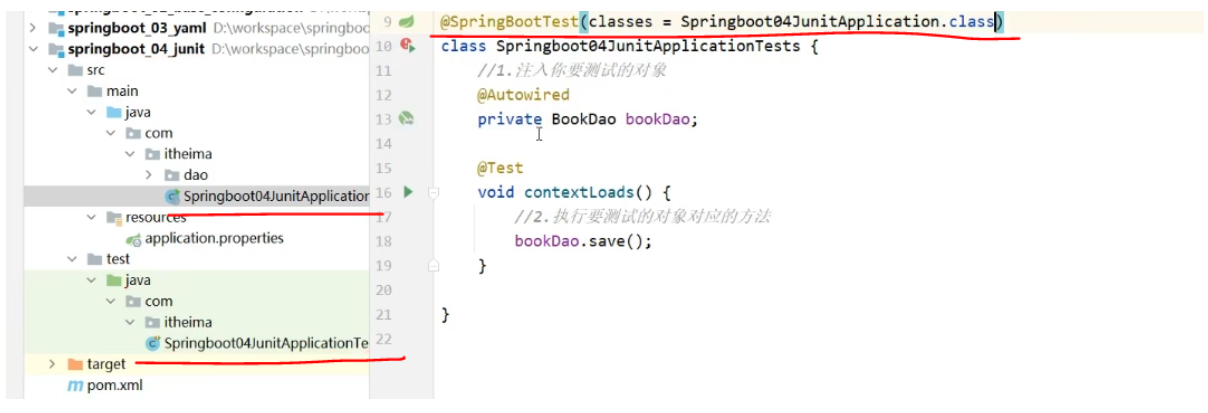
7、spring boot整合junit
引导类在com.itheima包下面,而测试类在com包下面,那么测试类就会报错。因为这样配置无法拿到spring容器。解决方法是,在测试类上面加上class属性,class=引导类.class。这就就能拿到spring容器了
整合实现:
-
@RunWith(设置运行器)
-
@ContextConfiguration(class=启动类.class)
解决上面的报错,有两种方式。一种是在@SpringBootTest注解加上class=引导类.class;另一种是加上@ContextConfiguration(class=引导类.class)
注意点:
- 测试类如果存在于引导类所在包或子包中无需指定引导类
- 测试类如果不存在于引导类所在的包或子包中需要通过classes属性指定引导类
8、mybatis plus分页功能
- 分页操作需要设定分页对象IPage
java
@Test
void testGetPage(){
    IPage page = new Page(1,5);
    bookDao.selectPage(page,null);
}- IPage对象中封装了分页操作中的所有数据:数据、当前页码值、每页数据总量、最大页码值、数据总量
- 分页操作是在MyBatisPlus的常规操作基础上增强得到,内部是动态的拼写SQL语句,因此需要增强对应的功能, 使用MyBatisPlus拦截器实现
java
@Configuration
public class MpConfig {
    @Bean
    public MybatisPlusInterceptor mpInterceptor() {
        //1.定义Mp拦截器
        MybatisPlusInterceptor mpInterceptor = new MybatisPlusInterceptor();
        //2.添加具体的拦截器
        mpInterceptor.addInnerInterceptor(new PaginationInnerInterceptor());
        return mpInterceptor;
    }
}
9、排查错误
- Windonws端口被占用
xml
# 查询端口
netstat -ano
# 查询指定端口
netstat -ano |findstr "端口号"
# 根据进程PID查询进程名称
tasklist |findstr "进程PID号"
# 根据PID杀死任务
taskkill /F /PID "进程PID号"
# 根据进程名称杀死任务
taskkill -f -t -im "进程名称"- 后台启动java应用
sh
nohup java -jar xxx.jar > server.log 2>&1 &- 配置文件优先级
应用classpath目录的配置文件 < 应用classpath目录下config目录的配置文件 < jar包所在目录的配置文件 < jar包所在目录的同级config目录下的配置文件 < 操作系统环境变量 < 命令行参数
- 倒排索引
根据内容获取数据ID,这个过程与传统根据ID获取内容过程相反,所以称为倒排索引
10、定时任务
1、java实现
这个程序每隔2秒输出一次timer task...
java
public class TimerTaskApp {
    public static void main(String[] args) {
        Timer timer = new Timer();

        TimerTask task = new TimerTask() {
            @Override
            public void run() {
                System.out.println("timer task...");
            }
        };
        timer.schedule(task, 0, 2000);
    }
}
2、quartz
Quartz的概念。
- 工作(Job):用于定义具体执行的工作
- 工作明细(JobDetail):用于描述定时工作相关的信息
- 触发器(Trigger):描述了工作明细与调度器的对应关系
- 调度器(Scheduler):用于描述触发工作的执行规则,通常使用cron表达式定义规则
1、导入maven坐标
xml
<dependency>
    <groupId>org.springframework.boot</groupId>
    <artifactId>spring-boot-starter-quartz</artifactId>
</dependency>
2、创建job
java
public class MyQuartz extends QuartzJobBean {
    @Override
    protected void executeInternal(JobExecutionContext context) throws JobExecutionException {
        System.out.println("quartz task running...");
    }
}
3、创建配置类,指定工作明细和触发器,并将job、JobDetail、Trigger三者关联起来
java
@Configuration
public class QuartzConfig {
    @Bean
    public JobDetail printJobDetail(){
        //绑定具体的工作。storeDurably参数表示没有使用这个job对象,是否持久化job对象。加上就是持久化,不持久化就会导致job对象没有使用而被清理
        return JobBuilder.newJob(MyQuartz.class).storeDurably().build();
    }

    @Bean
    public Trigger printJobTrigger(){
        ScheduleBuilder schedBuilder = CronScheduleBuilder.cronSchedule("0/5 * * * * ?");
        //绑定对应的工作明细
        return TriggerBuilder.newTrigger().forJob(printJobDetail()).withSchedule(schedBuilder).build();
    }
}
4、启动spring boot应用,就会每隔5秒输出一次quartz task running...
3、spring task
1、启动类加注解EnableScheduling,开启定时任务功能
java
@SpringBootApplication
@EnableScheduling //开启定时任务功能
public class SpringTaskApplication {

    public static void main(String[] args) {
        SpringApplication.run(SpringTaskApplication.class, args);
    }

}
2、创建任务
java
@Component
public class MyBean {
    @Scheduled(cron = "0/1 * * * * ?")
    public void print(){
        System.out.println(Thread.currentThread().getName()+" :spring task run...");
    }
}
这就每隔1秒就会执行一次
11、收发邮件
1、导入maven坐标
xml
<dependency>
    <groupId>org.springframework.boot</groupId>
    <artifactId>spring-boot-starter-mail</artifactId>
</dependency>
2、配置application.yml,配置邮件服务器的供应商、发件人邮箱地址、密码
yml
spring:
  mail:
    host: smtp.qq.com
    username: 222@qq.com
    password: xxxx
3、编写邮件内容
java
@Service
public class SendMailServiceImpl implements SendMainService {
    @Autowired
    private JavaMailSender javaMailSender;

    //发送人
    private String from = "222@qq.com";
    //接收人
    private String to = "111@163.com";
    //标题
    private String subject = "测试邮件";
    //正文
    private String context = "测试邮件正文内容";

    @Override
    public void sendMail() {
        SimpleMailMessage message = new SimpleMailMessage();
        message.setFrom(from+"(小甜甜)");
        message.setTo(to);
        message.setSubject(subject);
        message.setText(context);
        javaMailSender.send(message);
    }
}
原理篇
一、自动配置
1、proxyBeanMethod
Springconfig.java。@Configuration标识该类是一个配置类,它有一个属性proxyBeanMethod,默认为true
java
@Configuration(proxyBeanMethod=true)
public class Springconfig{
    @Bean
    public Cat cat(){
        return new Cat();
    }
}
application.java
Context context = AnnotationApplicationContext(Springconfig.class);
Springconfig springconfig = context.getBean(Springconfig.class);
System.out.println(springconfig);
System.out.println(springconfig.cat());
System.out.println(springconfig.cat());
System.out.println(springconfig.cat());
输出结果:
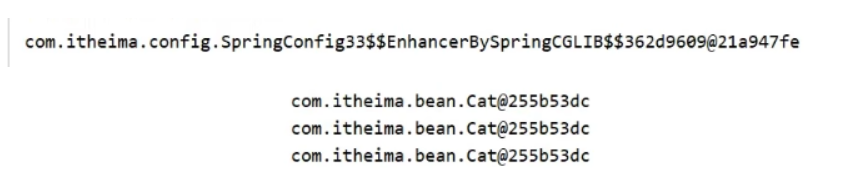
解析
proxyBeanMethod属性置为true,获取到的是代理对象。通过代理对象来调用cat方法,虽然cat方法内部是new Cat,但是输出的cat对象是同一个。也就是说,每调用一次,都是从单例池中直接取,而不是走的new Cat。
如果我们将proxyBeanMethod属性置为false,输出结果如下
java
@Configuration(proxyBeanMethod=false)
public class Springconfig{
    @Bean
    public Cat cat(){
        return new Cat();
    }
}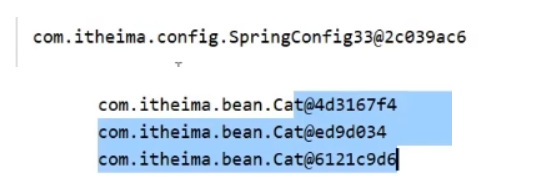
获取到的Springconfig就不再是代理对象了,多次调用springconfig.cat(),就是直接通过目标对象调用cat方法,走的就是new Cat,每调用一次就创建一个对象。
2、@Import、@ImportResource、ImportSelector
@Import(xxx.class)就可以将xxx对象注入到spring容器中
@ImportResource(xxx.xml):可以将xxx.xml中声明的bean注入到spring容器中
ImportSelector是一个接口,实现了该接口,就可以根据条件来动态实现bean的注册
- MyImportSelector.java,满足条件的话创建Dog对象,否则创建Cat对象
java
public class MyImportSelector implements ImportSelector{
    @Override
    public String[] selectImports(AnnotationMetadata metadata){
        if(某个条件){
            return new String[]{"com.southwind.Dog"};
        }
        return new String[]{"com.southwind.Cat"};
    }
}- SpringConfig.java
java
@Import(MyImportSelector.class)
public clas SpringConfig{

}
3、bean的加载控制
- @ConditionalOnClass。下面的例子是,发现有Mouse这个类,就会创建cat这个对象。
java
public class Config{
    @Bean
    @ConditionalOnClass(Mouse.class)
    public Cat cat(){
        return new Cat();
    }
}- @ConditionalOnMissingClass。下面的例子是,发现没有Mouse这个类,就会创建cat这个对象;如果有则不会创建。
java
public class Config{
    @Bean
    @ConditionalOnMissingClass("com.southwind.Mouse")
    public Cat cat(){
        return new Cat();
    }
}- @ConditionalOnBean。下面的例子是,发现有Mouse这个对象,就会创建cat这个对象。
java
public class Config{
    @Bean
    @ConditionalOnBean("com.southwind.Mouse")
    public Cat cat(){
        return new Cat();
    }
}- @ConditionalOnMissingBean。没有某个对象下才创建当前对象
上面注解的使用场景:我现在要实现一个框架,在pom中添加对应依赖后,程序就会对相应对象进行加载;如果不配做pom依赖就不加载
比如说:引入druid数据源
pom.xml
xml
<groupId>druid</groupId>
<artifactId>druid</artifactId>
SpringConfig.java
java
public class SpringConfig{
    @Bean
    @ConditionalOnClass("com.mysql.cj.jdbc.Driver")
    public DruidDataSource dataSsource(){
        return new DuridDataSource();
    }
}
我们在SpringConfig类里面加了@ConditionalOnClass("com.mysql.cj.jdbc.Driver")注解,表示有mysql驱动包才会创建DruidDataSource。现在我们的pom.xml中没有引入,则不会创建DruidDataSource。如果我们在pom.xml中引入mysql驱动包,就会创建DruidDataSource
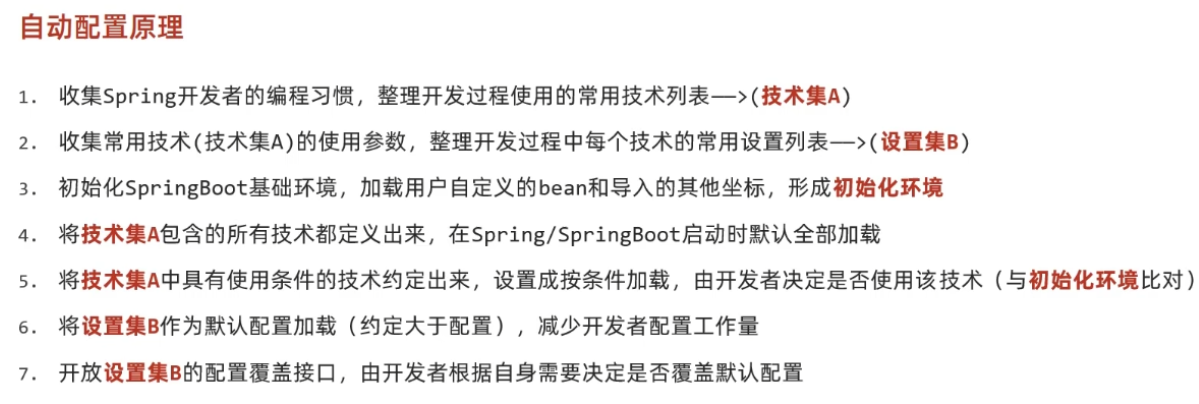
4、自动配置原理
spring boot给我们做一些自动配置,就可以简化开发;同时做一些自动配置,就不需要我们再次验证了

通过META-INF/spring.factories读取其中的内容获取到要加载到技术集A。这里得到很多配置
加这个坐标,满足条件检测。

带默认值的配置。
spring boot收集开发者常用的技术,并收集对应技术常使用的参数。用户使用spring boot,只需要搭建初始化环境,创建自定义bean,导入pom依赖即可。spring boot会将所有的技术都定义出来,随着spring boot启动时全部加载。但是一些配置我们不使用,加载它干嘛呢?spring boot开发了按照条件加载。它提供了相应的技术,但是需要一个开关来决定使用使用该技术。同时,对于一些参数配置提供了约定的默认参数(约定大于配置),例如mysql默认端口3306等。如果这个默认端口不符合你现在的业务需求,也开放了接口来覆盖相应的值。
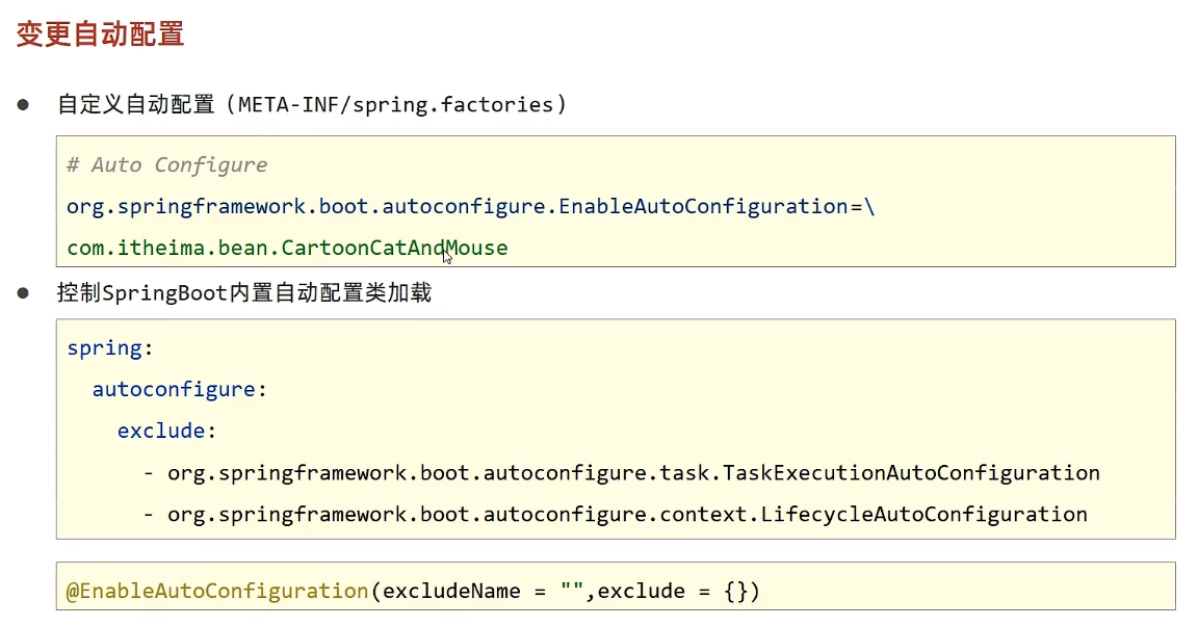
5、变更自动配置
二、自定义starter
实现功能:记录系统访客IP及访问次数
实现细节:
-
数据记录位置:Map/redis,案例选择Map
-
功能触发位置:每次web请求(拦截器)
-
业务参数
-
输出频度:默认10秒
-
输出内容:ip+次数
-
输出格式:详细模式、简单模式
-
1、创建基础项目
pom.xml
xml
<?xml version="1.0" encoding="UTF-8"?>
<project xmlns="http://maven.apache.org/POM/4.0.0" xmlns:xsi="http://www.w3.org/2001/XMLSchema-instance"
         xsi:schemaLocation="http://maven.apache.org/POM/4.0.0 https://maven.apache.org/xsd/maven-4.0.0.xsd">
    <modelVersion>4.0.0</modelVersion>
    <groupId>cn.itcast</groupId>
    <artifactId>ip_spring_boot_starter</artifactId>
    <version>0.0.1-SNAPSHOT</version>
    <name>ip_spring_boot_starter</name>
    <description>ip_spring_boot_starter</description>
    <properties>
        <java.version>1.8</java.version>
        <project.build.sourceEncoding>UTF-8</project.build.sourceEncoding>
        <project.reporting.outputEncoding>UTF-8</project.reporting.outputEncoding>
        <spring-boot.version>2.5.4</spring-boot.version>
    </properties>
    <dependencies>
        <dependency>
            <groupId>org.springframework.boot</groupId>
            <artifactId>spring-boot-starter-web</artifactId>
        </dependency>

        <dependency>
            <groupId>org.springframework.boot</groupId>
            <artifactId>spring-boot-configuration-processor</artifactId>
        </dependency>
    </dependencies>
    <dependencyManagement>
        <dependencies>
            <dependency>
                <groupId>org.springframework.boot</groupId>
                <artifactId>spring-boot-dependencies</artifactId>
                <version>${spring-boot.version}</version>
                <type>pom</type>
                <scope>import</scope>
            </dependency>
        </dependencies>
    </dependencyManagement>

</project>
2、创建业务类
java
public class IpCountService {
    private Map<String, Integer> ipCountMap = new HashMap<>();

    @Autowired
    private HttpServletRequest httpServletRequest;

    @Autowired
    private IpProperties ipProperties;

    public void count(){
        String ip = httpServletRequest.getRemoteAddr();
        Integer count = ipCountMap.get(ip);
        if(count == null){
            ipCountMap.put(ip, 1);
        }else {
            ipCountMap.put(ip, count+1);
        }
    }

    //这里的ipProperties.cycle,是读取ipProperties的cycle属性
    @Scheduled(cron = "0/#{ipProperties.cycle} * * * * ?")
    public void print(){
        if(IpProperties.LogModel.DETAIL.getValue().equals(ipProperties.getModel())){
            System.out.println("ip地址          访问次数");
            for (Map.Entry<String, Integer> entry : ipCountMap.entrySet()) {
                String ip = entry.getKey();
                Integer count = entry.getValue();
                System.out.println(ip + "       " + count);
            }
        } else if(IpProperties.LogModel.SIMPLE.getValue().equals(ipProperties.getModel())){
            System.out.println("ip地址");
            for (Map.Entry<String, Integer> entry : ipCountMap.entrySet()) {
                String ip = entry.getKey();
                System.out.println(ip);
            }
        }

        if(ipProperties.getCycleReset()){
            ipCountMap.clear();
        }
    }
}
3、创建IpProperties,从配置文件中读取前缀为tools.ip的属性
java
@ConfigurationProperties(prefix = "tools.ip")
@Component("ipProperties")
public class IpProperties {

    /**
     * 日志显示周期
     */
    private Long cycle = 5L;

    /**
     * 是否重置数据
     */
    private Boolean cycleReset = false;

    /**
     * 日志输出模式,detail-极简模式,simple-简单模式
     */
    private String model = LogModel.DETAIL.value;

    public enum LogModel{
        DETAIL("detail"),
        SIMPLE("simple");

        private String value;

        LogModel(String value) {
            this.value = value;
        }

        public String getValue() {
            return value;
        }
    }

    public Long getCycle() {
        return cycle;
    }

    public void setCycle(Long cycle) {
        this.cycle = cycle;
    }

    public Boolean getCycleReset() {
        return cycleReset;
    }

    public void setCycleReset(Boolean cycleReset) {
        this.cycleReset = cycleReset;
    }

    public String getModel() {
        return model;
    }

    public void setModel(String model) {
        this.model = model;
    }
}
4、指定自动配置类,开启定时任务,同时引入IpProperties类,并创建ipCountService对象到spring容器
java
@EnableScheduling
@Import(IpProperties.class)
public class IpAutoConfiguration {
    @Bean
    public IpCountService ipCountService(){
        return new IpCountService();
    }
}
5、创建拦截器,对业务方法进行拦截,进而调用计数功能
java
public class IpCountInterceptor implements HandlerInterceptor {
    @Autowired
    private IpCountService ipCountService;

    @Override
    public boolean preHandle(HttpServletRequest request, HttpServletResponse response, Object handler) throws Exception {
        ipCountService.count();
        return true;
    }
}
java
@Configuration
public class SpringMvcConfig implements WebMvcConfigurer {
    @Override
    public void addInterceptors(InterceptorRegistry registry) {
        registry.addInterceptor(ipCountInterceptor()).addPathPatterns("/**");
    }

    @Bean
    public IpCountInterceptor ipCountInterceptor(){
        return new IpCountInterceptor();
    }
}
6、在resources目录下创建META-INF目录,在META-INF目录下创建spring.factories文件。文件内容中指定上面的自动配置类
xml
org.springframework.boot.autoconfigure.EnableAutoConfiguration=\
cn.itcast.autoConfig.IpAutoConfiguration
7、创建spring-configuration-metadata.json,在里面配置属性,给配置进行提示
json
"hints": [
    {
        "name": "tools.ip.model",
        "values": [
            {
                "value": "detail",
                "description": "详细模式."
            },
            {
                "value": "simple",
                "description": "简单模式."
            }
        ]
    }
]
8、在其他项目中引入ip_spring_boot_starter,在引入之前,首先要将ip_spring_boot_starter进行clean和Install,因为其他模块引入是通过maven实现的,不安装的话,其他模块就无法用到
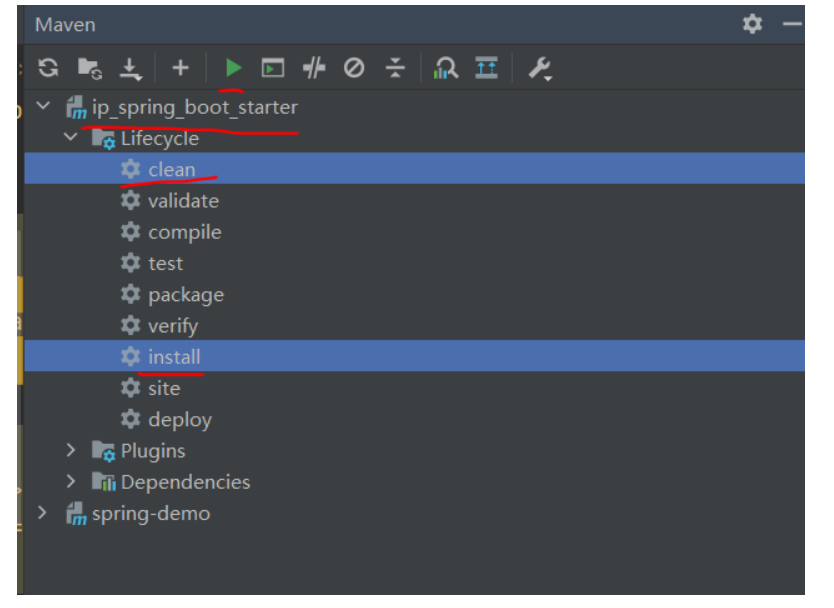
选中这个项目的clean和install,然后点击运行
9、在其他项目spring-demo中引入我们创建的ip_spring_boot_starter
xml
<dependency>
    <groupId>cn.itcast</groupId>
    <artifactId>ip_spring_boot_starter</artifactId>
    <version>0.0.1-SNAPSHOT</version>
</dependency>
10、创建controller
java
@RestController
@RequestMapping("/book")
public class BookController {

    @GetMapping
    public String show(){
        return "hello";
    }
}
11、接着界面点击刷新就会看到效果
Spring Boot
Spring Boot 是一个快速开发框架,可以迅速搭建出一套基于 Spring 框架体系的应用,是 Spring Cloud 的基础。
Spring Boot 开启了各种自动装配,从而简化代码的开发,不需要编写各种配置文件,只需要引入相关依赖就可以迅速搭建一个应用。
- 特点
1、不需要 web.xml
2、不需要 springmvc.xml
3、不需要 tomcat,Spring Boot 内嵌了 tomcat
4、不需要配置 JSON 解析,支持 REST 架构
5、个性化配置非常简单
- 如何使用
1、创建 Maven 工程,导入相关依赖。
xml
<!-- 继承父包 -->
<parent>
    <groupId>org.springframework.boot</groupId>
    <artifactId>spring-boot-starter-parent</artifactId>
    <version>2.0.7.RELEASE</version>
</parent>

<dependencies>
  <!-- web启动jar -->
  <dependency>
    <groupId>org.springframework.boot</groupId>
    <artifactId>spring-boot-starter-web</artifactId>
  </dependency>
  <dependency>
    <groupId>org.projectlombok</groupId>
    <artifactId>lombok</artifactId>
    <version>1.18.6</version>
    <scope>provided</scope>
  </dependency>
</dependencies>
2、创建 Student 实体类
java
package com.southwind.entity;

import lombok.Data;

@Data
public class Student {
    private long id;
    private String name;
    private int age;
}
3、StudentRepository
java
package com.southwind.repository;

import com.southwind.entity.Student;

import java.util.Collection;

public interface StudentRepository {
    public Collection<Student> findAll();
    public Student findById(long id);
    public void saveOrUpdate(Student student);
    public void deleteById(long id);
}
4、StudentRepositoryImpl
java
package com.southwind.repository.impl;

import com.southwind.entity.Student;
import com.southwind.repository.StudentRepository;
import org.springframework.stereotype.Repository;

import java.util.Collection;
import java.util.HashMap;
import java.util.Map;

@Repository
public class StudentRepositoryImpl implements StudentRepository {

    private static Map<Long,Student> studentMap;

    static{
        studentMap = new HashMap<>();
        studentMap.put(1L,new Student(1L,"张三",22));
        studentMap.put(2L,new Student(2L,"李四",23));
        studentMap.put(3L,new Student(3L,"王五",24));
    }

    @Override
    public Collection<Student> findAll() {
        return studentMap.values();
    }

    @Override
    public Student findById(long id) {
        return studentMap.get(id);
    }

    @Override
    public void saveOrUpdate(Student student) {
        studentMap.put(student.getId(),student);
    }

    @Override
    public void deleteById(long id) {
        studentMap.remove(id);
    }
}
5、StudentHandler
java
package com.southwind.controller;

import com.southwind.entity.Student;
import com.southwind.repository.StudentRepository;
import org.springframework.beans.factory.annotation.Autowired;
import org.springframework.web.bind.annotation.*;

import java.util.Collection;

@RestController
@RequestMapping("/student")
public class StudentHandler {

    @Autowired
    private StudentRepository studentRepository;

    @GetMapping("/findAll")
    public Collection<Student> findAll(){
        return studentRepository.findAll();
    }

    @GetMapping("/findById/{id}")
    public Student findById(@PathVariable("id") long id){
        return studentRepository.findById(id);
    }

    @PostMapping("/save")
    public void save(@RequestBody Student student){
        studentRepository.saveOrUpdate(student);
    }

    @PutMapping("/update")
    public void update(@RequestBody Student student){
        studentRepository.saveOrUpdate(student);
    }

    @DeleteMapping("/deleteById/{id}")
    public void deleteById(@PathVariable("id") long id){
        studentRepository.deleteById(id);
    }
}
6、application.yml
yaml
server:
  port: 9090
7、启动类
java
package com.southwind;

import org.springframework.boot.SpringApplication;
import org.springframework.boot.autoconfigure.SpringBootApplication;

@SpringBootApplication
public class Application {
    public static void main(String[] args) {
        SpringApplication.run(Application.class,args);
    }
}
@SpringBootApplication 表示当前类是 Spring Boot 的入口,Application 类的存放位置必须是其他相关业务类的存放位置的父级。
Spring Boot 整合 JSP
- pom.xml
xml
<parent>
  <groupId>org.springframework.boot</groupId>
  <artifactId>spring-boot-starter-parent</artifactId>
  <version>2.0.7.RELEASE</version>
</parent>

<dependencies>
  <!-- web -->
  <dependency>
    <groupId>org.springframework.boot</groupId>
    <artifactId>spring-boot-starter-web</artifactId>
  </dependency>

  <!-- 整合JSP -->
  <dependency>
    <groupId>org.springframework.boot</groupId>
    <artifactId>spring-boot-starter-tomcat</artifactId>
  </dependency>
  <dependency>
    <groupId>org.apache.tomcat.embed</groupId>
    <artifactId>tomcat-embed-jasper</artifactId>
  </dependency>

  <!-- JSTL -->
  <dependency>
    <groupId>jstl</groupId>
    <artifactId>jstl</artifactId>
    <version>1.2</version>
  </dependency>

  <dependency>
    <groupId>org.projectlombok</groupId>
    <artifactId>lombok</artifactId>
    <version>1.18.6</version>
    <scope>provided</scope>
  </dependency>
</dependencies>- 创建配置文件 application.yml
yaml
server:
  port: 8181
#配置视图解析器
spring:
  mvc:
    view:
      prefix: /
suffix: .jsp- 创建 Handler
java
package com.southwind.controller;

import com.southwind.entity.Student;
import com.southwind.repository.StudentRepository;
import org.springframework.beans.factory.annotation.Autowired;
import org.springframework.stereotype.Controller;
import org.springframework.web.bind.annotation.GetMapping;
import org.springframework.web.bind.annotation.PathVariable;
import org.springframework.web.bind.annotation.PostMapping;
import org.springframework.web.bind.annotation.RequestMapping;
import org.springframework.web.servlet.ModelAndView;

@Controller
@RequestMapping("/hello")
public class HelloHandler {

    @Autowired
    private StudentRepository studentRepository;

    @GetMapping("/index")
    public ModelAndView index(){
        ModelAndView modelAndView = new ModelAndView();
        modelAndView.setViewName("index");
        modelAndView.addObject("list",studentRepository.findAll());
        return modelAndView;
    }

    @GetMapping("/deleteById/{id}")
    public String deleteById(@PathVariable("id") long id){
        studentRepository.deleteById(id);
        return "redirect:/hello/index";
    }

    @PostMapping("/save")
    public String save(Student student){
        studentRepository.saveOrUpdate(student);
        return "redirect:/hello/index";
    }

    @PostMapping("/update")
    public String update(Student student){
        studentRepository.saveOrUpdate(student);
        return "redirect:/hello/index";
    }

    @GetMapping("/findById/{id}")
    public ModelAndView findById(@PathVariable("id") long id){
        ModelAndView modelAndView = new ModelAndView();
        modelAndView.setViewName("update");
        modelAndView.addObject("student",studentRepository.findById(id));
        return modelAndView;
    }
}- JSP
jsp
<%--
  Created by IntelliJ IDEA.
  User: southwind
  Date: 2019-03-21
  Time: 12:02
  To change this template use File | Settings | File Templates.
--%>
<%@ page contentType="text/html;charset=UTF-8" language="java" %>
<%@ page isELIgnored="false" %>
<%@ taglib prefix="c" uri="http://java.sun.com/jsp/jstl/core" %>
<html>
<head>
    <title>Title</title>
</head>
<body>
    <h1>学生信息</h1>
    <table>
        <tr>
            <th>学生编号</th>
            <th>学生姓名</th>
            <th>学生年龄</th>
            <th>操作</th>
        </tr>
        <c:forEach items="${list}" var="student">
            <tr>
                <td>${student.id}</td>
                <td>${student.name}</td>
                <td>${student.age}</td>
                <td>
                    <a href="/hello/findById/${student.id}">修改</a>
                    <a href="/hello/deleteById/${student.id}">删除</a>
                </td>
            </tr>
        </c:forEach>
    </table>
    <a href="/save.jsp">添加学生</a>
</body>
</html>
jsp
<%--
  Created by IntelliJ IDEA.
  User: southwind
  Date: 2019-03-21
  Time: 12:09
  To change this template use File | Settings | File Templates.
--%>
<%@ page contentType="text/html;charset=UTF-8" language="java" %>
<html>
<head>
    <title>Title</title>
</head>
<body>
    <form action="/hello/save" method="post">
        ID:<input type="text" name="id"/><br/>
        name:<input type="text" name="name"/><br/>
        age:<input type="text" name="age"/><br/>
        <input type="submit" value="提交"/>
    </form>
</body>
</html>
jsp
<%--
  Created by IntelliJ IDEA.
  User: southwind
  Date: 2019-03-21
  Time: 12:09
  To change this template use File | Settings | File Templates.
--%>
<%@ page contentType="text/html;charset=UTF-8" language="java" %>
<html>
<head>
    <title>Title</title>
</head>
<body>
    <form action="/hello/update" method="post">
        ID:<input type="text" name="id" value="${student.id}" readonly/><br/>
        name:<input type="text" name="name" value="${student.name}"/><br/>
        age:<input type="text" name="age" value="${student.age}"/><br/>
        <input type="submit" value="提交"/>
    </form>
</body>
</html>
Spring Boot HTML
Spring Boot 可以结合 Thymeleaf 模版来整合 HTML,使用原生的 HTML 作为视图。
Thymeleaf 模版是面向 Web 和独立环境的 Java 模版引擎,能够处理 HTML、XML、JavaScript、CSS 等。
<p th:text="${message}"></p>- pom.xml
xml
<!-- 继承父包 -->
<parent>
  <groupId>org.springframework.boot</groupId>
  <artifactId>spring-boot-starter-parent</artifactId>
  <version>2.0.7.RELEASE</version>
</parent>

<dependencies>
  <!-- web启动jar -->
  <dependency>
    <groupId>org.springframework.boot</groupId>
    <artifactId>spring-boot-starter-web</artifactId>
  </dependency>

  <dependency>
    <groupId>org.projectlombok</groupId>
    <artifactId>lombok</artifactId>
    <version>1.18.6</version>
    <scope>provided</scope>
  </dependency>

  <dependency>
    <groupId>org.springframework.boot</groupId>
    <artifactId>spring-boot-starter-thymeleaf</artifactId>
  </dependency>
</dependencies>- appliction.yml
yaml
server:
  port: 9090
spring:
  thymeleaf:
    prefix: classpath:/templates/
    suffix: .html
    mode: HTML5
encoding: UTF-8- Handler
java
package com.southwind.controller;

import org.springframework.stereotype.Controller;
import org.springframework.web.bind.annotation.GetMapping;
import org.springframework.web.bind.annotation.RequestMapping;

@Controller
@RequestMapping("/index")
public class IndexHandler {

    @GetMapping("/index")
    public String index(){
        System.out.println("index...");
        return "index";
    }
}- HTML
html
<!DOCTYPE html>
<html lang="en">
<head>
    <meta charset="UTF-8">
    <title>Title</title>
</head>
<body>
    <h1>Hello World</h1>
</body>
</html>
如果希望客户端可以直接访问 HTML 资源,将这些资源放置在 resource/static 路径下即可,否则必须通过 Handler 的后台映射才可以访问静态资源。
Thymeleaf 常用语法
- 赋值、拼接
java
@GetMapping("/index2")
public String index2(Map<String,String> map){
  map.put("name","张三");
  return "index";
}
html
<p th:text="${name}"></p>
<p th:text="'学生姓名是'+${name}+2"></p>
<p th:text="|学生姓名是,${name}|"></p>- 条件判断:if/unless
th:if 表示条件成立时显示内容,th:unless 表示条件不成立时显示内容
java
@GetMapping("/if")
public String index3(Map<String,Boolean> map){
    map.put("flag",true);
    return "index";
}
html
<p th:if="${flag == true}" th:text="if判断成立"></p>
<p th:unless="${flag != true}" th:text="unless判断成立"></p>- 循环
java
@GetMapping("/index")
public String index(Model model){
    System.out.println("index...");
    List<Student> list = new ArrayList<>();
    list.add(new Student(1L,"张三",22));
    list.add(new Student(2L,"李四",23));
    list.add(new Student(3L,"王五",24));
    model.addAttribute("list",list);
    return "index";
}
html
<table>
  <tr>
    <th>index</th>
    <th>count</th>
    <th>学生ID</th>
    <th>学生姓名</th>
    <th>学生年龄</th>
  </tr>
  <tr th:each="student,stat:${list}" th:style="'background-color:'+@{${stat.odd}?'#F2F2F2'}">
    <td th:text="${stat.index}"></td>
    <td th:text="${stat.count}"></td>
    <td th:text="${student.id}"></td>
    <td th:text="${student.name}"></td>
    <td th:text="${student.age}"></td>
  </tr>
</table>
stat 是状态变量,属性:
-
index 集合中元素的index(从0开始)
-
count 集合中元素的count(从1开始)
-
size 集合的大小
-
current 当前迭代变量
-
even/odd 当前迭代是否为偶数/奇数(从0开始计算)
-
first 当前迭代的元素是否是第一个
-
last 当前迭代的元素是否是最后一个
-
URL
Thymeleaf 对于 URL 的处理是通过 @{...} 进行处理,结合 th:href 、th:src
html
<h1>Hello World</h1>
<a th:href="@{http://www.baidu.com}">跳转</a>
<a th:href="@{http://localhost:9090/index/url/{na}(na=${name})}">跳转2</a>
<img th:src="${src}">
<div th:style="'background:url('+ @{${src}} +');'">
<br/>
<br/>
<br/>
</div>- 三元运算
java
@GetMapping("/eq")
public String eq(Model model){
    model.addAttribute("age",30);
    return "test";
}
html
<input th:value="${age gt 30?'中年':'青年'}"/>-
gt great than 大于
-
ge great equal 大于等于
-
eq equal 等于
-
lt less than 小于
-
le less equal 小于等于
-
ne not equal 不等于
-
switch
java
@GetMapping("/switch")
public String switchTest(Model model){
    model.addAttribute("gender","女");
    return "test";
}
html
<div th:switch="${gender}">
  <p th:case="女">女</p>
  <p th:case="男">男</p>
  <p th:case="*">未知</p>
</div>- 基本对象
#ctx:上下文对象#vars:上下文变量#locale:区域对象#request:HttpServletRequest 对象#response:HttpServletResponse 对象#session:HttpSession 对象#servletContext:ServletContext 对象
java
@GetMapping("/object")
public String object(HttpServletRequest request){
    request.setAttribute("request","request对象");
    request.getSession().setAttribute("session","session对象");
    return "test";
}
html
<p th:text="${#request.getAttribute('request')}"></p>
<p th:text="${#session.getAttribute('session')}"></p>
<p th:text="${#locale.country}"></p>- 内嵌对象
可以直接通过 # 访问。
1、dates:java.util.Date 的功能方法
2、calendars:java.util.Calendar 的功能方法
3、numbers:格式化数字
4、strings:java.lang.String 的功能方法
5、objects:Object 的功能方法
6、bools:对布尔求值的方法
7、arrays:操作数组的功能方法
8、lists:操作集合的功能方法
9、sets:操作集合的功能方法
10、maps:操作集合的功能方法
java
@GetMapping("/util")
public String util(Model model){
    model.addAttribute("name","zhangsan");
    model.addAttribute("users",new ArrayList<>());
    model.addAttribute("count",22);
    model.addAttribute("date",new Date());
    return "test";
}
html
<!-- 格式化时间 -->
<p th:text="${#dates.format(date,'yyyy-MM-dd HH:mm:sss')}"></p>
<!-- 创建当前时间,精确到天 -->
<p th:text="${#dates.createToday()}"></p>
<!-- 创建当前时间,精确到秒 -->
<p th:text="${#dates.createNow()}"></p>
<!-- 判断是否为空 -->
<p th:text="${#strings.isEmpty(name)}"></p>
<!-- 判断List是否为空 -->
<p th:text="${#lists.isEmpty(users)}"></p>
<!-- 输出字符串长度 -->
<p th:text="${#strings.length(name)}"></p>
<!-- 拼接字符串 -->
<p th:text="${#strings.concat(name,name,name)}"></p>
<!-- 创建自定义字符串 -->
<p th:text="${#strings.randomAlphanumeric(count)}"></p>
Spring Boot 数据校验
java
package com.southwind.entity;

import lombok.Data;
import org.hibernate.validator.constraints.Length;

import javax.validation.constraints.Min;
import javax.validation.constraints.NotEmpty;
import javax.validation.constraints.NotNull;

@Data
public class User {
    @NotNull(message = "id不能为空")
    private Long id;
    @NotEmpty(message = "姓名不能为空")
    @Length(min = 2,message = "姓名长度不能小于2位")
    private String name;
    @Min(value = 16,message = "年龄必须大于16岁")
    private int age;
}
java
@GetMapping("/validator")
public void validatorUser(@Valid User user,BindingResult bindingResult){
  System.out.println(user);
  if(bindingResult.hasErrors()){
    List<ObjectError> list = bindingResult.getAllErrors();
    for(ObjectError objectError:list){
      System.out.println(objectError.getCode()+"-"+objectError.getDefaultMessage());
    }
  }
}
Spring Boot 整合 JDBC
- pom.xml
xml
<dependency>
    <groupId>org.springframework.boot</groupId>
    <artifactId>spring-boot-starter-jdbc</artifactId>
</dependency>

<dependency>
    <groupId>mysql</groupId>
    <artifactId>mysql-connector-java</artifactId>
    <version>8.0.11</version>
</dependency>- application.yml
yaml
server:
  port: 9090
spring:
  thymeleaf:
    prefix: classpath:/templates/
    suffix: .html
    mode: HTML5
    encoding: UTF-8
  datasource:
    url: jdbc:mysql://localhost:3306/test?useUnicode=true&characterEncoding=UTF-8
    username: root
    password: root
driver-class-name: com.mysql.cj.jdbc.Driver- User
java
package com.southwind.entity;

import lombok.Data;
import org.hibernate.validator.constraints.Length;

import javax.validation.constraints.Min;
import javax.validation.constraints.NotEmpty;
import javax.validation.constraints.NotNull;

@Data
public class User {
    @NotNull(message = "id不能为空")
    private Long id;
    @NotEmpty(message = "姓名不能为空")
    @Length(min = 2,message = "姓名长度不能小于2位")
    private String name;
    @Min(value = 60,message = "成绩必须大于60分")
    private double score;
}- UserRepository
java
package com.southwind.repository;

import com.southwind.entity.User;

import java.util.List;

public interface UserRepository {
    public List<User> findAll();
    public User findById(long id);
    public void save(User user);
    public void update(User user);
    public void deleteById(long id);
}- UserRepositoryImpl
java
package com.southwind.repository.impl;

import com.southwind.entity.User;
import com.southwind.repository.UserRepository;
import org.springframework.beans.factory.annotation.Autowired;
import org.springframework.jdbc.core.BeanPropertyRowMapper;
import org.springframework.jdbc.core.JdbcTemplate;
import org.springframework.stereotype.Repository;

import java.util.List;

@Repository
public class UserRepositoryImpl implements UserRepository {

    @Autowired
    private JdbcTemplate jdbcTemplate;

    @Override
    public List<User> findAll() {
        return jdbcTemplate.query("select * from user",new BeanPropertyRowMapper<>(User.class));
    }

    @Override
    public User findById(long id) {
        return jdbcTemplate.queryForObject("select * from user where id = ?",new Object[]{id},new BeanPropertyRowMapper<>(User.class));
    }

    @Override
    public void save(User user) {
        jdbcTemplate.update("insert into user(name,score) values(?,?)",user.getName(),user.getScore());
    }

    @Override
    public void update(User user) {
        jdbcTemplate.update("update user set name = ?,score = ? where id = ?",user.getName(),user.getScore(),user.getId());
    }

    @Override
    public void deleteById(long id) {
        jdbcTemplate.update("delete from user where id = ?",id);
    }
}- Handler
java
package com.southwind.controller;

import com.southwind.entity.User;
import com.southwind.repository.UserRepository;
import org.springframework.beans.factory.annotation.Autowired;
import org.springframework.web.bind.annotation.*;

import java.util.List;

@RestController
@RequestMapping("/user")
public class UserHandler {

    @Autowired
    private UserRepository userRepository;

    @GetMapping("/findAll")
    public List<User> findAll(){
        return userRepository.findAll();
    }

    @GetMapping("/findById/{id}")
    public User findById(@PathVariable("id") long id){
        return userRepository.findById(id);
    }

    @PostMapping("/save")
    public void save(@RequestBody User user){
        userRepository.save(user);
    }

    @PutMapping("/update")
    public void update(@RequestBody User user){
        userRepository.update(user);
    }

    @DeleteMapping("/deleteById/{id}")
    public void deleteById(@PathVariable("id") long id){
        userRepository.deleteById(id);
    }
}
Spring Boot 整合 MyBatis
- pom.xml
xml
<dependency>
  <groupId>org.mybatis.spring.boot</groupId>
  <artifactId>mybatis-spring-boot-starter</artifactId>
  <version>1.3.1</version>
</dependency>- application.yml
yaml
server:
  port: 9090
spring:
  thymeleaf:
    prefix: classpath:/templates/
    suffix: .html
    mode: HTML5
    encoding: UTF-8
  datasource:
    url: jdbc:mysql://localhost:3306/test?useUnicode=true&characterEncoding=UTF-8
    username: root
    password: root
    driver-class-name: com.mysql.cj.jdbc.Driver
mybatis:
  mapper-locations: classpath:/mapping/*.xml
type-aliases-package: com.southwind.entity- UserRepository
java
package com.southwind.mapper;

import com.southwind.entity.User;

import java.util.List;

public interface UserRepository {
    public List<User> findAll(int index,int limit);
    public User findById(long id);
    public void save(User user);
    public void update(User user);
    public void deleteById(long id);
    public int count();
}- UserRepository.xml
xml
<?xml version="1.0" encoding="UTF-8" ?>
        <!DOCTYPE mapper PUBLIC "-//mybatis.org//DTD Mapper 3.0//EN" "http://mybatis.org/dtd/mybatis-3-mapper.dtd">
<mapper namespace="com.southwind.mapper.UserRepository">

    <select id="findAll" resultType="User">
        select * from user limit #{param1},#{param2}
    </select>

    <select id="count" resultType="int">
        select count(id) from user
    </select>

    <select id="findById" parameterType="long" resultType="User">
        select * from user where id = #{id}
    </select>

    <insert id="save" parameterType="User">
        insert into user(name,score) values(#{name},#{score})
    </insert>

    <update id="update" parameterType="User">
        update user set name = #{name},score = #{score} where id = #{id}
    </update>

    <delete id="deleteById" parameterType="long">
        delete from user where id = #{id}
    </delete>
</mapper>- User
java
package com.southwind.entity;

import lombok.Data;
import org.hibernate.validator.constraints.Length;

import javax.validation.constraints.Min;
import javax.validation.constraints.NotEmpty;
import javax.validation.constraints.NotNull;

@Data
public class User {
    @NotNull(message = "id不能为空")
    private Long id;
    @NotEmpty(message = "姓名不能为空")
    @Length(min = 2,message = "姓名长度不能小于2位")
    private String name;
    @Min(value = 60,message = "成绩必须大于60分")
    private double score;
}- Handler
java
package com.southwind.controller;
import com.southwind.entity.User;
import com.southwind.mapper.UserRepository;
import org.springframework.beans.factory.annotation.Autowired;
import org.springframework.stereotype.Controller;
import org.springframework.web.bind.annotation.*;
import org.springframework.web.servlet.ModelAndView;

@Controller
@RequestMapping("/mapper")
public class UserMapperHandler {

    @Autowired
    private UserRepository userRepository;
    private int limit = 10;

    @GetMapping("/findAll/{page}")
    public ModelAndView findAll(@PathVariable("page") int page){
        ModelAndView modelAndView = new ModelAndView();
        int index = (page-1)*limit;
        modelAndView.setViewName("show");
        modelAndView.addObject("list",userRepository.findAll(index,limit));
        modelAndView.addObject("page",page);
        //计算总页数
        int count = userRepository.count();
        int pages = 0;
        if(count%limit == 0){
            pages = count/limit;
        }else{
            pages = count/limit+1;
        }
        modelAndView.addObject("pages",pages);
        return modelAndView;
    }

    @GetMapping("/deleteById/{id}")
    public String deleteById(@PathVariable("id") long id){
        userRepository.deleteById(id);
        return "redirect:/mapper/findAll/1";
    }

    @GetMapping("/findById")
    public ModelAndView findById(@RequestParam("id") long id){
        ModelAndView modelAndView = new ModelAndView();
        modelAndView.addObject("user",userRepository.findById(id));
        modelAndView.setViewName("update");
        return modelAndView;
    }

    @PostMapping("/update")
    public String update(User user){
        userRepository.update(user);
        return "redirect:/mapper/findAll/1";
    }

    @PostMapping("/save")
    public String save(User user){
        userRepository.save(user);
        return "redirect:/mapper/findAll/1";
    }

    @GetMapping("/redirect/{name}")
    public String redirect(@PathVariable("name") String name){
        return name;
    }
}- HTML
html
<!DOCTYPE html>
<html xmlns:th="http://www.thymeleaf.org">
<html lang="en">
<head>
    <meta charset="UTF-8">
    <title>Title</title>
</head>
<body>
    <form action="/mapper/save" method="post">
        用户姓名:<input type="text" name="name" /><br/>
        用户成绩:<input type="text" name="score" /><br/>
        <input type="submit" value="提交"/>
    </form>
</body>
</html>
html
<!DOCTYPE html>
<html xmlns:th="http://www.thymeleaf.org">
<html lang="en">
<head>
    <meta charset="UTF-8">
    <title>Title</title>
</head>
<body>
    <form action="/mapper/update" method="post">
        用户ID:<input type="text" name="id" th:value="${user.id}" readonly/><br/>
        用户姓名:<input type="text" name="name" th:value="${user.name}" /><br/>
        用户成绩:<input type="text" name="score" th:value="${user.score}" /><br/>
        <input type="submit" value="提交"/>
    </form>
</body>
</html>
html
<!DOCTYPE html>
<html xmlns:th="http://www.thymeleaf.org">
<html lang="en">
<head>
    <meta charset="UTF-8">
    <title>Title</title>
    <script type="text/javascript" th:src="@{/jquery-3.3.1.min.js}"></script>
    <script type="text/javascript">
        $(function(){
            $("#first").click(function(){
                var page = $("#page").text();
                page = parseInt(page);
                if(page == 1){
                    return false;
                }
                window.location.href="/mapper/findAll/1";
            });
            $("#previous").click(function(){
                var page = $("#page").text();
                page = parseInt(page);
                if(page == 1){
                    return false;
                }
                page = page-1;
                window.location.href="/mapper/findAll/"+page;
            });
            $("#next").click(function(){
                var page = $("#page").text();
                var pages = $("#pages").text();
                if(page == pages){
                    return false;
                }
                page = parseInt(page);
                page = page+1;
                window.location.href="/mapper/findAll/"+page;
            });
            $("#last").click(function(){
                var page = $("#page").text();
                var pages = $("#pages").text();
                if(page == pages){
                    return false;
                }
                window.location.href="/mapper/findAll/"+pages;
            });
        });
    </script>
</head>
<body>
    <h1>用户信息</h1>
    <table>
        <tr>
            <th>用户ID</th>
            <th>用户名</th>
            <th>成绩</th>
            <th>操作</th>
        </tr>
        <tr th:each="user:${list}">
            <td th:text="${user.id}"></td>
            <td th:text="${user.name}"></td>
            <td th:text="${user.score}"></td>
            <td>
                <a th:href="@{/mapper/deleteById/{id}(id=${user.id})}">删除</a>
                <a th:href="@{/mapper/findById(id=${user.id})}">修改</a>
            </td>
        </tr>
    </table>
    <a id="first" href="javascript:void(0)">首页</a>
    <a id="previous" href="javascript:void(0)">上一页</a>
    <span id="page" th:text="${page}"></span>/<span id="pages" th:text="${pages}"></span>
    <a id="next" href="javascript:void(0)">下一页</a>
    <a id="last" href="javascript:void(0)">尾页</a><br/>
    <a href="/mapper/redirect/save">添加用户</a>
</body>
</html>
Spring Boot整合Redis
Redis
基于内存进⾏存储,⽀持 key-value 的存储形式,底层是⽤ C 语⾔编写的。
基于 key-value 形式的数据字典,结构⾮常简单,没有数据表的概念,直接⽤键值对的形式完成数据的管理,Redis ⽀持 5 种数据类型:
- 字符串
- 列表
- 集合
- 有序集合
- 哈希
安装Redis
下载安装参考:https://www.renren.io/detail/14294
https://blog.csdn.net/m0_59281987/article/details/129160247
解压,并在本地硬盘任意位置创建⽂件夹,在其中创建 3 个⼦⽂件夹
bin:放置启动 Redis 的可执⾏⽂件
db:放置数据⽂件
etc:放置配置⽂件,设置 Redis 服务的端⼝、⽇志⽂件位置、数据⽂件位置...
启动 Redis 服务
1、进⼊ redis ⽬录,启动 redis-server
sudo ./bin/redis-server ./etc/redis.conf2、进⼊ redis ⽬录,启动 redis-cli,启动 Redis 的客户端管理窗⼝,在此窗⼝中即可操作 Redis 数据库
./bin/redis-cli3、对数据进⾏操作
set key value
get key
4、关闭 Redis 服务
shutdown5、退出客户端,control+C
Spring Data Redis 操作 Redis
1、pom.xml
xml
<parent>
<groupId>org.springframework.boot</groupId>
<artifactId>spring-boot-starter-parent</artifactId>
<version>2.1.5.RELEASE</version>
</parent>
<dependencies>
<dependency>
<groupId>org.springframework.boot</groupId>
<artifactId>spring-boot-starter-web</artifactId>
</dependency>
<dependency>
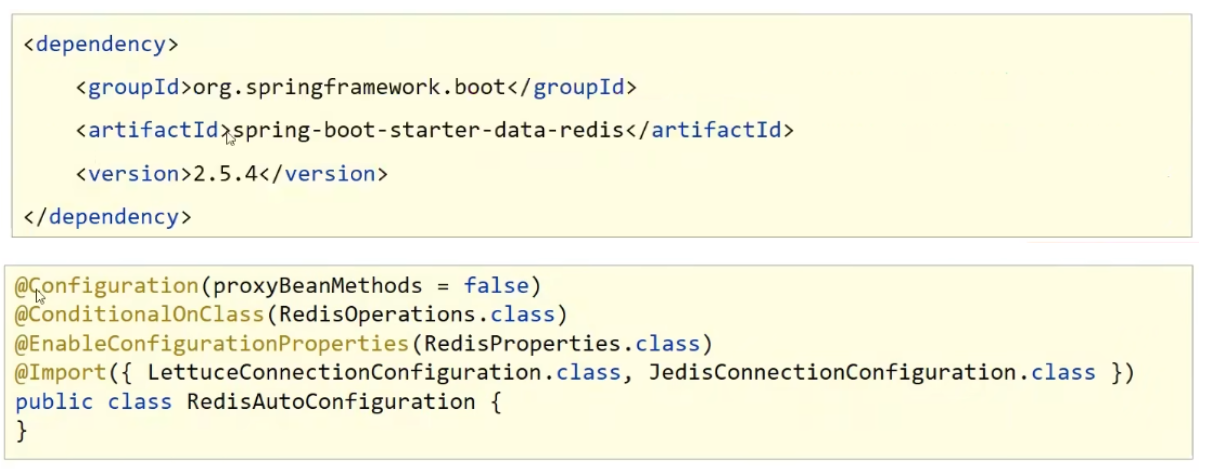
<groupId>org.springframework.boot</groupId>
<artifactId>spring-boot-starter-data-redis</artifactId>
</dependency>
<!--redis数据库连接池-->
<dependency>
<groupId>org.apache.commons</groupId>
<artifactId>commons-pool2</artifactId>
</dependency>
<dependency>
<groupId>org.projectlombok</groupId>
<artifactId>lombok</artifactId>
<version>1.18.6</version>
<scope>provided</scope>
</dependency>
</dependencies>2、创建实体类,实现序列化接⼝,否则⽆法存⼊ Redis 数据库。
java
@Data
public class Student implements Serializable{
    private long id;
    private String name;
    private Double score;
    private Date birthday;
}
3、创建控制器
java
package com.southwind.controller;

import com.southwind.entity.Student;
import org.springframework.beans.factory.annotation.Autowired;
import org.springframework.data.redis.core.RedisTemplate;
import org.springframework.stereotype.Controller;
import org.springframework.ui.Model;
import org.springframework.web.bind.annotation.*;

import java.util.ArrayList;
import java.util.List;
import java.util.Map;

@RestController
public class StudentController {
    @Autowired
    private RedisTemplate redisTemplate;

    @PostMapping("/set")
    public void set(@RequestBody Student student){
        redisTemplate.opsForValue().set("stu", student);
    }

    @GetMapping("/get/{key}")
    public Student get(@PathVariable("key") String key){
        return (Student) redisTemplate.opsForValue().get(key);
    }

    @DeleteMapping("/delete/{key}")
    public boolean delete(@PathVariable("key") String key){
        redisTemplate.delete(key);
        return redisTemplate.hasKey(key);
    }
}
4、application.yml
yml
spring:
  redis:
    database: 0
    host: localhost
    port: 6379
5、创建启动类
java
package com.southwind;

import org.springframework.boot.SpringApplication;
import org.springframework.boot.autoconfigure.SpringBootApplication;

@SpringBootApplication
public class Application {
    public static void main(String[] args) {
        SpringApplication.run(Application.class, args);
    }
}
取:
http://localhost:8080/get/stu存:
http://localhost:8080/set
{
    "id": 1,
    "name": "哈哈",
    "score": 99,
    "birthday": "2024-01-23"
}
我们使用redis先存数据,然后再取数据,是能取得刚刚存的数据,但是去redis数据库中通过get stu查出来是nil,表示是空。
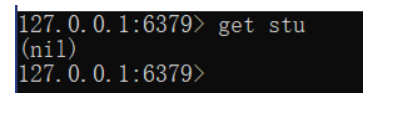
这时我们看下redis中的所有key值

第二个是我们通过项目存进去的key。这是因为spring-data-redis会对stu进行序列化操作,即在stu前面加了一串字母。
Redis 5 种数据类型
- 字符串
java
@GetMapping("/string")
public String stringTest(){
 redisTemplate.opsForValue().set("str","Hello World");
 String str = (String) redisTemplate.opsForValue().get("str");
 return str;
}- 列表
java
@GetMapping("/list")
public List<String> listTest(){
 ListOperations<String,String> listOperations = redisTemplate.opsForList();
 listOperations.leftPush("list","Hello");
 listOperations.leftPush("list","World");
 listOperations.leftPush("list","Java");
 List<String> list = listOperations.range("list",0,2);
 return list;
}- 集合
java
@GetMapping("/set")
public Set<String> setTest(){
 SetOperations<String,String> setOperations = redisTemplate.opsForSet();
 setOperations.add("set","Hello");
 setOperations.add("set","Hello");
 setOperations.add("set","World");
 setOperations.add("set","World");
 setOperations.add("set","Java");
 setOperations.add("set","Java");
 Set<String> set = setOperations.members("set");
 return set;
}- 有序集合
java
@GetMapping("/zset")
public Set<String> zsetTest(){
 ZSetOperations<String,String> zSetOperations = redisTemplate.opsForZSet();
 zSetOperations.add("zset","Hello",1);
 zSetOperations.add("zset","World",2);
 zSetOperations.add("zset","Java",3);
 Set<String> set = zSetOperations.range("zset",0,2);
 return set;
}- 哈希
HashMap key value
HashOperations key hashkey value
key 是每⼀组数据的 ID,hashkey 和 value 是⼀组完整的 HashMap 数据,通过 key 来区分不同的HashMap
java
哈希
HashMap hashMap1 = new HashMap();
hashMap1.put(key1,value1);
HashMap hashMap2 = new HashMap();
hashMap2.put(key2,value2);
HashMap hashMap3 = new HashMap();
hashMap3.put(key3,value3);
HashOperations<String,String,String> hashOperations =
redisTemplate.opsForHash();
hashOperations.put(hashMap1,key1,value1);
hashOperations.put(hashMap2,key2,value2);
hashOperations.put(hashMap3,key3,value3);
Spring Boot 整合 Spring Security
基本使用
1、创建 Maven ⼯程,pom.xml
xml
<parent>
  <groupId>org.springframework.boot</groupId>
  <artifactId>spring-boot-starter-parent</artifactId>
  <version>2.1.5.RELEASE</version>
</parent>

<dependencies>
  <dependency>
    <groupId>org.springframework.boot</groupId>
    <artifactId>spring-boot-starter-web</artifactId>
  </dependency>

  <dependency>
    <groupId>org.springframework.boot</groupId>
    <artifactId>spring-boot-starter-thymeleaf</artifactId>
  </dependency>

  <dependency>
    <groupId>org.springframework.boot</groupId>
    <artifactId>spring-boot-starter-security</artifactId>
  </dependency>

</dependencies>
2、创建handler
java
@Controller
public class HelloController {
    @GetMapping("/index")
    public String index(){
        return "index";
    }
}
3、创建HTML
html
<!DOCTYPE html>
<html lang="en">
<head>
    <meta charset="UTF-8">
    <title>Title</title>
</head>
<body>
    hello world
</body>
</html>
4、创建application.yml
yml
spring:
  thymeleaf:
    prefix: classpath:/templates
    suffix: .html
5、创建启动类
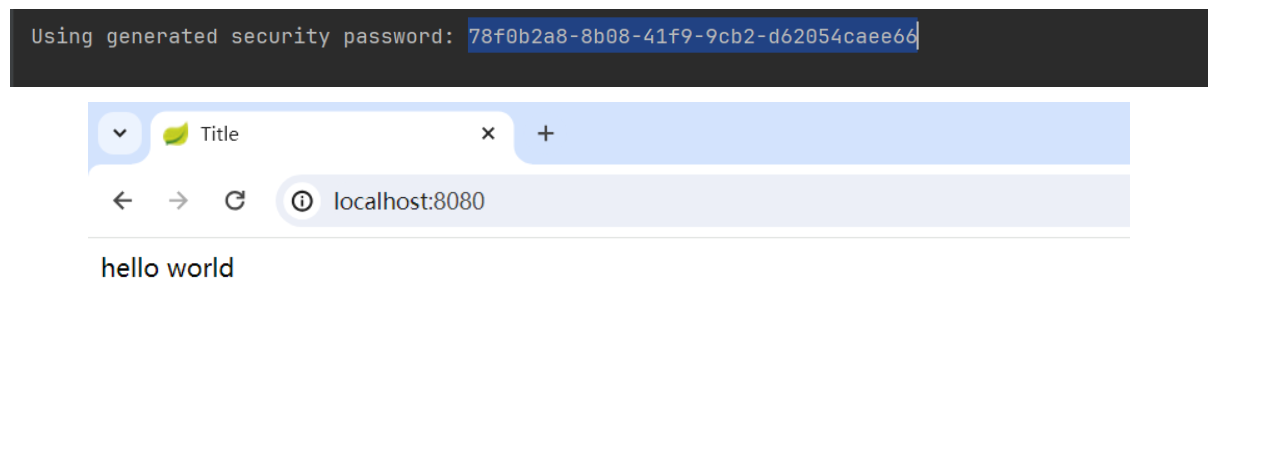
6、启动项目,访问index地址,页面会跳转到login页面,如下:这是security框架生效了。因为我们还没有登录,所以会让我们跳转到登录页面。
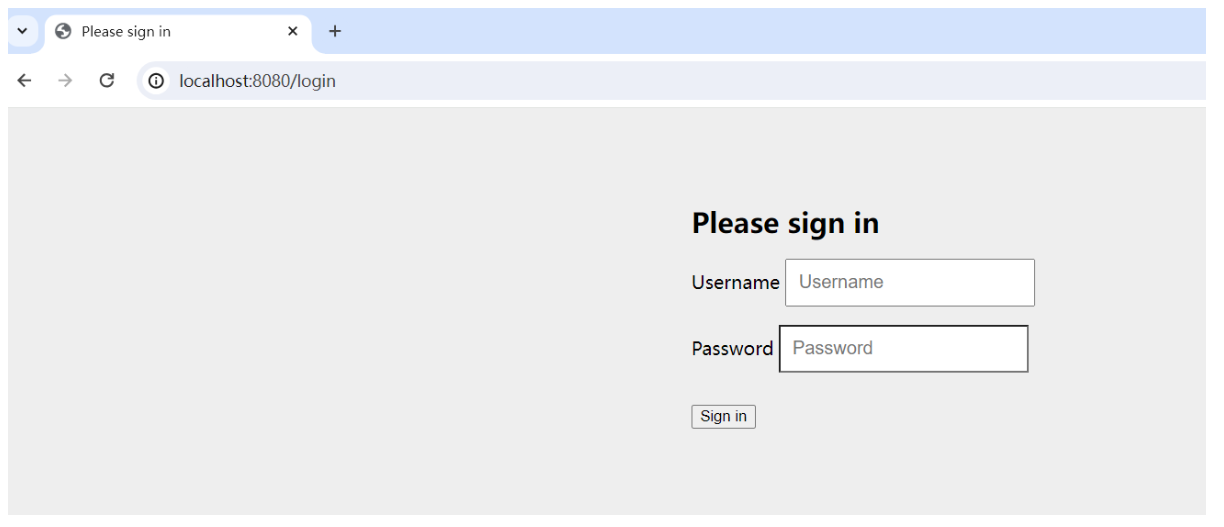
用户名默认是user,密码是控制台打印出来的。我们输入用户名和密码后点击登录就能访问到index页面了。
7、设置自定义密码
yml
spring:
  thymeleaf:
    prefix: classpath:/templates/
    suffix: .html
  security:
    user:
      name: admin
      password: 123123
权限管理
定义两个 HTML 资源:index.html、admin.html,同时定义两个⻆⾊ ADMIN 和 USER,ADMIN 拥有访问 index.html 和 admin.html 的权限,USER 只有访问 index.html 的权限。
7、创建 MyPasswordEncoder密码编码类和SecurityConfig 类。
java
package com.southwind.config;

import org.springframework.security.crypto.password.PasswordEncoder;

/**
 * 对密码进行编码
 */
public class MyPasswordEncoder implements PasswordEncoder {
    @Override
    public String encode(CharSequence charSequence) {
        return charSequence.toString();
    }

    @Override
    public boolean matches(CharSequence charSequence, String s) {
        return s.equals(charSequence.toString());
    }
}
java
package com.southwind.config;

import org.springframework.context.annotation.Configuration;
import org.springframework.security.config.annotation.authentication.builders.AuthenticationManagerBuilder;
import org.springframework.security.config.annotation.web.builders.HttpSecurity;
import org.springframework.security.config.annotation.web.configuration.EnableWebSecurity;
import org.springframework.security.config.annotation.web.configuration.WebSecurityConfigurerAdapter;

@Configuration
@EnableWebSecurity
public class SecurityConfig extends WebSecurityConfigurerAdapter {
    /**
     * 设置角色和权限关系
     * @param http
     * @throws Exception
     */
    @Override
    protected void configure(HttpSecurity http) throws Exception {
        //地址栏访问/admin,则必须拥有ADMIN角色;访问/index,则必须拥有ADMIN角色或者USER角色
        //.anyRequest().authenticated()表示任何请求都需要进行认证
        //.formLogin().loginPage("/login").permitAll()表示设置登录页面为login,并且允许所有请求进行访问,因为登录页面不进行放行的话就没法访问系统了
        //csrf().disable();表示禁用csrf
        http.authorizeRequests().antMatchers("/admin").hasRole("ADMIN")
                .antMatchers("/index").access("hasRole('ADMIN') or hasRole('USER')")
                .anyRequest().authenticated()
                .and()
                .formLogin()
                .loginPage("/login")
                .permitAll()
                .and()
                .logout()
                .permitAll()
                .and()
                .csrf()
                .disable();
    }

    /**
     * 设置用户和角色关系
     * @param auth
     * @throws Exception
     */
    @Override
    protected void configure(AuthenticationManagerBuilder auth) throws Exception {
        //添加一个用户user,密码是000,对应角色是USER
        //添加一个用户admin,密码是123,对应角色是ADMIN和USER
        auth.inMemoryAuthentication().passwordEncoder(new MyPasswordEncoder())
                .withUser("user").password(new MyPasswordEncoder().encode("000")).roles("USER")
                .and()
                .withUser("admin").password(new MyPasswordEncoder().encode("123")).roles("ADMIN", "USER");
    }
}
8、修改 Handler
java
package com.southwind.controller;

import org.springframework.stereotype.Controller;
import org.springframework.web.bind.annotation.GetMapping;

@Controller
public class HelloController {
    @GetMapping("/index")
    public String index(){
        return "index";
    }

    @GetMapping("/admin")
    public String admin(){
        return "admin";
    }

    @GetMapping("/login")
    public String login(){
        return "login";
    }
}
9、创建HTML页面
login.html
html
<!DOCTYPE html>
<html lang="en">
<html xmlns:th="http://www.thymeleaf.org">
<head>
    <meta charset="UTF-8">
    <title>Title</title>
</head>
<body>
    <form th:action="@{/login}" method="post">
        ⽤户名:<input type="text" name="username"/><br/>
        密码:<input type="text" name="password"/><br/>
        <input type="submit" value="登录"/>
    </form>
</body>
</html>
index.html
html
<!DOCTYPE html>
<html lang="en">
<head>
<meta charset="UTF-8">
<title>Title</title>
</head>
<body>
hello world
<form action="/logout" method="post">
<input type="submit" value="退出"/>
</form>
</body>
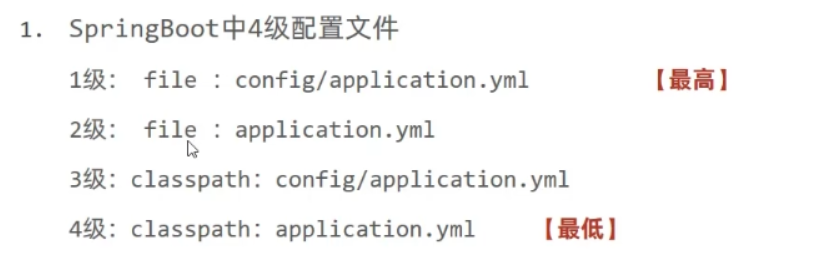
</html>配置优先级
Spring Boot支持以下三种配置文件:application.properties、application.yml、application.yaml,那么这三者同时存在时,优先级是:
application.properties > application.yml > application.yaml
虽然Spring Boot支持多种格式的配置文件,但是推荐使用yml格式。
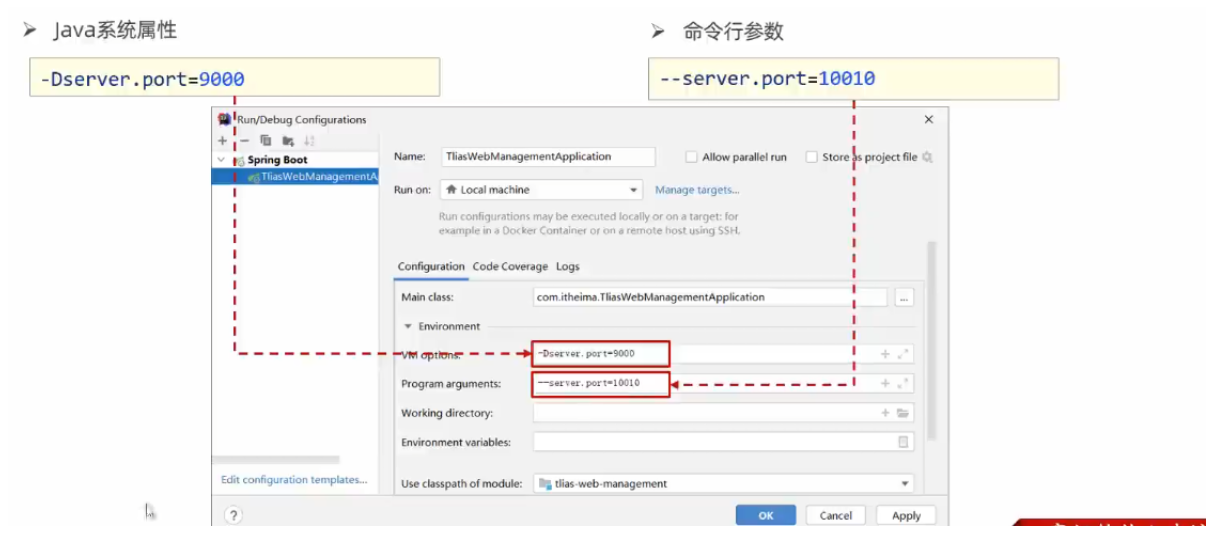
Spring Boot中除了支持配置文件之外,还支持Java系统属性和命令行参数的方式进行配置。
Java系统属性:-Dserver.port=9000
命令行参数:--server.port=10010
第三方Bean
如果我们引入第三方的jar包,想要通过如下调用:
java
SAXReader saxReader = new SAXReader();
saxReader.xxx();
上面这种方法,我们每次都要new对象,这是比较消耗资源的。我们可以把它交给Spring容器来处理,用的时候直接通过@Autowired注入即可。
如果要管理的对象来自第三方,我们可以使用@Bean来将该对象交给IOC容器管理。
我们可以在Spring Boot启动类定义:
java
@Bean
public SAXReader sAXReader(){
	return new SAXReader();
}
自动配置
- 方案一:我们要通过@Autowired注解注入相应的bean,就需要在相应的类上面加上像@Component这样的注解,还要通过@ComponentScan指定要扫描的包。不加@ComponentScan的话,是找不到对应bean的。如果我们要扫描的包比较多,在不同的路径,我们可以这样设置
java
@ComponentScan({"com.southwind", "com.alibaba"})但是,这种方法加一个包就需要加一段扫描路径,配置比较繁琐。
- 方案二:@Import导入。使用该注解导入的类会被Spring加载到IOC容器。
java
@Import({TokenParse.class})