OC---UI学习
UILabel
- UILabel是UIKit框架中的一个类
- Label主要参数
- text:文本
- frame:位置框架
- backgroundcolor:背景颜色
- textAlignment:设置文本在Label中的位置
- textColor:文本颜色
- shadowColor:阴影颜色
- shadowOffset:阴影偏移量
- numberOflines: 文本行数
objective-c
- (void) createUI {
    //UILable是显示在屏幕上的,并且可以显示文字的一种UI视图
    UILabel* label = [[UILabel alloc] init];
    //显示文字赋值,字符串对象
    label.text = @"请选择登录界面";
    //设定lable的显示位置
    label.frame = CGRectMake(130, 200, 160, 40);
    //设置UI背景色/clearColor表示透明色
    label.backgroundColor = [UIColor yellowColor];
    //将lable显示到屏幕上
    [self.view addSubview:label];
    //调整lable文字大小,使用系统默认字体,大小为20
    label.font = [UIFont systemFontOfSize:22];
    label.textColor = [UIColor blackColor];
    //lable的高级属性
    //设定阴影的颜色
    label.shadowColor = [UIColor grayColor];
    //设定阴影的偏移量
    label.shadowOffset = CGSizeMake(3, 3);
    //设置text文字的对齐模式,默认为靠左侧对齐,center为居中对齐。right右对齐
    label.textAlignment = NSTextAlignmentCenter;
    //如果文本过长,会出现省略号,一下实现自动换行,其他的大于0的情况,文字会尽量按照设定行数显示,如果为0,那么会对文字自动计算所需要的行数
    label.numberOfLines = 0;

}- CGRectMake参数:
x:矩形左上角的 X 坐标(水平位置)。y:矩形左上角的 Y 坐标(垂直位置)。width:矩形的 宽度。height:矩形的 高度。
UIButton
UIButton是UIKit框架中的一个类,继承了UIControl的交互特性(如触摸事件处理),用于创建可点击的按钮,通常用于响应用户的触摸事件,然后执行响应的操作或触发特定的动作。
- 创建一个普通按钮
objective-c
//创建普通的UIButton按钮函数
- (void)creatUIRectButton {
    //创建圆角类型按钮
    //通过类方法来创建(button的内存是自己管理的)
    UIButton* button = [UIButton buttonWithType:UIButtonTypeRoundedRect];
    //设置位置
    button.frame = CGRectMake(150, 100, 100, 40);

    //显示文字
    //@paramemter
    //p1: 字符串类型,表示显示到按钮上的文字
    //p2: 设置文字显示的状态类型;UIControlStateNormal:正常状态
    //为不同状态设置不同文本
    [button setTitle:@"按钮01" forState:UIControlStateNormal];
    //p1:显示的文字
    //p2:显示文字的状态;UIControlStateHighlighted:按下状态
    [button setTitle:@"按钮按下" forState:UIControlStateHighlighted];
    //背景颜色
    button.backgroundColor = [UIColor yellowColor];
    //文字颜色
    //p1:颜色
    //p2:状态
    [button setTitleColor:[UIColor blackColor] forState:UIControlStateNormal];
    [button setTitleColor:[UIColor orangeColor] forState:UIControlStateHighlighted];
    //设置按钮的风格颜色
    //[button setTintColor:[UIColor whiteColor]];
    //设置字体大小
    button.titleLabel.font = [UIFont systemFontOfSize:18.0];
    //添加到视图中并显示
    [self.view addSubview:button];
}
button通过一个正常状态与高亮状态,给予用户不同的反馈
- 创建图片按钮
objective-c
- (void)creatImageButton {
    //创建一个自定义类型button
    UIButton* buttonImage = [UIButton buttonWithType:UIButtonTypeCustom];
    buttonImage.frame = CGRectMake(150, 200, 100, 100);
    //从应用束资源束中加载图片文件并创建UIImage对象
    UIImage* icon01 = [UIImage imageNamed:@"button01.jpg"];
    UIImage* icon02 = [UIImage imageNamed:@"button02.jpg"];
    //p1:显示图片对象
    //p1:按钮状态
    [buttonImage setImage:icon01 forState:UIControlStateNormal];
    [buttonImage setImage:icon02 forState:UIControlStateHighlighted];
    [self.view addSubview:buttonImage];
}
注意要将图片提前导入到项目之中,注意图片格式
- UIButton的事件触发
objective-c
- (void)creatButton {
UIButton* button = [UIButton buttonWithType:UIButtonTypeRoundedRect];
button.backgroundColor = [UIColor yellowColor];
button.frame = CGRectMake(150, 100, 100, 40);
[button setTitle:@"按钮" forState:UIControlStateNormal];
button.titleLabel.font = [UIFont systemFontOfSize:18];
/*
为按钮添加响应时间逻辑
1. target常见取值:
self:当前视图控制器或视图
nil:使用响应链寻找处理方法
其他对象
会对target产生弱引用,不会阻止target被释放,但若target释放后,按钮仍然可能触发事件(需要手动移除target)
2. action:
事件触发时调用的方法,必须是target对象中实现的方法
3. controlEvents:
出发事件的条件
*/
[button addTarget:self action:@selector(pressButton:) forControlEvents:UIControlEventTouchUpInside];
[button addTarget:self action:@selector(touchDown) forControlEvents:UIControlEventTouchDown];
[self.view addSubview:button];
/*
如果事件函数带参数,那么不同按钮调用时会有区别
button.tag = 101;
*/
button.tag = 101;
UIButton* button02 = [UIButton buttonWithType:UIButtonTypeRoundedRect];
button02.tag = 102;
button02.frame = CGRectMake(150, 400, 100, 40);
[button02 setTitle:@"修改密码" forState:UIControlStateNormal];
[button02 setTitle:@"请修改密码" forState:UIControlStateHighlighted];
button02.titleLabel.textAlignment = NSTextAlignmentCenter;
[button02 setTitleColor:[UIColor blackColor] forState:UIControlStateNormal];
[button02 setTitleColor:[UIColor redColor] forState:UIControlStateHighlighted];
button02.backgroundColor = [UIColor yellowColor];
button02.titleLabel.font = [UIFont systemFontOfSize:18.0];
[button02 addTarget:self action:@selector(modifyPassword) forControlEvents:UIControlEventTouchUpInside];
[button02 addTarget:self action:@selector(pressButton:) forControlEvents:UIControlEventTouchUpInside];
[self.view addSubview:button02];
}
/*
- (void)pressButton {
NSLog(@"按钮被按下");
}
*/
//参数调用此函数按钮对象本身
- (void)pressButton:(UIButton* )button {
if (button.tag == 101) {
NSLog(@"button01 is pressed");
}
if (button.tag == 102) {
NSLog(@"button02 is pressed");
}
}
//触碰时调用事件函数
- (void)touchDown {
NSLog(@"按钮被触碰");
}
//修改密码触碰后调用函数
- (void)modifyPassword {
NSLog(@"请输入新密码");
}
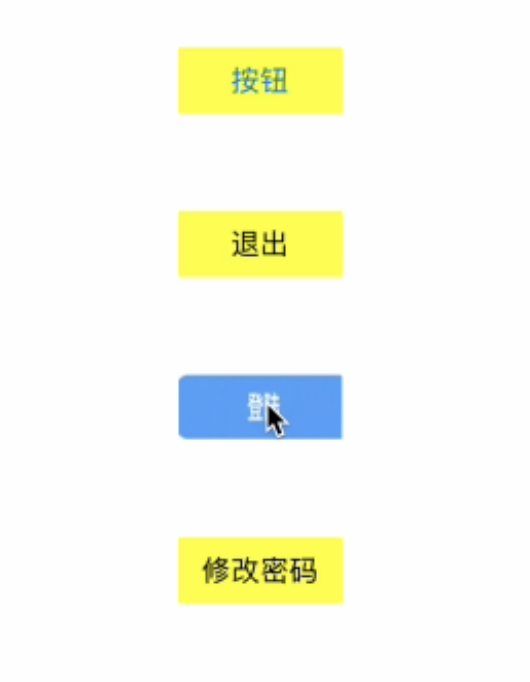
1. 按压并松开最上面按钮出现如下输出
> 按钮被触碰
> button01 is pressed
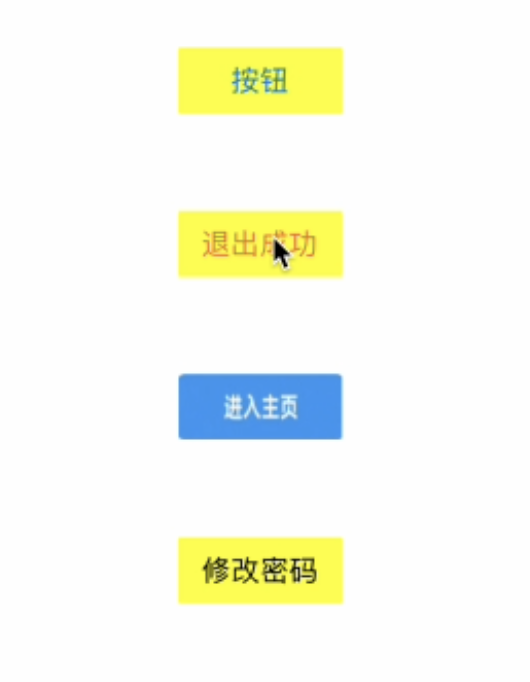
2. 触碰修改密码密码按钮会出现
> 请输入新密码
> button02 is pressed
> 根据按钮不同的状态(UIControlEvents)显示不同的样式这里通过设置button的tag值来决定点击事件中执行的操作
一般从0开始,便于操作
UIView基础
UIview是ios得1视图对象,是显示在我们屏幕上的所有的对象的基类
所有显示在屏幕上的对象都一定继承与UIView,也就是说所有屏幕上可以看到的对象都是UIView的子类
UIView是一个矩形对象,有背景颜色,可以显示,有层级关系
objective-c
#import "ViewController.h"

@interface ViewController ()

@end

@implementation ViewController

- (void)viewDidLoad {
    [super viewDidLoad];
    // Do any additional setup after loading the view.

    UIView* view = [[UIView alloc] init];
    view.frame = CGRectMake(160, 150, 100, 200);
    view.backgroundColor = [UIColor orangeColor];
    //将新建的视图添加到父亲的视图上
    //过程:1.将新建的视图添加到屏幕上;2.将视图作为父亲视图的子视图管理起来
    [self.view addSubview:view];

    //隐藏视图
    //YES为隐藏;默认为NO显示
    view.hidden = YES;

    //设置视图的透明度
    // = 1:不透明 ; = 0:透明 ;= 0.5:半透明
    view.alpha = 0.5;
    self.view.backgroundColor = [UIColor blueColor];

    //设置是否显示不透明
    view.opaque = NO;

    //将自己从父亲视图删除
    //1.从父亲的管理视图中删除
    //2.不会显示在屏幕上
    [view removeFromSuperview];
}

@end
UIView层级关系
在多个视图同时被添加到父视图上时,回你出现一个先添加与后添加的关系,后添加的视图会覆盖先添加的视图。
object
#import "ViewController.h"

@interface ViewController ()

@end

@implementation ViewController

- (void)viewDidLoad {
    [super viewDidLoad];
    // Do any additional setup after loading the view.
    //创建三个视图对象
    UIView* view01 = [[UIView alloc] init];
    view01.frame = CGRectMake(100, 100, 150, 150);
    view01.backgroundColor = [UIColor blueColor];
    UIView* view02 = [[UIView alloc] init];
    view02.frame = CGRectMake(125, 125, 150, 150);
    view02.backgroundColor = [UIColor orangeColor];
    UIView* view03 = [[UIView alloc] init];
    view03.frame = CGRectMake(150, 150, 150, 150);
    view03.backgroundColor = [UIColor greenColor];

    //显示到屏幕上,受父亲视图管理
    //哪一个视图被限添加到父亲视图中,就先绘制哪一个视图
    [self.view addSubview:view01];
    [self.view addSubview:view02];
    [self.view addSubview:view03];

    //将某一个子视图调整到最前面
    [self.view bringSubviewToFront:view01];
    //参数:UIview对象
    //将某一个子视图调整到最后面显示
    [self.view sendSubviewToBack:view01];

    //subview:是管理所有self.view的子视图的数组
    UIView* viewFront = self.view.subviews[2];
    [view01 removeFromSuperview];

    UIView* viewBack = self.view.subviews[0];

    if (view01 == viewBack) {
        NSLog(@"相等");
    }
}


@end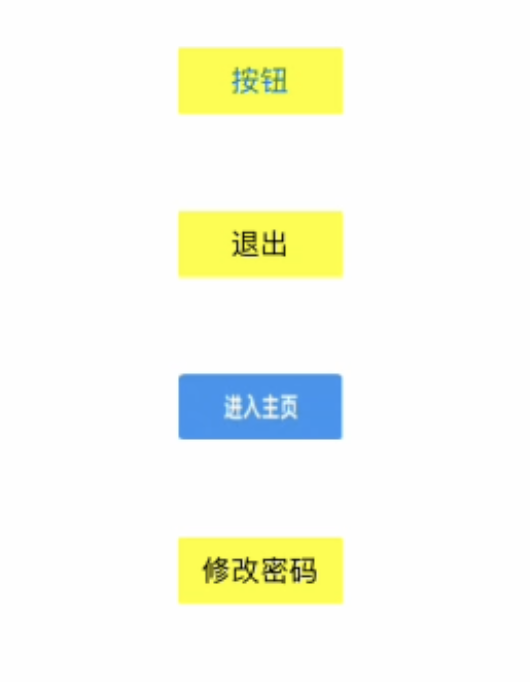
注释:就是类似效果
可以通过bringSubviewToFront:与sendSubviewToBack:方法调节视图位置
同时也可以调用对象的removeFromSuperview方法删除自己。
UIWindow
在现在这个版本中已经不需要创建UIWindow了,程序自己会创建,我们只用创建一个根视图控制器来决定我们要推出那一个视图控制器展示在用户眼前。
- UIWindow是iOS中的一个界面对象,用于表示和管理应用程序的窗口,他通常包含应用程序的视图层次结构的背景,并且是所有视图控制器和视图的容器。在应用程序中,UIWindow对象在屏幕上扮演一个至关重要的角色,他负责协调视图对象的展示与事件的响应
是iOS应用程序中最底层的界面对象,是应用程序可视化的载体,所有视图与视图控制器都必须加载到UIWindow中,才能最终显示在屏幕上
协调事件响应,当用户触摸屏幕时,系统会自动生成一个UIEvent(触摸事件),并首先传递给UIWindow
以下现实场景:
1.消息推送弹窗:消息的悬浮通知
2.多任务多窗口:多窗口独立
3.游戏中的弹窗菜单:游戏应用中常需要暂停游戏并弹出设置菜单
4.全屏广告:应用程序中的全屏广告通常会在新的UIWindow中修显示
-
视图控制器:
简称VC是MVC模式的核心组件,负责管理视图(view)与数据(Model)之间的交互逻辑(导演)
主要功能:
1.创建和管理视图
VC负责创建或加载视图,并定义视图的布局
2.视图生命周期的管理
VC控制视图的显示与隐藏,并在不同阶段触发特定的方法,用于执行界面更新或资源释放
3.事件响应
VC监听用户操作(如按钮点击、滑动手势),并调用相应的处理方法
4.数据与界面的绑定
VC从Model层获取数据,并更新提交到View中(如从网络请求获取用户信息后,填充到界面的文本框),同时将用户输出的数据传递给Model层
5.页面跳转(导航)
VC通过协调不同界面之间的切换逻辑
6.父子控制器关系
复杂界面可通过容器视图管理器管理子控制器
视图:负责界面元素的展示,如按钮、文本框、图片等
数据:村醋界面元素需要展示的内容,如用户信息,网络请求结果等。
objec
#import "SceneDelegate.h"

@interface SceneDelegate ()

@end

@implementation SceneDelegate


- (void)scene:(UIScene *)scene willConnectToSession:(UISceneSession *)session options:(UISceneConnectionOptions *)connectionOptions {
    // Use this method to optionally configure and attach the UIWindow `window` to the provided UIWindowScene `scene`.
    // If using a storyboard, the `window` property will automatically be initialized and attached to the scene.
    // This delegate does not imply the connecting scene or session are new (see `application:configurationForConnectingSceneSession` instead).

    self.window.rootViewController = [[UIViewController alloc] init];
    self.window.backgroundColor = [UIColor blueColor];
    UIView* view = [[UIView alloc] initWithFrame:CGRectMake(100, 100, 150, 150)];
    view.backgroundColor = [UIColor colorWithRed:0.2 green:0.3 blue:0.5 alpha:0];
    UIView* backview = [[UIView alloc] initWithFrame:CGRectMake(100, 100, 200, 200)];
    backview.backgroundColor = [UIColor orangeColor];
    [backview addSubview:view];

    /*
     子视图的坐标参照父亲视图的坐标
     当父亲视图移动时,所有的子视图都会移动
     */

    [self.window addSubview:backview];

    /*
     每一个view都有一个window属性
     打印出结果发现地址都相同,说明是同一个window
     当我们把子视图添加到父视图上时,会将父视图的window赋给子视图的window
     */
    NSLog(@"%@",view.window);
    NSLog(@"%@",backview.window);
    NSLog(@"%@",self.window);

    /*
     <UIWindow: 0x10590f1d0; frame = (0 0; 402 874); hidden = YES; gestureRecognizers = <NSArray: 0x600000c6dbc0>; backgroundColor = UIExtendedSRGBColorSpace 0 0 1 1; layer = <UIWindowLayer: 0x600000c69f20>>
     <UIWindow: 0x10590f1d0; frame = (0 0; 402 874); hidden = YES; gestureRecognizers = <NSArray: 0x600000c6dbc0>; backgroundColor = UIExtendedSRGBColorSpace 0 0 1 1; layer = <UIWindowLayer: 0x600000c69f20>>
     <UIWindow: 0x10590f1d0; frame = (0 0; 402 874); hidden = YES; gestureRecognizers = <NSArray: 0x600000c6dbc0>; backgroundColor = UIExtendedSRGBColorSpace 0 0 1 1; layer = <UIWindowLayer: 0x600000c69f20>>
     */

    [self.window makeKeyAndVisible];


}


- (void)sceneDidDisconnect:(UIScene *)scene {
    // Called as the scene is being released by the system.
    // This occurs shortly after the scene enters the background, or when its session is discarded.
    // Release any resources associated with this scene that can be re-created the next time the scene connects.
    // The scene may re-connect later, as its session was not necessarily discarded (see `application:didDiscardSceneSessions` instead).
}


- (void)sceneDidBecomeActive:(UIScene *)scene {
    // Called when the scene has moved from an inactive state to an active state.
    // Use this method to restart any tasks that were paused (or not yet started) when the scene was inactive.
}


- (void)sceneWillResignActive:(UIScene *)scene {
    // Called when the scene will move from an active state to an inactive state.
    // This may occur due to temporary interruptions (ex. an incoming phone call).
}


- (void)sceneWillEnterForeground:(UIScene *)scene {
    // Called as the scene transitions from the background to the foreground.
    // Use this method to undo the changes made on entering the background.
}


- (void)sceneDidEnterBackground:(UIScene *)scene {
    // Called as the scene transitions from the foreground to the background.
    // Use this method to save data, release shared resources, and store enough scene-specific state information
    // to restore the scene back to its current state.
}


@end
UIController
我们的项目在创建时会同步创建一对UIViewController文件
调用关系为:
Appdeledate.m -> SceneDelegate.m -> ViewController.m
- 一个视图推出另一个视图
objec
#import "ViewController.h"
#import "ViewC02.h"
@interface ViewController ()

@end

@implementation ViewController

//第一次程序加载视图时调用,只能加载一次
- (void)viewDidLoad {
    [super viewDidLoad];
    // Do any additional setup after loading the view.
    self.view.backgroundColor = [UIColor blueColor];
    NSLog(@"viewDidLoad第一次加载视图");
}

/*
 当我们的视图控制器即将显示时调用次函数
 视图分为:1.显示前(不显示)2.正在处于显示状态 3.已经被隐藏
 参数:表示是否有动画切换后显示
 每一次视图显示时都要被调用
 */
- (void)viewWillAppear:(BOOL)animated {
    NSLog(@"viewWillAppear即将显示");
}

/*
 视图即将消失调用此函数
 参数:表示是否动画切换后消失
 当前的状态:视图还是显示在屏幕上的
 */
- (void)viewWillDisappear:(BOOL)animated {
    NSLog(@"viewWillDisappear视图即将消失");
}

//*****animated表示视图即将消失的过程是否是用动画,他有两种可能的值YES or NO******

/*
 当视图已经显示到屏幕后的瞬间调用次函数
 参数:表示是否用动画切换显示的
 当前状态已经显示到屏幕上了
 */
- (void)viewDidAppear:(BOOL)animated {
    NSLog(@"viewDidAppear当前视图已经显示");
}

/*
 当前视图已经从屏幕上消失了
 参数:表示是否用动画来切换的
 当前视图已经从屏幕上消失
 */
- (void)viewDidDisappear:(BOOL)animated {
    NSLog(@"veiwDidDisappear视图已经消失");
}

- (void)touchesBegan:(NSSet<UITouch *> *)touches withEvent:(UIEvent *)event {
    ViewC02* vc = [[ViewC02 alloc] init];
    /*
     显示一个新的视图控制器界面到屏幕上
     参数:
     p1:新的控制器对象
     p2:是否使用动画效果
     p3:切换结束后功能调用,如果不需要就直接传空
     */
    [self presentViewController:vc animated:YES completion:nil];
}

@end


#import "ViewC02.h"

@interface ViewC02 ()

@end

@implementation ViewC02

- (void)viewDidLoad {
    [super viewDidLoad];
    // Do any additional setup after loading the view.
    //设置控制器2的颜色
    self.view.backgroundColor = [UIColor orangeColor];

}

//当点击当前控制器二的界面屏幕时
-(void)touchesBegan:(NSSet<UITouch *> *)touches withEvent:(UIEvent *)event {
    /*
     使当前的控制器消失掉
     参数:
     p1:是否有动画效果
     p2:是否调用块中函数
     */
    [self dismissViewControllerAnimated:YES completion:nil];
}

/*
 当我们的视图控制器即将显示时调用次函数
 视图分为:1.显示前(不显示)2.正在处于显示状态 3.已经被隐藏
 参数:表示是否有动画切换后显示
 每一次视图显示时都要被调用
 */
- (void)viewWillAppear:(BOOL)animated {
    NSLog(@"viewWillAppear即将显示");
}

/*
 视图即将消失调用此函数
 参数:表示是否动画切换后消失
 当前的状态:视图还是显示在屏幕上的
 */
- (void)viewWillDisappear:(BOOL)animated {
    NSLog(@"viewWillDisappear视图即将消失");
}

//*****animated表示视图即将消失的过程是否是用动画,他有两种可能的值YES or NO******

/*
 当视图已经显示到屏幕后的瞬间调用次函数
 参数:表示是否用动画切换显示的
 当前状态已经显示到屏幕上了
 */
- (void)viewDidAppear:(BOOL)animated {
    NSLog(@"viewDidAppear当前视图已经显示");
}

/*
 当前视图已经从屏幕上消失了
 参数:表示是否用动画来切换的
 当前视图已经从屏幕上消失
 */
- (void)viewDidDisappear:(BOOL)animated {
    NSLog(@"veiwDidDisappear视图已经消失");
}


/*
#pragma mark - Navigation

// In a storyboard-based application, you will often want to do a little preparation before navigation
- (void)prepareForSegue:(UIStoryboardSegue *)segue sender:(id)sender {
    // Get the new view controller using [segue destinationViewController].
    // Pass the selected object to the new view controller.
}
*/

@end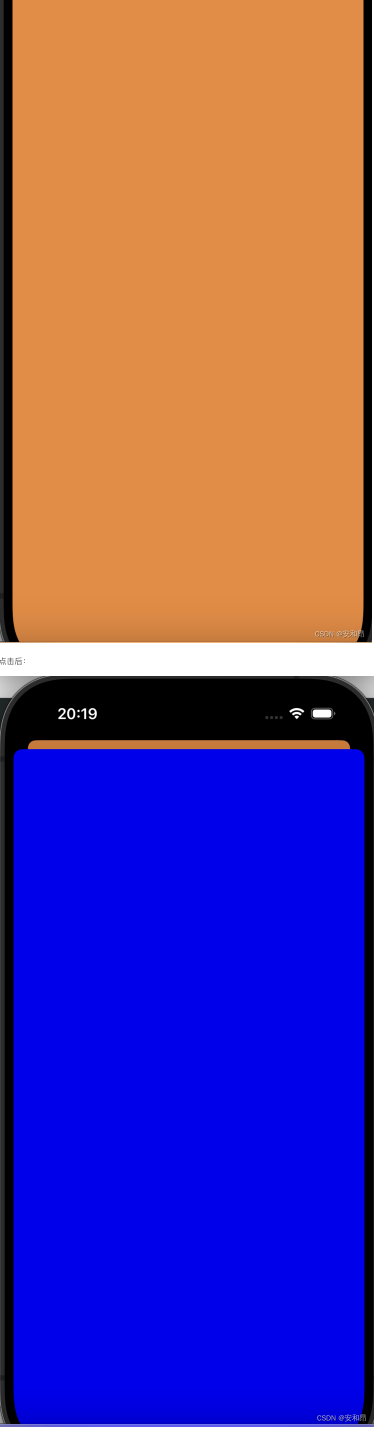
为什么在 touchesBegan: 中创建 ViewC02?
- 交互触发:代码的意图是用户触摸屏幕时弹出一个新界面。
- 按需创建:视图控制器是比较重量级的对象,不需要提前创建,而是在用户需要时才实例化。
- 动态呈现 :通过
presentViewController:方法将新控制器以模态方式显示在当前界面上方,覆盖原内容。
NSTimer
(定时器与视图移动)
NSTimer类方法创建一个定时器并且启动这个定时器
p1:间隔时间,以秒为单位
p2:表示实现定时器函数的对象
p3:表示定时器函数对象
p4:定时器函数中的一个参数没有参数可以传nil
p5:表示定时器是否可以重复
返回值:一个新建好的定时器对象
c
#import "ViewController.h"

@interface ViewController ()

@end

@implementation ViewController
//属性与成员变量同步
//@synthesize timerView = _timerView;

- (void)viewDidLoad {
    [super viewDidLoad];
    // Do any additional setup after loading the view.
    UIButton* button = [UIButton buttonWithType:UIButtonTypeRoundedRect];
    button.frame = CGRectMake(100, 100, 80, 40);

    [button setTitle:@"启动定时器" forState:UIControlStateNormal];
    [button addTarget:self action:@selector(pressStart) forControlEvents:UIControlEventTouchUpInside];
    button.backgroundColor = [UIColor orangeColor];
    [self.view addSubview:button];

    UIButton* buttonstop = [UIButton buttonWithType:UIButtonTypeRoundedRect];
    buttonstop.frame = CGRectMake(100, 200, 80, 40);
    buttonstop.backgroundColor = [UIColor purpleColor];
    [buttonstop setTitle:@"停止计时器" forState:UIControlStateNormal];
    [buttonstop addTarget:self action:@selector(pressStop) forControlEvents:UIControlEventTouchUpInside];
    [self.view addSubview:buttonstop];

    UIView* view = [[UIView alloc]init];
    view.frame = CGRectMake(0, 0, 80, 80);
    view.backgroundColor = [UIColor yellowColor];
    [self.view addSubview:view];


    //设置view的标签值
    //通过父视图对象以及view的标签值可以获得相应的视图对象
    view.tag = 101;

}

//按下开始按钮时调用
- (void)pressStart {
  //避免多次创建导致停不下在
    if (_timerView != nil) {
        [_timerView invalidate];
    }
    _timerView = [NSTimer scheduledTimerWithTimeInterval:0.01 target:self selector:@selector(updateTimer:) userInfo:@"小明say" repeats:YES];
}

- (void)updateTimer:(NSTimer*) timer{
    NSLog(@"%@你是彭于晏",timer.userInfo);

    UIView* view = [self.view viewWithTag:101];
    view.frame =CGRectMake(view.frame.origin.x+1, view.frame.origin.y+1, 80, 80);
}

//按下停止按钮时调用
- (void)pressStop {
    if (_timerView != nil) {
        [_timerView invalidate];
    }
}

@end
UIView 的 frame 属性
-
frame是UIView的一个重要属性,类型为CGRect(矩形区域),定义了视图在父视图坐标系中的位置和大小。CGRect
由两个结构体组成:
origin(CGPoint类型):视图左上角的坐标点,包含x和y两个值。size(CGSize类型):视图的宽度和高度,包含width和height两个值。
UISwitch
定义一个开关控件
可以进行状态的改变
所有UIKit框架库中的控件均以UI开头
苹果官方的控件都定义在UIKit框架库中
objective-c
#import <UIKit/UIKit.h>

@interface ViewController : UIViewController

@property(nonatomic, retain)UISwitch* mySwitch;
@end
///

#import "ViewController.h"

@interface ViewController ()

@end

@implementation ViewController


- (void)viewDidLoad {
    [super viewDidLoad];
    // Do any additional setup after loading the view.

    /*
     创建一个开关对象
     继承与UIView
     */
    _mySwitch = [[UISwitch alloc] init];

    /*
     苹果官方的控件的位置设置
     位置x、y的值可以改变
     宽高无法改变
     */
    _mySwitch.frame = CGRectMake(100, 100, 80, 40);

    /*
     开关状态设置属性
     */
    _mySwitch.on = YES; //默认状态
    [_mySwitch setOn:YES animated:YES];
    //_mySwitch.backgroundColor = [UIColor yellowColor];
    /*
     添加视图显示
     */
    [self.view addSubview:_mySwitch];
    //设置开启状态风格颜色
    //[_mySwitch setOnTintColor:[UIColor redColor]];
    //设置开关圆按钮的风格颜色
    //[_mySwitch setThumbTintColor:[UIColor greenColor]];
    //设置整体风格颜色
    //[_mySwitch setTintColor:[UIColor orangeColor]];

    /*
     响应事件
     UIControlEventValueChanged:状态发生变化触发
     */
    [_mySwitch addTarget:self action:@selector(swChange:) forControlEvents:UIControlEventValueChanged];

}

- (void)swChange :(UISwitch*) sw{
    //on表示当前结束后的状态
    if (sw.on == YES) {
        NSLog(@"开关被打开");
    } else {
        NSLog(@"开关被关闭");
    }
}
@end
UISlider与UIProgressView
object
#import <UIKit/UIKit.h>

@interface ViewController : UIViewController
//进度条定义
@property(nonatomic, retain)UIProgressView* progressView;
//滑动条定义
@property(nonatomic, retain)UISlider* slider;
@end

#import "ViewController.h"

@interface ViewController ()

@end

@implementation ViewController


- (void)viewDidLoad {
    [super viewDidLoad];
    // Do any additional setup after loading the view.
    //进度条创建
    _progressView = [[UIProgressView alloc] init];
    //进度条位置大小设置(高度不可调)
    _progressView.frame = CGRectMake(50, 100, 300, 40);
    //设置风格颜色值
    _progressView.progressTintColor = [UIColor redColor];
    _progressView.trackTintColor = [UIColor yellowColor];
    //设置进度条的进度值
    //范围0-1
    _progressView.progress = 0.3;
    //设置进度条风格特征
    _progressView.progressViewStyle = UIProgressViewStyleDefault;
    [self.view addSubview:_progressView];


    //滑动条创建
    _slider = [[UISlider alloc] init];
    _slider.frame = CGRectMake(20, 200, 350, 40);
    //设置滑动条最大值
    _slider.maximumValue = 100;
    //最小值(可以为负值)
    _slider.minimumValue = 0;
    //设置滑块位置(去取决于最大最小值)float类型
    _slider.value = 40;
    //左侧滑动条的背景颜色
    _slider.minimumTrackTintColor = [UIColor blueColor];
    //右侧滑动条的背景颜色
    _slider.maximumTrackTintColor = [UIColor yellowColor];
    //设置滑块的颜色
    _slider. thumbTintColor = [UIColor orangeColor];
    //对滑动条添加事件函数
    //UIControlEventValueChanged:变化就调用
    [_slider addTarget:self action:@selector(pressSlider) forControlEvents:UIControlEventValueChanged];

    [self.view addSubview:_slider];
}

- (void) pressSlider {
    /*
     进度条与滑动条同步
     */
    //_progressView.progress = _slider.value; //范围相同
    _progressView.progress = (_slider.value - _slider.minimumValue) / (_slider.maximumValue - _slider.minimumValue);
    NSLog(@"value = %f", _slider.value);
}
@end
步进器与分栏控制器
obje
//
//  ViewController.m
//  UIearn
//
//  Created by xiaoli pop on 2025/5/26.
//

#import "ViewController.h"

@interface ViewController ()

@end

@implementation ViewController


- (void)viewDidLoad {
    [super viewDidLoad];
    //滑动条

    _slider = [[UISlider alloc] init];
    _slider.frame = CGRectMake(10, 400, 200, 20);
    _slider.maximumTrackTintColor = [UIColor blueColor];
    _slider.minimumTrackTintColor = [UIColor orangeColor];
    [self.view addSubview:_slider];

    _stepper = [[UIStepper alloc] init];
    //宽高不可改变
    _stepper.frame = CGRectMake(100, 100, 80, 40);
    //设置最值
    _stepper.minimumValue = 0;
    _stepper.maximumValue = 100;
    //设置当前值
    _stepper.value = 10;
    //步进值
    _stepper.stepValue = 1;
    //是否可以重复响应事件操作
    _stepper.autorepeat = YES;
    /*
     是否可以将步进结果通过事件函数响应出来
     就是说会不会同步响应
     */
    _stepper.continuous = YES;
    //添加一个事件函数
    [_stepper addTarget:self action:@selector(stepChange:) forControlEvents:UIControlEventValueChanged];

    [self.view addSubview:_stepper];

    //创建分栏控件
    _segControl = [[UISegmentedControl alloc] init];
    //宽度可变,高度不可变
    _segControl.frame = CGRectMake(10, 300, 300, 40);
    /*
     添加一个按钮元素
     参数:
     1.按钮文字
     2.按钮位置
     3.是否有插入的动画效果
     */
    [_segControl insertSegmentWithTitle:@"安康" atIndex:0 animated:NO];
    [_segControl insertSegmentWithTitle:@"西安" atIndex:1 animated:NO];
    [_segControl insertSegmentWithTitle:@"延安" atIndex:2 animated:NO];
    [_segControl insertSegmentWithTitle:@"宝鸡" atIndex:3 animated:NO];

    //设置选择默认按钮索引
    _segControl.selectedSegmentIndex = 0;
    //添加响应事件
    [_segControl addTarget:self action:@selector(segChange) forControlEvents:UIControlEventValueChanged];
    [self.view addSubview: _segControl];


}
- (void)stepChange:(UIStepper*)step {
    NSLog(@"%f", step.value);
}

- (void)segChange {
    NSLog(@"%@", [_segControl titleForSegmentAtIndex:_segControl.selectedSegmentIndex]);
}
@end- 获取对应index的
object
[_segControl titleForSegmentAtIndex:_segControl.selectedSegmentIndex]TextField
objective-c
#import "ViewController.h"

@interface ViewController ()

@end

@implementation ViewController


- (void)viewDidLoad {

    [super viewDidLoad];

    _textField = [[UITextField alloc] init];
    _textField.frame = CGRectMake(100, 350, 180, 40);
    _textField.font = [UIFont systemFontOfSize:15];
    _textField.textColor = [UIColor blackColor];
    /*
     UITextBorderStyleRoundedRect:圆角风格
     UITextBorderStyleLine:线框风格
     UITextBorderStyleBezel:beze线框
     UITextBorderStyleNone:无边框风格
     */
    _textField.borderStyle = UITextBorderStyleRoundedRect;
    /*
     设置虚拟键盘风格
     UIKeyboardTypeDefault:默认
     UIKeyboardTypeNamePhonePad:字母加数字
     UIKeyBoardTypeNumberPad:纯数字
     */
    _textField.keyboardType = UIKeyboardTypeDefault;
    /*
     提示文字信息
     当text属性为空时,显示此条信息
     浅灰色
     */
    _textField.placeholder = @"请输入用户名";
    /*
     是否作为密码输入
     YES:加密输入
     NO:正常输入
     */
    _textField.secureTextEntry = NO;
    _textField.delegate = self;
    [self.view addSubview:_textField];

}
- (void)textFieldDidBeginEditing:(UITextField *)textField {
    NSLog(@"正在进行编辑");
}

- (void)textFieldDidEndEditing:(UITextField *)textField {
    _textField.text = @" ";
    NSLog(@"编辑已经结束");
}
- (BOOL)textFieldShouldBeginEditing:(UITextField *)textField {
    return YES;
}

- (BOOL)textFieldShouldEndEditing:(UITextField *)textField {
    if (_textField.text.length < 8) {
        return NO;
    } else {
        return YES;
    }
}
- (void)touchesBegan:(NSSet<UITouch *> *)touches withEvent:(UIEvent *)event {
    //使虚拟键盘回收,不作为消的第一响应着
    [_textField resignFirstResponder];
  //[self.view endEditing:YES];
}
@end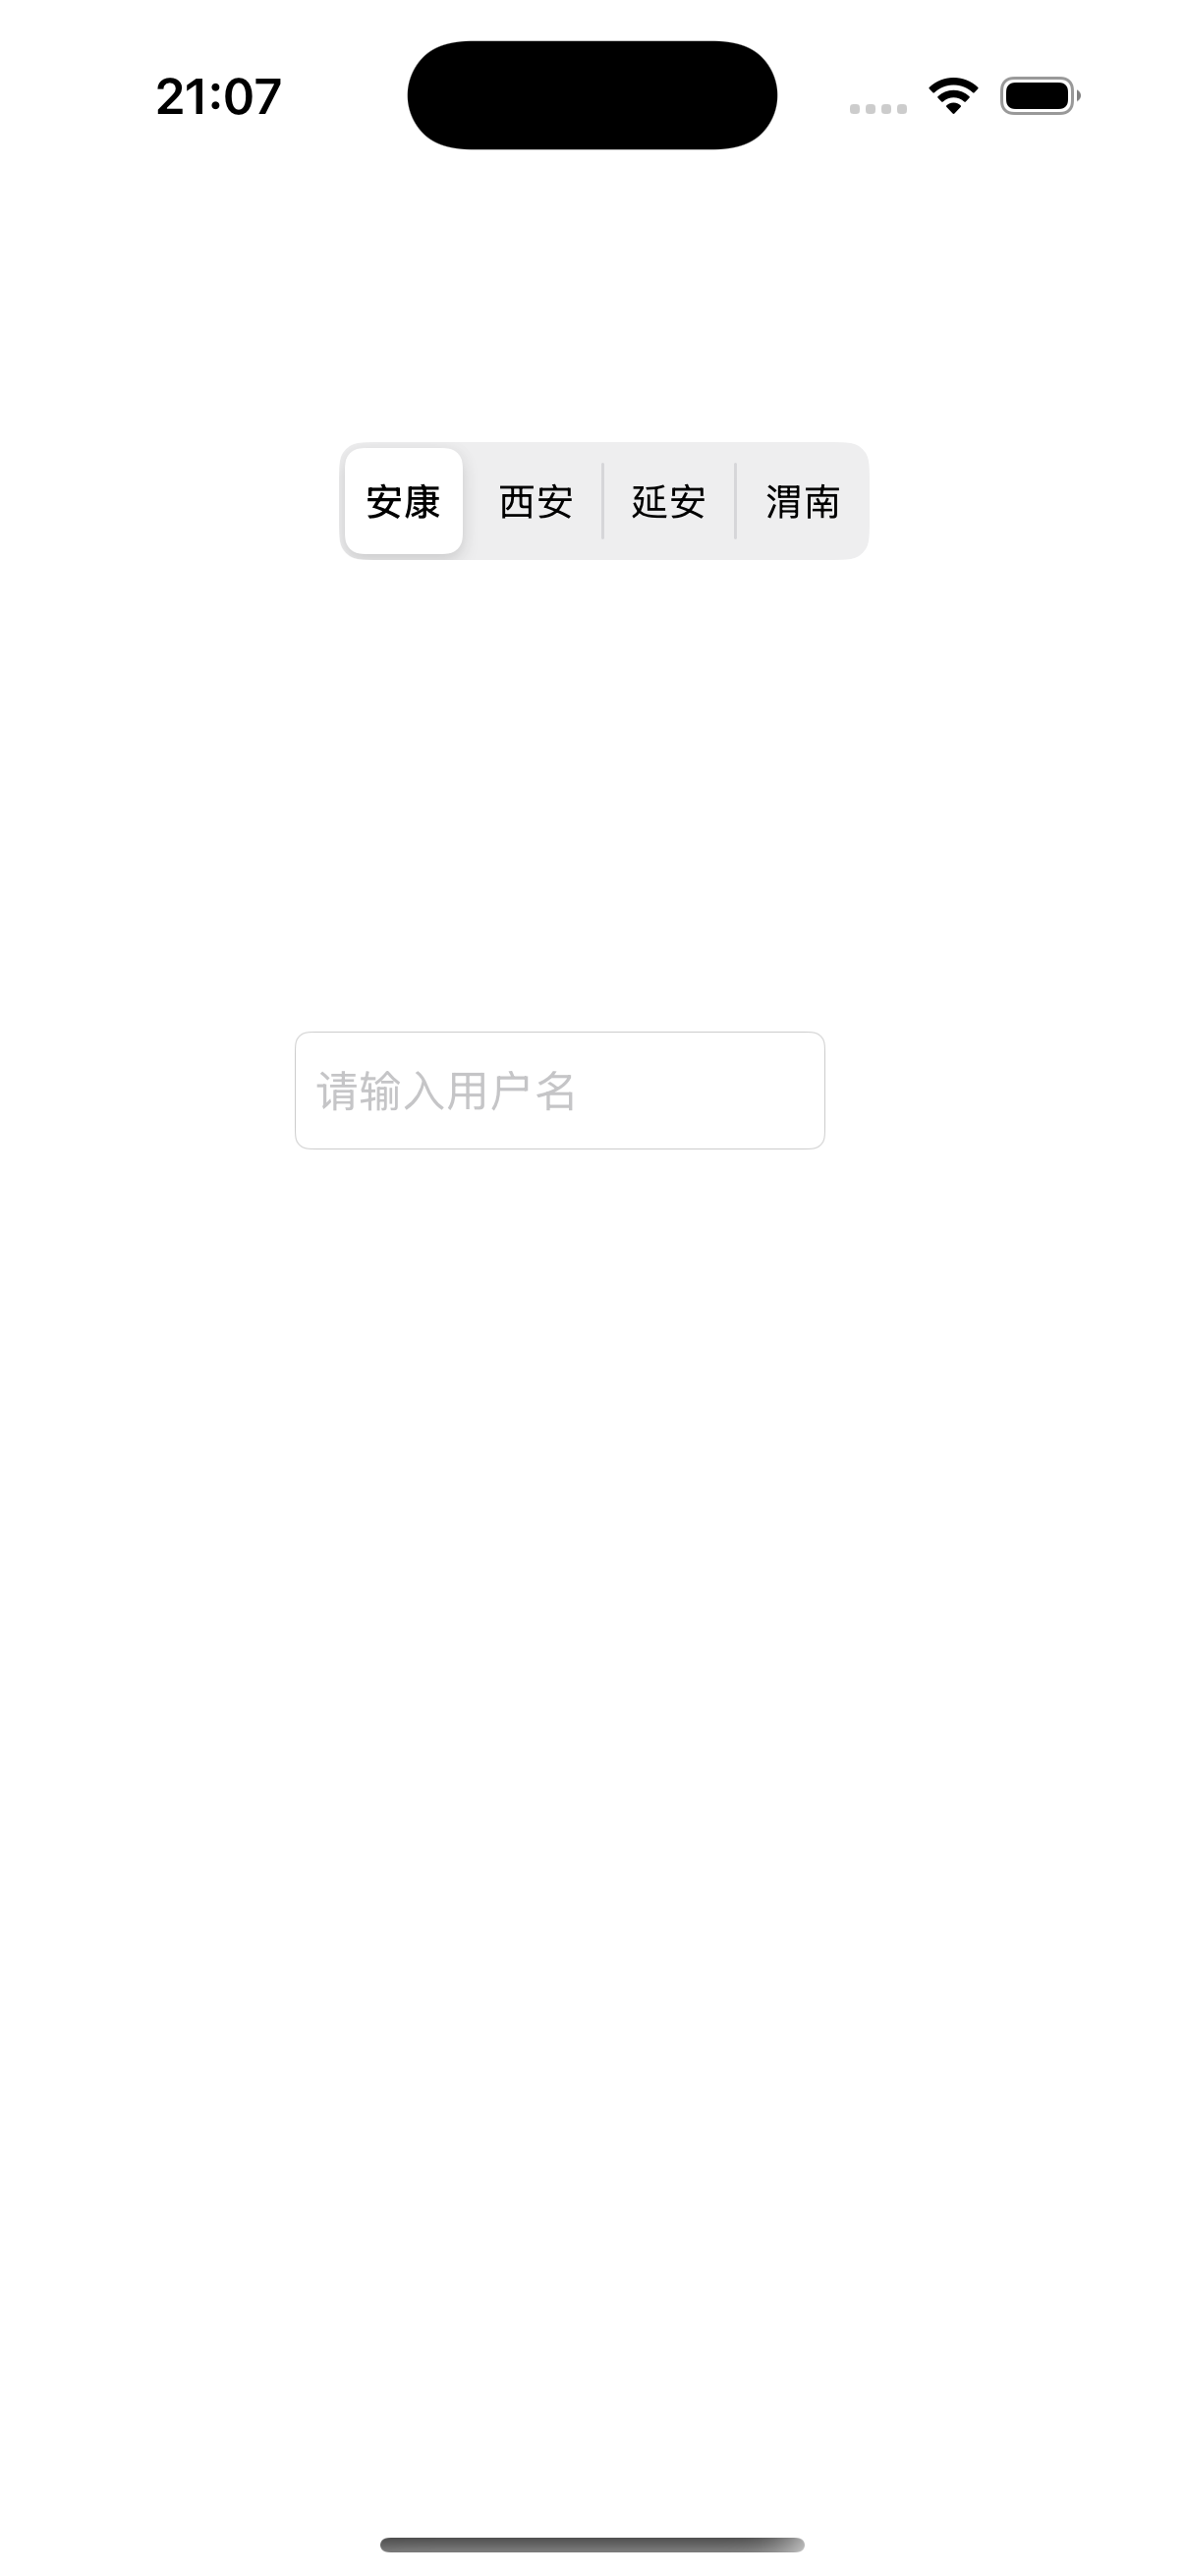
警告对话框与等待提示器
c
#import <UIKit/UIKit.h>

@interface ViewController : UIViewController
/*
 定义一个警告对话框视图对象
 */
@property(nonatomic, retain)UIAlertController* alertcontroller;
/*
 当下载。或者加载比较大的文文件时,可以显示此控件,处于提示等待状态
 */
@property(nonatomic, retain)UIActivityIndicatorView* activityIndicator;
@end


//
//  ViewController.m
//  UIearn
//
//  Created by xiaoli pop on 2025/5/26.
//

#import "ViewController.h"

@interface ViewController ()

@end

@implementation ViewController


- (void)viewDidLoad {

    [super viewDidLoad];

    /*
     创建两个按钮
     */
    for (int i = 0; i < 2; i++) {
        UIButton* button = [UIButton buttonWithType:UIButtonTypeRoundedRect];
        button.frame = CGRectMake(150, 100 + 100 * i, 100, 40);
        if (!i) {
            [button setTitle:@"警告对话框" forState:UIControlStateNormal];
        } else if (i == 1) {
            [button setTitle:@"等待对话框" forState:UIControlStateNormal];
        }
        button.backgroundColor = [UIColor greenColor];
        button.tag = 101 + i;
        [button addTarget:self action:@selector(pressButton:) forControlEvents:UIControlEventTouchUpInside];
        [self.view addSubview:button];
    }

}

- (void)pressButton:(UIButton*)button {
    // 警告对话框
    if (button.tag == 101) {
        _alertcontroller = [UIAlertController alertControllerWithTitle:@"警告" message:@"手机电量过低" preferredStyle:UIAlertControllerStyleAlert];
        //添加一个取消按钮
        UIAlertAction* cancleAction = [UIAlertAction actionWithTitle:@"取消" style:UIAlertActionStyleCancel handler:nil];
        //将取消按钮添加到对话框中
        [_alertcontroller addAction:cancleAction];

        UIAlertAction* newAction = [UIAlertAction actionWithTitle:@"新的" style:UIAlertActionStyleDefault handler:nil];
        [_alertcontroller addAction:newAction];

        //添加一个确认按钮
        UIAlertAction* confirmAction = [UIAlertAction actionWithTitle:@"确认" style:UIAlertActionStyleDefault handler:^(UIAlertAction * _Nonnull action) {
            NSLog(@"点击了确认按钮");
        }];
        [_alertcontroller addAction:confirmAction];
        [self presentViewController:_alertcontroller animated:YES completion:nil];
    } else if (button.tag == 102) {
        //创建等待提示器
        _activityIndicator = [[UIActivityIndicatorView alloc] initWithFrame:CGRectMake(157, 300, 100, 100)];
        //设置提示风格
        _activityIndicator.activityIndicatorViewStyle = UIActivityIndicatorViewStyleLarge;
        [self.view addSubview:_activityIndicator];
        //启动动画并显示
        [_activityIndicator startAnimating];
    }
}
@end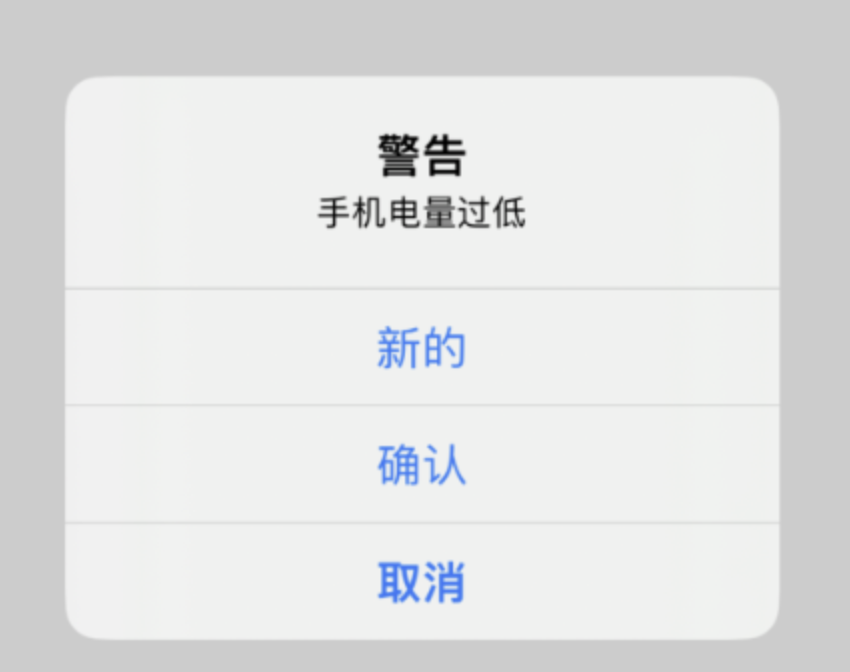
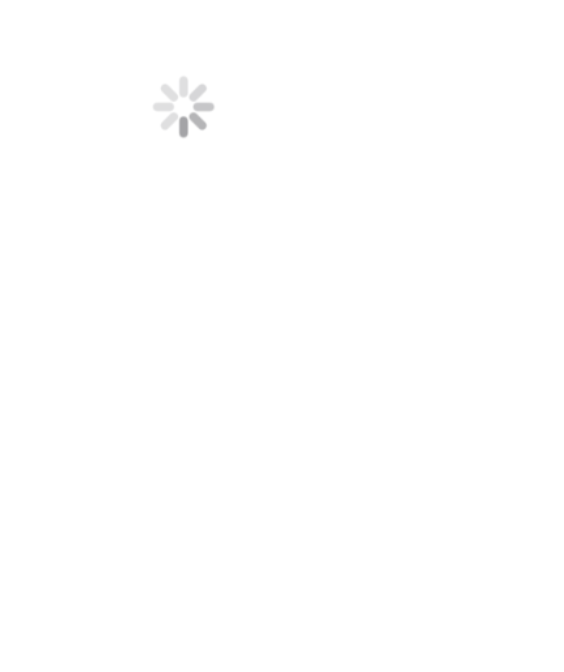
在iOS13后设定的等待提示器风格只有UIActivityIndicatorViewStyleLarge和UIActivityIndicatorViewStyleMedium两种风格
UIScrollView
c
/*
    定义并创建一个滚动视图
    可以对视图内容进行滚屏查看功能
*/
UIScrollView* sv = [[UIScrollView alloc] init];
/*
 设置滚动视图的位置,使用矩形来定位视图位置
 */
CGRect screenBounds = [[UIScreen mainScreen] bounds];
sv.frame = screenBounds;
/*
 是否按照整页来滚动视图
 */
sv.pagingEnabled = YES;
/*
 是否开启滚动效果
 */
sv.scrollEnabled = YES;
/*
 设置画布大小,画布显示在滚动视图内部,一般大于Frame的大小
 */
sv.contentSize = CGSizeMake(screenBounds.size.width * 5, screenBounds.size.height);
/*
 是否开启边缘弹动效果
 */
sv.bounces = YES;
/*
 开启横向弹动效果
 */
sv.alwaysBounceHorizontal = YES;
/*
 开启纵向弹动效果
 */
sv.alwaysBounceVertical = YES;
/*
 开启横向显示滚动条
 */
sv.showsHorizontalScrollIndicator = YES;
/*
 开启纵向显示滚动条
 */
sv.showsVerticalScrollIndicator = YES;
sv.backgroundColor = [UIColor yellowColor];
for (int i = 1; i <= 5; i++) {
    NSString* strName = [NSString stringWithFormat:@"photo0%d.jpg",i];
    UIImage* image = [UIImage imageNamed:strName];
    UIImageView* iview = [[UIImageView alloc] initWithImage:image];
    iview.frame = CGRectMake(screenBounds.size.width * (i - 1), 0, screenBounds.size.width, screenBounds.size.height);
    [sv addSubview:iview];
}
[self.view addSubview:sv];
UIScrollView的高级功能
object
#import "ViewController.h"

@interface ViewController ()

@end

@implementation ViewController
- (void)viewDidLoad {
    [super viewDidLoad];
    _scrollView = [[UIScrollView alloc] init];
    CGRect screenBounds = [[UIScreen mainScreen] bounds];
    _scrollView.frame = CGRectMake(0, 65, screenBounds.size.width, screenBounds.size.height * 0.75);
    //取消弹动效果
    _scrollView.bounces = NO;
    /*
     是否允许通过点击屏幕让滚动视图响应事件
     YES:滚动视图可以接受触碰事件
     NO:不接受触碰事件
     */
    //_scrollView.userInteractionEnabled = NO;
    _scrollView.contentSize = CGSizeMake(screenBounds.size.width , screenBounds.size.height * 5 * 0.75);
    for (int i = 1; i <= 5; i++) {
        NSString* strName = [NSString stringWithFormat:@"photo0%d.jpg",i];
        UIImage* image = [UIImage imageNamed:strName];
        UIImageView* iview = [[UIImageView alloc] initWithImage:image];
        //设置图像在滚动视图画布中的位置
        iview.frame = CGRectMake(0, screenBounds.size.height * (i - 1) * 0.75, screenBounds.size.width, screenBounds.size.height);
        [_scrollView addSubview:iview];
    }
    [self.view addSubview:_scrollView];
    //滚动视图画布的移动位置,(偏移位置)
    //决定画布显示的最终图像结果
    _scrollView.contentOffset = CGPointMake(0, 0);
    _scrollView.pagingEnabled = NO;
    _scrollView.delegate = self;

}

//当滚动视图移动时,只要offet坐标发生变化,都会调用此函数
//可以使用次函数监控滚动视图的位置
- (void)scrollViewDidScroll:(UIScrollView *)scrollView {
    NSLog(@"y = %f", scrollView.contentOffset.y);
}

//当滚动视图结束拖动时调用次函数
- (void)scrollViewDidEndDragging:(UIScrollView *)scrollView willDecelerate:(BOOL)decelerate {
    NSLog(@"Did End Drag");
}

//滚动视图即将开始被拖动时
- (void)scrollViewWillBeginDragging:(UIScrollView *)scrollView {
    NSLog(@"Will begin Drag");
}

//视图即将结束拖动时调用
- (void)scrollViewWillEndDragging:(UIScrollView *)scrollView withVelocity:(CGPoint)velocity targetContentOffset:(inout CGPoint *)targetContentOffset {
    NSLog(@"Will end Drag");
}

- (void)scrollViewWillBeginDecelerating:(UIScrollView *)scrollView {
    NSLog(@"Will Begin Decelereting");
}
- (void)scrollViewDidEndDecelerating:(UIScrollView *)scrollView {
    NSLog(@"视图停止移动");
}

- (void)touchesBegan:(NSSet<UITouch *> *)touches withEvent:(UIEvent *)event {
    CGRect screenBounds = [[UIScreen mainScreen] bounds];
    //_scrollView.contentOffset = CGPointMake(0, 0);
    [_scrollView scrollRectToVisible:CGRectMake(0, 0, screenBounds.size.width, screenBounds.size.height) animated:YES];
}

@end