一.前言
前面我们介绍了一下nginx的安装和基础配置,今天继续来深入讲解一下nginx的其他配置
二.nginx多站点配置
一个nginx上可以运行多个网站。有多种方式:
http:// + ip/域名 + 端口 + URI
其中,ip/域名变了,那么网站入口就变了,端口变了,网站入口也变了,而每个网站都需要有自己的入口
2.1 多端口
root@web01 nginx# cat nginx.conf
worker_processes 2;
events {
worker_connections 1024;
}
http {
include mime.types;
default_type application/octet-stream;
charset utf-8;
8yy复制8行,小p黏贴
server {
listen 80;
server_name localhost;
location / {
root /html/one;
index index.html index.htm;
}
}
server {
listen 81;
server_name localhost;
location / {
root /html/two;
index index.html index.htm;
}
}
server {
listen 82;
server_name localhost;
location / {
root /html/three;
index index.html index.htm;
}
}
}
root@web01 nginx# mkdir -p /html/{one,two,three}
root@web01 nginx# echo 'one' >/html/one/index.html
root@web01 nginx# echo 'two' >/html/two/index.html
2.2 多ip
我们首先要给centos7配置一下多个ip
root@web01 three# cd /etc/sysconfig/network-scripts/
root@web01 network-scripts# ls
root@web01 network-scripts# vim ifcfg-ens33
TYPE="Ethernet"
BOOTPROTO="static"
NAME="ens33"
DEVICE="ens33"
ONBOOT="yes"
IPADDR1=192.168.61.139
IPADDR2=192.168.61.140
IPADDR3=192.168.61.141
NETMASK=255.255.255.0
GATEWAY=192.168.20.2
DNS1=223.5.5.5
保存退出
重启网卡服务:systemctl restart network,查看ip地址:
root@web01 network-scripts# ip addr
1: lo: <LOOPBACK,UP,LOWER_UP> mtu 65536 qdisc noqueue state UNKNOWN group default qlen 1000
link/loopback 00:00:00:00:00:00 brd 00:00:00:00:00:00
inet 127.0.0.1/8 scope host lo
valid_lft forever preferred_lft forever
inet6 ::1/128 scope host
valid_lft forever preferred_lft forever
2: ens33: <BROADCAST,MULTICAST,UP,LOWER_UP> mtu 1500 qdisc pfifo_fast state UP group default qlen 1000
link/ether 00:0c:29:37:68:fd brd ff:ff:ff:ff:ff:ff
inet 192.168.61.139/24 brd 192.168.61.255 scope global noprefixroute ens33
valid_lft forever preferred_lft forever
inet 192.168.61.140/24 brd 192.168.61.255 scope global secondary
noprefixroute ens33
valid_lft forever preferred_lft forever
inet 192.168.61.141/24 brd 192.168.61.255 scope global secondary
noprefixroute ens33
valid_lft forever preferred_lft forever
inet6 fe80::20c:29ff:fe37:68fd/64 scope link
valid_lft forever preferred_lft forever
多个ip地址都配置好了。那么之前的三个网站,我们调整一下配置即可,每个网站就可以都用80端口了。
root@web01 nginx# vim nginx.conf
worker_processes 2;
events {
worker_connections 1024;
}
http {
include mime.types;
default_type application/octet-stream;
charset utf-8;
server {
listen 80;
server_name localhost;
location / {
root /html/one;
index index.html index.htm;
}
}
server {
listen 192.168.61.139:80;
server_name localhost;
location / {
root /html/two;
index index.html index.htm;
}
}
server {
listen 192.168.61.140:80;
server_name localhost;
location / {
root /html/three;
index index.html index.htm;
}
}
}
root@web01 nginx# mkdir -p /html/{one,two,three}
root@web01 nginx# echo 'one' >/html/one/index.html
root@web01 nginx# echo 'two' >/html/two/index.html
2.3 多域名
多ip的方式其实也不太好,因为如果我们的多网站想在互联网上被公网访问,那么就需要多个ip,而公 网ip是收费的。那么有一种省钱的方式,就是多域名方式。
server {
listen 80;
server_name a.xxx.com;
location / {
root /html/one;
index index.html index.htm;
}
}
server {
listen 80;
server_name b.xxx.com;
location / {
root /html/two;
index index.html index.htm;
}
}
server {
listen 80;
server_name c.xxx.com;
location / {
root /html/three;
index index.html index.htm;
}
}
因为xxx.com不是我的,我们直接通过浏览器访问www.xxx.com可能会访问别人的网站,我们现在 做实验想暂用一下这个域名,那么我们可以修改我们物理机系统的hosts文件,添加一个ip和域名的对应 关系即可,因为hosts文件的优先级比DNS服务器要高
C:\Windows\System32\drivers\etc\hosts
192.168.61.139 a.xxx.com b.xxx.com c.xxx.com # cmd来ping一下域名ping a.xxx.com
cmd来ping一下域名
ping a.jaden.com
然后通过浏览器访问即可,可以看到一个ip地址可以对应多个域名,一个域名可以在nginx上配置一个站 点。这也是很多网站的玩法,多个域名指向了同一个网站。
自助建站服务好多都是这么玩的,他公司自己买个服务器,买个公网ip,买个域名,然后开一个自助建 站的网站,用户就可以来网站上注册账号,他就给用户分配个子域名,帮用户创建一个站点根目录,nginx上配置一下,再开一个ftp服务,让用户自己可以上传网站代码,这就搞定了,每年收个几百上千 的,也能挣钱。往往一个服务器上可能都能跑几百个网站。 那么这就有问题了,如果每来一个我们就在nginx主配置文件中添加一个server记录,那么nginx配置文 件会变得很大,很难管理,所以要换一种方式来管理配置文件,将每个人的配置都单独拆分出来即可。
三. include配置文件
root@web01 nginx# cat nginx.conf
worker_processes 2;
events {
worker_connections 1024;
}
http {
include mime.types;
default_type application/octet-stream;
charset utf-8;
include /etc/nginx/conf.d/*.conf; # 加载外部以.conf结尾的配置文件,如果你的路径下没 有conf.d就自行创建一个-- mkdir conf.d
}
root@web01 conf.d# cat d_com.conf
server {
listen 80;
server_name d.com;
location / {
root /html/four;
index index.html index.htm;
}
}
nginx官网:www.nginx.org
可以在documentation文档中找到默认站点配置方式,下面这个网站就变成了默认网站,当访问的域名nginx不能匹配到对应网站时,就自动打开下面这个网站。
root@web01 conf.d# cat c_com.conf
server {
listen 80 default_server;
server_name c.com;
location / {
root /html/three;
index index.html index.htm;
}
}
四.nginx日志
现在web服务器都必须要开启日志记录功能,而且记录必须超过半年,这是网络安全法规定的。https://www.wangan.com/wenda/6791
之前我们也看过日志,系统的安全日志,就是ssh登录的时候我们看的,如下
root@web01 conf.d# cat /var/log/secure
登录系统就会被记录。
web服务程序也是一样,每次有人请求我们,我们就把本次请求相关信息给记录下来,有了记录,那么 如果服务器被网络攻击了,那么我们就可以在日志中去分析是谁在什么时候攻击我们的,什么样的攻 击,哪些成功了,哪些失败了。方便我们后面进行攻击溯源。
nginx默认已经帮我们记录了日志,在 /var/log/nginx/ 目录下面。
root@web01 conf.d# ls /var/log/nginx/
access.log access.log-20230412 error.log error.log-20230412
#每个日志是会按照当 天的日期进行切割
我们清空一下日志
root@web01 nginx# > access.log
root@web01 nginx# cat access.log
访问一下网站,再看日志
root@web01 nginx# cat access.log
192.168.61.1 - - 12/Apr/2023:15:17:44 +0800 "GET /icon/duimutou.png HTTP/1.1" 200 78796 "http://b.jaden.com/" "Mozilla/5.0 (Windows NT 10.0; Win64; x64) AppleWebKit/537.36 (KHTML, like Gecko) Chrome/111.0.0.0 Safari/537.36"
304状态码表示客户端浏览器用的是浏览器缓存页面,所以看到后面是0,表示没有响应任何数据
上面是访问日志的简单查看,除了访问日志,nginx还有错误日志。
4.1 错误日志
root@web01 nginx# cat error.log
2023/04/12 11:34:25 error 2342#2342: *1 open() "/web/one/favicon.ico" failed (2: No such file or directory), client: 192.168.61.1, server: localhost, request: "GET /favicon.ico HTTP/1.1", host: "192.168.61.139", referrer: "http://192.168.61.139/"
#没有favicon.ico文件,可以切换到站点目录中去下载一个:wget https://www.mi.com/favicon.ico
还有人故意访问一个错误的路径,让你的网站报错,显示出nginx的版本。
error_log /opt/nginx_error.log info;
4.2 访问日志
定制日志记录格式:这个必须配置在在server配置外面
log_format compression 'remote_addr - remote_user $time_local '
'"request" status $bytes_sent '
'"http_referer" "http_user_agent" "$gzip_ratio"';
compression可以理解为是这个格式的名字,谁想用这个格式,谁就用这个名字来指定格式
192.168.61.1 - - 12/Apr/2023:14:19:59 +0800 "GET / HTTP/1.1" 304 0 "-" "Mozilla/5.0 (Windows NT 10.0; Win64; x64) AppleWebKit/537.36 (KHTML, like Gecko) Chrome/111.0.0.0 Safari/537.36"
$remote_addr 客户端的ip地址
$remote_user 客户端的用户名
$time_local 当前时间
$request 请求起始行
$status http状态码
$bytes_sent 响应资源的大小
$http_referer 记录资源的跳转地址
$http_user_agent 用户的终端信息
$gzip_ratio gzip的压缩级别
比如我们想让日志记录一下请求时间、客户端ip、请求uri、状态码、文件大小
vim /etc/nginx/nginx.conf
worker_processes 1;
events {
worker_connections 1024;
}
http {
log_format test '$time_local remote_addr "request" status bytes_sent';
include mime.types;
default_type application/octet-stream;
charset utf-8;
include /etc/nginx/conf.d/*.conf;
}
每个网站都可以单独记录自己的日志
root@web01 nginx# cd conf.d/
root@web01 conf.d# ls
a.xxx.com.conf.stop b.jaden.com.conf c.xxx.com.conf
root@web01 conf.d# vim b.xxx.com.conf
server {
listen 80;
server_name b.xxx.com;
access_log /opt/nginx/b.xxx.com_log test; # test是上面指定的日志格式的名 称,/opt/目录下面没有nginx目录,需要我们手动创建,这个目录是随意指定的昂,mkdir /opt/nginx, 还要授权:chown nginx:nginx /opt/nginx,不然nginx用户没办法访问这个目录
location / {
root /web/two;
index index.html index.htm;
}
}
改完之后,重启nginx,然后访问网站,看一下/opt/nginx目录,看看日志格式。
access_log /var/log/nginx/access.log compression;
access_log /opt/nginx/access.log compression; # /opt/目录需要授权,不然没办法记录进 去
注意:错误日志的格式我们是不能自定义的,顶多能修改错误日志的保存路径。
五.开启basic认证
有些网站会开启一个叫做basic认证的东西,basic认证叫做http基本认证,就是给我们的网站多一把 锁,防止恶意访问,比如访问一些敏感后台路径等操作。
比如我们搭建的那个游戏网站,我只想自己玩,不想让其他人玩,就可以加上个basic认证。
首先生成一个叫做htpasswd的账号密码文件,有很多在线网站就能生成,如下
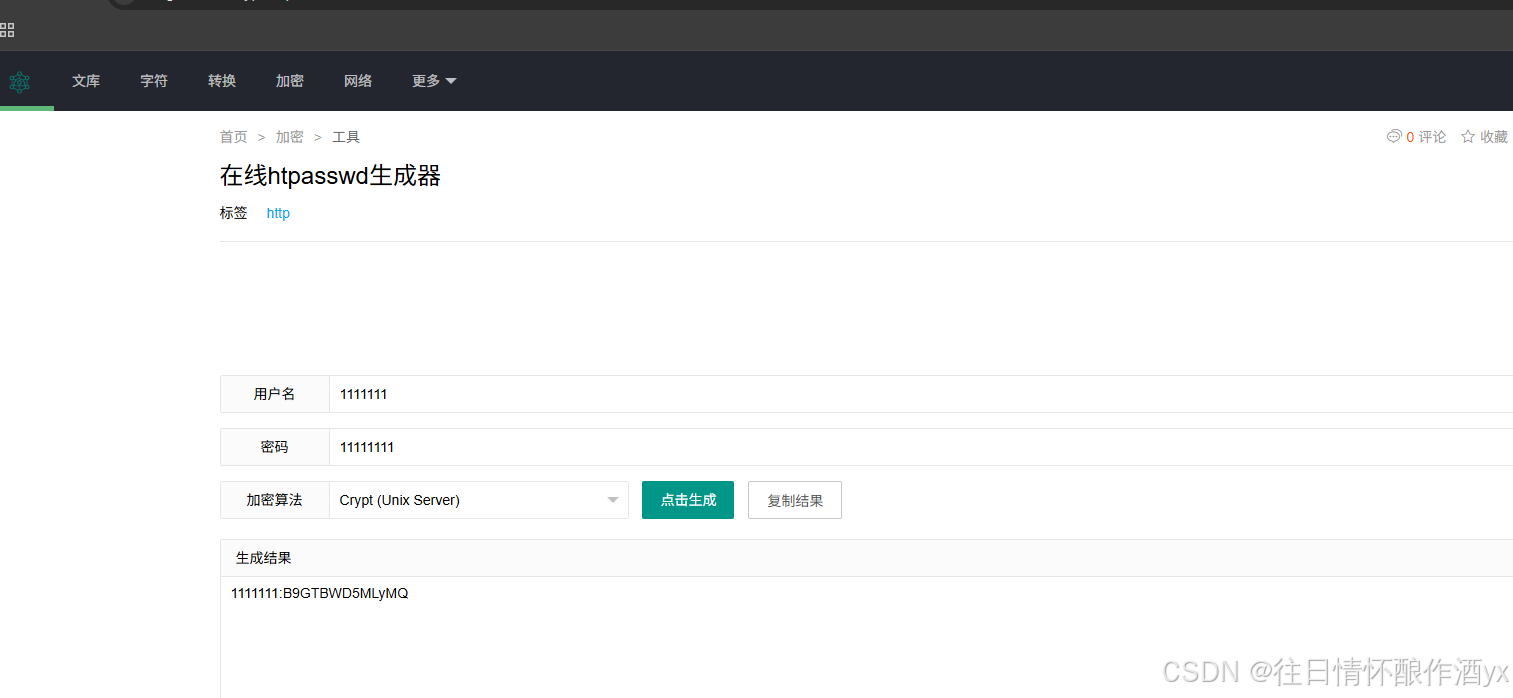
把生成的密码保存下来,比如保存到 /etc/nginx/htpasswd 文件中
vim /etc/nginx/htpasswd
写入刚才保存的用户和密码1111111:B9GTBWD5MLyMQ
然后修改一下nginx下的b网站的配置文件:
auth_basic "b.jaden.com"; #auth_basic表示开启这个功能,"b.xxx.com"是备注信息,随便 写,一些老浏览器能看到,新浏览器都看不到备注信息了。
auth_basic_user_file /etc/nginx/htpasswd; # 这是账号密码存放在哪个位置
如下
root@web01 nginx# cd /etc/nginx/conf.d/
root@web01 conf.d# ls
a.xxx.com.conf b.xxx.com.conf c.xxx.com.conf
root@web01 conf.d# vim b.xxx.com.conf
server {
listen 80;
server_name b.xxx.com;
access_log /opt/nginx/b.xxx.com_log xxx;
location / {
auth_basic "b.xxx.com";
auth_basic_user_file /etc/nginx/htpasswd;
root /web/two;
index index.html index.htm;
}
}
保存之后重新启动nginx就可以了
访问b网站效果如下:登录成功之后,在刷新页面就不会再弹出验证框了。
六.ssl证书配置
http协议访问的网站现在默认会显示不安全,因为数据默认是明文传输的。
https是http+ssl,ssl是加密协议,通过证书来进行加密的,安装了证书的网站才会用https协议来交 互,才不会提示不安全。
一般申请证书之前需要先申请一个域名,才有资格申请证书,比如,我的域名是在阿里云上买的,那么 我想申请https的证书,就需要到阿里云上去申请
搜索SSL证书-->证书管理控制台-->SSL证书-->免费证书-->创建证书-->按照操作提交申请即可-->审核通 过后下载证书
将证书放到opt目录的cert下,cert需要我们自己创建,其实名字随便起,一般都叫cert,表示证书的意思
root@web01 conf.d# cd /opt/
root@web01 opt# mkdir cert
root@web01 opt# cd cert/
root@web01 cert# unzip 9683539_wulaoban.top_nginx.zip [
root@web01 cert]# ls 9683539_wulaoban.top.key 9683539_wulaoban.top.pem 9683539_wulaoban.top_nginx.zip
#阿里云的nginx的证书部署文档中建议如下的配置:
#以下属性中,以ssl开头的属性表示与证书配置有关。
server {
#配置HTTPS的默认访问端口为443。
#如果未在此处配置HTTPS的默认访问端口,可能会造成Nginx无法启动。
#如果您使用Nginx 1.15.0及以上版本,请使用listen 443 ssl代替listen 443和ssl on。
listen 443 ssl; # http--80 https -- 443
#填写证书绑定的域名
server_name <yourdomain>;
root html;
index index.html index.htm;
#填写证书文件名称
ssl_certificate cert/<cert-file-name>.pem;
#填写证书私钥文件名称
ssl_certificate_key cert/<cert-file-name>.key;
ssl_session_timeout 5m;
#表示使用的加密套件的类型
ssl_ciphers ECDHE-RSA-AES128-GCMSHA256:ECDHE:ECDH:AES:HIGH:!NULL:!aNULL:!MD5:!ADH:!RC4;
#表示使用的TLS协议的类型,您需要自行评估是否配置TLSv1.1协议。
ssl_protocols TLSv1.1 TLSv1.2 TLSv1.3;
ssl_prefer_server_ciphers on;
location / {
#Web网站程序存放目录
root html;
index index.html index.htm;
}
}
#比如,我们按照自己的网站修改为如下内容:
server {
listen 443 ssl;
server_name www.wulaoban.top;
ssl_certificate /opt/cert/9683539_wulaoban.top.pem;
ssl_certificate_key /opt/cert/9683539_wulaoban.top.key;
ssl_session_timeout 5m;
#表示使用的加密套件的类型
ssl_ciphers ECDHE-RSA-AES128-GCMSHA256:ECDHE:ECDH:AES:HIGH:!NULL:!aNULL:!MD5:!ADH:!RC4;
#表示使用的TLS协议的类型,您需要自行评估是否配置TLSv1.1协议。
ssl_protocols TLSv1.1 TLSv1.2 TLSv1.3; # 如果不加TLSv1.1,就删掉
ssl_prefer_server_ciphers on;
location / {
#Web网站程序存放目录
root /web/www.wulaoban.top;
index index.html index.htm;
}
}
在/web目录下创建一个名叫www.wulaoban.top的文件夹
总结:
第一步:申请域名,然后申请证书,把证书下载下来
第二步:修改nginx对应网站的配置文件
第三步:准备站点源代码
#第四步:因为大家没有真实域名,所以我们还需要修改hosts文件,加一个dns解析记录192.168.61.139 www.xxx.top
第五步:访问https://www.xxx.top/smallboll/
另外:我们还可以把smallboll里面的文件拷贝到站点根目录中,就不用加上/smallboll/来访问了。
七.总结
大家肯定是看完就忘了,而我觉得大家可以了解个大概,点赞关注加收藏,需要用到的时候再来仔细看。