Excel 中的数据验证可确保用户在工作表中仅输入有效数据。在设计表单、收集数据或构建财务模型时,数据验证有助于维护结构并最大限度地减少用户错误。在本文中,我们将向您展示如何使用 C# 以编程方式在 Excel 中应用数据验证。
C# Excel 数据验证库
数据验证可确保用户在 Excel 电子表格中输入有效且符合预期的内容。我们将使用**++Aspose.Cells for .NET++** API 在 Excel 中添加不同类型的数据验证。它提供了一种强大而灵活的方法来定义规则,例如下拉列表、数值范围、日期限制和自定义公式,所有这些都无需 Microsoft Excel 即可实现。
在您的项目中通过NuGet包安装**++Aspose.Cells for .NET++**:
PM> Install-Package Aspose.Cells然后导入相关的命名空间:
using Aspose.Cells;使用 C# 在 Excel 中创建下拉列表验证
您可以通过在 Excel 中创建下拉列表验证来将用户输入限制为一组预定义的选项。这可以确保值的一致性,这在表单或模板中尤其有用。
按照以下步骤使用 C# 在 Excel 中创建下拉列表:
- 创建一个新Workbook对象。
- worksheet使用索引访问第一个。
- CellArea定义验证目标。
- 访问工作表的验证集合。
- 使用该方法添加新的验证Add()。
- 将验证类型设置为ValidationType.List。
- Formula1使用属性(逗号分隔)定义下拉选项。
- 使用方法将单元格区域添加到验证中AddArea()。
- 保存工作簿以生成经过验证的 Excel 文件。
以下是实现这些步骤的 C# 代码示例:
// Create a new Excel workbook
var workbook = new Workbook();

// Access the first worksheet in the workbook
var sheet = workbook.Worksheets[0];

// Define the target cell area for validation (A1 in this case)
var area = new CellArea
{
    StartRow = 0,     // Row index starts from 0 (Row 1)
    EndRow = 0,       // Apply to a single row
    StartColumn = 0,  // Column index starts from 0 (Column A)
    EndColumn = 0     // Apply to a single column
};

// Access the validations collection of the worksheet
var validations = sheet.Validations;

// Add a new validation entry for the specified cell area
int index = validations.Add(area);
var validation = validations[index];

// Set the validation type to a dropdown list
validation.Type = ValidationType.List;

// Define the allowed list items (comma-separated values)
validation.Formula1 = "Red,Green,Blue";

// Set the input message shown when the cell is selected
validation.InputMessage = "Select a color from the list.";

// Set the error message shown if invalid data is entered
validation.ErrorMessage = "Only Red, Green, or Blue are allowed.";

// Enable the display of the error message
validation.ShowError = true;

// Apply the defined area to the validation
validation.AddArea(area);

// Save the workbook to the specified file path
workbook.Save("dropdown-validation.xlsx");
使用 C# 在 Excel 中创建下拉列表验证
使用 C# 在 Excel 中限制为整数
整数验证可确保用户在 Excel 中仅输入有效的整数值,这对于数量字段、年龄输入或不接受小数或文本的预算表非常有用。
假设您想限制一个单元格仅接受 1 到 100 之间的数字。如果没有此规则,用户可能会意外输入无效输入,例如 150 或 abc,从而导致电子表格出现计算错误或逻辑问题。
使用**++Aspose.Cells for .NET++**,您可以在 C# 中以编程方式强制执行此验证规则,而无需在 Excel 中手动配置它。
以下代码片段显示如何限制用户仅输入允许的值:
using Aspose.Cells;

// Create a new Excel workbook
var workbook = new Workbook();

// Access the first worksheet in the workbook
var sheet = workbook.Worksheets[0];

// Define the target cell area — B2 (row 1, column 1)
var area = new CellArea
{
    StartRow = 1,
    EndRow = 1,
    StartColumn = 1,
    EndColumn = 1
};

// Access the worksheet’s validations collection
var validations = sheet.Validations;

// Add a new validation and get its index
int index = validations.Add(area);

// Retrieve the validation object using the index
var validation = validations[index];

// Set validation type to WholeNumber (only integers allowed)
validation.Type = ValidationType.WholeNumber;

// Set the operator to Between
validation.Operator = OperatorType.Between;

// Define the valid range: 1 to 100
validation.Formula1 = "1";
validation.Formula2 = "100";

// Set the error message that appears when invalid data is entered
validation.ErrorMessage = "Enter a number between 1 and 100.";

// Enable showing the error alert when validation fails
validation.ShowError = true;

// (Optional if not using Add(area) earlier) Add the area to the validation explicitly
validation.AddArea(area);

// Save the workbook to a file
workbook.Save("numbers-validation.xlsx");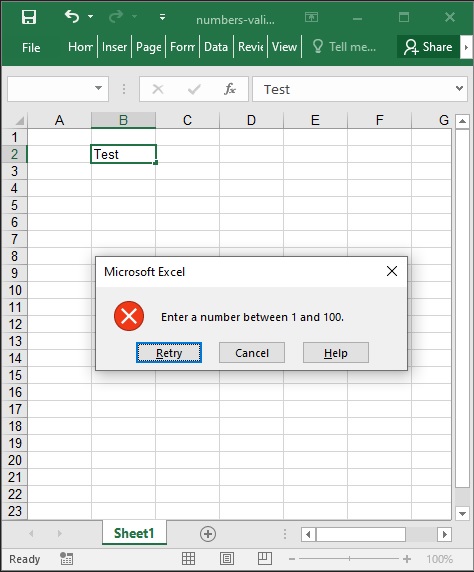
使用 C# 在 Excel 中限制为整数
使用 C# 在 Excel 中应用日期范围验证
日期验证可帮助您确保用户仅输入有效日期。它适用于规划工具、考勤记录、预订表以及任何需要特定范围内日期的场景。
例如,假设您正在构建一个项目调度模板,并且您想限制用户只能输入 2024 年内的日期。允许用户输入此范围之外的日期(如 2023 年或 2025 年)可能会破坏公式或创建不一致的记录。
++Aspose.Cells for .NET++ 可以轻松地将日期验证应用于特定单元格,因此用户只能输入符合您条件的日期。
以下代码片段演示了如何确保用户只能输入 2024 年 1 月 1 日至 2024 年 12 月 31 日之间的日期。超出范围的任何内容都会触发错误,从而帮助您在整个电子表格中维护更清晰、更准确的数据。
using Aspose.Cells;

// Create a new Excel workbook
var workbook = new Workbook();

// Access the first worksheet in the workbook
var sheet = workbook.Worksheets[0];

// Define the cell area to apply validation — C3 (row 2, column 2)
var area = new CellArea
{
    StartRow = 2,
    EndRow = 2,
    StartColumn = 2,
    EndColumn = 2
};

// Access the validations collection of the worksheet
var validations = sheet.Validations;

// Add a new validation and get its index
int index = validations.Add(area);

// Retrieve the validation object
var validation = validations[index];

// Set the validation type to Date
validation.Type = ValidationType.Date;

// Set the operator to Between (start and end dates)
validation.Operator = OperatorType.Between;

// Specify the valid date range: Jan 1, 2024 to Dec 31, 2024
validation.Formula1 = "2024-01-01";
validation.Formula2 = "2024-12-31";

// Set the error message to display when the date is out of range
validation.ErrorMessage = "Date must be within the year 2024.";

// Enable showing the error alert
validation.ShowError = true;

// Re-apply the area to ensure validation is bound correctly
validation.AddArea(area);

// Save the workbook to the specified path
workbook.Save("date-validation.xlsx");
使用基于公式的验证在 Excel 中使用 C# 进行验证
有时,简单的下拉菜单或固定数字范围是不够的,尤其是当您的规则依赖于其他单元格中的值时。借助基于公式的验证,您可以使用 Excel 风格的公式定义自定义规则。这些规则可以引用其他单元格并动态评估输入是否有效。例如,您可能希望确保单元格B1 中的值始终大于A1中的值。这在价格比较、评分表或日期序列中很常见。
**++Aspose.Cells for .NET++**完全支持此功能,并允许您像在 Excel 中一样使用自定义公式定义验证。
以下代码示例显示如何使用 C# 在 Excel 中应用基于公式的验证。
using Aspose.Cells;

// Create a new Excel workbook
var workbook = new Workbook();

// Access the first worksheet in the workbook
var sheet = workbook.Worksheets[0];

// Define the cell area for validation — B1 (row 0, column 1)
var area = new CellArea
{
    StartRow = 0,
    EndRow = 0,
    StartColumn = 1,
    EndColumn = 1
};

// Access the worksheets validations collection
var validations = sheet.Validations;

// Add a new validation to the collection and get its index
int index = validations.Add(area);

// Retrieve the validation object by index
var validation = validations[index];

// Set the validation type to Custom (used for formula-based rules)
validation.Type = ValidationType.Custom;

// Set the custom formula: B1 must be greater than A1
validation.Formula1 = "=B1>A1";

// Define the error message shown when validation fails
validation.ErrorMessage = "Value in B1 must be greater than A1.";

// Enable display of the error alert on invalid input
validation.ShowError = true;

// Add the area explicitly to ensure it is covered by validation
validation.AddArea(area);

// Save the workbook to the specified file path
workbook.Save("formula-validation.xlsx");
使用 C# 在 Excel 中配置输入和错误消息
应用数据验证只是解决方案的一部分。在用户输入错误数据时提供指导也同样重要,而自定义警报和消息在此发挥着关键作用。
++Aspose.Cells for .NET++ 允许您设置有用的输入消息 和**错误警报,**当用户选择单元格或输入无效数据时会显示这些消息。这些消息可以提升用户体验,减少混淆,并使您的 Excel 模板更加专业。
例如,当用户点击某个单元格时,您可以显示如下工具提示
"仅允许 1 到 100 之间的值。"
如果他们输入了错误的值,Excel 会显示一个对话框,提示:
"无效输入:请输入一个介于 1 到 100 之间的数字。"
您还可以通过选择是否完全阻止用户 ( Stop)、允许他们继续并显示警告 ( Warning) 或仅显示信息消息 ( Information) 来自定义 Excel 对无效输入的响应方式。
按照以下步骤使用 C# 配置验证警报:
- 设置验证规则后,设置InputTitle并InputMessage在用户选择单元格时显示帮助文本。
- 定义ErrorTitle并ErrorMessage解释如果验证失败,出了什么问题。
- 选择一个AlertStyle--- 选项包括Stop、、Warning和Information。
- 设置ShowError为true以启用验证警报。
- 保存工作簿。
这些警报使您的电子表格更加直观和用户友好,特别是当您创建模板供其他人频繁使用或重复使用时。
var workbook = new Workbook();
var sheet = workbook.Worksheets[0];

// Set up validation area — apply to cell C1
var area = new CellArea
{
    StartRow = 0,
    EndRow = 0,
    StartColumn = 2, // Column C = 2
    EndColumn = 2
};

// Add validation
int index = sheet.Validations.Add(area);
var validation = sheet.Validations[index];

validation.Type = ValidationType.Custom;

// This formula always evaluates to FALSE
validation.Formula1 = "=FALSE";

// Set up input and error messages
validation.InputTitle = "Input Restricted";
validation.InputMessage = "Try entering anything to see the validation.";
validation.ErrorTitle = "Invalid Input";
validation.ErrorMessage = "You triggered this validation error successfully!";
validation.AlertStyle = ValidationAlertType.Stop;
validation.ShowError = true;
validation.ShowInput = true;

// Apply validation to area
validation.AddArea(area);

// Save the validated workbook
workbook.Save("D:\\Files\\validated_with_alerts.xlsx");
它们的警报增强了可用性并清楚地指导用户输入什么。

使用 C# 在 Excel 中配置输入和错误消息
结论
在本文中,我们展示了如何使用 ++Aspose.Cells for .NET++ 在 Excel 中使用 C# 实现数据验证。从下拉菜单到自定义公式,您可以构建智能且防错的电子表格,而无需依赖 Excel 本身。