目录
[一 同步与协调模式](#一 同步与协调模式)
[1 保护性暂停模式](#1 保护性暂停模式)
[2 顺序控制模式](#2 顺序控制模式)
[3 生产者消费者模式](#3 生产者消费者模式)
[4 Balking模式(犹豫模式)](#4 Balking模式(犹豫模式))
[二 线程管理/生命周期模式](#二 线程管理/生命周期模式)
[1 两阶段终止模式](#1 两阶段终止模式)
一 同步与协调模式
1 保护性暂停模式
一个线程需要等待另一个线程提供特定条件(通常是某个结果)满足后才能继续执行。
Guarded Suspension 保护性暂停是一种节点的多线程设计模式,用于在条件不满足时暂停线程执行,直到条件满足后在继续执行。(线程不满足等待条件,手动实现主动等待)
代码实现:
java
package day01.mysynchronized;

import java.util.ArrayList;

public class example6 {
    public static void main(String[] args) {
        GuardObject<ArrayList<Integer>> guardObject = new GuardObject<>();
        // 线程1等待线程2的结果
        new Thread(() -> {
            //  等待结果
            System.out.println("t1线程开始执行... 等待结果");
            ArrayList<Integer> result = guardObject.get();
            result.forEach(System.out::println);
        }, "t1").start();
        new Thread(() -> {
            System.out.println("t2线程开始执行...");
            try {
                Thread.sleep(3000);
            } catch (InterruptedException e) {
                e.printStackTrace();
            }
            ArrayList<Integer> objects = new ArrayList<>();
            objects.add(1);
            objects.add(2);
            guardObject.complete(objects);
        }, "t2").start();

    }
}

class GuardObject<T> {
    private T response;

    public T get() {
        synchronized (this) {
            while (response == null) {
                try {
                    this.wait();
                } catch (InterruptedException e) {
                    e.printStackTrace();
                }
            }
            return response;
        }
    }

    public void complete(T response) {
        synchronized (this) {
            this.response = response;
            this.notifyAll();
        }
    }
}
更完善的:
java
import java.util.ArrayList;
import java.util.List;
import java.util.concurrent.TimeUnit;
import java.util.concurrent.TimeoutException;
public class Example7 {
public static void main(String[] args) {
GuardObject<List<Integer>> guardObject = new GuardObject<>();
// 线程1等待线程2的结果
Thread t1 = new Thread(() -> {
System.out.println(Thread.currentThread().getName() + "开始执行... 等待结果");
try {
// 设置5秒超时
List<Integer> result = guardObject.get(5000);
System.out.println(Thread.currentThread().getName() + "收到结果:");
result.forEach(System.out::println);
} catch (TimeoutException e) {
System.out.println(Thread.currentThread().getName() + "等待结果超时");
} catch (InterruptedException e) {
System.out.println(Thread.currentThread().getName() + "被中断");
}
}, "t1");
Thread t2 = new Thread(() -> {
System.out.println(Thread.currentThread().getName() + "开始执行...");
try {
// 模拟耗时操作
Thread.sleep(3000);
// 创建结果
List<Integer> objects = new ArrayList<>();
objects.add(1);
objects.add(2);
// 设置结果
guardObject.complete(objects);
System.out.println(Thread.currentThread().getName() + "已发送结果");
} catch (InterruptedException e) {
System.out.println(Thread.currentThread().getName() + "被中断");
}
}, "t2");
t1.start();
t2.start();
// 确保主线程等待子线程完成
try {
t1.join();
t2.join();
} catch (InterruptedException e) {
Thread.currentThread().interrupt();
}
System.out.println("所有线程执行完成");
}
}
/**
* 增强版保护对象类
* @param <T> 结果类型
*/
class GuardObject<T> {
private T response;
private boolean done = false; // 完成状态标志
/**
* 获取结果(无限等待)
* @return 结果对象
* @throws InterruptedException 如果等待时被中断
*/
public T get() throws InterruptedException, TimeoutException {
return get(0);
}
/**
* 获取结果(带超时)
* @param timeout 超时时间(毫秒),0表示无限等待
* @return 结果对象
* @throws InterruptedException 如果等待时被中断
* @throws TimeoutException 如果超过指定的超时时间
*/
public T get(long timeout) throws InterruptedException, TimeoutException {
synchronized (this) {
long start = System.currentTimeMillis();
long remaining = timeout;
while (!done) {
if (timeout > 0 && remaining <= 0) {
throw new TimeoutException("等待结果超时");
}
if (timeout == 0) {
this.wait();
} else {
this.wait(remaining);
remaining = timeout - (System.currentTimeMillis() - start);
}
}
return response;
}
}
/**
* 设置结果
* @param response 结果对象
* @throws IllegalStateException 如果结果已被设置
*/
public void complete(T response) {
synchronized (this) {
if (done) {
throw new IllegalStateException("结果已被设置");
}
this.response = response;
this.done = true;
this.notifyAll();
}
}
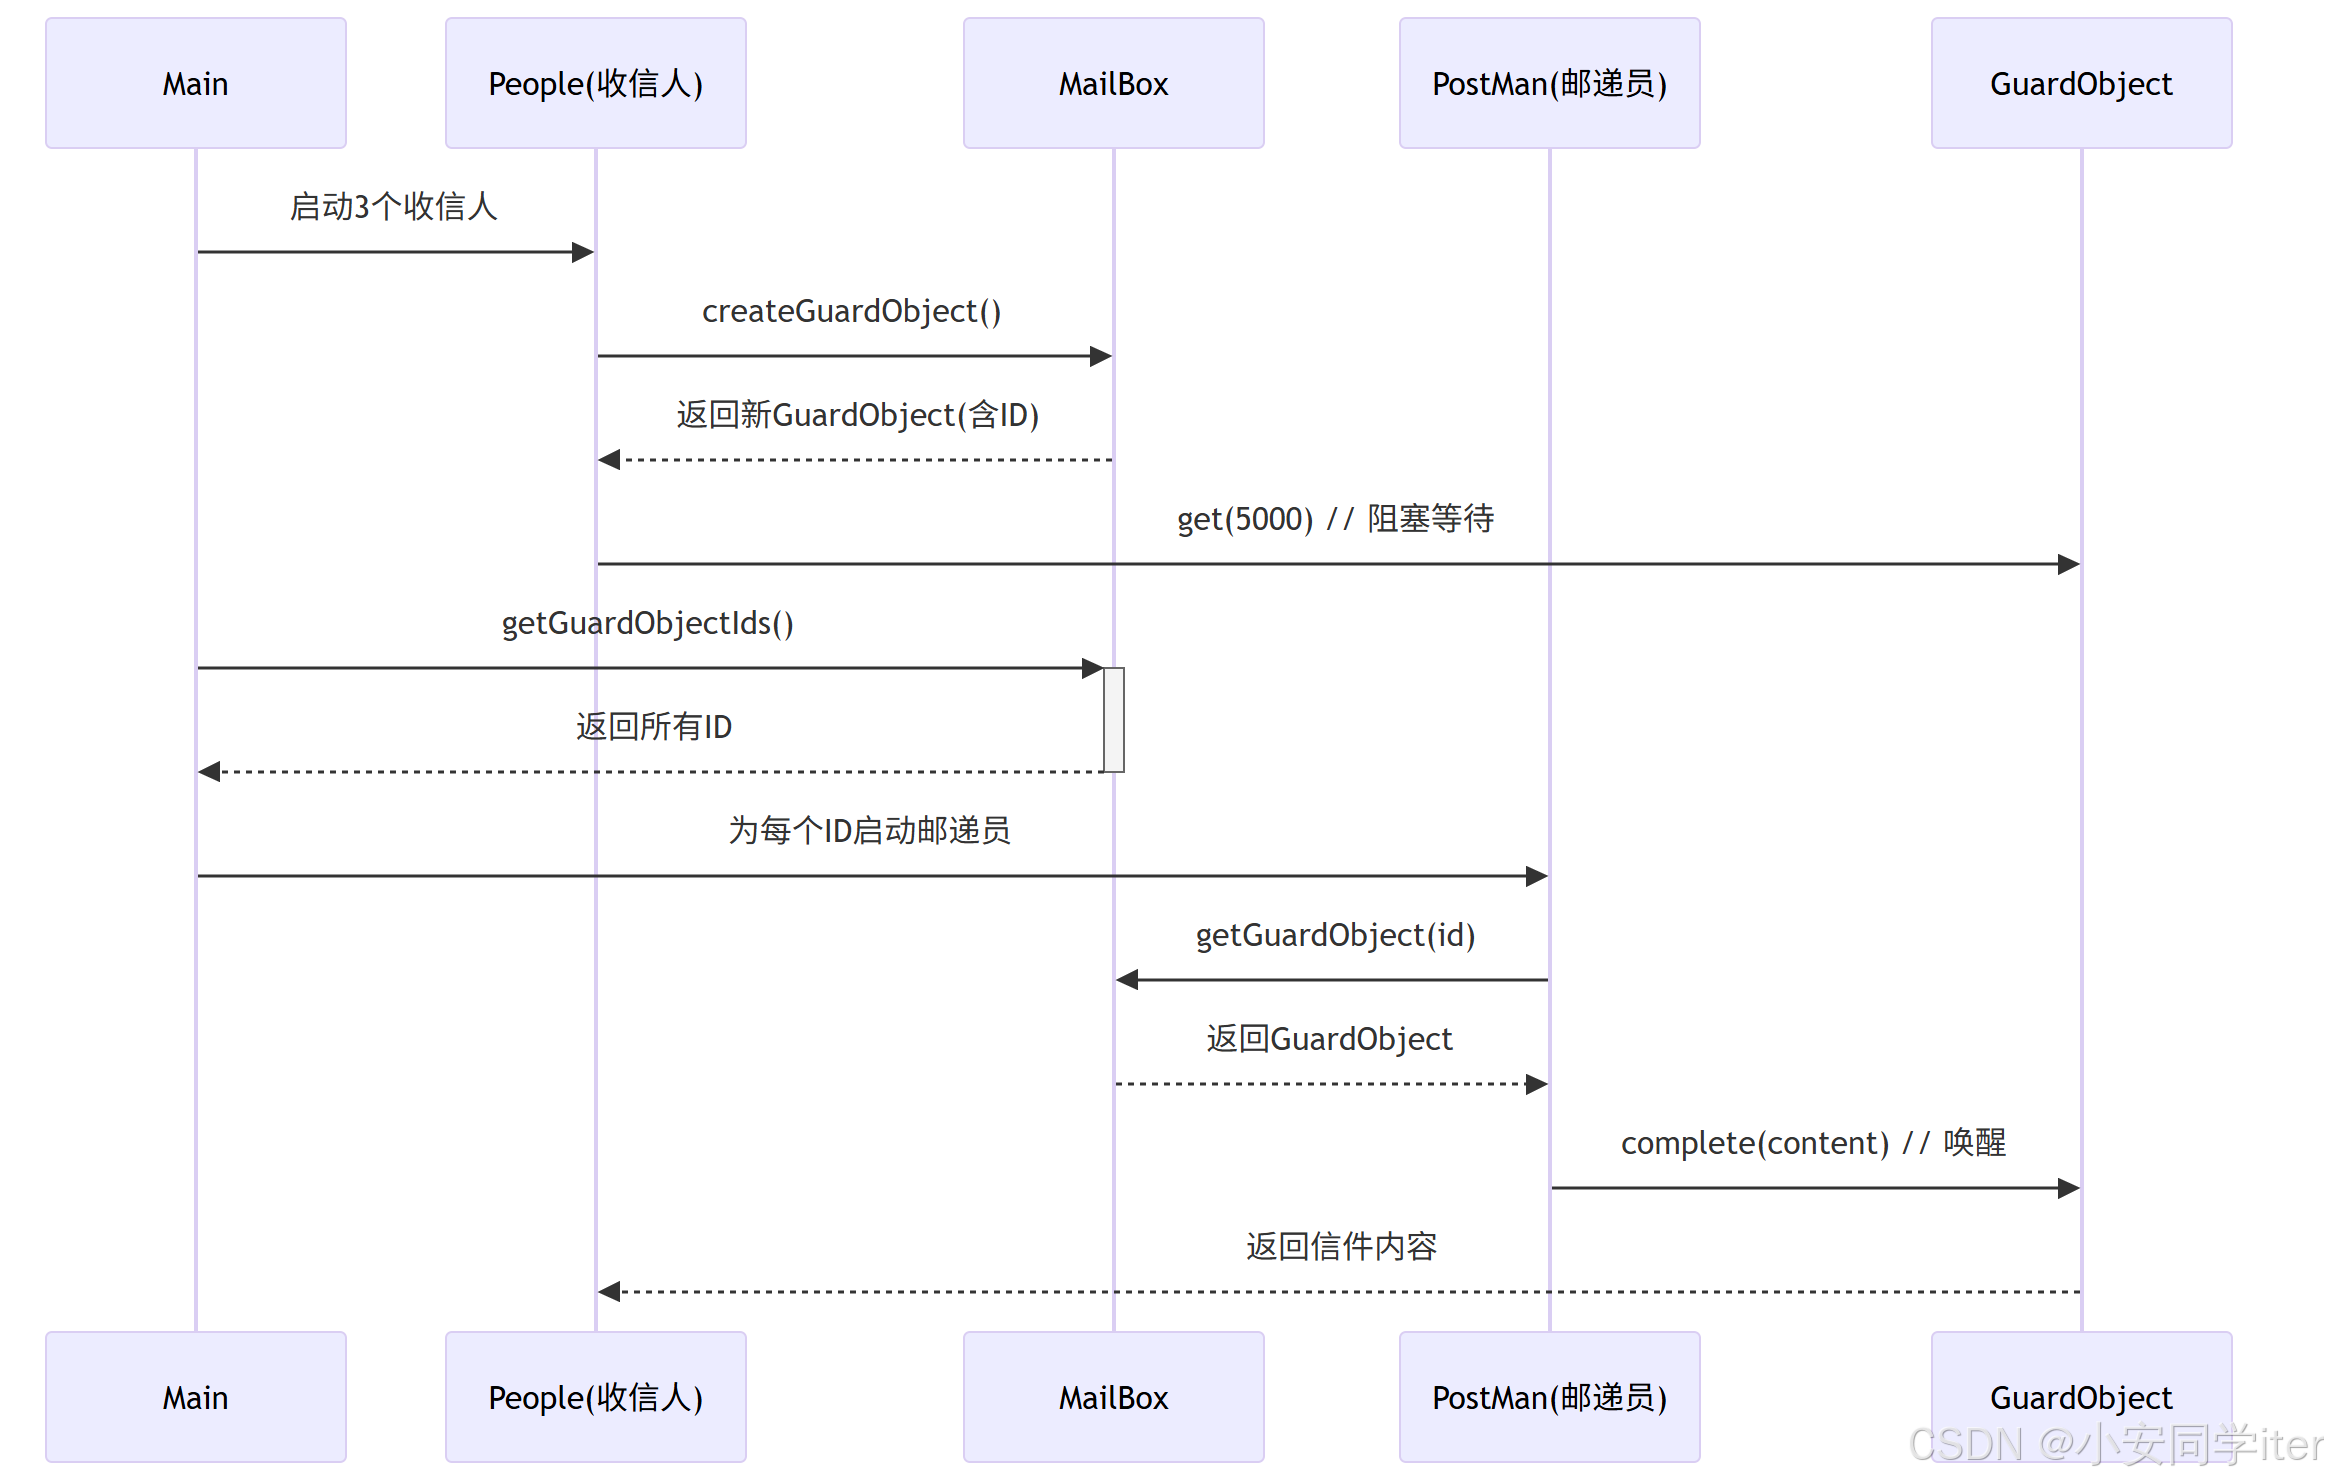
}一个使用等待通知机制的例子
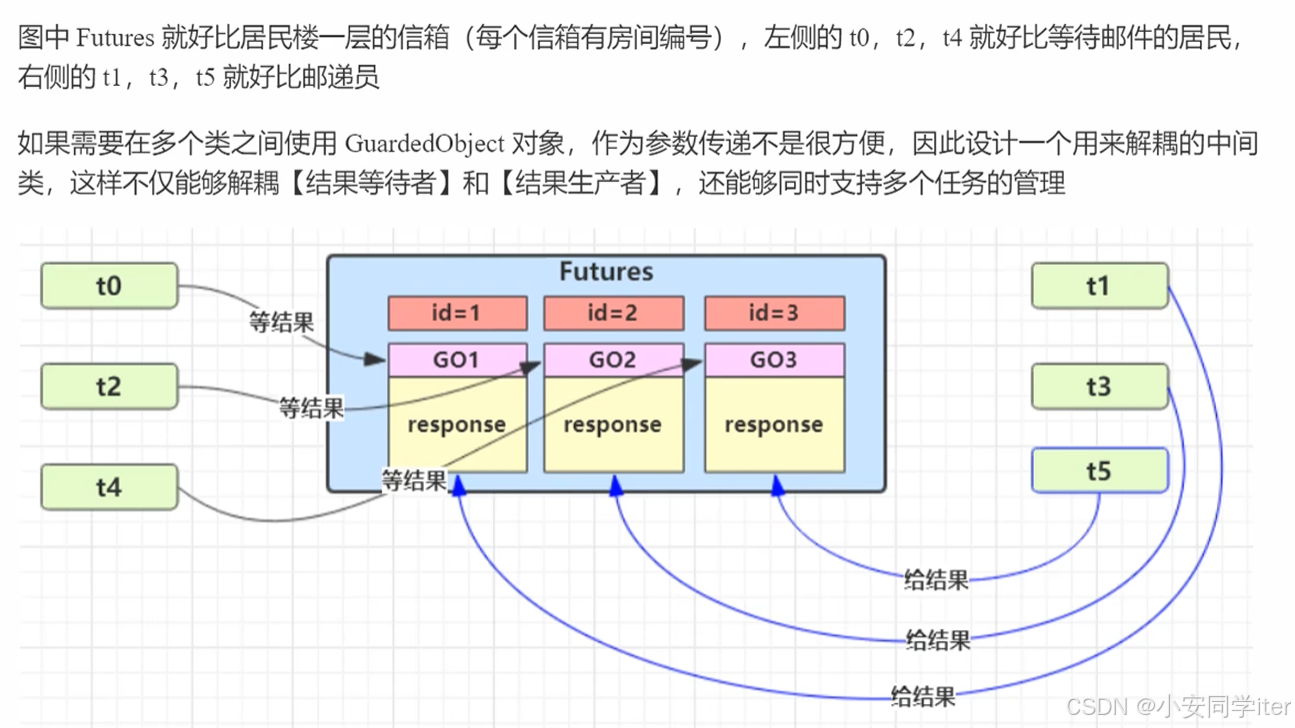
信箱类:借助HashMap用于管理收信人id与对应的异步结果对象GuardObject
收信人:借助信箱类的管理,设置对应的id与新建异步结果对象,接着调用对应的get进行等待。
邮递员:传递收件人的id,并设置对应的content,借助信箱类根据收件人id得到对应的GuardObject异步结果对象,调用compete通知(将content传递)。
异步结果对象:两个方法,get/compete一个等待,一个通知,实现多线程的保护性暂停模式。
1 收信人
在收信人当中需要内置变量信箱,在初始化创建时就需要对应调用创建信箱的方法,然后重写run方法,因为我们需要实现的是每创建一个收信人就需要新建一个线程执行业务代码,run方法当中使用get进行等待,若邮递员发送通知之后再将结果接收,接收成功之后还需从信箱当中移除。
java
/**
 * 模拟收信人
 */
class People extends Thread {
    private final GuardObject<String> guardObject;

    public People() {
        super("People-" + System.currentTimeMillis());
        this.guardObject = MailBox.createGuardObject();
    }

    @Override
    public void run() {
        System.out.println(Thread.currentThread().getName() + "开始收信...");
        try {
            // 等待信件,带超时
            String response = guardObject.get(5000);
            System.out.println(Thread.currentThread().getName() + "收到信:" + response);
        } catch (TimeoutException e) {
            System.out.println(Thread.currentThread().getName() + "收信超时");
        } catch (InterruptedException e) {
            System.out.println(Thread.currentThread().getName() + "收信被中断");
            Thread.currentThread().interrupt(); // 恢复中断状态
        } finally {
            // 确保从MailBox中移除GuardObject
            MailBox.removeGuardObject(guardObject.getId());
        }
    }
}
2 邮递员
邮递员需要内置两个成员变量,一个是收信人的id用来获取寻找对应的收信人,同时也是开启新的线程继承Thread类重写run方法,首先获取收信人的对象,调用compete方法通知对应的收信人
java
/**
 * 邮递员类
 */
class PostMan extends Thread {
    private final int id;
    private final String content;

    public PostMan(int id, String content) {
        super("PostMan-" + id);
        this.id = id;
        this.content = content;
    }

    @Override
    public void run() {
        GuardObject<String> guardObject = MailBox.getGuardObject(id);
        if (guardObject == null) {
            System.out.println(Thread.currentThread().getName() + "错误:收信人不存在");
            return;
        }

        System.out.println(Thread.currentThread().getName() + "开始发送信件...");
        try {
            // 模拟投递延迟
            Thread.sleep(1000 + (int)(Math.random() * 2000));

            // 发送信件
            guardObject.complete(content);
            System.out.println(Thread.currentThread().getName() + "已发送信件");
        } catch (InterruptedException e) {
            System.out.println(Thread.currentThread().getName() + "发送被中断");
            Thread.currentThread().interrupt(); // 恢复中断状态
        } catch (IllegalStateException e) {
            System.out.println(Thread.currentThread().getName() + "错误:" + e.getMessage());
        }
    }
}
3 信箱类
信箱当中维护的是一个HashMap集合,id存储收件人信息,id,GuardObject<String>对象
java
/**
 * 用于管理多个 GuardObject 的信箱类
 */
class MailBox {
    private static final AtomicInteger idGenerator = new AtomicInteger(1);
    private static final Map<Integer, GuardObject<?>> map = new ConcurrentHashMap<>();

    /**
     * 创建并返回一个泛型 GuardObject
     */
    public static <T> GuardObject<T> createGuardObject() {
        int id = idGenerator.getAndIncrement();
        GuardObject<T> guardObject = new GuardObject<>(id);
        map.put(id, guardObject);
        return guardObject;
    }

    /**
     * 获取所有 GuardObject 的 ID
     */
    public static Set<Integer> getGuardObjectIds() {
        return map.keySet();
    }

    /**
     * 根据id获取GuardObject
     */
    @SuppressWarnings("unchecked")
    public static <T> GuardObject<T> getGuardObject(int id) {
        return (GuardObject<T>) map.get(id);
    }

    /**
     * 移除GuardObject
     */
    public static void removeGuardObject(int id) {
        map.remove(id);
    }
}
4 保护对象
这里同时也会根据id维护独立的GuardObject对象,里面实现了get与compete的逻辑代码
java
/**
 * 增强版保护对象类
 */
class GuardObject<T> {
    private T response;
    private boolean done = false;
    private final int id;

    public GuardObject(int id) {
        this.id = id;
    }

    public int getId() {
        return id;
    }

    /**
     * 获取结果(带超时)
     */
    public T get(long timeout) throws InterruptedException, TimeoutException {
        synchronized (this) {
            long start = System.currentTimeMillis();
            long remaining = timeout;

            while (!done) {
                if (timeout > 0 && remaining <= 0) {
                    throw new TimeoutException("等待结果超时");
                }

                if (timeout == 0) {
                    this.wait();
                } else {
                    this.wait(remaining);
                    remaining = timeout - (System.currentTimeMillis() - start);
                }
            }

            return response;
        }
    }

    /**
     * 设置结果
     */
    public void complete(T response) {
        synchronized (this) {
            if (done) {
                throw new IllegalStateException("结果已被设置");
            }

            this.response = response;
            this.done = true;
            this.notifyAll();
        }
    }
完整代码
java
package day01.mysynchronized;
import java.util.Map;
import java.util.Set;
import java.util.concurrent.ConcurrentHashMap;
import java.util.concurrent.TimeoutException;
import java.util.concurrent.atomic.AtomicInteger;
public class Example7 {
public static void main(String[] args) throws InterruptedException {
// 创建多个收信人
for (int i = 0; i < 3; i++) {
new People().start();
}
// 等待收信人创建GuardObject
Thread.sleep(1000);
// 获取所有等待收信的ID
Set<Integer> ids = MailBox.getGuardObjectIds();
// 为每个收信人创建邮递员
int mailCount = 1;
for (int id : ids) {
new PostMan(id, "信件内容" + mailCount++).start();
}
}
}
/**
* 模拟收信人
*/
class People extends Thread {
private final GuardObject<String> guardObject;
public People() {
super("People-" + System.currentTimeMillis());
this.guardObject = MailBox.createGuardObject();
}
@Override
public void run() {
System.out.println(Thread.currentThread().getName() + "开始收信...");
try {
// 等待信件,带超时
String response = guardObject.get(5000);
System.out.println(Thread.currentThread().getName() + "收到信:" + response);
} catch (TimeoutException e) {
System.out.println(Thread.currentThread().getName() + "收信超时");
} catch (InterruptedException e) {
System.out.println(Thread.currentThread().getName() + "收信被中断");
Thread.currentThread().interrupt(); // 恢复中断状态
} finally {
// 确保从MailBox中移除GuardObject
MailBox.removeGuardObject(guardObject.getId());
}
}
}
/**
* 邮递员类
*/
class PostMan extends Thread {
private final int id;
private final String content;
public PostMan(int id, String content) {
super("PostMan-" + id);
this.id = id;
this.content = content;
}
@Override
public void run() {
GuardObject<String> guardObject = MailBox.getGuardObject(id);
if (guardObject == null) {
System.out.println(Thread.currentThread().getName() + "错误:收信人不存在");
return;
}
System.out.println(Thread.currentThread().getName() + "开始发送信件...");
try {
// 模拟投递延迟
Thread.sleep(1000 + (int)(Math.random() * 2000));
// 发送信件
guardObject.complete(content);
System.out.println(Thread.currentThread().getName() + "已发送信件");
} catch (InterruptedException e) {
System.out.println(Thread.currentThread().getName() + "发送被中断");
Thread.currentThread().interrupt(); // 恢复中断状态
} catch (IllegalStateException e) {
System.out.println(Thread.currentThread().getName() + "错误:" + e.getMessage());
}
}
}
/**
* 用于管理多个 GuardObject 的信箱类
*/
class MailBox {
private static final AtomicInteger idGenerator = new AtomicInteger(1);
private static final Map<Integer, GuardObject<?>> map = new ConcurrentHashMap<>();
/**
* 创建并返回一个泛型 GuardObject
*/
public static <T> GuardObject<T> createGuardObject() {
int id = idGenerator.getAndIncrement();
GuardObject<T> guardObject = new GuardObject<>(id);
map.put(id, guardObject);
return guardObject;
}
/**
* 获取所有 GuardObject 的 ID
*/
public static Set<Integer> getGuardObjectIds() {
return map.keySet();
}
/**
* 根据id获取GuardObject
*/
@SuppressWarnings("unchecked")
public static <T> GuardObject<T> getGuardObject(int id) {
return (GuardObject<T>) map.get(id);
}
/**
* 移除GuardObject
*/
public static void removeGuardObject(int id) {
map.remove(id);
}
}
/**
* 增强版保护对象类
*/
class GuardObject<T> {
private T response;
private boolean done = false;
private final int id;
public GuardObject(int id) {
this.id = id;
}
public int getId() {
return id;
}
/**
* 获取结果(带超时)
*/
public T get(long timeout) throws InterruptedException, TimeoutException {
synchronized (this) {
long start = System.currentTimeMillis();
long remaining = timeout;
while (!done) {
if (timeout > 0 && remaining <= 0) {
throw new TimeoutException("等待结果超时");
}
if (timeout == 0) {
this.wait();
} else {
this.wait(remaining);
remaining = timeout - (System.currentTimeMillis() - start);
}
}
return response;
}
}
/**
* 设置结果
*/
public void complete(T response) {
synchronized (this) {
if (done) {
throw new IllegalStateException("结果已被设置");
}
this.response = response;
this.done = true;
this.notifyAll();
}
}
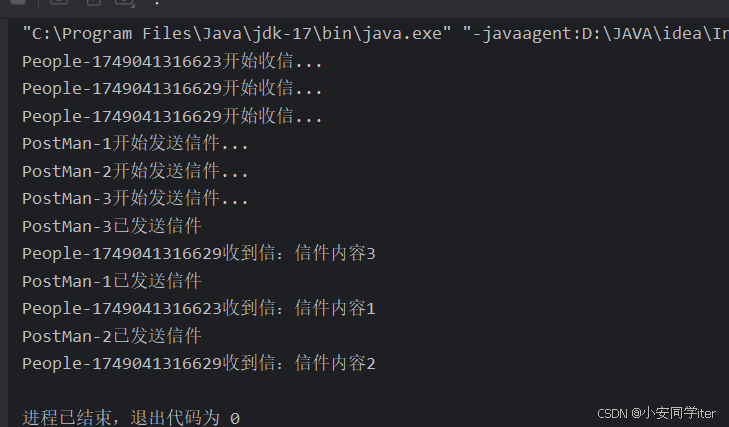
}结果展示
2 顺序控制模式
顺序控制是同步模式中的一种重要控制方式,它确保多个操作或任务按照预定的顺序执行。
(1 利用wait/notify
java
package day01.tongbu;

public class example1 {
    static final Object lock = new Object();
    //用于标记线程2是否已经执行完毕
    static boolean flag = false;

    public static void main(String[] args) {
        Thread t1 = new Thread(() -> {
            synchronized (lock) {
                while (!flag) {
                    try {
                        lock.wait();
                    } catch (InterruptedException e) {
                        e.printStackTrace();
                    }
                }
                System.out.println("t1 线程被唤醒,执行剩下的业务");
            }
        });
        Thread t2 = new Thread(() -> {
            synchronized (lock) {
                System.out.println("t2 线程执行完毕");
                flag = true;
                lock.notify();
            }
        });
        t1.start();
        t2.start();
        try {
            t1.join();
            t2.join();
        } catch (InterruptedException e) {
            e.printStackTrace();
        }
    }
}
(2 使用ReentrantLock
java
package day01.tongbu;

import java.util.concurrent.locks.Condition;
import java.util.concurrent.locks.ReentrantLock;

public class example3 {
    static boolean flag = false;
    static final ReentrantLock lock = new ReentrantLock();
    static final Condition condition = lock.newCondition();

    public static void main(String[] args) {
        // 实现先执行线程2,再执行线程1
        Thread t1 = new Thread(() -> {
            // 获取锁,未获取将阻塞
            lock.lock();
            try {
                while (!flag) {
                    System.out.println("线程1等待线程2");
                    condition.await();
                }
                Thread.sleep(500);
                System.out.println("线程1开始执行");
                Thread.sleep(500);
                System.out.println("线程1完成工作");
            } catch (InterruptedException e) {
                e.printStackTrace();
            } finally {
                lock.unlock();
            }

        });
        Thread t2 = new Thread(() -> {
            lock.lock();
            try {
                System.out.println("线程2开始执行");
                Thread.sleep(500);
                System.out.println("线程2执行完毕");
                flag = true;
                condition.signal();
            } catch (Exception e) {
                e.printStackTrace();
            } finally {
                lock.unlock();
            }
        });
        t1.start();
        t2.start();
        try {
            t1.join();
            t2.join();
        } catch (InterruptedException e) {
            e.printStackTrace();
        }
    }
}
(3 借助park/unpark
java
package day01.tongbu;

import java.util.concurrent.locks.LockSupport;

public class example4 {
    public static void main(String[] args) {
        Thread t1 = new Thread(() -> {
            System.out.println("t1等待....");
            LockSupport.park();
            System.out.println("t1运行");
            try {
                Thread.sleep(1000);
            } catch (InterruptedException e) {
                e.printStackTrace();
            }
            System.out.println("t1结束");
        });
        Thread t2 = new Thread(() -> {
            System.out.println("t2开始运行");
            try {
                Thread.sleep(1000);
            } catch (InterruptedException e) {
                e.printStackTrace();
            }
            System.out.println("t2结束并标记t1");
            LockSupport.unpark(t1);
        });
        t1.start();
        t2.start();
        try {
            t1.join();
            t2.join();
        } catch (InterruptedException e) {
            e.printStackTrace();
        }
    }
}
(对比
| 特性 | synchronized + wait/notify | ReentrantLock + Condition | LockSupport |
|---|---|---|---|
| 实现复杂度 | 低 | 中 | 低 |
| 性能 | 中等 | 高 | 最高 |
| 灵活性 | 低 | 高 | 中 |
| 多条件支持 | ❌ | ✅ | ❌ |
| 公平锁选项 | ❌ | ✅ | ❌ |
| 超时控制 | ❌ | ✅ | ✅ |
| 唤醒先于阻塞 | ❌ | ❌ | ✅ |
| 锁获取尝试 | ❌ | ✅ | ❌ |
| 内存占用 | 低 | 中 | 低 |
| 适用场景 | 简单同步 | 复杂同步 | 简单阻塞/唤醒 |
(4 实现多个线程交替执行
使用ReentractLock
java
package day01.tongbu;

import java.util.concurrent.locks.Condition;
import java.util.concurrent.locks.ReentrantLock;

public class example5 {
    static ReentrantLock lock = new ReentrantLock();
    static Condition conditionA = lock.newCondition();
    static Condition conditionB = lock.newCondition();
    static Condition conditionC = lock.newCondition();
    static int flag = 1;
    static final int MAX_LOOP = 5; // 控制打印5次ABC

    public static void main(String[] args) {
        Thread t1 = new Thread(() -> {
            lock.lock();
            try {
                for (int i = 0; i < MAX_LOOP; i++) {
                    while (flag != 1) {
                        conditionA.await();
                    }
                    System.out.print("A");
                    flag = 2;
                    conditionB.signal();
                }
            } catch (Exception e) {
                e.printStackTrace();
            } finally {
                lock.unlock();
            }
        });

        Thread t2 = new Thread(() -> {
            lock.lock();
            try {
                for (int i = 0; i < MAX_LOOP; i++) {
                    while (flag != 2) {
                        conditionB.await();
                    }
                    System.out.print("B");
                    flag = 3;
                    conditionC.signal();
                }
            } catch (Exception e) {
                e.printStackTrace();
            } finally {
                lock.unlock();
            }
        });

        Thread t3 = new Thread(() -> {
            lock.lock();
            try {
                for (int i = 0; i < MAX_LOOP; i++) {
                    while (flag != 3) {
                        conditionC.await();
                    }
                    System.out.print("C");
                    flag = 1;
                    conditionA.signal();
                }
            } catch (Exception e) {
                e.printStackTrace();
            } finally {
                lock.unlock();
            }
        });

        t1.start();
        t2.start();
        t3.start();

        // 等待所有线程执行完毕
        try {
            t1.join();
            t2.join();
            t3.join();
        } catch (InterruptedException e) {
            e.printStackTrace();
        }

    }
}
模块化
java
import java.util.concurrent.locks.Condition;
import java.util.concurrent.locks.ReentrantLock;

public class example5 {
    static ReentrantLock lock = new ReentrantLock();
    static Condition[] conditions = new Condition[3];
    static int currentFlag = 0; // 0 -> A, 1 -> B, 2 -> C
    static final int MAX_LOOP = 5;

    public static void main(String[] args) {
        // 初始化每个 condition
        for (int i = 0; i < conditions.length; i++) {
            conditions[i] = lock.newCondition();
        }

        // 启动三个线程
        Thread t1 = new PrintThread(0, 'A', 1).getThread();
        Thread t2 = new PrintThread(1, 'B', 2).getThread();
        Thread t3 = new PrintThread(2, 'C', 0).getThread();

        t1.start();
        t2.start();
        t3.start();

        // 等待全部完成
        try {
            t1.join();
            t2.join();
            t3.join();
        } catch (InterruptedException e) {
            e.printStackTrace();
        }

        System.out.println("全部打印完成!");
    }

    static class PrintThread {
        private final int id;
        private final char toPrint;
        private final int nextId;

        public PrintThread(int id, char toPrint, int nextId) {
            this.id = id;
            this.toPrint = toPrint;
            this.nextId = nextId;
        }

        public Thread getThread() {
            return new Thread(() -> {
                lock.lock();
                try {
                    for (int i = 0; i < MAX_LOOP; i++) {
                        while (currentFlag != id) {
                            conditions[id].await();
                        }
                        System.out.println(toPrint);
                        currentFlag = nextId;
                        conditions[nextId].signal();
                    }
                } catch (Exception e) {
                    e.printStackTrace();
                } finally {
                    lock.unlock();
                }
            });
        }
    }
}
3 Balking模式(犹豫模式)
当某个线程发现另一个线程已经执行了相同的操作时,放弃当前操作并直接返回,避免重复操作导致的资源浪费或状态不一致。
Balking 模式的核心是 避免重复操作和无效操作,通过状态检查确保操作只在合适的状态下执行。
实现多次访问不再重复创建
java
package day01;

public class ax5 {
    public static void main(String[] args) throws InterruptedException {
        TwoPhaseTermination tpt = new TwoPhaseTermination();
        tpt.start();
        tpt.start(); // 被balking拒绝
        Thread.sleep(3500);
        tpt.stop();
        // 测试重启功能
        Thread.sleep(500);
        tpt.start(); // 应能重新启动
        Thread.sleep(1500);
        tpt.stop();
    }
}

class TwoPhaseTermination {
    private Thread monitor;
    // stop 这个状态是判断是否已经停止,防止调用stop时出错,而state状态用来判断当前是否正在运行
    private volatile boolean stop = false;
    private static final int NEW = 0;
    private static final int RUNNING = 1;
    private volatile int state = NEW;

    public synchronized void start() {
        if (state != NEW) {
            System.out.println(Thread.currentThread().getName() + ": 拒绝重复启动");
            return;
        }

        state = RUNNING;
        stop = false;

        monitor = new Thread(() -> {
            try {
                while (!stop) {
                    try {
                        Thread.sleep(1000);
                        System.out.println("执行监控记录");
                    } catch (InterruptedException e) {
                        System.out.println("睡眠中被中断,准备退出");
                    }
                }
            } finally {
                synchronized (TwoPhaseTermination.this) {
                    state = NEW; // 关键修改:重置为NEW而非TERMINATED
                }
                System.out.println("料理后事,释放资源");
            }
        }, "monitor");

        monitor.start();
    }

    public synchronized void stop() {
        if (state != RUNNING) return;
        stop = true;
        if (monitor != null) {
            monitor.interrupt();
        }

    }
}
二 线程管理/生命周期模式
1 两阶段终止模式
两阶段终止模式(Two-Phase Termination Pattern)是一种多线程编程中安全终止线程的设计模式。它的核心思想是:在终止线程前,先发出终止请求(第一阶段),然后线程在完成必要清理工作后再真正终止(第二阶段)。这种模式避免了直接强制终止线程导致的资源泄露、数据不一致等问题
++简单来说就是在一个线程T1中如何优雅的终止线程T2,给T2一个料理后事的机会++
在某些线程正在运行时如何正确终止线程,如果强制stop会带来相对应的问题:
- 1 资源未释放:线程可能持有锁或者打开文件或者网络连接未关闭
- 2 数据不一致:线程可能正在修改共享数据,突然终止会导致数据损坏。
- 3 不可控性:无法保证线程在安全点终止。
(1 使用interrupt
需要借助interrupt进行打断,存在一个中断标志位,可以在这个中断循环之外将其他需要善后的地方再进行操作,可实现优雅终止。在下面代码实现的过程当中需要注意是在睡眠当中还是在运行当中被打断。
代码当中先开启工作线程,线程两个判断,如果isInterrupted==true就是执行了interrupt()将线程打断(模拟将后事料理),而另一种情况就是没有被打断就休眠1s(模拟工作过程),主线程先休眠再打断工作线程。
java
package day01;

public class ax5 {
    public static void main(String[] args) {
        TwoPhaseTermination tpt = new TwoPhaseTermination();
        tpt.start();
         try {
            Thread.sleep(3500);
        } catch (InterruptedException e) {
             System.out.println("main thread stop");
        }
        tpt.stop();
    }
}

class TwoPhaseTermination {
    private Thread monitor;

    public void start() {
        monitor = new Thread(() -> {
            while (true) {
                Thread current = Thread.currentThread();
                if (current.isInterrupted()) {
                    System.out.println("打断线程,料理后事");
                    break;
                } else {
                    try {
                        Thread.sleep(1000);
                        System.out.println("执行监控记录");
                    } catch (InterruptedException e) {
                        current.interrupt();// 重置标志位位
                    }
                }
            }
        });
        monitor.start();
    }
    public void stop() {
        monitor.interrupt();
    }
}
补充:
|-------------------|----------|-----------------------------------------|
| interrupted() | 静态方法 | 当前线程 (调用 Thread.interrupted()) |
| isInterrupted() | 实例方法 | 指定线程对象 (如 thread.isInterrupted()) |
|-------------------|-------------------------------------|
| interrupted() | - 当前线程需要检查中断状态并主动清除标志(如处理完中断后)。 |
| | - 需要确保中断状态不会被后续逻辑误判(如循环中检查中断状态)。 |
| isInterrupted() | - 检查其他线程的中断状态(如监控子线程是否被中断)。 |
| | - 需要多次检查中断状态且保留标志位(如在循环中持续监控)。 |
(2 使用volatile改进两阶段终止模式
设置一个volatile共享变量,实现线程之间共享
java
package day01;

public class ax5 {
    public static void main(String[] args) {
        TwoPhaseTermination tpt = new TwoPhaseTermination();
        tpt.start();
        try {
            Thread.sleep(3500);
        } catch (InterruptedException e) {
            System.out.println("main thread stop");
        }
        tpt.stop();
    }
}

class TwoPhaseTermination {
    private Thread monitor;
    // 保证共享变量在多线程之间的可见性
    private volatile boolean flag = false;

    public void start() {
        monitor = new Thread(() -> {
            while (true) {
                Thread current = Thread.currentThread();
                if (flag) {
                    System.out.println("打断线程,料理后事");
                    break;
                } else {
                    try {
                        Thread.sleep(1000);
                        System.out.println("执行监控记录");
                    } catch (InterruptedException e) {
                        // 重置标志位位
                        current.interrupt();
                    }
                }
            }
        });
        monitor.start();
    }

    public void stop() {
        flag  = true;
        // 打断监控线程(中断在睡眠期间的线程,不加的话需要等待睡眠结束)
        monitor.interrupt();
    }
}
三 异步模式
1 生产者消费者模式
消费者与生产者之间的协调关系,为了解决生产过剩的情况或者说消费过多,这里的缓冲区相当于就是一个物品的储物箱,达到最大说明生产者生产太多了,达到最小说明消费者消费太多了。当达到最大就让生产者进入等待队列,唤醒消费者,反之就让消费者进入等待队列,唤醒生产者。
借助ReentrantLock与条件变量
java
package day01.lockax;

import java.util.concurrent.locks.Condition;
import java.util.concurrent.locks.ReentrantLock;

public class Conditional {
    private final ReentrantLock lock = new ReentrantLock();
    private final Condition notEmpty = lock.newCondition();  // 消费者等待条件
    private final Condition notFull = lock.newCondition();   // 生产者等待条件
    private final int[] buffer = new int[5];                 // 缓冲区
    private int count = 0;                                   // 当前缓冲区元素数量

    // 生产者方法:向缓冲区添加元素
    public void produce(int item) throws InterruptedException {
        lock.lock();
        try {
            // 如果缓冲区已满,等待
            while (count == buffer.length) {
                System.out.println("缓冲区已满,生产者等待...");
                notFull.await();  // 释放锁并等待
            }

            // 添加元素到缓冲区
            buffer[count++] = item;
            System.out.println("生产者生产了: " + item + ",当前缓冲区大小: " + count);

            // 唤醒消费者
            notEmpty.signal();
        } finally {
            lock.unlock();
        }
    }

    // 消费者方法:从缓冲区取出元素
    public void consume() throws InterruptedException {
        lock.lock();
        try {
            // 如果缓冲区为空,等待
            while (count == 0) {
                System.out.println("缓冲区为空,消费者等待...");
                notEmpty.await();  // 释放锁并等待
            }

            // 从缓冲区取出元素
            int item = buffer[--count];
            System.out.println("消费者消费了: " + item + ",当前缓冲区大小: " + count);

            // 唤醒生产者
            notFull.signal();
        } finally {
            lock.unlock();
        }
    }

    // 测试生产者-消费者模型
    public static void main(String[] args) {
        Conditional example = new Conditional();

        // 启动生产者线程
        Thread producer = new Thread(() -> {
            for (int i = 1; i <= 10; i++) {
                try {
                    example.produce(i);
                    Thread.sleep(500);  // 模拟生产耗时
                } catch (InterruptedException e) {
                    e.printStackTrace();
                }
            }
        });

        // 启动消费者线程
        Thread consumer = new Thread(() -> {
            for (int i = 1; i <= 10; i++) {
                try {
                    example.consume();
                    Thread.sleep(800);  // 模拟消费耗时
                } catch (InterruptedException e) {
                    e.printStackTrace();
                }
            }
        });

        producer.start();
        consumer.start();
    }
}
2 工作线程(线程池)
核心:不同的任务类型使用不同的线程池。
代码展示:
java
package threadPool;

import java.util.concurrent.ExecutorService;
import java.util.concurrent.Executors;
import java.util.concurrent.Future;
import java.util.concurrent.TimeUnit;

public class RestaurantThreadPoolExample {

    // 封装服务员任务逻辑
    private static void waiterTask(ExecutorService cookerPool, int taskId) {
        System.out.println("服务员[" + taskId + "] 处理点餐");
        Future<String> dishFuture = cookerPool.submit(() -> {
            // 模拟烹饪时间
            Thread.sleep(500);
            return "菜品[" + taskId + "] 完成 - 由厨师" + Thread.currentThread().getName();
        });

        try {
            // 模拟处理其他事务的时间
            Thread.sleep(300);
            System.out.println("服务员[" + taskId + "] 取菜: " + dishFuture.get());
        } catch (Exception e) {
            System.err.println("任务[" + taskId + "] 出错: " + e.getMessage());
        }
    }

    public static void main(String[] args) {
        // 创建有意义的线程池名称
        final int NUM_WAITERS = 5;
        final int NUM_COOKERS = 2;

        ExecutorService waitersPool = Executors.newFixedThreadPool(NUM_WAITERS);
        ExecutorService cookerPool = Executors.newFixedThreadPool(NUM_COOKERS);

        // 提交所有服务员任务
        for (int i = 1; i <= NUM_WAITERS; i++) {
            final int taskId = i;
            waitersPool.execute(() -> waiterTask(cookerPool, taskId));
        }

        // 优雅关闭线程池
        waitersPool.shutdown();
        try {
            // 等待服务员任务完成(包含它们提交的厨师任务)
            if (!waitersPool.awaitTermination(5, TimeUnit.SECONDS)) {
                System.err.println("警告: 服务员线程池未及时关闭");
            }
        } catch (InterruptedException e) {
            Thread.currentThread().interrupt();
        } finally {
            cookerPool.shutdown();
            try {
                // 确保厨师任务完成
                if (!cookerPool.awaitTermination(2, TimeUnit.SECONDS)) {
                    System.err.println("警告: 厨师线程池未及时关闭,强制终止剩余任务");
                    cookerPool.shutdownNow();
                }
            } catch (InterruptedException e) {
                cookerPool.shutdownNow();
                Thread.currentThread().interrupt();
            }
        }

        System.out.println("====== 所有任务执行完成 ======");
    }
}