文章目录
- [1. 实时同步工具](#1. 实时同步工具)
- [2. lsyncd 实时同步服务](#2. lsyncd 实时同步服务)
-
- [2.1 环境准备](#2.1 环境准备)
- [2.2 rsync准备](#2.2 rsync准备)
-
- [2.2.1 服务端检查](#2.2.1 服务端检查)
- [2.2.2 客户端检查](#2.2.2 客户端检查)
- [2.2.3 备份测试](#2.2.3 备份测试)
- [2.3 配置lsyncd](#2.3 配置lsyncd)
-
- [2.3.1 安装软件](#2.3.1 安装软件)
- [2.3.2 编写配置文件](#2.3.2 编写配置文件)
- [2.4 测试](#2.4 测试)
- [3. 案例-网站存储架构](#3. 案例-网站存储架构)
-
- [3.1 rsync服务配置](#3.1 rsync服务配置)
-
- [3.1.1 服务端配置](#3.1.1 服务端配置)
- [3.1.2 客户端配置](#3.1.2 客户端配置)
- [3.2 lsyncd服务配置](#3.2 lsyncd服务配置)
-
- [3.2.1 服务端配置](#3.2.1 服务端配置)
- [3.3 nfs服务配置](#3.3 nfs服务配置)
-
- [3.3.1 服务端配置](#3.3.1 服务端配置)
- [3.3.2 客户端配置](#3.3.2 客户端配置)
- [3.4 测试](#3.4 测试)
- [4. Ubuntu模板机](#4. Ubuntu模板机)
-
- [4.1 配置host解析](#4.1 配置host解析)
- [4.2 远程连接优化](#4.2 远程连接优化)
- [4.3 关闭防火墙](#4.3 关闭防火墙)
- [4.4 配置apt源](#4.4 配置apt源)
- [4.5 安装常用工具](#4.5 安装常用工具)
- [4.6 同步时间](#4.6 同步时间)
- [4.7 配置vim自动添加脚本注释](#4.7 配置vim自动添加脚本注释)
- [4.8 设置root密码](#4.8 设置root密码)
- [4.9 编写修改主机名和ip的脚本](#4.9 编写修改主机名和ip的脚本)
- [4.10 配置命令行颜色](#4.10 配置命令行颜色)
- [4.11 编写回收站脚本,配置rm别名](#4.11 编写回收站脚本,配置rm别名)
- [4.12 克隆模板机](#4.12 克隆模板机)
- [5. 案例2-网站存储架构-Ubuntu 22.04](#5. 案例2-网站存储架构-Ubuntu 22.04)
-
- [5.1 配置rsync服务](#5.1 配置rsync服务)
-
- [5.1.1 客户端](#5.1.1 客户端)
- [5.1.2 客户端](#5.1.2 客户端)
- [5.2 配置lsyncd服务](#5.2 配置lsyncd服务)
-
- [5.2.1 服务端](#5.2.1 服务端)
- [5.3 配置nfs服务](#5.3 配置nfs服务)
-
- [5.3.1 客户端](#5.3.1 客户端)
- [5.3.2 客户端](#5.3.2 客户端)
- [5.4 测试](#5.4 测试)
- [6. 踩坑记录](#6. 踩坑记录)
-
- [1. clnt_create: RPC: Timed out](#1. clnt_create: RPC: Timed out)
- [2. ISO镜像故障](#2. ISO镜像故障)
- [3. Ubuntu报错:Job for lsyncd.service failed because a timeout was exceeded.](#3. Ubuntu报错:Job for lsyncd.service failed because a timeout was exceeded.)
- [7. 思维导图](#7. 思维导图)
1. 实时同步工具
| 同步工具 | 说明 |
|---|---|
| inotify | 不推荐使用。本质是监控指定目录,需要和rsync服务结合使用;需要书写脚本。 |
| sersync | 对inotify+rsync二次开发,通过配置文件指定监控的目录,同步数据。 性能较好,但是很久没更新软件。 通过二进制部署,无法通过apt/yum安装 |
| lsyncd | 类似于sersync,通过配置文件监控指定目录,目录发生变化会调用rsync实现数据同步。 通过apt/域名安装即可 |
| drbd | 基于磁盘分区(数据块block)的数据同步工具; 主节点正常时,备用节点不运行。 |
2. lsyncd 实时同步服务
- lsyncd:Live Syncing Daemon,实时同步服务
- lsyncd需要监控存放数据的目录,并实时同步给备份服务器,所以lsyncd服务端应该配置在rsync的客户端
- lsyncd与rsync都是同步服务,rsync是定时备份,可以把lsyncd看作是rsync的扩展程序
2.1 环境准备
| 服务器 | 主机名 |
|---|---|
| lsyncd服务端(rsync客户端) | nfs01 |
| lsyncd客户端(rsync服务端) | backup |
2.2 rsync准备
2.2.1 服务端检查
shell
[root@backup ~]# systemctl is-active rsyncd.service
active
[root@backup ~]# cat /etc/rsyncd.conf
#created by oldboy 15:01 2009-6-5
##rsyncd.conf start##
fake super = yes
uid = rsync
gid = rsync
use chroot = no
max connections = 2000
timeout = 600
pid file = /var/run/rsyncd.pid
lock file = /var/run/rsync.lock
log file = /var/log/rsyncd.log
ignore errors
read only = false
list = false
hosts allow = 172.16.1.0/24
#hosts deny = 0.0.0.0/32
auth users = rsync_backup
secrets file = /etc/rsync.password
#####################################
[data]
comment = www by old0boy 14:18 2012-1-13
path = /data
[backup]
comment = www by old0boy 14:18 2012-1-13
path = /backup
[blog]
comment = www by old0boy 14:18 2012-1-13
path = /nfs/backup/blog
[root@backup ~]# id rsync
用户id=1000(rsync) 组id=1000(rsync) 组=1000(rsync)
[root@backup ~]# cat /etc/rsync.password
rsync_backup:1
[root@backup ~]# ll /etc/rsync.password
-rw------- 1 root root 15  6月 12 10:08 /etc/rsync.password
[root@backup ~]# ll /data -d
drwxr-xr-x 2 rsync rsync 6  6月 17 10:39 /data
2.2.2 客户端检查
shell
[root@nfs01 ~]# cat /etc/rsync-client.password
1
[root@nfs01 ~]# ll /etc/rsync-client.password
-rw------- 1 root root 2  6月 12 11:44 /etc/rsync-client.password
2.2.3 备份测试

2.3 配置lsyncd
2.3.1 安装软件
- 该软件一般系统自带
shell
[root@nfs01 ~]# rpm -qa |grep lsyncd
lsyncd-2.2.3-2.ky10.x86_64
[root@nfs01 ~]# rpm -ql  lsyncd
/etc/logrotate.d/lsyncd
/etc/lsyncd.conf # 配置文件
/etc/sysconfig/lsyncd
......
2.3.2 编写配置文件
- 路径:/etc/lsyncd.conf
shell
[root@nfs01 ~]# cat /etc/lsyncd.conf
--全局部分主要配置lsyncd服务,日志,pid文件.
settings {
   --※※※※※日志文件,主要查看日志文件.
   logfile    = "/var/log/lsyncd.log",
   --pid文件
   pidfile    = "/var/run/lsyncd.pid",
   --服务状态文件
   statusFile = "/var/log/lsyncd.status",
   --改为非守护进程模式,默认.rsync命令,lsyncd
   nodaemon   = true,
   --控制最多用于传输数据的进程数量 rsync进程数(最大)
   --※※※※※根据cpu核心数来 一致或2倍
   maxProcesses = 2
}

--配置rsync命令,rsync服务端与客户端模式
--sync部分可以有多个.
sync {
    --指定rsync工作模式
    default.rsync,
    --※※※※※ 指定lsyncd监控目录,源目录
    source    = "/nfs/blog",
    --※※※※※ 指定目标 rsync服务端    用户名@rsync ip地址::模块名字
    target    = "rsync_backup@172.16.1.41::data",
    --※※※※※ 每隔5秒同步一次.
    delay     = 5,
    --rsync命令的  --delete 选项  保存客户端与服务端 内容一致.
    delete    = true,
    -- 配置rsync命令位置,rsync命令选项,
    rsync     = {
        -- 命令位置
        binary   = "/usr/bin/rsync",
        -- rsync命令的 -a选项
        archive  = true,
        -- rsync命令的  -z选项 压缩
        compress = true,
        -- ※※※※※配置rsync--password-file密码文件
        password_file = "/etc/rsync-client.password"
    }
}
# 重启服务
[root@nfs01 ~]# systemctl restart lsyncd.service
2.4 测试
3. 案例-网站存储架构
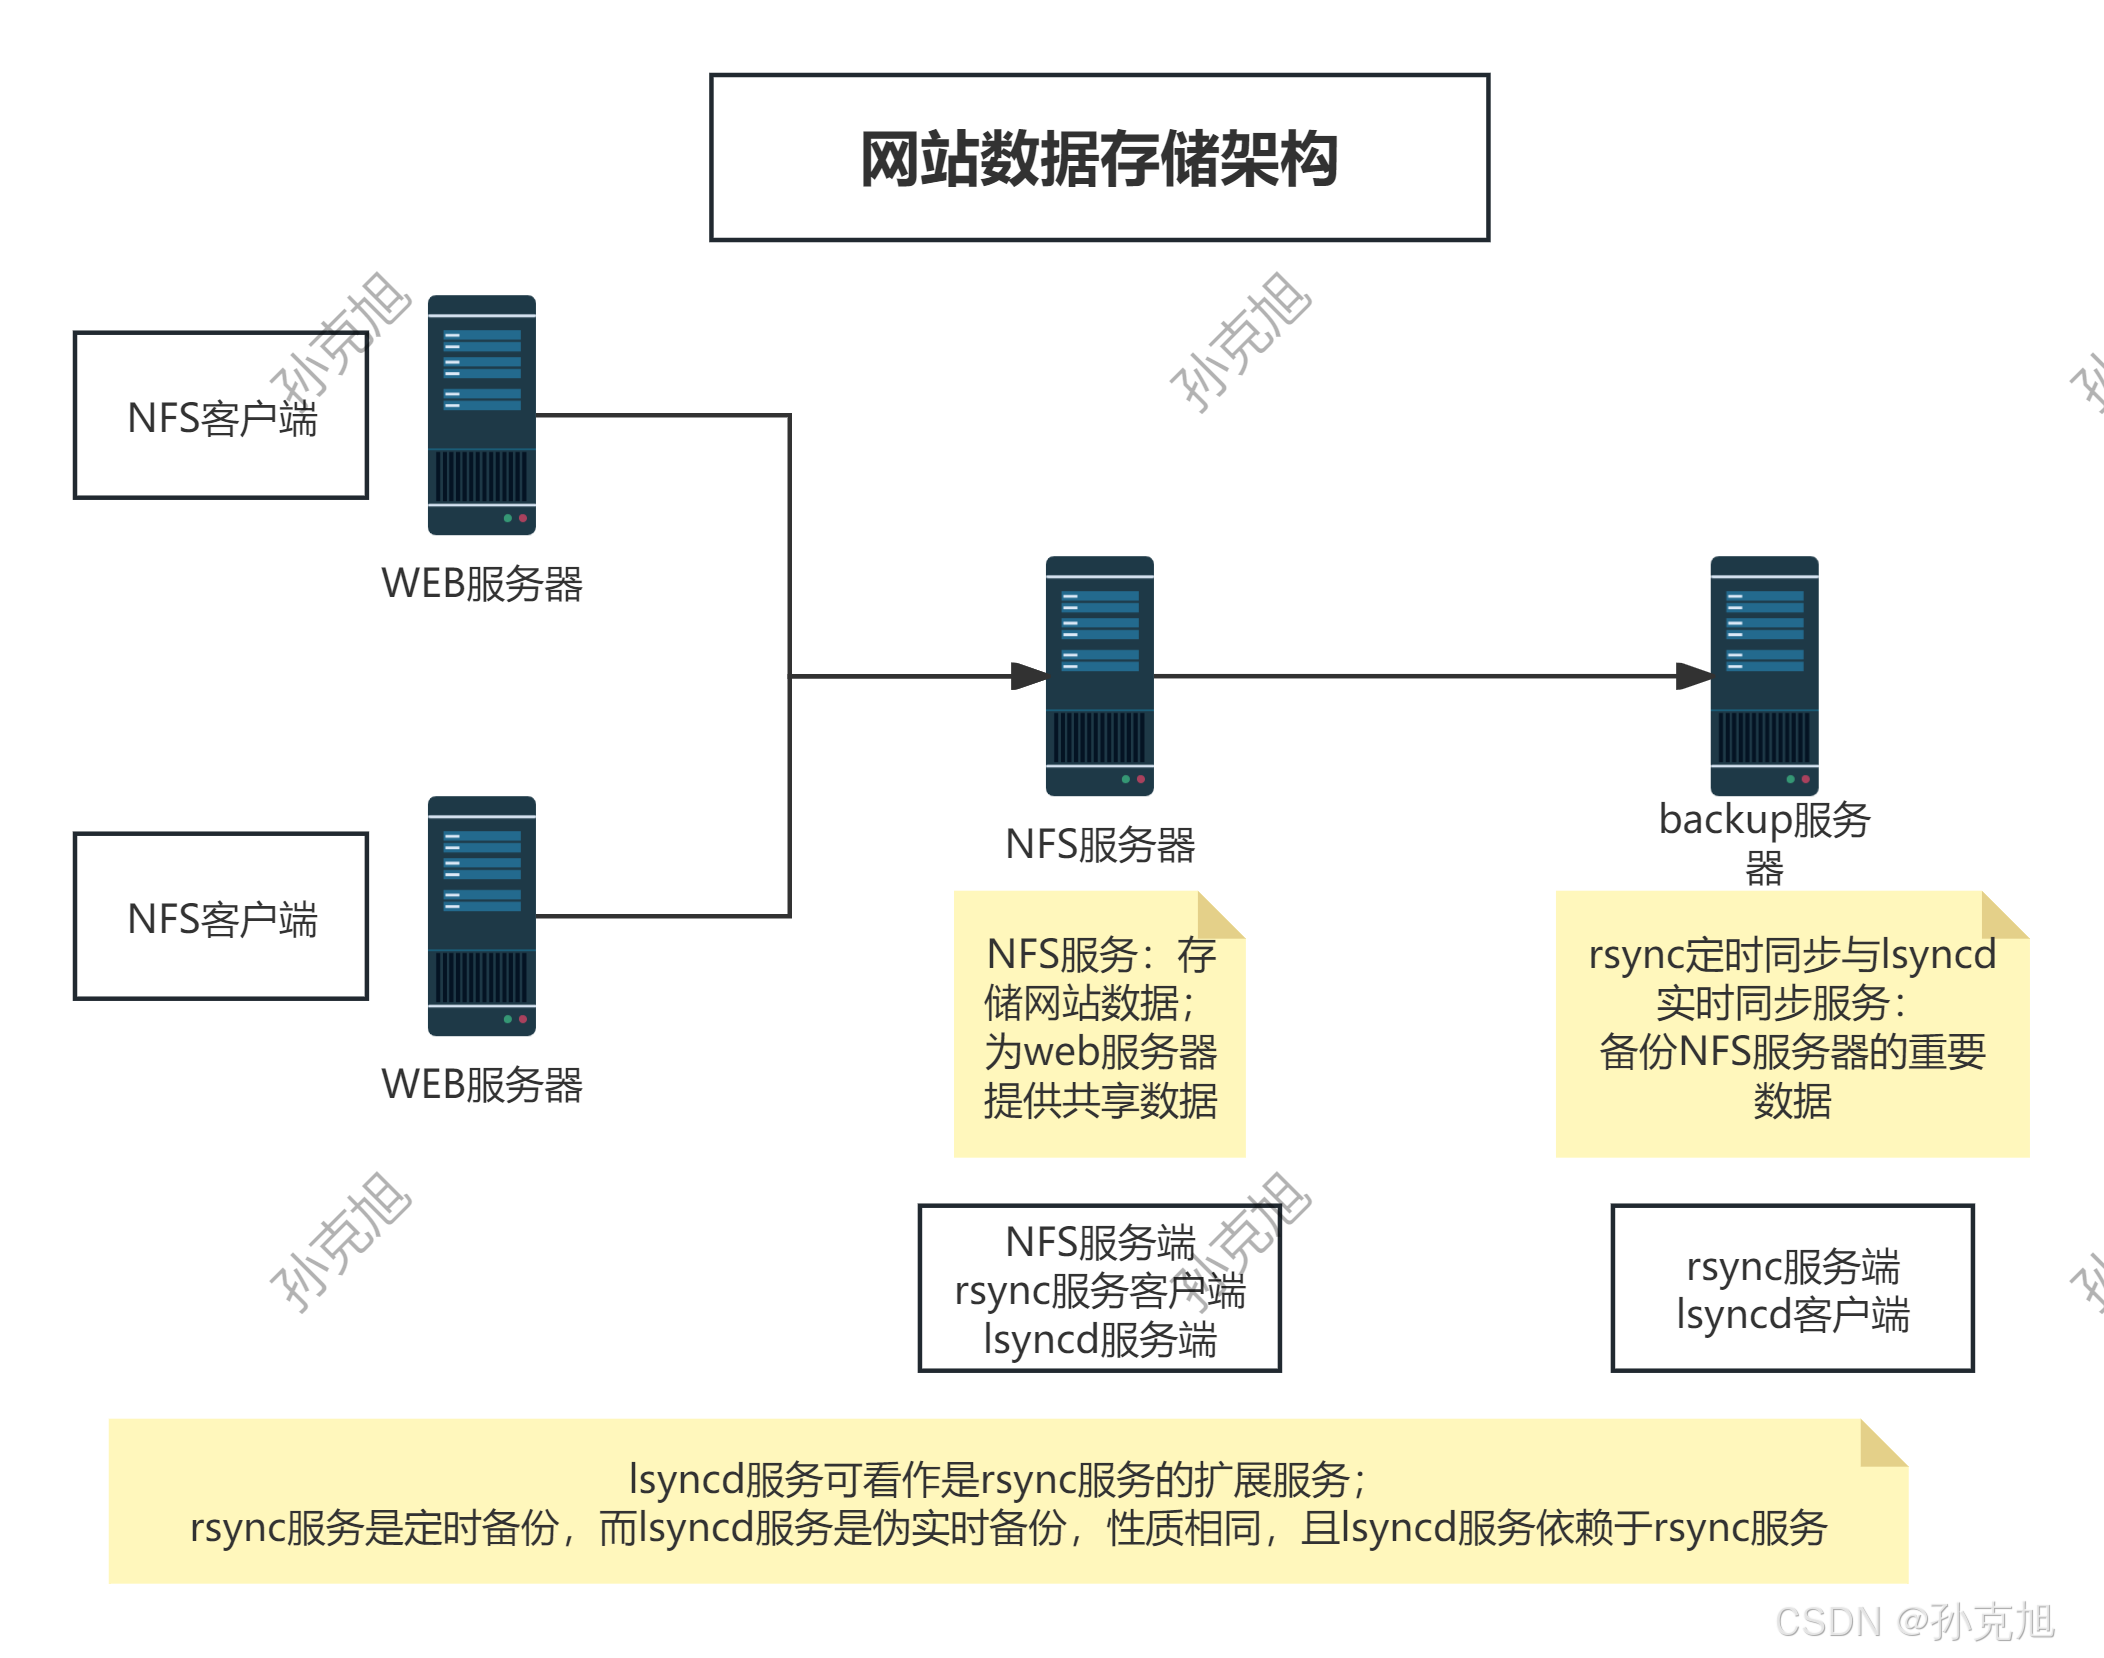
| 服务器 | 需求 |
|---|---|
| web服务器 | NFS共享目录挂载点:/app/code/blog |
| NFS服务器 | 共享目录:/nfs/blog;虚拟用户:www(1999,1999) |
| 备份服务器(backup) | 备份目录:/nfs/backup/blog;模块名称:blog |
- 配置rsync服务
- 配置lsyncd服务
- 配置nfs服务
3.1 rsync服务配置
3.1.1 服务端配置
- 修改rsync配置文件,添加blog模块
shell
# 添加blog模块
[root@backup ~]# cat /etc/rsyncd.conf
#created by oldboy 15:01 2009-6-5
##rsyncd.conf start##
fake super = yes
uid = rsync
gid = rsync
use chroot = no
max connections = 2000
timeout = 600
pid file = /var/run/rsyncd.pid
lock file = /var/run/rsync.lock
log file = /var/log/rsyncd.log
ignore errors
read only = false
list = false
hosts allow = 172.16.1.0/24
#hosts deny = 0.0.0.0/32
auth users = rsync_backup
secrets file = /etc/rsync.password
#####################################
[data]
comment = www by old0boy 14:18 2012-1-13
path = /data
[backup]
comment = www by old0boy 14:18 2012-1-13
path = /backup
[blog]
comment = www by old0boy 14:18 2012-1-13
path = /nfs/backup/blog- 查看虚拟用户与用户验证的密码文件
- 该密码文件必须是root可读或可读可写
shell
[root@backup ~]# id rsync
用户id=1000(rsync) 组id=1000(rsync) 组=1000(rsync)
[root@backup ~]# ll /etc/rsync.password
-rw------- 1 root root 15 6月 12 10:08 /etc/rsync.password- 创建模块对应的目录
- 该目录存放备份文件,所以所属用户/组应该是rsync
shell
[root@backup ~]# mkdir -p /nfs/backup/blog/
[root@backup ~]# chown -R rysnc:rsync /nfs/backup/blog/
[root@backup ~]# ll -d /nfs/backup/blog/
drwxr-xr-x 2 rsync rsync 176 6月 17 19:59 /nfs/backup/blog/- 重启服务
shell
[root@backup ~]# systemctl restart rsyncd.service 3.1.2 客户端配置
- 备份服务器备份的数据应该是存储服务器的数据,所以客户端应该是nfs01
- 创建rsync用户的密码文件,也是只能被root用户可读或可读可写
shell
[root@nfs01 ~]# cat /etc/rsync-client.password
1
[root@nfs01 ~]# ll /etc/rsync-client.password
-rw------- 1 root root 2  6月 12 11:44 /etc/rsync-client.password
3.2 lsyncd服务配置
3.2.1 服务端配置
- lsyncd服务是监听指定的目录,当目录变化后会执行rsync命令实现伪实时同步
- 所以lsyncd服务端应该是rsync的客户端,即nfs01
- 修改配置文件
shell
[root@nfs01 ~]# cat -n /etc/lsyncd.conf
     1	--全局部分主要配置lsyncd服务,日志,pid文件.
     2	settings {
     3	   --※※※※※日志文件,主要查看日志文件.
     4	   logfile    = "/var/log/lsyncd.log",
     5	   --pid文件
     6	   pidfile    = "/var/run/lsyncd.pid",
     7	   --服务状态文件
     8	   statusFile = "/var/log/lsyncd.status",
     9	   --改为非守护进程模式,默认.rsync命令,lsyncd
    10	   nodaemon   = true,
    11	   --控制最多用于传输数据的进程数量 rsync进程数(最大)
    12	   --※※※※※根据cpu核心数来 一致或2倍
    13	   maxProcesses = 2
    14	}
    15
    16	--配置rsync命令,rsync服务端与客户端模式
    17	--sync部分可以有多个.
    18	sync {
    19	    --指定rsync工作模式
    20	    default.rsync,
    21	    --※※※※※ 指定lsyncd监控目录,源目录
    22	    source    = "/nfs/blog",
    23	    --※※※※※ 指定目标 rsync服务端    用户名@rsync ip地址::模块名字
    24	    target    = "rsync_backup@172.16.1.41::blog",
    25	    --※※※※※ 每隔5秒同步一次.
    26	    delay     = 5,
    27	    --rsync命令的  --delete 选项  保存客户端与服务端 内容一致.
    28	    delete    = true,
    29	    -- 配置rsync命令位置,rsync命令选项,
    30	    rsync     = {
    31	        -- 命令位置
    32	        binary   = "/usr/bin/rsync",
    33	        -- rsync命令的 -a选项
    34	        archive  = true,
    35	        -- rsync命令的  -z选项 压缩
    36	        compress = true,
    37	        -- ※※※※※配置rsync--password-file密码文件
    38	        password_file = "/etc/rsync-client.password"
    39	    }
40 }- 重启服务
shell
[root@nfs01 ~]# systemctl restart lsyncd.service3.3 nfs服务配置
3.3.1 服务端配置
- 先启动中介-rpcbind
shell
[root@nfs01 ~]# systemctl is-active rpcbind.service
active
[root@nfs01 ~]# rpcinfo -p
   program vers proto   port  service
    100000    4   tcp    111  portmapper
    100000    3   tcp    111  portmapper
100000 2 tcp 111 portmapper- 配置nfs服务的配置文件
shell
[root@nfs01 ~]# cat /etc/exports
# nfs服务配置文件
/nfs/blog 172.16.1.0/24(rw,all_squash,anonuid=1999,anongid=1999)- 添加虚拟用户和创建共享目录
shell
# useradd -s /sbin/nologin -M -u 1999 www
[root@nfs01 ~]# id www
用户id=1999(www) 组id=1999(www) 组=1999(www)
# 创建目录后要修改所属用户/组
[root@nfs01 ~]# ll -d /nfs/blog/
drwxr-xr-x 2 www www 176 6月 17 19:59 /nfs/blog/- 重启nfs服务并查看共享目录
shell
[root@nfs01 ~]# systemctl reload nfs
[root@nfs01 ~]# rpcinfo -p |grep [n]fs
    100003    3   tcp   2049  nfs
    100003    4   tcp   2049  nfs
    100227    3   tcp   2049  nfs_acl
[root@nfs01 ~]# showmount -e
Export list for nfs01:
/nfs/blog 172.16.1.0/24
/nfs/pics 172.16.1.0/24
/nfsdata  172.16.1.0/24
3.3.2 客户端配置
- 创建nfs文件的挂载点
shell
[root@web01 ~]# mkdir -p /app/code/blog/- 查看nfs共享目录并挂载
shell
[root@web01 ~]# showmount -e nfs01
Export list for nfs01:
/nfs/blog 172.16.1.0/24
/nfs/pics 172.16.1.0/24
/nfsdata  172.16.1.0/24
[root@web01 ~]# mount -t nfs nfs01:/nfs/blog /app/code/blog/
[root@web01 ~]# df -hT /app/code/blog/
文件系统        类型  容量  已用  可用 已用% 挂载点
nfs01:/nfs/blog nfs4 77G 4.0G 73G 6% /app/code/blog- 也可永久挂载,需修改磁盘分区配置文件:/etc/fstab
shell
nfs01:/nfs/blog /app/code/blog nfs defaults 0 03.4 测试

- 太过完美

- 关闭集群时,先关闭客户端web01
- 再关闭备份服务的客户端:nfs01
- 最后关闭备份服务器:backup
- 最最后vmware备份快照
- 😘
4. Ubuntu模板机
- Ubuntu 22.04
- NAT网卡、LAN网卡
- 分区:/boot 2g、swap 2g、/ 剩余容量
4.1 配置host解析
shell
cat >>/etc/hosts <<EOF
172.16.1.105 lb01-ubt
172.16.1.106 lb02-ubt
172.16.1.107 web01-ubt
172.16.1.108 web02-ubt
172.16.1.109 web03-ubt
172.16.1.131 nfs01-ubt
172.16.1.141 backup-ubt
172.16.1.151 db01-ubt
172.16.1.161 m01-ubt
EOF
4.2 远程连接优化
shell
修改ssh服务端配置文件

#2.关闭对应功能
cat >>/etc/ssh/sshd_config<<EOF
UseDNS no
GSSAPIAuthentication no
PermitRootLogin yes
EOF
#3.重启sshd
systemctl restart sshd
#4.检查
egrep '^(PermitRootLogin|GSSAPIAuthentication|UseDNS)' /etc/ssh/sshd_config

结果有2个no即可.
4.3 关闭防火墙
shell
systemctl  disable  ufw
systemctl  stop   ufw
4.4 配置apt源
- ubuntu版本是22.04 STL
shell
cat >/etc/apt/sources.list<<EOF
deb https://mirrors.aliyun.com/ubuntu/ jammy main restricted universe multiverse
deb-src https://mirrors.aliyun.com/ubuntu/ jammy main restricted universe multiverse

deb https://mirrors.aliyun.com/ubuntu/ jammy-security main restricted universe multiverse
deb-src https://mirrors.aliyun.com/ubuntu/ jammy-security main restricted universe multiverse

deb https://mirrors.aliyun.com/ubuntu/ jammy-updates main restricted universe multiverse
deb-src https://mirrors.aliyun.com/ubuntu/ jammy-updates main restricted universe multiverse

# deb https://mirrors.aliyun.com/ubuntu/ jammy-proposed main restricted universe multiverse
# deb-src https://mirrors.aliyun.com/ubuntu/ jammy-proposed main restricted universe multiverse

deb https://mirrors.aliyun.com/ubuntu/ jammy-backports main restricted universe multiverse
deb-src https://mirrors.aliyun.com/ubuntu/ jammy-backports main restricted universe multiverse

EOF


apt update
4.5 安装常用工具
shell
安装工具
apt install -y tree vim   telnet  lrzsz   nmap  ncat  ntpdate
4.6 同步时间
- 先修改时区为Asia/Shanghai
shell
[root@aliyun-ubuntu ~]# timedatectl set-timezone Asia/Shanghai
[root@aliyun-ubuntu ~]# date
Wed Jun 18 13:20:22 CST 2025
################################
cat >/var/spool/cron/crontabs/root<<EOF
#1. sync time by lidao996 at 20230101
*/3 * * * * /sbin/ntpdate ntp.aliyun.com  >/dev/null  2>&1
EOF

select-editor选2
vim.basic
4.7 配置vim自动添加脚本注释
shell
vim /etc/vim/vimrc
set ignorecase
autocmd BufNewFile *.py,*.cc,*.sh,*.java,*.bash exec ":call SetTitle()"

func SetTitle()
if expand("%:e") =~ 'sh\|bash'
call setline(1, "#!/bin/bash")
call setline(2,"##############################################################")
call setline(3, "# File Name:".expand("%"))
call setline(4, "# Version:V1.0")
call setline(5, "# Author:oldboy lidao996")
call setline(6, "# Organization:www.oldboyedu.com")
call setline(7, "# Desc:")
call setline(8,"##############################################################")

endif
endfunc
4.8 设置root密码
- 便于使用root远程登录
shell
[root@aliyun-ubuntu ~]# passwd root
New password:
Retype new password:
4.9 编写修改主机名和ip的脚本
shell
#!/bin/bash
#author: lidao996
#desc: change ip and hostname
#version: v7.0 fina
#sh   脚本  主机名  ip地址(新的ip)

net_config=/etc/netplan/00-installer-config.yaml

#0.root?
[ $UID -ne 0 ] && {
   echo "pls run as root".
   exit 1
}

#1.脚本参数个数
if [ $# -ne 2 ] ;then
  echo "请输入2个参数"
  exit 2
fi

#2.模板机ip地址(最后1位)
ip=`hostname -I |awk '{print $1}'|sed 's#.*\.##g'`
#3.新的ip
ip_new=`echo $2 |sed 's#^.*\.##g'`
#4.新的主机名
hostname=$1

#5.修改ip
if [ -f $net_config ];then
   sed -i "s#10.0.0.$ip#10.0.0.$ip_new#g" $net_config
   sed -i "s#172.16.1.$ip#172.16.1.$ip_new#g" $net_config
else
   echo "eth0网卡不存在,修改失败"
fi


#6.生效
netplan apply
networkctl reload


#7.修改主机名
hostnamectl set-hostname $hostname- 使用方式:
- 如需修改主机名为web01,ip为10.0.0.31、172.16.1.31(ip第4部分必须相同)
- 命令:
bash 脚本路径 web01 10.0.0.31
4.10 配置命令行颜色
shell
vim ~/.bashrc
export PS1='[\[\e[34;1m\]\u@\[\e[0m\]\[\e[32;1m\]\H\[\e[0m\]\[\e[31;1m\] \w\[\e[0m\]]\$ '
source ~/.bashrc
4.11 编写回收站脚本,配置rm别名
shell
#.回收站别名
cat recyle-rm.sh
#!/bin/bash
##############################################################
# File Name:07.recyle-rm.sh
# Version:V1.0
# Author:oldboy lidao996
# Organization:www.oldboyedu.com
# Desc:
##############################################################
#1.vars
files="$@"
dir=/recyle/
#2.判断
if [ $# -eq 0 ];then
echo "Help: $0 file dir ...."
exit
fi
#3.创建临时目录
#后期可以加入判断 目录不存在则创建
mkdir -p $dir
tmp_dir=`mktemp -d -p ${dir}`
#4.把文件,目录...移动到临时目录
#这里未来可以加入更多的判断.
mv -t ${tmp_dir} ${files}
#5.文件,目录已经移动到回收站
echo "文件,目录已经移动到回收站:${tmp_dir}"
########################################
# 配置rm别名
echo "alias rm='bash ~/recyle-rm.sh'" >>/etc/profile
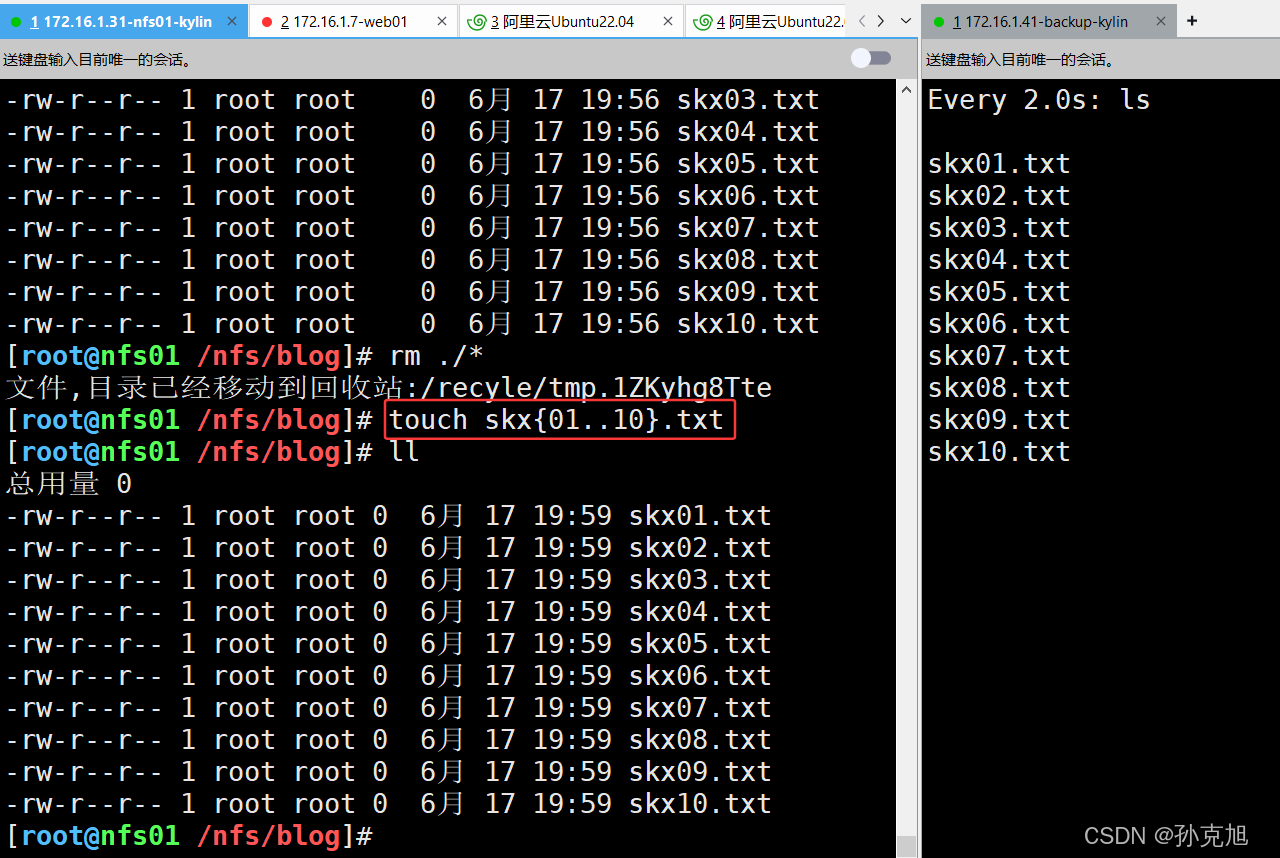
source /etc/profile4.12 克隆模板机
- 根据hosts文件克隆模板机即可

- 没台设备启动后要修改主机名和ip
- 以lb01为例
bash change.sh(脚本路径) lb01 10.0.0.105- ip a,查看ip信息
- hostname,查看主机名
- 关机,设置快照
5. 案例2-网站存储架构-Ubuntu 22.04
- 配置服务的顺序
- rsync
- lsyncd
- nfs服务
- lsyncd需要指定监听的目录,该目录应该是web服务器传递的用户数据,也是nfs共享的目录;从逻辑上考虑第二部应该配置nfs,但是rsync与lsyncd太过相似,且性质相同,所以将nfs服务配置放在最后。
5.1 配置rsync服务
5.1.1 客户端
- Ubuntu默认安装了rsync,直接查看配置文件位置
shell
# 发现没有conf文件
[root@backup ~]# dpkg -L rsync |grep '*.conf'
# 使用该命令查看
[root@backup ~]# systemctl cat rsync.service
- 配置文件位置和kylin一样
- 修改配置文件
- vim /etc/rsyncd.conf,然后复制粘贴......
- 太low了😒
shell
# 1.启动kylin系统的backup虚拟机,使用scp命令传输文件
[root@backup ~]# scp /etc/rsyncd.conf root@172.16.1.141:/etc/
root@172.16.1.141's password:
rsyncd.conf                                                                    100%  640   652.7KB/s   00:00
# 2.在Ubuntu的backup中查看文件
[root@backup ~]# cat /etc/rsyncd.conf
#created by oldboy 15:01 2009-6-5
##rsyncd.conf start##
fake super = yes
uid = rsync
gid = rsync
use chroot = no
max connections = 2000
timeout = 600
pid file = /var/run/rsyncd.pid
lock file = /var/run/rsync.lock
log file = /var/log/rsyncd.log
ignore errors
read only = false
list = false
hosts allow = 172.16.1.0/24
#hosts deny = 0.0.0.0/32
auth users = rsync_backup
secrets file = /etc/rsync.password
#####################################
[data]
comment = www by old0boy 14:18 2012-1-13
path = /data
[backup]
comment = www by old0boy 14:18 2012-1-13
path = /backup
[blog]
comment = www by old0boy 14:18 2012-1-13
path = /nfs/backup/blog

# 3.复制后查看文件有无需要修改的参数- 添加虚拟用户rsync
shell
[root@backup ~]# id rsync
id: 'rsync': no such user
[root@backup ~]# useradd -s /sbin/nologin -M rsync
[root@backup ~]# id rsync
uid=1001(rsync) gid=1001(rsync) groups=1001(rsync)
[root@backup ~]# tail -1 /etc/passwd
rsync:x:1001:1001::/home/rsync:/sbin/nologin- 创建校验用户密码文件:/etc/rsync.password
shell
[root@backup ~]# cat /etc/rsync.password
rsync_backup:1
[root@backup ~]# ll /etc/rsync.password
-rw-r--r-- 1 root root 15 Jun 18 14:10 /etc/rsync.password
[root@backup ~]# chmod 600 /etc/rsync.password
[root@backup ~]# ll /etc/rsync.password
-rw------- 1 root root 15 Jun 18 14:10 /etc/rsync.password- 创建blog模块对应的目录:/nfs/backup/blog
shell
[root@backup ~]# mkdir -p /nfs/backup/blog
[root@backup ~]# ll /nfs/backup/blog -d
drwxr-xr-x 2 root root 4096 Jun 18 14:11 /nfs/backup/blog/
[root@backup ~]# chown -R rsync:rsync /nfs/backup/blog
[root@backup ~]# ll /nfs/backup/blog -d
drwxr-xr-x 2 rsync rsync 4096 Jun 18 14:11 /nfs/backup/blog/- 启动服务,本地测试
shell
[root@backup ~]# systemctl start rsync.service
[root@backup ~]# rsync -avz /etc/hosts rsync_backup@172.16.1.141::blog
Password:
sending incremental file list
hosts

sent 336 bytes  received 43 bytes  252.67 bytes/sec
total size is 432  speedup is 1.14
[root@backup ~]# ll /nfs/backup/blog/
total 12
drwxr-xr-x 2 rsync rsync 4096 Jun 18 14:19 ./
drwxr-xr-x 3 root  root  4096 Jun 18 14:11 ../
-rw-r--r-- 1 rsync rsync  432 Jun 18 09:24 hosts
5.1.2 客户端
- 创建rsync用户的密码文件
shell
[root@nfs01 ~]# cat /etc/rsync-client.password
1
[root@nfs01 ~]# chmod 600 /etc/rsync-client.password
	ll /etc/rsync-client.password
-rw------- 1 root root 2 Jun 18 14:20 /etc/rsync-client.password- 测试
shell
[root@nfs01 ~]# rsync -avz /etc/hostname rsync_backup@backup::blog --password-file=/etc/rsync-client.password
sending incremental file list
hostname

sent 119 bytes  received 43 bytes  324.00 bytes/sec
total size is 6  speedup is 0.04
# 到服务端查看
[root@backup ~]# ls /nfs/backup/blog/
hostname  hosts
5.2 配置lsyncd服务
5.2.1 服务端
- 安装软件并修改配置文件
shell
[root@nfs01 ~]# apt install -y lsyncd
Reading package lists... Done
Building dependency tree... Done
Reading state information... Done
lsyncd is already the newest version (2.2.3-1).
0 upgraded, 0 newly installed, 0 to remove and 72 not upgraded.- 找一下配置文件位置
shell
[root@nfs01 /nfs/blog]# systemctl cat lsyncd.service 
- 查看一下该文件配置

可见配置文件位置是:/etc/lsyncd/lsyncd.conf.lua
- 添加配置文件
shell
# 先创建目录
[root@nfs01 ~]# mkdir -p /etc/lsyncd
[root@nfs01 ~]# scp root@172.16.1.31:/etc/lsyncd.conf /etc/lsyncd/lsyncd.conf.lua

Authorized users only. All activities may be monitored and reported.
root@172.16.1.31's password:
lsyncd.conf                  100% 1439     1.0MB/s   00:00
[root@nfs01 ~]# ll /etc/lsyncd/lsyncd.conf.lua
-rw-r--r-- 1 root root 1439 Jun 18 15:04 /etc/lsyncd/lsyncd.conf.lua
[root@nfs01 ~]# cat /etc/lsyncd/lsyncd.conf.lua
--全局部分主要配置lsyncd服务,日志,pid文件.
settings {
   --※※※※※日志文件,主要查看日志文件.
   logfile    = "/var/log/lsyncd.log",
   --pid文件
   pidfile    = "/var/run/lsyncd.pid",
   --服务状态文件
   statusFile = "/var/log/lsyncd.status",
   --改为非守护进程模式,默认.rsync命令,lsyncd
   nodaemon   = true,
   --控制最多用于传输数据的进程数量 rsync进程数(最大)
   --※※※※※根据cpu核心数来 一致或2倍
   maxProcesses = 2
}

--配置rsync命令,rsync服务端与客户端模式
--sync部分可以有多个.
sync {
    --指定rsync工作模式
    default.rsync,
    --※※※※※ 指定lsyncd监控目录,源目录
    source    = "/nfs/blog",
    --※※※※※ 指定目标 rsync服务端    用户名@rsync ip地址::模块名字
    target    = "rsync_backup@172.16.1.141::blog",
    --※※※※※ 每隔5秒同步一次.
    delay     = 5,
    --rsync命令的  --delete 选项  保存客户端与服务端 内容一致.
    delete    = true,
    -- 配置rsync命令位置,rsync命令选项,
    rsync     = {
        -- 命令位置
        binary   = "/usr/bin/rsync",
        -- rsync命令的 -a选项
        archive  = true,
        -- rsync命令的  -z选项 压缩
        compress = true,
        -- ※※※※※配置rsync--password-file密码文件
        password_file = "/etc/rsync-client.password"
    }
}
# 查看配置文件,修改相关参数
- 这里nodaemon必须为false,否则与systemd冲突
- 创建监控目录并测试
shell
[root@nfs01 ~]# mkdir -p /nfs/blog
# 重启服务
[root@nfs01 ~]# systemctl restart lsyncd.service 
5.3 配置nfs服务
5.3.1 客户端
- 下载服务
shell
apt install nfs-kernel-server -y- 编辑配置文件
shell
[root@nfs01 ~]# cat /etc/exports
/nfs/blog 172.16.1.0/24(rw,all_squash,anonuid=1999,anongid=1999)- 添加虚拟用户:www uid=1999
shell
[root@nfs01 ~]# id www
id: 'www': no such user
[root@nfs01 ~]# useradd -s /sbin/nologin -M -u 1999 www
[root@nfs01 ~]# id www
uid=1999(www) gid=1999(www) groups=1999(www)
[root@nfs01 ~]# tail -1 /etc/passwd
www:x:1999:1999::/home/www:/sbin/nologin- 修改共享目录所属用户/组
shell
[root@nfs01 /nfs/blog]# chown -R www:www /nfs/blog/
[root@nfs01 /nfs/blog]# ll -d /nfs/blog/
drwxr-xr-x 2 www www 4096 Jun 18 15:56 /nfs/blog//- 启动服务
shell
[root@nfs01 ~]# systemctl restart nfs-server.service
[root@nfs01 ~]# systemctl status nfs-server.service
● nfs-server.service - NFS server and services
     Loaded: loaded (/lib/systemd/system/nfs-server.service; enabled; vendor preset: enabled)
     Active: active (exited) since Wed 2025-06-18 16:43:09 CST; 6s ago
    Process: 6008 ExecStartPre=/usr/sbin/exportfs -r (code=exited, status=0/SUCCESS)
    Process: 6009 ExecStart=/usr/sbin/rpc.nfsd (code=exited, status=0/SUCCESS)
   Main PID: 6009 (code=exited, status=0/SUCCESS)
        CPU: 5ms

Jun 18 16:43:09 nfs01 systemd[1]: Starting NFS server and services...
Jun 18 16:43:09 nfs01 exportfs[6008]: exportfs: /etc/exports [1]: Neither 'subtree_check' or 'no_subtree_>
Jun 18 16:43:09 nfs01 exportfs[6008]:   Assuming default behaviour ('no_subtree_check').
Jun 18 16:43:09 nfs01 exportfs[6008]:   NOTE: this default has changed since nfs-utils version 1.0.x
Jun 18 16:43:09 nfs01 systemd[1]: Finished NFS server and services.
[root@nfs01 ~]# showmount -e
Export list for nfs01:
/nfs/blog 172.16.1.0/24
5.3.2 客户端
- 安装nfs客户端工具
shell
apt install nfs-common -y- 挂载nfs共享目录
shell
[root@web01 ~]# showmount -e nfs01
Export list for nfs01:
/nfs/blog 172.16.1.0/24
[root@web01 ~]# mkdir -p /app/code/blog
[root@web01 ~]# mount -t nfs nfs01:/nfs/blog /app/code/blog/
[root@web01 ~]# df -hT /app/code/blog/
Filesystem      Type  Size  Used Avail Use% Mounted on
nfs01:/nfs/blog nfs4 94G 3.4G 86G 4% /app/code/blog- 测试

5.4 测试

- 关闭时先关客户端,再关服务端
- web01
- nfs0
- backup
6. 踩坑记录
1. clnt_create: RPC: Timed out

- 内网中有多个设备,需要指定NFS服务器

- rpcinfo也是同理

2. ISO镜像故障

- 我的硬盘出现问题了;可以将镜像放置在其他盘内
3. Ubuntu报错:Job for lsyncd.service failed because a timeout was exceeded.


- 修改配置文件重的nodaemon参数,改为false
nodaemon 是 lsyncd 的一个关键配置项,用于控制进程是否以 守护进程(daemon)模式 运行:
nodaemon = true- lsyncd 会以 前台进程 运行(不脱离终端)。
- 适用于手动调试(如
lsyncd -nodaemon /path/to/config),但 与 systemd 管理冲突。
nodaemon = false(默认值)- lsyncd 以 守护进程 运行(后台服务模式)。
- 这是与
systemd配合使用的正确方式。
7. 思维导图
【金山文档】 思维导图 https://www.kdocs.cn/l/co3I7PtpTYQX