前言
我们都知道在webpack,vite,rsbuild等cli中我们可以使用@xxx/xxx引入文件,也可以通过在config文件内部配置alias控制对应引入路径。甚至添加较多的匹配规则
bash
 alias: {
      '@': './src/',
      '@common': './src/common',
      '@op': './src/operation',
    },
但是这个功能是怎么实现的呢?这里将带大家手挫一下简单的实现。
目标🎯
src/page:
javascript
// src/demo.ts
import { foo } from '@common/foo';
const bar = require('@op/bar');
alias 配置:
perl
{
  "@common": "./src/common",
  "@op": "./src/operation"
}
output:
javascript
import { foo } from './src/common/foo';
const bar = require('./src/operation/bar');
实现
大家都知道当我们在打包编译过程中都是回去读取文件,第一反应会是怎么去读取呢?Reg匹配吗?这样可以但是效率低下,同时十分消耗性能。
在编译过程中,我们是会转换成AST,而我们就在这里面去做动作。
以一个import { add } from '@components/utils'引入为例,使用babel-parse编译得到AST🌲如下:
json
{
  "type": "File",
  "start": 0,
  "end": 40,
  "loc": {
    "start": {
      "line": 1,
      "column": 0,
      "index": 0
    },
    "end": {
      "line": 1,
      "column": 40,
      "index": 40
    }
  },
  "errors": [],
  "program": {
    "type": "Program",
    "start": 0,
    "end": 40,
    "loc": {
      "start": {
        "line": 1,
        "column": 0,
        "index": 0
      },
      "end": {
        "line": 1,
        "column": 40,
        "index": 40
      }
    },
    "sourceType": "module",
    "interpreter": null,
    "body": [
      {
        "type": "ImportDeclaration",
        "start": 0,
        "end": 40,
        "loc": {
          "start": {
            "line": 1,
            "column": 0,
            "index": 0
          },
          "end": {
            "line": 1,
            "column": 40,
            "index": 40
          }
        },
        "specifiers": [
          {
            "type": "ImportSpecifier",
            "start": 9,
            "end": 12,
            "loc": {
              "start": {
                "line": 1,
                "column": 9,
                "index": 9
              },
              "end": {
                "line": 1,
                "column": 12,
                "index": 12
              }
            },
            "imported": {
              "type": "Identifier",
              "start": 9,
              "end": 12,
              "loc": {
                "start": {
                  "line": 1,
                  "column": 9,
                  "index": 9
                },
                "end": {
                  "line": 1,
                  "column": 12,
                  "index": 12
                },
                "identifierName": "add"
              },
              "name": "add"
            },
            "local": {
              "type": "Identifier",
              "start": 9,
              "end": 12,
              "loc": {
                "start": {
                  "line": 1,
                  "column": 9,
                  "index": 9
                },
                "end": {
                  "line": 1,
                  "column": 12,
                  "index": 12
                },
                "identifierName": "add"
              },
              "name": "add"
            }
          }
        ],
        "source": {
          "type": "StringLiteral",
          "start": 20,
          "end": 39,
          "loc": {
            "start": {
              "line": 1,
              "column": 20,
              "index": 20
            },
            "end": {
              "line": 1,
              "column": 39,
              "index": 39
            }
          },
          "extra": {
            "rawValue": "@components/utils",
            "raw": "'@components/utils'"
          },
          "value": "@components/utils"
        },
        "attributes": []
      }
    ],
    "directives": [],
    "extra": {
      "topLevelAwait": false
    }
  },
  "comments": []
}我们重点关注属性ImportDeclaration,着是声明该语句为导入语句 带入审查一下: 导入函数名:
 引用地址:
引用地址: 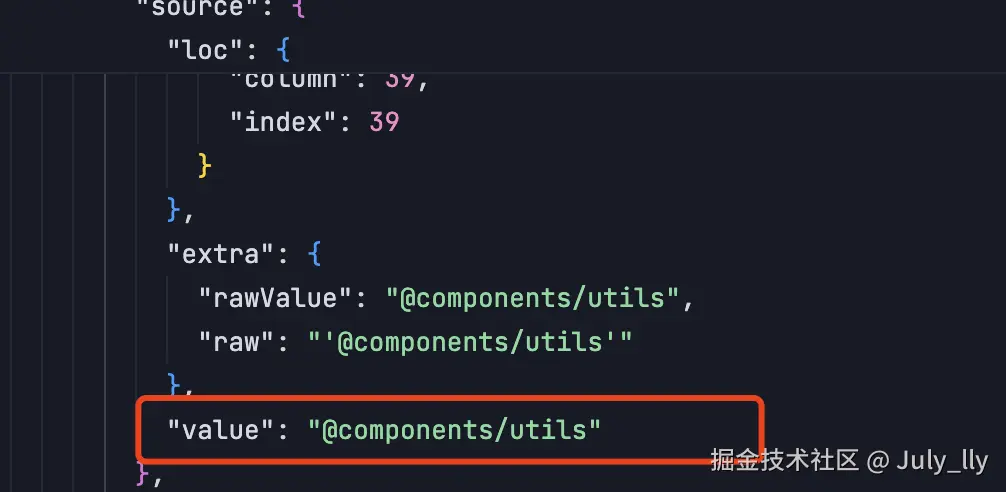
有了这些数据是不是便轻易就能替换了,这里还其他npm包能帮你加倍完成任务
文件目录🌲如下:

转换文件:
ini
import fs from 'fs';
import { parse } from '@babel/parser';
import traverseModule from '@babel/traverse';
import generateModule from '@babel/generator';
import config from './config.js';
// 🔧 兼容 CommonJS 导出
const traverse = traverseModule.default;
const generate = generateModule.default;


function resolveAliasPath(value) {
  console.log('valueLLL', value);
  console.log('config.alias', config.alias);
  for (const key in config.alias) {
    console.log('key:', key);
    if (value.startsWith(key)) {
      console.log('::::', value, config.alias[key]);
      return value.replace(key, config.alias[key]);
    }
  }
  return value;
}

export function rewriteImportsWithAlias(filePath) {
  const rawCode = fs.readFileSync(filePath, 'utf-8');
  console
  const ast = parse(rawCode, {
    sourceType: 'module',
    plugins: ['jsx'], // 如有 ts 改成 ['jsx', 'typescript']
  });

  // 确保 dist 目录存在
  const distDir = './dist';
  if (!fs.existsSync(distDir)) {
    fs.mkdirSync(distDir);
  }
  //将AST写入文件
  fs.writeFileSync('./dist/ast.json', JSON.stringify(ast, null, 2));

  traverse(ast, {
    ImportDeclaration(path) {
      const source = path.node.source.value;
      path.node.source.value = resolveAliasPath(source);
    },
    CallExpression(path) {
      const callee = path.node.callee;
      if (
        callee.type === 'Identifier' &&
        callee.name === 'require' &&
        path.node.arguments.length === 1 &&
        path.node.arguments[0].type === 'StringLiteral'
      ) {
        const arg = path.node.arguments[0];
        arg.value = resolveAliasPath(arg.value);
      }
    },
  });

  const output = generate(ast, {}, rawCode);
  return output.code;
}
config: 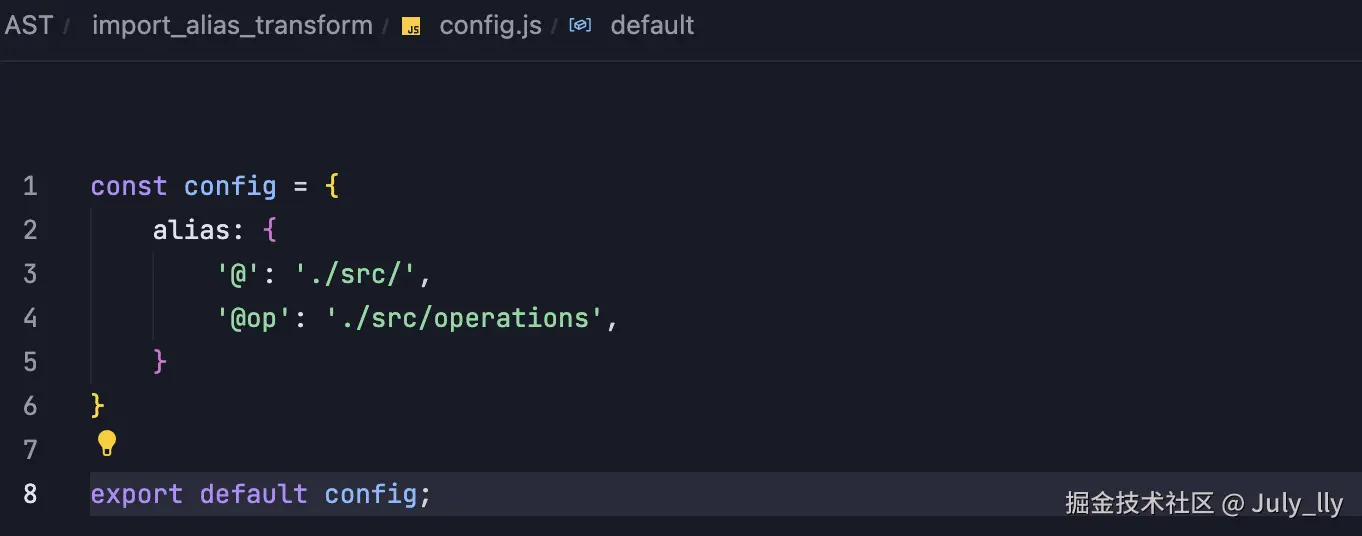
demo内的内容:

运行文件可以得到dist文件夹下的内容:

结尾
大部分工具(如 Vite、Webpack、Rspack)在实现时都采用 路径前缀匹配,也就是:
kotlin
for (const aliasKey in aliasMap) {
  if (importPath.startsWith(aliasKey)) {
    // 替换成对应的路径
    return importPath.replace(aliasKey, aliasMap[aliasKey]);
  }
}
👉 所以 不用正则,效率不会差,甚至可以 O(1) 优化成哈希前缀匹配(如果实现上很讲究)。
比如 Webpack 源码中用的是 enhanced-resolve 里的 ResolverPlugin 插件机制,在 resolve 的过程中一层一层挂钩函数去改路径。而 vite 用的 esbuild(或 rollup)本身提供的 resolveId hook 中就有 alias 重写。